
STR 921 L - Saw Herkules - Free user manual and instructions
Find the device manual for free STR 921 L Herkules in PDF.

User questions about STR 921 L Herkules
0 question about this device. Answer the ones you know or ask your own.
Ask a new question about this device
Download the instructions for your Saw in PDF format for free! Find your manual STR 921 L - Herkules and take your electronic device back in hand. On this page are published all the documents necessary for the use of your device. STR 921 L by Herkules.
USER MANUAL STR 921 L Herkules
GBR Original operating instructions Stone Cutting Machine
natural_image
Person standing on a treadmill with a device, labeled '2' and '3' indicating part number (no text or symbols on the device itself)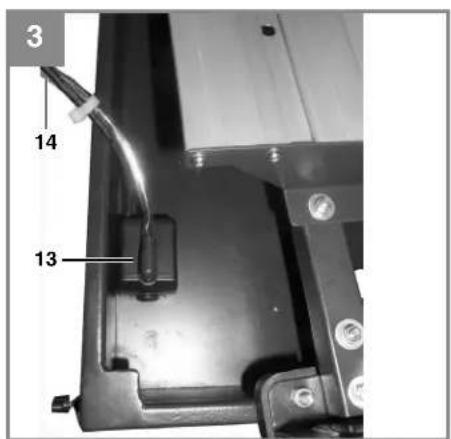
-2-


natural_image
Mechanical setup with a cutting cutter on a conveyor belt, showing a labeled component '27' (no readable text or symbols beyond the label)

natural_image
Close-up of a hand using a cutting tool to cut a circular saw on a workbench (no text or symbols visible)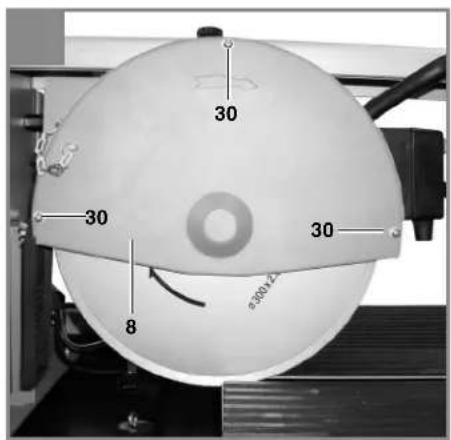
natural_image
Black metal tray with a hand placing a small bucket labeled '36' and a bucket beside it (no text or symbols on the main subject)

natural_image
Close-up of a cable being inserted into a mechanical component, showing wires and connectors (no text or symbols visible)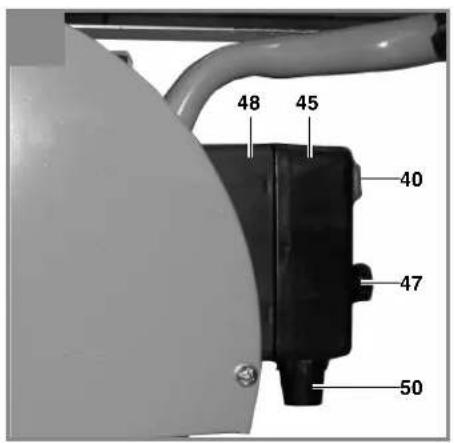
natural_image
Interior view of an electronic device showing internal components and a labeled part (no readable text or symbols)DEU

flowchart
graph TD
    A["Warning"] --> B["Envelope"]
    B --> C["iSC"]
    C --> D["Recycle with Waste"]
    D --> E["Recycle with Waste"]
DEU
Nur für EU-Länder
Caution - Read the operating instructions to reduce the risk of inquiry

Wear ear-muffs. The impact of noise can cause damage to hearing.

Wear a breathing mask. Dust which is injurious to health can be generated when working on wood and other materials. Never use the device to work on any materials containing asbestos!

Wear safety goggles. Sparks generated during working or splinters, chips and dust emitted by the device can cause loss of sight.
Caution! Risk of injury through cutting

Segmented diamond cutting wheels must not be used
Dismantle the laser before you clean the machine with water.
GBR
⚠️ Important!
When using the equipment, a few safety precautions must be observed to avoid injuries and damage. Please read the complete operating instructions and safety regulations with due care. Keep this manual in a safe place, so that the information is available at all times. If you give the equipment to any other person, hand over these operating instructions and safety regulations as well. We cannot accept any liability for damage or accidents which arise due to a failure to follow these instructions and the safety instructions.
1. Safety regulations
The corresponding safety information can be found in the enclosed booklet.
Caution!
Read all safety regulations and instructions. Any errors made in following the safety regulations and instructions may result in an electric shock, fi re and/or serious injury. Keep all safety regulations and instructions in a safe place for future use.
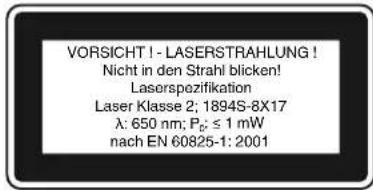
Special information about the laser
⚠️ Important: Laser radiation Do not look into the beam Laser class 2
• Do not look directly into the laser beam with the naked eye.
• Never look directly into the laser path.
- Never direct the laser beam at reflecting surfaces, persons or animals. Even a low output laser beam can inflict injury on the eye.
- Caution: It is vital to follow the work procedures described in these instructions. Using the tool in any other way may result in hazardous exposure to laser radiation.
• Never open laser module.
- When the tool is not going to be used for an extended period of time, the batteries should be removed.
Additional safety instructions
- Set up the machine on a level, non-slip floor. Make sure that the machine does not wobble.
- Check that the voltage on the rating plate is the same as your supply voltage. Only then are you to insert the power plug in the socket-outlet.
• Wear safety goggles.
• Wearear-muffs.
• Wear safety gloves.
- Never use cracked diamond cutting wheels. Replace immediately.
• Never use segmented cutting wheels.
- Caution! The cutting wheel runs on after the machine is switched off!
• Never apply side pressure to the diamond cutting wheel in order to bring it to a halt.
• Caution! The diamond cutting wheel must be cooled with water at all times.
• Always pull out the power plug before changing the cutting wheel.
• Use only suitable diamond cutting wheels.
• Never leave the machine unattended in rooms with children.
• Always pull out the power plug before examining the electric motor compartment system
• Disorder in the work area can easily lead to accidents.
• Make sure that you stand squarely and solidly while working. Avoid abnormal body positions and always keep your balance.
- If the cutting wheel becomes jammed, switch off the equipment and disconnect it from the power supply; only then are you to remove the workpiece.
GBR
2. Layout and items supplied
2.1 Layout (Fig. 1/3/4/6/10)
-
Feet
-
Diamond wheel
- Trough
- Work table
- Angle stop
- Rail fence
- Chain bar
- Safety hood for the cutting wheel
- Handle
- Star grip screw for setting the angle
- Star grip screw for securing during transportation
- Thumb screws
- Cooling water pump
- Hose
- Motor
- ON/OFF switch
- Angle scale
2.2 Items supplied
- Open the packaging and take out the equipment with care.
- Remove the packaging material and any packaging and/or transportation braces (if available).
- Check to see if all items are supplied.
- Inspect the equipment and accessories for transport damage.
- If possible, please keep the packaging until the end of the guarantee period.
Important!
The equipment and packaging material are not toys. Do not let children play with plastic bags, foils or small parts. There is a danger of swallowing or suff oating!
• Stone cutting machine
• Trough (3)
• Cooling water pump (13)
• Angle stop (5)
Feet (1)
• Original operating instructions
- Safetyinstructions
3. Proper use
The stone cutting machine can be used for normal cutting work on concrete slabs, cobblestones, marble and granite slabs, bricks, tiles, etc. as long as the machine is large enough to take them. It is designed for DIY applications and craft businesses. It should never be used for cutting wood or metal.
The machine should be used exclusively for its intended purpose. No other use is permitted and the manufacturer will not accept liability for any damages or injury resulting from any such use; responsibility rests with the user/operator in any such case. Only use cutting wheels which are suitable for the machine. Saw blades should never be used. Compliance with the safety instructions, the assembly instructions, and advice and instructions on operation contained in the operating instructions also falls under the terms of intended use. All persons operating or carrying out maintenance work on the machine must be acquainted with the above and be aware of all potential dangers.
In addition, strict compliance with the accident prevention regulations in force in your area, as well as all other general rules of health and safety at work, is imperative. The manufacturer's liability shall be deemed void if the machine is modified in any way and the manufacturer shall therefore accept no liability for any damages arising as a result of modified cations. Even if the machine is used as intended, certain residual risk factors cannot be completely eliminated. For reasons of design and the construction of the machine, the following eventualities are possible:
- Contact with the diamond cutting wheel where it is not covered.
- Contact with the diamond cutting wheel while it is turning.
- Defective diamond tips flying off the cutting wheel.
• Workpieces or parts of workpieces kicking back. - Damage to hearing if the ear-muffs specified are not used.
Please note that our equipment has not been designed for use in commercial, trade or industrial applications. Our warranty will be voided if the machine is used in commercial, trade or industrial businesses or for equivalent purposes.
GBR
4. Technical data
Motor rating 2200 W S2 20 min
Motor speed 3000 rpm
AC motor 230 V \~ 50 Hz
Insulation material class .... Class B
Protection type IP54
Cut length 920 mm
Jolly length 920 mm
Max. workpiece thickness 90° ..... 70 mm
Max. workpiece thickness 45° ..... 55 mm
Table size 920 x 550 mm
Diamond wheel 300 x 25.4
Laser class 2
Laser wavelength 650 nm
Laser output .... < 1 mW
Laser power supply 2 x 1.5 V (AAA)
Weight 78 kg
Load factor:
A load factor of S2 20 min (intermittent periodic duty) means that you may operate the motor continuously at its nominal power level (2200 W) for no longer than the time stipulated on the specifications label (20 minutes ON period).
If you fail to observe this time limit the motor will overheat. During the OFF period the motor will cool again to its starting temperature.
Sound and vibration
Sound and vibration values were measured in accordance with EN 61029.
With-load operation
L_pA sound pressure level 94,5 dB(A)
K_pA uncertainty 3 dB
L_WA sound power level 107,5 dB(A)
K_WA uncertainty ....3 dB
No-load operation
L_pA sound pressure level ..... 76 dB(A)
K_pA uncertainty 3 dB
L_WA sound power level 89 dB(A)
K_WA uncertainty ....3 dB
Keep the noise emissions and vibrations to a minimum.
- Only use appliances which are in perfect working order.
• Service and clean the appliance regularly.
• Adapt your working style to suit the appliance.
• Do not overload the appliance.
- Have the appliance serviced whenever necessary.
- Switch the appliance off when it is not in use.
• Wear protective gloves.
Residual risks
Even if you use this electric power tool in accordance with instructions, certain residual risks cannot be rules out. The following hazards may arise in connection with the equipment's construction and layout:
- Lung damage if no suitable protective dust mask is used.
- Damage to hearing if no suitable ear protection is used.
- Health damage caused by hand-arm vibrations if the equipment is used over a prolonged period or is not properly guided and maintained.
5. Before starting the equipment
Before you connect the equipment to the mains supply make sure that the data on the rating plate are identical to the mains data.
Always pull the power plug before making adjustments to the equipment.
- The machine must be set up so that it stands firmly, i.e. it must be securely screwed to a work bench, the base frame supplied in delivery, or similar.
- All covers and safety devices must be correctly attached before the machine is used for the first time.
• The cutting wheel must rotate smoothly.
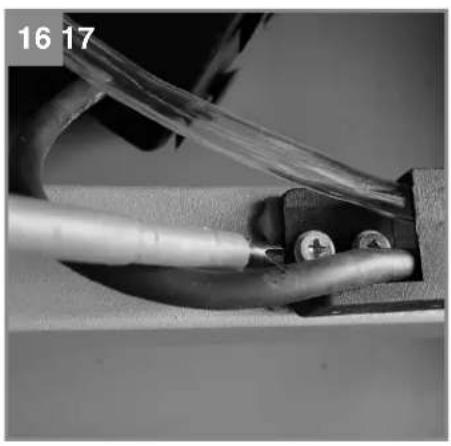
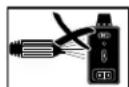
Fitting the hose and cable guide (Fig. 16)
Assembly of the sub-frame and cooling water pump (Fig. 2-5)
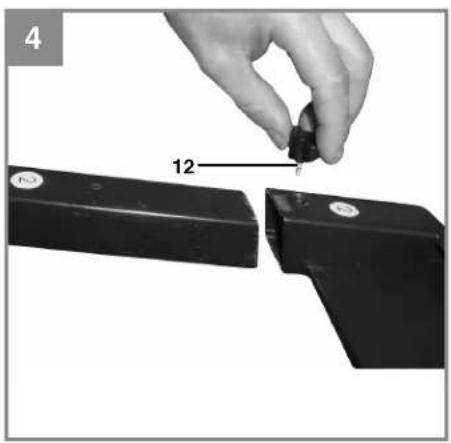
- Secure the feet (1) to the water trough using the thumb screws (12).
- Place the complete tile cutter into the trough (3).
- Place the cooling water pump (13) in a suitable position in the water trough and secure it to the base of the trough with the suction cups. The pump, cable and cooling water hose (14) must not be able to get into the cutting area.
- Fill with water until the pump (13) is completely immersed in water.
GBR
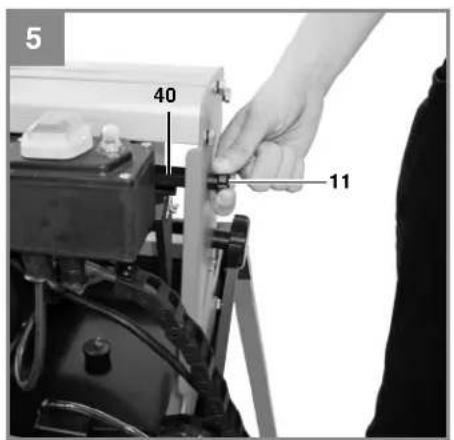
- Remove the star handle screw (11) and spacer (40).
Important: Before you lift the machine out of the trough or transport it, the cutting unit must be secured again with the star handle screw (11) and spacer (40).
Important!
To guarantee proper operation, the cooling water hose (14) must not be kinked during installation.
Caution!
It must be impossible for the cable and the cooling water hose to get into the cutting area.
6. Operation
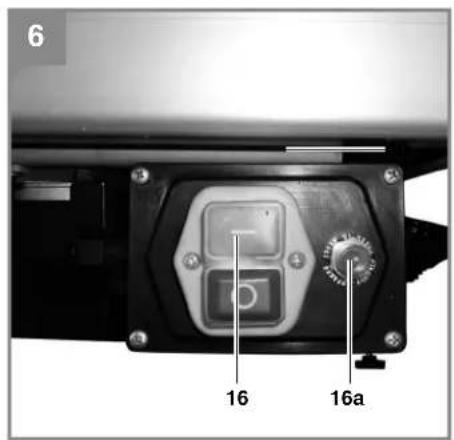
6.1 ON/OFF switch (Fig. 6)
- To switch on, press the "I" on the ON/OFF switch (16).
- Before you begin cutting, wait until the cutting wheel has reached maximum speed and the cooling water pump (13) has started supplying the cutting wheel with water.
• To switch off, press the "0" on the switch (16). - Your machine is equipped with an overload switch (16 a). If the machine is overloaded, the overload switch (16 a) will trigger. After a cooling down period, the machine can be reactivated by pressing the overload switch (16 a).
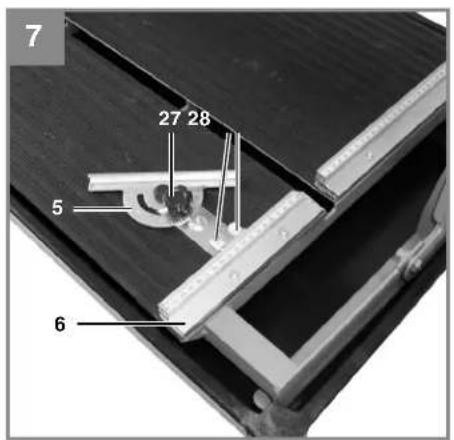
6.2 90° Cutting (Fig. 7/8)
• Loosen the star grip screw (27).
- Set the angle stop (5) to 90° and retighten the star grip screw (27).
- Retighten the screws (28) to fasten the angle stop (5).
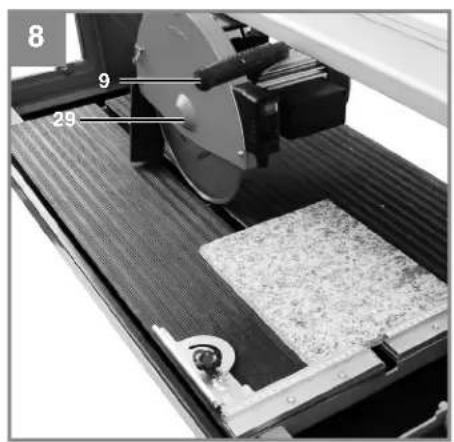
- Move the machine head (29) to the far end with the handle (9).
- Position the tile against the rail fence (6) on the angle stop (5).
• Switch on the tile cutting machine.
- Caution: Always wait until the cooling water has reached the cutting wheel (2) first.
- Move the machine head (29) slowly and smoothly forward through the tile with the handle (9).
- Switch off the tile cutting machine after completion of cutting.
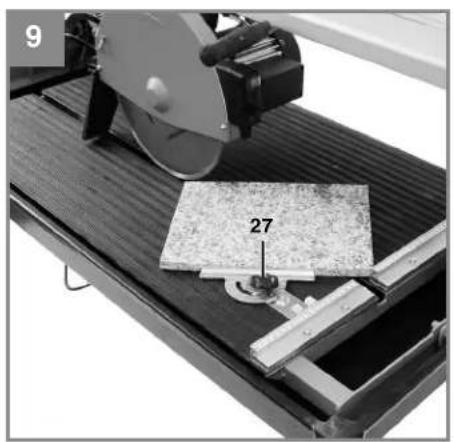
6.3 45° Diagonal cut (Fig. 9)
• Set the angle stop (5) to 45°.
• Cut as described in 6.2.
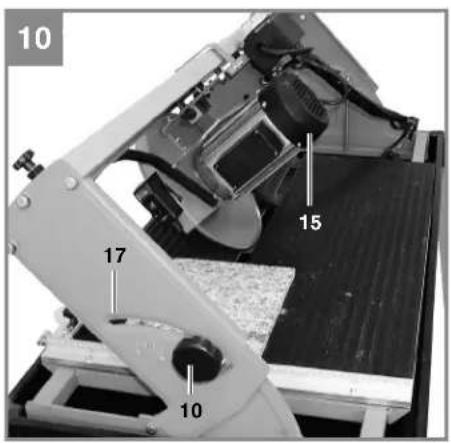
6.4 45° Lengthwise cut, "jolly cut" (Fig.10)
• Loosen the star grip screw (10).
- Tilt the guide rail (7) to the left to 45° on the angle scale (17).
• Retighten the star grip screw (10).
• Cut as described in 6.2.
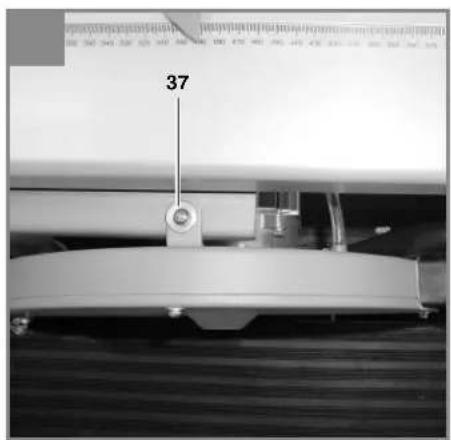
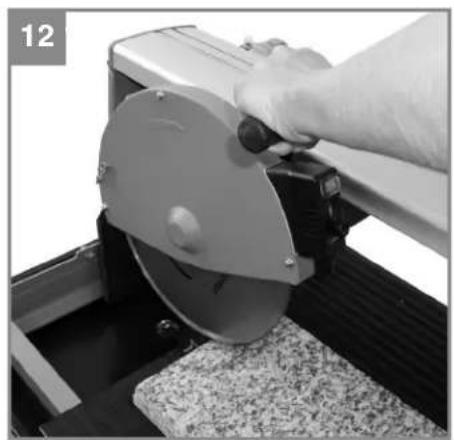
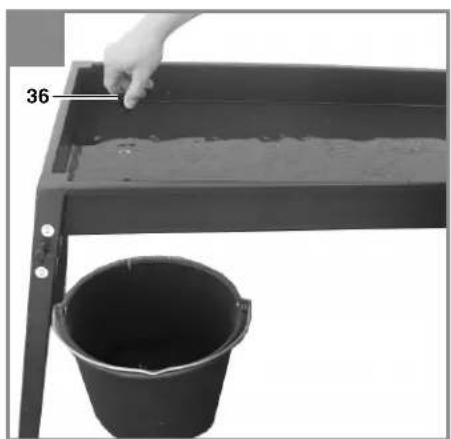
6.4.1 Machining large workpieces (Fig. 11/12)
To enable you to machine large workpieces, the cutting unit can be pivoted upwards. In this position you can machine workpieces with a length of up to 920 mm (up to a max. workpiece thickness of 38 mm).
- Remove the screw (37) on the top for this purpose.
- The cutting until will pivot upwards automatically.
- You can now complete the required cuts as described in sections 6.2 to 6.4. All that is required is slight additional pressure downwards on the handle.
6.5 Changing the diamond cutting wheel (Fig. 13/14)
• Pull out the power plug.
- Unscrew the 3 screws (30) and remove the safety hood (8) for the blade.
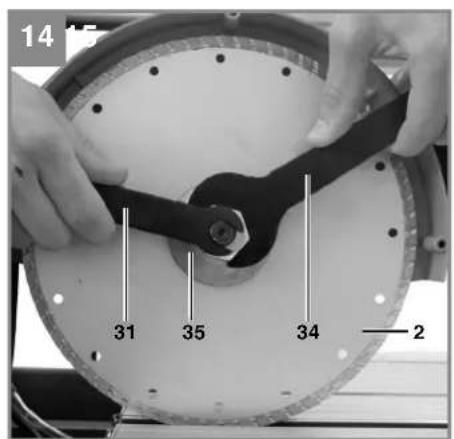
- Place the wrench (31) on the motor shaft and hold.
- Using the wrench (34), loosen the flange nut in the direction of rotation of the cutting wheel (2). (Caution: Left-hand screw-thread.)
- Remove the outer flange (35) and cutting wheel (2).
- Clean the mounting flange thoroughly before fitting the new cutting wheel.
- Fit the new cutting wheel by following the above procedures in reverse and then tighten. Caution: Pay attention to the direction of rotation of the cutting wheel!
• Mount the safety hood (8) for the blade again.
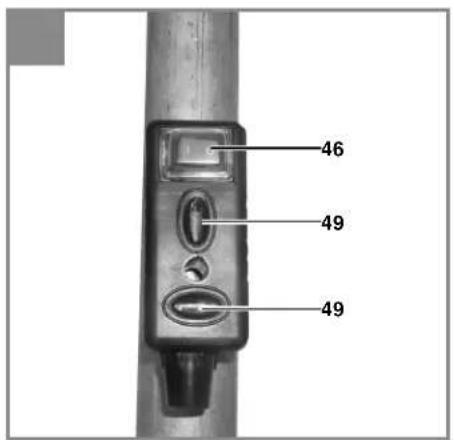
6.6 Operating the laser (Fig. 17-21)
6.6.1 Stationary operation (Fig. 17/18)
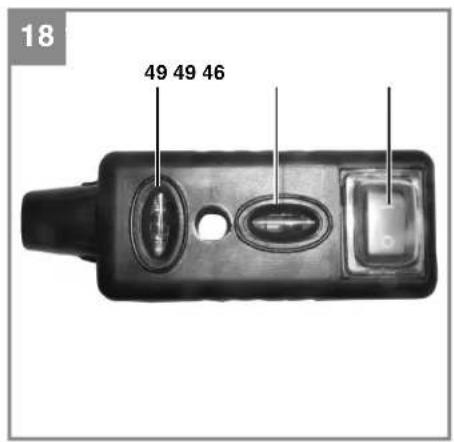
To switch on: Move the ON/OFF switch (46) to the "I" position.
To switch off: Move the ON/OFF switch (46) to the "0" position.
Switch on the laser (45). A laser line is projected onto the material you wish to process, providing
GBR
an exact guide for the cut. You can additionally adjust the laser with the screw (47). To do so, undo the screw (47) by a few turns. The laser (45) can now be moved and adjusted vertically and horizontally on the adapter (48). Tighten screw (47) again when you are satisfied with the adjustment.
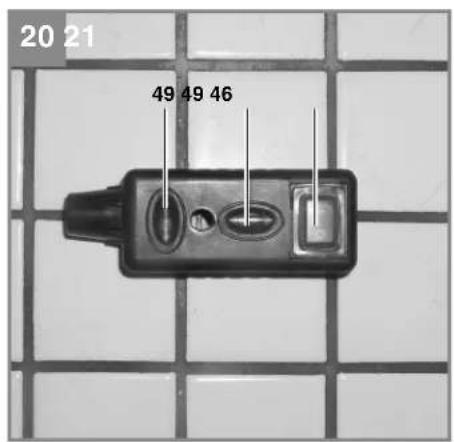
6.6.2 Use as a laser level unit (Fig. 17-20)
Remove the screw (47). The laser (45) can now be taken off the adapter (48) and used as an external laser level unit. The laser (45) is equipped with two spirit levels (49) and can therefore be adjusted both horizontally and vertically. The base plate (50) of the laser is magnetic, enabling it to be secured on suitable surfaces.
See Figures 19 and 20 for two examples of use.
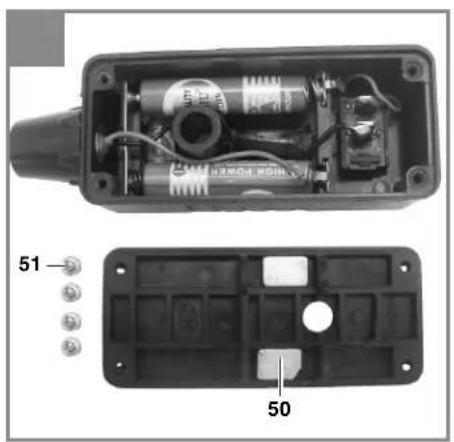
6.6.3 Replacing the battery
Unscrew the 4 screws (51) and remove the base plate (50). Take out the old batteries and replace with new ones. Then screw the base plate (50) back on.
7. Replacing the power cable
If the power cable for this equipment is damaged, it must be replaced by the manufacturer or its after-sales service or similarly trained personnel to avoid danger.
8. Cleaning, maintenance and ordering of spare parts
Always pull out the mains power plug before starting any cleaning work.
8.1 Cleaning
- Remove dust and dirt from the machine at regular intervals. Cleaning is best carried out with a rag or brush.
- Never use caustic agents to clean plastic parts.
- The trough (3) and the cooling water pump (13) must be cleaned at regular intervals or proper cooling of the diamond cutting wheel (2) will not be guaranteed.
8.2 Maintenance
Lubricate all moving parts at regular intervals.
8.3 Transport
- The coolant must be drained completely before transport.
- Do not lift the machine by any of the safety devices.
8.4 Ordering replacement parts:
Please quote the following data when ordering replacement parts:
• Type of machine
• Article number of the machine
• Identification number of the machine
- Replacement part number of the part required For our latest prices and information please go to www.isc-gmbh.info
9. Disposal and recycling
The unit is supplied in packaging to prevent its being damaged in transit. This packaging is raw material and can therefore be reused or can be returned to the raw material system.
The unit and its accessories are made of various types of material, such as metal and plastic. Defective components must be disposed of as special waste. Ask your dealer or your local council.
10. Storage
Store the equipment and accessories out of children's reach in a dark and dry place at above freezing temperature. The ideal storage temperature is between 5 and 30 °C. Store the electric tool in its original packaging.


GBR
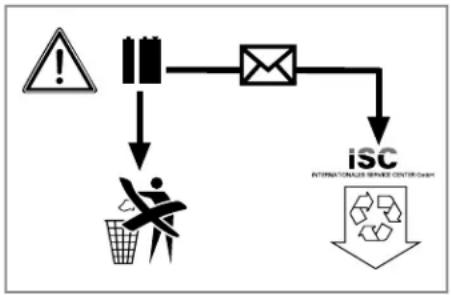
11. Battery disposal
Batteries contain materials that are potentially harmful to the environment. Never place batteries in your household refuse, in fire or in water. Batteries should be collected, recycled or disposed of by environment-friendly means. Send your old batteries to ISC GmbH, Eschenstrasse 6 in D-94405 Landau. You can then be sure that the equipment will be correctly disposed of by the manufacturer.
flowchart
graph TD
    A["Warning"] --> B["Envelope"]
    B --> C["iSC"]
    C --> D["Recycle with Waste"]
    D --> E["Recycle with Waste"]
GBR

For EU countries only
Never place any electric power tools in your household refuse.
To comply with European Directive 2002/96/EC concerning old electric and electronic equipment and its implementation in national laws, old electric power tools have to be separated from other waste and disposed of in an environment-friendly fashion, e.g. by taking to a recycling depot.
Recycling alternative to the return request:
As an alternative to returning the equipment to the manufacturer, the owner of the electrical equipment must make sure that the equipment is properly disposed of if he no longer wants to keep the equipment. The old equipment can be returned to a suitable collection point that will dispose of the equipment in accordance with the national recycling and waste disposal regulations. This does not apply to any accessories or aids without electrical components supplied with the old equipment.
The reprinting or reproduction by any other means, in whole or in part, of documentation and papers accompanying products is permitted only with the express consent of the iSC GmbH.
Subject to technical changes
- The product meets the requirements of EN 61000-3-11 and is subject to special connection conditions. This means that use of the product at any freely selectable connection point is not allowed.
- Given unfavorable conditions in the power supply the product can cause the voltage to fluctuate temporarily.
- The product is intended solely for use at connection points that a) do not exceed a maximum permitted mains system impedance of Z or b) have a continuous current-carrying capacity of the mains of at least 100 A per phase.
- As the user, you are required to ensure, in consultation with your electric power company if necessary, that the connection point at which you wish to operate the product meets one of the two requirements, a) or b), named above.
GBR
Warranty certifi cate
Dear Customer,
In the unlikely event that your device develops a fault, we are truly sorry for this, and suggest that you please contact our service department at the address shown on this guarantee card, or contact the nearest authorised DIY store. Please note the following terms, under which guarantee claims can be made:
- These guarantee terms cover additional guarantee rights and do not affect your statutory warranty rights. We do not charge you for this guarantee.
- Our guarantee only covers problems caused by material or manufacturing defects, and it is restricted to the rectification of these defects or replacement of the device. Please note that our devices have not been designed for use in commercial, trade or industrial applications. Consequently, the guarantee is invalidated if the equipment is used in commercial, trade or industrial applications or for other equivalent activities. The following are also excluded from our guarantee: compensation for transport damage, damage caused by failure to comply with the installation/assembly instructions or damage caused by unprofessional installation, failure to comply with the operating instructions (e.g. connection to the wrong mains voltage or current type), misuse or inappropriate use (such as overloading of the device or use of non-approved tools or accessories), failure to comply with the maintenance and safety regulations, ingress of foreign bodies into the device (e.g. sand, stones or dust), effects of force or external influences (e.g. damage caused by the device being dropped) and normal wear resulting from proper operation of the device. This applies in particular to rechargeable batteries for which we nevertheless issue a guarantee period of 12 months. The guarantee is rendered null and void if any attempt is made to tamper with the device.
- The guarantee is valid for a period of 5 years starting from the purchase date of the device. Guarantee claims should be submitted before the end of the guarantee period within two weeks of the defect being noticed. No guarantee claims will be accepted after the end of the guarantee period. The original guarantee period remains applicable to the device even if repairs are carried out or parts are replaced. In such cases, the work performed or parts fitted will not result in an extension of the guarantee period, and no new guarantee will become active for the work performed or parts fitted. This also applies when an on-site service is used.
- In order to assert your guarantee claim, please send your defective device postage-free to the address shown below. Please enclose either the original or a copy of your sales receipt or another dated proof of purchase. Please keep your sales receipt in a safe place, as it is your proof of purchase. It would help us if you could describe the nature of the problem in as much detail as possible. If the defect is covered by our guarantee then your device will either be repaired immediately and returned to you, or we will send you a new device.
Also refer to the restrictions of this warranty concerning wear parts/consumables and missing parts as set forth in the warranty conditions in these operating instructions.
FRA

Negotovost K_nA 3 dB
Nivo zvočne moči L _WA 107,5 dB (A)
Negotovost K_WA .....3 dB
Prosti tek
Nivo zvočnega tlaka L _pA 76 dB (A)
Negotovost K_nA .....3 dB
Negotovost K_WA .....3 dB
Omejite hrupnost in vibracije na minimum!
flowchart
graph TD
    A["Warning"] --> B["Envelope"]
    B --> C["iSC"]
    C --> D["Recycle with Waste"]
    B --> E["Disposal"]
    E --> F["Recycle with Waste"]
TUR
87/404/EC_2009/105/EC
2005/32/EC_2009/125/EC
2006/95/EC
2006/28/EC
x 2004/108/EC
2004/22/EC
□1999/5/EC
□97/23/EC
□90/396/EC_2009/142/EC
□89/686/EC_96/58/EC
X 2011/65/EC
x 2006/42/EC
Annex IV
Notified Body:
Notified Body No.:
Reg. No.
□2000/14/EC_2005/88/EC
Annex V
Annex VI
Noise: measured L_WA = dB(A) ; guaranteed L_WA = dB(A)
P = KW; L/∅ = cm
Notified Body:
2006/28/EC
Emission No.:
Standard references: EN 61029-1; EN 12418; EN 55014-1; EN 55014-2; EN 61000-3-2; EN 61000-3-11; EN 60825-1
Subject to change without notice
Archive-File/Record: NAPR006582
Documents registrar: Daniel Protschka
Wiesenweg 22, D-94405 Landau/Isar


EH 10/2012 (01)


