
Swift LT - Respiratory medical device ResMed - Free user manual and instructions
Find the device manual for free Swift LT ResMed in PDF.

| Product type | Nasal mask for positive pressure device (CPAP or inspiratory assistance) |
| Brand | ResMed |
| Model | Swift LT |
| Intended use | Adult patients (>30 kg) under positive pressure prescription, multiple use by a single patient at home or multiple patients in medical settings |
| Gross dimensions (without headgear) | 380 mm (H) x 57 mm (W) x 62 mm (D) |
| Treatment pressure | 4 to 20 cm H₂O |
| Resistance (nominal pressure drop) | 0.6 cm H₂O at 50 L/min; 2.0 cm H₂O at 100 L/min |
| Dead space (Large cushion) | 94 ml |
| Acoustic level | 25 dBA (uncertainty 3 dBA); 17 dBA at 1 m |
| Operating conditions | +5°C to +40°C, humidity 15-95% non-condensing |
| Storage/transport conditions | -20°C to +60°C, max humidity 95% non-condensing |
| Materials | Latex-free, PVC-free, DEHP-free |
| Standards | CE (class IIa), ISO 14971, ISO 13485, ISO 10993-1, ISO 17510-2 |
| Daily maintenance | Clean with a damp cloth and mild soap, rinse with clear water, dry away from direct sunlight |
| Weekly maintenance | Complete disassembly, soak in warm soapy water, gentle brushing, rinse and dry |
| Prohibited products | Scented solutions, bleach, alcohol, strongly scented products (e.g., lemon), eucalyptus, essential oils |
| Spare parts | Complete system ref. 60561 (cushions S, M, L), headgear, frame, elbow, short tube |
| Warranty | Conforms to European Directive 1999/44/EC and EU national legislation |
| Disposal | With household waste (no hazardous substances) |
| Device compatibility | ResMed devices with mask selection: choose 'SWIFT' or 'MIRAGE'; not compatible with AutoSet CS™ 2 and VPAP™ Adapt SV |
Frequently Asked Questions - Swift LT ResMed
User questions about Swift LT ResMed
0 question about this device. Answer the ones you know or ask your own.
Ask a new question about this device
Download the instructions for your Respiratory medical device in PDF format for free! Find your manual Swift LT - ResMed and take your electronic device back in hand. On this page are published all the documents necessary for the use of your device. Swift LT by ResMed.
USER MANUAL Swift LT ResMed
natural_image
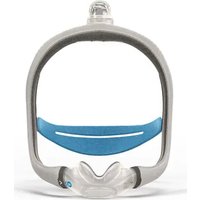
Close-up of a person wearing a blue and white respirator device, holding a white nasal tube (no text or symbols visible)Swift LT
Swift™ LT
NASAL PILLOWS SYSTEM
Thank you for choosing the Swift LT.
Intended Use
The Swift LT channels airflow noninvasively to a patient from a positive airway pressure device such as a continuous positive airway pressure (CPAP) or bilevel system.
The Swift LT is:
• to be used by adult patients (> 30 kg) for whom positive airway pressure has been prescribed
- intended for single-patient re-use in the home environment and multipatient re-use in the hospital/institutional environment.
Using the Swift LT
When using the Swift LT with ResMed flow generators that have mask setting options, if available select 'SWIFT'; otherwise select 'MIRAGE' as the mask option.
For a full list of compatible devices for this mask, see the Mask/Device Compatibility List on www.resmed.com on the Products page under Service & Support. If you do not have Internet access, please contact your ResMed representative.
Notes:
- The Swift LT is not compatible for use with the ResMed AutoSet CS ^TM 2 and VPAP ^TM Adapt SV devices.
- SmartStop may not operate effectively when using Swift LT with some flow generators that have this feature.
- If you experience nasal dryness or irritation, use of a humidifier is recommended.
Parts of the Swift LT & Ordering Information
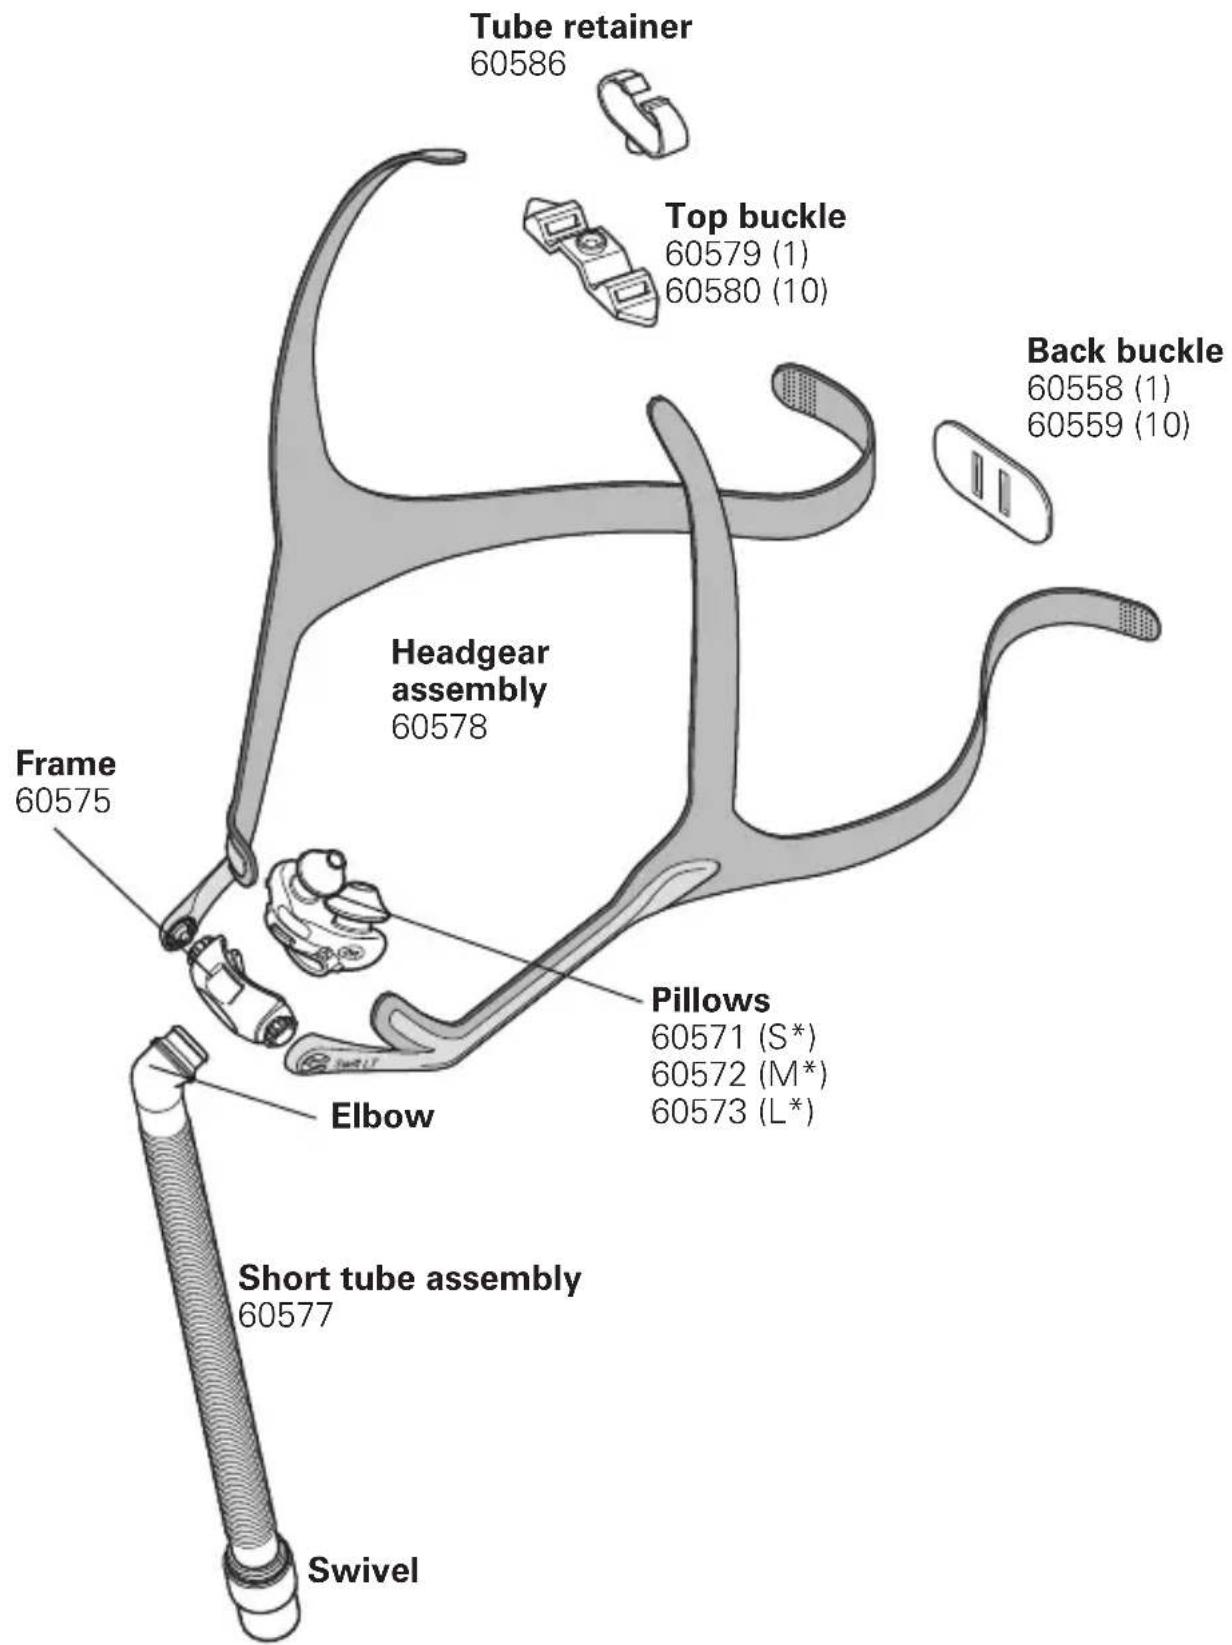
Complete system
60561
(includes small, medium and large pillows)
S* Small; M* Medium; L* Large
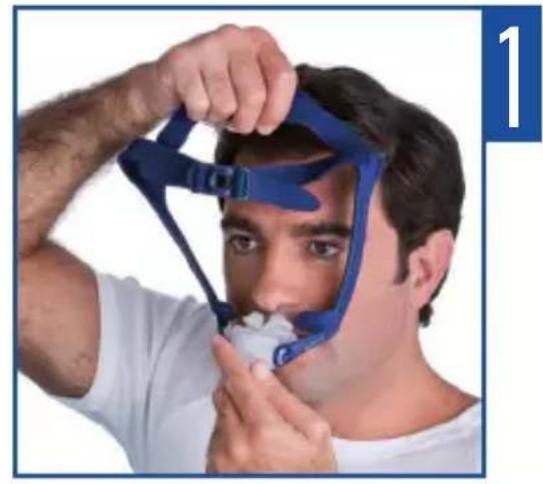
Fitting your Swift LT
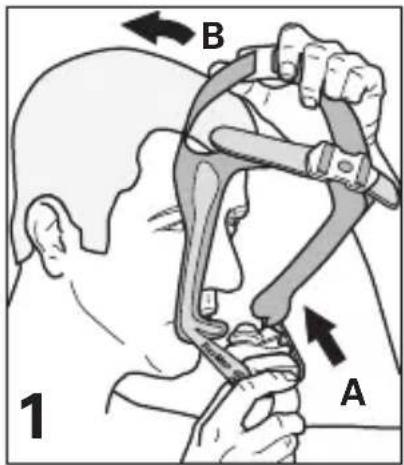
(A) Hold the pillows at your nose; (B) pull the headgear over your head.
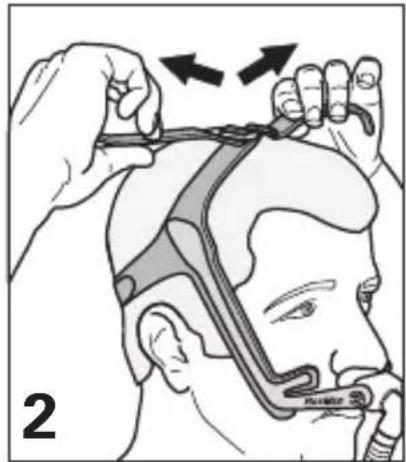
natural_image
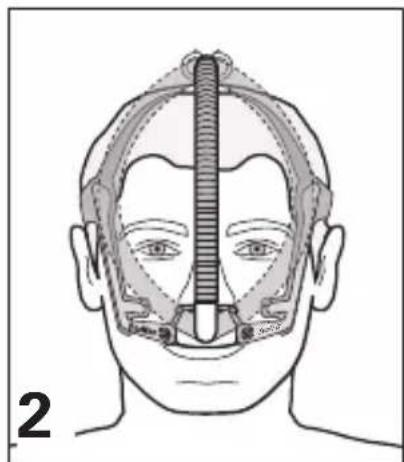
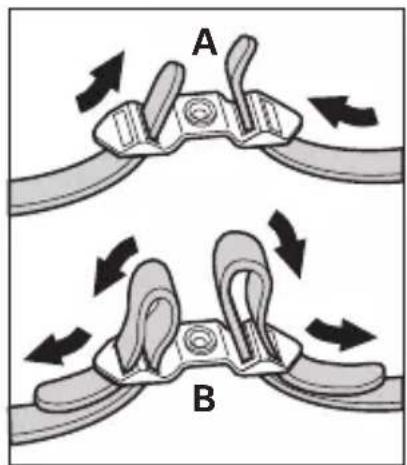
Illustration of a person using a hairnet to adjust the head area (no text or symbols present)Adjust top straps (over-tightening may cause excess pressure on your nose).
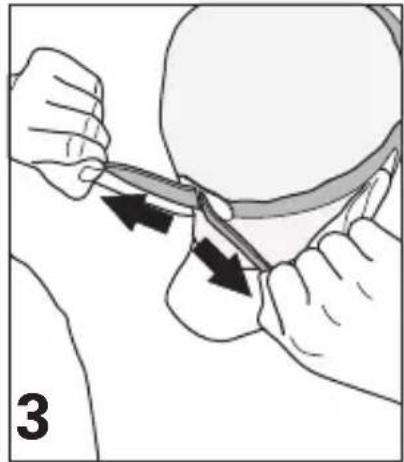
natural_image
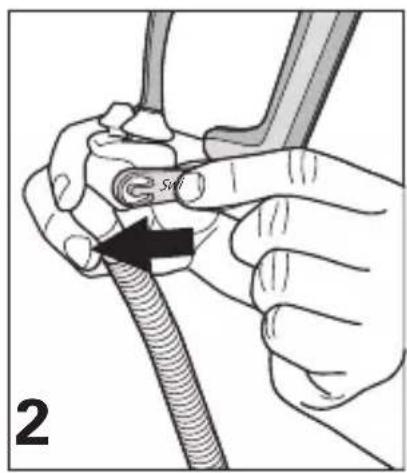
Illustration of a medical procedure showing hands manipulating a tool with arrows indicating motion (no text or symbols)Adjust each end of the backstrap (overtightening may cause excess pressure on upper lip).
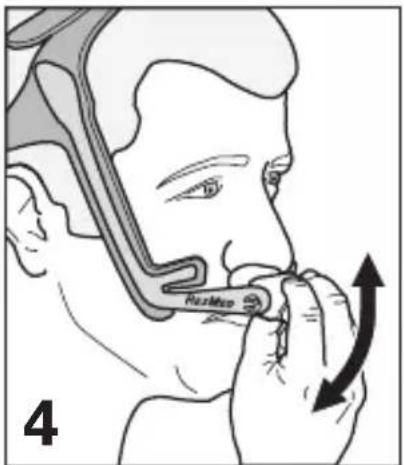
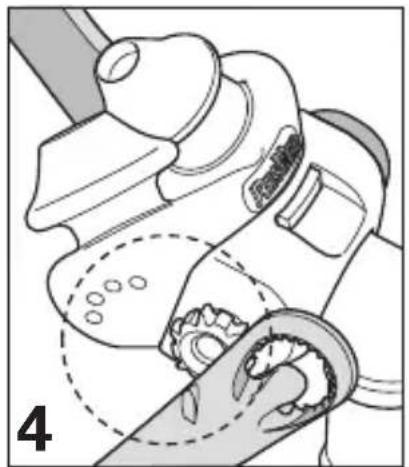
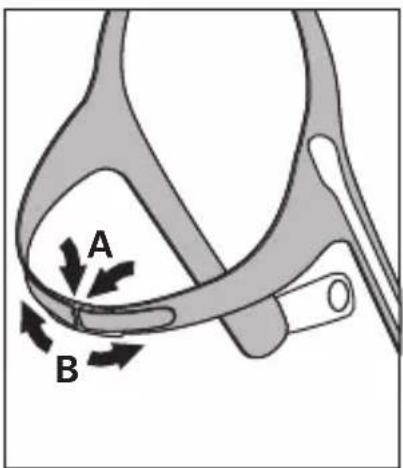
Rotate frame to adjust pillow angle to ensure it sits comfortably.
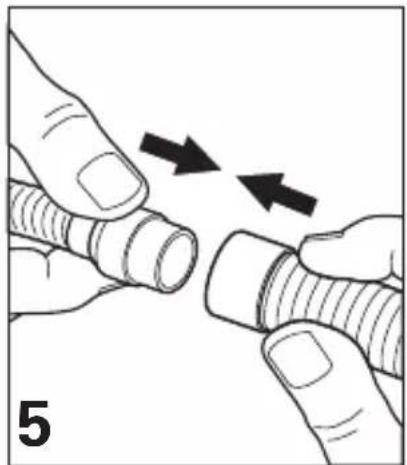
natural_image
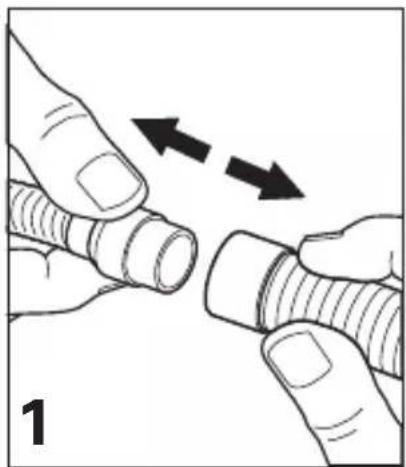
Illustration of two hands holding a threaded pipe with arrows indicating direction (no text or symbols)Connect the short tube to the flow generator's air tubing.
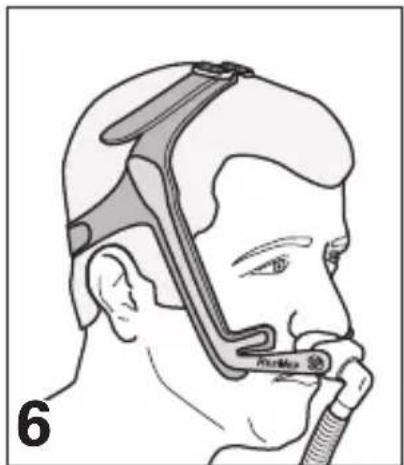
natural_image
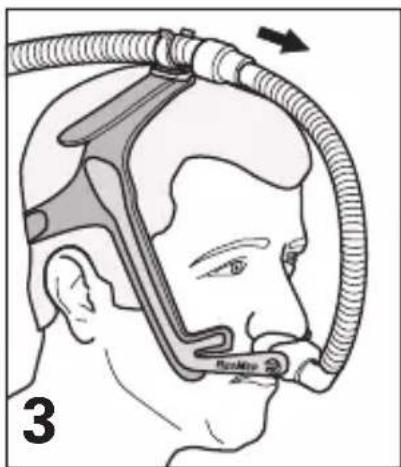
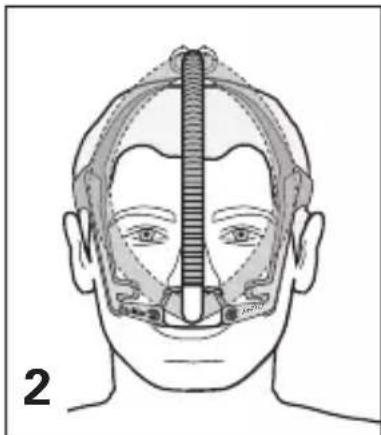
Side profile illustration of a person using a medical device (no text or symbols visible)The Swift LT is now fitted and ready for use. Headgear should sit midway between ear and eye.
Using Tube Retainer (Optional)
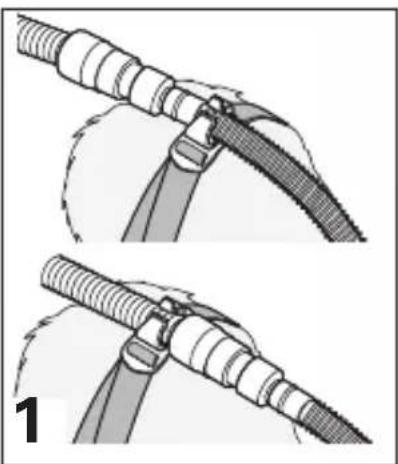
natural_image
Two-step diagram showing a mechanical assembly with threaded components and a curved component, labeled '1' (no text or symbols on the diagrams themselves)Push tube retainer into buckle. Clip either short tube or air tubing to tube retainer.
natural_image
Anatomical line drawing of a human head with surgical hardware, showing nasal and oral cavity structures (no text or labels)When using the tube retainer, the tubing can be positioned to either side of your face or centred.
natural_image
Illustration of a person wearing a medical device with tubing, no text or symbols presentIf the mask pulls on your nose, increase length of tube between mask and tube retainer.
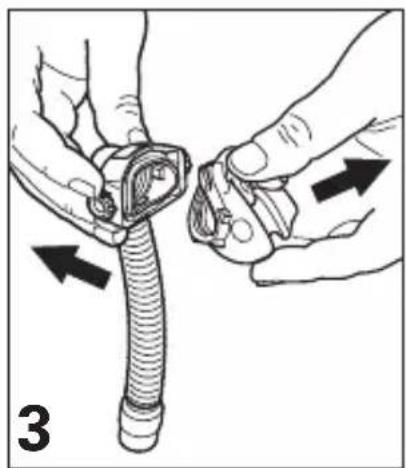
Disassembling your Swift LT
natural_image
Illustration of two hands adjusting a threaded component with directional arrows indicating movement (no text or symbols)Detach air tubing from short tube.
natural_image
Illustration of hands holding a flexible hose with a black arrow pointing to a cable (no text or symbols)Remove headgear from frame.
natural_image
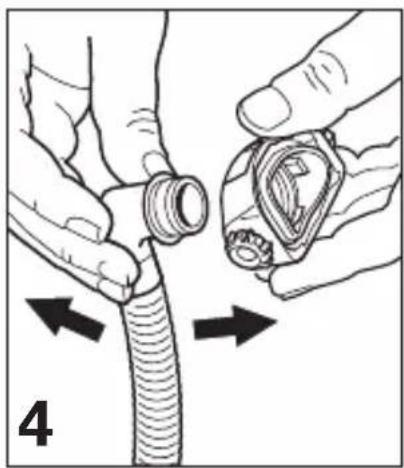
Illustration of hands adjusting a flexible hose component with directional arrows indicating movement (no text or symbols)Remove pillows from frame.
natural_image
Illustration of hands adjusting a coiled tube with a valve, showing directional arrows (no text or symbols)Remove elbow from frame.
Cleaning your Swift LT in the home
Notes:
- The nasal pillows system and headgear should be cleaned by handwashing.
- The headgear may be washed without being disassembled.

WARNING
Do not use aromatic-based solutions or scented oils (eg, eucalyptus or essential oils), bleach, alcohol or products that smell strongly (eg, citrus) to clean any of the system's components. Residual vapours from these solutions can be inhaled if not rinsed thoroughly. They may also damage the system, causing cracks.

CAUTION
If any visible deterioration of a system component is apparent (cracking, crazing, tears etc.), the component should be discarded and replaced.
Daily/After Each Use
Handwash the separated mask components (excluding headgear) by gently rubbing in warm (approx. 30^ C) water using mild soap or diluted dishwashing detergent for one minute. Rinse all components well with drinking quality water and allow them to air dry out of direct sunlight.
Weekly
Handwash the headgear and tube retainer in warm (approx. 30^ C) water using mild soap or diluted dishwashing detergent. Rinse well and allow them to air dry out of direct sunlight.
Reprocessing your Swift LT between Patients
The Nasal Pillows System should be reprocessed when used between patients. Cleaning, disinfection and sterilisation instructions are available from the ResMed website, www.resmed.com/masks/sterilization.
If you do not have Internet access, please contact your ResMed representative.
Storage
Ensure that your Swift LT is thoroughly clean and dry before storing it for any length of time. Store the mask in a cool dry place out of direct sunlight.
Disposal
The Swift LT does not contain any hazardous substances and may be disposed of with your normal household refuse.
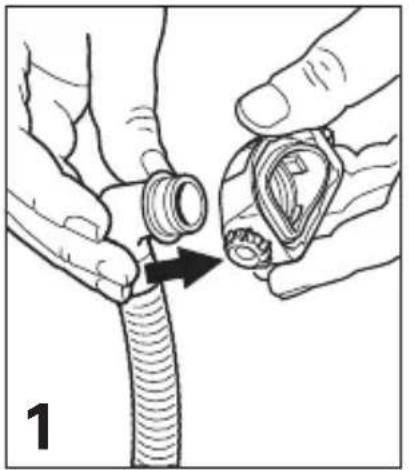
Reassembling your Swift LT
natural_image
Illustration of hands adjusting a coiled cable with a valve (no text or symbols)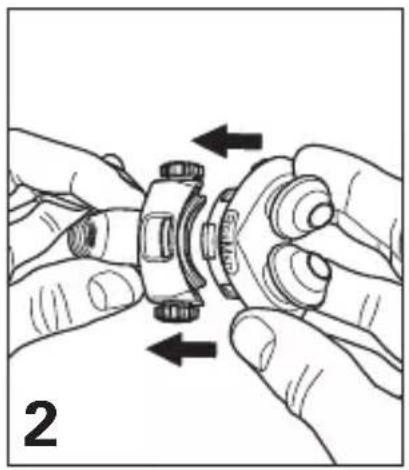
natural_image
Illustration of hands assembling a mechanical gear assembly (no text or symbols)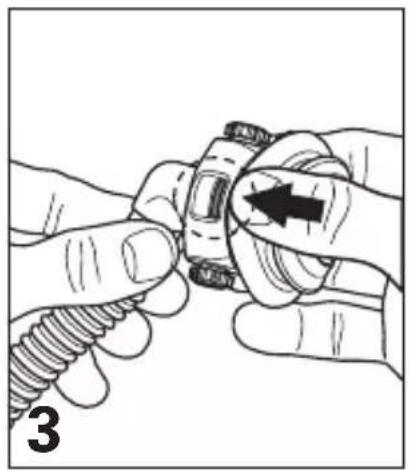
natural_image
Illustration of hands adjusting a mechanical component with a screw and nut (no text or symbols)Insert elbow into frame. Align pillows with frame. Push pillows firmly into frame. Ensure top and bottom retention tabs slot into place.
natural_image
Illustration of a robotic arm and hand positioning a gear (no text or symbols)Check positioning markers on pillows and headgear are on the same side.
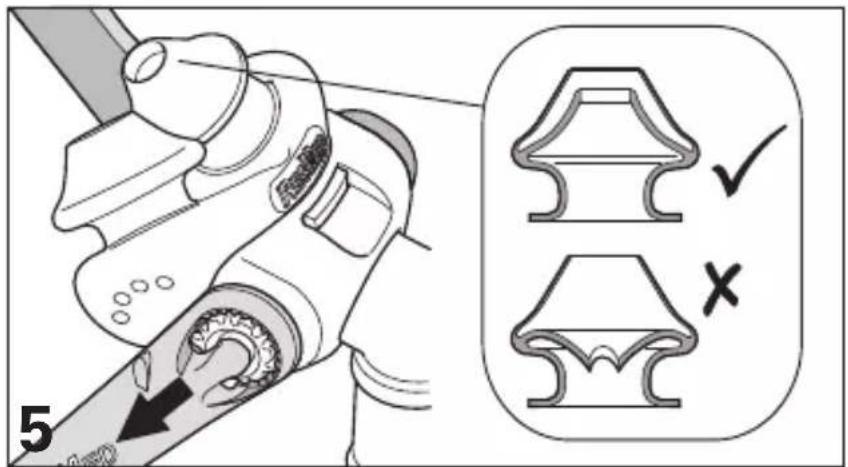
Slide left and right headgear stability arms onto frame. Ensure inner wall of pillows is in correct position. If not, squeeze pillow sides to release inner walls.
Reassembling the headgear
natural_image
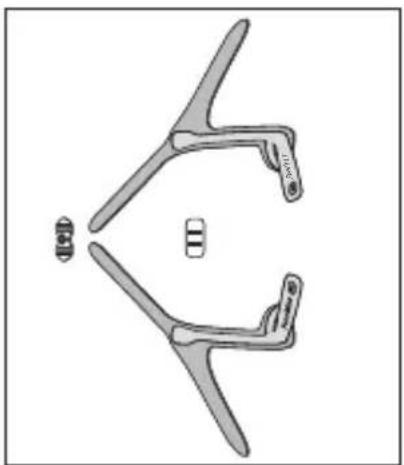
Technical line drawing of a mechanical component with two symmetrical arms and two small protrusions (no text or symbols)Lay out the headgear as shown, writing facing upwards.
(A) Thread the top straps through the top buckle, then (B) back over to secure.
(A) Thread both backstraps through the back buckle (Velcro™ facing outwards), then (B) fold back over to secure.
Troubleshooting
Possible reason Solution
Pillows won't seal properly, are uncomfortable or cause red marks
Pillows may have been fitted incorrectly, incorrectly adjusted, or the headgear is too tight.
Carefully follow instructions in "Fitting your Swift LT". Check headgear is not over-tightened. Check ResMed logo on top of pillows is facing outwards.
Inner wall position of one/both pillows is incorrect.
Squeeze pillow sides to release inner wall. The correct position is shown in "Reassembling your Swift LT".
Pillows are wrong size. Talk to your clinician.
Pillows may be dirty. Clean pillows according to instructions in “Cleaning your Swift LT in the Home”.
Nasal pillows system is too noisy
System is assembled incorrectly.
Reassemble the Swift LT. Make sure the pillows are fully inserted into the frame.
Before using your Swift LT

WARNINGS
- The vent holes must be kept clear.
- The mask should not be used unless the CPAP system is turned on and operating properly.
- Follow all precautions when using supplemental oxygen.
- Oxygen flow must be turned off when the flow generator is not operating, so that unused oxygen does not accumulate within the flow generator enclosure and create a risk of fire.
- At a fixed flow rate of supplemental oxygen flow, the inhaled oxygen concentration varies, depending on the pressure settings, patient breathing pattern, mask, point of application and leak rate.
- The technical specifications of the mask are provided for your clinician to check that they are compatible with the flow generator. If used outside specification or if used with incompatible devices, the seal and comfort of the mask may not be effective, optimum therapy may not be achieved, and leak, or variation in the rate of leak, may affect the flow generator function.
- Discontinue using the Swift LT if you have ANY adverse reaction to the use of the mask, and consult your physician or sleep therapist.
- As with all masks, some rebreathing may occur at low CPAP pressures.
- Refer to your flow generator manual for details on settings and operational information.
- Remove all packaging before using the mask.
- Using a mask may cause tooth, gum or jaw soreness or aggravate an existing dental condition. If symptoms occur, consult your physician or dentist.
Technical specifications
Note: The mask system does not contain latex, PVC or DEHP materials.
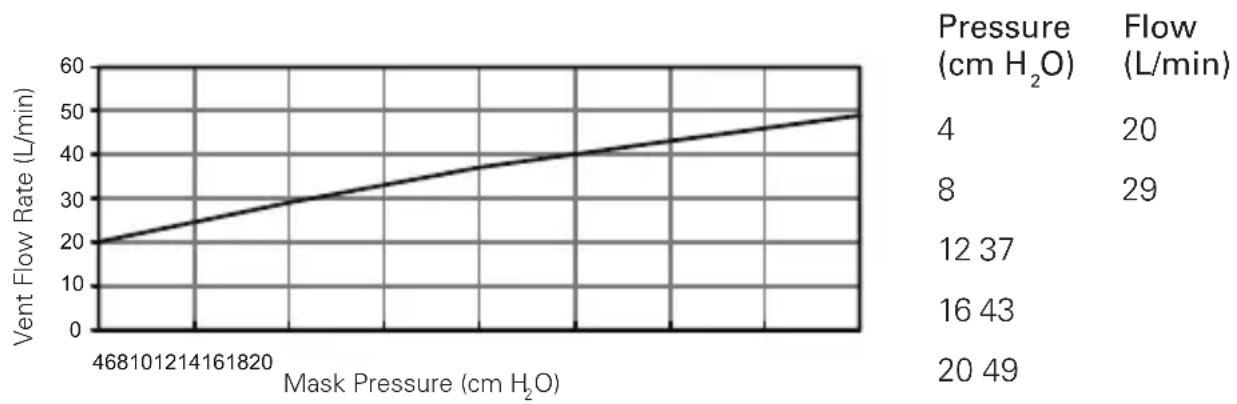
Pressure-Flow Curve
Note: The mask contains passive venting that meets the requirements for protection against rebreathing as specified in ISO 17510-2. As a result of manufacturing variations, the vent flow rate may vary.
line
| Mask Pressure (cm H₂O) | Vent Flow Rate (L/min) | | ---------------------- | ---------------------- | | 468 | 20 | | 10 | 25 | | 12 | 30 | | 14 | 35 | | 16 | 40 | | 18 | 45 | | 20 | 50 || Dead Space Information | Physical dead space is the empty volume of the mask to the end of the swivel. Using the large cushions this is 94 mL. |
| Standards CE designation in accordance with EC directive 93/42/EEC, class IIa. ISO 14971, ISO 13485, ISO 10993-1 and ISO 17510-2. | |
| Therapy Pressure | 4 to 20 cm H_2O . |
| Resistance Drop in pressure measured (nominal) at 50 L/min: 0.6 cm H_2O and at 100 L/min: 2.0cm H_2O . | |
| Sound DECLARED DUAL-NUMBER NOISE EMISSION VALUES in accordance with ISO 4871. The A-weighted sound power level of the mask is 25 dBA, with uncertainty 3 dBA. The A-weighted sound pressure level of the mask at a distance of 1 m is 17 dBA, with uncertainty 3 dBA. | |
| Environmental Conditions | Operating temperature: +5°C to +40°C Operating humidity: 15%–95% non-condensing Storage and transport temperature: -20°C to +60°C Storage and transport humidity: up to 95% non-condensing. |
| Gross Dimensions | 380 mm (H) x 57 mm (W) x 62 mm (D). Mask fully assembled with short tube assembly – no headgear. |
Note: The manufacturer reserves the right to change these specifications without notice.
Symbols
Caution, consult accompanying documents; LOT Lot number; REF Part number; ESE RER epean Authorised Representative; Temperature limitation; Humidity limitation; Does not contain latex;
Manufacturer; Indicates a Warning or Caution and alerts you to a possible injury or explains special measures for the safe and effective use of the device.
Consumer Warranty
ResMed acknowledges all consumer rights granted under the EU Directive 1999/44/EG and the respective national laws within the EU for products sold within the European Union.
Swift™ LT
NASENPOLSTER
natural_image
Illustration of a person adjusting a head-mounted device with arrows indicating motion (no text or symbols)natural_image
Illustration of hands performing a medical procedure with arrows indicating direction (no text or symbols)natural_image
Illustration of two hands holding a threaded pipe with arrows indicating direction (no text or symbols)natural_image
Side profile illustration of a person wearing a medical device with a cap (no text or symbols visible)natural_image
Two-step diagram showing a mechanical assembly with threaded components and a curved component, no text or symbols present.natural_image
Anatomical line drawing of a human head with surgical hardware, no text or labels presentnatural_image
Illustration of two hands holding a threaded pipe with directional arrows indicating movement (no text or symbols)natural_image
Illustration of hands holding a flexible hose with a black arrow pointing to a cable (no text or symbols)natural_image
Illustration of hands adjusting a flexible hose component with directional arrows (no text or symbols)natural_image
Illustration of hands adjusting a coiled tube with directional arrows indicating movement (no text or symbols)natural_image
Illustration of hands adjusting a mechanical component with a directional arrow (no text or symbols)natural_image
Illustration of hands assembling a mechanical component with directional arrows indicating motion (no text or symbols)natural_image
Illustration of hands adjusting a mechanical component with a spring (no text or symbols)natural_image
Illustration of a mechanical device with gear and a hand, no visible text or symbolsnatural_image
Diagram of a mechanical linkage or bracket with two symmetrical arms and a central vertical bar (no text or symbols)natural_image
Illustration of a person using a medical device to interact with another person (no text or symbols visible)natural_image
Illustration of hands performing a medical procedure with arrows indicating direction (no text or symbols)natural_image
Illustration of two hands holding a coiled tube with two arrows indicating direction (no text or symbols)natural_image
Illustration of a person wearing a medical or surgical cap device, viewed from the side (no text or symbols present)natural_image
Two-step diagram showing a cable being inserted into a connector, with no visible text or symbols.natural_image
Front view of a human head with internal anatomical structures (no text or labels)natural_image
Medical illustration of a human head with a medical device inserted into the neck area, showing no text or symbols.natural_image
Illustration of two hands adjusting a threaded component with directional arrows indicating movement (no text or symbols)natural_image
Illustration of hands connecting a cable with a screw, showing a black arrow pointing to the cable (no text or symbols present)natural_image
Illustration of hands adjusting a flexible hose component with directional arrows indicating movement (no text or symbols)natural_image
Illustration of hands adjusting a coiled tube with directional arrows indicating movement (no text or symbols)natural_image
Illustration of hands adjusting a mechanical component with a spring, showing a close-up view (no text or symbols)natural_image
Illustration of hands assembling a mechanical component with directional arrows indicating motion (no text or symbols)natural_image
Illustration of hands adjusting a mechanical component with a threaded spring and arrow indicating direction (no text or symbols)natural_image
Illustration of a robotic arm and hand positioning gear (no text or symbols)natural_image
Technical line drawing of a mechanical component with two symmetrical arms and a central slot (no text or symbols)natural_image
Illustration of a person using a hairnet to adjust the head (no text or symbols present)natural_image
Illustration of a medical procedure showing hands holding a tool with arrows indicating direction (no text or symbols)natural_image
Illustration of two hands holding a threaded pipe with arrows indicating direction (no text or symbols)natural_image
Illustration of a person wearing a head-mounted medical device with a probe inserted (no text or symbols visible)natural_image
Two-step diagram showing a mechanical assembly with threaded components and a curved component, labeled '1' (no text or symbols on the diagrams themselves)natural_image
Anatomical illustration of a human head with surgical hardware and nasal cavity (no text or labels)natural_image
Illustration of two hands holding a threaded pipe with two arrows indicating direction (no text or symbols)natural_image
Illustration of hands holding a flexible cable with a black arrow pointing to a component (no text or symbols present)natural_image
Illustration of hands adjusting a flexible hose component with directional arrows indicating movement (no text or symbols)natural_image
Illustration of hands adjusting a coiled tube with directional arrows indicating movement (no text or symbols)natural_image
Illustration of hands adjusting a mechanical component with a spring (no text or symbols)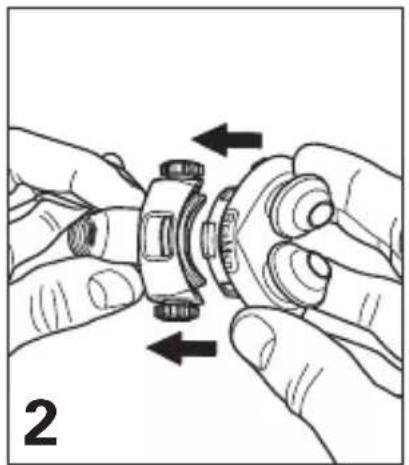
natural_image
Illustration of hands assembling a mechanical gear assembly (no text or symbols)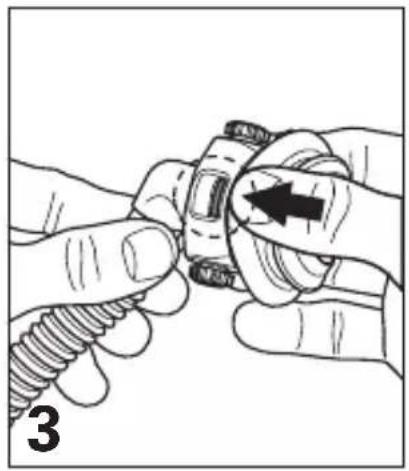
natural_image
Illustration of hands adjusting a mechanical component with a compass (no text or symbols)natural_image
Diagram of a robotic arm and hand positioning, showing mechanical components and gear alignment (no text or labels)natural_image
Technical line drawing of a mechanical component with two symmetrical arms and a central section (no text or symbols)natural_image
Illustration of a person using a hairnet to adjust the head (no text or symbols present)natural_image
Illustration of a medical procedure showing two hands performing a tool on a patient's head (no text or symbols present)natural_image
Illustration of two hands holding a threaded connector with arrows indicating movement (no text or symbols)natural_image
Side profile illustration of a person wearing a medical head cap and holding a device (no text or symbols visible)natural_image
Two-step diagram showing a mechanical assembly with threaded components and a curved component, labeled '1' (no text or symbols on the diagrams themselves)Duw de slangklem in de gesp. Klem de korte slang of de luchtslang op de slangklem.
natural_image
Front view of a human head with surgical hardware and nasal cavity (no text or symbols)natural_image
Illustration of two hands holding a threaded pipe with two arrows indicating direction (no text or symbols)natural_image
Illustration of hands connecting a cable with a screw, showing a black arrow pointing to the cable (no text or symbols present)natural_image
Illustration of hands adjusting a flexible hose component with directional arrows indicating movement (no text or symbols)natural_image
Illustration of hands adjusting a coiled tube with directional arrows indicating movement (no text or symbols)natural_image
Illustration of hands adjusting a coiled tube component with an arrow indicating direction (no text or symbols)natural_image
Illustration of hands assembling a mechanical gear assembly (no text or symbols)natural_image
Illustration of hands adjusting a mechanical component with a threaded spring (no text or symbols)natural_image
Illustration of a robotic arm and hand positioning gear (no text or symbols)natural_image
Diagram of a mechanical linkage or bracket assembly with two symmetrical arms and a central circular symbol (no text or labels)ResMed Pty Ltd 1 Elizabeth Macarthur Drive Bella Vista NSW 2153 Australia
See www.resmed.com for other ResMed locations worldwide.
For patent information, see www.resmed.com/ip
Swift, AutoSet CS and VPAP are trademarks of ResMed Pty Ltd and are registered in U.S. Patent and Trademark Office.
Velcro is a registered trademark of Velcro Industries B.V.
© 2020 ResMed.
0123
natural_image
Man adjusting a blue headband device with a white cap, no visible text or symbols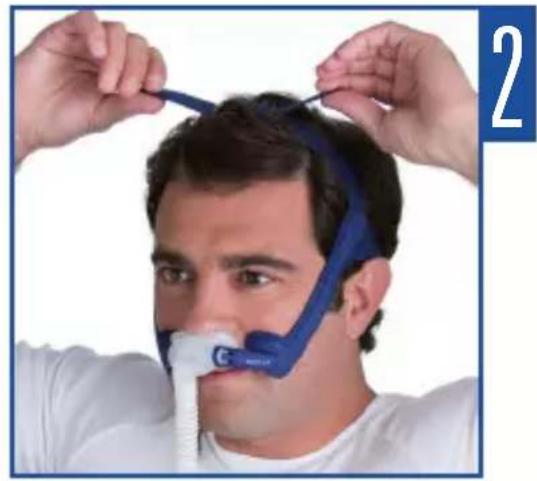
natural_image
Person adjusting a blue and white head-mounted device (no visible text or symbols)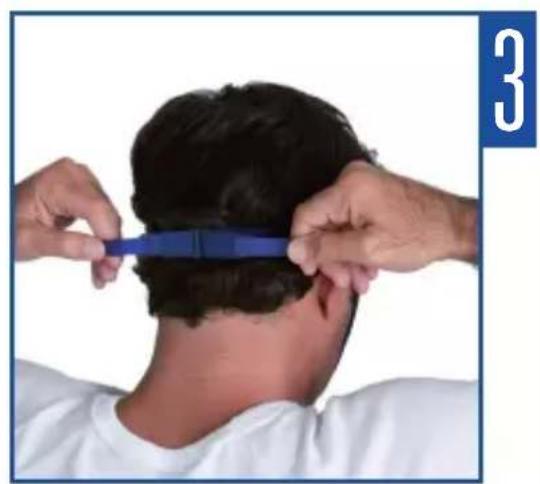
natural_image
Person styling hair with a blue comb, viewed from behind (no text or symbols visible)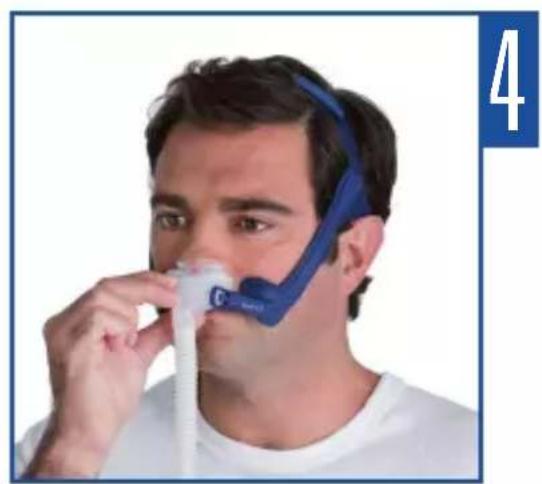
natural_image
Man wearing a blue and white respirator mask using a nasal cannula (no text or symbols visible)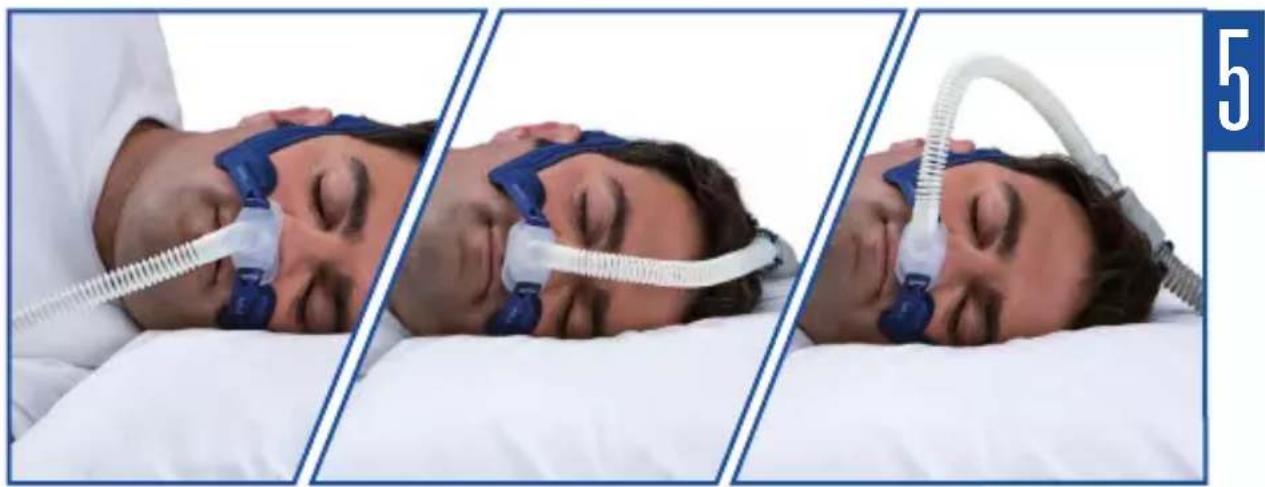
natural_image
Three-panel sequence showing a person undergoing nasal pressure on a bed, with medical tubing and earplugs visible (no text or symbols)| 608672/1 2020-06 |
| SWIFT LT |
| USER |
| EUR1 |

- Swift™ LT
- Intended Use
- Using the Swift LT
- Notes:
- Fitting your Swift LT
- Using Tube Retainer (Optional)
- Disassembling your Swift LT
- Cleaning your Swift LT in the home
- WARNING
- CAUTION
- Daily/After Each Use
- Weekly
- Reprocessing your Swift LT between Patients
- Storage
- Disposal
- Reassembling your Swift LT
- Reassembling the headgear
- Troubleshooting
- Nasal pillows system is too noisy
- Before using your Swift LT
- WARNINGS
- Technical specifications
- Symbols
- Consumer Warranty
Brand : ResMed
Model : Swift LT
Category : Respiratory medical device