
GLL 12-22 G Professional - Laser pointer BOSCH - Free user manual and instructions
Find the device manual for free GLL 12-22 G Professional BOSCH in PDF.

User questions about GLL 12-22 G Professional BOSCH
0 question about this device. Answer the ones you know or ask your own.
Ask a new question about this device
Download the instructions for your Laser pointer in PDF format for free! Find your manual GLL 12-22 G Professional - BOSCH and take your electronic device back in hand. On this page are published all the documents necessary for the use of your device. GLL 12-22 G Professional by BOSCH.
USER MANUAL GLL 12-22 G Professional BOSCH
natural_image
3D rendering of a Bosch Ethernet port (no text or symbols visible)en Original instructions
fr Notice originale
es Manual original
English ...... Page 7
Français ...... Page 24

natural_image
3D rendering of a gray plastic electronic component with two ports and a label pointing to it (no visible text or symbols)(9)
1 608 M00 C5D
1 608 M00 C43
natural_image
Coiled USB cable with two connectors (no text or symbols visible)(15)
natural_image
Simple line drawing of a rectangular device with a curved top and rounded side (no text or symbols)(16)

(17)
GLL 12-22:
1 608 M00 05B
GLL 12-22 G:
1 608 M00 05J
(18)
natural_image
Line drawing of a tripod-mounted camera with tripod handle and base mount (no text or symbols)BT 150
0 601 096 B00
English
Safety Instructions

All instructions must be read and observed in order for the measuring tool to function safely. The safeguards integrated into the measuring tool may be compromised if the measuring tool is not used in accordance with these instructions. Never make warning signs on the measuring tool unrecognisable. SAVE THESE IN-STRUCTIONS FOR FUTURE REFERENCE AND INCLUDE THEM WITH THE MEASURING TOOL WHEN TRANSFERRING IT TO A THIRD PARTY.
▶ Warning! If operating or adjustment devices other than those specified here are used or other procedures are carried out, this can lead to dangerous exposure to radiation.
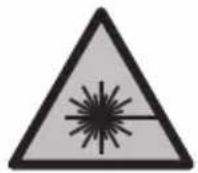
The measuring tool is delivered with a laser warning sign (marked in the illustration of the measuring tool on the graphics page).
If the text of the laser warning label is not in your national language, stick the provided warning label in your national language over it before operating for the first time.
Do not direct the laser beam at persons or animals and do not stare into the direct or reflected laser beam yourself. You could blind somebody, cause accidents or damage your eyes.
▶ If laser radiation hits your eye, you must close your eyes and immediately turn your head away from the beam.
▶ Do not make any modifications to the laser equipment.
▶ Do not use the laser goggles (accessory) as protective goggles. The laser goggles make the laser beam easier to see; they do not protect you against laser radiation.
▶ Do not use the laser goggles (accessory) as sunglasses or while driving. The laser goggles do not provide full UV protection and impair your ability to see colours.
▶ Have the measuring tool serviced only by a qualified specialist using only original replacement parts. This will ensure that the safety of the measuring tool is maintained.
▶ Do not let children use the laser measuring tool unsupervised. They could unintentionally blind themselves or other persons.
8 | English
▶ Do not use the measuring tool in explosive atmospheres which contain flammable liquids, gases or dust. Sparks may be produced inside the measuring tool, which can ignite dust or fumes.
▶ Do not open the battery. There is a risk of short-circuiting.
In case of damage and improper use of the battery, vapours may be emitted. The battery can set alight or explode. Ensure the area is well ventilated and seek medical attention should you experience any adverse effects. The vapours may irritate the respiratory system.
If used incorrectly or if the battery is damaged, flammable liquid may be ejected from the battery. Contact with this liquid should be avoided. If contact accidentally occurs, rinse off with water. If the liquid comes into contact with your eyes, seek additional medical attention. Liquid ejected from the battery may cause irritation or burns.
The battery can be damaged by pointed objects such as nails or screwdrivers or by force applied externally. An internal short circuit may occur, causing the battery to burn, smoke, explode or overheat.
When the battery is not in use, keep it away from paper clips, coins, keys, nails, screws or other small metal objects that could make a connection from one terminal to another. A short circuit between the battery terminals may cause burns or a fire.
▶ Only use the battery with products from the manufacturer. This is the only way in which you can protect the battery against dangerous overload.
▶ Only charge the batteries using chargers recommended by the manufacturer. A charger that is suitable for one type of battery may pose a fire risk when used with a different battery.
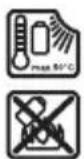
Protect the battery against heat, e.g. against continuous intense sunlight, fire, dirt, water and moisture. There is a risk of explosion and short-circuiting.
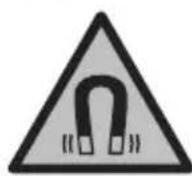
Keep the measuring tool and the magnetic accessories away from implants and other medical devices, e.g. pacemakers or insulin pumps. The magnets inside the measuring tool and accessories generate a field that can impair the function of implants and medical devices.
▶ Keep the measuring tool and the magnetic accessories away from magnetic data storage media and magnetically sensitive devices. The effect of the magnets inside the measuring tool and accessories can lead to irreversible data loss.
Safety instructions for power supply
This power supply is not intended for use by children or persons with physical, sensory or mental limitations or a lack of experience or knowledge. This power supply can be used by children aged 8 or older and by persons who have physical, sensory or mental limitations or a lack of experience or knowledge if a person responsible for their safety supervises them or has instructed them in the safe operation of the power supply and they understand the associated dangers. Otherwise, there is a risk of operating errors and injuries.

Do not expose the power supply to rain or wet conditions. Water entering the supply will increase the risk of electric shock.
▶ Keep the power supply clean. Dirt poses a risk of electric shock.
▶ Always check the power supply before using it. Stop using the power supply if you discover any damage. Do not open the power supply yourself, and have it repaired only by Bosch or by an authorised after-sales service centre using only original replacement parts. Damaged power supplies increase the risk of an electric shock.
Product Description and Specifications
Please observe the illustrations at the beginning of this operating manual.
Intended Use
The measuring tool is intended for determining and checking horizontal and vertical lines.
The measuring tool is suitable for indoor use.
This product is a consumer laser product in accordance with EN 50689.
Product Features
The numbering of the product features shown refers to the illustration of the measuring tool on the graphic page.
(1) Laser beam outlet aperture
(2) On/off switch
(3) Magnetic rotating mount
(4) Fastening slot
(5) Magnet
10 | English
(6) 1/4" tripod mount
(7) Charge indicator of the lithium-ion battery pack ^4
(8) USB Type-C® port ^a)b)
(9) Lithium-ion battery pack ^4
(10) Lithium-ion battery pack locking mechanism ^a)
(11) Locking mechanism of the battery compartment cover
(12) Battery compartment cover
(13) Serial number
(14) Laser warning label
(15) USB Type-C ^® cable ^a)
(16) Protective bag
(17) Laser viewing glasses ^a)
(18) Tripod ^a)
a) Accessories shown or described are not included with the product as standard. You can find the complete selection of accessories in our accessories range.
b) USB Type-C® and USB-C® are trademarks of USB Implementers Forum.
Technical Data
| Line Laser GLL 12-22 GLL 12-22 G | ||
| Article number | 3 601 K65 2.. 3 601 K65 3.. | |
| Working rangeA) | 12 m | 12 m |
| Levelling accuracyB)C)D) | ±0.8 mm/m | ±0.6 mm/m |
| Self-levelling range ±3.5° ±3.5° | ||
| Levelling time < 6 s < 6 s | ||
| Operating temperature -10 °C to +40 °C | -10 °C to +40 °C | |
| Storage temperature -20 °C to +70 °C | -20 °C to +70 °C | |
| Max. altitude 2000 m 2000 m | ||
| Relative air humidity max. 90 % | 90 % | |
| Pollution degree according to IEC 61010-1 | 2E) | 2E) |
| Laser class | 2 | 2 |
English | 11
Line Laser GLL 12-22 GLL 12-22 G
| Laser type < 5 mW, | 630-650 nm | < 5 mW,500-540 nm |
| C_6 5 5 | ||
| Divergence 25 × 5 mrad | (full angle) | 25 × 5 mrad(full angle) |
| Tripod mount 1/4" 1/4" | ||
| Power supply | ||
| – Lithium-ion battery pack 3.7 V 3.7 V | ||
| – Non-rechargeable batteries (alkaline manganese) | 2 × 1.5 V LR6 (AA) | 2 × 1.5 V LR6 (AA) |
| Operating time^B) | 10 h 8 h | |
| Weight according to EPTA-Procedure 01:2014 | 0.35 kg 0.35 kg | |
| Dimensions (length × width × height) 104 × 64 × 100 mm 104 × 64 × 100 mm | ||
| Protection rating | IP55 | IP55 |
| Lithium-ion battery pack (accessory) | BA 3.7V 1.0Ah A | BA 3.7V 1.0Ah A |
| Article number | 1 607 A35 ON8 | 1 607 A35 ON8 |
| Charging connection | USB Type-C® USB Type-C® | |
| Recommended USB Type-C® cable | 1 600 A01 6A8 | 1 600 A01 6A8 |
| Rated voltage | 3.7 V = | 3.7 V = |
| Capacity | 1.0 Ah | 1.0 Ah |
| Recommended ambient temperature during charging | +10 °C to +35 °C | +10 °C to +35 °C |
| Power supply (accessory) | ||
| Output voltage | 5.0 V = | 5.0 V = |
| Minimum output current | 500 mA | 500 mA |
| Recommended power supply^F) | ||
| – EU | 2 609 120 713 | 2 609 120 713 |
| – UK | 2 609 120 718 | 2 609 120 718 |
| – ARG | 1 600 A01 3A0 | 1 600 A01 3A0 |
12 | English
Line Laser GLL 12-22 GLL 12-22 G
| - BRA | 1 600 A01 3A2 1 600 A01 3A2 |
| - MEX | 1 600 A01 3A1 1 600 A01 3A1 |
| - KOR | 2 609 120 716 2 609 120 716 |
| - AUS | 2 609 120 717 2 609 120 717 |
A) The working range may be reduced by unfavourable environmental conditions (e.g. direct sunlight).
B) At 20-25°C
C) Valid when levelled (0°)
D) The values stated presuppose normal to favourable environmental conditions (e.g. no vibration, no fog, no smoke, no direct sunlight). Extreme fluctuations in temperature can cause deviations in accuracy.
E) Only non-conductive deposits occur, whereby occasional temporary conductivity caused by condensation is expected.
F) For additional technical data, visit: https://www.bosch-professional.com/ecodesign The serial number (13) on the type plate is used to clearly identify your measuring tool.
Measuring Tool Power Supply
The measuring tool can be operated either with a Bosch lithium-ion battery pack (9) or with conventional non-rechargeable batteries.
Note: Never store the measuring tool without an inserted battery compartment cover (12) or lithium-ion battery pack (9), particularly in dusty or humid environments.
Operation with Lithium-Ion Battery Pack
Inserting/Replacing a Lithium-Ion Battery Pack
To switch from non-rechargeable batteries to a lithium-ion battery pack (9), remove the battery compartment cover (12) and the inserted non-rechargeable batteries.
Insert the lithium-ion battery pack (9) and let the locking mechanism (10) click into place.
To remove the lithium-ion battery pack (9), press the locking mechanism (10) and take the lithium-ion battery pack out of the measuring tool.
Charging a Lithium-Ion Battery Pack
For charging, use the recommended USB power supply unit or a USB power supply unit whose output voltage and minimum output current comply with the requirements in the "Technical Data" section. Observe the operating manual of the USB power supply unit. Recommended power supply unit: See "Technical Data".
▶ Pay attention to the mains voltage. The voltage of the power source must match the voltage specified on the rating plate of the power adaptor. Power adaptors marked with 230 V can also be operated with 220 V.
▶ Only use the USB connection to charge the battery at an ambient temperature of between +10 °C and +35 °C. Charging outside of this temperature range can damage the battery and increase the risk of fire.
Note: Lithium-ion rechargeable batteries are supplied partially charged according to international transport regulations. To ensure full rechargeable battery capacity, fully charge the rechargeable battery before using your tool for the first time.
If the lithium-ion battery pack is running low, the laser lines will flash slowly for approx. 1 min.
If the lithium-ion battery pack is empty, the laser lines will flash quickly for approx. 10 s, then the measuring tool will switch off.
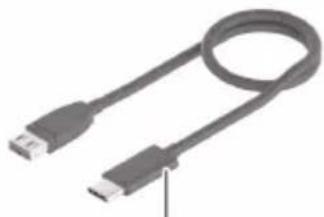
Open the flap for the USB Type-C® port (8). Connect the USB port to a USB power supply unit using the USB cable (15). Connect the USB power supply unit to the mains supply.
Colour of charge Indicator (7) Meaning
Yellow Lithium-ion battery pack is being charged.
Green Lithium-ion battery pack is fully charged.
Red Charging voltage or charging current is unsuitable.
Remove the USB cable (15) after completing the charging process. Close the flap for the USB Type-C® port (8) to protect it from dust and splashes.
Operation with Non-Rechargeable Batteries
To switch from a lithium-ion battery pack (9) to non-rechargeable batteries, remove the lithium-ion battery pack (9).
It is recommended that you use alkaline manganese batteries to operate the measuring tool.
Insert the non-rechargeable batteries.
When inserting the batteries, ensure that the polarity is correct according to the illustration on the inside of the battery compartment.
Insert the battery compartment cover (12) and let it click into place.
If the non-rechargeable batteries are running low, the laser lines will flash slowly for approx. 1 min.
14 | English
If the non-rechargeable batteries are empty, the laser lines will flash quickly for approx. 10 s, then the measuring tool will switch off.
Always replace all the batteries at the same time. Only use batteries from the same manufacturer and which have the same capacity.
▶ Take the batteries out of the measuring tool when you are not using it for a prolonged period of time. The batteries can corrode and self-discharge during prolonged storage in the measuring tool.
Operation
Starting Operation
▶ Protect the measuring tool from moisture and direct sunlight.
▶ Do not expose the measuring tool to any extreme temperatures or fluctuations in temperature. For example, do not leave it in a car for extended periods of time. If it has been subjected to significant fluctuations in temperature, first allow the measuring tool to adjust to the ambient temperature and then always carry out an accuracy check before continuing work (see "Accuracy Check of the Measuring Tool", page 15).
The precision of the measuring tool may be compromised if exposed to extreme temperatures or fluctuations in temperature.
- Avoid substantial knocks to the measuring tool and avoid dropping it. Always carry out an accuracy check before continuing work if the measuring tool has been subjected to severe external influences (see "Accuracy Check of the Measuring Tool", page 15).
▶ Switch the measuring tool off when transporting it. The pendulum unit is locked when the tool is switched off, as it can otherwise be damaged by big movements.
Switching On/Off
Before all work, turn the measuring tool on the magnetic rotating mount (3) so that the outlet aperture (1) is not obstructed.
To switch on the measuring tool, slide the on/off switch (2) to the "ON" position. Immediately after switching on, the measuring tool sends laser lines out of the outlet aperture (1).
▶ Do not direct the laser beam at persons or animals and do not stare into the laser beam yourself (even from a distance).
To switch off the measuring tool, slide the on/off switch (2) to the OFF position. The pendulum unit is locked when the tool is switched off.
If you switch off and transport the measuring tool, click it back into place on the rotating mount (3)
▶ Never leave the measuring tool unattended when switched on, and ensure the measuring tool is switched off after use. Others may be blinded by the laser beam.
GLL 12-22 G: If the maximum permitted operating temperature of 40^ C is exceeded, the tool shuts down to protect the laser diode. Once it has cooled down, the measuring tool is operational again and can be switched back on.
Automatic Levelling (see figures A-B)
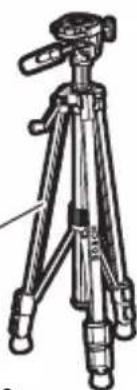
Position the measuring tool on a level, firm support or attach it to a tripod (18).
Turn the measuring tool on the magnetic rotating mount (3) so that the outlet aperture (1) is not obstructed.
After switching on, the automatic levelling function automatically compensates irregularities within the self-levelling range of ±3.5^ . The levelling is finished as soon as the laser lines are permanently lit (i.e. no longer flashing) and do not move anymore.
If automatic levelling is not possible, e.g. because the surface on which the measuring tool stands deviates by more than 3.5^ from the horizontal plane, the laser lines will flash continuously and quickly and the measuring tool will work without automatic levelling. The laser lines remain switched on, but the two intersecting lines will no longer necessarily be perpendicular to each other.
To work with automatic levelling again, set up the measuring tool so that it is horizontal and wait for the self-levelling procedure to complete. As soon as the measuring tool is within the self-levelling range of ±3.5^ and is levelled in, the laser lines will light up continuously again.
In case of ground vibrations or position changes during operation, the measuring tool is automatically levelled again. Upon re-levelling, check the position of the horizontal or vertical laser line with regard to the reference points to avoid errors by moving the measuring tool.
Accuracy Check of the Measuring Tool
Influences on Accuracy
The largest influence is exerted by the ambient temperature. In particular, temperature differences that occur from the ground upwards can refract the laser beam.
In order to minimise thermal influences resulting from heat rising from the floor, it is recommended that you use the measuring tool on a tripod. In addition, position the measuring tool in the centre of the work surface, wherever this is possible.
16 | English
In addition to external influences, device-specific influences (e.g. falls or heavy impacts) can also lead to deviations. For this reason, check the levelling accuracy each time before beginning work.
First check the height accuracy and levelling accuracy of the horizontal laser line, then the levelling accuracy of the vertical laser line.
Should the measuring tool exceed the maximum deviation during one of the tests, please have it repaired by a Bosch after-sales service.
Checking the Height Accuracy of the Horizontal Line
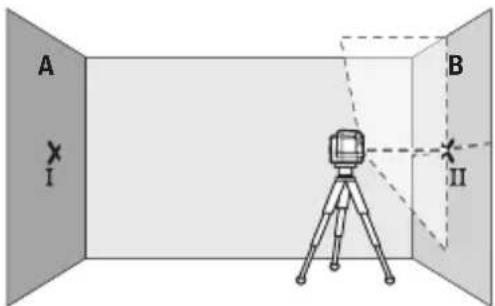
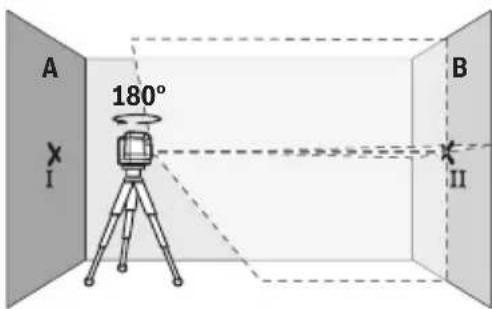
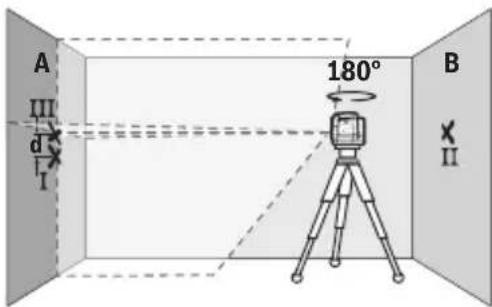
For this check, you will need a free measuring distance of 5 m on firm ground between two walls (designated A and B).
- Mount the measuring tool close to wall A on a tripod, or place it on a firm, flat surface. Turn the measuring tool on the magnetic rotating mount (3) so that the laser outlet aperture (1) is not obstructed. Switch on the measuring tool.
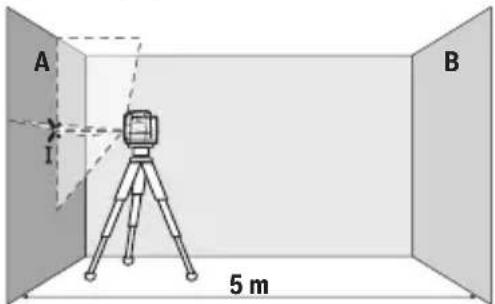
- Aim the laser at the closer wall A and allow the measuring tool to level in. Mark the middle of the point at which the laser lines cross on the wall (point I).
- Turn the measuring tool 180^ , allow it to level in and mark the point where the laser lines cross on the opposite wall B (point II).
- Position the measuring tool – without rotating it – close to wall B, switch it on and allow it to level in.
- Align the height of the measuring tool (using the tripod or by placing objects underneath as required) so that the point where the laser lines cross exactly hits the previously marked point II on wall B.
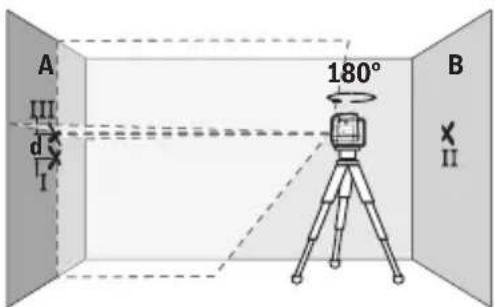
- Turn the measuring tool 180^ without adjusting the height. Aim it at wall A such that the vertical laser line runs through the already marked point I. Allow the measuring tool to level in and mark the point where the laser lines cross on wall A (point III).
- The discrepancy d between the two marked points I and III on wall A reveals the actual height deviation of the measuring tool.
The maximum permitted deviation over the measuring distance of 2 × 5 m = 10 m is as follows:
GLL 12-22: 10 m × ± 0.8 mm/m = ± 8 mm . The discrepancy d between points I and III must therefore amount to no more than 8 mm.
GLL 12-22 G: 10 m × ± 0.6 mm/m = ± 6 mm . The discrepancy d between points I and III must therefore amount to no more than 6 mm.
Checking the Level Accuracy of the Horizontal Line
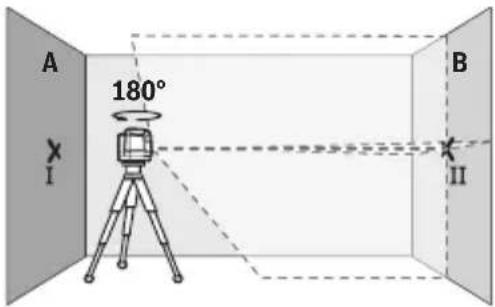
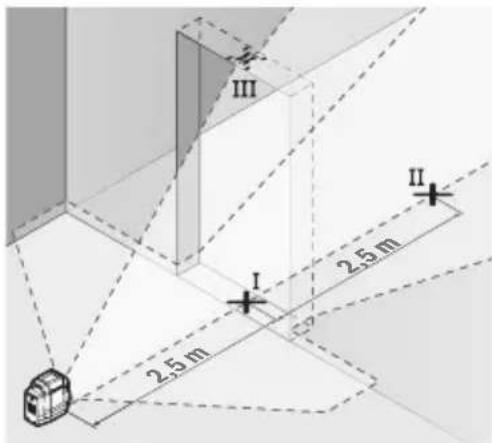
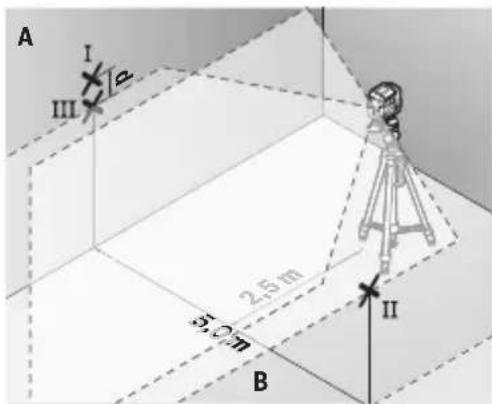
For this check, you will need a free area of 5 × 5 m.
- Mount the measuring tool in the middle between walls A and B on a tripod, or place it on a firm, level surface. Turn the measuring tool on the magnetic rotating mount (3) so that the laser outlet aperture (1) is not obstructed. Switch the measuring tool on and allow it to level in.
18 | English
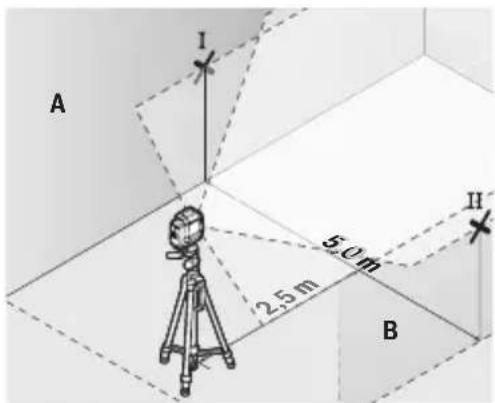
- At a distance of 2.5m from the measuring tool, mark the centre of the laser line on both walls (point I on wall A and point II on wall B).
- Set up the measuring tool at a 5 m distance and rotated by 180^ and allow it to level in.
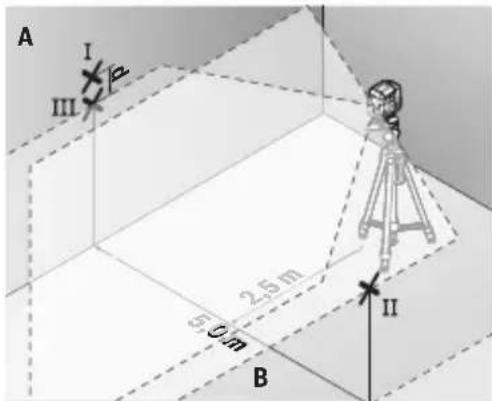
- Align the height of the measuring tool (using the tripod or by placing objects underneath as required) so that the centre of the laser line exactly hits the previously marked point II on wall B.
- Mark the centre of the laser line on wall A as point III (vertically above or below point I).
- The discrepancy d between the two marked points I and III on wall A reveals the actual horizontal deviation of the measuring tool.
The maximum permitted deviation over the measuring distance of 2 × 5 m = 10 m is as follows:
GLL 12-22: 10 m × ± 0.8 mm/m = ± 8 mm . The discrepancy d between points I and III must therefore amount to no more than 8 mm.
GLL 12-22 G: 10 m × ± 0.6 mm/m = ± 6 mm . The discrepancy d between points I and III must therefore amount to no more than 6 mm.
Checking the Level Accuracy of the Vertical Line
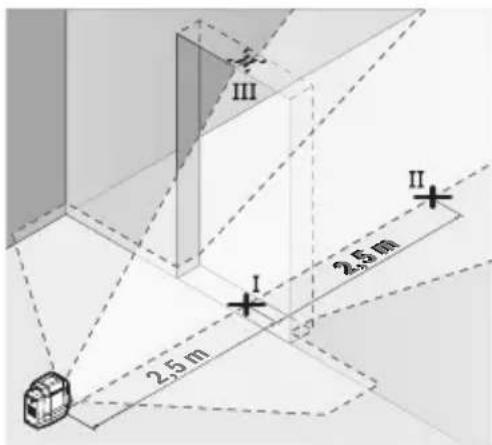
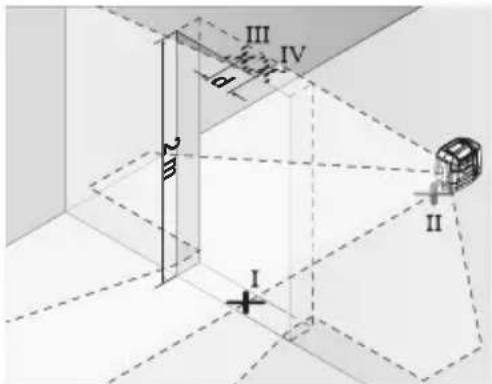
For this check, you will need a door opening (on solid ground) which has at least 2.5 m of space either side of the door.
- Place the measuring tool 2.5 m away from the door opening on a firm, flat surface (not on a tripod). Turn the measuring tool on the magnetic rotating mount (3) so that the laser outlet aperture (1) is not obstructed. Switch the measuring tool on and allow it to level in.
- Mark the centre of the vertical laser line on the floor of the door opening (point I), 5 m away on the other side of the door opening (point II) and on the upper edge of the door opening (point III).
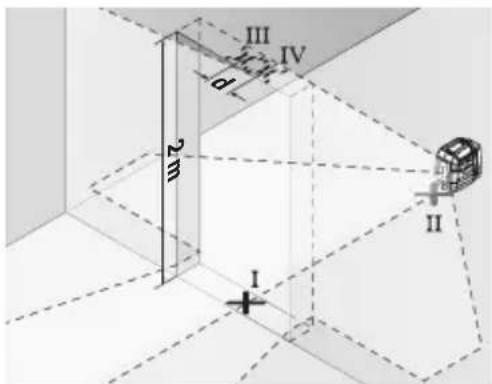
- Set up the measuring tool on the other side of the door opening, directly behind point II. Allow the measuring tool to level in and align the vertical laser line in such a way that its centre passes through points I and II exactly.
- Mark the centre of the laser line on the upper edge of the door opening as point IV.
- The discrepancy d between the two marked points III and IV reveals the actual vertical deviation of the measuring tool.
- Measure the height of the door opening.
You can calculate the maximum permitted deviation as follows:
GLL 12-22:
Doubled height of the door opening × 0.8 mm/m
Example: At a door opening height of 2 m, the maximum deviation amounts to
2 × 2 m × ± 0.8 mm/m = ± 3.2 mm . The points III and IV must therefore be no further than 3.2 mm from each other.
GLL 12-22 G:
Doubled height of the door opening × 0.6 mm/m
20 | English
Example: At a door opening height of 2 m, the maximum deviation amounts to 2 × 2 m × ± 0.6 mm/m = ± 2.4 mm. The points III and IV must therefore be no further than 2.4 mm from each other.
Working Advice
▶ Only the centre of the laser line must be used for marking. The width of the laser line changes depending on the distance.
Working with the Tripod
A tripod offers a stable, height-adjustable support surface for measuring. Place the measuring tool with the 1/4" tripod mount (6) on the thread of the tripod (18) or a conventional camera tripod. Tighten the measuring tool using the locking screw of the tripod.
Roughly align the tripod before switching on the measuring tool.
Attaching Using the Magnetic Rotating Mount (see figures C-D)
You can secure the measuring tool to magnetisable materials or vertical surfaces using the built-in magnetic rotating mount (3).
Attachment options for the rotating mount (3):
- Using the magnets (5), it can be attached to magnetisable materials (see figure C) - Using a commercially available fastening screw, it can be attached via the fastening slot (4) to wood.
▶ Keep your fingers away from the rear side of the magnetic rotating mount while attaching the rotating mount to surfaces. The strong pulling force of the magnets (5) may jam your fingers.
Roughly align the magnetic rotating mount (3) before switching on the measuring tool. If you switch off and transport the measuring tool, click it back into place on the rotating mount (see figure D).
Laser Goggles
The laser goggles filter out ambient light. This makes the light of the laser appear brighter to the eye.
▶ Do not use the laser goggles (accessory) as protective goggles. The laser goggles make the laser beam easier to see; they do not protect you against laser radiation.
▶ Do not use the laser goggles (accessory) as sunglasses or while driving. The laser goggles do not provide full UV protection and impair your ability to see colours.
Maintenance and Service
Maintenance and Cleaning
Keep the measuring tool clean at all times.
Never immerse the measuring tool in water or other liquids.
Wipe off any dirt using a damp, soft cloth. Do not use any detergents or solvents.
The areas around the outlet aperture of the laser in particular should be cleaned on a regular basis. Make sure to check for lint when doing this.
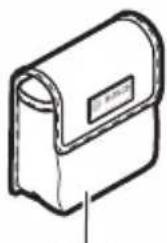
Only store and transport the measuring tool in the protective pouch (16).
If the measuring tool needs to be repaired, send it off in the protective pouch (16).
After-Sales Service and Application Service
Our after-sales service responds to your questions concerning maintenance and repair of your product as well as spare parts. You can find explosion drawings and information on spare parts at: www.bosch-pt.com
The Bosch product use advice team will be happy to help you with any questions about our products and their accessories.
In all correspondence and spare parts orders, please always include the 10-digit article number given on the nameplate of the product.
India
Bosch Service Center
69, Habibullah Road, (Next to PSBB School), T. Nagar
Chennai - 600077
Phone: (044) 64561816
Bosch Service Center
18, Community Center
Phase 1, Mayapuri
New Delhi - 110064
Phone: (011) 43166190
Bosch Service Center
Shop no 7&8, Aspen garden
Walbhat road, Goregaon (E)
Near to Ram Mandir Railway Station
Mumbai - 400063
Mobile: 09819952950
22 | English
Malaysia
Robert Bosch Sdn. Bhd.(220975-V) PT/SMY
No. 8A, Jalan 13/6
46200 Petaling Jaya
Selangor
Tel.: (03) 79663194
Toll-Free: 1800 880188
Fax: (03) 79583838
E-Mail: kiathoe.chong@my.bosch.com
www.bosch-pt.com.my
Great Britain
Robert Bosch Ltd. (B.S.C.)
P.O. Box 98
Broadwater Park
North Orbital Road
Denham Uxbridge
UB 9 5HJ
At www.bosch-pt.co.uk you can order spare parts or arrange the collection of a product in need of servicing or repair.
Tel. Service: (0344) 7360109
E-Mail: boschservicecentre@bosch.com
Israel
Ledico Ltd.
31 Lazrov Street
P.O. Box 6018 Rishon Le Ziyon
service@ledico.com
Korea
You can find further service addresses at:
www.bosch-pt.com/serviceaddresses
Transport
The recommended lithium-ion batteries are subject to legislation on the transport of dangerous goods. The user can transport the batteries by road without further requirements.
When shipping by third parties (e.g.: by air transport or forwarding agency), special requirements on packaging and labelling must be observed. For preparation of the item being shipped, consulting an expert for hazardous material is required.
Dispatch battery packs only when the housing is undamaged. Tape or mask off open contacts and pack up the battery in such a manner that it cannot move around in the packaging. Please also observe the possibility of more detailed national regulations.
Disposal

Measuring tools, rechargeable/non-rechargeable batteries, accessories and packaging should be sorted for environmental-friendly recycling.
Do not dispose of the measuring tools or battery packs/batteries with household waste.
Only for EU countries:
According to the Directive 2012/19/EU on waste electrical and electronic equipment and its transposition into national law, measuring tools that are no longer usable, and, according to the Directive 2006/66/EC, defective or drained batteries must be collected separately and disposed of in an environmentally correct manner.
If disposed incorrectly, waste electrical and electronic equipment may have harmful effects on the environment and human health, due to the potential presence of hazardous substances.
Only for United Kingdom:
According to The Waste Electrical and Electronic Equipment Regulations 2013 (SI 2013/3113) (as amended) and the Waste Batteries and Accumulators Regulations 2009 (SI 2009/890) (as amended), products that are no longer usable must be collected separately and disposed of in an environmentally friendly manner.
Battery packs/batteries:
Li-ion:
Please observe the notes in the section on transport (see "Transport", page 22).
Français
Robert Bosch Morocco SARL
53, Rue Lieutenant Mahroud Mohamed
20300 Casablanca
Tel.: +212 5 29 31 43 27
E-Mail : sav.outillage@ma.bosch.com
France
Robert Bosch (France) S.A.S.
www.bosch-pt.com/serviceaddresses
Transport
Calle Robert Bosch No. 405
www.bosch-pt.com/serviceaddresses
Transporte
www.bosch-pt.com/serviceaddresses
Transporte
www.bosch-pt.com/serviceaddresses
Nakliye
www.bosch-pt.com/serviceaddresses
110 | Русский
Транспортировка
www.bosch-pt.com/serviceaddresses
Транспортування
www.bosch-pt.com/serviceaddresses
Тасымалдау
Uzbekistan, Uzbekistan, Uzbekistan, Uzbekistan, Uzbekistan, Uzbekistan, Uzbekistan, Uzbekistan, Uzbekistan, Uzbekistan, Uzbekistan, Uzbekistan, Uzbekistan, Uzbekistan, Uzbekistan, Uzbekistan, Uzbekistan, Uzbekistan, Uzbekistan, Uzbekistan, Uzbekistan, Uzbekistan, Uzbekistan, Uzbekistan, Uzbekistan, Uzbekistan, Uzbekistan, Uzbekistan, Uzbekistan, Uzbekistan, Uzbekistan, Uzbekistan, Uzbekistan, Uzbekistan,
- ΒΩΥΜΥΟΓΟΥΟΥΟΥΟΥΟΥΟΥΟΥΟΥΟΥΟΥΟΥΟΥΟΥΟΥΟΥΟΥΟΥΟΥΟΥΟΥΟΥΟΥΟΥΟΥΟΥΟΥΟΥΟΥΟΥΟΥΟΥΟΥΟΥΟΥΟΥΟΥΟΥΟΥΟΥΟΥΟΥΟΥΟΥΟΥΟΥΟΥΟΥΟΥΟΥΟΥΟΗ
Fig.6037: 12-14. The following table contains the text in the source image: "Fig.6037: 12-14. The following table contains the text in the source image: Fig.6037: 12-14. The following table contains the text in the source image: Fig.6037: 12-14.
www.bosch-pt.com
www.bosch-pt.com/serviceaddresses
www.bosch-pt.com/serviceaddresses
Транспорт
- Usmerite laser na bliski zid A i pustite da se merni alat niveliše. Označite sredinu tačke na kojoj se laserske linije na zidu ukrštaju (tačka I).
- Okrenite merni alat za 180°, pustite da se niveliše i označite tačku ukrštanja laserskih linija na suprotnom zidu B (tačka II).
- Stavite merni alat - bez okretanja - blizu zida B, uključite ga i pustite da se niveliše.

- Merni alat usmerite u vis tako (pomoću stativa ili po potrebi podmetanjem), da tačka ukrštanja laserskih linija tačno pogađa prethodno označenu tačku II na zidu B.
- Merni alat okrenite za 180°, a da ne pomerate visinu. Usmerite ga prema zidu A, tako da vertikalna laserska linija prolazi kroz već označenu tačku I. Pustite merni alat da se niveliše i označite tačku ukrštanja laserskih linija na zidu A (tačka III).
– Označite na 2,5 m udaljenosti od mernog alata na oba zida sredinu laserske linije (tačka I na zidu A i tačka II na zidu B).
- Postavite merni alat za 180° okrenut na 5 m udaljenosti i iznivelišite ga.
– Merni alat usmerite uvis tako (pomoću stativa ili po potrebi podmetanjem) da sredina laserske linije tačno pogađa prethodno označenu tačku II na zidu B.
– Označite na zidu A sredinu laserske linije kao tačku III (vertikalno iznad odn. ispod tačke I).
192 | Srpski
- Razlika d između obe označene tačke I i III na zidu A predstavlja stvarno odstupanje mernog alata od horizontale.
Na mernoj deonici od 2 × 5 m = 10 m maksimalno dozvoljeno odstupanje iznosi:
GLL 12-22: 10 m × ±0,8 mm/m = ±8 mm. Razlika d između tačaka I i III sme, prema tome, da iznosi maksimalno 8 mm.
GLL 12-22 G: 10 m × ±0,6 mm/m = ±6 mm. Razlika d između tačaka l i III sme, prema tome, da iznosi maksimalno 6 mm.
Provera preciznosti nivelisanja vertikalne linije
Za kontrolu potreban Vam je otvor od vrata, kod kojih (na čvrstoj zemlji) sa svake strane vrata ima najmanje 2,5 m prostora.
- Postavite merni alat na 2,5 m rastojanja od otvora vrata na čvrstu ravnu podlogu (ne na stativ). Okrenite merni alat na magnetnom obrtnom držaču (3) tako da otvor za izlaz lasera (1) bude slobodan. Uključite merni alat i pustite ga da se niveliše.
– Označite sredinu vertikalne laserske linije na podu otvora za vrata (tačka I), na razdaljini od 5 m od druge strane otvora za vrata (tačka II) kao i na gornjoj ivici otvora za vrata (tačka III).
– Postavite merni alat sa druge strane otvora vrata direktno iza tačke II. Sačekajte da se merni alat niveliše i vertikalnu lasersku liniju usmerite tako da njena sredina prolazi tačno kroz tačke I i II.
– Označite sredinu laserske linije na gornjoj ivici otvora za vrata kao tačku IV.
www.bosch-pt.com/serviceaddresses
Transport
Preporučeni litijum-jonski akumulatori podležu zahtevima propisa o opasnim materijama. Korisnik može bez dodatnih uslova transportovati akumulatore na drumu. Kod slanja preko trećih lica (na primer vazdušnih transportom ili špedicijom) mora se obratiti pažnja na posebne zahteve u pogledu pakovanja i označavanja. Tada se kod pripreme paketa za slanje mora pozvati stručnjak za opasne materije.
Akumulatorske baterije šaljite samo ako kućište nije oštećeno. Odlepite otvorene kontakte i upakujte akumulatorsku bateriju tako, da se ne pokreće u paketu. Molimo da obratite pažnju na eventualne dalje nationalne propise.
Uklanjanje dubreta

Merne alate, akumulatore/baterije, pribor i pakovanja treba predati na reciklažu koja je u skladu sa zaštitom životne sredine.
Merne alate i akumulatorske baterije/baterije nemojte bacati u kućni otpad!
Samo za EU-zemlje:
Prema evropskoj direktivi 2012/19/EU o starim električnim i elektronskim uređajima i njenoj primeni u nacionalnom pravu, merni alati koji se više ne mogu koristiti, a prema evropskoj direktivi 2006/66/EC akumulatori/baterije koje su u kvaru ili istrošene moraju se odvojeno sakupljati i uključiti u reciklažu koja ispunjava ekološke uslove.
www.bosch-pt.com/serviceaddresses
1 609 92A 8C4 | (05.07.2023) Bosch Power Tools
搬運
www.bosch-pt.com/serviceaddresses
224|한국어
운반
https://www.bosch-professional.com/ecodesign
IOI I I I I I I I I I I I I I I I I I I I I I I I I I I I I I I I I I I I
النقطة IV.
www.bosch-pt.com/serviceaddresses
240 | عربي
النقل
(b. هستند USB Implement
مشخصات فنى
GLL 12-22GLL 12-22 G
3 601 K65 2..3 601 K65 3..
ليزر خطى
شماره فنی
245 | فارسی
https://www.bosch-professional.com/ecodesign
کمک یک سهپایه یا-
نطه IV علامتگذاری-
کنید.
254 | فارسی
-abزار - اクトلاف واقعى
www.bosch-pt.com/serviceaddresses
عمل دستگاه
