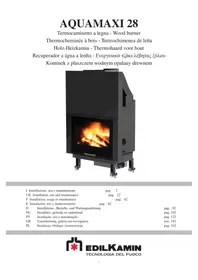
AQUAMAXI 28 - Fireplace EDILKAMIN - Free user manual and instructions
Find the device manual for free AQUAMAXI 28 EDILKAMIN in PDF.


| Product type | Wood-burning thermofireplace |
| Brand | Edilkamin |
| Model | AQUAMAXI 28 |
| Firebox dimensions (W x D x H) | 73 x 45 x 48 cm |
| Glass dimensions (W x H) | 85.5 x 61 cm |
| Adjustable leg height | Up to 12 cm |
| Weight with packaging | 490 kg |
| Useful thermal output | 32.5 kW |
| Nominal power | 26 kW |
| Nominal water power | 18 kW |
| Efficiency | 80 % |
| Maximum operating pressure | 1.5 bar |
| Water capacity | 90 litres |
| Heatable volume (indicative) | 680 m³ |
| Flue outlet diameter | 25 cm (female) |
| External air intake diameter | 10 cm |
| Power supply | 230 V / 50 Hz |
| Recommended fuel | Dry wood (beech, oak, hornbeam, birch) |
| Main functions | Water heating (radiators, underfloor heating) and cooking |
| Maintenance and cleaning | Cleaning the glass with suitable spray when cold, annual flue sweeping |
| Safety devices | Overheating acoustic alarm, safety valve pressure 1.5 bar, thermal relief valve |
| Spare parts and repairability | Replaceable refractory bricks, screen-printed glass, removable sliding guides |
Frequently Asked Questions - AQUAMAXI 28 EDILKAMIN
User questions about AQUAMAXI 28 EDILKAMIN
0 question about this device. Answer the ones you know or ask your own.
Ask a new question about this device
Download the instructions for your Fireplace in PDF format for free! Find your manual AQUAMAXI 28 - EDILKAMIN and take your electronic device back in hand. On this page are published all the documents necessary for the use of your device. AQUAMAXI 28 by EDILKAMIN.
USER MANUAL AQUAMAXI 28 EDILKAMIN
natural_image
Exterior view of a black industrial stove with visible flames and wheels (no text or symbols)UK Installation, use and maintenance
F Installation, usage et maintenance
natural_image
Cross-sectional diagram of a modern industrial furnace with visible flames and cooling pipes (no text or symbols)natural_image
Technical illustration of a mechanical device with labeled components and a close-up inset showing a cable or wire connection (no text or symbols present)INSTALLAZIONE
CANNA FUMARIA E COMIGNOLO
Regolazione aria
natural_image
Illustration of a door with a handle and directional arrow, labeled 'fig. 5' (no text or symbols on the door itself)Smontaggio cielino
line
| Q | H | H min | H max | |------|-------|-------|-------| | 0 | High | Low | High | | 1 | Mid | Low | High | | 2 | Low | Low | Low | | 3 | Low | Low | Low | | 4 | Low | Low | Low | | 5 | Low | Low | Low | | 6 | Low | Low | Low | | 7 | Low | Low | Low | | 8 | Low | Low | Low | | 9 | Low | Low | Low | | 10 | Low | Low | Low | | 11 | Low | Low | Low | | 12 | Low | Low | Low | | 13 | Low | Low | Low | | 14 | Low | Low | Low | | 15 | Low | Low | Low | | 16 | Low | Low | Low | | 17 | Low | Low | Low | | 18 | Low | Low | Low | | 19 | Low | Low | Low | | 20 | Low | Low | Low | | 21 | Low | Low | Low | | 22 | Low | Low | Low | | 23 | Low | Low | Low | | 24 | Low | Low | Low | | 25 | Low | Low | Low | | 26 | Low | Low | Low | | 27 | Low | Low | Low | | 28 | Low | Low | Low | | 29 | Low | Low | Low | | 30 | Low | Low | Low | | 31 | Low | Low | Low | | 32 | Low | Low | Low | | 33 | Low | Low | Low | | 34 | Low | Low | Low | | 35 | Low | Low | Low | | 36 | Low | Low | Low | | 37 | Low | Low | Low | | 38 | Low | Low | Low | | 39 | Low | Low | Low | | 40 | High | High | High | | 41 | High | High | High | | 42 | High | High | High | | 43 | High | High | High | | 44 | High | High | High | | 45 | High | High | High | | 46 | High | High | High | | 47 | High | High | High | | 48 | High | High | High | | 49 | High | High | High | | 50+ | High | High | High | | Q = (various) for each category: H, H max, Hs, H min; Q ranges fromQ.
portata volumetrica
natural_image
Circular red and green gradient button with control icons above (no text or symbols)line
| Q | H | H_max | H_s | ½H_s | H_min | |------|-------|-------|-------|-------|-------| | 0 | High | High | High | High | High | | 1.5 | Low | Low | Low | Low | Low |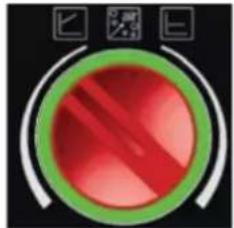
natural_image
Circular graphic with red and green concentric rings, no text or symbols presentportata volumetrica
natural_image
Black industrial vacuum cleaner with attached hose and control panel (no visible text or symbols)Bidone aspiracenere
The undersigned EDILKAMIN S.p.a. with head offi ce headquarters at Via Vincenzo Monti 47 - 20122 Milano - Italy - VAT 0192220192
Declares under its own responsibility as follows: The wood Thermo Fireplaces illustrated below conforms to Regulation EU 305/2011 (CPR) and to the harmonised European Standard EN 13229:2001 - A1:2003 - A2:2004 - AC:2006 - AC:2007
THE WOOD THERMO FIREPLACES, trademark EDILKAMIN, called AQUAMAXI 28
YEAR OF MANUFACTURE: Ref. Data nameplate Declaration of performance (DoP - EK 108) Ref. Data nameplate
EDILKAMIN S.p.a. will decline all responsibility of malfunctioning or damage to the equipment in case of unauthorized substitution, assembly or modifications of any sort on the said equipment on the part of non-EDILKAMIN personnel.
Dear Sir/Madam
Congratulations and thank you for choosing our product.
Please read this document carefully before you use this product in order to obtain the best performance in complete safety.
For further details or assistance, please contact the DEALER where you purchased the product or visit our website www.edilkamin.com. and click on DEALERS.
Please note that a qualified dealer MUST install the fireplace as is stipulated in the Italian Ministerial Decree No. 37 ex Italian Law No. 46/90.
For installations implemented outside Italy, please refer to the local regulations in the country of use.
NOTE
- After having unpacked the boiler-fireplace, ensure that its contents are complete and intact (“cold hand” handle, guarantee booklet, glove, technical data sheet/CD).
In case of anomalies please contact the dealer where you purchased the product immediately.
You will need to present a copy of the warranty booklet and valid proof of purchase.
Installation/Testing
In Italy, installation must be carried out accordance with standard UNI 10683. The installer must issue a Declaration of Conformity in accordance with standard UNI 10683 for the fume part and conforming to UNI 10412 for the hydraulic part.
Note: Test the product before fitting the coverings.
- Commissioning/ testing
Commissioning, as specified in standard UNI 10683 consists in a series inspections to be performed with the boiler-fireplace installed in order to ascertain the correct operation of the system and its compliance to applicable regulations.
- Incorrect installation, incorrect maintenance, or improper use of the product, shall relieve the manufacturer from any damage resulting from the use of this product.
- the proof of purchase tag, necessary for identifying the boiler-fireplace, is located:
- on the top of the package
- in the warranty booklet found inside the fi rebox
- on the ID plate affixed to the back side of the unit;
THE THERMO FIREPLACE MUST NEVER BE MADE TO OPERATE WITHOUT WATER IN THE SYSTEM.
IT CAN BE DAMAGED IF IT IS IGNITED WITH NO WATER IN THE SYSTEM.
MUST BE MADE WITH A PRESSURE OF ABOUT 1.5 BAR.
- The appliance is not designed to be used by people, including children, with reduced physical, sensorial or mental abilities.
- The principal risks that can be derived from the use of the fi replace unit are associated with incorrect installation, direct contact with flames and hot parts (glass, pipes), the introduction of foreign substances, use of non-recommended fuels, or incorrect maintenance (do not touch without special gloves).
- For correct operation, the installation must be performed respecting the information included in this document.
- Only use wood as fuel.
- Under no circumstances should any foreign substances be put into the hearth or the hopper.
NEVER use liquid fuel to ignite the thermo fireplace or rekindle the embers.
- Do not use fl ammable products to clean the smoke channel (the flue section connecting the thermo fireplace smoke outlet to the chimney fl ue).
- The glass can be cleaned when COLD with a suitable product and a cloth. The ash should be vacuumed.
- Do not lay laundry directly on the thermo fireplace to dry. Any clothes horse or similar must be placed at a safe distance from the thermo fireplace (danger of fire).
- Whilst the thermo fireplace is in operation, the exhaust pipes and door become very hot (do not touch without using the right gloves).
- Do not obstruct the ventilation apertures in the room where the thermo fireplacee is installed, nor the air inlets of the thermo fi replace itself.
- Do not wet the thermo fireplace and do not go near electrical parts with wet hands.
-
Use appropriate anti-freeze additives for the water of the system.
-
The product is supplied with two anti-corrosion discs (one on the outside and one on the inside of the combustion chamber). They must be removed during unpacking and disposed of as normal waste.
- In the event that the water used for filling and topping up has a hardness greater than 35^ , use a water softener. For suggestions please refer to regulation UNI 8065-1989 (Water Treatment In Heating Systems For Civil Use).
- Important: only thermo fireplaces with coils driven by a thermal relief valve should be installed on closed tank systems (one or two-coil version).
- The discharge of the safety valve must be accessible and visible.
The discharge water must be channelled into a vertical pipe using a funnel with backflow air intakes, appropriately spaced from the discharge point.
The conveying pipe must have the following characteristics:
- Must not originate more than 50 cm from the discharge of the valve and must be positioned in the same room where the KIT is positioned.
- Must have a vertical expansion of not less than 30 cm.
After which the pipe can continue horizontally with a gradient that fosters the flow of water.
- The diameter of the pipe must be at least one measurement larger than the nominal measurement of the discharge of the valve.
The end of the pipe must discharge into the sewer system.
IT IS FORBIDDEN TO SHUT OFF THE DISCHARGE
IMPORTANT!!!
In the case of a fire in the thermo fireplace, in the flue or in the chimney, proceed as follows:
- Disconnect the power supply
- Use a carbon dioxide (CO _2 ) extinguisher
- Call the fi re brigade
DO NOT ATTEMPT TO PUT THE FIRE OUT WITH WATER!
After the event, have the appliance checked by an authorised Service Centre and have an authorised technician check the fl ue.
SAFETY INFORMATION
IN CASE OF INSTALLATION ON OPEN TANK SYSTEMS
The connections, start-up and check of proper operation must be carried out by qualified personnel,
able to make the connections in accordance with current law and, in Italy:
1 - The correct installation of the system is the responsibility of the installer, who should take into account the standards UNI 10683 - EN 13384-1 - UNI 10412-2
2 - Everything must be carried out by qualified personnel according to Ministerial Decree 37, pursuant to Law 46/1990
3 - The safety and heat discharge valves should be checked at least once a year by qualified personnel
Ministerial Decree 37, pursuant to Law 46/1990.
For installations implemented outside Italy, please refer to the local regulations in the country of use.
The thermo fireplace and the system are filled with water that flows from the water inlet pipe (the diameter must not be less than 18 mm) to the open expansion tank.
All the vents of the radiators must be opened during this phase so as to prevent air pockets from forming in the system, which would obstruct the circulation of water.
NB:
- The open tank should be positioned at a height greater than 3m higher than the highest component of the primary circuit and less than 15m from the edge of the thermo fireplace.
- In any case, the tank must be high enough to create a greater pressure than that produced by the pump (circulator).
- The system must never be filled directly from the water mains as the pressure may be greater than that stipulated on the data plate of the thermo fireplace, with resulting damage to the thermo fi replace itself.
- The safety pipe to the expansion tank must allow the water to flow freely without shut-off valves and be appropriately insulated to prevent the water inside from freezing, which would compromise the connection.
- The water inlet pipe must not have taps nor curves.
- The maximum operating pressure must not exceed 1.5 bar
• The testing pressure is 3 bar. - It is a good idea to add an anti-freeze liquid to the water contained in the system or to observe standard UNI 8065.
- Never ignite the fire in the thermo fireplace (not even as a test) unless the system is filled with water as this could cause irreparable damage.
- Connect the drains of the thermal relief valve (TRV) and the safety valve (SV) (diagrams are found on the following pages).
- The flow test of the system must be carried out with the expansion tank open.
- It is recommended to install a 6 bar safety valve on the hot sanitary water circuit so as to drain any excessive increase in the volume of the water in the heat exchanger.
- Place all the components of the system (circulator, heat exchanger, valves, etc.) in easily accessible points for routine and special maintenance procedures.
WATER TREATMENT
If need be, antifreeze, descaling and anticorrosive solutions are to be added to the water.
A softener must be used if the hardness of the water used to refi ll and top-up the system exceeds 35^ f (French degrees).
IN CASE OF INSTALLATION ON CLOSED TANK SYSTEMS
(provisions in addition to those provided for open tank systems)
- The one or two-coil versions of the fireplace unit can be installed on closed-tank systems IF the coil is used only for cooling by connecting it to the optional heat discharge valve (see Fig. 1).
- Be careful not to exceed 1.5 bar when filling the system.
- Only if a thermal relief valve actuates the coil can the fi replace be installed on a CLOSED TANK system (version marked with the abbreviation CS).
- When connecting a thermo fireplace to an existing system, an assessment must be made regarding a need for another CLOSED TANK on the system.
- The upstream pressure of the cooling circuit must be at least 1.5 bar (UNI 10412/2 point 6.2).
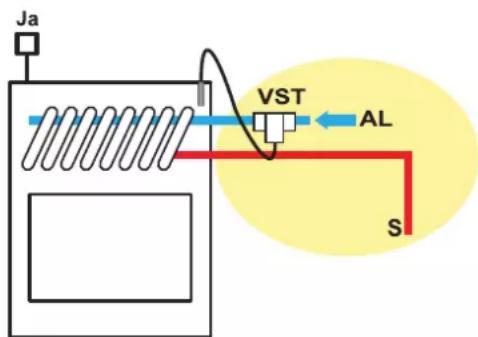
The thermal relief valve (TRV - provided by Edilkamin) must be connected to the cooling circuit (AL) with a minimum pressure of 1.5 bar.
$$ \mathrm{JA} = \text { automatic relief valve } $$
$$ S = \text { d r a i n } $$
Fig. 1
Please refer to UNI 8065-1989 standard (water treatment in domestic heating systems).
GENERAL INFORMATION
AQUAMAXI is designed for heating water and cooking by burning wood in the combustion chamber.
The water contained in the thermo fireplace is heated and sent into the heating system (radiators, heated towel rails, underfloor heating panels) and also heats the room in which it is located via natural convection radiation.
The thermo fi replace MUST NEVER FUNCTION WITHOUT WATER IN THE SYSTEM.
The water is heated by circulating in the cavity that touches all the walls of the combustion chamber and the upper boiler.
The cavity is made of sheet steel and the inner lining of the combustion chamber is made of very thick refractory bricks suitable for cooking, and easily replaced.
The hearth is closed in the front by a door (silk-screen printed glass) that slides up and down and side to side for cleaning the glass.
AQUAMAXI is available in the following versions:
- with single coil
- with double coil
- with single coil, with open-tank hydraulic kit and built-in electronic control unit (left or right)
Each coil can be used for:
1) the production of domestic hot water; pay attention to the water hardness, can cause limescale deposits)
2) the separation of the primary circuit from the secondary circuit.
3) a closed-tank installation with optional valve

natural_image
Cross-sectional diagram of a portable stove with visible flames and cooling pipes (no text or symbols)GENERAL INFORMATION
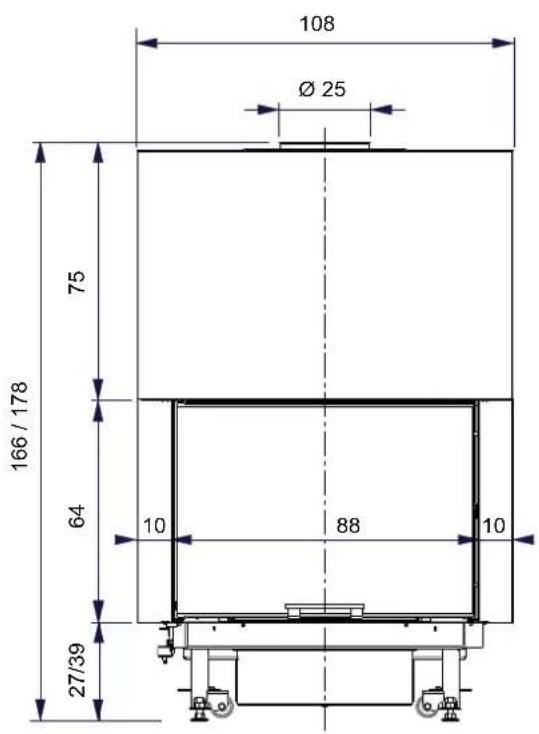
- combustion chamber dimensions cm 73 x 45 x 48 h
- glass dimensions cm 85,5 x 61 h
- adjustable feet with a height of 12 cm max
FRONT SIDE
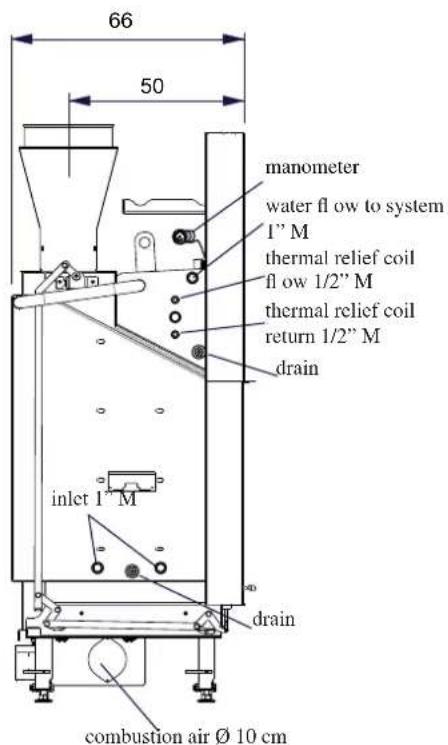
SYSTEM
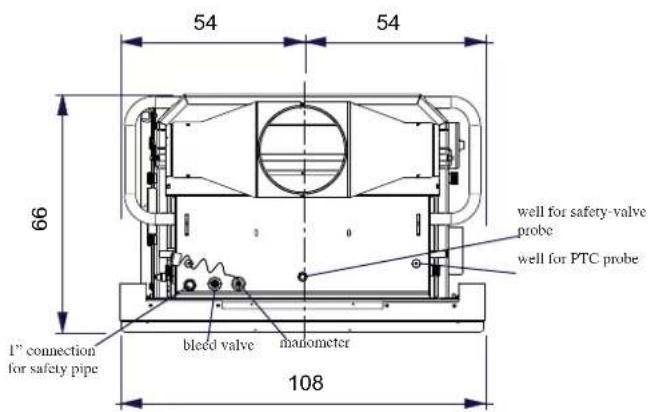
GENERAL INFORMATION
| THERMO TECHNICAL CHARACTERISTICS according to EN 13229 | ||
| Thermal power output 32,5 kW | ||
| Rated power | 26 | kW |
| Water heating power 18 kW | ||
| Thermal power transferred to the environment | 8 | kW |
| Yield / Efficiency | 80 | % |
| Emissions CO 13% O_2 | 0,194 | % |
| Fume temperature | 243 | °C |
| Draught | 12 | Pa |
| Fuel consumption | 7,1 | kg/h |
| Maximum operating pressure | 1,5 | bar |
| Temperatura massima d'esercizio | 90 | °C |
| Water capacity | 90 litres | |
| System return (male) | 1" | inches |
| System flow (male) | 1" | inches |
| Heating capacity * | 680 | m^3 |
| ø female smoke outlet (H min. 4 mt) | 25 | cm |
| ø external air inlet | 10 | cm |
| Weight including packing | 490 kg | |
| TECHNICAL DATA FOR SIZING THE FLUE which must, in any case, comply with the guidelines of this sheet and the installation rules for each product | ||
| Thermal power output 26 kW | ||
| Temperature of fumes on exit from the discharge pipe 292 °C | ||
| Minimum draught 6 P | a | |
| Fume flow capacity 28,2 g/s | ||
N.B.: DATA PROJECT (Refer to standard EN 13229)
* The heatable room dimensions are calculated on the basis home insulation in compliance with Italian law 10/91, and subsequent changes together with an expected heat output of 33Kcal / m^3 per hour.
* It is also important to consider the position of the boiler-fireplace in the room to be heated.
** boiler temperature is 70° - (δT=25K)
The data shown above is purely indicative.
EDILKAMIN s.p.a. reserves the right to change the products at its discretion without notice.
N.B.
- Any unauthorised modification is forbidden
- Use spare parts recommended by the manufacturer
- The use of counterfeit parts results in the guarantee becoming null and void
• CERTIFICATIONS AND BENEFITS \*
* Given their variability over time in the various countries, check from time to time. This text is valid for the year this sheet was prepared (see edition details on the last page).
ITALY: allowed in Lombardy pursuant to DGR No. 1118-2013 allowed in the Marche region pursuant to Regional Law No. 3 of 2012 admitted to the Conto Termico (renewable heating incentive) admitted to a 50% deduction; 65% (check the conditions of external accessibility to the product)
FRANCE: enrolled in Flamme Verte
CZECH REPUBLIC: admitted to NEW GREEN SAVE PROGRAMME and in accordance with the Directives of the Ministry of the Environment No. 9-2013
INSTALLATION
IMPORTANT ADVICE
In addition to the contents of this document, please take into consideration the regulations of the various countries, for example, in Italy:
- No. 10683 - firewood heat generators: installation requirements
- No. 10412:2 - hot water heating systems.
Specific safety requirements for systems provided with residential solid fuel burning appliances and combined boiler, not exceeding a total nominal heat input of 35 kW.
Particularly:
- Before carrying out any assembly it is important to verify compatibility of the appliance, as stipulated in UNI 10683 standard, paragraphs 4.1 / 4.1.1 / 4.1.2.
- When assembly is completed, the installer must implement "start-up operations" and issue documentation as required by UNI 10683 standard in paragraphs 4.6 and 5, respectively.
- The connections, commissioning and verification of proper operation of the thermo fireplace must be carried out by qualified personnel, who can implement the electrical and plumbing connections as required by UNI standards 10683, paragraph 4.5 and 10412:2, apart from complying with these assembly instructions.
- Verification must be carried out with the fireplace on and after having been on for a couple of hours, before covering the thermo fi replace, so that you can intervene if need be. After which, the fi nishing operations such as:
- setting-up the fi replace mantel
- mounting the fi replace covering
- pilasters, painting, etc.
are carried out, once the tests are completed successfully.
Consequently, EDILKAMIN does not accept responsibility for expenses deriving from demolition as well as construction even if either occurs as a result, after having replaced any damaged parts of the thermo fi replace.
The fireplace unit must only be installed on floors with adequate load-bearing capacity.
Otherwise, appropriate countermeasures should be taken (such as a load-plate).
- The appliance should not be used as an incinerator and should not be used with fuels other than wood.
VERIFY COMPATIBILITY WITH OTHER DEVICES
The thermo fireplace MUST NOT be installed in the same space as type B gas heating equipment (e.g. gas boilers, stoves, and equipment served by an extraction hood - ref. UNI 10683 and 7129).
In general, the thermo fireplace could create low pressure in the room, affecting the operation of such appliances or being affected by them.
SAFETY DISTANCES (Fig. 1)
The distances indicated are the minimum required safety distances from structures made of combustible materials or any other combustible components.
MINIMUM SAFETY DISTANCES FROM FLAMMABLE MATERIALS
$$ L = 2 0 0 \mathrm{mm} $$
$$ R = 2 0 0 \mathrm{mm} $$
$$ B = 1 0 0 \mathrm{mm} $$
$$ F = 1 2 0 0 \mathrm{mm} $$
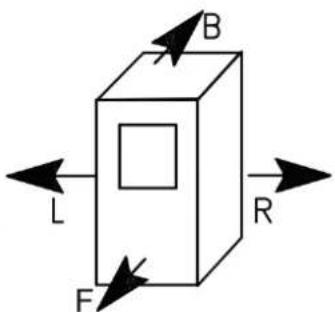
Fig. 1
EXTERNAL AIR INLET
An external connection with a 10 cm diameter crosssection throughout (refer to the technical table) is absolutely necessary for the thermo fi replace to function properly and is therefore imperative for this to be implemented.
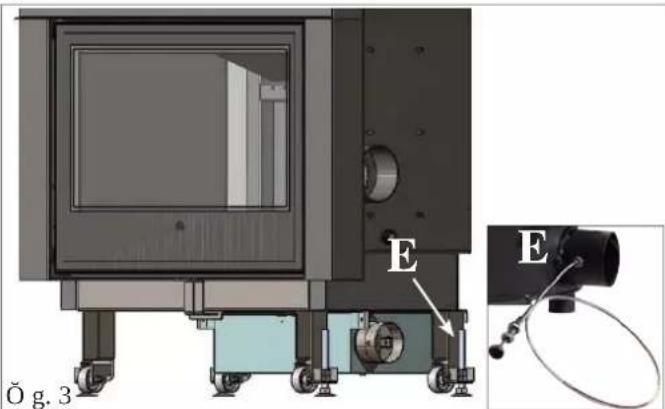
This connection must link the air adjustment mechanism (E), delivered separately.
The mechanism, delivered separately, may be fitted on the left, right or rear of the fi replace unit.
Connection can be made with a flexible aluminium pipe.
Ensure that the points where there may be dispersion of air are sealed well.
The air adjustment mechanism (E) can be removed and mounted on the right side of the thermo fi replace.
It is recommended to place a protection grille on the outer part of the air inlet channel, however, ensure that this does not reduce the cross-section.
For distances longer than 3 m or with bends, increase the given cross-section by a minimum of 10% to a maximum of 20%.
The intake of external air must enter at floor level (it cannot enter from above).
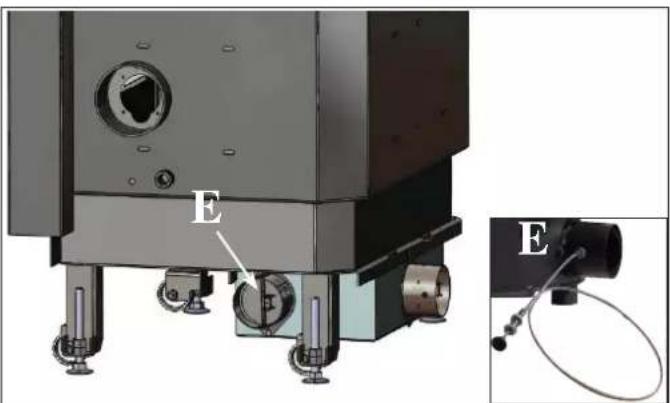
natural_image
Mechanical device with labeled component E, shown from two views (no text or symbols on the device itself)INSTALLATION
CHIMNEY FLUES AND CHIMNEYPOT
The thermo fireplace smoke outlet has a circular crosssection so that stainless steel pipes can be used. If the chimney flue inlet is not vertically above the thermo fireplace, the connection from the fireplace to the flue must not have a narrowing section or inclinations greater than 45^ (fi g. 1-2-3-4).
The fireplace unit must not be connected to a shared flue.
The fume section must be inspectable and installed in such a way that it can be cleaned (use inspectable TEEs).
If the chimney flue is not brand new or too big, it is recommended to fit in stainless tubes of an appropriate diameter and with suitable insulation.
If the chimney flue is installed outside, it is recommended to use an insulated, double walled, stainless steel flue.
The characteristics of the construction must be suitable to withstand a smoke temperature of at least 450^ C, with particular reference to the mechanical resistance, insulation and the gas tight scaling.
The flue must be certified under EN 1856.
The junction of the steel flue inlet and the smoke outlet of the fi replace must be sealed with high temperature mastic.
Have qualified personnel clean the flue once a year.
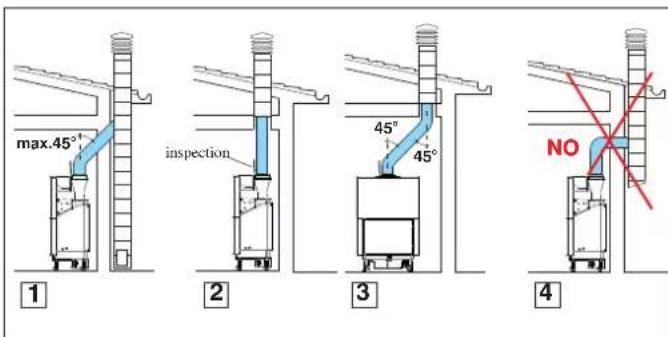
The fundamental characteristics of the chimneypot are:
- an internal cross-section at the base, which is the same as that of the chimney fl ue.
- an outlet cross-section which is no smaller than twice that of the chimney fl ue.
- its position must be high enough to catch the wind and avoid downdraft areas in turbulent wind.
In addition to that mentioned above, please consider the indications stipulated in UNI 10683/2005 standard, paragraph 4.2: “connection to the smoke outlet system” and its subsections.
INSTALLATION COVERING, FIREPLACE MANTEL
If combining with a pre-fabricated Edilkamin covering, to define the exact positioning of the thermo fireplace, it is important to take the chosen covering model into consideration.
The positioning is implemented according to the model chosen (refer to the installation instructions found inside the packaging of each thermo fi replace covering).
Always ensure the thermo fireplace is level during the installation process.
- Drill a hole into the wall or the flooring for the external air intake and connect the air adjustment mechanism to the hole as described in the chapter called “external air inlet”.
- Use a stainless steel flue to connect the thermo fireplace to the chimney flue, adhering with the diameters indicated in the specifications table and the guidelines given in the chapter called "chimney flues".
- Verify that all moving parts function properly before setting the thermo fi replace covering in place.
- This system must be tested and ignited for the first time before the covering is set in place.
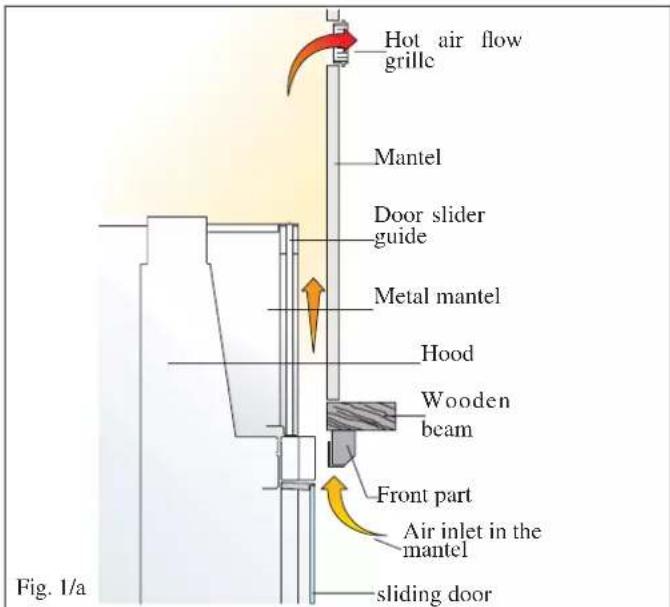
The base of the thermo fireplace covering must allow the internal air to be recycled. Therefore, suitable slots or apertures must be made for the air to pass through. Parts of the thermo fi replace covering that are made of marble, stone and bricks must be mounted with a small gap between them and the fire-place so as to prevent possible breakage due to expansion and excessive overheating.
Protect wooden parts with fi reproof materials.
Fireproof parts of the covering (beams or frames) must not be in contact with the fireplace unit but must be at least 1-2 cm away to allow a flow of air that prevents heat accumulation (see Fig. 1/a).
The housing compartment must be made of masonry or fireproof materials and must not have combustible elements inside.
The fireplace mantel can be made of fireproof plasterboard panels or gypsum board and, however, of completely fi reproof material. Air should be allowed to flow inside the fireplace mantel (through the gap between the door and the beam).
Through convective motion, the air will flow out from the grille installed at the top, resulting in heat recovery and preventing excessive overheating (See Fig. 1/a).
The fireplace mantel must have appropriate openings to carry out maintenance on the fittings.
In addition to that mentioned above, please consider the indications stipulated in the UNI 10683 standard, paragraphs 4.4 and 4.7: “insulation, finishing, fireplace covering and safety recommendations”.
Insulating mats must be applied when using an installation KIT so as to protect it from the heat radiation emitted by the thermo fi replace.
INSTALLATION
EXPANSION TANK
The expansion tank absorbs volumes accumulations of water once it is heated.
The closed expansion tank is a vessel with a membrane inside that can absorb up to a certain increase in volume of water.
The installer is responsible for properly sizing the closed expansion tank based on the water content.
The fireplace unit can be operated with a closed tank ONLY if one of the coils is connected to a heat discharge valve as shown in the following diagrams.
The open expansion tank positioned above absorbs the variation in water volume and provides the hydraulic system with the pressure necessary to prevent air from entering.
We recommend that it be placed at least 3 metres above the highest element of the circuit.
A lower position can cause frequent “backflows” in the expansion tank with risks for the functioning and life of the fireplace unit, so it is important that the installer carefully assess this height.
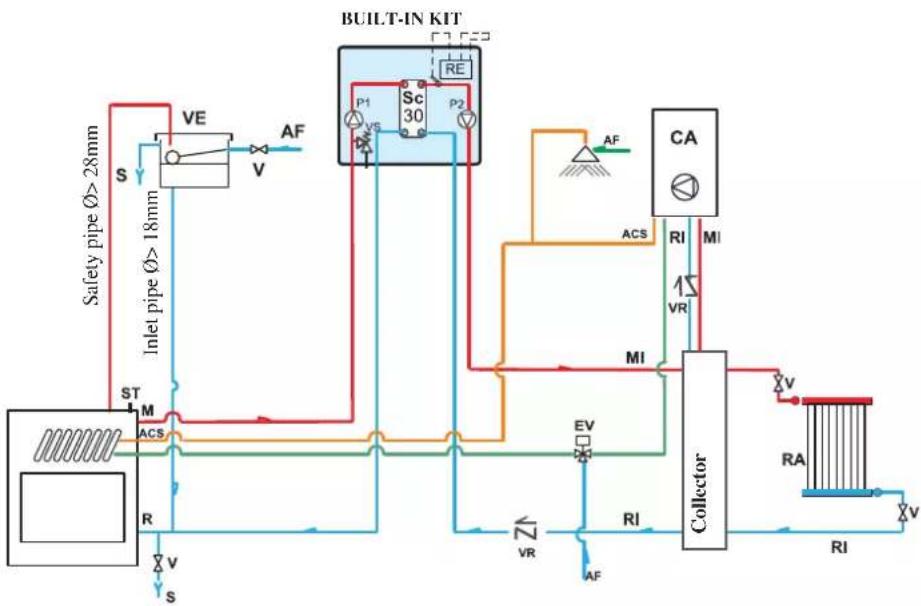
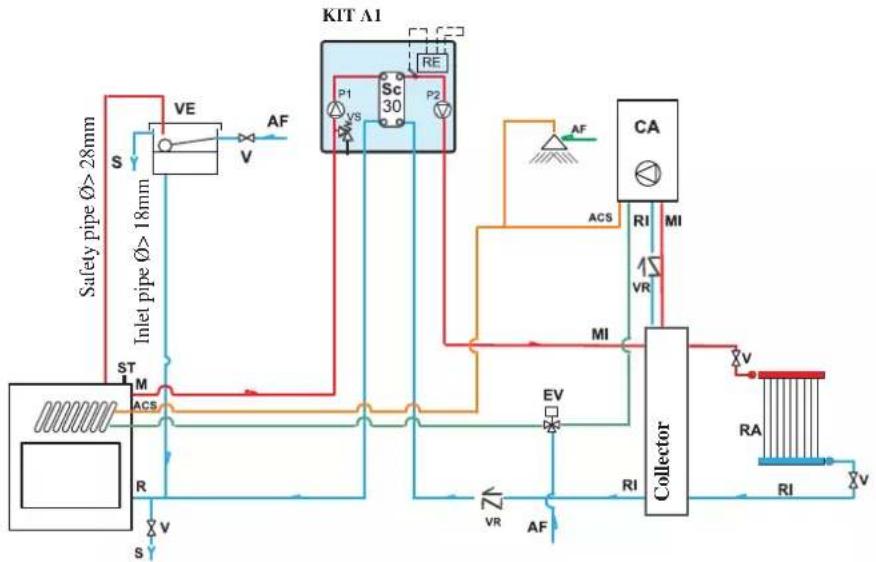
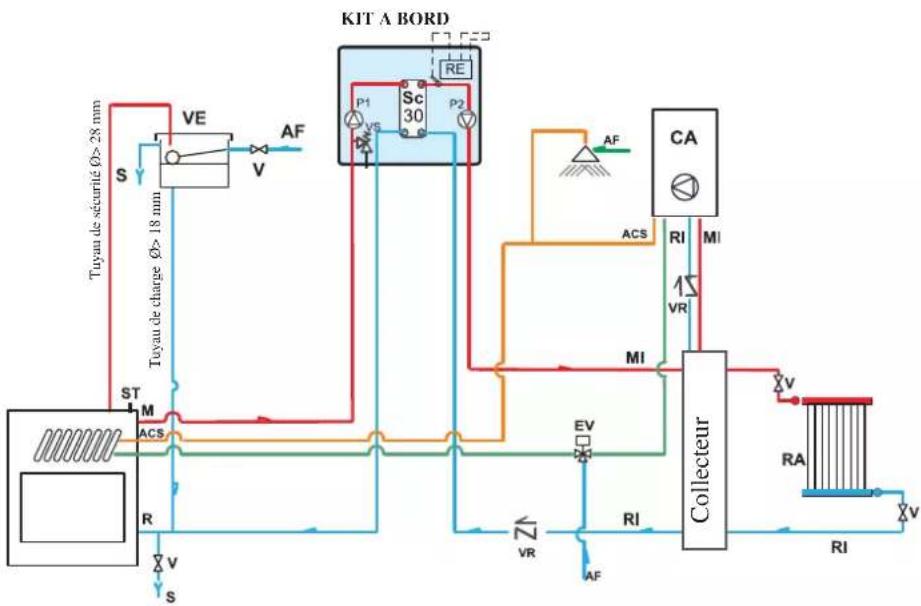
EXAMPLE OF A HYDRAULIC SYSTEM FOR OPEN-TANK FIREPLACE UNIT, COMBINED WITH A GAS BOILER. PRODUCTION OF DOMESTIC HOT WATER WITH COIL.
ACQUAMAXI WITH 1 COIL WITH BUILT-IN HYDRAULIC KIT (LEFT OR RIGHT)
flowchart
graph TD
    A["Safety pipe Ø>28mm"] --> B["VE"]
    B --> C["AF"]
    C --> D["SC 30"]
    D --> E["P1"]
    D --> F["P2"]
    E --> G["RE"]
    F --> H["CA"]
    G --> I["ACS"]
    H --> J["MI"]
    I --> K["Collector"]
    J --> L["RA"]
    K --> M["RI"]
    L --> N["V"]
    M --> O["V"]
    P["Inlet pipe Ø>18mm"] --> Q["S"]
    Q --> R["ST"]
    R --> S["M"]
    S --> T["ACS"]
    T --> U["R"]
    U --> V["S"]
    V --> W["v"]
    W --> X["VR"]
    X --> Y["AF"]
    Y --> Z["ZT"]
    Z --> AA["RI"]
    AA --> AB["RA"]
    AB --> AC["V"]
ACS: Hot Sanitary Water
AF: Cold Water
CA: Wall Mounted Boiler
EV: 3-way Solenoid Valve
NA: Normally Open
NC: Normally Closed
Ja: Automatic Relief Valve
Jm: Manual Relief Valve
MAN: Manometer
MI: System Flov
P: Pump (circulator)
P2: Secondary circuit pump
P1: Circuit pump
RA: Radiators
RE: Electronic Regulator
RI: System Return
S: Drain
Sc 30: 30-plate Heat Exchanger
ST: Temperature Sensor
TC: Thermo Fireplace
V: Valve
VE: Open Expansion Tank
Vec: Closed Expansion Tank
VR: Check Valve
VSP: 1.5 bar Pressurized Safety Valve
VST: Thermal Relief Valve
BUILT-IN KIT
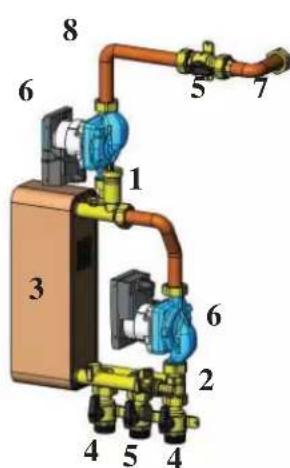
1 Upper header
2 Lower header
3 Heat
4 Ball valve
5 Ball valve
6 Electronic
7 Pipe 1 primary output
8 Pipe 2 primary output
9 Secondary heating pipe
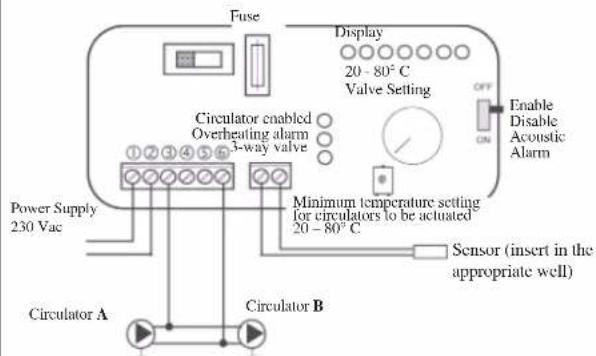
Electrical Connections
SELECTOR FUNCTIONS
Selector: OFF
Everything is switched off
Selector: MAN
Driven Circulator Valve is set
Selector: AUTO
Circulator is set Valve is set
Alarm selection
No acoustic signal in the OFF position
INSTALLATION
EXAMPLE OF A HYDRAULIC SYSTEM FOR OPEN-TANK FIREPLACE UNIT, COMBINED WITH A GAS BOILER. PRODUCTION OF DOMESTIC HOT WATER WITH COIL.
ACQUAMAXI WITH 1 COIL
flowchart
graph TD
    A["Safety pipe Ø > 28mm"] --> B["Inlet pipe Ø > 18mm"]
    B --> C["VE"]
    C --> D["AF"]
    D --> E["SC 30"]
    E --> F["P1 VS"]
    E --> G["P2"]
    E --> H["RE"]
    H --> I["CA"]
    I --> J["RI"]
    I --> K["MI"]
    K --> L["Collector"]
    L --> M["V"]
    L --> N["RA"]
    L --> O["RI"]
    L --> P["V"]
    Q["ST M"] --> R["ACS"]
    R --> S["R"]
    S --> T["S"]
    U["AV"] --> V["VR"]
    W["AF"] --> X["ACS"]
    Y["MI"] --> Z["Collector"]
    AA["EV"] --> AB["Collector"]
    AC["VR"] --> AD["Collector"]
    AE["AF"] --> AF["Collector"]
Kit is designed to facilitate the work carried out by the installers. In fact, it consists of all the necessary components for the product to be properly installed. NB: insulating mats must be applied so that the components of the kit are well-protected from the heat radiation emitted by the thermo-fi replace.
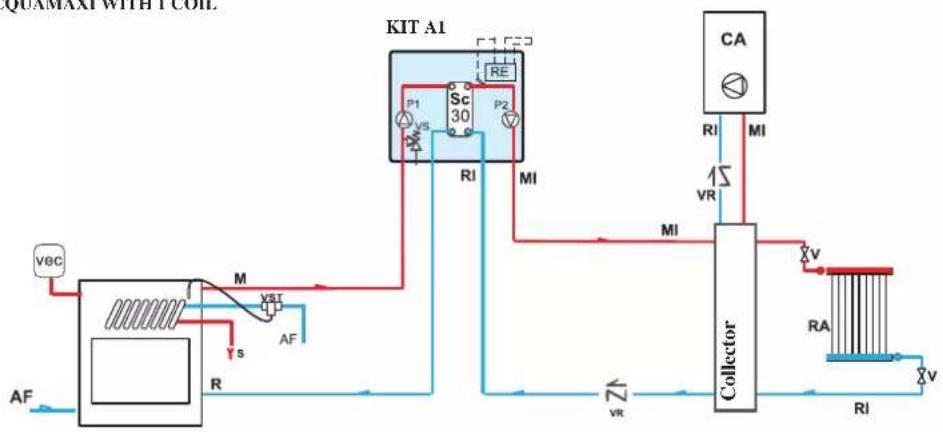
EXAMPLE OF A HYDRAULIC SYSTEM FOR CLOSED-TANK FIREPLACE UNIT WITH COIL, COMBINED WITH A GAS BOILER.
ACQUAMAXI WITH 1 COIL
flowchart
graph TD
    A["VEC"] --> B["Block with M, VST, AF"]
    B --> C["R"]
    C --> D["SI/O"]
    D --> E["RI"]
    E --> F["Collector"]
    F --> G["RA"]
    G --> H["VI"]
    H --> I["RF"]
    I --> J["MI"]
    J --> K["CA"]
    K --> L["RI"]
    L --> M["MI"]
    M --> N["Collector"]
    N --> O["V"]
    O --> P["RF"]
    P --> Q["MI"]
    Q --> R["Collector"]
    R --> S["V"]
    S --> T["RF"]
    T --> U["MI"]
    U --> V["Collector"]
    V --> W["V"]
    W --> X["RF"]
    X --> Y["MI"]
    Y --> Z["Collector"]
    Z --> AA["V"]
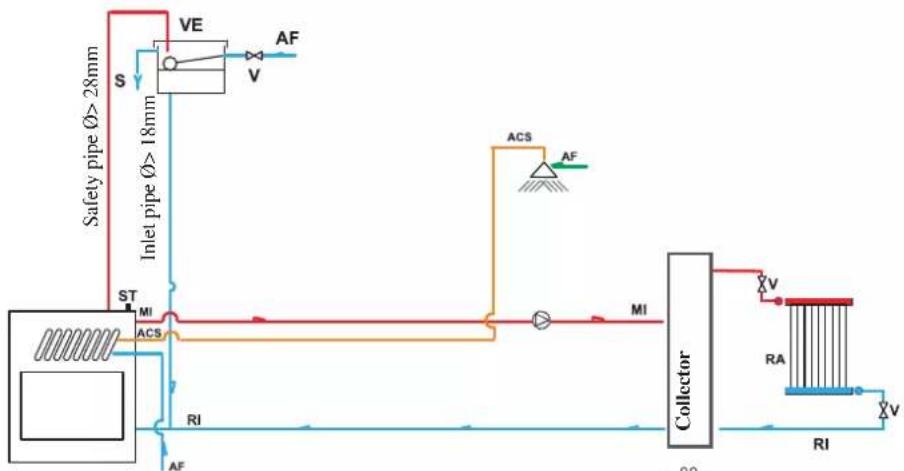
EXAMPLE OF A HYDRAULIC SYSTEM FOR OPEN-TANK FIREPLACE UNIT AS THE SINGLE SOURCE OF HEAT. PRODUCTION OF DOMESTIC HOT WATER WITH COIL.
ACQUAMAXI WITH 1 COIL
flowchart
graph TD
    A["Safety pipe Ø>28mm"] --> B["Inlet pipe Ø>18mm"]
    B --> C["VE"]
    C --> D["AF"]
    B --> E["ACS"]
    E --> F["ACS"]
    F --> G["Collector"]
    G --> H["RA"]
    H --> I["RI"]
    I --> J["RF"]
    B --> K["ST"]
    B --> L["MI"]
    B --> M["ACS"]
    M --> N["RI"]
    N --> O["RF"]
    style A fill:#f9f,stroke:#333
    style B fill:#ccf,stroke:#333
    style G fill:#cfc,stroke:#333
    style H fill:#fcc,stroke:#333
    style I fill:#cff,stroke:#333
ACS: Hot Sanitary Water
AF: Cold Water
CA: Wall Mounted Boiler
EV: 3-way Solenoid Valve
NA: Normally Open
NC: Normally Closed
Ja: Automatic Relief Valve
Jm: Manual Relief Valve
MAN: Manometer
MI: System Flow
P: Pump (circulator)
P2: Secondary circuit pump
P1: Circuit pump
RA: Radiators
RE: Electronic Regulator
RI: System Return
S: Drain
Sc 30: 30-plate Heat Exchanger
ST: Temperature Sensor
TC: Thermo Fireplace
V: Valve
VE: Open Expansion Tank
Vec: Closed Expansion Tank
VR: Check Valve
VSP: 1.5 bar Pressurized Safety Valve
VST: Thermal Relief Valve
INSTALLATION
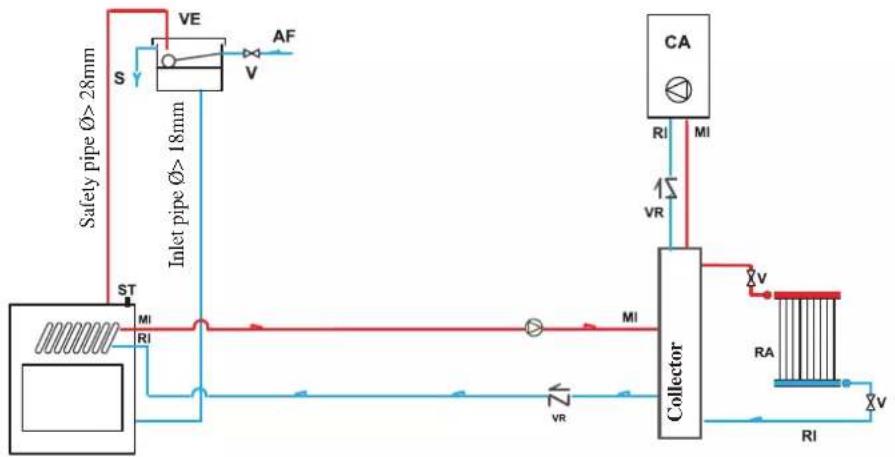
EXAMPLE OF A HYDRAULIC SYSTEM FOR OPEN-TANK FIREPLACE UNIT, COMBINED WITH A GAS BOILER. COIL FOR SYSTEM SEPARATION.
ACQUAMAXI WITH 1 COIL
flowchart
graph TD
    A["Safety pipe Ø>28mm"] --> B["Inlet pipe Ø>18mm"]
    B --> C["VE"]
    C --> D["AF"]
    B --> E["MI"]
    E --> F["Collector"]
    F --> G["RA"]
    G --> H["RI"]
    H --> I["V"]
    F --> J["MI"]
    J --> K["VR"]
    K --> L["VA"]
    style A fill:#f9f,stroke:#333
    style B fill:#ccf,stroke:#333
    style F fill:#cfc,stroke:#333
    style G fill:#fcc,stroke:#333
    style H fill:#cff,stroke:#333
EXAMPLE OF A HYDRAULIC SYSTEM FOR CLOSED-TANK FIREPLACE UNIT WITH COIL. COMBINED WITH A GAS BOILER.
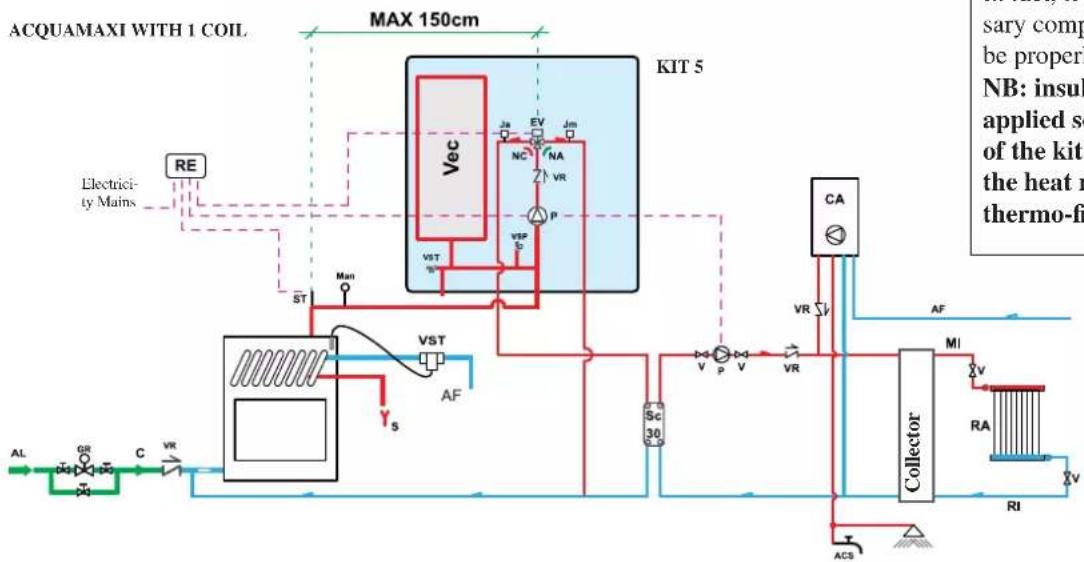
flowchart
graph TD
    A["ACQUAMAXI WITH 1 COIL"] --> B["Electricity Mains"]
    B --> C["RE"]
    C --> D["Max 150cm"]
    D --> E["VEc"]
    E --> F["VA"]
    F --> G["VA"]
    G --> H["VA"]
    H --> I["VA"]
    I --> J["VA"]
    J --> K["VA"]
    K --> L["VA"]
    L --> M["VA"]
    M --> N["VA"]
    N --> O["VA"]
    O --> P["VA"]
    P --> Q["VA"]
    Q --> R["VA"]
    R --> S["VA"]
    S --> T["VA"]
    T --> U["VA"]
    U --> V["VA"]
    V --> W["VA"]
    W --> X["VA"]
    X --> Y["VA"]
    Y --> Z["VA"]
    Z --> AA["VA"]
    AA --> AB["VA"]
    AB --> AC["VA"]
    AC --> AD["VA"]
    AD --> AE["VA"]
    AE --> AF["VA"]
    AF --> AG["VA"]
    AG --> AH["VA"]
    AH --> AI["VA"]
    AI --> AJ["VA"]
    AJ --> AK["VA"]
    AK --> AL["VA"]
    AL --> AM["VA"]
    AM --> AN["VA"]
    AN --> AO["VA"]
    AO --> AP["VA"]
    AP --> AQ["VA"]
    AQ --> AR["VA"]
    AR --> AS["VA"]
    AS --> AT["VA"]
    AT --> AU["VA"]
    AU --> AV["VA"]
    AV --> AW["VA"]
    AW --> AX["VA"]
    AX --> AY["VA"]
    AY --> AZ["VA"]
    AZ --> BA["VA"]
    BA --> BB["VA"]
    BB --> BC["VA"]
    BC --> BD["VA"]
    BD --> BE["VA"]
    BE --> BF["VA"]
    BF --> BG["VA"]
    BG --> BH["VA"]
    BH --> BI["VA"]
    BI --> BJ["VA"]
    BJ --> BK["VA"]
    BK --> BL["VA"]
    BL --> BM["VA"]
    BM --> BN["VA"]
    BN --> BO["VA"]
    BO --> BP["VA"]
    BP --> BQ["VA"]
    BQ --> BR["VA"]
    BR --> BS["VA"]
    BS --> BT["VA"]
    BT --> BU["VA"]
    BU --> BV["VA"]
    BV --> BW["VA"]
    BW --> BX["VA"]
    BX --> BY["VA"]
    BY --> BZ["VA"]
Kit is designed to facilitate the work carried out by the installers. In fact, it consists of all the necessary components for the product to be properly installed.
NB: insulating mats must be applied so that the components of the kit are well-protected from the heat radiation emitted by the thermo-fi replace.
EXAMPLE OF A HYDRAULIC SYSTEM FOR CLOSED-TANK FIREPLACE UNIT WITH COIL, COMBINED WITH A GAS BOILER, SYSTEM SEPARATION AND PRODUCTION OF DOMESTIC HOT WATER WITH KIT D
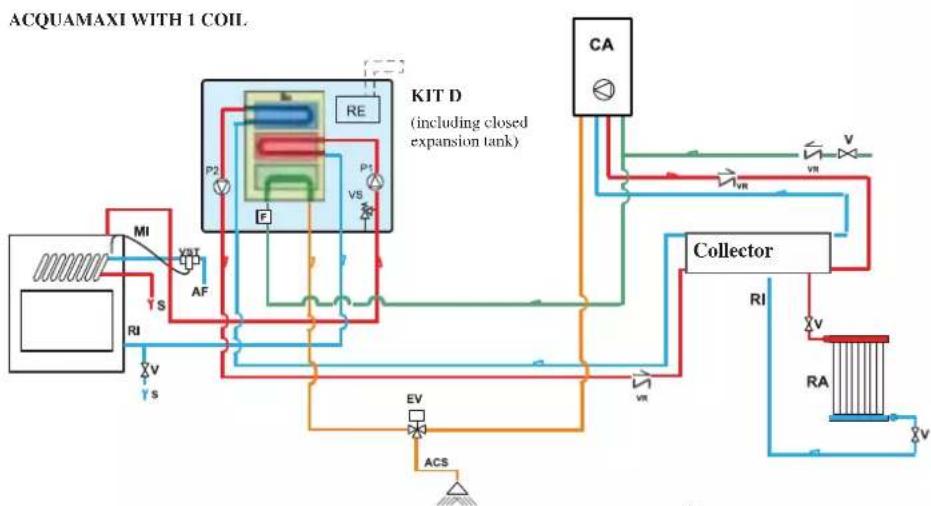
flowchart
graph TD
    A["ACQUAMAXI WITH 1 COIL"] --> B["RE"]
    B --> C["F"]
    C --> D["PI"]
    D --> E["VS"]
    E --> F["PA"]
    F --> G["CA"]
    G --> H["Collector"]
    H --> I["RA"]
    I --> J["VA"]
    J --> K["VA"]
    K --> L["VA"]
    L --> M["VA"]
    M --> N["VA"]
    N --> O["VA"]
    O --> P["VA"]
    P --> Q["VA"]
    Q --> R["VA"]
    R --> S["VA"]
    S --> T["VA"]
    T --> U["VA"]
    U --> V["VA"]
    V --> W["VA"]
    W --> X["VA"]
    X --> Y["VA"]
    Y --> Z["VA"]
    Z --> AA["VA"]
    AA --> AB["VA"]
    AB --> AC["VA"]
    AC --> AD["VA"]
    AD --> AE["VA"]
    AE --> AF["VA"]
    AF --> AG["VA"]
    AG --> AH["VA"]
    AH --> AI["VA"]
    AI --> AJ["VA"]
    AJ --> AK["VA"]
    AK --> AL["VA"]
    AL --> AM["VA"]
    AM --> AN["VA"]
    AN --> AO["VA"]
    AO --> AP["VA"]
    AP --> AQ["VA"]
    AQ --> AR["VA"]
    AR --> AS["VA"]
    AS --> AT["VA"]
    AT --> AU["VA"]
    AU --> AV["VA"]
    AV --> AW["VA"]
    AW --> AX["VA"]
    AX --> AY["VA"]
    AY --> AZ["VA"]
    AZ --> BA["VA"]
    BA --> BB["VA"]
    BB --> BC["VA"]
    BC --> BD["VA"]
    BD --> BE["VA"]
    BE --> BF["VA"]
    BF --> BG["VA"]
    BG --> BH["VA"]
    BH --> BI["VA"]
    BI --> BJ["VA"]
    BJ --> BK["VA"]
    BK --> BL["VA"]
    BL --> BM["VA"]
    BM --> BN["VA"]
    BN --> BO["VA"]
    BO --> BP["VA"]
    BP --> BQ["VA"]
    BQ --> BR["VA"]
    BR --> BS["VA"]
    BS --> BT["VA"]
    BT --> BU["VA"]
    BU --> BV["VA"]
    BV --> BW["VA"]
    BW --> BX["VA"]
    BX --> BY["VA"]
    BY --> BZ["VA"]
ACS: Hot Sanitary Water
AF: Cold Water
CA: Wall Mounted Boiler
EV: 3-way Solenoid Valve
NA: Normally Ope
NC: Normally Closed
Ja: Automatic Relief Valve
Jm: Manual Relief Valve
MAN: Manometer
MI: System Flow
P: Pump (circulator)
P2: Secondary circuit pump
P1: Circuit pump
RA: Radiators
RE: Electronic Regulator
RI: System Return
S: Drain
Sc 30: 30-plate Heat Exchanger
ST: Temperature Sensor
TC: Thermo Fireplace
V: Valve
VE: Open Expansion Tank
Vec: Closed Expansion Tank
VR: Check Valve
VSP: 1.5 bar Pressurized Safety Valve
VST: Thermal Relief Valve
INSTALLATION
EXAMPLE OF A HYDRAULIC SYSTEM FOR CLOSED-TANK FIREPLACE UNIT WITH COIL, COMBINED WITH A GAS BOILER, SYSTEM SEPARATION THROUGH SECOND COIL.
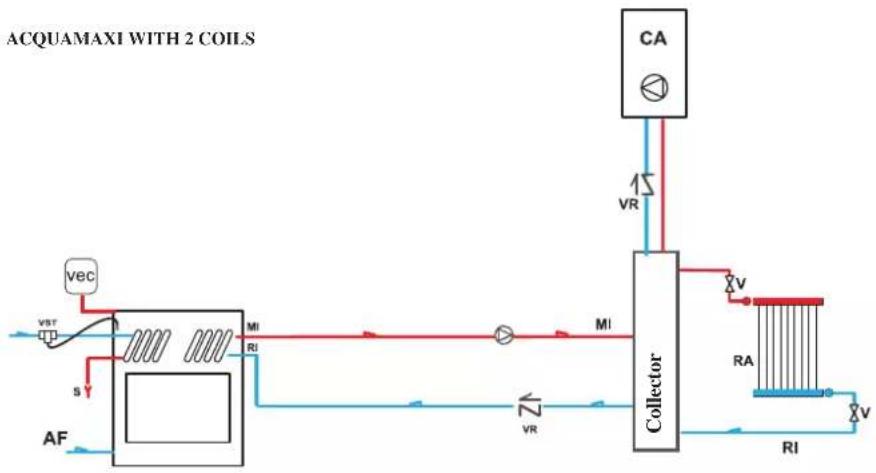
flowchart
graph LR
    A["ACQUAMAXI WITH 2 COILS"] --> B["Collector"]
    B --> C["RA"]
    B --> D["RI"]
    B --> E["VA"]
    B --> F["VR"]
    B --> G["MI"]
    B --> H["VI"]
    B --> I["RC"]
    J["vec"] --> K["RF"]
    K --> L["SI"]
    L --> M["RF"]
    M --> N["SI"]
    N --> O["RF"]
    O --> P["SI"]
    P --> Q["RF"]
    R["CA"] --> S["Valve"]
    S --> T["Valve"]
    T --> U["Valve"]
    U --> V["Valve"]
    V --> W["Valve"]
    X["V"] --> Y["Valve"]
    Y --> Z["Valve"]
    Z --> AA["Valve"]
EXAMPLE OF A HYDRAULIC SYSTEM FOR CLOSED-TANK FIREPLACE UNIT WITH COIL, COMBINED WITH A GAS BOILER. PRODUCTION OF DOMESTIC HOT WATER WITH SECOND COIL
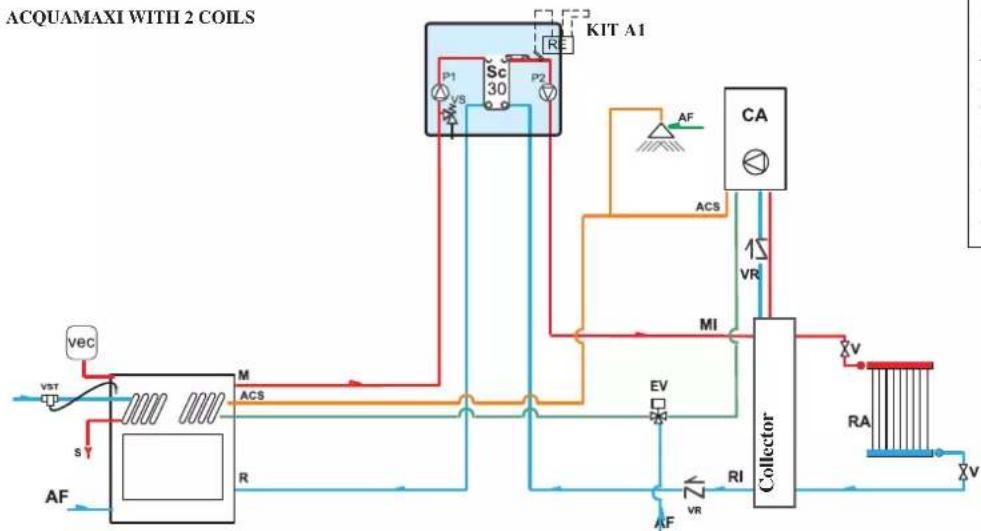
flowchart
graph TD
    A["ACQUAMAXI WITH 2 COILS"] --> B["SCR"]
    B --> C["KE"]
    C --> D["CA"]
    D --> E["Collector"]
    E --> F["RA"]
    F --> G["V"]
    H["VEC"] --> I["M"]
    I --> J["ACS"]
    J --> K["MI"]
    K --> L["CV"]
    M["S"] --> N["R"]
    O["AF"] --> P["RC"]
    Q["P1"] --> R["VS"]
    S["P2"] --> T["RE"]
    U["ACS"] --> V["VR"]
    W["AV"] --> X["VI"]
    Y["RF"] --> Z["VR"]
    AA["EV"] --> AB["RC"]
    AC["RI"] --> AD["VA"]
    AE["VST"] --> AF["RC"]
    AG["KIT A1"] --> AH["RE"]
    AI["VA"] --> AJ["VR"]
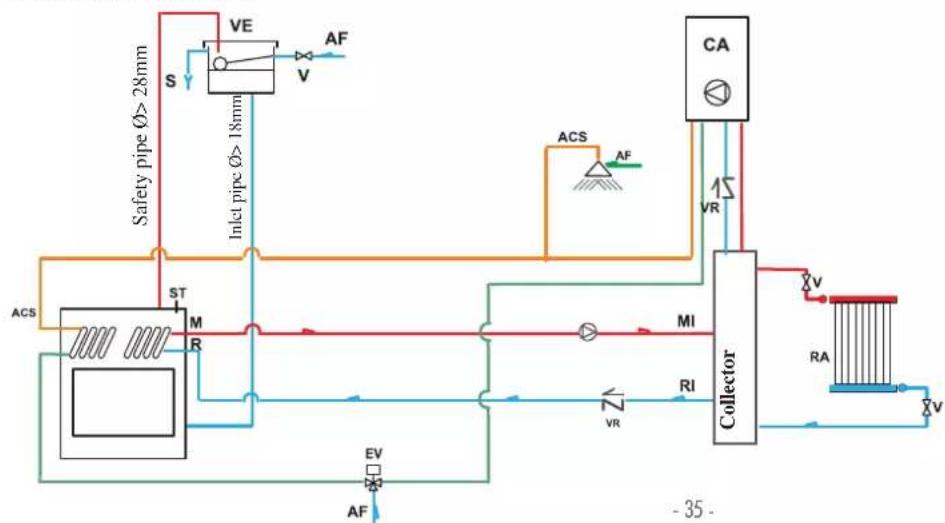
EXAMPLE OF A HYDRAULIC SYSTEM FOR OPEN-TANK FIREPLACE UNIT COMBINED WITH A GAS BOILER. PRODUCTION OF DOMESTIC HOT WATER WITH COIL AND SYSTEM SEPARATION WITH SECOND COIL.
ACQUAMAXI WITH 2 COILS
flowchart
graph TD
    A["Safety pipe Ø > 28mm"] --> B["VE"]
    B --> C["V"]
    C --> D["Inlet pipe Ø > 18mm"]
    D --> E["ACS"]
    E --> F["Collector"]
    F --> G["RA"]
    G --> H["V"]
    H --> I["ACS"]
    I --> J["St M R"]
    J --> K["ACS"]
    K --> L["ACS"]
    L --> M["ACS"]
    M --> N["ACS"]
    N --> O["ACS"]
    O --> P["ACS"]
    P --> Q["ACS"]
    Q --> R["ACS"]
    R --> S["ACS"]
    S --> T["ACS"]
    T --> U["ACS"]
    U --> V["ACS"]
    V --> W["ACS"]
    W --> X["ACS"]
    X --> Y["ACS"]
    Y --> Z["ACS"]
    Z --> AA["ACS"]
    AA --> AB["ACS"]
    AB --> AC["ACS"]
    AC --> AD["ACS"]
    AD --> AE["ACS"]
    AE --> AF["ACS"]
    AF --> AG["ACS"]
    AG --> AH["ACS"]
    AH --> AI["ACS"]
    AI --> AJ["ACS"]
    AJ --> AK["ACS"]
    AK --> AL["ACS"]
    AL --> AM["ACS"]
    AM --> AN["ACS"]
    AN --> AO["ACS"]
    AO --> AP["ACS"]
    AP --> AQ["ACS"]
    AQ --> AR["ACS"]
    AR --> AS["ACS"]
    AS --> AT["ACS"]
    AT --> AU["ACS"]
    AU --> AV["ACS"]
    AV --> AW["ACS"]
    AW --> AX["ACS"]
    AX --> AY["ACS"]
    AY --> AZ["ACS"]
    AZ --> BA["ACS"]
    BA --> BB["ACS"]
    BB --> BC["ACS"]
    BC --> BD["ACS"]
    BD --> BE["ACS"]
    BE --> BF["ACS"]
    BF --> BG["ACS"]
    BG --> BH["ACS"]
    BH --> BI["ACS"]
    BI --> BJ["ACS"]
    BJ --> BK["ACS"]
    BK --> BL["ACS"]
    BL --> BM["ACS"]
    BM --> BN["ACS"]
    BN --> BO["ACS"]
    BO --> BP["ACS"]
    BP --> BQ["ACS"]
    BQ --> BR["ACS"]
    BR --> BS["ACS"]
    BS --> BT["ACS"]
    BT --> BU["ACS"]
    BU --> BV["ACS"]
    BV --> BW["ACS"]
    BW --> BX["ACS"]
    BX --> BY["ACS"]
    BY --> BZ["ACS"]
    BZ --> CA["ACS"]
    CA --> CB["ACS"]
    CB --> CC["ACS"]
    CC --> CD["ACS"]
    CD --> CE["ACS"]
    CE --> CF["ACS"]
    CF --> CG["ACS"]
    CG --> CH["ACS"]
    CH --> CI["ACS"]
    CI --> CJ["ACS"]
    CJ --> CK["ACS"]
    CK --> CR["ACS"]
    CR --> CS["ACS"]
    CS --> CT["ACS"]
    CT --> CU["ACS"]
    CU --> CV["ACS"]
    CV --> CW["ACS"]
    CW --> CX["ACS"]
    CX --> CY["ACS"]
    CY --> CZ["ACS"]
Kit is designed to facilitate the work carried out by the installers. In fact, it consists of all the necessary components for the product to be properly installed.
NB: insulating mats must be applied so that the components of the kit are well-protected from the heat radiation emitted by the thermo-fi replace.
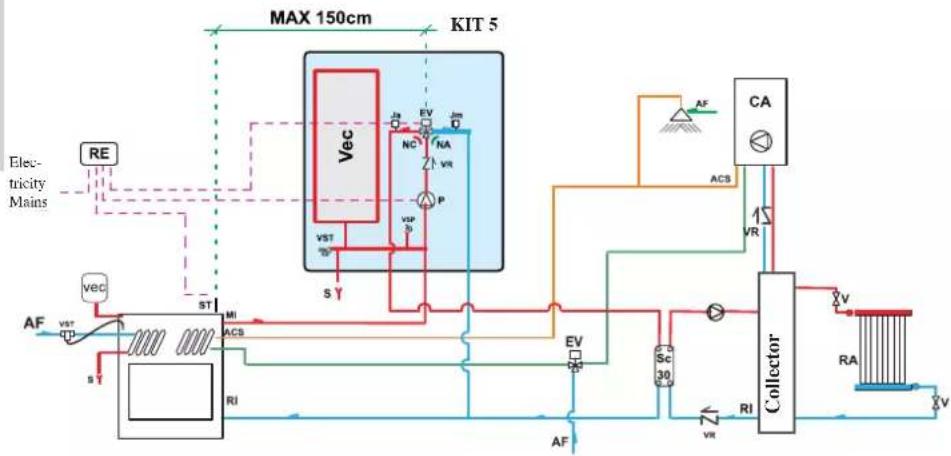
ACS: Hot Sanitary Water
AF: Cold Water
CA: Wall Mounted Boiler
EV: 3-way Solenoid Valve
NA: Normally Open
NC: Normally Closed
Ja: Automatic Relief Valve
Jm: Manual Relief Valve
MAN: Manometer
MI: System Flow
P: Pump (circulator)
P2: Secondary circuit pump
P1: Circuit pump
RA: Radiators
RE: Electronic Regulator
RI: System Return
S: Drain
Sc 30: 30-plate Heat Exchanger
ST: Temperature Sensor
TC: Thermo Fireplace
V: Valve
VE: Open Expansion Tank
Vec: Closed Expansion Tank
VR: Check Valve
VSP: 1.5 bar Pressurized Safety Valve
VST: Thermal Relief Valve
INSTALLATION
EXAMPLE OF A HYDRAULIC SYSTEM FOR CLOSED-TANK FIREPLACE UNIT WITH COIL, COMBINED WITH A GAS BOILER. PRODUCTION OF DOMESTIC HOT WATER WITH SECOND COIL.
ACQUAMAXI WITH 2 COILS
flowchart
graph TD
    A["Electricity Mains"] --> B["RE"]
    B --> C["Max 150cm"]
    C --> D["KIT 5"]
    D --> E["CA"]
    E --> F["Collector"]
    F --> G["RA"]
    G --> H["V"]
    F --> I["ACS"]
    F --> J["VR"]
    F --> K["SA"]
    F --> L["SC"]
    F --> M["RI"]
    F --> N["RF"]
    F --> O["PI"]
    F --> P["ACS"]
    F --> Q["VR"]
    F --> R["PI"]
    F --> S["SA"]
    F --> T["RC"]
    F --> U["VR"]
    F --> V["PI"]
    F --> W["SA"]
    F --> X["RC"]
    F --> Y["VR"]
    F --> Z["PI"]
    F --> AA["SA"]
    F --> AB["RC"]
    F --> AC["VR"]
    F --> AD["PI"]
    F --> AE["SA"]
    F --> AF["RC"]
    F --> AG["VR"]
    F --> AH["PI"]
    F --> AI["SA"]
    F --> AJ["RC"]
    F --> AK["VR"]
    F --> AL["PI"]
    F --> AM["SA"]
    F --> AN["RC"]
    F --> AO["VR"]
    F --> AP["PI"]
    F --> AQ["SA"]
    F --> AR["RC"]
    F --> AS["VR"]
    F --> AT["PI"]
Kit 1 is designed to facilitate the work carried out by the installers. In fact, it consists of all the necessary components for the product to be properly installed.
NB: insulating mats must be applied so that the components of the kit are well-protected from the heat radiation emitted by the thermo-fi replace.
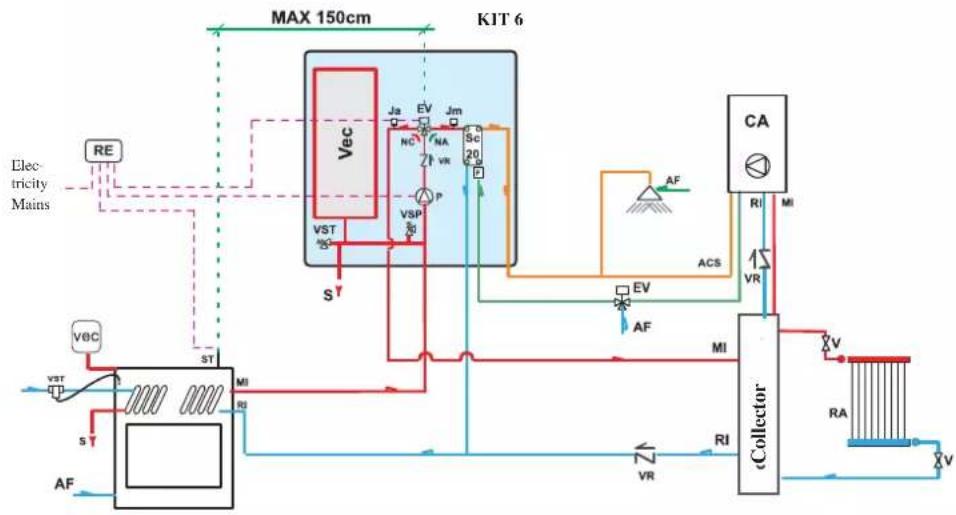
EXAMPLE OF A HYDRAULIC SYSTEM FOR CLOSED-TANK FIREPLACE UNIT WITH COIL, COMBINED WITH A GAS BOILER. SYSTEM SEPARATION WITH SECOND COIL AND PRODUCTION OF DOMESTIC HOT WATER WITH KIT 6
ACQUAMAXI WITH 2 COILS
flowchart
graph TD
    A["RE"] --> B["Max 150cm"]
    B --> C["VEC"]
    C --> D["Ja EV Jm"]
    D --> E["Sc 20"]
    E --> F["VSP"]
    F --> G["VST"]
    G --> H["S"]
    H --> I["Collector"]
    I --> J["RA"]
    J --> K["V"]
    L["VEC"] --> M["St"]
    N["VECT"] --> O["St"]
    P["ACS"] --> Q["VR"]
    R["AF"] --> S["ACS"]
    T["MI"] --> U["Collector"]
    V["VR"] --> W["Collector"]
    X["VA"] --> Y["Collector"]
    Z["VA"] --> AA["Collector"]
ACS: Hot Sanitary Water
AF: Cold Water
CA: Wall Mounted Boiler
EV: 3-way Solenoid Valve
NA: Normally Open
NC: Normally Closed
Ja: Automatic Relief Valve
Jm: Manual Relief Valve
MAN: Manometer
MI: System Flow
P: Pump (circulator)
P2: Secondary circuit pump
P1: Circuit pump
RA: Radiators
RE: Electronic Regulator
RI: System Return
S: Drain
Sc 30: 30-plate Heat Exchanger
ST: Temperature Sensor
TC: Thermo Fireplace
V: Valve
VE: Open Expansion Tank
Vec: Closed Expansion Tank
VR: Check Valve
VSP: 1.5 bar Pressurized Safety Valve
VST: Thermal Relief Valve
ELECTRONIC REGULATOR
IMPORTANT ADVICE REGARDING THE INSTALLATION
The connections, commissioning and verification of proper operation of the fireplace must be carried out by qualified personnel, who can implement all connections in accordance with the laws in force, particularly with Italian Law No. 46/90, apart from complying with these instructions.
Compliance with regulations regarding the earth connection is fundamental for the safety of people.
It is obligatory to install a differential circuit breaker switch before the device and the entire electrical circuit of the thermo fi replace.
It is also obligatory to connect the pump, valve and metal parts of the thermo fi replace to an earthing system.
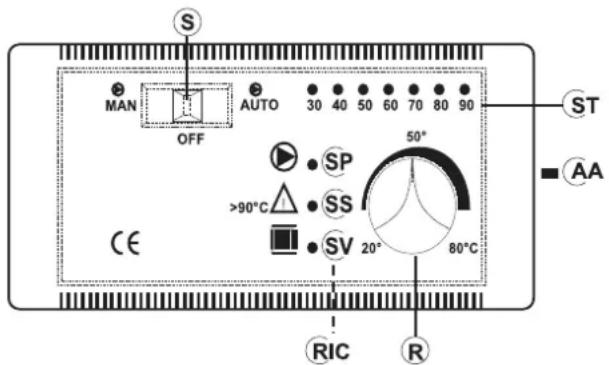
LEGEND
AA acoustic alarm switch
R way valve opening setting (KITS 1-3)
R circulators operation setting (KIT 2)
RIC internal pump setting
S MAN-OFF-AUTO selector
SP pump light
SS overheating light
ST temperature scale
SV 3-way valves light (KITS 1-3)
SV circulators setting (KIT 2)
| TECHNICAL DATA | |
| Power Supply (+15 – 10%) Vac 230 | |
| Degree of protection IP 40 | |
| Min/Max Room Temperature °C 0÷+50 | |
| Sensor range mt 1,2 | |
| Thermometer | °C 30÷90 |
| Maximum contact rating of the circulator | W 400 |
| Maximum contact rating of the 3-way valve | W 250 |
| Fuse | mA 500 |
The electric control regulator allows you to monitor the operating conditions and is equipped with:
- MAN-OFF-AUTO selector (S)
- temperature scale (ST)
- acoustic alarm (AA)
- 3-way valve opening setting (R) (KIT1-3)
- circulators operation setting (R) (KIT2)
- internal pump setting (RIC)
- 3-way valve light (SV) (KIT1-KIT3)
- circulators setting light (SV) (KIT2)
- overheating pump (SS)
- pump light (SP)
OPERATION
- Control device:
- Thermometer
- Protection device (acoustic alarm system):
• Acoustic alarm (AA)
• Overheating alarm (SS)
This system intervenes when the water temperature exceeds 90^ C and warns the user to stop adding fuel.
The acoustic alarm can be disabled from the switch (AA).
However, the alarm remains enabled by means of the overheating light (SS). To restore the initial settings, the switch (AA) must be enabled after the water temperature in the thermo fi replace has cooled down.
Power supply device (circulation system):
• MAN-OFF-AUTO selector (S)
- Pump light (SP)
The pump remains on when in manual mode and off when in OFF mode. When in AUTO mode, the pump is activated by the system when the desired temperature is reached, by means of the internal setting (RIC), which ranges from 20 to 80°C (this is pre-set at 20°C).
- Operation device (setting system):
• 3-way valve opening setting (R)
• 3-way valve operating light (SV)
When the fluid reaches the temperature set through the regulator, the 3-way valve diverts the fluid to the radiators and the operating light (SV) goes on.
When the temperature of the fluid drops below the set value, the system opens the electrical circuit and the 3-way valve bypasses the fluid directly to the thermo fireplace.
Attention: During normal operation check that the warning lights (SV) and (SP) are lit.
POSITIONING
The electronic regulator must be installed close to the thermo fi replace. The sensor of the operation, protection and control devices must be placed directly on the thermo fireplace or at most on the flow pipe, no more than 5 cm away from the thermo fireplace and in any case before any intercepting device.
The sensor must be immersed in the well.
INSTALLATION
The power supply must be disconnected from the mains and the AUTO-OFF-MAN selector (S) must be in the OFF position when all these operations are carried out.
Follow this procedure to install the electronic regulator correctly: loosen the fastening screw, remove the cover and fasten it in place against the wall with the dowels supplied.
Then make the connections, paying utmost attention to the wiring diagram and pass the wires through ducts that are in conformity with the regulations in force. Put the cover back in place and tighten the screw.
Connect the brown wire (phase) and blue wire (neutral) of the 3-way Valve, respectively, to terminals 5 and 6 of the regulator. Connect the yellow/green wire to the earth.
Follow the assembly instructions contained in the package to connect the regulator to the system properly.
INSTRUCTIONS FOR USE
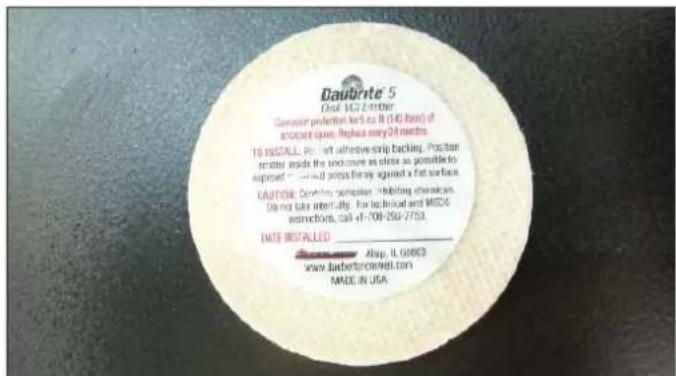
The product is supplied with two anti-corrosion discs (one on the outside and one on the inside of the combustion chamber). They must be removed during unpacking and disposed of as normal waste.
Air regulation
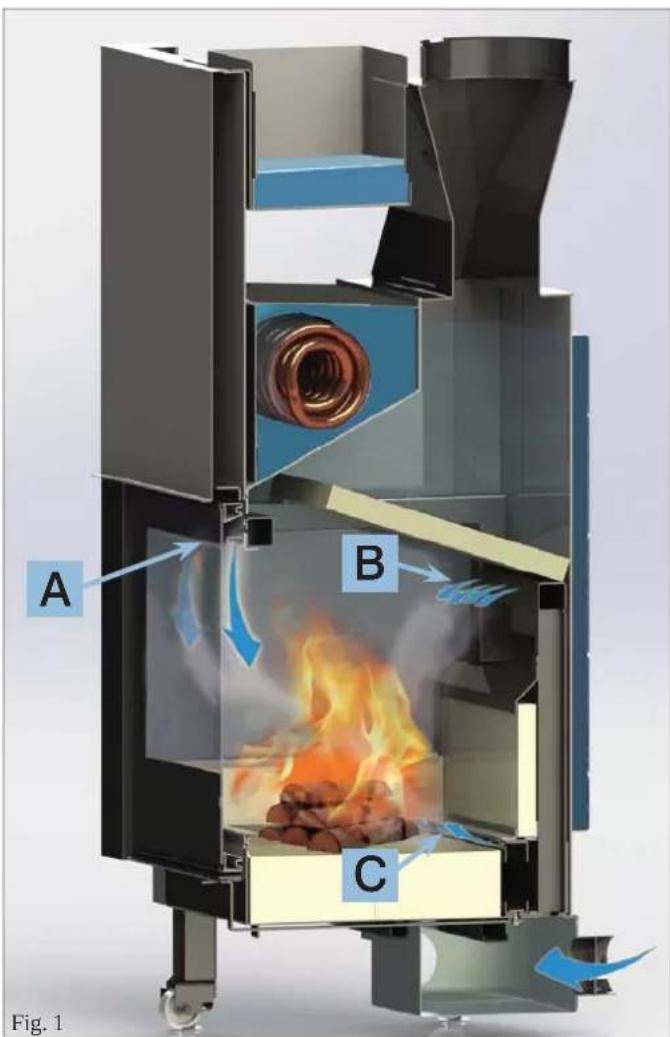
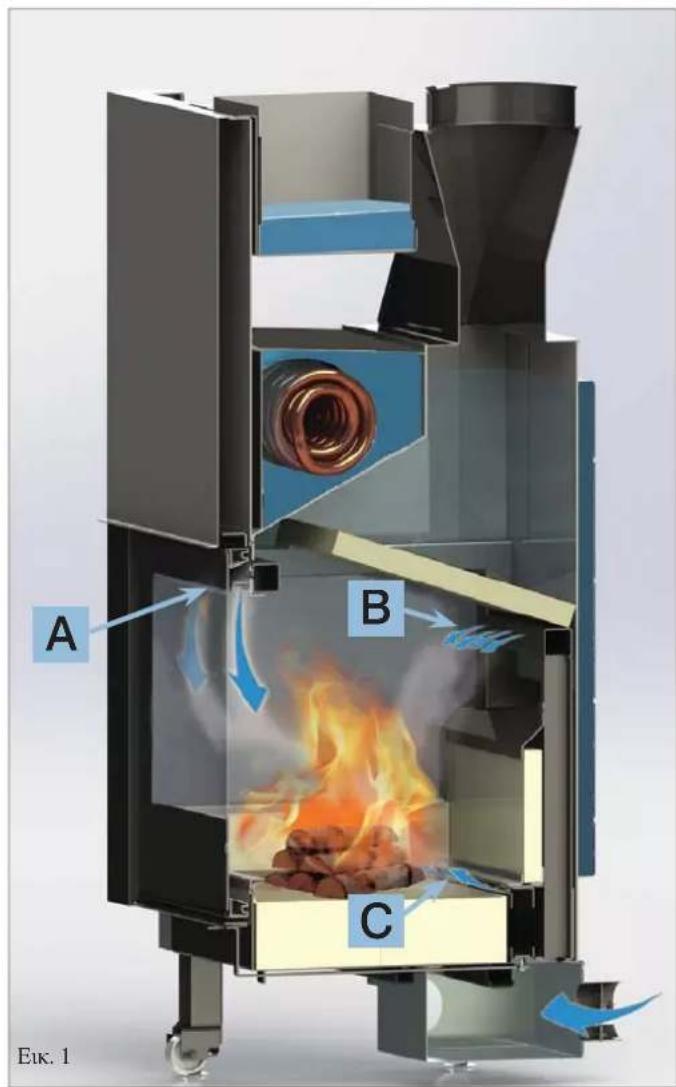
The primary combustion and glass-cleaning air (A) enters from the top of the glass after being heated along its path (Fig. 1) and keeps the glass clean.
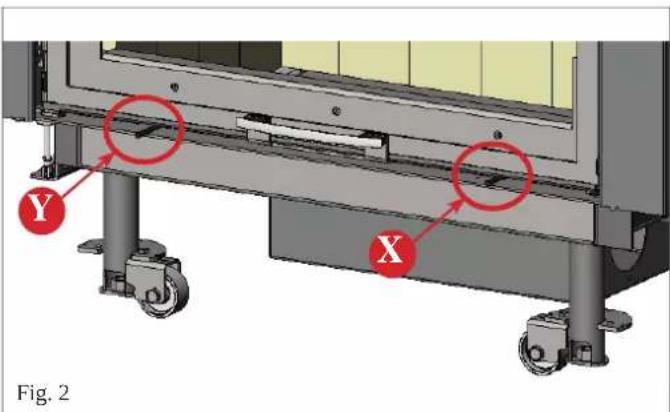
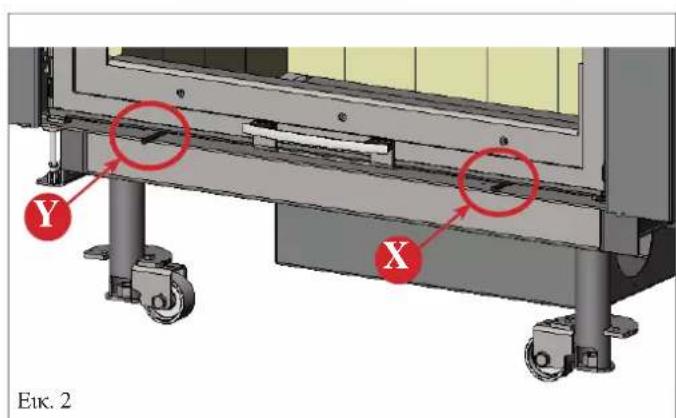
The amount of air is controlled by a lever located on the left under the door (Y - Fig. 2) and is heated during its passage in the ducts at the sides and above the mouth of the combustion chamber.
The secondary or post-combustion air (B) enters the combustion chamber through the holes in the bottom of the combustion chamber (Fig. 1).
The amount of post-combustion air is pre-calibrated.
The air taken up, through a duct, from the lower part of the replace unit is heated during its path on the back of the combustion chamber, due to the strong irradiation to which it is subjected, and exits from holes of variable diameter on the bottom.
The air exiting the holes hits the Å ow of fumes and triggers post-combustion, which burns the non-combusted elements and carbon monoxide.
The “Turbo” air (C) enters at the bottom of the combustion chamber at the level of the embers (Fig. 1) to speed up the lighting of the replace unit.
It is regulated with the lever to the right under the door (X - Fig. 2)
The con; guration must be chosen by the installer.
External air regulation
The control, via the dedicated damper (E- .g. 3) located on the external air intake, regulates the quantity of primary air necessary for combustion.
Push the knob to close the external air intake; pull the knob to open the external air intake.
INSTRUCTIONS FOR USE
Practical advice
It is recommended to keep the radiators closed in the room where the thermo fireplace is installed; The heat emitted from the outlet may be sufficient to heat.
- An incomplete combustion process causes excessive fouling on the heat exchanger pipe.
To prevent this you must:
- burn dry wood.
- ensure the hearth contains a bed of embers and burning carbon before adding more wood.
- place larger logs together with smaller ones.
- make sure the temperature of the return water is at least 50 °C (use temperature control valve).
- Do not exceed the load values shown in the specification table (page 28 under fuel consumption) since excessive loads can create overheating problems.
N.B.
Seasoned wood has a heating capacity of about 4 kWh/kg, while fresh wood has a heating capacity of only 2 kWh/kg. Therefore, for the same heating capacity double the quantity of fuel is needed.
| Water content g/kg of wood | Heating capacity kWh/kg | Greater consumption of wood % | |
| Very seasoned | 100 4,5 0 | ||
| seasoned for 2 years | 200 4 15 | ||
| seasoned for 1 year | 350 3 71 | ||
| Freshly cut wood | 500 2,1 153 |
recommended material: beech, oak, hornbeam and birch
Igniting the fi replace
To light the fire the first time, always use small pieces of wood. They burn more quickly and thus bring the fireplace to the correct temperature more quickly.
Use larger pieces of wood to refuel the fire.
Always place the wood well back in the fireplace, almost in contact with the back wall of the same, so that even it if slips it will not touch the door.
- Ensure that at least one radiator is always open.
- Actuate the switches of the electronic regulator.
- Place a pile of medium-thin dry wood in the thermo fireplace and ignite the fire.
- Wait a few minutes until it reaches sufficient combustion.
- Close the door
- Set the thermostat on the electronic regulator (*) at a temperature between 50 and 70°C.
NOTE: There may be a slight smell of paint the first few times it is ignited, however, this will disappear quickly.
Removing the ash (only when the fi re is out and the thermo fi replace is cold)
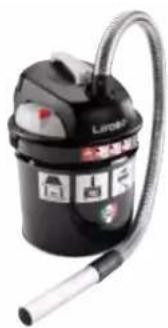
Remove the ash with a dustpan or a vacuum cleaner.
Place the ash only in non-combustible containers; remember that remaining embers can re-light even 24 hours after burning.
MAINTENANCE
Cleaning the hearth
- The soot deposits that tend to accumulate on the internal walls of the hearth decrease the efficiency of heat transfer.
- It is therefore necessary to clean the fireplace regularly, by bringing the water temperature to 80 / 85°C to soften the fouling and then remove this with a steel spatula.
Glass cleaning
- Use an appropriate spray for ceramic glass to clean the glass (Glasskamin - Edilakmin).
- The glass must be cleaned when cold.
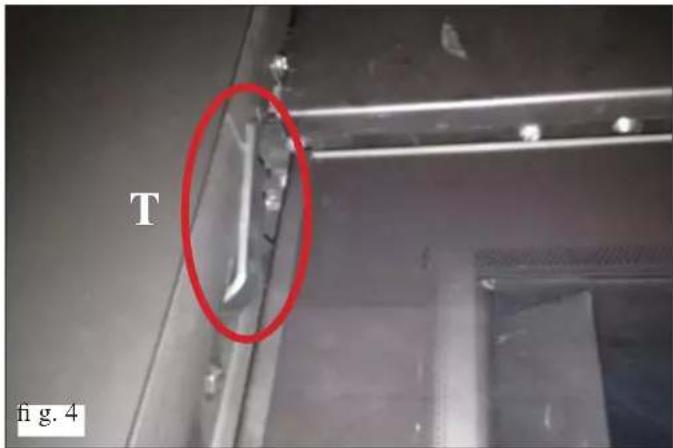
- Before opening the door, make sure it is secured with the lever at the top right (T - fi g. 4).
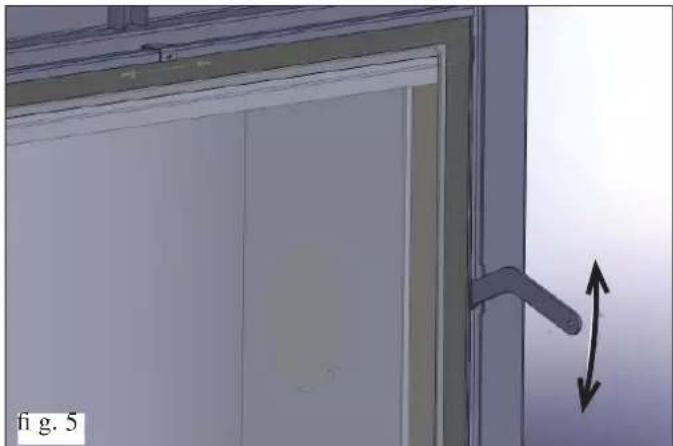
- For the opening swing of the door it is necessary to bring it in the closed position.
- Insert the "cold handle" door handle on the latch between the structure and the door and turn to open (fi g. 5).
natural_image
Illustration of a door with a handle and directional arrow, labeled 'fig. 5' (no text or symbols on the diagram itself)Removing the ceiling
The ceiling, made of refractory material, and can be removed for cleaning.
NOTE ON THE DOOR GUIDES
The guides can be completely removed from the door (guides, pulleys and counterweights).
For any requirements, please contact an Authorised Edilkamin Technical Assistance Centre.
INSTRUCTIONS FOR USE
THE ELECTRONIC CIRCULATOR (BUILT-IN KIT)
The product you have purchased is equipped with a circulator with electronic motor.
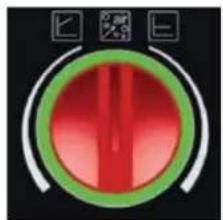
Electronic control of operation:
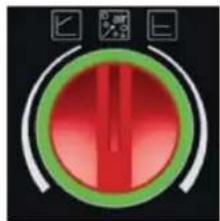
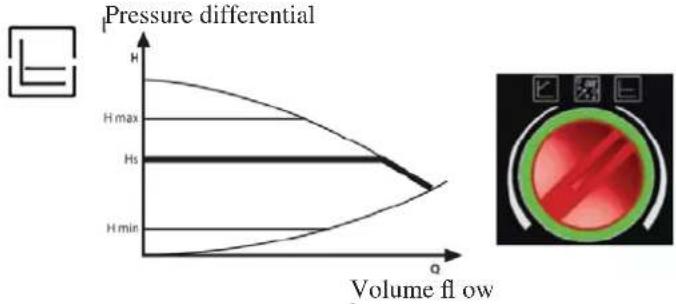
a) Control mode p - c
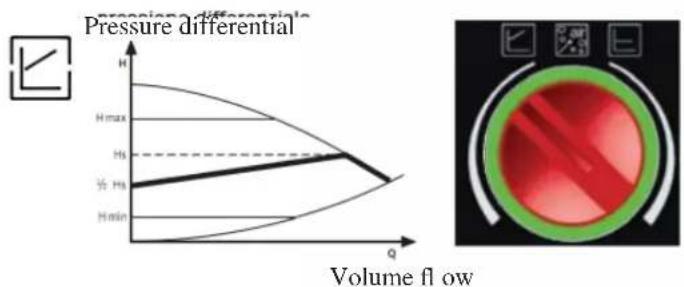
In this mode, the electronic controller keeps the differential pressure generated by the pump at a constant set value of H s.
c) Venting procedure
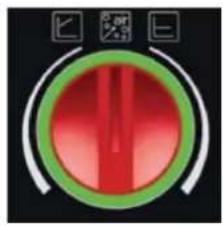
This procedure allows the expulsion of air present in the hydraulic circuit. After manual selection of the “AIR” mode, the pump will automatically alternate between maximum and minimum speed for 10 minutes. At the end of the procedure, the circulator will go to the pre-set speed. You can then select the desired mode of operation
line
| Volume flow | Pressure differential | | ----------- | -------------------- | | H | H | | Hs | H | | Hmin | H |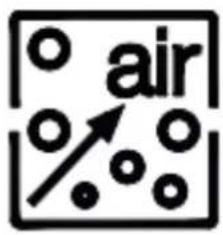
natural_image
Circular indicator dial with red center and green ring, no visible text or symbolsb) Control mode p - v
In this mode, the electronic controller varies the pressure differential between the set value Hs and 1/2 H s. The pressure differential varies with the volume flow.
line
| Pressure differential | Value | | --------------------- | ----- | | H | max | | Hs | - | | ½Hs | - | | Hmin | - || LEDMEANING WORK CONDITIONCAUSERESOLUTIVEACTION | ||||
| Green led on Working pump The pump works in base of its settings | Normally work | |||
| The green led flash quickly | The pump works 10 minutes to purge the air. After it is necessary to set the power | Normally work | ||
| The led flash with light red/green | The pump is ready to work but doesn't turn | The pump will start to work automatically when the problem is solved | - undervoltage U < 160V overvoltage U >253V- Engine temperature too high | - Check the voltage 195V < U < 253V- Check the water temperature |
| The led flash with red light | Pump out of service The pump is stopped (blocked) The pump doesn't start automatically | Change the pump | ||
| Led off No supply | voltage The pump doesn't receive the voltage | - The pump isn't connected on the motherboard- The led is defective- The pump is defective | - Check the wire connection- Check if the pump works- Change the pump | |
CHECK LIST
To be integrated with a complete reading of the technical specifications
Positioning and installing
• Air vent in the room
• The flue/chimney must only receive the discharge from the thermo fireplace
• The flue (section of duct that connects the thermo fireplace to the chimney) only has sections with max 45^ angles and no horizontal sections
• Chimney pot that is high enough to avoid downdraft areas
• The exhaust pipes are made of suitable material (marked EN 1856-I with characteristics for wood)
- When using any flammable materials (e.g. wood), all precautions have been taken to prevent a fire hazard
• The heating capacity has been appropriately assessed considering radiator efficiency:
- The plumbing system is declared conforming the laws of the country (such as, in Italy, to Ministerial Decree 37, formerly Law 46/1990) by a qualified technician.
Uso
• The wood used must be good quality and not damp.
• The door is closed properly
- The discharge pipes and the interior parts of the combustion chamber are clean.
- The bleeding process has been applied to the hydraulic system.
• The pressure (shown on the pressure gauge) is at least 1,5 bar.
CLEANING ACCESSORIES
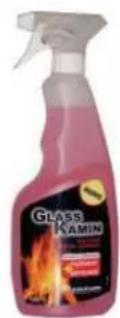
GlassKamin
Used for cleaning the ceramic glass
natural_image
Black and white photo of a Linke vacuum cleaner with attached hose and control panel (no visible text or symbols)Ash vacuum cleaner
User for cleaning the hearth
INFORMATION FOR USERS
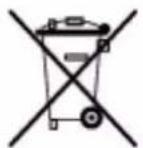
In accordance with Art. 13 of the Legislative Decree No. 151, dated 25 July 2005, “Implementation of Directives: 2002/95/EC, 2002/96/EC and 2003/108/EC, pertaining to the reduction of hazardous substances used in electrical and electronic equipment, as well as disposal of waste”. The crossed-out wheeled bin symbol shown on the equipment or on the packaging indicates that the product must be disposed of separately at the end of its useful life. Therefore, at the end of the equipment’s useful life, the user must hand in the equipment to suitable collection facilities for electrical and electronic waste, or return it to the retailer when a new, equivalent appliance is purchased in a ratio of one to one.
TABLE DES MATIÈRES
natural_image
Cross-sectional diagram of a portable industrial stove with visible flames and cooling pipes (no text or symbols)INFORMATION GÉNÉRALES
Fig. 1
PRISE D'AIR EXTERNE
natural_image
Mechanical device with labeled component E, shown from two views (no text or symbols on main body)INSTALLATION
CONDUITS D'ÉVACUATION DES FUMÉES ET POT
ACQUAMAXI AVEC I SERPENTIN AVEC KIT HYDRAULIQUE A BORD (DRT OU GCHE)
flowchart
graph TD
    A["Power Supply"] --> B["ACS"]
    B --> C["Collecteur"]
    C --> D["RA"]
    C --> E["RI"]
    C --> F["VI"]
    C --> G["VR"]
    C --> H["MI"]
    C --> I["RE"]
    I --> J["SC 30"]
    J --> K["P1"]
    J --> L["P2"]
    J --> M["VE"]
    J --> N["AF"]
    J --> O["S"]
    J --> P["Tuyau de charge Ø>18 mm"]
    J --> Q["Tuyau de sécurité Ø>28 mm"]
    J --> R["S"]
    J --> S["M"]
    J --> T["R"]
    J --> U["V"]
    J --> V["S"]
    J --> W["ACS"]
    J --> X["VA"]
    J --> Y["VA"]
    J --> Z["VA"]
    J --> AA["VA"]
    J --> AB["VA"]
    J --> AC["VA"]
    J --> AD["VA"]
    J --> AE["VA"]
    J --> AF["VA"]
    J --> AG["VA"]
    J --> AH["VA"]
CA: Chaudière murale
CA: Chaudière murale
CA: Chaudière murale
CA: Chaudière murale
CA: Chaudière murale
SS voyant surchauffe
Réglage air
natural_image
Illustration of a door with a handle and directional arrow, labeled 'fig. 5' (no text or symbols on the door itself)line
| Pressure | Value | | -------- | ----- | | H | H | | H max | H | | Hs | H | | H min | H |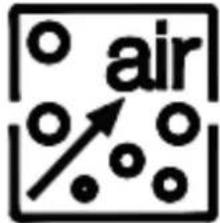
natural_image
Circular indicator dial with red center and green ring, no visible text or symbolsnatural_image
Black and white photo of a LIFO® vacuum cleaner with attached hose and control panel (no visible text or symbols)natural_image
Cross-sectional diagram of a portable industrial stove with visible flames and cooling pipes (no text or symbols)INFORMACIÓN GENERAL
Fig. 1
TOMA DE AIRE EXTERNA
natural_image
Technical diagram of a mechanical device with labeled components and a close-up inset showing a cable or connector (no text or symbols present)INSTALACIÓN
- selector MAN-OFF-AUTO(S)
- escala temperatura(ST)
- alarma acústica (AA)
Regulación aire
natural_image
Illustration of a door with a handle and directional arrow, labeled 'fig. 5' (no text or symbols on the diagram itself)line
| Q | H | H min | H max | |------|-------|-------|-------| | 0 | High | Low | High | | 100 | Low | Low | Low |natural_image
Circular gauge or dial with red center and green ring, no visible text or symbolsnatural_image
Circular graphic with red and green concentric rings, no text or symbols presentnatural_image
Black and white photo of a vacuum cleaner with attached hose and control panel (no visible text or symbols)natural_image
Cross-sectional diagram of a modern industrial furnace with visible flames and cooling pipes (no text or symbols)ALLGEMEINE INFORMATIONEN
natural_image
Technical diagram of a mechanical device with labeled components and a close-up inset showing a cable or connector (no text or symbols present)INSTALLATION
RAUCHFANG UND SCHORNSTEIN
Luftregelung
natural_image
Illustration of a door with a lever and double-headed arrow indicating vertical motion (no text or symbols)line
| q | H | | ---- | ----- | | 0 | H max | | 1.5 | Hs | | 2.5 | Hmin |natural_image
Circular indicator dial with red center and green ring, no visible text or symbolsnatural_image
Black and white photo of a vacuum cleaner with attached tubing (no visible text or symbols)natural_image
Cross-sectional diagram of a portable industrial stove with visible flames and cooling pipes (no text or symbols)ALGEMENE INFORMATIE
natural_image
Mechanical device with labeled component E, shown from two views (no text or symbols on main body)INSTALLATIE
P: Pomp (circulator)
PI: Pomp primair circuit
P2: Pomp circuit
RA: Radiators
P: Pomp (circulator)
P1: Pomp primair circuit
P2: Pomp circuit
RA: Radiators
P: Pomp (circulator)
P1: Pomp primair circuit
P2: Pomp circuit
RA: Radiators
P: Pomp (circulator)
P1: Pomp primair circuit
P2: Pomp circuit
RA: Radiators
P: Pomp (circulator)
P1: Pomp primair circuit
P2: Pomp circuit
RA: Radiators
R reg. opening driewegklep (KIT 1 - 3)
R reg. werking circulators (KIT 2)
RIC interne afstelling pomp
S keuzeschakelaar MAN-OFF-AUTO
SP controlelamp pomp
SV reg. circulators (KIT 2)
| TECHNISCHE GEGEVENS | |
| Voeding (+15 - 10%) Vac 230 | |
| Beschermgraad | IP |
| min/max kamertemperatuur °C 0÷+50 | |
| Lengte sonde mt 1,2 | |
| Thermometer °C 30÷90 | |
| Maximum vermogen contacten circulators W 400 | |
| Maximum vermogen contacten driewegkleppen | W 250 |
| Zekering mA 500 |
Luchtregeling
natural_image
Exterior view of a door with a lever and directional arrow, labeled 'Afb. 5' (no other text or symbols)natural_image
Circular gauge or dial with red center and green ring, no visible text or symbolsnatural_image
Black and white photo of a vacuum cleaner with attached hose and control panel (no visible text or symbols)natural_image
Cross-sectional diagram of a portable industrial stove with visible flames and cooling pipes (no text or symbols)INFORMAÇÕES GERAIS
natural_image
Mechanical device with labeled component E, shown from two views (no text or symbols on main body)INSTALAÇÃO
REVESTIMENTOS, COIFAS
Regulação do ar
natural_image
Illustration of a door with a handle and directional arrow, labeled 'fig. 5' (no text or symbols on the diagram itself)Desmontagem do topo
INSTRUÇÕES PARA O USO
natural_image
Circular red and green gradient button with control buttons (no text or symbols)b) Modalidade de controlo p - v
natural_image
Black industrial vacuum cleaner with attached hose and control panel (no visible text or symbols)Balde aspira-cinzas
natural_image
Cross-sectional diagram of a modern industrial furnace with visible flames and cooling pipes (no text or symbols)ΓΕΝΙΚΕΣ ΠΛΗΡΟΦΟΡΙΕΣ
natural_image
Technical diagram of a mechanical device with labeled component E, shown from two orthographic views (no text or symbols beyond labels)ΕΓΚΑΤΑΣΤΑΣΗ
ΟΔΗΓΙΕΣ ΧΡΗΣΗΣ
Πρακτικές συμβουλές
natural_image
Exterior view of a door with a handle and directional arrow indicating movement (no text or symbols)natural_image
Circular red indicator knob with green ring, no visible text or symbolsnatural_image
Black industrial vacuum cleaner with attached hose and control panel (no visible text or symbols)natural_image
Cutaway view of a modern industrial furnace with visible flames and cooling pipes (no text or symbols)INFORMACJE OGÓLNE
natural_image
Technical diagram of a mechanical device with labeled components (E), showing internal components and a close-up inset view (no readable text or symbols)INSTALACJA
PRZEWÓD KOMINOWY
ST: Sonda temperature
TC: Termokominek
V: Zawór
ST: Sonda temperature
TC: Termokominek
V: Zawór
ST: Sonda temperature
TC: Termokominek
V: Zawór
ST: Sonda temperature
TC: Termokominek
V: Zawór
natural_image
Exterior view of a door with a handle and arrow indicating vertical motion (no text or symbols)Demontaż deflektora
line
| Q | H | | ---- | ----- | | 0 | H max | | 0 | Hs | | 0 | H min |natural_image
Circular red indicator knob with green ring and control buttons (no text or symbols)natural_image
Black and white photo of a LiDAR vacuum cleaner with attached hose and control panel (no visible text or symbols)
- INSTALLAZIONE
- CANNA FUMARIA E COMIGNOLO
- Regolazione aria
- Smontaggio cielino
- Dear Sir/Madam
- NOTE
- Installation/Testing
- - Commissioning/ testing
- IT IS FORBIDDEN TO SHUT OFF THE DISCHARGE
- IMPORTANT!!!
- DO NOT ATTEMPT TO PUT THE FIRE OUT WITH WATER!
- SAFETY INFORMATION
- IN CASE OF INSTALLATION ON OPEN TANK SYSTEMS
- NB:
- WATER TREATMENT
- IN CASE OF INSTALLATION ON CLOSED TANK SYSTEMS
- GENERAL INFORMATION
- N.B.: DATA PROJECT (Refer to standard EN 13229)
- N.B.
- • CERTIFICATIONS AND BENEFITS \*
- INSTALLATION
- IMPORTANT ADVICE
- VERIFY COMPATIBILITY WITH OTHER DEVICES
- SAFETY DISTANCES (Fig. 1)
- EXTERNAL AIR INLET
- CHIMNEY FLUES AND CHIMNEYPOT
- The fireplace unit must not be connected to a shared flue.
- The fundamental characteristics of the chimneypot are:
- INSTALLATION COVERING, FIREPLACE MANTEL
- EXPANSION TANK
- EXAMPLE OF A HYDRAULIC SYSTEM FOR OPEN-TANK FIREPLACE UNIT, COMBINED WITH A GAS BOILER. PRODUCTION OF DOMESTIC HOT WATER WITH COIL.
- SELECTOR FUNCTIONS
- ELECTRONIC REGULATOR
- IMPORTANT ADVICE REGARDING THE INSTALLATION
- Compliance with regulations regarding the earth connection is fundamental for the safety of people.
- LEGEND
- OPERATION
- Power supply device (circulation system):
- POSITIONING
- The power supply must be disconnected from the mains and the AUTO-OFF-MAN selector (S) must be in the OFF position when all these operations are carried out.
- INSTRUCTIONS FOR USE
- Air regulation
- External air regulation
- Practical advice
- Igniting the fi replace
- Removing the ash (only when the fi re is out and the thermo fi replace is cold)
- MAINTENANCE
- Cleaning the hearth
- Glass cleaning
- Removing the ceiling
- NOTE ON THE DOOR GUIDES
- THE ELECTRONIC CIRCULATOR (BUILT-IN KIT)
- Electronic control of operation:
- CHECK LIST
- To be integrated with a complete reading of the technical specifications
- Positioning and installing
- Uso
- CLEANING ACCESSORIES
- INFORMATION FOR USERS
- TABLE DES MATIÈRES
- INFORMATION GÉNÉRALES
- PRISE D'AIR EXTERNE
- CONDUITS D'ÉVACUATION DES FUMÉES ET POT
- Réglage air
- INFORMACIÓN GENERAL
- TOMA DE AIRE EXTERNA
- INSTALACIÓN
- Regulación aire
- ALLGEMEINE INFORMATIONEN
- RAUCHFANG UND SCHORNSTEIN
- Luftregelung
- ALGEMENE INFORMATIE
- INSTALLATIE
- Luchtregeling
- INFORMAÇÕES GERAIS
- INSTALAÇÃO
- REVESTIMENTOS, COIFAS
- Regulação do ar
- Desmontagem do topo
- INSTRUÇÕES PARA O USO
- ΓΕΝΙΚΕΣ ΠΛΗΡΟΦΟΡΙΕΣ
- ΕΓΚΑΤΑΣΤΑΣΗ
- ΟΔΗΓΙΕΣ ΧΡΗΣΗΣ
- Πρακτικές συμβουλές
- INFORMACJE OGÓLNE
- INSTALACJA
- PRZEWÓD KOMINOWY
- Demontaż deflektora
Brand : EDILKAMIN
Model : AQUAMAXI 28
Category : Fireplace