15T - Jack Güde - Free user manual and instructions
Find the device manual for free 15T Güde in PDF.

User questions about 15T Güde
0 question about this device. Answer the ones you know or ask your own.
Ask a new question about this device
Download the instructions for your Jack in PDF format for free! Find your manual 15T - Güde and take your electronic device back in hand. On this page are published all the documents necessary for the use of your device. 15T by Güde.
USER MANUAL 15T Güde
EC-DECLARATION OF CONFORMITY.
DÉCLARATION DE CONFORMITÉ CE•
natural_image
Black industrial hand pump with warning label and two cylindrical metal parts (no visible text or symbols on main subject)2T 12T
18016 #84117
3T 15T
18017 #84118
5T 20T
18018 #84120
8T
84115
text_image
Technical diagram of a mechanical device with labeled parts, including cylindrical rods and a digital display unit.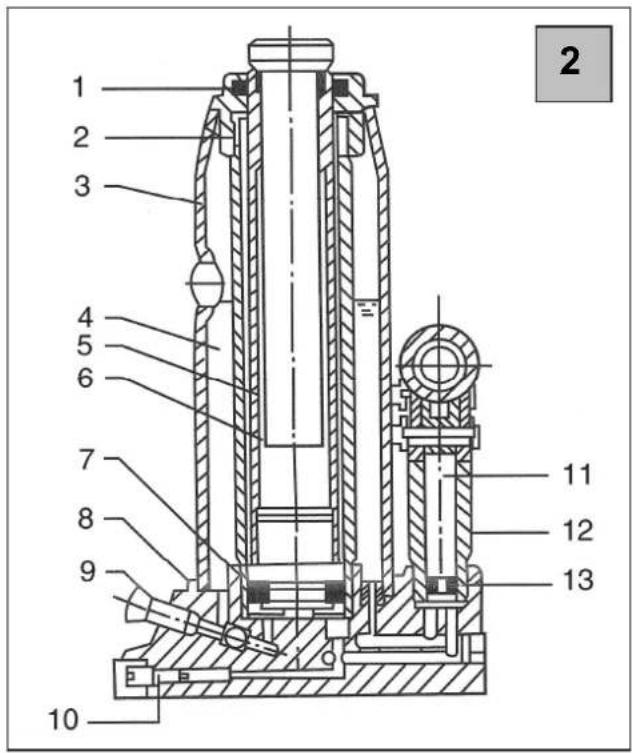
text_image
1 2 3 4 5 6 7 8 9 10 11 12 13 2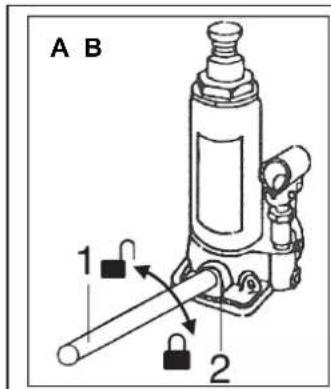
text_image
A B 1 2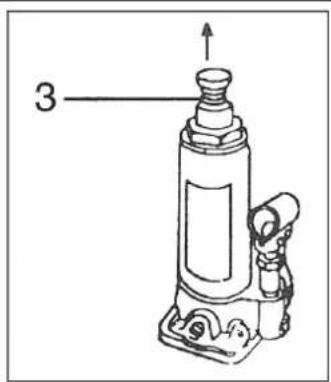
text_image
3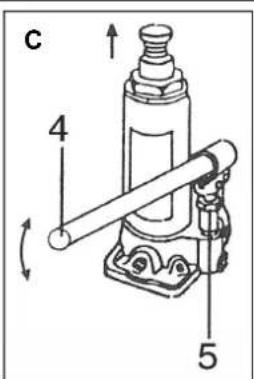
text_image
C 4 5
text_image
4 1 2DE
!!! Please read this instruction for operation carefully before putting the machine into operation !!!
A.V. 2 Surplus print even in shortened version requires permission. Technical changes reserved. Illustrations used represent examples.
Signs on Unit
Meaning of Symbols
Symbols shown below are used throughout this manual and/or on the unit:
Product Safety:
| CE | |
| Product compliance with respective EU standards |
Warning:
| Warning/Caution | Beware of the hand injury/nipping |
| Beware of stumbling | Keep sufficient distance from persons standing nearby. |
Environment Protection:
 |  |
| Do not throw the packaging material away, arrange its proper disposal. | The packaging material from the cardboard can be handed in into a corresponding collection point. |
Packaging:
 |  | |
| Protect from moisture Keep Up | ||
| Interseroh-Recycling | ||
Technical specifications:
 |  | ||
| Max. carrying capacity height mm | |||
 | |||
| Weight | |||
Unit
A premium quality hydraulic cylinder, a large pedal of special cast iron to add the stability,
a freely movable tilting lift lever,
2-part lifting lever, dimensionally fitting, to control the valves, supporting plate, screwing support.
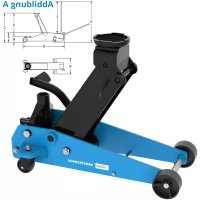
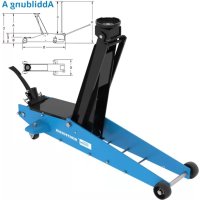
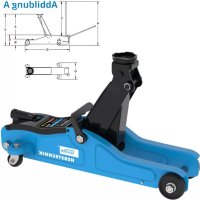
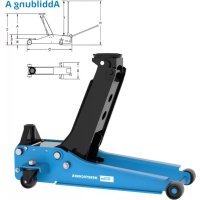
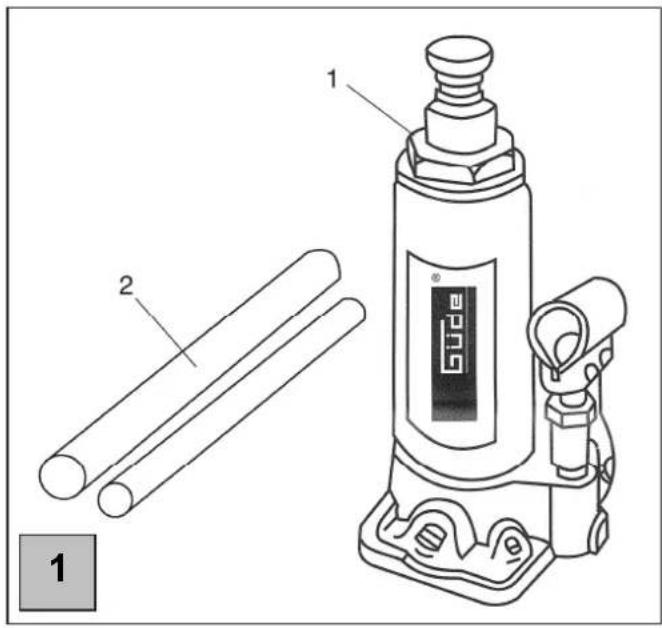
Machine description
Fig. 1:
-
Vehicle lifting jack
-
Two-part lifting lever
Fig. 2:
- Upper cover
-
Enlargement screw
-
Oil tank
-
Hydraulic oil
-
Piston
-
Hydraulic cylinder
-
Packing ring
-
Vehicle lifting jack foot
-
Drain valve
-
Safety valve
-
Pimp piston
-
Pump body
-
Packing ring
General Safety Instructions
Prior to the initial use of the unit, the operating instructions should be read completely. If in doubt with regard to connection and operation of the unit, consult the manufacturer (servicing department).
FOLLOW THE INSTRUCTIONS BELOW CAREFULLY IN ORDER TO SECURE A HIGH DEGREE OF SAFETY:
CAUTION!
- All the accidents prevention statutory instruments and the other general safety and occupational medicine regulations applicable to power means must be observed. Any other use is considered a use inconsistent with determination. The manufacturer shall not be held liable for any damages resulting therefrom. Operating instructions are included in the delivery and in case of resale, they should be forwarded to a new owner.
- The work powers and competences have to be determined clearly and observed so that no uncertain competences arise in respect of the safety.
- Mechanical maintenance works should be done at specified intervals and within the specified scope
- Following the maintenance, any removed protection devices must be put at places with an expert diligence. The protection devices and their effect must be checked by an expert before the unit is put in operation again.
- Any faults and defects have to be reported immediately after being recognised. The vehicle lifting jacks have to be marked as appropriate to minimise the scope of damage and not to affect the safety of the unit. The warranty claims becomes nil and void if the stipulation is not observed.
- There are places and parts on the unit that cannot be hidden or protected. However, the function and serviceability of the unit is not affected. Good personal safety practices of the operator are therefore essential for protection of the operating person and the protection from damage of the unit.
- The vehicle lifting jacks may thus be used and operated only within the conditions stipulated in the contract of delivery and service.
- In principle, any additional equipment, alterations, or conversion of the units are prohibited. They are always subject to an agreement with the manufacturer.
- If (residual) hazards and risks arise in operation not described in this operating manual, the operator shall be obliged to report them to the manufacturer.
- Never excess the lifting capacity defined for the jack.
- Use the vehicle lifting jack on a strong and flat base only.
- Never work under the lifted vehicle unless more safety measures have been taken to prevent travel, slide or tilting of the vehicle.
- Do not take the vehicle lifting jack to parts. Dismantling results in false functions and defects.
- Do not change the set-up of the safety valve.
- Check the serviceability of the jack before every use, check it mainly for the hydraulic oil spill, firm settling of the screws and valves and the full oil filling.

Caution: At reaching the lift height, the load has to be secured with supports.

Caution: Jack to be positioned to the designated point on the vehicle only (see the vehicle manual).

Caution: Essentially, it is forbidden to stay under a lifted load.
Emergency Action
Apply the first aid adequate to the injury and get qualified medical assistance as quickly as possible. Protect the injured person from more accidents and calm him/her down.
For the sake of eventual accident, in accordance with DIN 13164, a workplace has to be fitted with a first-aid kit. It is essential to replace any used material in the first-aid kit immediately after it has been used. If you seek help, state the following pieces of information:
- Accident site
- Accident type
- Number of injured persons
- Injury type(s)
Assigned Use
The automotive jack may only be used for one-sided lifting of a car for repair or maintenance purposes. The load must be reliably secured against accidental movement and then – after lifting is complete – secured with safety supports under axles.
Use the vehicle lifting jack only to lift the vehicles according to their operating instructions. In addition, the load has to be secured with supports.
The manufacturer should not be held liable for any personal and material losses due to a failure to observe these rules.
Residual hazards and protective measures
Exposure to materials and other substances
• Biological / Microbiological hazards:
Discharge of oil
Neglecting ergonomic principles
- Inadequate local lighting:
Inadequate lighting provides a high security risk Always provide sufficient lighting in the workplace.
• Human behavior / misconduct :
Moving the load being lifted can result in damage and failure of the lifter. Never move a load by means of the jack.
If the vehicle is raised, nobody must lean against the vehicle. Keep safe distance from the vehicle.
Other dangers
- break during operation :
Never get yourself under the lifted vehicle if it is not adequately secured. The jacked-up vehicle by axle stands secure.
- Loss of stability :
Instability of the load and sliding down the load. Use only on level, firm and stable ground.
- Slipping, tripping or falling of persons:
The lifting rod or the jack itself can be a tripping hazard. Nichtbenötigung leg of the lifting rod remove them. Keep the work area around the jack clean.
- Faulty installation :
Incorrect start the device can slip this fall and the load.
Always use the recommended mounting points according to the operating instructions for the load to be lifted and pay attention to a smooth and level surface of the jack and secure the load with safety stands from.
- Crushing:
In the area of moving parts can cause bruising of body parts. Make sure that there are no body parts in the area of the lifting mechanism -being the .
Warranty
A warranty period of 12 months applies to commercial use and 24 months apply to private use and commences on the day of purchase of the device.
Warranty applies exclusively to failures due to defective material or workmanship. An original sale slip with indication of date of sale must be presented in case of claiming for the warranty rights.
Warranty does not cover unprofessional use such as device overload, violent use, damage caused by third party or foreign materials, failure to comply with operations and assembly manual, and normal wear and tear.
Disposal
Disposal instructions are illustrated in the form of pictograms on the device or packaging. Description of the pictograms is given in "Identification" chapter.
Disposal of transport packaging
Packaging protects the device against damage during transport. Packaging materials are usually selected according to their effect on environment and disposal methods and can therefore be recycled.
Returning of the packaging back to circulation saves resources and costs for packaging disposal.
Parts of the packaging (e.g. foil, styropor) may be dangerous for children. Risk of suffocation!
Keep these parts of the packaging out of reach of children and dispose as soon as possible.
Operator Requirements
The operator shall read the instruction manual carefully before using the unit.
Qualification
No special qualification is required for use of the unit except for detailed direction by a professional.
Minimum Age
Only persons above 16 years of age are allowed to work with the unit.
Exempted from the provision is the use of the juvenile trainees if they work in the course of their professional training with an aim to obtain the skill under a trainer supervision.
Training
Use of the unit requires adequate lesson by a professional or the use of the manual only. Special training is not required.
Transportation and Storage
Units not in the use should be stored in a dry and locked room.
Technische Daten
| Max. carrying capacity (tonnes): | 2 | 3 | 5 |
| Min. height (mm): 158 | 180 | 200 | |
| Lift height (mm) : 90 | 110 | 125 | |
| Adjustment height (mm)*: | 60 | 60 | 80 |
| Max. final height (mm): | 308 | 350 | 405 |
| Weight (kg): 2,4 | 3,3 | 4,3 | |
| Ordering No.: | 18016 | 18017 | 18018 |
| Max. carrying capacity (tonnes): | 8 | 12 | 15 | 20 |
| Min. height (mm): 200 | 210 | 225 | 235 | |
| Lift height (mm): 125 | 125 | 140 | 145 | |
| Adjustment height (mm)*: | 80 | 80 | 80 | 60 |
| Max. final height (mm): | 405 | 415 | 445 | 440 |
| Weight (kg): 5,5 | 7,2 | 9 | 11 | |
| Ordering No.: | 84115 | 84117 | 84118 | 84120 |
* max. setting screw lift
Lifting (Fig. 3)
- On a flat surface under the vehicle with sufficient capacity.
- Secure the vehicle against rolling away.
• Find the designated anchoring point on the vehicle. - Close the valve (A) pic. 2, pos. 9
- Pump or – to be more specific – lift up (C)
- Secure the vehicle with supports under axles!
Lowering (Fig. 3)
- Remove the supports under axles.
- Slowly open the valve (A).
Operation (Fig. 3)
Lifting
- The opened drain valve (2) will be closed by turning the lifting lever small end (1) to the right.
- Put the vehicle lifting jack under the vehicle to be lifted, specifically under the determined clamp (read the vehicle operating manual). If necessary, remove the extension screw (3) turning it to the left from the hub so that it touches the vehicle. The precise attachment point may be determined in that way.
- Put the lifting laver (4) in the pump (5) and lift the vehicle to the required height pumping.
Senken

Lower the vehicle slowly. Open the drain valve slowly!
Open the drain valve by pushing the lifting lever small end into the valve and turning the lever slowly to the left.

Open the drain valve by 1 turn as a maximum!
If the vehicle is lowered at full, pull out the jack. If the extension screw is screwed out, screw it in before removing it turning to the right again as far as to the stop.
Operator Safety Instructions
- Do not use the machine until you have read the instruction manual carefully.
- Observe any safety instructions included in the manual.
- Be responsible to the others.
Inspections and Maintenance
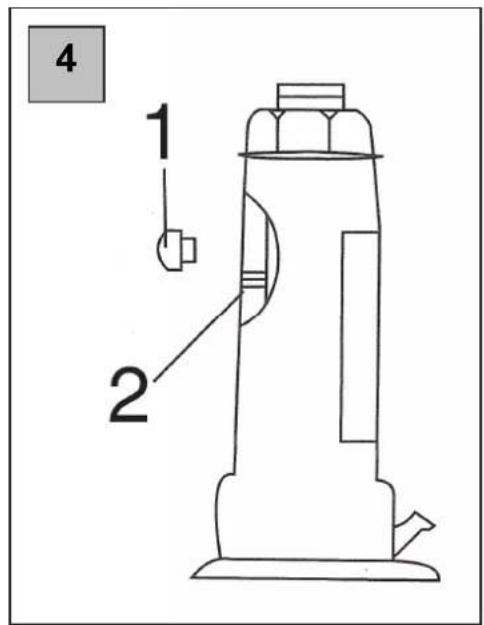
Hydraulic Oil Replenishment (Fig. 4):
- Put the vehicle lifting jack vertically.
- Check if the jack is lowered completely. If necessary lower it to the stop.
- Remove the oil filler plug (filling hole) from the body.
- Pour premium quality hydraulic oil in the cylinder up to the filler hole lower edge. De-aerate the cylinder proceeding according to the description in part 4 (De-aeration).
- Put the filler plug back in the body.
Lubrication:
Lubricate the moving parts and the enlargement screw threading regularly to provide the vehicle lifting jack safe functioning.
De-aeration
Air bubbles may enter the vehicle lifting jack hydraulic system with time and affect its functioning.
- Open the drain valve and remove the filler plug.
- Push the pump down several times to get the air out of the system.
- Close the drain valve and replace the filler plug.
- Now, the vehicle lifting function should be easy and appropriate. If it is not, repeat the procedure once again.
Corrosion Prevention
If the lifting jack is out of use, you will prevent the corrosion of the unit by full lowering of the lifting piston, screwing the enlargement screw and lowering the pump. Avoid any contact of moving parts with dirt. If the vehicle lifting jack still gets dirty, clean it carefully and grease the moving parts.
Inspections and Maintenance Safety Instructions
The machine will serve as a sufficient aid only if maintained and cared for appropriately. Insufficient maintenance and care may result in accidents and injuries.
Inspections and Maintenance Schedule
| Time Interval | Description Other Details if Necessary | |
| As needed | • Clean the unit and grease the moving parts |
Troubles – Causes - Troubleshooting
| Trouble Cause | Troubleshooting | |
| Vehicle lifting jack will not lift or will not lift the specific load. | Drain valve not closed properly.Too little hydraulic oil in the system.Air in the hydraulic system.Valves not closed or contaminated. | Close the drain valve by turning the lifting lever to the right.Replenish the hydraulic oil according to the description in the manual.De-aerate the system according to the description in the manual.To rinse the valves, push the piston and close the drain valve quickly. Lift the drain valve with hand and push and push the piston down as fast as possible. |
| The lifting jack will lower under the weight of the load. | Drain valve not closed properly.Valves not closed or contaminated. | Close he drain valve by turning the lifting lever to the rightTo rinse the valves, push the piston down and close the drain valve. Lift the piston several times by hand, open the drain valve and push the piston down as fast as possible. |
| Oil will escape from the oil screw. | Too much oil in the system | Drain the required amount of oil from the filler hole. Mind the regulations for the oil disposal. |
| Insufficient pressure at pumping | Too little hydraulic oil in the system.Valves not closed or contaminated. | Pour the hydraulic oil in the filler hole.To rinse the valves, push the piston down and close the drain valve. Lift the piston with hand several times, close the drain valve and push the piston down as fast as possible. |
| Lifting lever will move up and down under the weight of the load | Valves not closed or contaminated. | To rinse the valves, push the piston down and close the drain valve. Lift the piston with hand several times, close the drain valve and push the piston down as fast as possible. |
| Vehicle lifting jack unable to reach the full height | Too little hydraulic oil in the system.Air in the hydraulic system. | Pour the hydraulic oil in the filler hole.Open the drain valve, pump the lifting lever several times. Close the drain valve, Repeat the procedure if necessary. |
Service
Any technical questions? Complaint? Do you need spare parts or operation manual?
Go to our website www.guede.com and the section Service will help you quickly and without bureaucracy. Please, help us to help you. In order to identify your device in case of complaint, please indicate serial number, order number and year of manufacture. All information is available on the product label. To have all information always at hand, put them down.
Serial number:
Order number:
Year of manufacture:
Phone: +49 (0) 79 04 / 700-360
Fax: +49 (0) 79 04 / 700-51999
E-Mail: support@ts.guede.com
Important information for the customer
Please be sure to know that returning the product in or after the warranty period must be made in the original packaging.
FR
EC-DECLARATION OF CONFORMITY
We, hereby declare the conception and construction of the below mentioned appliances correspond - at the type of construction being launched - to appropriate basic safety and hygienic requirements of EC Directives. In case of any change to the appliance not discussed with us the Declaration expires.