MMR-88 - Radio Renkforce - Free user manual and instructions
Find the device manual for free MMR-88 Renkforce in PDF.
User questions about MMR-88 Renkforce
0 question about this device. Answer the ones you know or ask your own.
Ask a new question about this device
Download the instructions for your Radio in PDF format for free! Find your manual MMR-88 - Renkforce and take your electronic device back in hand. On this page are published all the documents necessary for the use of your device. MMR-88 by Renkforce.
USER MANUAL MMR-88 Renkforce
natural_image
Abstract geometric star-like pattern with five petal-like shapes and dot patterns (no text or symbols)renkforce
GB Operating Instructions
DAB Internet Radio
Item No. 2633082 Page 25 - 47
F Mode d'emploi
Radio DAB Internet
text_image
QR code image containing encoded data, no visible human-readable text6 Symbolerklärung
2 Introduction....28
3 Intended use....28
4 Delivery content....29
5 Latest product information....29
6 Description of symbols....30
7 Safety instructions ....30
7.1 General information ....30
7.2 Handling....30
7.3 Operating environment....30
7.4 Operation....31
7.5 Li-ion battery 32
7.6 Connected devices ....32
7.7 LED light 32
8 Product overview 33
9 Getting started 35
9.1 Inserting the rechargeable battery 35
9.2 Recharging the battery ....35
9.3 Operating the radio....36
9.4 Locking the buttons (key lock) 37
10 Operation - DAB radio 37
10.1 Displaying DAB service information....37
10.2 Selecting DAB channels automatically ....38
10.3 Selecting DAB channels manually....38
10.4 Setting DAB DRC (Dynamic Range Control)....38
10.5 Setting DAB station order 39
10.6 Pruning DAB stations....39
10.7 Adjusting system settings 39
11 Operation – FM radio....40
11.1 Tuning to FM channels manually 40
11.2 Auto-scanning for FM channels 40
11.3 Displaying FM service information (RDS) 40
11.4 Setting the FM scan zone 41
11.5 Toggling FM audio (Mono/Auto)....41
12 Managing stations....41
12.1 Presetting stations (DAB/FM) 41
12.2 Recalling stored stations (DAB/FM)....42
13 Listening with headphones....43
14 Charging external devices via USB 43
15 Using the LED flashlight ....43
16 Resetting the radio....44
17 Software upgrade 44
18 Cleaning and care....45
19 Disposal....45
19.1 Product 45
19.2 (Rechargeable) batteries 46
20 Declaration of Conformity (DOC)....47
21 Technical data....47
21.1 Power supply ....47
21.2 Radio 47
21.3 Environment....47
21.4 Other....47
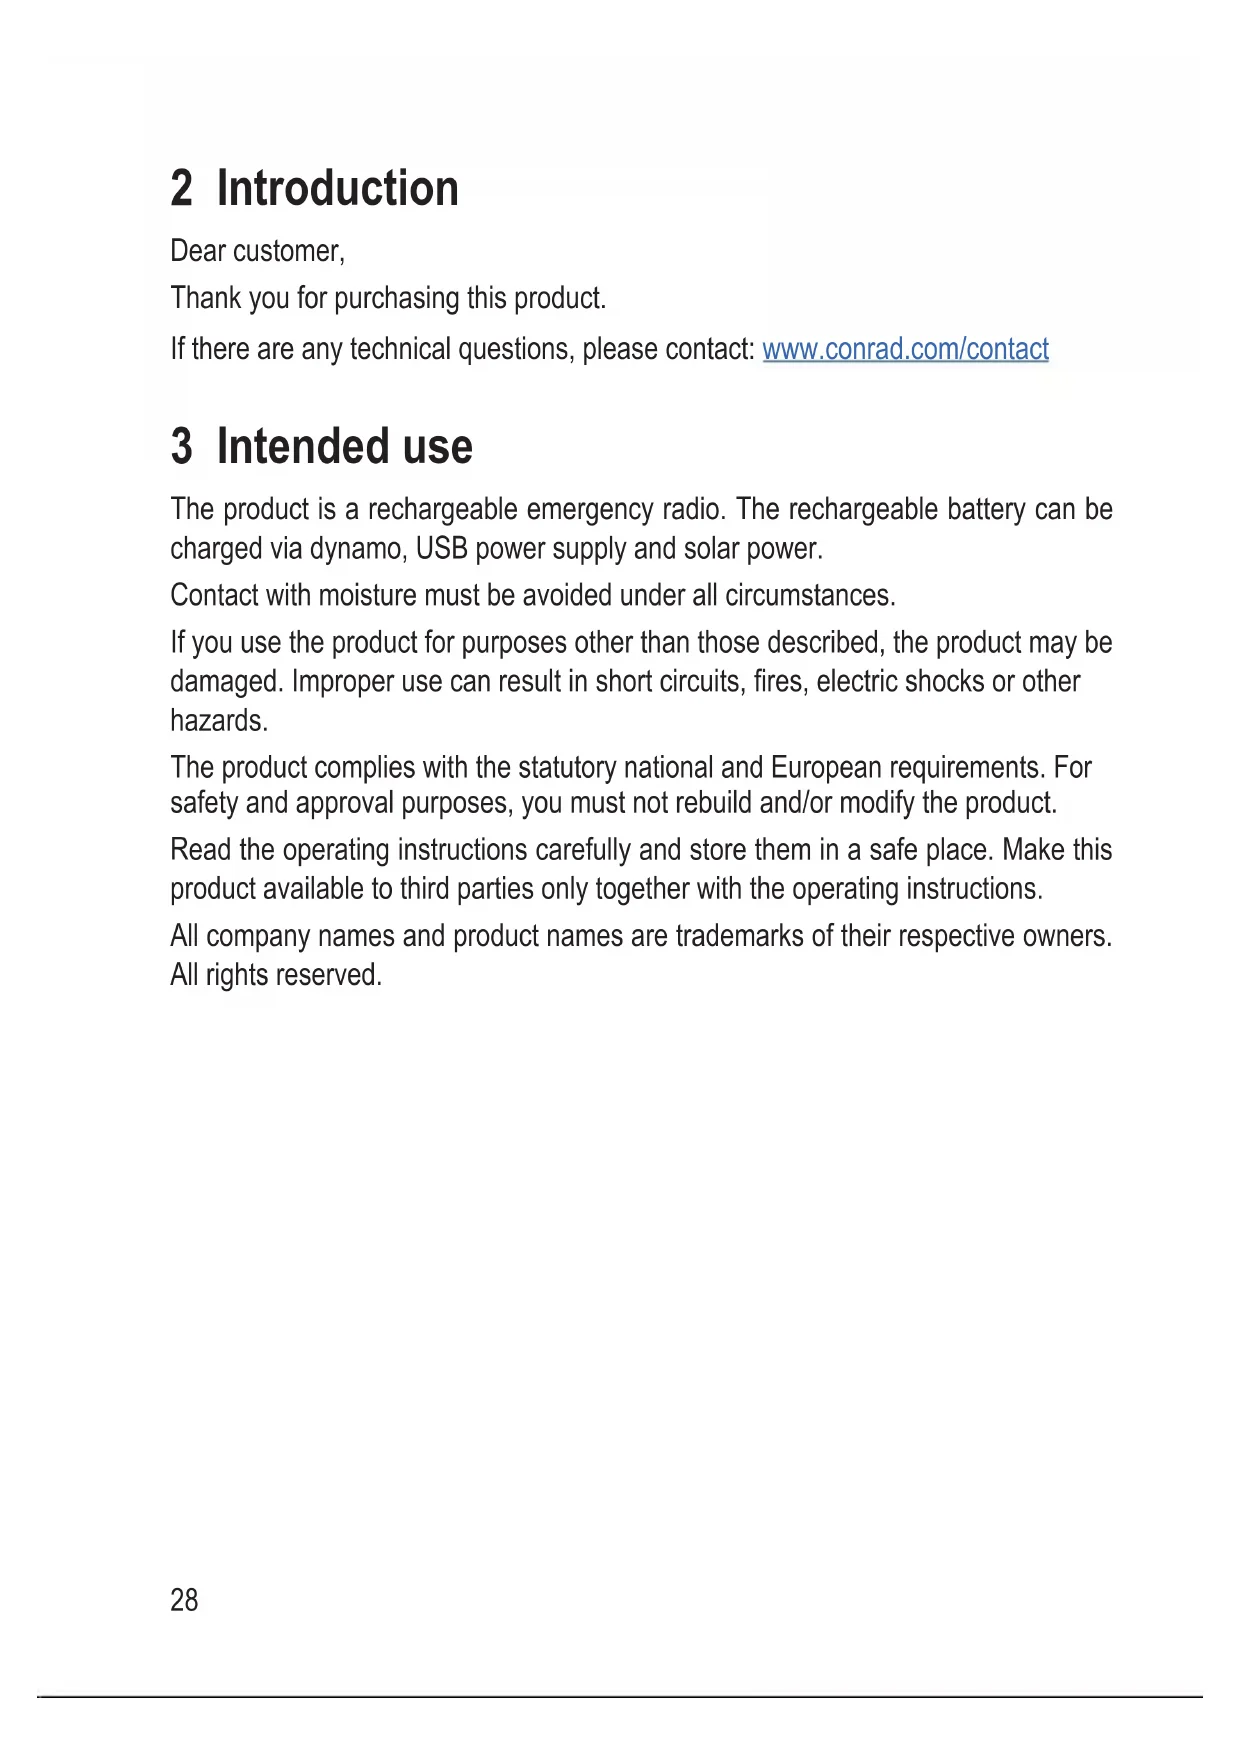
2 Introduction
Dear customer,
Thank you for purchasing this product.
If there are any technical questions, please contact: www.conrad.com/contact
3 Intended use
The product is a rechargeable emergency radio. The rechargeable battery can be charged via dynamo, USB power supply and solar power.
Contact with moisture must be avoided under all circumstances.
If you use the product for purposes other than those described, the product may be damaged. Improper use can result in short circuits, fires, electric shocks or other hazards.
The product complies with the statutory national and European requirements. For safety and approval purposes, you must not rebuild and/or modify the product.
Read the operating instructions carefully and store them in a safe place. Make this product available to third parties only together with the operating instructions.
All company names and product names are trademarks of their respective owners. All rights reserved.
4 Delivery content
Radio
USB charging cable (USB-A to Micro USB)
Wrist strap
Operating instructions
5 Latest product information
Download the latest operating instructions at www.conrad.com/downloads or scan the QR code shown. Follow the instructions on the website.
text_image
QR code image containing encoded data, no visible human-readable text6 Description of symbols
The following symbols are on the product/appliance or are used in the text:

The symbol warns of hazards that can lead to personal injury.
7 Safety instructions

Read the operating instructions carefully and especially observe the safety information. If you do not follow the safety instructions and information on proper handling in this manual, we assume no liability for any resulting personal injury or damage to property. Such cases will invalidate the warranty/guarantee.
7.1 General information
The device is not a toy. Keep it out of the reach of children and pets.
Do not leave packaging material lying around carelessly. This may become dangerous playing material for children.
If you have questions which remain unanswered by these operating instructions, contact our technical support service or other technical personnel.
Maintenance, modifications and repairs must only be completed by a technician or an authorised repair centre.
7.2 Handling
Please handle the product carefully. Jolts, impacts or a fall even from a low height can damage the product.
7.3 Operating environment
Do not place the product under any mechanical stress.
Protect the appliance from extreme temperatures, strong jolts, flammable gases, steam and solvents.
Protect the product from high humidity and moisture.
Do not switch the product on after it has been taken from a cold to a warm
environment. The condensation that forms might destroy the product. Allow the product to reach room temperature before you use it.
7.4 Operation
Consult an expert when in doubt about the operation, safety or connection of the appliance.
If it is no longer possible to operate the product safely, take it out of operation and protect it from any accidental use. DO NOT attempt to repair the product yourself. Safe operation can no longer be guaranteed if the product:
– is visibly damaged,
– is no longer working properly,
– has been stored for extended periods in poor ambient conditions or
– has been subjected to any serious transport-related stresses.
Do not block any ventilation openings. Install in accordance with the manufacturer's instructions.
Do not install near any heat sources such as radiators, heat registers, stoves or other apparatus (including amplifiers) that produce heat.
Only use attachments/accessories specified by the manufacturer.
To prevent possible hearing damage, do not listen at high volume levels for long periods.
7.5 Li-ion battery
Never damage the rechargeable battery. Damaging the casing of the rechargeable battery might cause an explosion or a fire!
Never short-circuit the contacts of the rechargeable battery. Do not throw the battery or the product into fire. There is a danger of fire and explosion!
Charge the rechargeable battery regularly, even if you do are not using the product. Due to the rechargeable battery technology being used, you do not need to discharge the rechargeable battery first.
Never charge the rechargeable battery of the product unattended.
When charging, place the product on a surface that is not heat-sensitive. It is normal that a certain amount of heat is generated during charging.
7.6 Connected devices
Also observe the safety and operating instructions of any other devices which are connected to the product.
7.7 LED light
Attention, LED light:
Do not look directly into the LED light!
Do not look into the beam directly or with optical instruments!
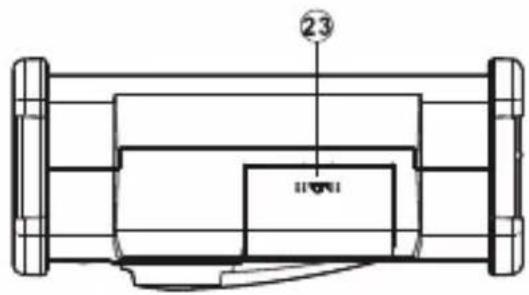
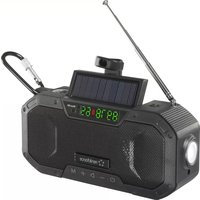
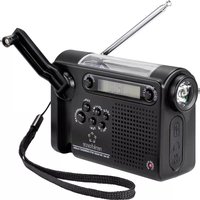
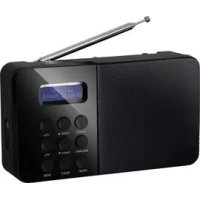
8 Product overview

text_image
Technical diagram of a mechanical device with numbered components and directional arrows indicating motion or assembly.
natural_image
Technical drawing of a mechanical bearing assembly with mounting holes and a central bore (no text or symbols)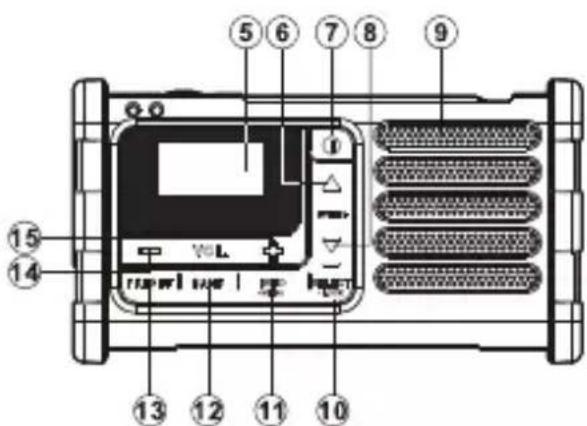
text_image
Technical diagram of a device rear panel with numbered components and labeled ports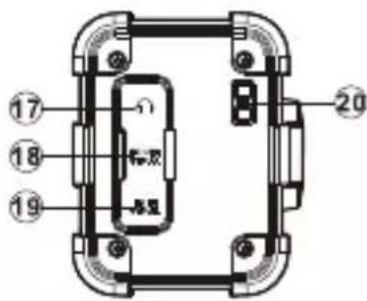
text_image
17 18 19 20
text_image
Technical diagram of a mechanical device with numbered components and labeled parts
text_image
23 110011 LED Flashlight button
2 Solar charging panel
3 Charging indicator
4 Low battery indicator
5 LCD display
6 Tuning up button
7 Power button
8 Tuning down button
9 Speaker
10 Select/Lock button
11 Info/Menu button
12 Band button
13 Preset button
14 Volume down
15 Volume up
16 LED Flashlight
17 3.5 mm headphone socket
18 USB charging socket
19 Micro USB charging port
20 Carrying strap holder
21 Telescopic antenna
22 Dynamo power hand crank
23 Battery compartment
9 Getting started
9.1 Inserting the rechargeable battery
The unit is powered by a 850 mAh rechargeable Lithium-ion battery.
- Open the battery compartment on the bottom of the unit by pushing the battery door following the arrow direction.
- Insert the rechargeable battery into the compartment. Make sure the battery is inserted with correct polarity as shown in the compartment.
- Install the battery door.
9.2 Recharging the battery
The radio can play approx. 10 hours when the battery is fully charged. When the low battery indicator LED blinks recharge your radio.
Important:
Before operating the radio for the first time, fully charge the battery.
9.2.1 Charging the battery via USB power supply
Charging the battery via a USB power supply is the most efficient charging method and takes approx. 2 hours.
- Plug the USB-A end of the USB charging cable into a suitable USB power supply.
- Plug the MicroUSB end of the USB charging cable into the MicroUSB socket on the radio.
→ The battery power icon will flash.
→ The battery power icon will stop flashing if the battery is charged.
→ The charging indicator LED will be on during the charging process.
9.2.2 Charging the battery via dynamo
If you charge the battery for one minute with the dynamo you can operate the radio for approx. 5-7 minutes.
- Bring the telescopic antenna into its rest position.
-
Take the dynamo crank from its rest position.
-
Rotate the dynamo crank in either direction at a speed of approx. 120 rotations per minute until the charging indicator turns red.
- After charging, bring the dynamo crank into its rest position.
9.2.3 Charging the battery via solar power
Expose the built-in solar panel to sunlight to charge the battery. The battery is also charged if the radio is switched off. It takes approx. 15 hours to fully charge the battery under direct sunlight.
Important:
- The solar panel will charge the battery only under natural sunlight. It will not deliver a charge in artificial light.
-
DO NOT attempt to charge the battery by placing the solar panel directly under any kind of sun lamp, this can cause irreversible damage to the radio and may damage the casing.
-
Position the radio so that the solar panel receives direct sunlight.
9.3 Operating the radio
- Carefully straighten up the antenna.
- Press the Power button to turn on the radio.
→ The display will show "Welcome to Digital Radio"
→ (First time use) the radio scans the entire DAB range and stops at the first found station.
→ (Not first time use) the radio selects the last used station.
- Press the Select button to play the station.
- Press the Tuning up/down button to display the station list and find a desired station.
- Press the Select button to select the station.
→ The radio will tune to the station and display the station name.
- Press the Volume buttons to adjust the volume for comfortable listening.
- After use, press the Power button to turn off the radio.
Note:
Your body can affect signal reception. Keep the antenna away from your body. Do not touch the antenna with your body.
9.4 Locking the buttons (key lock)
The key lock function is used to prevent unintentional operation of the radio.
- Press and hold the Select/Lock button until "Keys Locked" is shown on the display.
→ All buttons are disabled to prevent accidental operation.
- To disable the key lock function, press and hold the Select/Lock button until "Keys Unlocked" is shown on the display.
10 Operation - DAB radio
10.1 Displaying DAB service information
While listening to DAB radio, press and release the Info/Menu button to cycle through the below radio station information:
| Item Indicates | |
| Radio text Artist, track name, traffic alerts, ... | |
| Signal error/strength Signal strength and error numberNote: The lower the error number the better the signal strength. Adjust the antenna to improve the signal strength. | |
| Program type (PTY) Pop, classic, news, ... | |
| Multiplex name The DAB multiplex the station belongs to;Broadcasting frequency | |
| Channel and frequency Channel number and frequency | |
| Bit rate and audio type Bit rate and audio coding | |
| Format Station format | |
| Date Current date | |
10.2 Selecting DAB channels automatically
Scan the whole DAB network in your area. The radio will tune to the first station found after the scan is completed.
- Press and hold the Info/Menu button to enter the DAB menu list.
- Press the Tuning up/down button to select "Full scan".
- Press the Select button to confirm the selection.
10.3 Selecting DAB channels manually
- Press and hold the Info/Menu button to enter the DAB menu list.
- Press the Tuning up/down button to select "Manual tune".
- Press the Select button to confirm the selection.
- Press the Tuning up/down button to scroll through the whole DAB channel.
- Press the Select button to select the desired channel.
10.4 Setting DAB DRC (Dynamic Range Control)
Dynamic Range Control (DRC) can make quieter sounds easier to hear when your radio is used in a noisy environment.
Note:
Not all DAB broadcasts support DRC.
- Press and hold the Info/Menu button to enter the DAB menu list.
- Press the Tuning up/down button to select "DRC value".
- Press the Select button to confirm the selection.
- Use the Tuning up/down button to select and enable a setting.
– DRC Off: DRC is switched off, broadcast DRC will be ignored.
– DRC High: DRC is set as sent by broadcaster.
– DRC Low: DRC level is set to 1/2 that sent by broadcaster.
10.5 Setting DAB station order
Your radio has 3 station order settings from which you can choose.
| Setting Description | |
| Alphanumeric Sorts the station list alpha-numerically (0... 9... A... Z). | |
| Ensemble Organizes the station list by DAB multiplex | |
| Valid Shows stations for which a signal can be found. | |
- Press and hold the Info/Menu button to enter DAB menu list.
- Press the Tuning up/down button to select "Station order".
- Press the Select button to confirm the selection.
- Use the Tuning up/down button to select and enable a setting.
→ The current setting is indicated by an asterisk “*”.
10.6 Pruning DAB stations
If you move to a different part of the country, some of the stations which were listed may not be available. Also, some DAB services might stop broadcasting or might change the location or frequency. These stations are shown in the station list with a question mark “?”. The prune function will delete the marked DAB stations from your station list.
- Press and hold the Info/Menu button to enter DAB menu list.
- Press the Tuning up/down button to select "Prune".
- Press the Select button to confirm the selection.
- Press the Tuning up/down button to select "YES" (Prune) or "NO" (Cancel).
- Press the Select button to confirm the selection.
10.7 Adjusting system settings
You can adjust the system settings to your needs. Settings include time/date, clock format, display contrast, language, or factory reset.
- Use the Tuning up/down button to enter the settings menu.
-
Use the Tuning up/down button to select "settings".
-
Press the Select button to confirm a selection.
- Press the Select button to confirm a setting.
11 Operation – FM radio
11.1 Tuning to FM channels manually
- Press the Band button to select "FM radio mode".
- Repeatedly press the Tuning up/down button to select the frequency that the radio will tune to. The frequency will change in steps of 50 kHz.
→ If the end of the waveband is reached, the radio will restart tuning from the opposite end of the waveband.
11.2 Auto-scanning for FM channels
- Press the Band button to select "FM radio mode".
- Press and hold the Tuning up/down button.
- The radio will search in an upwards or downwards direction until it finds a station of sufficient signal strength.
→ If the signal is strong enough and there is RDS data present then the radio will display the station name.
→ If the end of the waveband is reached, the radio will restart tuning from the opposite end of the waveband.
11.3 Displaying FM service information (RDS)
If a station/channel provides service information (RDS), the radio can display it, including: radio text, program type, frequency, and audio type.
- Repeatedly press the Info/Menu button to cycle through the information.
11.4 Setting the FM scan zone
By narrowing the scan zone for FM channels you can instruct the auto-scanning function for FM channels to only search for strong FM signals (channels), which makes channel searches more efficient.
| Setting Description | |
| Local Strong channels only | |
| Distant All stations | including distant radio channels |
- Press the Band button to select FM radio mode.
- Press the Tuning up/down button to select the required setting.
- Press the Select button to confirm the selection.
→ The current setting is indicated with an asterisk “*”.
11.5 Toggling FM audio (Mono/Auto)
If the signal of an FM radio station is weak, some hiss may be audible. It is possible to reduce this hiss by forcing the radio to play the station in mono rather than auto.
- Press the Band button to select FM radio mode.
- Press the Tuning up/down button to select between "Mono" or "Auto".
- Press the Select button to confirm the selection.
12 Managing stations
12.1 Presetting stations (DAB/FM)
You can store your preferred DAB and FM radio stations to preset station memories. There are 40 memory presets in your radio (20 for DAB and 20 for FM). Presets are remembered by your radio in the event of a power failure.
You can store stations manually by selecting a memory location or let the radio select a free memory location for you.
12.1.1 Storing stations manually
-
Tune to the required radio station.
-
Repeatedly press the Preset button until "MEM Browse" is shown on the display.
-
Press the Tuning up/down button to select a preset number "Px".
→ The preset number flashes on the display indicating the preset is still empty.
- Press the Select button to store the station.
→ The display will show "Saved" after the station is saved to the memory location.
- Repeat to store other stations.
Note:
Follow the same steps to overwrite memory locations with different stations.
12.1.2 Storing stations automatically
-
Tune to the required radio station.
-
Repeatedly press the Preset button until "MEM Store" is shown on the display.
-
Press the Select button to store the station.
→ The station is stored to the first free station memory.
→ The display will show "Saved" after the station is saved to the memory location.
12.2 Recalling stored stations (DAB/FM)
- Press the Band button to select the required mode (DAB or FM).
- Repeatedly press the Preset button until "MEM Browse" is shown on the display.
- Press the Tuning up/down button to select the desired station. Free memory locations are hidden.
13 Listening with headphones
Plug the headphone into the headphone socket for private listening. This will disconnect the external speaker.
Note:
Never use the headphone socket in rainy or moist conditions to prevent moist from entering the radio. Always keep the rubber cover well closed under these conditions.
14 Charging external devices via USB
Use the USB charging socket to charge USB devices such as mobile phones. The charging current is limited to 300 mA.
- Connect a suitable USB charging cable to the USB charging socket.
- Connect the USB charging cable to the device you intend to charge.
15 Using the LED flashlight
The built-in flashlight has different light modes you can manually select.
| Mode Sequence Description | ||
| High 1 Strong light | ||
| Low 2 Weak light | ||
| SOS 3 Morse Code Distress Signal – Three GB short flashes – Three long flashes – Three short flashes | ||
| Off 4 Flashlight is off | ||
- Press the LED flashlight button to switch the flashlight on.
- Repeatedly press the LED flashlight button to select a mode.
- To switch the flashlight off, press and hold the LED flashlight button.
--OR-- press the flashlight button until the flashlight switches off
16 Resetting the radio
By performing a factory reset, all user-entered settings will be erased.
- Press and hold the Info/Menu button to enter DAB menu list.
- Press the Select button to select "Factory reset".
- Press the Tuning up/down button to reset or cancel.
- Select "YES" and press the Select button to reset.
- Select "NO" and press the Select button to cancel.
17 Software upgrade
Software updates for your radio may be available in the future.
Important:
Do not perform software updates unless instructed by our technician.
- Press and hold the Info/Menu button to enter DAB menu list.
- Press the Select button to select "Software upgrade".
18 Cleaning and care
Important:
- Do not use aggressive cleaning agents, rubbing alcohol or other chemical solutions. They damage the housing and can cause the product to malfunction.
- Do not immerse the product in water.
-
This radio is a water resistant device, NOT a waterproof device. Please ensure the rubber cover on the USB, Micro USB and Headphone jack section is properly secured.
-
Disconnect the product from the power supply and disconnect other devices from the product.
- Clean the product with a dry, fibre-free cloth.
19 Disposal
19.1 Product
This symbol must appear on any electrical and electronic equipment placed on the EU market. This symbol indicates that this device should not be disposed of as unsorted municipal waste at the end of its service life.
Owners of WEEE (Waste from Electrical and Electronic Equipment) shall dispose of it separately from unsorted municipal waste. Spent batteries and accumulators, which are not enclosed by the WEEE, as well as lamps that can be removed from the WEEE in a non-destructive manner, must be removed by end users from the WEEE in a non-destructive manner before it is handed over to a collection point.
Distributors of electrical and electronic equipment are legally obliged to provide free take-back of waste. Conrad provides the following return options free of charge (more details on our website):
in our Conrad offices
at the Conrad collection points
at the collection points of public waste management authorities or the collection points set up by manufacturers or distributors within the meaning of the ElektroG End users are responsible for deleting personal data from the WEEE to be disposed of. It should be noted that different obligations about the return or recycling of WEEE may apply in countries outside of Germany.
19.2 (Rechargeable) batteries
Remove batteries/rechargeable batteries, if any, and dispose of them separately from the product. According to the Battery Directive, end users are legally obliged to return all spent batteries/rechargeable batteries; they must not be disposed of in the normal household waste.

Batteries/rechargeable batteries containing hazardous substances are labelled with this symbol to indicate that disposal in household waste is forbidden. The abbreviations for heavy metals in batteries are: Cd = Cadmium, Hg = Mercury, Pb = Lead (name on (rechargeable) batteries, e.g. below the trash icon on the left).
Used (rechargeable) batteries can be returned to collection points in your municipality, our stores or wherever (rechargeable) batteries are sold. You thus fulfil your statutory obligations and contribute to environmental protection.
Batteries/rechargeable batteries that are disposed of should be protected against short circuit and their exposed terminals should be covered completely with insulating tape before disposal. Even empty batteries/rechargeable batteries can contain residual energy that may cause them to swell, burst, catch fire or explode in the event of a short circuit.
20 Declaration of Conformity (DOC)
Conrad Electronic SE, Klaus-Conrad-Straße 1, D-92240 Hirschau hereby declares that this product conforms to the 2014/53/EU directive.
Click on the following link to read the full text of the EU declaration of conformity: www.conrad.com/downloads
Enter the product item number in the search box. You can then download the EU declaration of conformity in the available languages.
21 Technical data
21.1 Power supply
Power supply...... Li-Ion battery, 850 mAh
Charging methods ...... Dynamo/SolarPanel/USB
USB charging port (in)......MicroUSB, 5 V/DC, min. 500 mA
USB charging port (out).... USB Type-A, 5 V/DC, max. 300 mA
21.2 Radio
Frequency coverage..... FM: 87.50 - 108 MHz
DAB+ Band III: 5 A - 13F
Antenna ..... Telescopic antenna: FM/DAB
Audio output 400 mW
Earphones jack.... TRS, 3.5 mm stereo earphone jack (32 Ω)
21.3 Environment
Operating conditions....-10 to +60 °C, 20 - 80 % RH (non-condensing)
Storage conditions....-10 to +60 °C, 20 - 80 % RH (non-condensing)
21.4 Other
Dimensions (W x H x D) ...... 152 x 84 x 70 mm
Weight 392 g
France (email): technique@conrad-france.fr
Suisse: www.conrad.ch ____
text_image
QR code image containing encoded data, no visible human-readable textDimensions (L x H x P)....152 x 84 x 70 mm
Poids....392 g
1 Inhoudsopgave

17 Software-upgrade 90
text_image
QR code image containing encoded data, no visible human-readable texttext_image
Technical diagram of a mechanical device with numbered components and directional arrows indicating motion or assembly.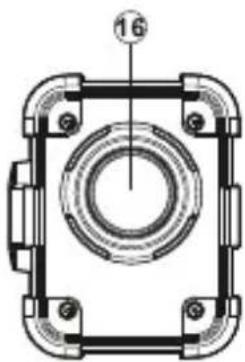
natural_image
Technical drawing of a mechanical bearing housing with mounting flanges and central bore (no text or symbols)
text_image
Technical diagram of a device rear panel with numbered labels pointing to ports and connectors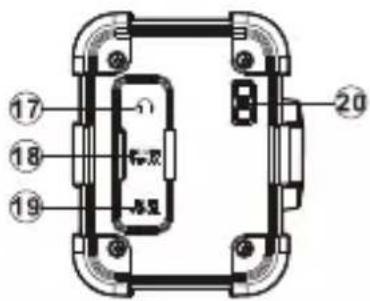
text_image
17 18 19 20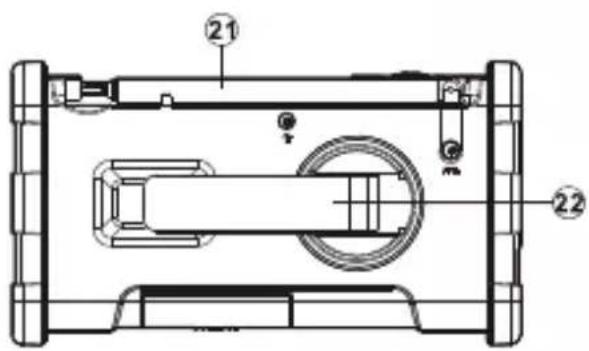
text_image
Technical diagram of a mechanical device with numbered components and labeled parts