RF-CR-300 - Radio Renkforce - Free user manual and instructions
Find the device manual for free RF-CR-300 Renkforce in PDF.
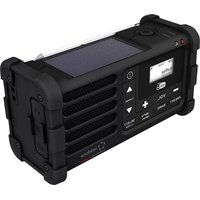
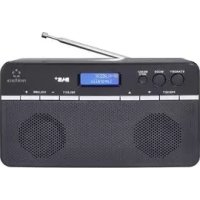
| Product Type | Portable rechargeable AM/FM radio with backup battery, solar panel, hand crank, flashlight and SOS alarm |
| Dimensions (L x H x W) | 166 x 53 x 80 mm |
| Weight | 444 g (with battery and accessories) |
| Power | Built-in rechargeable lithium-ion battery 5000 mAh, 3.7 V |
| USB Charging | USB Type-C, max. 5V/DC, 2.0 A; charging time approx. 3.5 hours |
| Solar Charging | Monocrystalline solar panel; full charge in 20 hours (50 mAh in 2 hours) |
| Manual Charging | Hand crank at 130-150 rpm; 30 min = 300 mAh; emergency use |
| Reception Bands | FM 87.5-108 MHz; AM 522-1710 kHz |
| Bluetooth | Version 5.0 BR/EDR; power 1.22 dBm; range 2402-2480 MHz |
| Speaker | Power 7 W RMS; sound pressure 80 dB |
| Battery Life | Up to 20 hours (radio) |
| Storage and Playback | MicroSD card reader up to 32 GB (MP3, m4a formats) |
| Additional Functions | LED flashlight (1.5 W), reading lamp, compass, SOS alarm, backup battery (USB-A output port) |
| Protection Rating | IPX5 (with protective cover closed) |
| Operating Temperature Range | -20 to +60 °C; relative humidity 45-75% (non-condensing) |
| Cleaning | Dry, lint-free cloth; do not use harsh chemicals; do not immerse |
| Safety | Do not look directly at the LED; keep out of reach of children; avoid short circuits |
| Repairability | Non-user-replaceable battery; repair by qualified technician only |
Frequently Asked Questions - RF-CR-300 Renkforce
User questions about RF-CR-300 Renkforce
0 question about this device. Answer the ones you know or ask your own.
Ask a new question about this device
Download the instructions for your Radio in PDF format for free! Find your manual RF-CR-300 - Renkforce and take your electronic device back in hand. On this page are published all the documents necessary for the use of your device. RF-CR-300 by Renkforce.
USER MANUAL RF-CR-300 Renkforce
Portable AM/FM radio, rechargeable, power bank, Solar panel, hand crank, torch
C
Item no. 2618046
1 Intended use
This radio is designed to receive and play AM and FM radio stations. It features a built-in LED display to ensure good visibility of the onscreen data, even in darkness. The automatic station search function allows you to save radio stations in a few simple steps. You can also play compatible audio files from a microSD card. A Bluetooth-enabled playback device (Bluetooth speaker or smartphone) can be paired with the radio to play sound. The radio features a built-in LED torch as well as a reading light under the solar panel, while a magnetic compass allows you to find your bearings in unfamiliar terrain. An SOS emergency call function generates sound signals in order to call for assistance. The built-in rechargeable battery can be charged via a USB Type-C cable, a solar panel or by means of a mechanically operated dynamo (with a crank handle). The rechargeable battery is protected against overload, and can also be used as a power bank in order to charge mobile phones and other devices via the integrated USB-A connection.
The IPX5 protection rating can only be guaranteed when the protective cap is closed. The product is suitable for indoor and outdoor use, including in adverse weather conditions. However, contact with moisture should be avoided, e.g. when charging via USB.
Using the product for purposes other than those described above may damage the product. Improper use can cause a short circuit, fire or other hazards.
This product complies with statutory, national and European regulations. For safety and approval purposes, you must not rebuild and/or modify the product.
Read the operating instructions carefully and store them in a safe place. Make this product available to third parties only together with the operating instructions.
All company and product names contained herein are trademarks of their respective owners. All rights reserved.
USB4*, USB Type-C* and USB-C* are registered trademarks of USB Implementers Forum.
2 Delivery content
Crank radio
Snap hook
USB charging cable
Operating instructions
3 Latest product information
Download the latest product information at www.conrad.com/downloads or scan the QR code shown. Follow the instructions on the website.
4 Explanation of symbols
The following symbols appear on the product/device or in the text:

The symbol warns of hazards that can lead to personal injury.
5 Safety instructions

Read the operating instructions carefully and especially observe the safety information. If you do not follow the safety instructions and information on proper handling, we will assume no liability for any resulting personal injury or damage to property. Such cases will invalidate the warranty/guarantee.
5.1 General information
This product is not a toy. Keep it out of the reach of children and pets.
Do not leave packaging material lying around carelessly. It may become a dangerous plaything for children.
Should you have any questions or concerns after reading this document, please contact our technical support or a professional technician.
Maintenance, modifications and repairs must be carried out by a technician or a specialist repair centre.
5.2 Handling
Handle the product carefully. Impact, shocks or a fall even from a low height can damage the product.
This product should be operated at a minimum distance of 20 cm to the human body.
5.3 Operating environment
Do not expose the product to any mechanical stress.
Protect the product from extreme temperatures, strong jolts, flammable gases, vapours, and solvents.
Protect the product from high humidity and moisture.
The product must not be exposed to direct sunlight.
Never switch the device on immediately after taking it from a cold into a warm environment. This may cause condensation to form, which can destroy the product. Allow the product to reach room temperature before using it.
Avoid using the product near strong magnetic or electromagnetic fields, transmitter aerials or HF generators. These may prevent the product from functioning properly.
5.4 Operation
Consult an expert when in doubt about the operation, safety or connection of the device.
If it is no longer possible to operate the product safely, stop using it and prevent unauthorised use. DO NOT attempt to repair the product yourself. Safe operation can no longer be guaranteed if the product:
- is visibly damaged.
- is no longer working properly,
has been stored for extended periods in poor ambient conditions or
has been subjected to any serious transport-related stress.
5.5 Li-ion safety
The rechargeable battery is permanently built into the product and cannot be replaced.
Never damage the battery. Damaging the casing of rechargeable batteries may cause an explosion or a fire!
Never short-circuit the contacts of the battery. Do not throw the battery or the product into open flames. Risk of fire and explosion!
Charge the battery regularly, even when you are not using the product. Due to the rechargeable battery technology used, you do not need to discharge the rechargeable battery first.
Never leave the battery unattended when it is charging.
Place the product on a heat-resistant surface before charging the battery. It is normal for a certain amount of heat to be generated during charging.
5.6 Connected devices
Always observe the safety information and operating instructions of any other devices which are connected to the product.
5.7 LED light
Attention, LED light:
Do not look directly into the LED light!
Do not look into the beam directly or with optical instruments!
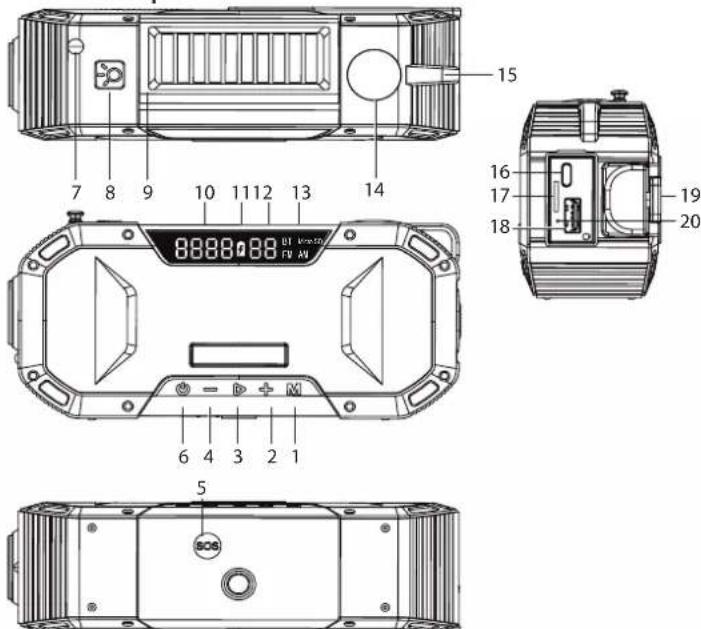
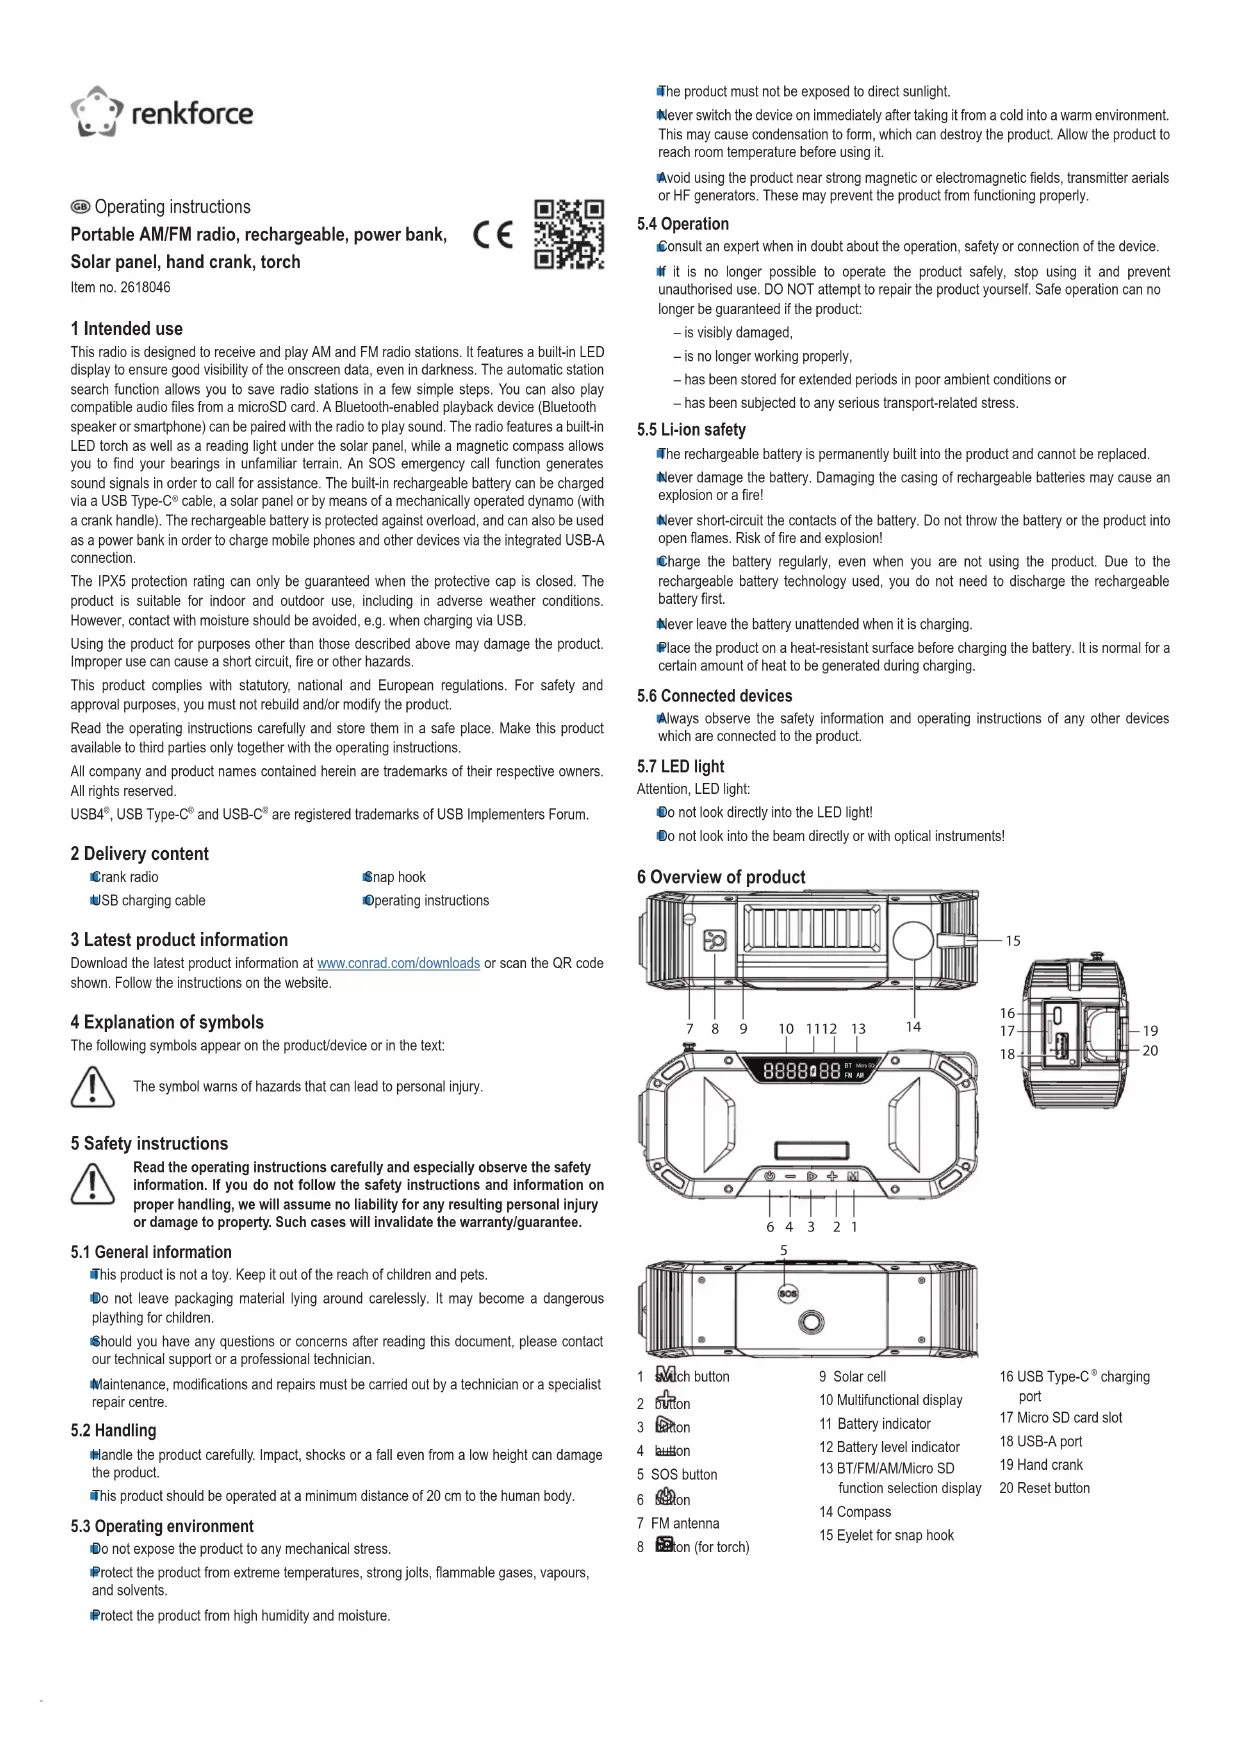
6 Overview of product
1
9 Solar cell
16 USB Type-C* charging
2 button
10 Multifunctional display
port
3 Lton
11 Battery indicator
17 Micro SD card slot
4 button
12 Battery level indicator
18 USB-A port
5 SOS button
13 BT/FM/AM/Micro SD
19 Hand crank
6 on
function selection display
20 Reset button
7 FM antenna
14 Compass
m = 311 ;
8
7 Installation
Look the snap hook (included) into the eyelet (15). You can also use other means to secure the radio in place. This gives you the option of either hanging the radio in your desired location or securing it in other ways.
is also possible to screw the radio onto a tripod. To do this, use the tripod screw thread on the bottom of the device.
Open the rubber water protection cap to reveal the USB Type-C charging port (16), the Micro SD card slot (17) and the USB-A port (18), and to plug in a USB cable or insert a microSD card. Attention! Please note that in this case (water protection cap open), the IPX5 protection rating does not apply.
8 Setup
The battery can be charged by turning the hand crank clockwise, by connecting a suitable USB power source with the correct connection specifications (see "Technical Data"), or via the solar panel.
Press and hold the button (6) to switch the device on/off.
8.1 Charging the radio with the hand crank

Before charging the device, switch it off using the button (6).
Fold out the crank handle (19) and turn it clockwise.
The battery indicator (11) will light up red when the battery is charging. Turning the crank handle (19) at speeds of 130 to 150 rpm generates sufficient current for charging the battery. When charging a completely empty battery, the radio will be ready for use after approx. 3 to 5 minutes.
After approx. 30 minutes of turning the crank handle, the battery will have a charge of up to 300mAh . The battery indicator (11) (battery symbol) lights up red when the battery is charging.
The battery indicator will switch off when the battery is fully charged. The numeric battery level indicator (12) will then show a full charge (full charge equals 99% ).

Manual charging by turning the crank handle is only intended for emergencies.
8.2 Charging via the solar panel

Before charging the device via the solar panel, switch it off using the button (6).
- Place the panel in the sun and align it at a 90^ angle to the sun.
- The battery indicator (11) will light up red when the battery is charging.
- The battery indicator will switch off when the battery is fully charged. The numeric battery level indicator (12) will then show a full charge (full charge equals 99% ).

This charging method is only suitable for the radio and the SOS function, as the charging power is comparatively low. It is generally intended to extend the battery life or to charge the battery in an emergency.
8.3 Charging via USB

Before charging the device via USB, switch it off using the button (6).
- Insert the USB charging cable into the USB Type-C* charging port (16). Charging will start automatically.
- The battery indicator (11) will light up red when the battery is charging.
- The battery indicator will switch off when the battery is fully charged. The numeric battery level indicator (12) will then show a full charge (full charge equals 99% ).
8.4 Connecting the Bluetooth speaker
- Press and hold the button (6) to switch the device on. The device will automatically enter pairing mode. The BT/FM/AM/Micro SD function selection display (13) will indicate that the Bluetooth function ("BT") is enabled.
- Enable Bluetooth on a Bluetooth-enabled device (speaker, smartphone, etc.).
- Find the Bluetooth ID "DF-580" and follow the instructions for your device to pair it with the radio. An acoustic prompt will be played to confirm that the devices have successfully paired. Once pairing is complete, the audio signal from the radio will be played on the paired device.
- To stop playback via a Bluetooth device, press the button (3)
- To switch to other modes, press the switch button (1).
8.5 Restoring factory settings
If the radio stops functioning or crashes, restore the factory settings.
Use a pointed object to press the reset button (20). The radio will switch off, after which you can switch it back on again.
9 Operation
9.1 Power bank function
the radio's battery is sufficiently charged, it can be used as a power bank for charging small devices, e.g. mobile phones.
To charge a mobile phone or similar device, plug the USB charging cable into the USB-A port (18)
9.2 Using the torch function
Press the button (8) to switch the built-in torch on/off.
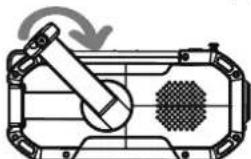
9.3 Using the reading light
- Fold out the solar cell. The reading light will switch on.
- To switch off the reading light, fold the solar cell back into place again after use.
9.4 Using the compass
Read the compass directions from the compass. The basic directions are: N = North E = East S = South and W = West (in addition to intercardinal directions, e.g. SSW). The north direction is magnetic north.
9.5 SOS function (emergency alarm)
The radio features an SOS function to call for help in the event of an emergency.
- To trigger the SOS alarm, press and hold the SOS button (5) on the bottom of the radio for 1 second. The SOS alarm will go off.
- To switch off the SOS alarm, press and hold the SOS button (5) on the bottom of the radio for 1 second. The SOS alarm will stop.

Please note that switching on the SOS function also resets the device to factory settings. Any previous Bluetooth connections must be re-established and radio stations must be reset using the automatic channel search.
9.6 Playing audio from microSD cards
- Insert a suitable Micro SD card up to 32 GB into the Micro SD card slot (17). If compatible audio files are stored on the card, playback will start automatically. Compatible file formats are MP3 and m4a audio files.
- Press the button (3) to stop the playback of an audio file.
- Press the button (3) to restart the playback of an audio file.
- Press the button (2) to skip to the next audio file.
- Press the button (4) to play the previous audio file.
9.7 Adjusting the volume
- To increase the volume, press and hold the button (2) for 3 seconds.
- To decrease the volume, press and hold the button (4) for 3 seconds.
- The volume setting is displayed on the multifunctional display (10). The volume can be set from levels 0 to 27.
9.8 Using/listening to the radio
9.8.1 Turning the radio on/off
- Press the button (6) to switch the radio on.
- Press the button (6) to switch the radio off.
9.8.2 Using the antenna
FM radio
Pull out the FM antenna (7) and change its length and orientation to receive the best signal. If there is strong interference and two or more stations are being received at once, shorten the antenna.
AM radio
A built-in magnetic antenna is used to receive medium-wave radio. To receive the best possible signal, turn the radio itself and not the antenna.
9.8.3 Setting the reception mode
- Press the switch button (1) to select the frequency band (FM, ON) for radio reception. The BT/FM/AM/Micro SD function selection display (13) will display "AM" or "FM" accordingly. Each additional press of the button switches between the frequency bands or the Bluetooth function.
- The currently selected function is displayed in the BT/FM/AM/Micro SD function selection display (13). The corresponding symbol will light up.
9.8.4 Automatic station search and station selection
- Press and hold the button (3) for 3 seconds to start the automatic station search. The radio will automatically searches for available stations in the currently selected frequency band. The detected stations will be automatically saved by the radio. It is not necessary to save the stations manually.

During the station search, you cannot select a station with the button (3), as this button will be locked. Wait until the automatic station search has finished and the stations have been saved.
- Short press the button to switch through the saved stations.
- The selected station will be displayed on the multifunctional display (10).
10 Cleaning and care
Important:
- Do not use any aggressive cleaning agents, rubbing alcohol or other chemical solutions. These may damage the housing and can cause the product to malfunction.
-
Do not immerse the product in water.
-
Disconnect the product from the power supply.
- Clean the product with a dry, lint-free cloth.
- Do not immerse the product under water.
11 Disposal

This symbol must appear on any electrical and electronic equipment placed on the EU market. This symbol indicates that this device should not be disposed of as unsorted municipal waste at the end of its service life.
Owners of WEEE (Waste from Electrical and Electronic Equipment) shall dispose of it separately from unsorted municipal waste. Spent batteries and accumulators, which are not enclosed by the WEEE, as well as lamps that can be removed from the WEEE in a non-destructive manner, must be removed by end users from the WEEE in a non-destructive manner before it is handed over to a collection point.
Distributors of electrical and electronic equipment are legally obliged to provide free take-back of waste. Conrad provides the following return options free of charge (more details on our website):
in our Conrad offices
at the Conrad collection points
at the collection points of public waste management authorities or the collection points set up by manufacturers or distributors within the meaning of the ElektroG
End users are responsible for deleting personal data from the WEEE to be disposed of.
It should be noted that different obligations about the return or recycling of WEEE may apply in countries outside of Germany.
12 Declaration of Conformity (DOC)
Conrad Electronic SE, Klaus-Conrad-Straße 1, D-92240 Hirschau hereby declares that this product conforms to the 2014/53/EU directive.
Click on the following link to read the full text of the EU declaration of conformity: www.conrad.com/downloads
Enter the product item number in the search box. You can then download the EU declaration of conformity in the available languages.
13 Technical data
13.1 Power supply
Power supply. Built-in lithium-ion rechargeable battery (5000 mAh, 3.7 V)
USB Type-C connection.. Max. 5 V/DC, 2.0 A
Power consumption.Torch 1.5 W
USB-A port output. 5V/DC,1A
Charging time approx. 3.5 hours (via USB at 5 V/DC with 2.0 A)
Charging time (solar charging) .... 20 hours for full charge (2 hours for 50 mAh (to use the SOS function)
13.2 Functions
Solar cell............ Monocrystalline
Speaker output power. 7 W (RMS)
Acoustic pressure. 80 dB
microSD card.. up to 32 GB
Volume levels 00 to 27
Play time. 20 hours
13.3 Wireless module
Device class (radio)............Class B
Reception frequency range. FM: 87.5-108 MHz
AM:522-1710 kHz
13.4 Bluetooth
Bluetooth protocol.. V 5.0 BR/EDR
Transmission power. 1.22 dBm
Frequency range 2402-2480 MHz
Transmission range. max. 10 metres
13.5 Ambient conditions
Operating/storage conditions. 20 to +60^ , 45-75% relative humidity (non-condensing)
Protection rating. IPX5
13.6 Other
Dimensions (L x H x W) 166 x 53 x 80 mm
Weight 444 g (with battery and accessories)
Mode d'emploi
Port USB-A. 5V/CC,1A
Portee de transmission.......max. 10 metres
13.5 Conditions ambientes
Conditions de
Volumeneaus .00 to 27
Afspeeltijd. 20 ur
13.3 Draadloze modulemodule
Apparaatklasse (radio) Klasse B