
ILX-LR1 - Camcorder SONY - Free user manual and instructions
Find the device manual for free ILX-LR1 SONY in PDF.
| Product Type | Camcorder |
| Brand | Sony |
| Model | ILX-LR1 |
| Device Type | Interchangeable Lens Camera |
| Lens Mount | Sony E-mount |
| Sensor | 35mm Full-frame CMOS |
| Effective Resolution | 61,000,000 pixels |
| Total Resolution | 62,500,000 pixels |
| Power Supply | 10 V to 18 V ---, 3.8 W (external power) |
| Operating Temperature | 0 °C to 40 °C |
| Storage Temperature | -20 °C to 55 °C |
| Weight (body only) | 243 g |
| Memory Card Support | SD/SDHC/SDXC (UHS-I/II) |
| Video Output | Micro HDMI Type D |
| Power Connector | Molex Micro-Fit 3.0 6-pin |
| Wi-Fi Network | IEEE 802.11 a/b/g/n/ac (2.4/5 GHz depending on model) |
| Bluetooth | Yes (2.4 GHz) |
| Supplied Accessories | Power and control cable, body cap, startup guide, reference guide |
| Main Functions | Photo shooting, movie, S&Q, smartphone sync, built-in menu |
| Safety | Internal magnets, do not expose to direct light, do not look at the sun, keep away from medical devices |
| Maintenance | Attach the lens cap for storage, clean with a soft cloth, avoid humidity |
| Mobile Compatibility | iPhone and iPad (models listed in the manual, updated May 2023) |
Frequently Asked Questions - ILX-LR1 SONY
User questions about ILX-LR1 SONY
0 question about this device. Answer the ones you know or ask your own.
Ask a new question about this device
Download the instructions for your Camcorder in PDF format for free! Find your manual ILX-LR1 - SONY and take your electronic device back in hand. On this page are published all the documents necessary for the use of your device. ILX-LR1 by SONY.
USER MANUAL ILX-LR1 SONY
https://www.sony.net/SonyInfo/Support/
©2023 Sony Corporation
Printed in Thailand

5055985410
SONY®
5-055-985-41(1)
ILX-LR1
ILX-LR1
E-mount

"Help Guide" (Web manual)
Refer to "Help Guide" for in-depth instructions on the many functions of the camera.
https://rd1.sony.net/help/ilc/2390/h_zz/
α
| Interchangeable Lens Digital Camera/Startup Guide EN | |
| Appareil photo à objectif interchangeable/Guide de démarrage FR | |
| Digitalkamera mit Wechselobjektiv/Einführungsanleitung DE | |
| Cámara Digital de Lentes Intercambiables/Guía de inicio ES | |
| Fotocamera digitale con obiettivo intercambiabile/Guida di avvio IT | |
| Câmara Digital de Objetivas intercambiáveis/Guia de inicio PT | |
| Digitale camera met verwisselbare lens/Beknopte gids NL | |
| Aparat cyfrowy z wymiennymi obiektywami/Przewodnik uruchamiania | PL |
| Цифровой фотоаппарат со сменным объективом/Руководство по началу работы | RU |
| Цифрова камера зі змінним об'єктивом/Посібник із початку роботи | UA |
| Digitalkamera med utbytbart objektiv/Startguide SE | |
| Digitaalinen kamera vaihdettavalla objektiivilla/Aloitusopas FI | |
| Digitalkamera med utskiftbart objektiv/Startveiledning NO | |
| Digitalkamera med udskifteligt objektiv/Startvejledning DK | |
ILX-LR1
About the "Help Guide"

For detailed instructions on using the camera, refer to the "Help Guide" (web manual). https://rd1.sony.net/help/ilc/2390/h_zz/
ILX-LR1 Help Guide

Preparations
Checking the supplied items
The number in parentheses indicates the number of pieces.
-
Camera (1)
• Power & Control Cable (SONY) (1)
• Body cap (1) (attached to the camera) -
Startup Guide (this manual) (1)
• Reference Guide (1)
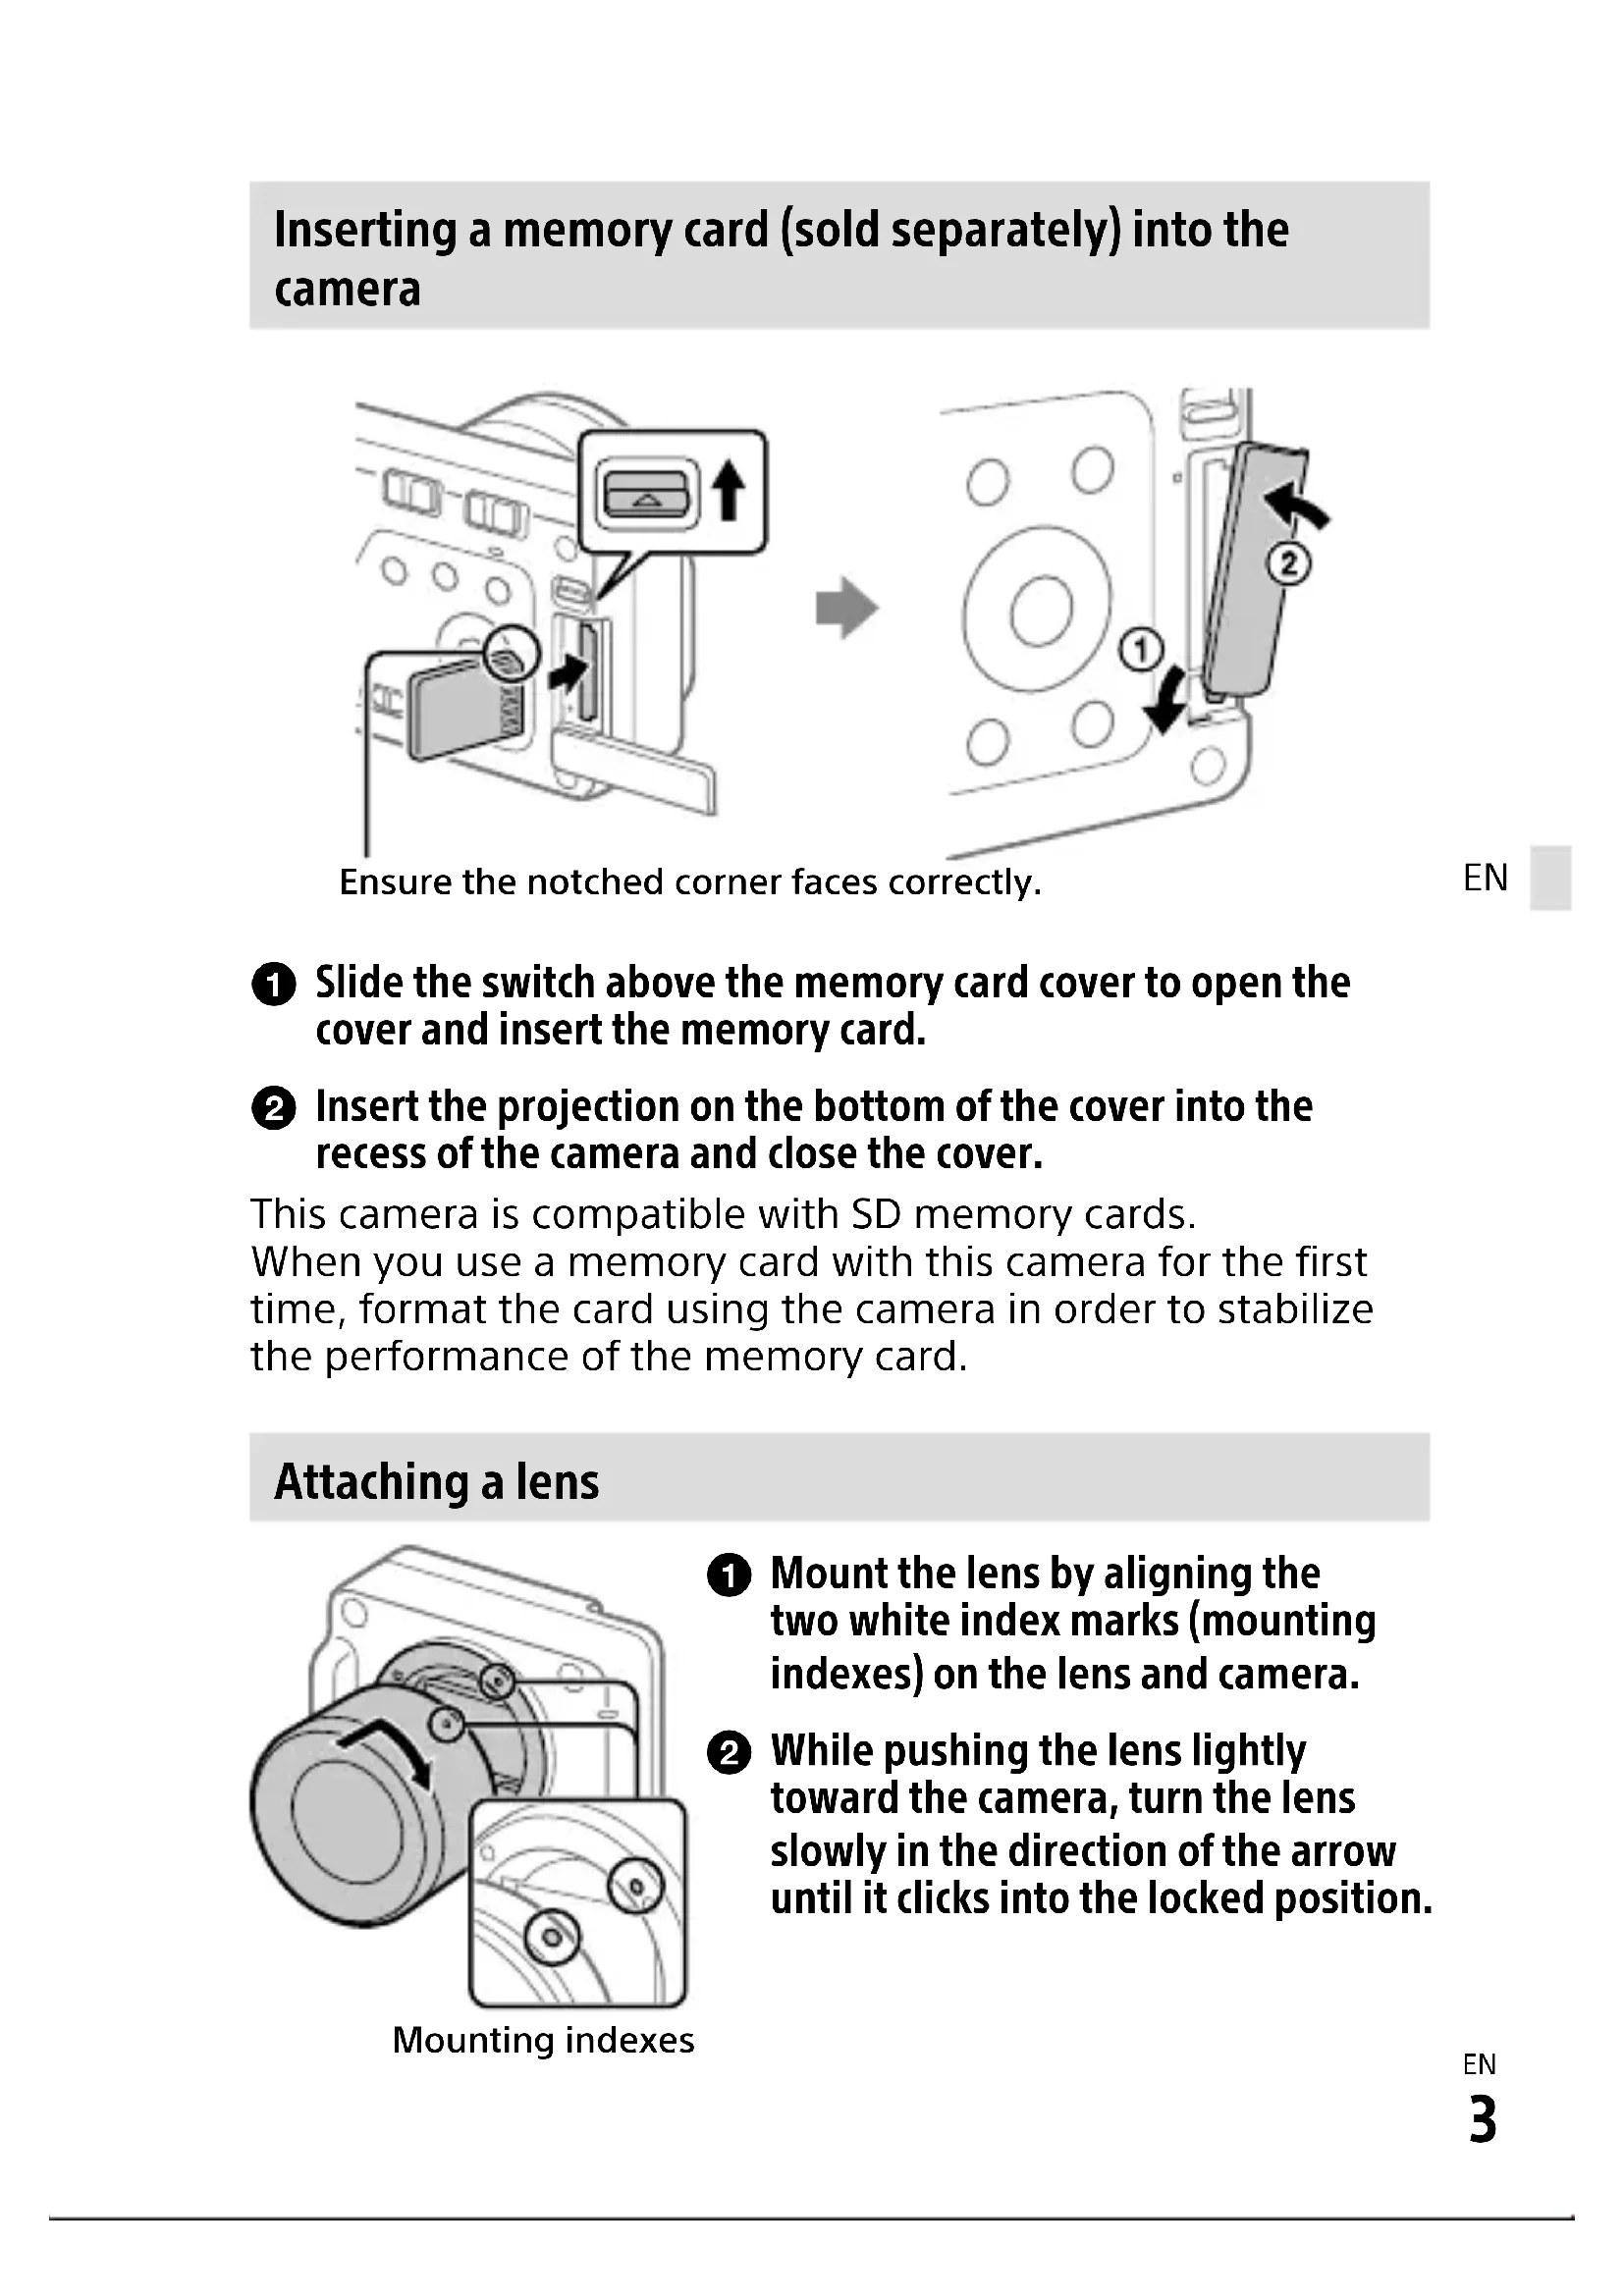
Inserting a memory card (sold separately) into the camera
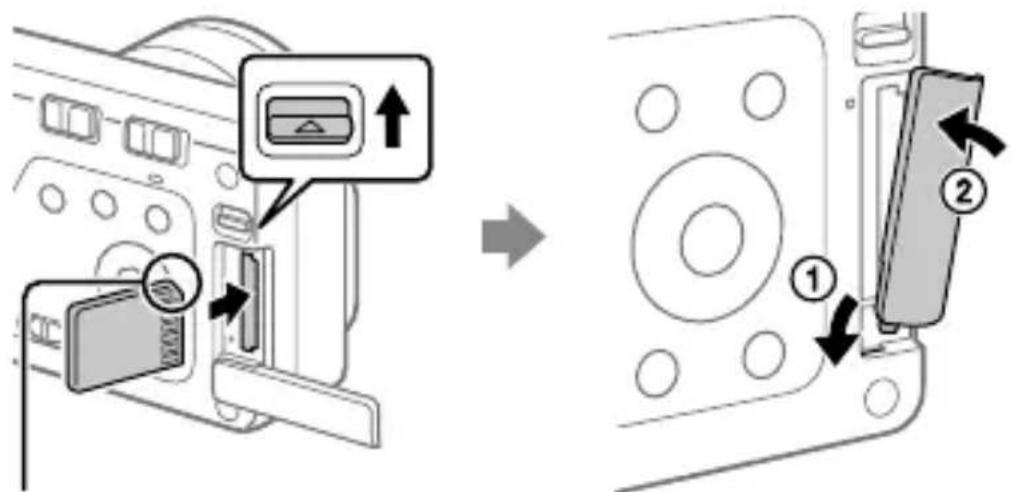
Ensure the notched corner faces correctly.
EN
① Slide the switch above the memory card cover to open the cover and insert the memory card.
② Insert the projection on the bottom of the cover into the recess of the camera and close the cover.
This camera is compatible with SD memory cards.
When you use a memory card with this camera for the first time, format the card using the camera in order to stabilize the performance of the memory card.
Attaching a lens

natural_image
Mechanical assembly diagram showing a cylindrical component with rotating arms and a close-up inset of its internal components (no text or symbols)Mounting indexes
① Mount the lens by aligning the two white index marks (mounting indexes) on the lens and camera.
② While pushing the lens lightly toward the camera, turn the lens slowly in the direction of the arrow until it clicks into the locked position.
Connecting to an external power source
Power & Control terminal
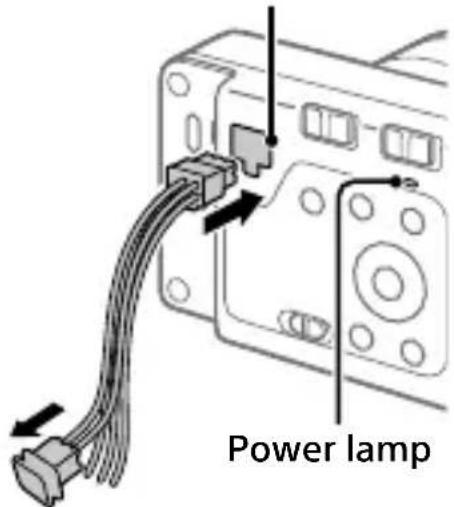
To a power supply device such as an AC adaptor
1 Connect the Power & Control Cable (supplied) to a power supply device such as an AC adaptor.
② Connect the Power & Control Cable to the Power & Control terminal of the camera.
③ Turn on the power supply device.
- Check that the power lamp of the camera is lit to ensure that power is being supplied correctly to the camera.
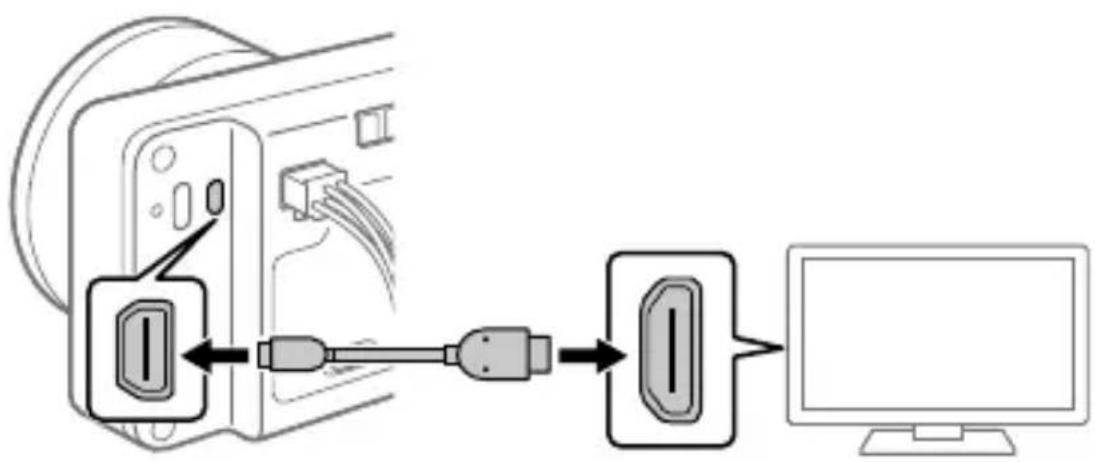
Connecting an external monitor to the camera
flowchart
graph LR
    A["Device with USB cable"] --> B["Switch"]
    B --> C["Computer"]
① Make sure that both the camera and external monitor are turned off.
② Connect the HDMI micro terminal of the camera and the HDMI terminal of the external monitor with an HDMI cable (sold separately).
3 Turn on the power of the external monitor, and then set the ON/OFF (Power) switch on the camera to "ON" to turn on the camera.
Performing initial setup for the camera
By establishing a Bluetooth connection (pairing) between the camera and a smartphone, you can perform initial camera setup such as date and time settings from the smartphone. Install the dedicated application on your smartphone in advance, and then follow steps ① to ④ under “Procedures for initial camera setup.”
Installing the dedicated smartphone application

Install the application from the following website. Also, update to the latest version of the dedicated application. The specifications of the dedicated application may change without notice.
https://www.sony.net/ca/
EN
Procedures for initial camera setup
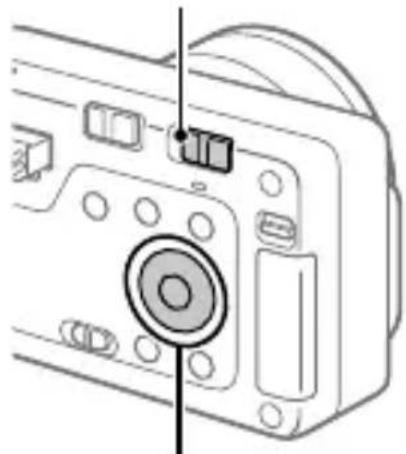
ON/OFF (Power) switch
natural_image
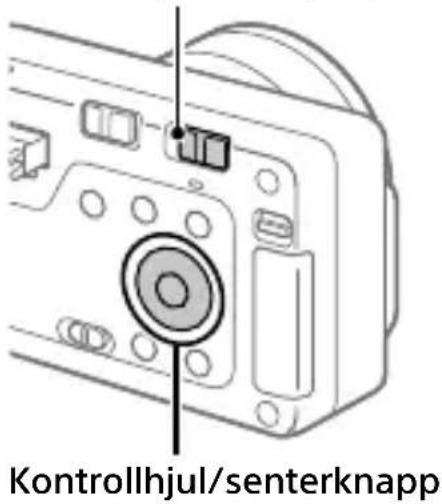
Line drawing of a camera module with no visible text or symbolsControl wheel/center button
① Turn on the power of the connected external monitor, and then set the ON/OFF (Power) switch on the camera to "ON" to turn on the camera.
② Select the desired language and then press the center of the control wheel.
- A privacy notice screen will appear on the external monitor. Read the privacy notice regarding biometrics by opening the link using your smartphone, etc.
③ Press the center of the control wheel.
4 Follow the instructions on the external monitor to connect the camera with your smartphone and perform the initial setup.
- You can also configure or change the initial settings later from the MENU of the camera.
EN
Pairing the camera with your smartphone later (Smartphone Connection)

For details on the connection method, refer to the following Help Guide URL:
https://rd1.sony.net/help/ilc/2390_pairing/h_zz/
1 Shooting still images
Shutter/MOVIE (Movie) button
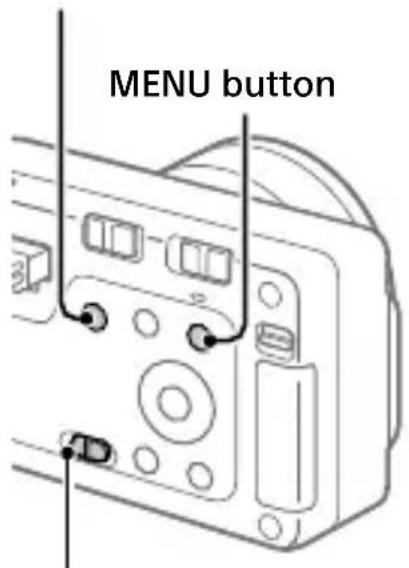
Still/Movie/S&Q switch
① Set the Still/Movie/S&Q switch to 📷 (Still).
② Press the MENU button and select (Shooting) → [Shooting Mode] → [Shoot Mode] → the desired shooting mode.
③ Press the shutter/MOVIE (Movie) button halfway down to focus.
4 Press the shutter/MOVIE (Movie) button all the way down.
Notes on use
Refer to "Precautions" in the "Help Guide" as well.
About this camera
This camera does not have a monitor, so when changing MENU settings or replacing the memory card/lens, etc., make sure that the camera operates correctly by confirming the screen of the external monitor.
Notes on handling the product
- Do not leave the lens exposed to a strong light source such as sunlight. Because of the lens's condensing function, doing so may cause smoke, fire, or a malfunction inside the camera body or the lens. If you have to leave the camera exposed to a light source such as sunlight, attach the lens cap to the lens.
- If sunlight or other strong light enters the camera through the lens, it may focus inside the camera and cause smoke or fire. Attach the lens cap when storing the camera. When shooting with backlighting, keep the sun sufficiently far away from the angle of view. Even if it is slightly away from the angle of view, smoke or fire may still occur.
- Do not look at sunlight or a strong light source through the lens when it is detached. This may result in unrecoverable damage to the eyes or cause a malfunction.
-
This camera (including accessories) has magnet(s) which may interfere with pacemakers, programmable shunt valves for hydrocephalus treatment, or other medical devices. Do not place this camera close to persons who use such medical devices. Consult your doctor before using this camera if you use any such medical device.
-
Increase the volume gradually. Sudden loud noises can damage your ears.
- Do not leave the camera, the supplied accessories, or memory cards within the reach of infants. They may be accidentally swallowed. If this occurs, consult a doctor immediately.
- When shooting still images continuously, the connected external monitor may flash between the shooting screen and a black screen. If you keep watching the screen in this situation, you may experience uncomfortable symptoms such as feeling of unwellness. If you experience uncomfortable symptoms, stop using the camera, and consult your doctor as necessary.
- Do not hold the camera in your hand while using it. Fix the camera to a device or equipment, etc. Be careful when operating the buttons or removing the camera from the equipment, as the camera will become hot when used for long periods of time.
Sony lenses/accessories
Using this unit with products from other manufacturers may affect its performance, leading to accidents or malfunction.
Note on the 5 GHz band for wireless LAN
When using the wireless LAN function outdoors, set the band to 2.4 GHz by following the procedure below. (WW559681 only)
- MENU → (Network) → [Wi-Fi] → [Wi-Fi Frequency Band]
How to turn off wireless network functions (Wi-Fi, etc.) temporarily
When you board an airplane, etc., you can turn off all wireless network functions temporarily using [Airplane Mode].
For Customers in the U.S.A. and Canada
This equipment complies with FCC radiation exposure limits set forth for an uncontrolled environment and meets the FCC radio frequency (RF) Exposure Guidelines. This equipment should be installed and operated keeping the radiator at least 20 cm or more away from person's body.
This equipment complies with ISED radiation exposure limits set forth for an uncontrolled environment and meets RSS-102 of the ISED radio frequency (RF) Exposure rules. This equipment should be installed and operated keeping the radiator at least 20 cm or more away from person's body.
For Customers in the U.S.A.
For question regarding your product or for the Sony Service Center nearest you, call 1-800-222-SONY (7669).
Supplier's Declaration of Conformity
Trade Name : SONY
Model : WW559681
Responsible Party : Sony Electronics Inc.
Address : 16535 Via Esprillo, San
Diego, CA 92127 U.S.A.
Telephone Number : 858-942-2230
Important note on use of 5 GHz wireless LAN
Compliance with FCC requirement 15.407(c)
Data transmission is always initiated by software, which is the passed down through the MAC, through the digital and analog baseband, and finally to the RF chip. Several special packets are initiated by the MAC.
These are the only ways the digital baseband portion will turn on the RF transmitter, which it then turns off at the end of the packet. Therefore, the transmitter will be on only while one of the aforementioned packets is being transmitted. In other words, this device automatically discontinue transmission in case of either absence of information to transmit or operational failure.
Frequency Tolerance: ±20 ppm
For Customers in Canada
5 150-5 350 MHz band is restricted to indoor operation only.
High-power radars are allocated as primary users (i.e. priority users) of the bands 5 250-5 350 MHz and 5 650-5 850 MHz and that these radars could cause interference and/or damage to LE-LAN devices.
For Customers in Europe
| IEEE802.11b/g/n | 2 400 MHz | < 60 mW e.i.r.p. |
| IEEE802.11a/n/ac | 5 150 -5 350 MHz5 470 -5 725 MHz | < 35 mW e.i.r.p. |
| IEEE802.11a/n/ac | 5 725 -5 850 MHz | < 25 mW e.i.r.p. |
| Bluetooth | 2 400 MHz | < 10 mW e.i.r.p. |
Hereby, Sony Corporation declares that this equipment is in compliance with Directive 2014/53/EU.
The full text of the EU declaration of conformity is available at the following internet address:
https://www.compliance.sony.eu
Hereby, Sony Corporation declares that this equipment is in compliance with the UK relevant statutory requirements.
The full text of the declaration of conformity is available at the following internet address:
https://compliance.sony.co.uk
For this radio equipment the following restrictions on putting into service or of requirements for authorization of use apply in AT/BE/BG/CY/CZ/DK/EE/FI/FR/DE/EL/HU/IE/IT/LV/LT/LU/MT/NL/PL/PT/RO/SK/SI/ES/SE/UK/UK(NI)/HR/IS/LI/NO/CH/AL/BA/MK/MD/RS/ME/XK/TR:
5 150 - 5 350 MHz band is restricted to indoor operations only.
Specifications
Camera
[System]
Camera Type: Interchangeable Lens Digital Camera
Lens: Sony E-mount lens
[Image sensor]
Image format: 35 mm full frame, CMOS image sensor
Effective pixel number of camera: Approx. 61 000 000 pixels
Total pixel number of camera: Approx. 62 500 000 pixels
[General]
Rated input: 10 V to 18 V, -3.8 W
Power & Control Cable (DC IN jack):
![SONY ILX-LR1 - [General] - 1](/content/2026/04/659232/images/d2fc5ccfc58c69a096831f4c916a80630368930ad78b4dc3cd9b931b8f8274ac.jpg)
Operating temperature: 0 to 40 °C (32 to 104 °F)
Storage temperature: -20 to 55 °C (-4 to 131 °F)
HDMI type D micro jack
Power & Control terminal Molex Micro-Fit 3.0 6pin (430450622)
UHS-I/II compatible SD memory card slot
Dimensions (W/H/D) (Approx.): 100 × 74 × 42.5 mm (4 × 3 × 11/16 in.)
Mass (Approx.): 243 g (8.6 oz) (camera body only)
[Wireless LAN]
WW559681 (see name plate on the bottom of camera)
Supported format: IEEE 802.11 a/b/g/n/ac
Frequency band: 2.4 GHz/5 GHz
WW853104 (see name plate on the bottom of camera)
Supported format: IEEE 802.11 b/g/n
Frequency band: 2.4 GHz
Design and specifications are subject to change without notice.
Compatible iPhone/iPad models
iPhone 14 Pro Max, iPhone 14 Pro, iPhone 14 Plus, iPhone 14, iPhone SE (3rd generation), iPhone 13 Pro Max, iPhone 13 Pro, iPhone 13, iPhone 13 mini, iPhone 12 Pro Max, iPhone 12 Pro, iPhone 12, iPhone 12 mini, iPhone SE (2nd generation), iPhone 11 Pro Max, iPhone 11 Pro, iPhone 11, iPhone XS Max, iPhone XS, iPhone XR, iPhone X, iPhone 8 Plus, iPhone 8, iPhone 7 Plus, iPhone 7, iPhone SE, iPhone 6s Plus, iPhone 6s, iPad Air (3rd, 4th, and 5th generation), iPad (5th through 10th generation), iPad mini (6th generation), iPad Pro 12.9-inch (1st through 6th generation), iPad Pro 11-inch (1st through 4th generation), iPad Pro 10.5-inch, iPad Pro 9.7-inch, iPad Air 2, iPad mini (5th generation), iPad mini 4 (As of May 2023)
Trademarks/Licenses
• is a trademark of Sony Group Corporation.
- Apple, iPhone and iPad are trademarks of Apple Inc., registered in the U.S. and other countries.
- USB Type-C® and USB-C® are registered trademarks of USB Implementers Forum.
- The terms HDMI, HDMI High-Definition Multimedia Interface, and the HDMI Logo are trademarks or registered trademarks of HDMI Licensing Administrator, Inc.
- Wi-Fi, the Wi-Fi logo and Wi-Fi Protected Setup are registered trademarks or trademarks of the Wi-Fi Alliance.
- The Bluetooth® word mark and logos are registered trademarks owned by Bluetooth SIG, Inc. and any use of such marks by Sony Group Corporation and its subsidiaries is under license.
- QR Code is a trademark of Denso Wave Inc.
- In addition, system and product names used in this manual are, in general, trademarks or registered trademarks of their respective developers or manufacturers. However, the ™ or ® marks may not be used in all cases in this manual.
IMPORTANT – Read the End User Software License Agreement before using your Sony product.
Using your product indicates your acceptance of the End User Software License Agreement. The software license agreement between you and Sony is available at the following URL:
(https://rd1.sony.net/help/di/el23/h_zz/)
- Use of the Made for Apple badge means that an accessory has been designed to connect specifically to the Apple product(s) identified in the badge, and has been certified by the developer to meet Apple performance standards. Apple is not responsible for the operation of this device or its compliance with safety and regulatory standards.
Made for

Additional information on this product and answers to frequently asked questions can be found at our Customer Support Website.
https://www.sony.net/
https://rd1.sony.net/help/ilc/2390/h_zz/
natural_image
Mechanical assembly diagram showing a cylindrical component with rotating arms and a close-up inset of its internal components (no text or symbols)Repères de montage
flowchart
graph LR
    A["Device with cable"] --> B["USB cable"]
    B --> C["Computer"]
https://www.sony.net/ca/
natural_image
Line drawing of a camera module with no visible text or symbolsDimensions (L/H/P) (approx.): 100 × 74 × 42,5 mm (4 × 3 × 1 11/16 po)
natural_image
Mechanical component diagram showing a cylindrical housing with rotating arms and a close-up inset of its internal structure (no text or symbols)Ansetzindexe
flowchart
graph LR
    A["Device with USB cable"] --> B["USB cable"]
    B --> C["Computer"]
https://www.sony.net/ca/
DE
natural_image
Line drawing of a camera module with no visible text or symbolsEinstellrad/Mitteltaste
https://rd1.sony.net/help/ilc/2390/h_zz/
natural_image
Mechanical assembly diagram showing a cylindrical component with rotating arms and a close-up inset of its internal components (no text or symbols)Índices de montura
flowchart
graph LR
    A["Device with cable"] --> B["USB cable"]
    B --> C["Computer"]
https://www.sony.net/ca/
natural_image
Line drawing of a camera module with no visible text or symbols- MENU → (Red) → [Wi-Fi] → [Banda de frec. Wi-Fi]
https://rd1.sony.net/help/ilc/2390/h_zz/
ILX-LR1 Guida

Preparazioni
natural_image
Mechanical assembly diagram showing a cylindrical component with rotating arms and a close-up inset of its internal components (no text or symbols)Indici di montaggio
flowchart
graph LR
    A["Device with cable"] --> B["USB cable"]
    B --> C["Computer"]
natural_image
Line drawing of a camera module with no visible text or symbols- MENU → (Rete) → [Wi-Fi] → [Banda freq. Wi-Fi]
https://rd1.sony.net/help/ilc/2390/h_zz/
natural_image
Mechanical assembly diagram showing a cylindrical component with rotating arms and a close-up inset of its internal components (no text or symbols)Índices de montagem
flowchart
graph LR
    A["Device with cable"] --> B["USB cable"]
    B --> C["Computer"]
https://www.sony.net/ca/
natural_image
Line drawing of a camera module with no visible text or symbolshttps://rd1.sony.net/help/ilc/2390/h_zz/
ILX-LR1 Helpgids

Voorbereidingen
natural_image
Mechanical assembly diagram showing a cylindrical component with rotating arms and a close-up inset of its internal components (no text or symbols)Vattingmarkeringen
https://www.sony.net/ca/
NL
NL
natural_image
Line drawing of a camera module with no visible text or symbols- MENU → (Netwerk) → [Wi-Fi] → [Wi-Fi-frequent.band]
https://rd1.sony.net/help/ilc/2390/h_zz/
natural_image
Mechanical assembly diagram showing a rotating component with directional arrows and a magnified inset (no text or symbols)Wskaźniki mocowania
flowchart
graph LR
    A["Device with USB cable"] --> B["USB cable"]
    B --> C["Computer"]
https://www.sony.net/ca/
PL
PL
natural_image
Line drawing of a camera module with no visible text or symbolsnatural_image
Mechanical assembly diagram showing a cylindrical component with rotating arms and a close-up inset of its internal components (no text or symbols)Метка крепления
flowchart
graph LR
    A["Device with USB cable"] --> B["USB cable"]
    B --> C["Computer"]
https://www.sony.net/ca/
RU
natural_image
Diagram of a camera module with no visible text or symbolsnatural_image
Mechanical assembly diagram showing a cylindrical component with rotating arms and a close-up inset of its internal components (no text or symbols)flowchart
graph LR
    A["Device with USB cable"] --> B["USB cable"]
    B --> C["Computer"]
natural_image
Line drawing of a camera module with no visible text or symbolsnatural_image
Mechanical assembly diagram showing a cylindrical component with rotating arms and a close-up inset of its internal components (no text or symbols)Monteringsmärken
flowchart
graph LR
    A["Device with USB cable"] --> B["USB cable"]
    B --> C["Computer"]
https://www.sony.net/ca/
SE
SE
5
natural_image
Line drawing of a camera module with no visible text or symbolsStyrratt/mittknapp
Avtryckare/ MOVIE (film)-knapp
MENU-knapp
natural_image
Mechanical assembly diagram showing a cylindrical component with rotating arms and a close-up inset of its internal components (no text or symbols)Kiinnitinindeksit
flowchart
graph LR
    A["Device with USB cable"] --> B["USB cable"]
    B --> C["Computer"]
natural_image
Line drawing of a camera module with no visible text or symbolsKiekkopainike/keskipainike
Hvis du vil vite mer om bruk av kameraet, kan du se "Hjelpeveiledning" (Internett-håndbok). https://rd1.sony.net/help/ilc/2390/h_zz/
ILX-LR1 Hjelpeveiledning

Forberedelser
Kontrollere leverte deler
Tallet i parentes angir antall deler.
natural_image
Mechanical assembly diagram showing a rotating component with directional arrows, alongside a close-up of its internal components (no text or symbols)Fatningsindekser
flowchart
graph LR
    A["Device with cable"] --> B["USB cable"]
    B --> C["Computer"]
https://www.sony.net/ca/
ON/OFF (Strømbryter)
Stillbilde/Film/S&Q-bryter
natural_image
Mechanical assembly diagram showing a cylindrical component with rotating arms and a close-up inset of its internal components (no text or symbols)Monteringsindeks
https://www.sony.net/ca/
natural_image
Line drawing of a camera module with no visible text or symbolsKontrolhjul/midterknap
- SONY®
- ILX-LR1
- α
- About the "Help Guide"
- Preparations
- Checking the supplied items
- Inserting a memory card (sold separately) into the camera
- Attaching a lens
- Connecting to an external power source
- Connecting an external monitor to the camera
- Performing initial setup for the camera
- Installing the dedicated smartphone application
- Procedures for initial camera setup
- Pairing the camera with your smartphone later (Smartphone Connection)
- Shooting still images
- Notes on use
- Refer to "Precautions" in the "Help Guide" as well.
- About this camera
- Notes on handling the product
- Sony lenses/accessories
- Note on the 5 GHz band for wireless LAN
- How to turn off wireless network functions (Wi-Fi, etc.) temporarily
- For Customers in the U.S.A. and Canada
- For Customers in the U.S.A.
- Supplier's Declaration of Conformity
- Important note on use of 5 GHz wireless LAN
- For Customers in Canada
- 150-5 350 MHz band is restricted to indoor operation only.
- For Customers in Europe
- Specifications
- Camera
- [System]
- [Image sensor]
- [General]
- [Wireless LAN]
- Compatible iPhone/iPad models
- Trademarks/Licenses
- IMPORTANT – Read the End User Software License Agreement before using your Sony product.
- Preparazioni
- Voorbereidingen
- Forberedelser
- Kontrollere leverte deler
Brand : SONY
Model : ILX-LR1
Category : Camcorder