
HBL5B2 011 - Blender HAIER - Free user manual and instructions
Find the device manual for free HBL5B2 011 HAIER in PDF.

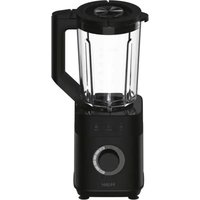
| Product type | Blender |
| Brand | Haier |
| Model | HBL5B2 011 |
| Power | 1200 W |
| Voltage | 220-240 V ~ 50/60 Hz |
| Net weight | 5 kg |
| Glass bowl capacity | 1 L (max liquid) |
| Personal bowl capacity | 0.6 L (max) |
| Speeds | Manual variable speed (MIN-MAX) + pulse function (P) |
| Automatic programs | Ice crush (1 min), Smoothie (1 min), Auto clean (30 s) |
| Safety function | Safety lock stops motor if lid or bowl improperly positioned |
| Protection | Automatic stop after 3 min of continuous use |
| Bowl material | Glass |
| Blade material | Stainless steel |
| Dishwasher safe parts | Measuring cup, multi-serve lid, glass bowl, bowl blade, personal bowl, lid, spatula |
| Included accessories | Glass bowl, personal bowl, lids, extra blade, 2-in-1 spatula/tamper |
| Use | For household use only |
| Compliance | CE |
Frequently Asked Questions - HBL5B2 011 HAIER
User questions about HBL5B2 011 HAIER
0 question about this device. Answer the ones you know or ask your own.
Ask a new question about this device
Download the instructions for your Blender in PDF format for free! Find your manual HBL5B2 011 - HAIER and take your electronic device back in hand. On this page are published all the documents necessary for the use of your device. HBL5B2 011 by HAIER.
USER MANUAL HBL5B2 011 HAIER
natural_image
Line drawing of a modern kitchen blender with control buttons and a rotary knob (no text or symbols)User manual (GB) ......P5
natural_image
Line drawing of a blender with a power plug and fan (no text or symbols)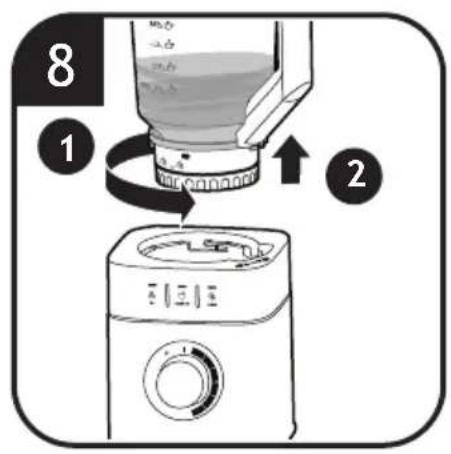
natural_image
Illustration of a glass pouring liquid from a bottle into a small glass (no text or symbols)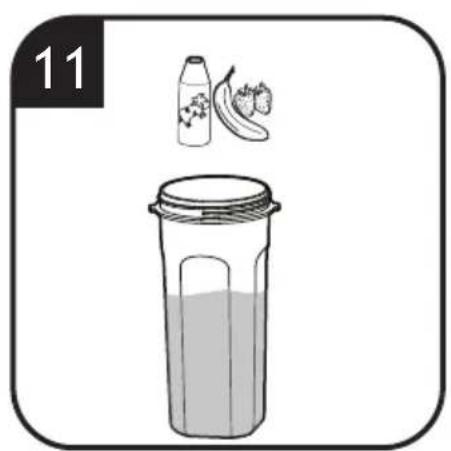
natural_image
Illustration of a glass jar containing a liquid, with a bottle and banana in the background (no text or symbols)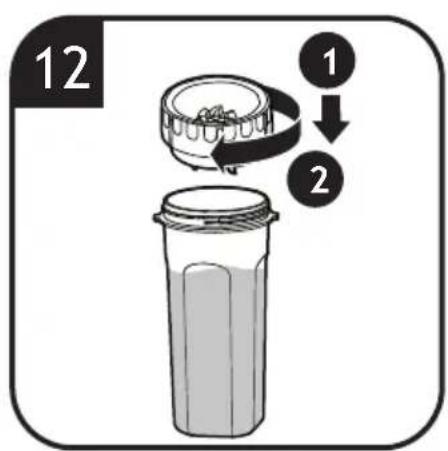
natural_image
Illustration of a blender with liquid being poured into it, no text or symbols present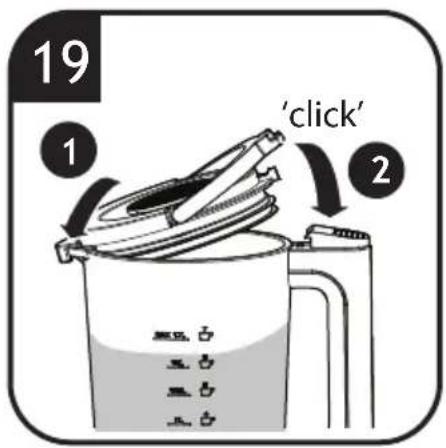
natural_image
Illustration of a hand mixer in a kitchen sink with a numbered label '21' (no text or symbols on the diagram itself)
This appliance is intended for domestic use only as described in this user guide. Please ensure that this guide is fully understood before operating the appliance.
WARNING To eliminate suffocation hazard for young children, discard all packaging materials immediately after removing the product.
The appliance can be used by persons with reduced physical, sensory or mental capabilities or lack of experience and knowledge if they have been given supervision or instruction concerning use of the appliance in a safe way and if they understand the hazards involved.
Children shall be supervised to ensure that they do not use or play with the appliance. Keep the appliance and its cord out of reach of children.
Do not pull or carry the appliance by the power cord. Always unplug the appliance from the socket by pulling the plug instead of the cord. Do not place the power cord over sharp edges or near hot surfaces. Do not use extension cord.
If the power cord is damaged stop using the appliance immediately. To avoid a safety hazard, an authorized Haier service engineer must replace the power cord.
Use only attachments, consumables or spares recommended or supplied by Haier.
WARNING Risk of injury!
Misuse of the appliance can potentially lead to injury.
CAUTION Cutting blades are very sharp, be careful when handling the sharp cutting blades during assembling and disassembling, emptying the jug and during cleaning.
CAUTION Ensure that the blender is switched off before removing it from the stand.
Always disconnect the appliance from the supply if it is left unattended and before assembling, disassembling or cleaning.
The blender is only to be used with the stand provided.
Only use the appliance in accordance with the power specification on the rating plate.
Only use the appliance on a dry level surface and never move it when working.
The appliance is only intended to blend or mix food with recommended size and quantity in the instructions. It must not be used for other than intended use.
Do not use a glass jug right after being taken out from dishwasher or refrigerator.
Be sure it stays at room temperature for at least 5 min before use.
Do not operate the appliance until the blade unit is securely fastened and the lid is properly assembled to the blender jug.
Be careful if hot liquid is poured into the blender as it can be ejected out of the appliance due to a sudden steaming. Never fill the blender jug with ingredients hotter than 70°C.
Switch off the appliance and disconnect from power supply before changing accessories or approaching parts that move in use.
Never insert your fingers into the blender jug to touch the sharp blades or remove the ingredients when the appliance is plugged in.
Never insert your fingers or an object into the blender jug while the appliance is working.
If some ingredients stick to the sides of the blender jug, switch off and unplug the appliance, then use the provided spatula to remove the ingredients from the sides.
Disconnect from power supply and allow the cutting blades to completely stop before removing any parts and before cleaning or any maintenance. Never immerse the motor base in liquid. Do not operate the appliance with wet hands.
Pay attention to clean surfaces which are intended to come into contact with food! Please note the information on cleaning in the instructions. Do not continue to use your appliance if it appears faulty.
Haier service: To ensure the continued safe and efficient operation of this appliance we recommend that any servicing or repairs are only carried out by an authorized Haier service engineer.
Recipe
Vegetable/Fruit juice (Max speed for 2 min maximum)
Food size: 1.5 cm x 1.5 cm x 1.5 cm Glass jug: 680 g carrots + 1020 g water
Personal cup: 240 g carrots + 360 g water
Smoothie (Program setting for 1 min)
Food size: 1.5 cm x 1.5 cm x 1.5 cm Glass jug: 680 g carrots + 1020 g water
Personal cup: 240 g carrots + 360 g water
Ice crush (Program setting for 1 min)
Food size: 2 cm x 2 cm x 2 cm
Glass jug: 200 g ice cube
Personal cup: 100 g ice cube
Auto clean (Program setting for 30 s)
Glass jug: 1.7 L water
Personal cup: Max scale (0.6 L) water
Note on the recipe:
1) For each use, the consecutive operation time should be less than 2
minutes. At least 10 minutes rest time must be maintained between two continuous cycles, let the unit cool to room temperature before performing next operation cycle.
2) If you want to stop the machine during operation, turn the knob to I position anytime.
The Environment
The symbol on this appliance indicates that this appliance may not be treated as household waste. Instead it must be handed over to the applicable collection point for the recycling of electrical and electronic equipment. Disposal must be carried out in accordance with local environmental regulations for waste disposal. For more detailed information about treatment, recovery and recycling of this appliance, please contact your local city office, your household and waste disposal service or the shop where you purchased the appliance.


This appliance complies with the European Directives 2014/35/EU, 2014/30/EU and
2011/65/EU.
CANDY HOOVER GROUP S.r.l. Via Comolli 16, 20861 Brugherio (MB) Italy
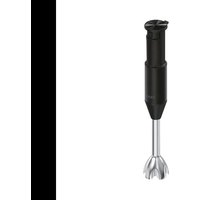
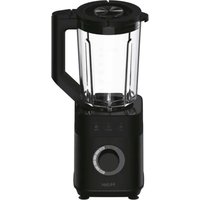
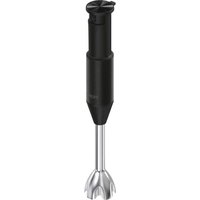
2. Getting to know your Blender
COMPONENTS & FEATURES:
A. Measuring cup
B. Lid hook
C. Lid of multi-serve jug
D. Measuring cup holder
E. Lid handle release
F. Lid latch
G. Glass jug
H. Multi-serve jug's blade
I. Preset buttons:

Ice crush function

Smoothie function

Auto clean function
J. Rotary knob
P: Pulse function icon
I : Standby mode
MVariable manual speed LED indicator
K. Main body
L. Personal cup's blade
M. Personal cup
N. Lid of Personal cup
O. 2-in-1 spatula and tamper
3. Before first use
- Before you use the appliance and accessories for the first time, thoroughly clean the parts that come into contact with food. Before you clean the appliance, unplug it. (Cleaning details refer to Chapter 5)
- To prevent spillage, do not put more than 1 litre of liquid in the blender jug.
- When you process hot liquid or ingredients that tend to foam, do not put more than 1.5 liters in the blender jug.
- Do not let the appliance run for more than 3 minutes at a time. Let the appliance cool down to room temperature before you continue processing.
- Do not mix pieces of ingredients larger than 2 x 2 x 2 cm.
To avoid overloading the appliance, you can
- Add more liquid ingredient.
- Process in several small batches.
• Use a higher speed setting.
- Do not attempt to process very thick ingredients such as bread dough or mash potatoes.
- Do not operate the appliance at no-load.
Built-in safety lock
- As a safety feature, when the blender is plugged in, if the lid, jug or knob are not in the correct position, the motor will be disabled, and the LEDs will flash continuously to caution.
- When the lid and jug are properly installed and the blender is plugged in, the lightbar LED lights will illuminate in a clockwise animation for 1 s and the 3 program LED will illuminate indicating the appliance is ready to use.
Safety Protection
- The blender has a safety protection system to prevent the motor overheating after a long time in use.
- When blender is run over 3 minutes, it will stop processing automatically. If you have not finished processing after 3 minutes, switch off the appliance and let it cool down to room temperature.
- After 3 minutes, if the blender is not in use, it will automatically go into sleep mode. Press the program function or rotate the knob to awaken the blender.
Note: Never use over 3 minutes consecutively.
4. Using your Blender
Glass jug
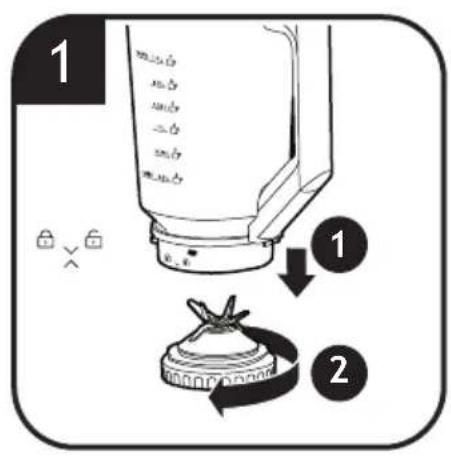
- Lower the glass jug onto the multi-serve jug's blade, rotate the multi-serve jug's blade clockwise until it locks into place. [Fig. 1]
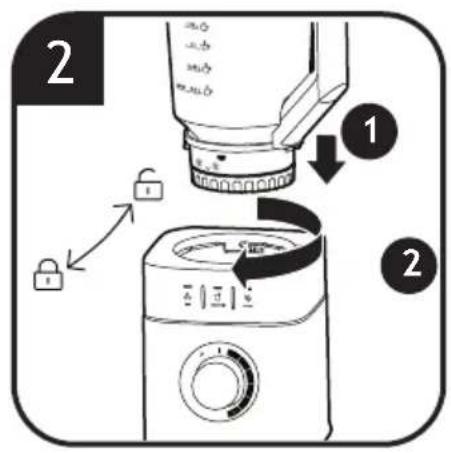
- Lower the glass jug onto the main body, rotate the glass jug clockwise until it locks into place. [Fig. 2]
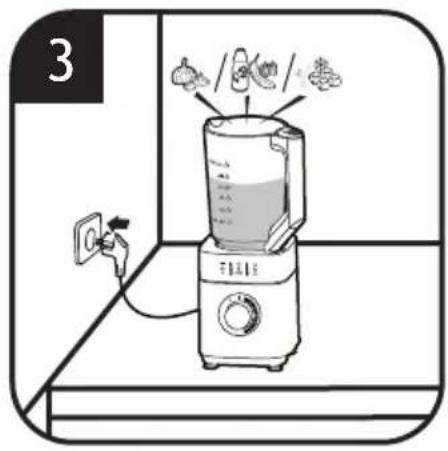
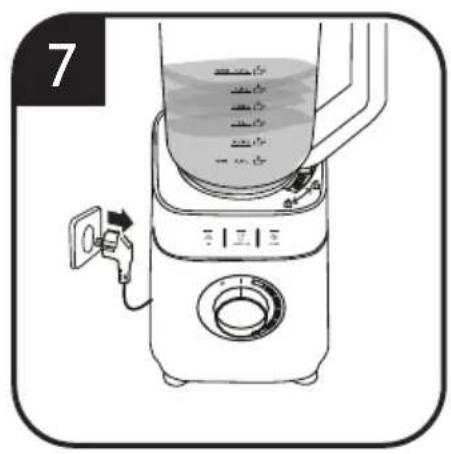
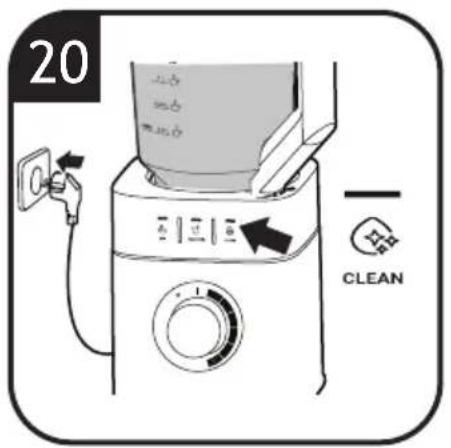
- Place on a level dry surface such as a table or work top and plug in. [Fig. 3]
-
Add ingredient to the glass jug. Do not mix pieces of ingredients larger than 2 x 2 x 2 cm. [Fig. 3]
-
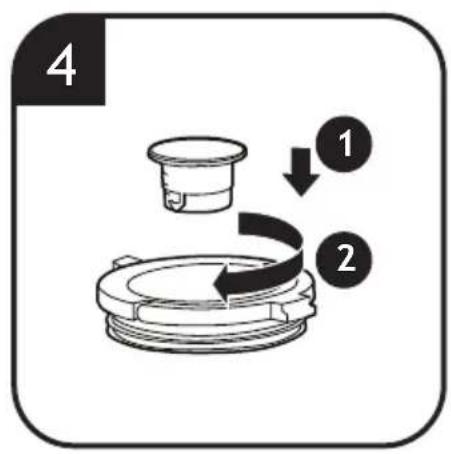
Push down the measuring cup and turn it clockwise until it locks into the holder of the lid. [Fig. 4]
-
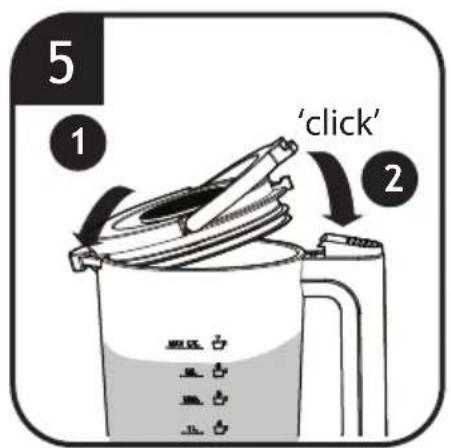
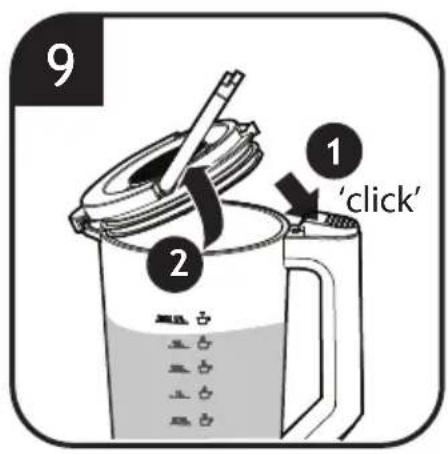
Fit the lid of multi-serve jug onto the glass jug to avoid any splashes during blending. [Fig. 5]
-
The lid hook must be located onto the jug spout first, the lid handle release must be pressed under the lid latch when the lid handle is fully assembled you hear a "click" sound. [Fig. 5]
-
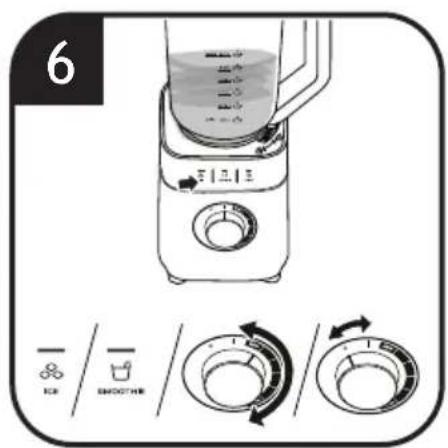
Once the product is fully assembled, the preset buttons will illuminate, and the function will be ready for use. Either press the preset button to run auto programs or operate the knob to blend manually. (For details refer to the function section) [Fig. 6]
-
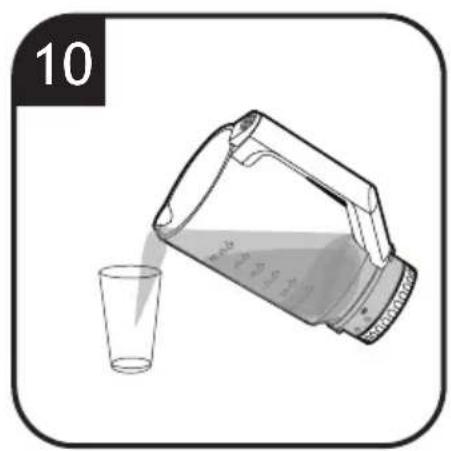
After blending, unplug it and turn the glass jug anti-clockwise and pour out to enjoy. [Fig. 7,8,9,10]
3 buttons function
(Turn the rotary knob to the standby position)
-
Ice crush :Press the button to crush ice finely with pre-programmed duration (1min).
-
Smoothie ☐: Press the button to make smoothie with pre-programmed duration (1min).
-
Auto clean : Press the button to clean with pre-programmed duration (30s).
-
All the programs stop automatically, but you also can press once to stop.
-
Manual variable speed: Rotate knob (J) to activate manual variable speed by rotating between MIN and MAX or rotate and hold the knob anticlockwise to P to use the pulse function, release knob to stop.
Personal cup
-
Put the ingredient into the personal cup. [Fig. 11]
-
Put the personal blender's blade onto the personal cup and rotate personal blender's blade clockwise until it locks into place. [Fig. 12]
-
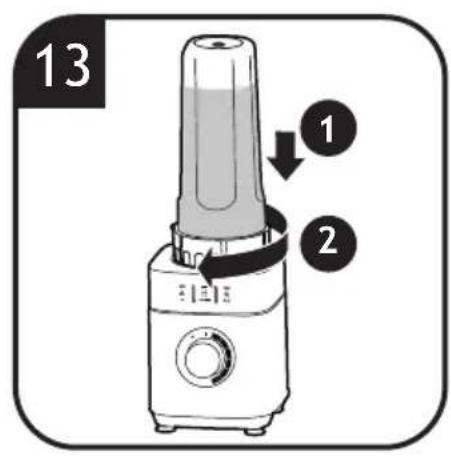
Rotates the personal cup clockwise until it locks into the main body, and plug in. [Fig. 13]
-
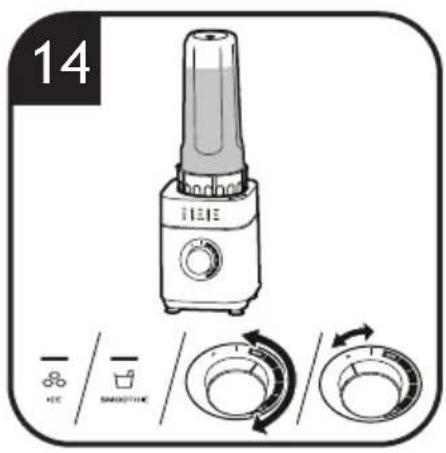
Select the procedure you want to blend. (Details refer to previous section) [Fig. 14]
-
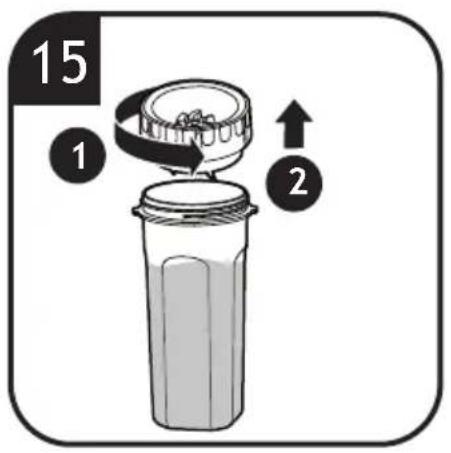
After blending, unplug it and remove the personal cup from the main body by rotating the cup anti-clockwise.
-
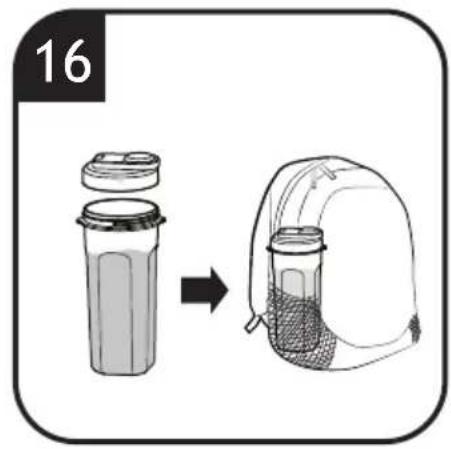
Turn the personal cup upside down with the personal cup blade base on the top, remove the personal blender's blade and attach the lid of the personal cup. Then you can enjoy using the personal cup. [Fig. 15,16]
Measuring cup
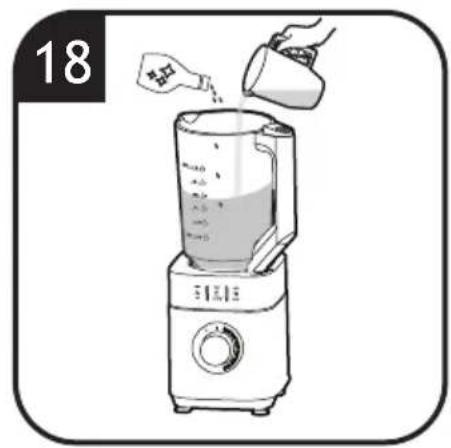
Add ingredients to the glass jug by using the measuring cup. DO NOT add ingredients past the MAX line on the jug.
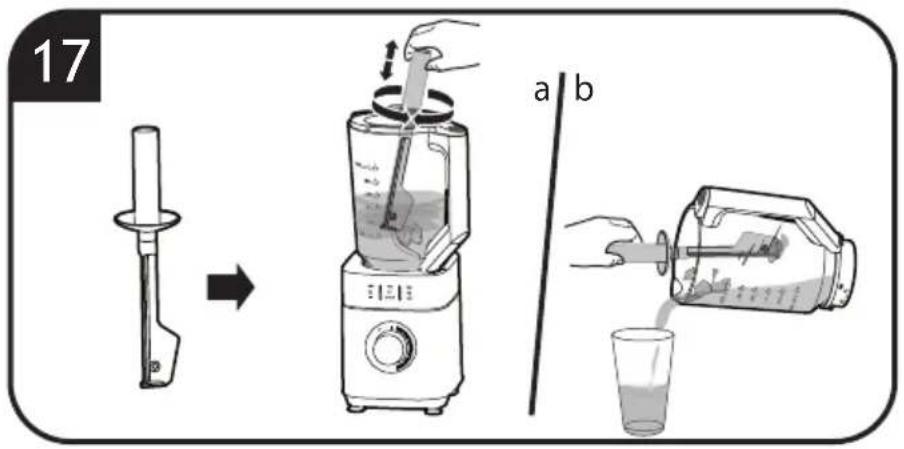
2-in-1 spatula and tamper [Fig. 17]
Using your tamper: When product is switched on, remove the measuring cup and insert the tamper into the measuring cup holder. Press it down lightly on the food to enhance the smoothness. [Fig. 17a]
Using your spatula: It can help to remove the sticky ingredients on the glass jug walls. Make sure product is switched off. [Fig. 17b]
Caution: Do not store the liquid or food in the personal cup for more than 2 hours.
5. Cleaning & Maintenance
- Before you clean the appliance, unplug it.
- The cutting edges are sharp. Be careful when you clean the blade unit.
- Make sure that the cutting edges of the blade do not come into contact with hard objects. This may cause the blades to get blunt.
- Clean the main body with a moist cloth.
- Clean the other parts in hot water (<70°C /158F°) with some washing-up liquid or in a dishwasher.
Cord storage
The cord can be stored in the main body which can be pushed in for storage and pulled out for use.
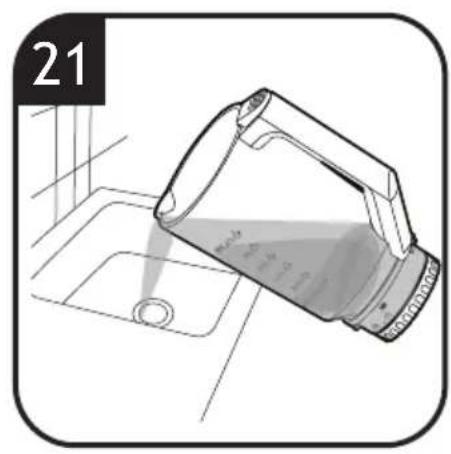
Cleaning [Fig. 18,19,20,21]
- Use the auto clean function to clean the glass jug or personal cup immediately after use.
Glass jug: Fill up 1 L of hot water(<70°C/158°F) along with 1 or 2 drops of washing up liquid.
Personal cup: Fill up the half cup of hot water(<70°C/158°F) along with 1 drop of washing up liquid.
An excess of washing up liquid creates more foam and consequently can lead to
overflowing.
2. The following parts/tools can be dishwasher cleaned: [Fig. 22]
- Measuring cup
- Lid of multi-serve jug
- Glass jug
- Multi-serve jug's blade
- Personal cup's blade
- Personal cup
- Lid of Personal cup
• 2-in-1 spatula and tamper
It is recommended to disassemble all the components following the indication chart before to washing in the dishwasher.
6. Troubleshooting
The appliance is not working.
Cause: The main plug of the power cord is not plugged in.
Solution:
- Connect the appliance to the power supply.
- The circuit breaker in the fuse box has tripped.
- Set the rotary switch to standby mode 1.
- Place the blender jug onto the main unit and rotate in a clockwise direction until it locks into place.
Appliance has a humming sound.
Cause: The blade is blocked or stiff.
Solution:
- Set the rotary switch to standby mode and unplug the appliance.
- Remove the blockage.
Appliance switches off during use.
Cause: Processing quantity is too great or processing time was too long.
Solution:
- Reduce the processing quantity. Make sure the pieces of ingredients not larger than 2 x 2 x 2 cm.
- Set the rotary switch to standby mode. Allow the appliance to cool down to room temperature.
Liquid is leaking from the blade base
Cause: Seal is missing or not properly assembled from the blade base.
Solution:
- Insert or reassemble the seal.
Liquid leak from the bottom
Cause: Liquid in the jug is too much or there is residue on the jug wall.
Solution:
- Wipe dry the surface of the jug and motor unit.
- Don't worry if liquid enters into the main body as it has a drain tank inside.
7. Technical data
| Electrical connection 220-240V~50-60Hz | |
| Power 1200W | |
| Net weight 5kg | |
8. Important information
Spares and Consumables
Always replace parts with genuine spares. These are available from your local dealer. When ordering parts always quote your model number.
Quality
Factories have been independently assessed for quality. Our products are made using a quality system which meets the requirements of ISO 9001.
Your Guarantee
The guarantee conditions for this appliance are as defined by our representative in the country in which it is sold. Details regarding these conditions can be obtained from the dealer from whom the appliance was purchased. The bill of sale or receipt must be produced when making any claim under the terms of this guarantee.
Nettoyage [Fig. 18,19,20,21]
Reinigung [Abb. 18,19,20,21]
Caraffa in vetro: acqua 1.7 L
Pulizia [Fig. 18,19,20,21]
Glazen kan: water 1.7 L
Schoonmaken [Afb. 18,19,20,21]
Limpeza [Fig. 18,19,20,21]
Limpieza [Fig. 18,19,20,21]
Rengøring [Fig. 18,19,20,21]
Smoothie (Programinnstilling for 1 min)
Matvarestørrelse: 1.5 cm x 1.5 cm x 1.5 cm
Isknusing (Programinnstilling for 1 min)
(Programinnstilling for 30 s)
Glassbeholder: 1.7 L vann
Personlig kopp: Maks beger (0,6 L) vann
Rengöring [Fig. 18,19,20,21]
Čištění [Obr. 18,19,20,21]
Čistenie [Obr. 18,19,20,21]

- Recipe
- Note on the recipe:
- The Environment
- Getting to know your Blender
- COMPONENTS & FEATURES:
- Before first use
- Built-in safety lock
- Safety Protection
- Using your Blender
- Glass jug
- buttons function
- Personal cup
- Measuring cup
- 2-in-1 spatula and tamper [Fig. 17]
- Cleaning & Maintenance
- Cord storage
- Cleaning [Fig. 18,19,20,21]
- The following parts/tools can be dishwasher cleaned: [Fig. 22]
- Troubleshooting
- The appliance is not working.
- Appliance has a humming sound.
- Appliance switches off during use.
- Liquid is leaking from the blade base
- Liquid leak from the bottom
- Technical data
- Important information
- Spares and Consumables
- Quality
- Your Guarantee
- Nettoyage [Fig. 18,19,20,21]
- Reinigung [Abb. 18,19,20,21]
- Pulizia [Fig. 18,19,20,21]
- Schoonmaken [Afb. 18,19,20,21]
- Limpeza [Fig. 18,19,20,21]
- Limpieza [Fig. 18,19,20,21]
- Rengøring [Fig. 18,19,20,21]
- Rengöring [Fig. 18,19,20,21]
- Čištění [Obr. 18,19,20,21]
- Čistenie [Obr. 18,19,20,21]
Brand : HAIER
Model : HBL5B2 011
Category : Blender