STM11 - Steam cleaner Duronic - Free user manual and instructions
Find the device manual for free STM11 Duronic in PDF.
| Product type | Steam mop |
| Brand | Duronic |
| Model | STM11 |
| Power | 1100 W |
| Voltage | 220-240 V, 50/60 Hz |
| Dimensions | 118 x 27 x 14 cm |
| Weight | 2 kg |
| Cable length | 4.5 m |
| Tank capacity | 300 ml |
| Maximum temperature | 120 °C |
| Steam flow rate | 22 ml/min |
| Usage | Cleaning hard floors (tile, linoleum, varnished wood) |
| Included components | Handle, pole, main unit, water tank, mop head, mop pad, cable hooks |
| Recommended water type | Demineralized or distilled water only |
| Cleaning and maintenance | Clean the unit with a dry or damp cloth; do not immerse; wash the mop pad in machine at 40°C max |
| Safety | Automatic indicator light (red -> green); do not use on people/animals; do not touch with wet hands |
| Spare parts | Replacement mop pad model STM-SP available at duronic.fr |
| Warranty | 1 year (Shine-Mart Ltd) |
| General information | Household use only |
Frequently Asked Questions - STM11 Duronic
User questions about STM11 Duronic
0 question about this device. Answer the ones you know or ask your own.
Ask a new question about this device
Download the instructions for your Steam cleaner in PDF format for free! Find your manual STM11 - Duronic and take your electronic device back in hand. On this page are published all the documents necessary for the use of your device. STM11 by Duronic.
USER MANUAL STM11 Duronic
Creative Consumer Products
natural_image
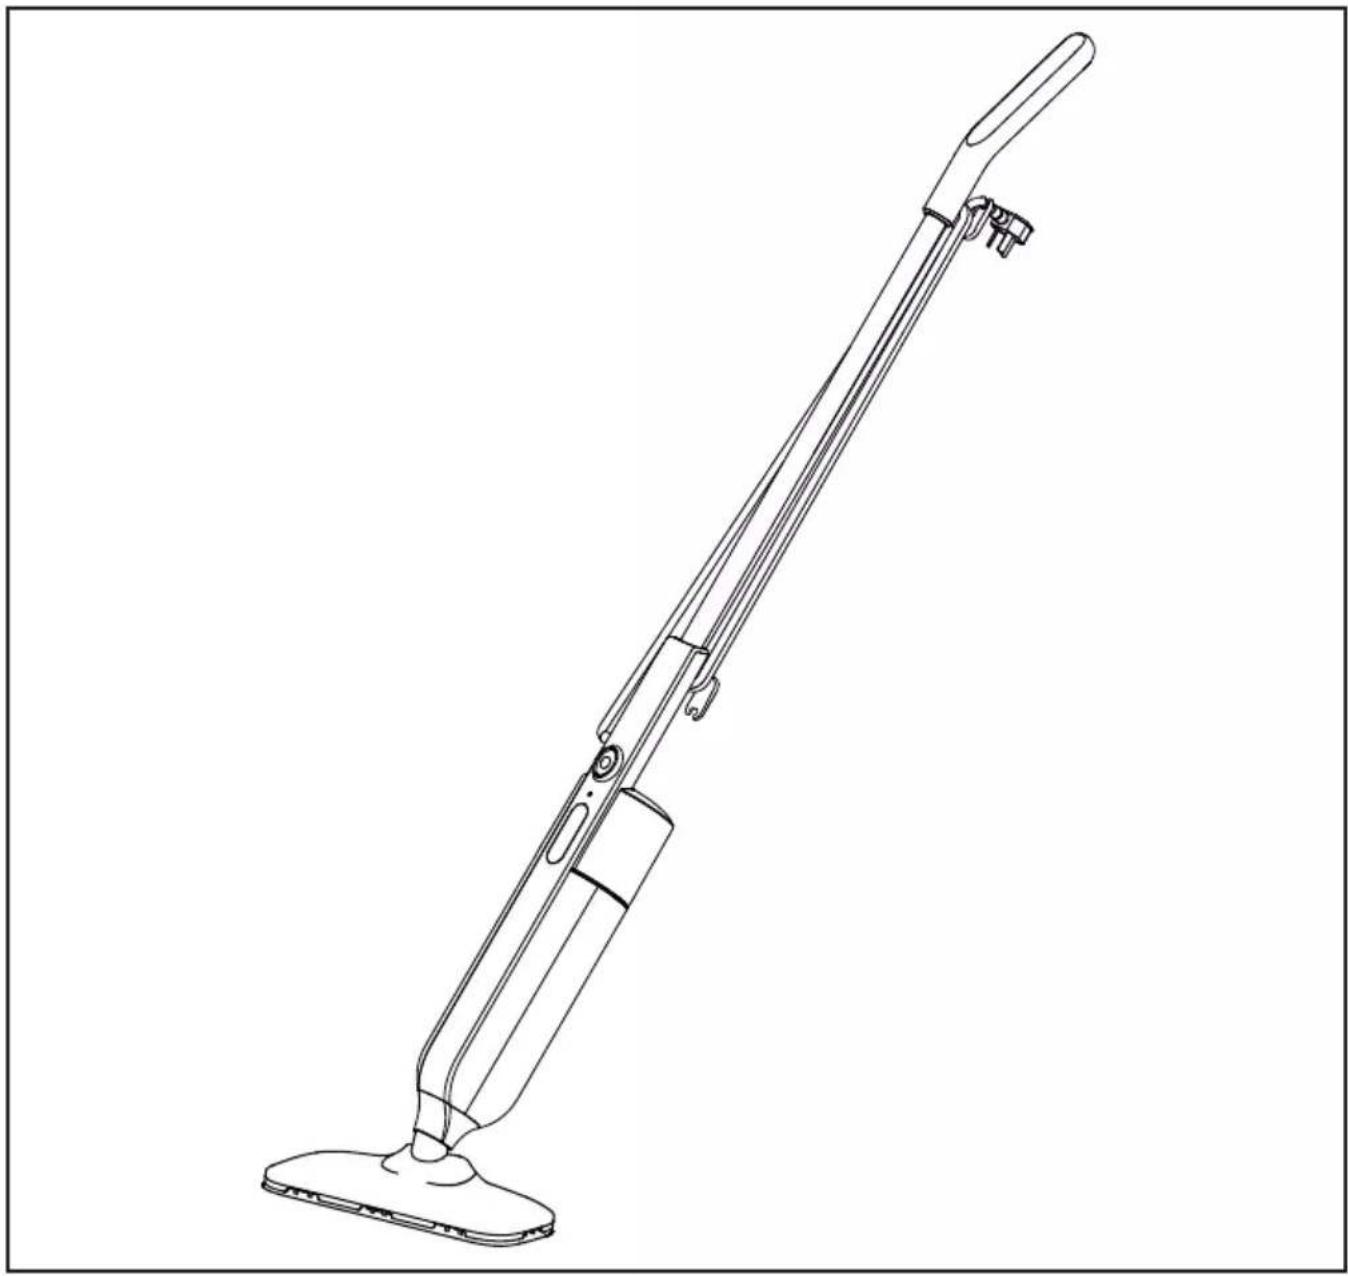
Line drawing of a single vacuum cleaner with handle and base (no text or symbols)STM11 STEAM MOP
PLEASE READ ALL THE INSTRUCTIONS BEFORE USE

duronic.com

duronic

@duronicmedia

Duronic

@duronicmedia
Contents
English Manual 3
Features and Specifications
| Product Code | Power Voltage | DimensionsWeight Cable Length | Tank Capacity | Max °C | Steam Flow Rate |
| STM11 | 1100W-220 - 240V, 50/60Hz | 118x27x14cm46.4x 10.6x5.5in2 kg4.5m | 300ml | 120°C 22ml/min |
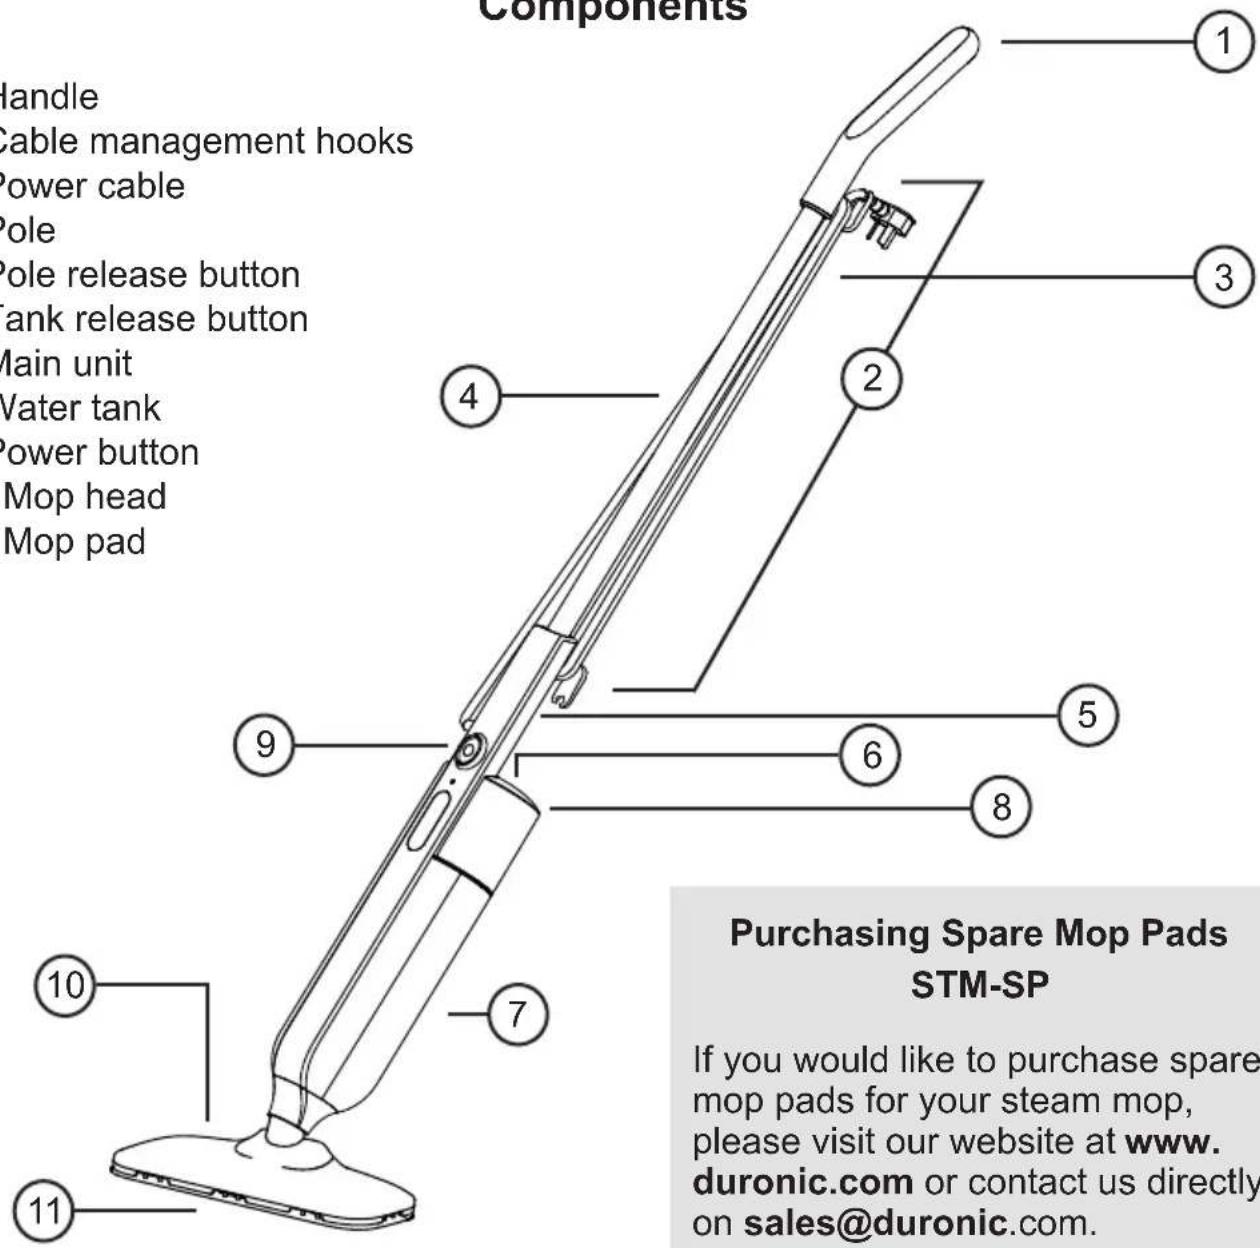
Components
- Handle
- Cable management hooks
- Power cable
- Pole
- Pole release button
- Tank release button
- Main unit
- Water tank
- Power button
- Mop head
- Mop pad
text_image
Components 1 2 3 4 5 6 7 8 9 10 11 handle cable management hooks lower cable hole hole release button tank release button Main unit Water tank lower button Mop head Mop pad Purchasing Spare Mop Pads STM-SP If you would like to purchase spare mop pads for your steam mop, please visit our website at www. duronic.com or contact us directly on sales@duronic.com.Purchasing Spare Mop Pads STM-SP
If you would like to purchase spare mop pads for your steam mop, please visit our website at www.duronic.com or contact us directly on sales@duronic.com.
DURONIC
Safety Information
PLEASE READ THIS MANUAL CAREFULLY AND RETAIN FOR FUTURE REFERENCE
• This appliance is for indoor/household use only. Do not use outdoors.
- This appliance is not designed for commercial or industrial use; it is for household use only.
- This appliance is not intended for use by persons (including children) with reduced physical, sensory or mental capabilities, or lack of experience and knowledge unless they have been given supervision or instruction concerning the use of the appliance by a person responsible for their safety.
- Children should be closely supervised at all times to ensure that they do not play with the appliance.
- Only use the appliance out of the reach of children because it gets hot.
- Do not operate this appliance if the power cable or plug is damaged. If either is damaged, return it to Duronic for service or repair by a professional technician.
- Never try to replace the parts and repair the unit by yourself. Do not modify the appliance in any way that is not described in the instructions for use. The machine contains live parts. Repairs may only be carried out by Duronic, using original spare parts and accessories.
- If an extension lead/cable is needed to reach the appliance to a mains power socket that is too far away out of reach of the machine's accompanying cable, please ensure that:
- the marked electrical rating of the extension lead is at least as great as the electrical rating of the appliance.
- the extension lead is of the grounded type.
- no other appliance is plugged into the same extension lead.
- the extension cable is safely positioned to avoid it being pulled on by children or animals or being tripped over.
- Do not cover the air inlet or the air outlet vent openings while the appliance is operating.
DURONIC
Safety Information (continued)
• Always turn off the steam mop before unplugging from the outlet.
- Unplug from the mains plug outlet when not in use.
- Never disconnect the plug by pulling on the power cable. You should always hold the plug with your hand and pull to disconnect.
- To protect against the risk of electric shock, do not immerse any part of steam mop in water or other liquids.
- The appliance is not to be used if it has been dropped, if there are visible signs of damage or if it is leaking.
- The appliance should not be left unattended while connected to the mains power.
- Do not use the steam mop for anything other than cleaning floors.
- Do not use tap water, synthetic solutions, scale removers, fragrances, soaps, chemicals, or any other foreign bodies to the water tank.
- Ensure that there is no foreign matter blocking the steam outlet.
- When the mop cleaning head is used, the temperature output is higher. Do not put your hands o feet under the mop head to avoid scalding.
• Always test the mop on an inconspicuous area first. Never use on materials that can not resist high temperature, such as dralon, natural fur etc.
- To avoid deformation, do not use the steam mop on a just-polished waxed wood floor. A flooring like this, made of special material or that requires specific cleaning via a specific method, should no be steam cleaned using this mop.
- Do not use on unsealed wooden or hard flooring.
- Don't use the steam mop in one place or the same place over and over again. Depending on the type of material the floor is made of, it may deform or fade.

CAUTION
- When using a steam mop, do not turn it upside down or spray it in the direction of people or animals. Danger of scalding!
- Never touch the plug or cable with wet hands. Risk of electrocution.
IMPORTANT:
- Only use deionised or distilled water in this steam mop.
- Do not use tap water, detergents, disinfectants, scented oils, cleaning solutions, bleach, vinegar or scented water in your steam mop. They will cause damage to your product and void your warranty.
Introduction
Using only water, a steam mop will clean your household floors without the need for harmful or toxic chemicals, leaving you with peace of mind that your family's wellbeing is taken care of.
In addition to this, steam mopping cleans and dries the flooring simultaneously, providing a nicer finish on smooth or shiny flooring as it ensures that streaks or marks aren't left behind.
Steam cleaning with the STM11 steam mop will bring a completely new level of cleanliness to your home. From the kitchen to bathroom, this lightweight steam mop will take care of the hard cleaning work so that you don't have to.
It is ideal for cleaning hard floors such as sealed wood, lino or tiles. Thanks to its simplistic design, it is easy to manoeuver along every edge and corner, blitzing away bacteria, dirt and scum along the way, leaving you with beautifully clean floors.
DURONIC
Before First Use
- Remove all of the packaging materials. Check that there are no parts missing.
- Assemble the steam mop following the steps below.
IMPORTANT:
- This steam mop operates by emitting steam at an increased temperature of 120^ C.
• Always test on an inconspicuous area of the floor first. - Never use it on flooring which cannot resist this temperature, or on floorings with coatings, polishes, or that are plastic or antique.
- If in any doubt, please check carefully on a part of the floor surface where minor marks will not matter.
IMPORTANT:
- Only use deionised or distilled water in this steam mop.
- Do not use tap water, detergents, disinfectants, scented oils, cleaning solutions, bleach, vinegar or scented water in your steam mop. They will cause damage to your product and void your warranty.
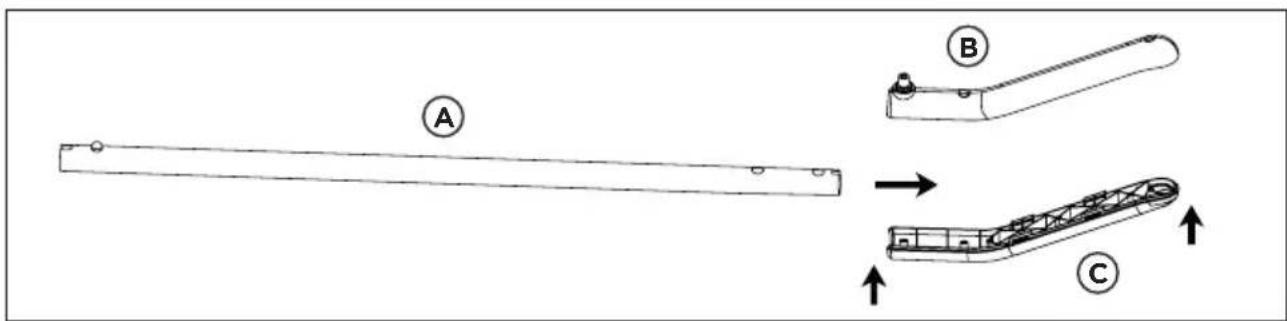
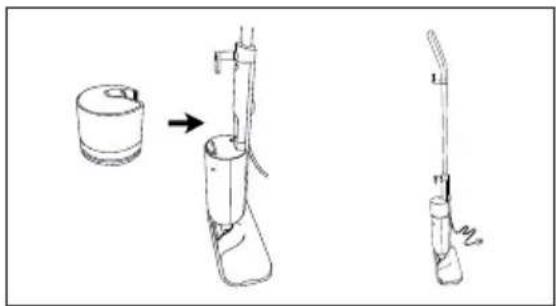
How to Assemble the Mop
text_image
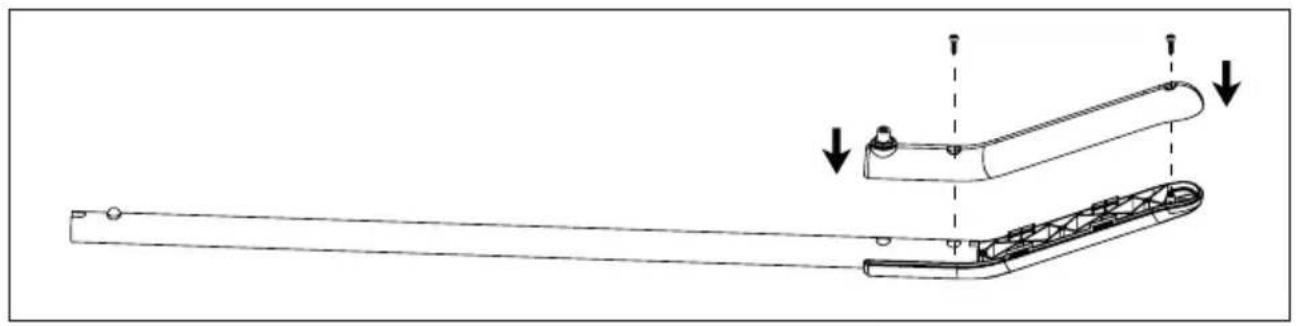
Technical diagram showing three labeled components (A, B, C) of a mechanical assembly with directional arrows indicating motion or assembly.- Place the pole(A) between the handle parts(B+C).
natural_image
Technical line drawing of a mechanical assembly with two components and directional arrows indicating motion (no text or symbols)- Fix them together with the two screws provided using a screwdriver.
text_image
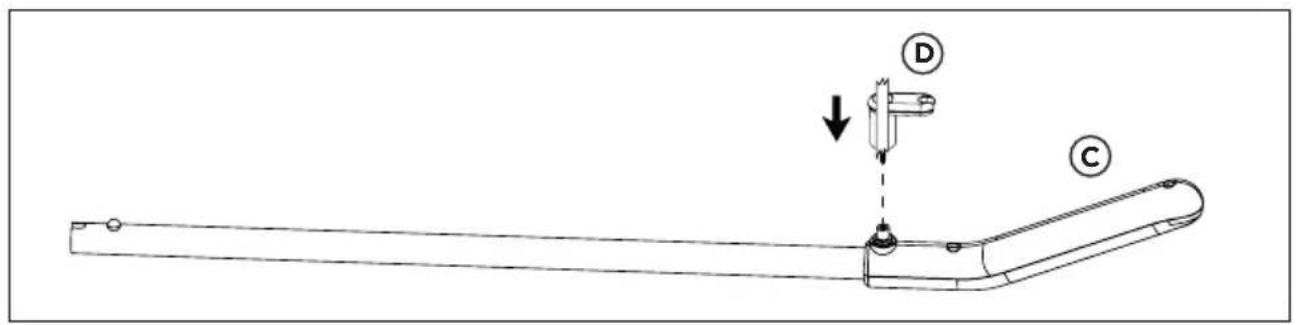
Technical diagram showing a mechanical assembly with labeled components D and C, including a downward arrow indicating direction.- Place the cable hook(D) into place on the handle(C).
natural_image
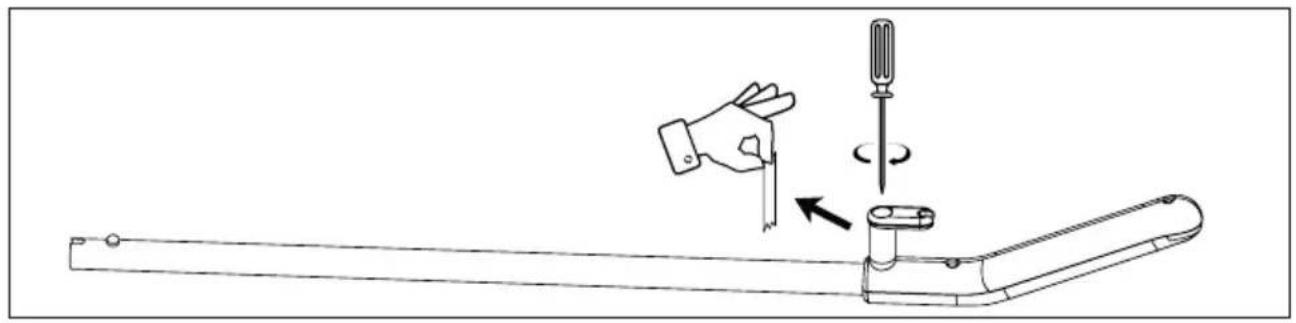
Line drawing of a hand holding a tool next to a screwdriver and a small component, with no text or symbols present.- Remove the tape and secure the hook into place using the integrated screw which is already inside the hook.
text_image
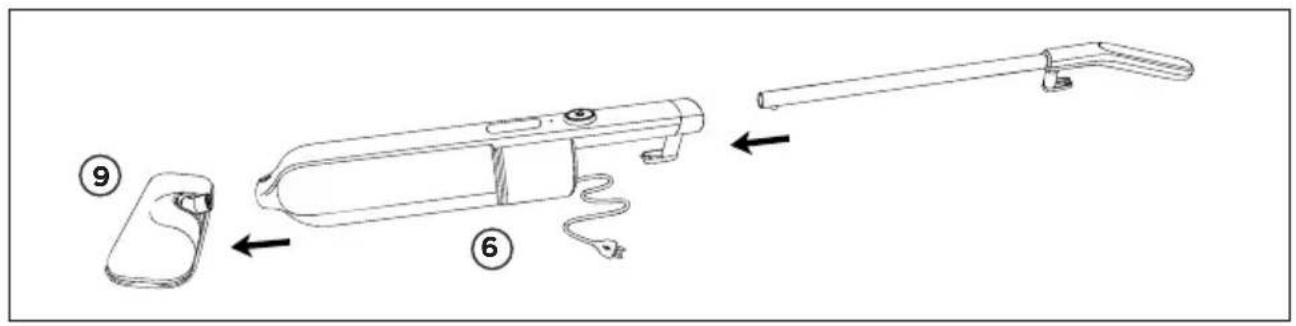
Technical diagram showing exploded and assembled views of a handheld device with numbered annotations- On the main unit(6), press down on the pole release button and slide the handle into the main unit until you hear a "click" sound. The click sound means the handle is now locked in place. Lastly, attach the mop head(9) to the main unit ensuring it is clicked in place.
How to Use
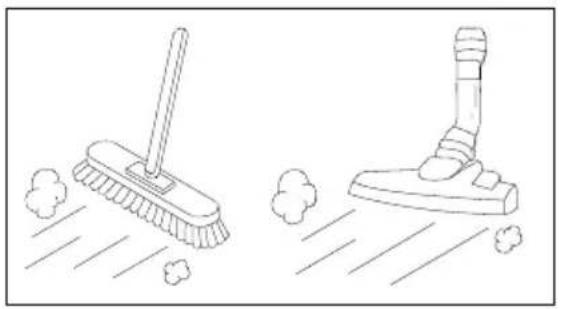
- Before using the steam mop, ensure that hard floors are swept or vacuumed to remove any surface dirt or debris.
natural_image
Illustration of two brooms with motion lines, one sweeping and the other sweeping (no text or symbols)Note:
We recommend to not use the steam mop on bare wooden floors, unsealed flooring or on any surfaces where wood is exposed (as it will absorb moisture and may distort).
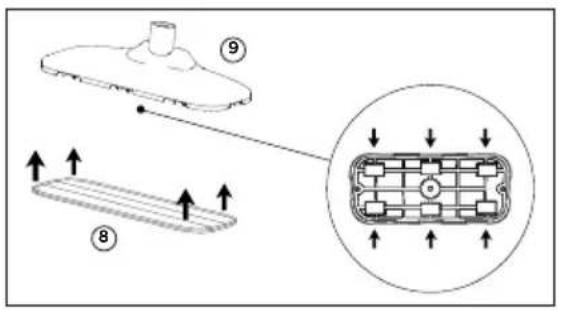
- Attach a mop pad(9) to the mop head(8) by aligning the hook & loop pads.
text_image
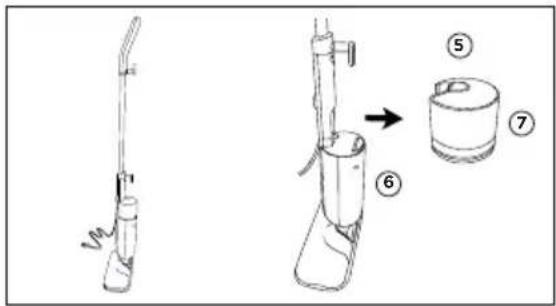
Diagram illustrating a mechanical or electrical component with labeled parts and directional arrows, including numbered annotations.- Push the tank release button(5) to release the water tank(7) from the main unit(6).
text_image
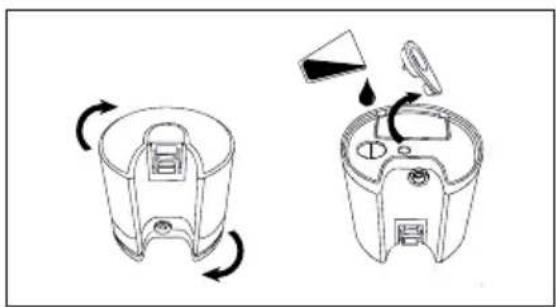
Diagram showing a vacuum cleaner with labeled parts including lever, pump, and container components- Remove the cap from the tank, fill the tank with deionised or distilled water. Fill to the max line.
Close the cap on the water tank.
natural_image
Diagram showing two views of a device with rotating and unrotating components, no text or symbols present.- Place the water tank back into the main unit and ensure that it clicks into place as this means the tank is securely back in the right place.
natural_image
Line drawing of a mechanical device with three views: top view, side view, and side view (no text or symbols)Note:
If you are using this mop for the first time, or for the first time after a period of not using it, you will need to wait a minute or two for the water to start traversing through into the main unit.
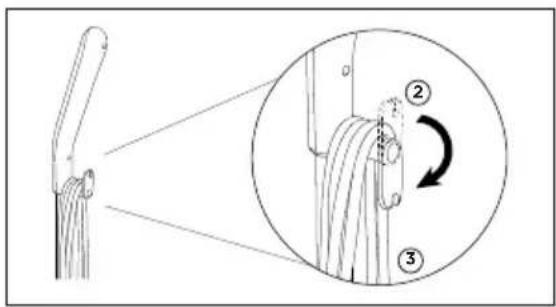
- Unwind the power cable(3) from the cable management hooks(2).
A quick way to release the cable is to rotate the cable management hooks inwards as this automatically releases the whole cable at the same time.
text_image
Diagram illustrating cable installation steps with labeled components and directional arrows- Plug in the power cable to a mains outlet.
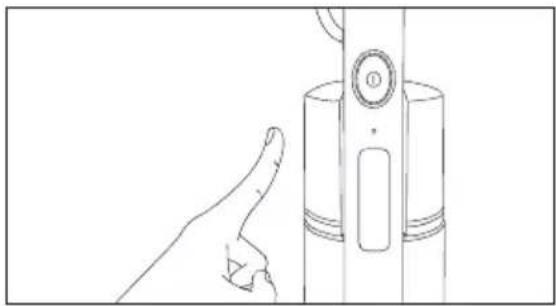
On the mop main unit, press the power button(8).
The power indicator light will light up red and the unit will start to preheat.

text_image
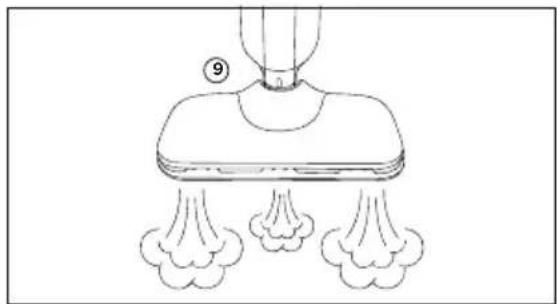
Diagram showing a hand pointing at a device labeled with number 8 and numbered ①, likely illustrating a step or process in a device control panel.- When the preheating is done, the light will turn green.
The water pump will start working and you will start to see steam start to come out of the mop head(9).

natural_image
Line drawing of a showerhead emitting smoke from three flares (no text or symbols)- Push and glide the mop over the floor surface to clean it. Try to use up all the water in the tank at one time.
Do not use the mop just in one place, or on the same place over and over again. Depending on the material of the floor, it may deform or fade it over time.
If there is any water left in the water tank, empty the remaining.

natural_image
Line drawing of a vacuum cleaner emitting exhaust smoke from a chimney (no text or symbols)- After you have finished mopping, press the power button to switch the mop off.
natural_image
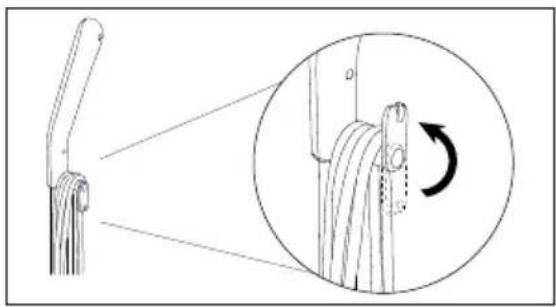
Line drawing of a hand pointing at a cylindrical device with a circular button (no text or symbols)- Unplug the power cable from the mains outlet socket and wind it around the cable management hooks to secure in place.
natural_image
Diagram showing a rope being lifted by a hook, with an inset illustrating the motion of the rope (no text or symbols present)Cleaning and Maintenance
Before cleaning, turn off the steam mop and allow it to cool down completely.
To clean the main unit, use a dry cloth to remove any dust or dirt. If there are stubborn areas of dirt, use a damp well-wrung cloth to wipe over the body.
Leave to air dry or use a dry cloth afterwards to dry it.
Important:
- Do not immerse the power cable, plug or the mop itself into water or any liquid.
- Do not pour water or any liquid over the mop.
- Do not use detergents, abrasive cleaning products or any kind of cleaning solutions in the water tank as this may damage the mop.
- Do not use alcohol or solvent-based cleaners on the plastic components, as this will cause the cracking and ageing of these parts.
DURONIC
Cleaning the Mop Pads
Please wash the mop pads immediately after use. The mop pads should be cleaned separately from other fabrics. Machine or hand wash and air dry naturally.
The mop pads can be machine washed at 40^ C max. For heavy soiling, soak the mop pads in warm water and detergent or a mild stain remover, then wash as normal in the washing machine.
Important:
- Do not use bleach or fabric softener when cleaning the mop pads.
Each mop pad can be used 70 to 80 times under normal circumstances.
When the mop pad appears damaged or the cleaning effect is weakened, it is recommended to replace the it with a new mop pad.
Storage
Store in a cool dry place.
Position the mop in such a way that it is rested against something stable, like a wall, ensuring that it will not fall at any time.
Remove the mop pads from the mop before storing it away.
Ensure the power cable is wrapped around the cable management hooks with the upper hook facing upwards so that it is securely holding the cable in place.
DURONIC
Troubleshooting
| Problem Possible Cause and Solution | |
| The mop won’t start | Check the mains power outlet, the fuse on the plug and if the switch is pressed on or off. |
| There is no steam coming out | Check if the steam holes were blocked. If they are, clean the blocked holes with a damp cloth. |
| There is a lot of moisture after use | The mop pad is either too wet or installed incorrectly. Remove it, wring it out and place it back onto the mop head ensuring all hook & loop pads are attached together. |
| It is difficult to move whilst in use | The mop pad may be too dirty. Wash and wring out the pad before continuing to use it. Alternatively, change the mop pad for a new one. |
| The mop pad is too dry. Allow the steam to pass through it for a short while to dampen it before attempting to use it again. | |
DURONIC
Warranty
1 Year Guarantee from Shine-Mart Ltd, Trademark owners of Duronic Products. NOTE: THESE STATEMENTS DO NOT AFFECT YOUR STATUTORY RIGHTS AS A CONSUMER
This product has been manufactured under the strictest or quality control procedures, and using the highest quality of materials, to ensure excellent performance and reliability. It will give very good and long lasting service, provided it is properly used and maintained. The product is guaranteed for 1 years from the date of original purchase. If any defect arises due to a faulty materials or poor workmanship, the faulty product must be returned to the original place of purchase. Refund or replacement is at the discretion of that company. Duronic Products are offered with a 1 year guarantee under the following conditions:
- The product must be returned to the retailer with original proof of purchase.
- The product must be installed and used in accordance with the instructions contained in this operating manual.
- It must be used only for domestic purposes.
- It does not cover wear and tear, malicious damage, misuse, neglect, inexpert repairs or consumable parts.
- Shine-Mart Ltd has no responsibilities for accidental or consequential loss or damage.
- Shine-Mart Ltd are not liable to carry out any type of servicing work, under the guarantee
- Valid in the UK only

This product is fitted with CE:1363 plug and fuse Imported by Shine-Mart Ltd, RM3 8SB

Information on waste Disposal for Consumers of Electrical & Electronic Equipment.
This mark on a product and/or accompanying documents indicates that when it is to be disposed of, it must be treated as Waste Electrical & Electronic Equipment, (WEEE).
Any WEEE marked products must not be mixed with general household waste, but kept separate for the treatment, recovery and recycling of the materials used.
For proper treatment, recovery and recycling; please take all WEEE marked waste to your Local Authority Civic waste site, where it will be accepted free of charge.
If customers dispose of Waste Electrical & Electronic Equipment correctly, they will be helping to save valuable resources and preventing any potential negative effects upon human health and the environment, of any hazardous materials that the waste may contain.
Follow Us


text_image
Technical diagram showing three labeled components (A, B, C) of a mechanical assembly with directional arrows indicating motion or assembly.natural_image
Technical line drawing of a mechanical assembly with two components and directional arrows indicating motion (no text or symbols)text_image
Technical diagram showing a mechanical assembly with labeled components D and C, including a downward arrow indicating direction.natural_image
Line drawing of a hand operating a screwdriver to lift a lever, with no text or symbols present.text_image
Technical diagram showing exploded and assembled views of a handheld device with numbered annotationsnatural_image
Illustration of two brooms with motion lines, one sweeping and the other sweeping (no text or symbols)Note:
text_image
Diagram illustrating a mechanical or electrical component with labeled parts and directional arrows, including a magnified inset showing internal structure.text_image
Technical diagram showing a vacuum cleaner with labeled parts including lever, pump, and container componentsnatural_image
Diagram showing two views of a device with rotating and unrolled components, no text or symbols presentnatural_image
Diagram showing three sequential steps of a mechanical device with no visible text or symbolsNote:
text_image
Diagram illustrating cable stripping process with labeled steps ② and ③ showing rope routing and motion directiontext_image
Diagram showing a hand pointing at a device labeled with number 8 and numbered ①, likely illustrating a step or process in a device control panel.natural_image
Line drawing of a showerhead emitting smoke from three flares (no text or symbols)natural_image
Line drawing of a vacuum cleaner with attached tree lines (no text or symbols)natural_image
Line drawing of a hand pointing at a cylindrical device with a circular button (no text or symbols)natural_image
Diagram showing a rope being lifted by a hook, with an inset illustrating the motion of the rope (no text or symbols present)text_image
Technical diagram showing three labeled components (A, B, C) of a mechanical assembly with directional arrows indicating motion or assembly.natural_image
Technical line drawing of a mechanical assembly with two components and directional arrows indicating motion (no text or symbols)text_image
Technical diagram showing a mechanical assembly with labeled components D and C, including a downward arrow indicating direction.natural_image
Line drawing of a hand operating a screwdriver to lift a lever, with no text or symbols present.text_image
Technical diagram showing exploded and assembled views of a handheld device with numbered annotationsnatural_image
Illustration of two brooms on a street with spray and cloud-like debris (no text or symbols)Hinweis:
text_image
Diagram illustrating a mechanical or electrical component with numbered parts and directional arrows indicating movement or force.text_image
Diagram showing a vacuum cleaner with labeled parts including lever, pump, and container componentsnatural_image
Diagram showing two views of a device with rotating and unrolled components, no text or symbols presentnatural_image
Diagram showing three sequential steps of a mechanical device with no visible text or symbolsHinweis:
text_image
Diagram illustrating cable stripping process with labeled steps ② and ③ showing rope routing and motion direction
text_image
Diagram showing a hand pointing at a device labeled with number 8 and numbered ①, likely illustrating a device status or control mechanism.
natural_image
Line drawing of a showerhead emitting smoke from three flares (no text or symbols)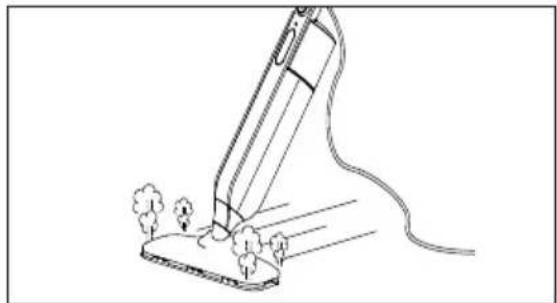
natural_image
Line drawing of a vacuum cleaner with attached spray bottle and spray plant (no text or symbols)natural_image
Line drawing of a hand pointing at a cylindrical device with a circular dial and handle (no text or symbols)natural_image
Diagram showing a rope being lifted by a hook, with an inset illustrating the motion of the rope (no text or symbols present)text_image
Technical diagram showing three labeled components (A, B, C) of a mechanical assembly with directional arrows indicating motion or assembly.natural_image
Technical line drawing of a mechanical assembly with two components and directional arrows indicating motion (no text or symbols)text_image
Technical diagram showing a mechanical assembly with labeled components D and C, including a downward arrow indicating direction.natural_image
Line drawing of a hand operating a screwdriver to lift a lever, with no text or symbols present.text_image
Technical diagram showing exploded and assembled views of a handheld device with numbered annotationsnatural_image
Illustration of two brooms with motion lines, one sweeping and the other sweeping (no text or symbols)Nota:
text_image
Diagram illustrating a mechanical or electrical component with labeled parts and directional arrows, including a magnified inset showing internal structure.text_image
Diagram showing a vacuum cleaner with labeled parts including lever, pump, and container componentsnatural_image
Diagram showing two views of a device with rotating and unrolled components, no text or symbols presentnatural_image
Diagram showing three sequential steps of a mechanical device with no visible text or symbolsNota:
text_image
Diagram illustrating cable installation steps with labeled components and directional arrowsnatural_image
Line drawing of a hand pointing at a vertical device with a circular button labeled ① (no text or symbols on the device itself)- When the preheating is done, the light will turn green.
The water pump will start working and you will start to see steam start to come out of the mop head(9).
natural_image
Line drawing of a showerhead emitting smoke from three flares (no text or symbols)natural_image
Line drawing of a vacuum cleaner with attached tree lines (no text or symbols)natural_image
Line drawing of a hand pointing at a cylindrical device with a circular button (no text or symbols)natural_image
Diagram showing a rope being lifted by a hook, with an inset illustrating the motion of the rope (no text or symbols present)text_image
Technical diagram showing three labeled components (A, B, C) of a mechanical assembly with directional arrows indicating motion or assembly.natural_image
Technical line drawing of a mechanical assembly with two components and directional arrows indicating motion (no text or symbols)text_image
Technical diagram showing a mechanical assembly with labeled components D and C, including a downward arrow indicating direction.natural_image
Line drawing of a mechanical device with a hand operating a tool and a screwdriver inserted, showing rotational motion (no text or symbols)text_image
Technical diagram showing exploded and assembled views of a handheld device with numbered annotationsnatural_image
Illustration of two brooms with spray and cloud-like dust, no text or symbols presentNota:
text_image
Diagram illustrating a mechanical or electrical component with numbered parts and directional arrows indicating movement or force.text_image
Diagram showing a vacuum cleaner with labeled parts including lever, pump, and container componentsnatural_image
Diagram showing two views of a device with rotating and unrolled components, no text or symbols present.natural_image
Diagram showing three sequential steps of a mechanical device with no visible text or symbolsNote:
text_image
Diagram illustrating cable installation steps with labeled parts and directional arrowstext_image
Diagram showing a hand pointing at a device labeled with number 8 and numbered ①, likely illustrating a step or process in a device control panel.natural_image
Line drawing of a showerhead emitting smoke from three flares (no text or symbols)natural_image
Line drawing of a vacuum cleaner with attached wires and trees (no text or symbols)natural_image
Line drawing of a hand pointing at a cylindrical device with a circular button (no text or symbols)natural_image
Diagram showing a rope being lifted by a hook, with an inset illustrating the motion of the rope (no text or symbols present)text_image
Technical diagram showing three labeled components (A, B, C) of a mechanical assembly with directional arrows indicating motion or assembly.natural_image
Technical line drawing of a mechanical assembly with two components and directional arrows indicating motion (no text or symbols)text_image
Technical diagram showing a mechanical assembly with labeled components D and C, including a downward arrow indicating motion or assembly.natural_image
Line drawing of a hand operating a screwdriver to lift a tool on a mechanical component (no text or symbols)text_image
Diagram showing exploded view of a handheld device with labeled parts and directional arrows indicating assembly steps.natural_image
Illustration of two brooms with spray and cloud patterns, no text or symbols presentUWAGA:
text_image
Diagram illustrating a mechanical or electrical component with labeled parts and directional arrows indicating movement or force.text_image
Diagram showing a vacuum cleaner with labeled parts including lever, pump, and container componentsnatural_image
Diagram showing two views of a device with rotating and unrolled components, no text or symbols presentnatural_image
Diagram showing three sequential steps of a mechanical device with no visible text or symbolsUWAGA:
text_image
Diagram illustrating cable installation steps with labeled components and directional arrows
text_image
Diagram showing a hand pointing at a device labeled with number 8 and numbered ①, likely illustrating a step or process in a device control panel.
natural_image
Line drawing of a showerhead emitting smoke from three flares (no text or symbols)
natural_image
Line drawing of a vacuum cleaner with attached tree lines (no text or symbols)natural_image
Line drawing of a hand pointing at a cylindrical device with a circular button (no text or symbols)natural_image
Diagram showing a rope being lifted by a hook, with an inset illustrating the motion of the rope (no text or symbols present)text_image
Technical diagram showing three labeled components (A, B, C) of a mechanical assembly with directional arrows indicating motion or assembly.natural_image
Technical line drawing of a mechanical assembly with two components and directional arrows indicating motion (no text or symbols)text_image
Technical diagram showing a mechanical assembly with labeled components D and C, including a downward arrow indicating direction.natural_image
Line drawing of a mechanical device with a hand operating a tool and a screwdriver inserted, showing rotational motion (no text or symbols)text_image
Diagram showing exploded view of a handheld device with labeled parts and directional arrows indicating assembly steps.natural_image
Illustration of two brooms on a street with spray and cloud-like debris (no text or symbols)Not:
text_image
Diagram illustrating a mechanical or electrical component with numbered parts and directional arrows indicating movement or force.text_image
Diagram showing a vacuum cleaner with labeled parts including lever, pump, and container componentsnatural_image
Diagram showing two views of a device with rotating and unrotating components, no text or symbols present.natural_image
Diagram showing three sequential steps of a mechanical device with no visible text or symbolsNot:
text_image
Diagram illustrating cable stripping process with labeled steps ② and ③ showing rope routing and motion directiontext_image
Diagram showing a hand pointing at a device labeled with number 8 and numbered ①, likely illustrating a step or process in a device control panel.natural_image
Line drawing of a showerhead emitting smoke from three flares (no text or symbols)- çalışın.