OX01R - Scale Duronic - Free user manual and instructions
Find the device manual for free OX01R Duronic in PDF.
User questions about OX01R Duronic
0 question about this device. Answer the ones you know or ask your own.
Ask a new question about this device
Download the instructions for your Scale in PDF format for free! Find your manual OX01R - Duronic and take your electronic device back in hand. On this page are published all the documents necessary for the use of your device. OX01R by Duronic.
USER MANUAL OX01R Duronic
Creative Consumer Electronics
text_image
%SpO₂ 9.9 /Min 7.6OX01R - Pulse Oximeter
PLEASE READ ALL THE INSTRUCTIONS BEFORE USE

duronic.com

duronic

@duronicmedia

Duronic

@duronicmedia
DURONIC
Contents
English Manual 5
Thank you for purchasing the Duronic OX01R Pulse Oximeter.
This Manual is written and compiled in accordance with the council directive MDD 93/42/EEC for medical devices and harmonized standards. In case of modifications and software upgrades, the information contained in this document is subject to change without notice.
Please read this User Manual carefully before using this product and retain for future reference.
Safety Information
Instructions for Safe Use
- Check the main unit and all accessories periodically to make sure that there is no visible damage that may affect patient's safety. If used regularly, it is recommended that the device should be inspected once a week at least. When there is obvious damage, stop using the monitor.
- You must not attempt to repair or disassemble the oximeter yourself. If the device requires repair, please contact the Duronic Customer Care Team.
- The oximeter cannot be used together with devices not specified in User Manual. The only accessories (if any) that can be used with this device are those recommended by manufacturer.
- This oximeter is calibrated before leaving factory.

Warning
- Explosive hazard---DO NOT use the oximeter in environment with inflammable gas, for example anaesthetic mixture with air/oxygen or where there is nitrous oxide. These are highly flammable.
- DO NOT use the oximeter while the user is being scanned by MRI and CT.
DURONIC
• This device is not suitable for anyone who is allergic to rubber.
- You may feel discomfort or pain if using the device continuously. It is recommended that the sensor should not be applied to the same finger for over 2 hours at a time.
- The infrared light emitted from the device is harmful to the eyes, so the user and anyone using the device should not stare at the light.
Attentions
- Please check the packs contents before use to make sure the device and accessories are totally in accordance with the list in section 4. If you are missing any parts, please contact Duronic directly for assistance.
- Keep the oximeter away from dust, vibration, corrosive substances, explosive materials, high temperature and moisture.
- Enamel or Acrylic fingernail polish or other fingernail applications may distort and/or produce inaccurate readings. Please remove them before use.
• This device is not intended for treatment.
- If the oximeter gets wet, stop using it immediately.
- When it is carried from a cold environment to a warm or humid environment, please do not use it straight away.
- Do not expose to high temperature or clean with high pressure steam as this will damage the oximeter. Please read the cleaning and disinfection instructions in this user manual for advice on how to clean it safely and effectively.
- Do not submerge the oximeter in water or any other liquid. When it needs cleaning, please wipe its surface with medical alcohol with a soft cloth. Do not spray any liquid on the device directly.
- Do not use this device on young infants or newborn babies.
• This oximeter is suitable for children above four years old and adults
DURONIC
(weight should be between 15kg to 110kg).
- The device may not work for all patients. If you are unable to achieve stable readings, discontinue use.
- The update period of data is less than 5 seconds, which is changeable according to different an individual's pulse rate.
- The oximeter does not have low-battery alarm function, it only shows the low-battery symbol on the digital display. Please change the battery when the energy has run out.
- Batteries must be removed if the device is going to be stored for more than one month, or else batteries may expire and leak.
- The disposal of the oximeter, its accessories and/or packaging (including battery, plastic bags, foams and paper boxes) should be done so responsibly following the local council/district refuse and recycling regulations.
About the OX01R
What Does it Do
The OX01R oximeter measures two things: oxygen saturation and pulse rate.
- Oxygen saturation is the percentage of oxyhaemoglobin (HbO 2 ) in blood. HbO 2 is a combination of haemoglobin (Hb) and oxygen molecules (O _2 ), that is present in all human blood and is an important physiological factor involved in respiration and circulation. The oxygen saturation of arterial blood in the average human body is around 98%. Measuring oxygen saturation is an important indicator of the amount of oxygen in the body. If there is not enough oxygen it can affect the normal function of the body in many ways and result in a condition called hypoxia.
In general, the normal levels of oxygen saturation should not be lower than 94%; if a measurement of 94% or less has been obtained, it means an insufficient supply of oxygen has been detected and proper medical advice should be sought from a qualified doctor.
DURONIC
- Pulse rate is the number of pulse beats per minute. In general, the pulse rate of every person should be between 60-100 beats per minute. If you are concerned about your pulse being too fast or slow, consult a qualified doctor for advice.
TIP: Talk to your doctor before using a home device like the OX01R so that you understand how to interpret the results.
How Does it Work?
Pulse Oximeter uses light to work out oxygen saturation. Light is emitted from one side of the device which goes across the pulse oximeter probe and reaches light detector on the other side. When a finger is placed in the oximeter between the source of light and the detector, the light has to try and pass through the finger and through the blood cells. By measuring how much light reaches the light detector on the other side, the pulse oximeter knows how much light has been absorbed by the haemoglobin (Hb) in the blood. The more Hb in the finger there is, the more light absorbed.
Application of the OX01R Oximeter
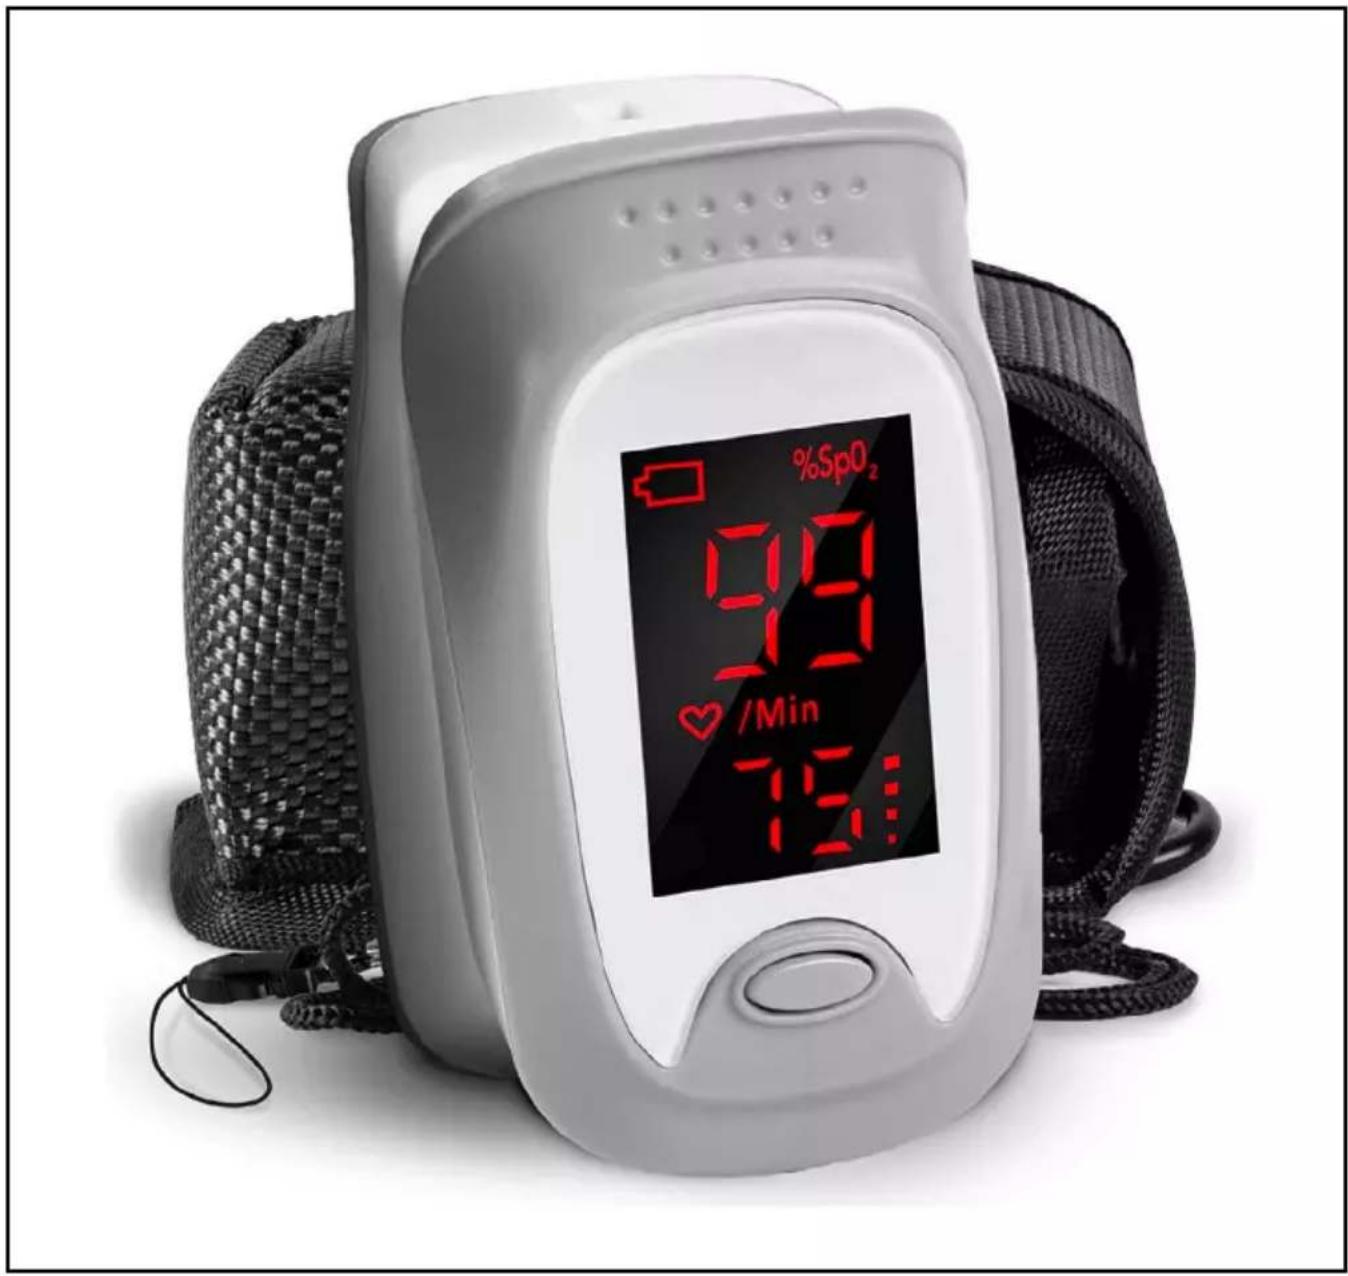
The OX01R Pulse Oximeter is a non-invasive device intended for the spot-check of oxygen saturation of arterial haemoglobin (SpO _2 ) and the pulse rate of adult and paediatric patients. With a clear digital display, this device is easy to use and comes with a lanyard to carry it with you should you wish.
The oximeter method can be used in a wide range of situations, for instance, family care at home, in hospitals, for social medical care organisations and for sports. While the OX01R can be used before and after sports, it is not recommended to be used during sports activities.

Note: this device is not suitable for use in continuous supervision patients.
Features
- Simple design and convenient to use.
- Quick accurate measurements every time.
- The OX01R is small in size, lightweight and portable (total weight is about 50g including batteries).
- Low power consumption so batteries last longer.
- The oximeter will automatically turn off when not in use for over 16 seconds.
- Comes with handy carry pouch for easy storage and a lanyard for transportation.
Key of Symbols
| Symbol Description | |
 | Type BF applied part. |
 | Caution: Please see this manual. |
| %SpO2 | Symbol of oxygen saturation. |
| bpmPR Symbol of pulse rate. | |
 | No SpO2alarms. |
 | Consult the instructions for use. |
 | When end users abandon this product, they must send the product to the collection place for recycling. |
| IP22 The degree of protection against harmful ingress of water and particulate matter. | |
Box Contents
- 1x storage bag
- 1x lanyard
- 2x AAA batteries
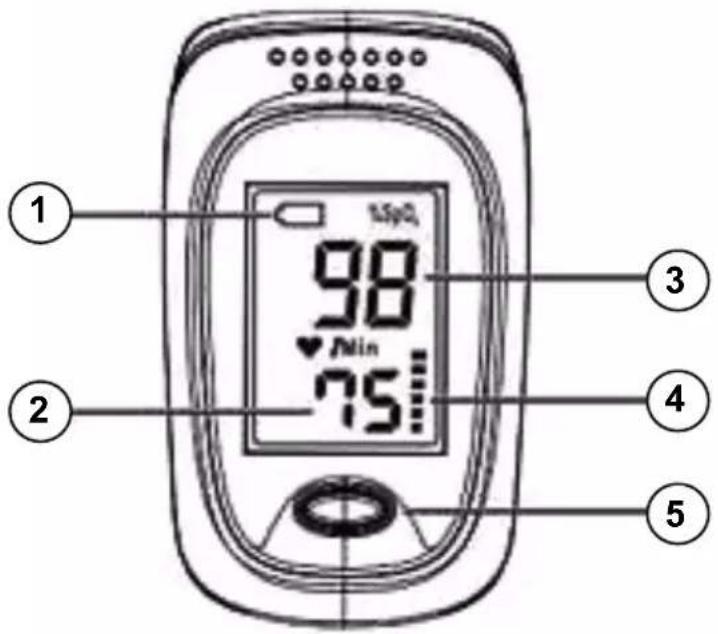
Digital Display
View of the Front Panel
- Low-voltage display
- Measured value of pulse rate
- Measured value of oxygen saturation
- Pulse rate bargraph display
- Power switch
text_image
1 2 3 4 5 98 75 1.5g/dLOperating Guide
Installing the Batteries
Step 1. Remove the battery cover and insert the two AAA size batteries in the correct position as demonstrated.
Step 2. Replace the cover ensuring it is locked in place

natural_image
Line drawing of a battery pack with internal components and battery stack (no text or symbols)
Take care when you insert the batteries as improper insertion may damage insertion may damage the device.
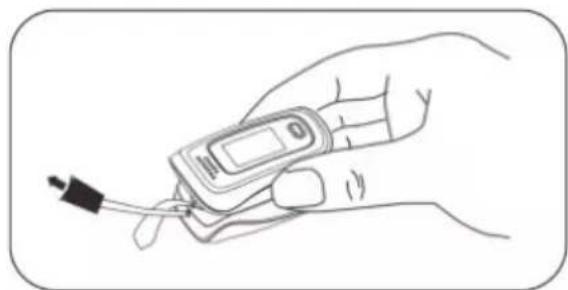
Attaching the Lanyard
Step 1. Insert the loop of the lanyard into one of the holes and push the loop in until it comes out of the other hole.
Step 2. Thread the lanyard strap through the loop and pull tight to secure in place.
natural_image
Line drawing of a hand holding a digital blood glucose meter with a probe inserted (no text or symbols)How to Take a Measurement
Only use the oximeter when you are sitting or standing comfortably. You will not get an accurate reading if you are under exertion or have been doing any vigorous activity beforehand or during use of the device.
- Insert the two batteries properly and then replace the cover.
- Open the clip by pinching it open.
- Place your finger nail-side up into the device resting it on the rubber pads inside. Make sure your finger is fully inserted, ensuring the end of the finger

natural_image
Line drawing of two hands using a handheld device to interact (no text or symbols present)touches the end of the space inside and that the finger's first digit covers the sensor.
- Close the clip around the finger
- Press the button on front panel once.
- Do not shake the finger and stay at ease during the process.
- The oximeter will instantly give you a reading providing you with your current statistics on the display screen.
DURONIC
Maintenance and Cleaning
- Change the batteries when the low-battery symbol appears on the screen.
- To clean the device, wipe with damp (well wrung) cloth. Then leave to air dry or dry with a clean dry cloth.
• Medical alcohol can be used in place of water if you wish to disinfect the product after use and prevent cross infection. - If you plan to not use the oximeter for a long period of time, remove the batteries before storing.

Warning:
High-pressure, high-temperature or gas sterilization cannot be used on the device.
Do not immerse the device in water or any other liquid.
It is recommended that the device should be kept in a dry environment. Humidity may reduce the life of the device, or even damage it.
Troubleshooting
| Problem Possible Reason | Solution | |
| The SpO_2 and Pulse Rate is not displaying normally | a.The finger is not properly positioned.b.The patient's SpO_2 is too low to be detected. | a.Place the finger properly and try again.b.Try again; If you are sure that the device is working well, seek medical help for a diagnosis. |
| The SpO_2 and Pulse Rate are not displayed stably | a.The finger is not placed inside deep enough.b.The finger is shaking or the patient is moving. | a.Place the finger properly and try again.b.Calm the patient and then try again. |
| The device cannot be turned on | a.Low battery or no battery.b.The batteries are not inserted properly.c.The malfunction of the device. | a.Change batteries.b.Check batteries are installed correctly.c.Contact Duronic. |
| The display has turned off suddenly | a.The device will power off automatically when there is no signal within 16 seconds.b.The batteries are almost drained. | a.Normal.b.Change batteries. |


Authorized European Representative: Wellkang Ltd
Manufactured by: Shenzhen Jumper Medical Equipment Co. Ltd
Distributed by: SHINEMART Ltd.
Technical Specification
| Display Information Display Mode | |
| Display Format LED display | |
| The Pulse Oxygen Saturation (SpO2) Digital | |
| Pulse Rate (PR) Digital | |
| Pulse Intensity (bar-graph) Digital bar-graph display | |
| SpO2Parameter Specification | |
| Measuring range 35%-100% (the resolution is 1%). | |
| Accuracy 70%-100%;±2%, Below 70% unspecified. | |
| Pulse Parameter Specification | |
| Measuring range 25bpm-250bpm (the resolution is 1 bpm) | |
| Accuracy ±2bpm | |
| Pulse Intensity | |
| Range Continuous bar-graph display, the higher display indicates the stronger pulse. | |
| Alert conditions | |
| SpO2 | Less than 94% |
| PR Less than 50bpm or more than 130bpm | |
| Battery Requirement | |
| 2 X 1.5V (AAA size) alkaline battery | |
| Power Consumption | |
| Smaller than 35 mA. | |
| Battery Useful Life | |
| Two batteries can work continually for 24 hours | |
| Power off | |
| The Oximeter can be powered off in case no finger is the Oximeter within 16 seconds. | |
| Optical Sensor | |
| Red light (wavelength is 660nm) | |
| Infrared (wavelength is 905nm) | |
| Dimensions and Weight | |
| Dimensions 62.2 (L)X37.0 (W)X33.1(H) mm | |
| Weight About 28g (without batteries) | |
Appendix: Electromagnetism Compatibility
Guidance and manufacture's declaration – electromagnetic emissions for all EQUIPMENT and SYSTEMS
| Guidance and manufacture's declaration – electromagnetic emission | ||
| The Duronic OX01R is intended for use in the electromagnetic environment specified below. The customer or the user of the OX01R should assure that it is used in such anenvironment. | ||
| Emission test Compliance Electromagnetic environment – guidance | ||
| RF emissionsCISPR 11 | Group 1 The OX01R uses RF energy only for its internal function. Therefore, its RF emissions are very low and are not likely to cause any interference in nearby electronic equipment. | |
| RF emissionCISPR 11 | Class B The OX01R is suitable for use in all establishments, including domestic establishments and those directly connected to the public low-voltage power supply network that supplies buildings used for domestic purposes. | |
Device Specifications
Classification:
Class II b (MDD 93/42/EEC IX Rule 10)
Class II (U.S.FDA)
Environment Requirements
| Operation Temperature: 5°C | -40°C |
| Storage Temperature: -10°C | -50°C |
| Ambient Humidity: 15%-80% | RH, no condensation in operation10%-93% RH, no condensation in storage |
| Atmospheric Pressure: 70 kPa to 106 kPa, in operation50kPa–106 kPa, in storage | |
DURONIC
Warranty
1 Year Guarantee from Shine-Mart Ltd, Trademark owners of Duronic Products. NOTE: THESE STATEMENTS DO NOT AFFECT YOUR STATUTORY RIGHTS AS A CONSUMER
This product has been manufactured under the strictest or quality control procedures, and using the highest quality of materials, to ensure excellent performance and reliability. It will give very good and long lasting service, provided it is properly used and maintained. The product is guaranteed for 1 years from the date of original purchase. If any defect arises due to a faulty materials or poor workmanship, the faulty product must be returned to the original place of purchase. Refund or replacement is at the discretion of that company.
Duronic Products are offered with a 1 year guarantee under the following conditions:
- The product must be returned to the retailer with original proof of purchase.
- The product must be installed and used in accordance with the instructions contained in this operating manual.
- It must be used only for domestic purposes.
- It does not cover wear and tear, malicious damage, misuse, neglect, inexpert repairs or consumable parts.
- Shine-Mart Ltd has no responsibilities for accidental or consequential loss or damage.
- Shine-Mart Ltd are not liable to carry out any type of servicing work, under the guarantee
- Valid in the UK only
This product is fitted with CE:1363 plug and fuse Imported by Shine-Mart Ltd, RM3 8SB

Information on waste Disposal for Consumers of
Electrical & Electronic Equipment.
This mark on a product and/or accompanying documents indicates that when it is to be disposed of, it must be treated as Waste Electrical & Electronic Equipment, (WEEE).
Any WEEE marked products must not be mixed with general household waste, but kept separate for the treatment, recovery and recycling of the materials used.
For proper treatment, recovery and recycling; please take all WEEE marked waste to your Local Authority Civic waste site, where it will be accepted free of charge.
If customers dispose of Waste Electrical & Electronic Equipment correctly, they will be helping to save valuable resources and preventing any potential negative effects upon human health and the environment, of any hazardous materials that the waste may contain.
Follow Us

text_image
duronic.com duronic @duronicmedia Duronic @duronicmedianatural_image
Exploded view diagram of a battery pack assembly showing internal components and battery casing (no text or labels)
natural_image
Line drawing of a hand holding a digital blood glucose meter with a probe inserted (no text or symbols)natural_image
Line drawing of two hands performing a step-up on a rectangular device (no text or symbols)natural_image
Line drawing of a battery pack assembly with cylindrical batteries and internal components (no text or symbols)
natural_image
Line drawing of a hand holding a digital blood glucose meter with a probe inserted (no text or symbols)Messung
natural_image
Line drawing of two hands using a tool to adjust or install a rectangular device (no text or symbols present)Hersteller: Shenzhen Jumper Medical Equipment Co. Ltd.
natural_image
Line drawing of a battery pack assembly with cylindrical batteries and internal components (no text or symbols)
natural_image
Line drawing of a hand holding a digital blood glucose meter with a probe inserted (no text or symbols)natural_image
Line drawing of two hands using a tool to interact with a rectangular device (no text or symbols present)natural_image
Line drawing of a battery pack assembly with cylindrical batteries and internal components (no text or symbols)
natural_image
Line drawing of a hand holding a digital blood glucose meter with a probe inserted (no text or symbols)natural_image
Line drawing of two hands inserting a small rectangular object into a device (no text or symbols)Prodottore: Shenzhen Jumper Medical Equipment Co. Ltd
natural_image
Line drawing of a battery pack assembly with cylindrical batteries and internal components (no text or symbols)
natural_image
Line drawing of a hand holding a digital blood glucose meter with a probe inserted (no text or symbols)natural_image
Line drawing of two hands using a tool to interact with a device (no text or symbols present)Installing the Batteries
natural_image
Line drawing of a battery pack assembly with cylindrical batteries and a closed casing (no text or symbols)