FX-WB - Workbench Fuxtec - Free user manual and instructions
Find the device manual for free FX-WB Fuxtec in PDF.
| Product type | 5-in-1 workbench |
| Brand | Fuxtec |
| Model | FX-WB |
| Worktop dimensions | 94 x 48 cm |
| Adjustable work heights | 52, 66, 80 cm |
| Maximum load capacity | 150 kg (all modes) |
| Net weight | 13 kg |
| Usage modes | Workbench, saw horse, elevator, dolly, transport aid |
| Castor type | 2 fixed + 2 swivel with brake |
| Main material | Steel |
| Intended use | Indoor, for DIY enthusiasts |
| Safety instructions | Read the manual, use on a flat surface, do not stand on the workbench in scaffolding mode with legs extended, do not overload |
| Maintenance | Regularly check condition, clean dirt, repair after consulting customer service |
| Package contents | Assembled workbench, 4 castors, washers, screws, quick-release connector, pull rope |
| Spare parts and repairability | Available on request from Fuxtec customer service |
Frequently Asked Questions - FX-WB Fuxtec
User questions about FX-WB Fuxtec
0 question about this device. Answer the ones you know or ask your own.
Ask a new question about this device
Download the instructions for your Workbench in PDF format for free! Find your manual FX-WB - Fuxtec and take your electronic device back in hand. On this page are published all the documents necessary for the use of your device. FX-WB by Fuxtec.
USER MANUAL FX-WB Fuxtec
natural_image
Yellow wireframe model of a four-legged table with metal legs and a flat top, against a black background (no text or symbols)MONTAGE
natural_image
Line drawing of a four-legged metal bench with legs and side supports (no text or symbols)- Werkbank Modus
natural_image
Technical line drawing of a mechanical assembly with no visible text or symbols- Sägebock-Modus

natural_image
Line drawing of a wooden workbench with four legs and a flat top (no text or symbols)natural_image
Technical line drawing of a wheeled cart with wheels and a protractor (no text or symbols)natural_image
Technical line drawings of two mechanical components mounted on a base plate (no text or symbols)natural_image
Technical line drawing of a mechanical assembly with no visible text or symbolsLeg Locking Buckle
1.
natural_image
Technical line drawing of mechanical components or assemblies (no visible text or symbols)Leg Locked
2.
natural_image
Technical line drawing of a four-legged table with arrows indicating direction (no text or symbols)Gusset Braces
3.
natural_image
Line drawing of a simple wooden tripod with metal legs and a small object on top, marked with 'X' symbols (no text or labels)WARNUNG:
VERWENDEN SIE DEN GERÜSTMODUS NICHT MIT AUSGEFAHRENEN BEINEN.

WARNING!
Read carefully and understand all ASSEMBLY AND OPERATION INSTRUCTIONS before operating. Failure to follow the safety rules and other basic safety precautions may result in serious personal injury.
This machine is designed for certain applications only. The distributor cannot be responsible for issues arising from modification. We strongly recommend this machine not be modified and/or used for any application other than that for which it was designed. If you have any questions relative to a particular application, DO NOT use the machine until you have first contacted the distributor to determine if it can or should be performed on the product.
INTENDED USE:
The workbench is the ultimate 5-in-1 portable workbench, sawhorse, scaffold, car creeper and trolley. The item can be transformed easily between different modes by following the instruction manual.
This product is intended for DIY and light trade use.
TECHNICAL SPECIFICATIONS:
Work platform size: L94xW48cm
Work height: 52/66/80cm
Loading capacity:
Workbench /Saw Horse mode - 150KG/330LBS
Scaffold mode - 150KG/330LBS
Car Creeper & Trolley mode - 150KG/330LBS
Net weight: 13KG/15KG
GENERAL SAFETY RULES

WARNING: Read and understand all instructions. Failure to follow all
instructions listed below may result in serious injury.

CAUTION: Do not allow persons to operate or assemble this workbench until
they have read this manual and have developed a thorough understanding of how the unit works.

WARNING: The warnings, cautions and instructions discussed in this instruction manual cannot cover all possible conditions or situations that could occur. It must be understood by the operator that common sense and caution are factors which cannot be built into this product, but must be applied by the operator.
SAVE THESE INSSTRUCTIONS
IMPORTANT SAFETY CONSIDERATIONS
- FAILURE TO FOLLOW THESE SAFETY PRECAUTIONS AND INSTRUCTIONS COULD RESULT IN DAMAGE TO THE PRODUCT AND/OR SERIOUS INJURY TO YOU!
● Make sure all moving parts are free from interference. - Keep hands clear of all moving parts.
- Ensure workbench is used in a dry place, protected from rain. The product is for INDOOR use only. Do not store or use it outdoors or in a moist environment.
- Keep work area well lit.
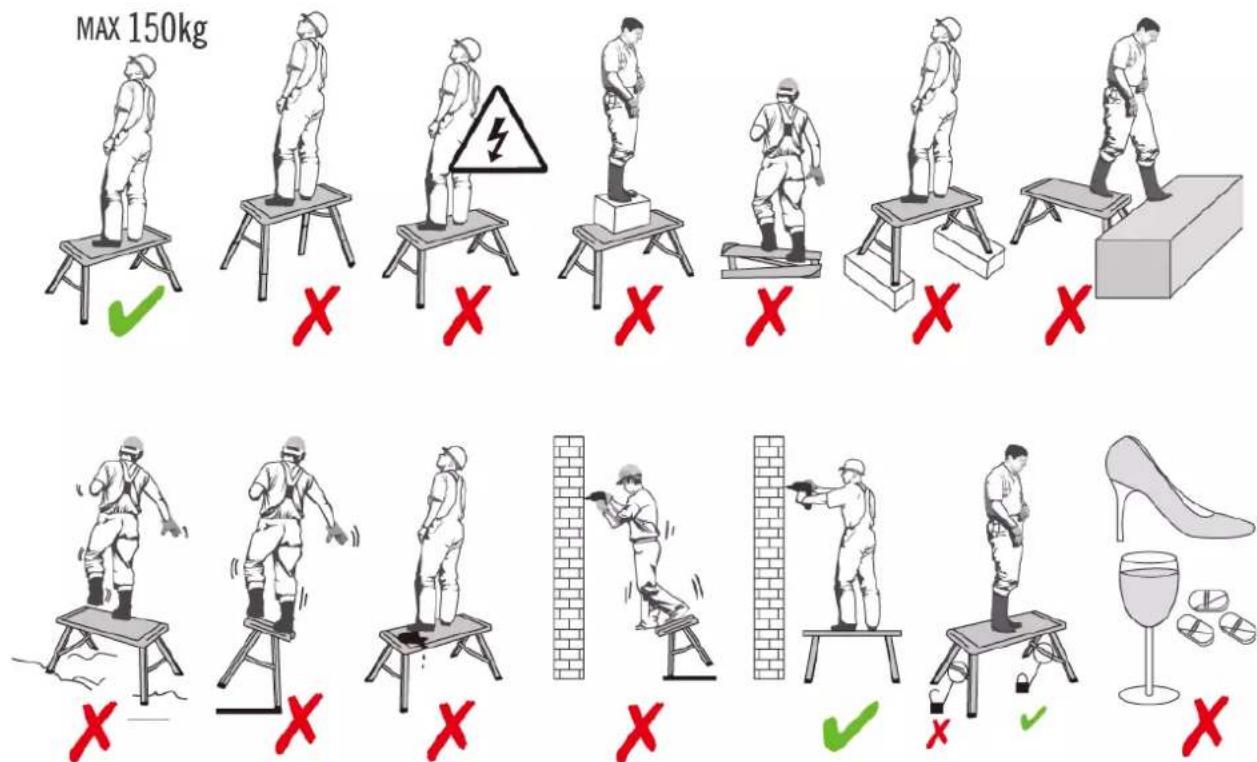
- Be aware of over balancing. When using this product in all modes, please keep your body or a heavy object in the centre or surface to avoid overbalance. Incorrect usage may cause it to turn over and result in personal injury.
- When transporting the workbench in a vehicle, always tie down to prevent movement and possible damage.
- Check to make sure that all fixing screws and knobs are tight and all legs are locked into position before operating the workbench.
- DO NOT USE SCAFFOLD MODE WHEN THE LEGS ARE EXTENTED. Always use this product on a stable, level surface. Failure to use properly or overload may result in serious personal injury.
- When using this product with power tools, please refer to the manufacturer's instructions for guidance on usage.
- The product must be used only for its prescribed purpose. Any use other than those mentioned in these instructions will be considered a case of misuse. The manufacturer shall not be liable for any damage or injury resulting from such cases of misuse.
- The manufacturer shall not be liable for any modifications made to the tool or for any damage resulting from such modifications.
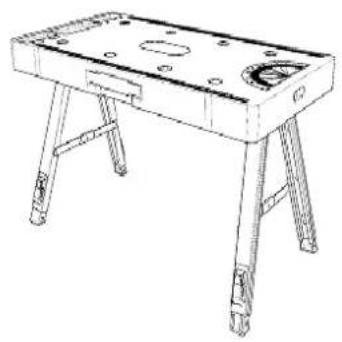
ASSEMBLY
Your 5-in-1 workbench comes fully assembled, just take it out of the packaging and follow the simple set up steps, then it's ready to use.
natural_image
Line drawing of a wooden table with legs and feet, no text or symbols present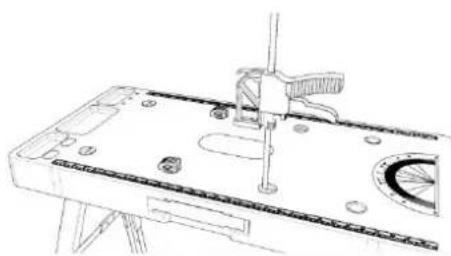
natural_image
Technical line drawing of a mechanical assembly with no visible text or symbols-
Sawhorse Mode
-
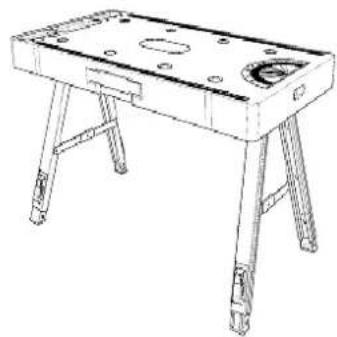
Workbench Mode
natural_image
Line drawing of a wooden table with four legs and a flat top (no text or symbols)
natural_image
Technical line drawing of a wheeled cart with wheels and a protractor (no text or symbols)- Scaffold Mode
- Car Creeper & Trolley Mode
Car Creeper & Trolley Mode
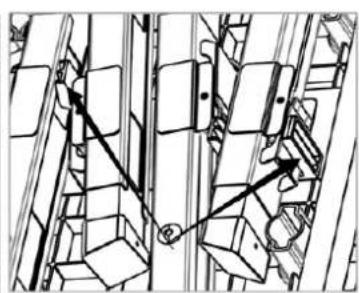
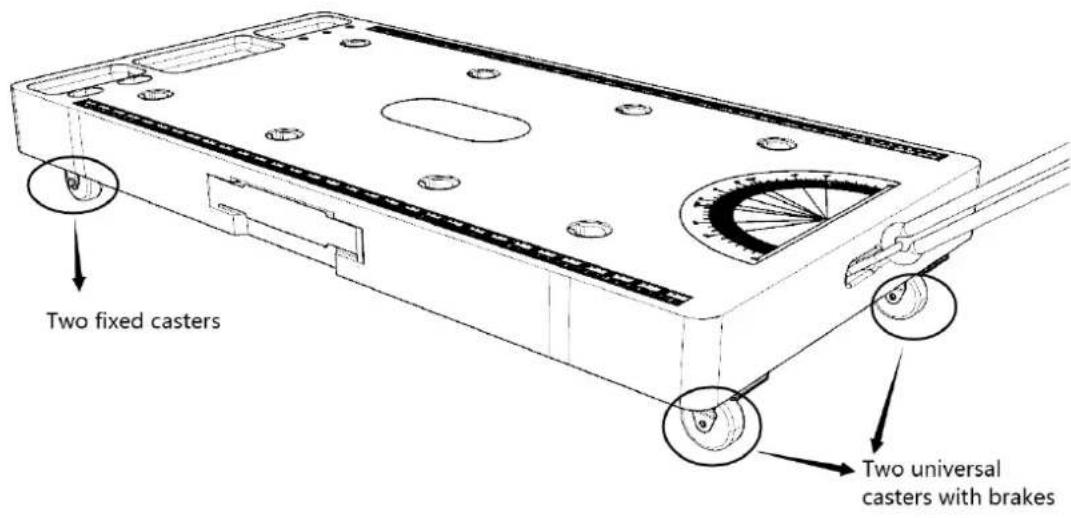
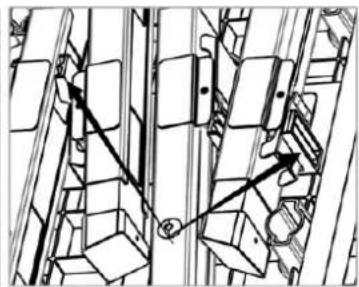
Please follow these steps to install casters in the car creeper & trolley mode:
- Find the casters, gaskets and screws in the back of the workbench, then line up all the screws, gasket and casters. Notice that the 2 universal casters with brakes should be installed under the compass and the left 2 fixed casters on the other side.
- Put one gasket on the screw hole and secure the screw by using a screwdriver.
- Rotate the caster to fix the 4 screws, make sure the casters are fully secured.
- Follow steps 1-3 to assemble the other 3 casters, then your car creeper is ready to go.
- Connect a pulling rope to the towing hole, then the dolly is completed.
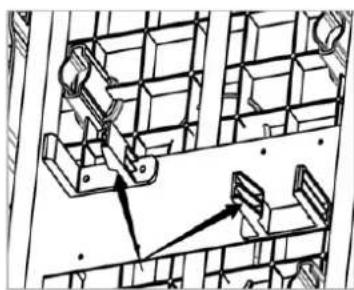
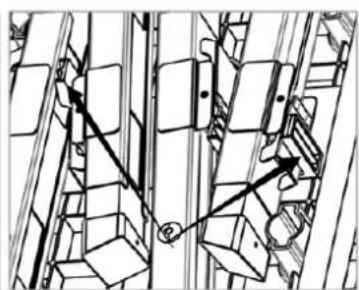
TIP : How to install the casters

natural_image
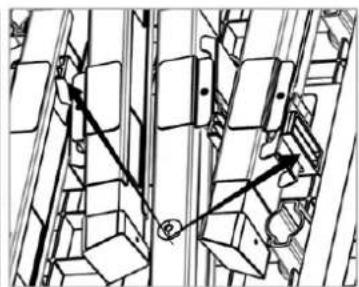
Technical line drawings of two mechanical components mounted on metal plates (no text or symbols)The 4 casters are packed in the back of the workbench and need to be installed by the consumer after purchase. During installation, please be aware of the following:
- Always use the gaskets which are provided in the carton. See the illustrations above.
- There are 2 universal/steering casters plus 2 fixed casters in the set, and each set of casters has their own position. Please refer to the illustration above.
Scaffold Mode
natural_image
Technical line drawing of a mechanical assembly with no visible text or symbolsLeg Locking Buckle 1.
natural_image
Technical line drawing of mechanical components or assemblies (no text or symbols visible)Leg Locked 2.
natural_image
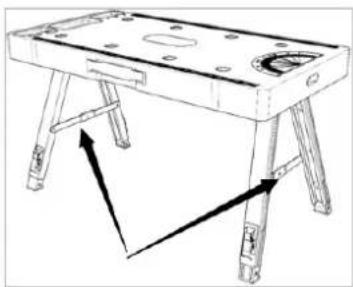
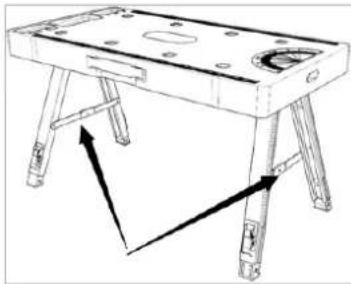
Technical line drawing of a four-legged workbench with arrows indicating direction (no text or symbols)Gusset Braces 3.
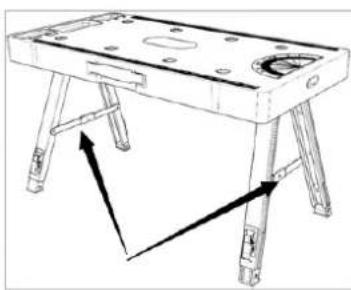
- Release all legs from their locking position, then rotate each pair of legs until you can't move them anymore.
- Ensure the gusset brace is locked by pushing it down. Repeat for all the other gusset braces, forming a scaffold.
natural_image
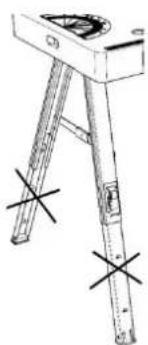
Technical line drawing of a tripod support structure with two cross marks at the base (no text or symbols)WARNING:
DON'T USE SCAFFOLD MODE WITH LEGS EXTENDED.
The inner legs are not designed to be used in this function.
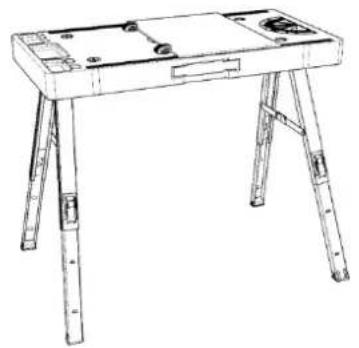
Workbench & Sawhorse mode
- Firstly, set up the legs by following the same steps as detailed with scaffold mode section.
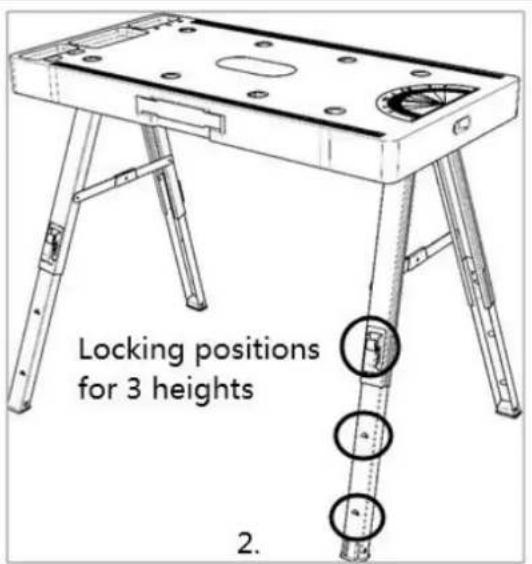
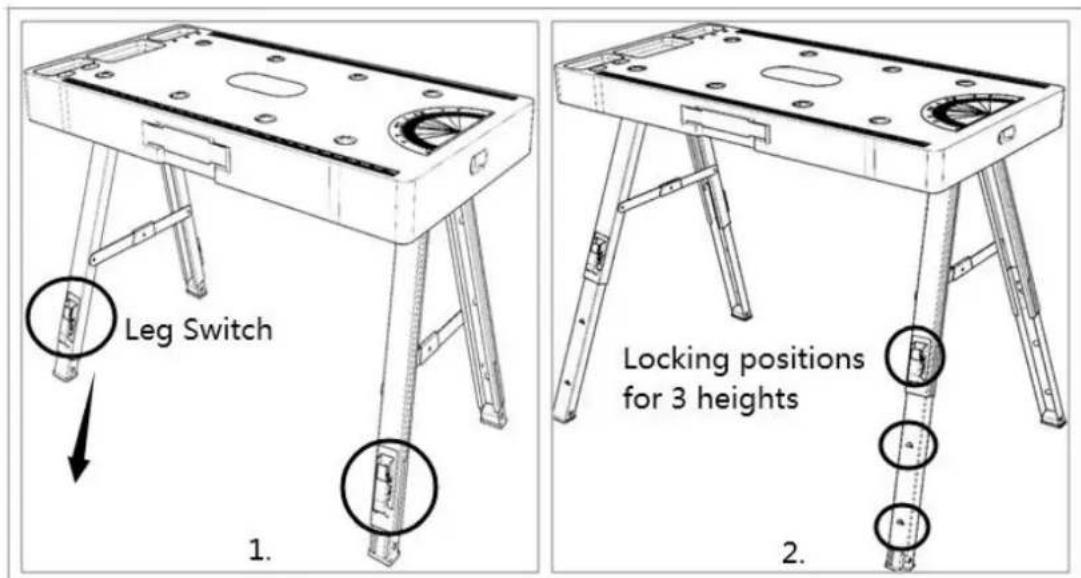
- Pull up the let switch on the side of each leg to release them, then pull the inner legs out to the workbench height, 66cm or 80cm. There are 3 locking positions, each for a height. The lowest one is for scaffold mode which is 52cm, the second is 66cm and the highest is 80cm. Gently turn the workbench upright onto a stable, level surface.
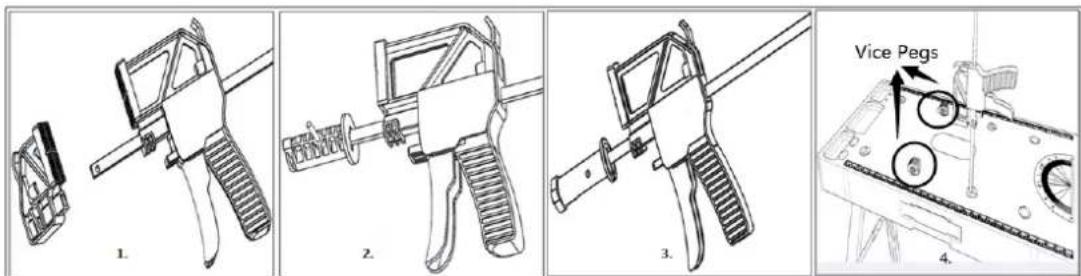
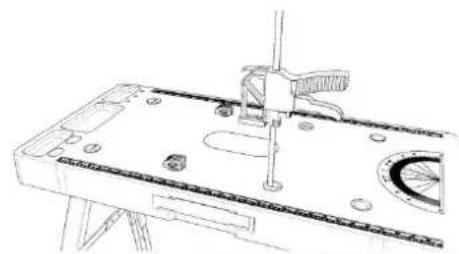
- Please follow below steps to connect with a quick clamp.
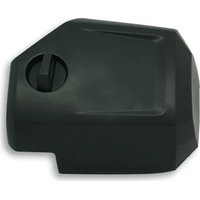
1) Remove the small plastic part of your quick clamp(Fig 1);
2) Put the steel bar into our connector (Fig 2) and push the pin into the lock hole, make sure they are connected firmly (Fig 3);
3) Put the connector into Sawhorse hole on the workbench surface and rotate at least 30 degrees (Fig 4);
4) With the help of the 2 vice pegs on the workbench, a sawhorse is completed.
NOTE: DO NOT step on the workbench while the legs are extended.
MAINTENANCE
- Maintain your workbench. It is recommended that the general condition of any workbench be examined before it is used. Keep your workbench in good repair by adopting a program of conscientious repair and maintenance. Have necessary repairs made by qualified service personnel.
- Wipe away dirt and dust from the workbench on a regular basis.
Sommaire
PRESENTATION....21
USAGE PRÉVU : 22
MONTAGE
natural_image
Line drawing of a four-legged table with legs and a front panel (no text or symbols)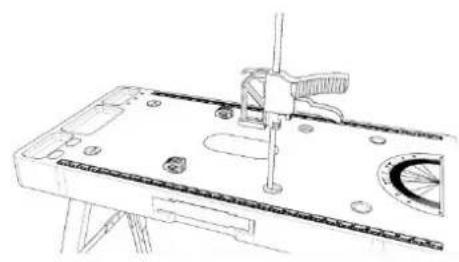
natural_image
Technical line drawing of a mechanical assembly with no visible text or symbolsnatural_image
Line drawing of a four-legged metal workbench with mounting holes and a flat base (no text or symbols)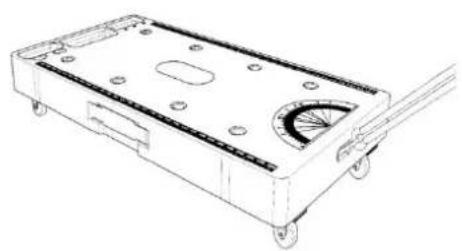
natural_image
Technical line drawing of a wheeled cart with wheels and a protractor (no text or symbols)natural_image
Technical line drawings of two mechanical components mounted on metal plates (no text or symbols)natural_image
Technical line drawing of a mechanical assembly with no visible text or symbolsLeg Locking Buckle 1.
natural_image
Technical line drawing of mechanical components or assemblies (no text or symbols visible)Leg Locked 2.

natural_image
Technical line drawing of a four-legged table with mounting feet and a central opening (no text or symbols)Gusset Braces 3.
natural_image
Line drawing of a mechanical support structure with no text or symbols
ATTENZIONE!
MONTAGGIO
natural_image
Line drawing of a four-legged table with legs and a front panel (no text or symbols)natural_image
Technical line drawing of a mechanical assembly with no visible text or symbols- Cavalletto da sega
natural_image
Line drawing of a wooden table with four legs and a central plate (no text or symbols)natural_image
Technical line drawing of a wheeled cart with wheels and a protractor (no text or symbols)natural_image
Technical line drawings of two mechanical components mounted on metal plates (no text or symbols)natural_image
Technical line drawing of a mechanical assembly with grid structure and two directional arrows (no text or symbols)Leg Locking Buckle
1.
natural_image
Technical line drawing of mechanical components with arrows indicating motion (no text or symbols)Leg Locked
2.
natural_image
Technical line drawing of a wooden table with four legs and a side shelf, showing directional arrows indicating movement (no text or symbols)Gusset Braces
3.
natural_image
Line drawing of a simple tripod table with two cross marks at the base (no text or symbols)ATTENZIONE:
NON UTILIZZARE LA MODALITÀ IMPALCATURA CON LE GAMBE ESTESE.