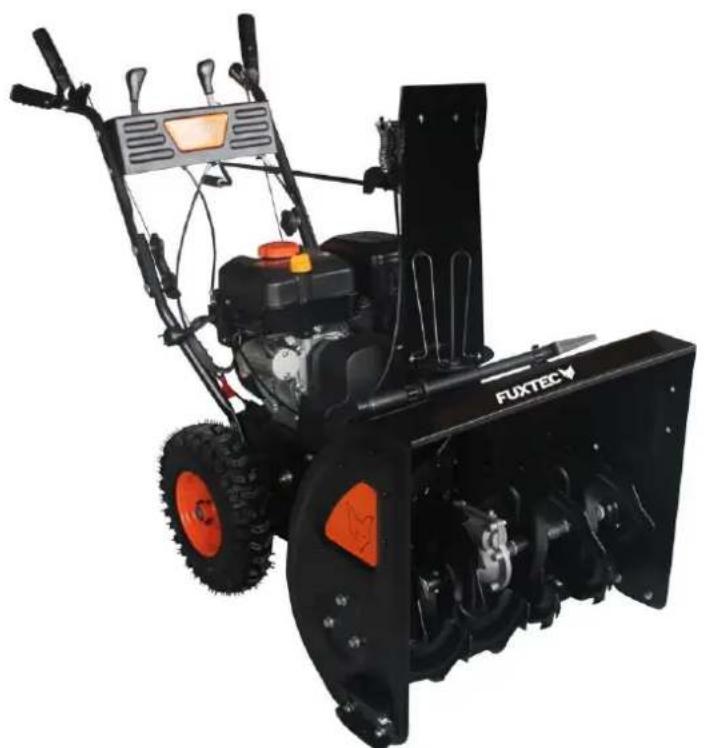
FX-SF210 - Snow blower Fuxtec - Free user manual and instructions
Find the device manual for free FX-SF210 Fuxtec in PDF.

| Product type | Thermal snow blower |
| Brand | Fuxtec |
| Model | FX-SF210 |
| Stage type | 2 stages |
| Clearing width | 600 mm |
| Discharge height | 510 mm |
| Ejection distance | 0 to 9 m |
| Ejection chute rotation | 180° |
| Engine | Zongshen SN210ZS170F/P-C, 208 cm³ |
| Output power | 4.0 kW at 3600 min⁻¹ |
| Max torque | 11 Nm at 2600 min⁻¹ |
| Speeds | 4 forward / 2 reverse |
| Electric start | 230 V |
| Fuel tank capacity | 3.6 L |
| Oil tank capacity | 0.5 L |
| Sound pressure level (Lpa) | 86 dB(A) (K=1.5 dB) |
| Guaranteed sound power level | 105 dB(A) |
| Net weight | 78 kg |
| Recommended tire pressure | 1.0 to 1.4 bar |
| Recommended fuel | Unleaded gasoline SP98 (octane rating ≥87) |
| Recommended engine oil | 4-stroke oil SAE 5W-30, 10W-30 or 30 depending on temperature |
| Engine maintenance | Drain every 25 h, spark plug every 100 h |
| Wear parts | Shear pins, skid shoes, scraper bar |
Frequently Asked Questions - FX-SF210 Fuxtec
User questions about FX-SF210 Fuxtec
0 question about this device. Answer the ones you know or ask your own.
Ask a new question about this device
Download the instructions for your Snow blower in PDF format for free! Find your manual FX-SF210 - Fuxtec and take your electronic device back in hand. On this page are published all the documents necessary for the use of your device. FX-SF210 by Fuxtec.
USER MANUAL FX-SF210 Fuxtec
natural_image
Line drawing of a snowplow truck with visible tracks and wheels, no text or symbols present
natural_image
Orange icon of a person reading a book on black background (no text or symbols)
Inhalt
DEUTSCHE VERSION....8
VERSION FRANCAISE....44
POLSKA WERSJA JEZYKOWA 284
Inhalt
DEUTSCHE VERSION....8
-
Technical data....112
-
Intended/unintended use....113
-
Safety symbols on the machine....115
-
Important safety instructions for using the machine 117
-
Overview of snow blower components....122
-
Position of the motor parts .....123
-
Mounting the snow blower 124
-
Starting/stopping the engine....130
-
Starting with the electric starter 130
-
Stopping the motor....132
-
Engage forward or reverse gears....132
-
Starting the milling auger 132
-
Problem solutions....133
-
Maintenance and cleaning 135
-
Customer service 142
-
Guarantee....142
-
Disposal instructions....142
-
EU Declaration of Conformity....143
VERSION ESPANOLA 145
Manual\_FX-SF210\_Int24\_rev14
POLSKA WERSJA JEZYKOWA 284
natural_image
Black FUKTEC snowman with orange wheels and visible blade (no text or symbols on the vehicle itself)CE
Manual_FX-SF210_Int24_rev14
Manual_FX-SF210_Int24_rev14
text_image
A B C D L M F E G J H I FUXTECnatural_image
Close-up of a hand using a wrench to adjust or install a mechanical component (no visible text or symbols)natural_image
Close-up of a metallic mechanical component with two circular fittings (no visible text or symbols)natural_image
Close-up of a mechanical component with black and red parts, no visible text or symbolsnatural_image
Close-up of a red industrial machine with black components and a metal lever (no visible text or symbols)natural_image
Close-up of a mechanical assembly with black components and red safety goggles (no visible text or symbols)natural_image
Close-up of a black mechanical component with a white wavy line and a black cable inserted, against a red background (no text or symbols visible)
natural_image
Mechanical component diagram showing a bracket with arrows indicating direction (no text or symbols)natural_image
Technical illustration of two bolted components with hexagonal nuts (no text or symbols)natural_image
Mechanical assembly diagram showing a lever mechanism with gears and shafts (no text or labels)Reifendruck
text_image
Red basic line for upper fuel levelÖlstand kontrollieren

Manual_FX-SF210_Int24_rev14
natural_image
Close-up of a person's arm holding a vehicle frame with attached sensors and wires (no visible text or symbols)
natural_image
Close-up of a mechanical device with attached components and wires, no visible text or symbolsManual_FX-SF210_Int24_rev14
natural_image
Illustration of four sequential actions: grip, push, climb, and take a stick (no text or symbols)natural_image
Technical line drawing of a mechanical bracket assembly with mounting holes and structural details (no text or symbols)natural_image
Technical line drawing of a mechanical gear assembly with three helical blades and central hub (no text or symbols)Räder
natural_image
Close-up of a mechanical vehicle showing tire tracks and mounting hardware (no visible text or symbols)
Manual_FX-SF210_Int24_rev14

bar
| Material | Temperature Range (°C) | | :--- | :--- | | 5W-30 | -20 to 0 | | 10W-30 | -20 to 0 | | 30 | 0 to 40°C |
text_image
Electrode .02-.03 in. (0.60-0.80 mm)Bild 25
Manual_FX-SF210_Int24_rev14
declare that the following Appliance complies with the appropriate basic safety and health requirements of the EC Directives (see item 4) based on its design and type, as brought into circulation by us.
This declaration relates exclusively to the machinery in the state in which it was placed on the market, and excludes components which are added and/or operations carried out subsequently by the final user.
Directives: - Machinery Directive 2006/42/EC
Responsible for documentation: Kappstraße 69, 71083 Herrenberg-Gültstein, Germany
- Directive 2012/46/EU against the emission of gaseous and particulate pollutants from internal combustion engines to be installed in non-road mobile machinery
Manual_FX-SF210_Int24_rev14
Conformity assessment method to Annex VI Directive 2000/14/EC
Technical file keeper :
Tun Gumpre
Authorized Signature/Date/ Place:
natural_image
Black and orange Fuxtech snow shower with visible blades and mounting bracket (no text or symbols)
Manual_FX-SF210_Int24_rev14
text_image
A B C D L M F E G J I H FUXTECnatural_image
Close-up of a hand using a wrench to adjust or install a mechanical component (no visible text or symbols)natural_image
Close-up of a metallic mechanical component with two protruding knobs (no visible text or symbols)natural_image
Close-up of a mechanical assembly with black components and red accents (no visible text or symbols)natural_image
Close-up of a red industrial machine component with black components and a metal tool inserted (no visible text or symbols)natural_image
Close-up of a mechanical component with red and black parts, no visible text or symbolsnatural_image
Close-up of a red vehicle's electrical plug with a black cable inserted, no visible text or symbols
natural_image
Mechanical component diagram showing a bracket with arrows indicating direction (no text or symbols)natural_image
Technical illustration of two bolted components with hexagonal nuts (no text or symbols)natural_image
Mechanical assembly diagram showing a lever mechanism with rotating components (no text or labels)Pression des pneus
text_image
Red basic line for upper fuel levelnatural_image
Close-up of a person's hand holding a black mechanical device with attached components (no visible text or symbols)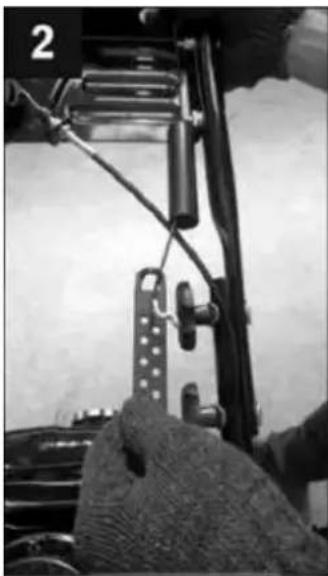
natural_image
Close-up of a vehicle's front suspension system with visible brackets and joints (no text or symbols)natural_image
Illustration of four sequential actions: hand grip, motion capture, push-ups, and take a pole (no text or symbols)natural_image
Technical line drawing of a mechanical assembly with mounting holes and structural brackets (no text or symbols)natural_image
Technical line drawing of a mechanical pump or turbine assembly (no text or symbols)Roues
natural_image
Close-up of a mechanical assembly with visible tire tracks and mounting components (no text or symbols)
text_image
Electrode .02-03 in. (19.60-0.80 mm)- Normes CE applicables
Directive Machine 2006/42/EC
Applicable EC Directives: -
Machinery Directive 2006/42/EC
Responsible for documentation:
Additional used EC Directives: :
Conformity assessment method to Annex VI Directive 2000/14/EC
Conservation de la
Technical file keeper :

Tim Gumprecht ; Herrenberg le 11.08.2021
Authorized Signature/Date/ Place:
natural_image
Black and orange FUKTEC snowman with visible blade, wheels, and control panel (no text or symbols on the vehicle itself)CE
Manual_FX-SF210_Int24_rev14
text_image
A B C D L M F E G J H I FUXTECnatural_image
Close-up of a hand using a wrench to adjust or install a mechanical component (no visible text or symbols)natural_image
Close-up of a metallic mechanical component with two circular fittings (no visible text or symbols)natural_image
Close-up of a black motorcycle's front wheel and side-mounted bracket (no visible text or symbols)natural_image
Close-up of a red tractor's wheel and suspension mechanism, showing metal clamps and bolts (no text or symbols visible)natural_image
Close-up of a black mechanical clamp with a white wire and screw, mounted on a red vehicle (no visible text or symbols)
natural_image
Mechanical component diagram showing a valve mechanism with directional arrows (no text or symbols)natural_image
Technical illustration of two bolted components with hexagonal nuts (no text or symbols)natural_image
Mechanical assembly diagram showing a lever mechanism with gears and shafts (no text or labels)text_image
Red basic line for upper fuel levelnatural_image
Close-up of a mechanical component with attached wires and a labeled part (no readable text or symbols)
natural_image
Close-up of a mechanical assembly with a hand adjusting a component (no visible text or symbols)natural_image
Illustration of a person using a golf forward motion controller, showing four sequential actions (no text or symbols)Manual_FX-SF210_Int24_rev14
natural_image
Technical line drawing of a mechanical assembly with mounting holes and structural brackets (no text or symbols)natural_image
Technical line drawing of a mechanical gear or turbine assembly (no text or symbols)Ruote
natural_image
Close-up of a mechanical vehicle's lower wheel and chassis, showing tire tracks and mounting hardware (no visible text or symbols)
declare that the following Appliance complies with the appropriate basic safety and health requirements of the EC Directives (see item 4) based on its design and type, as brought into circulation by us.
Machinery Directive 2006/42/EC
Responsible for documentation:
Kappstraße 69, 71083 Herrenberg-Gültstein, Germany
- Directive 2012/46/EU against the emission of gaseous and particulate pollutants from internal combustion engines to be installed in non-road mobile machinery
Conformity assessment method to Annex VI Directive 2000/14/EC
Conservazione della
documentazione tecnica: FUXTEC GmbH ; Kappstrasse 69 ; 71083 Herrenberg ; T. Gumprecht
Technical file keeper :

Title of Signatory: Managing
Director
ENGLISH VERSION
ORIGINAL OPERATING INSTRUCTIONS
FX-SF210 petrol snow blower
natural_image
Black and orange FUKTEC snowplow tractor with visible blade and mounting bracket (no text or symbols on body)CE
Your new appliance has been developed and designed to meet FUXTEC's high standards, such as ease of operation and user safety. Properly treated, this appliance will serve you well for years to come.

WARNING: To reduce the risk of injury, the user must read and understand this manual before operating the appliance.
FUXTEC GmbH
Kappstrasse 69, 71083 Herrenberg - Germany
- Technical data
| Type | FX-SF210 |
| Clearing principle | 2-stage |
| Clearing width | 600mm |
| Clearing height | 510mm |
| Ejection distance | 0-9m |
| Swivelling ejection chute | 180° |
| Gearbox | 4 forward gears2 reverse gears |
| Electric start function | 230V |
| Motor type | Zongshen SN210ZS170F/P-C |
| Displacement | 208cm3 |
| Output power (kW)(in accordance with ISO 8893) | 4.0kw / 3,600min-1 |
| Maximum torque (Nm/min)-1 | 11Nm / 2,600min-1 |
| Fuel tank capacity (L) | 3,6l |
| Oil tank (L) | 0,5l |
| Lpa at the operator station (2006/42/EC) | 86 dB(A) (K=1.5dB) |
| Measured Lwa according to ISO 10884 (2000/14/EC) | 102 dB(A) (K=1.5dB) |
| Guaranteed Lwa according to ISO 10884 (200/14/EC) | 105 dB(A) (K=1.5dB) |
| Net weight (kg) | 78 kg |
55. Intended/unintended use
This petrol-driven snow blower is intended exclusively for removing or clearing snow from pavements, garage areas or similar. The maximum snow height to be cleared should not exceed 51 cm.
Using the snow blower for other purposes is considered improper use and is not authorised. Appropriate protective equipment must be worn during use in accordance with the operating instructions. The user/operator and not the manufacturer is liable for any damage or injuries resulting from misuse. Only spare parts suitable for the machine as specified in the operating instructions may be used. Intended use also includes observing the safety instructions and the operating instructions in the operating manual. Persons who operate and maintain the machine must familiarise themselves with the possible dangers. In addition, the applicable accident prevention regulations and national occupational safety regulations must be observed and complied with. If other components or attachments are used on the snow blower, the manufacturer's liability for any resulting damage is completely excluded. This device is intended for use in open areas.
Residual risks
Even if the snow blower is used correctly, there is always a certain residual risk that cannot be ruled out. The following potential hazards can be derived from the type and design of the machine:
- Contact with ejected snow
- Reaching into the running milling machine (cutting injury)
- Unforeseen, sudden movement of the snow blower (cutting injury)
- Throwing away parts of the milling drum
- Damage to hearing if prescribed hearing protection is not worn
• Inhalation of exhaust fumes from the combustion engine - Contact of petrol or oil on the skin
Warning: The actual vibration value during use of the machine may deviate from that specified in the operating instructions or by the manufacturer. This can be caused by the following influencing factors, which should be taken into account before and during use:
- If the machine is used correctly
- Is the way the material is cut or how it is processed correct?
- Is the machine in good working order?
- Sharpness of the cutting tool or correct cutting tool
- If the handles have been fitted and are firmly attached to the machine body
If you notice an unpleasant feeling or skin discolouration on your hands while using the machine, stop working immediately. Take adequate work breaks. Failure to take adequate breaks can result in hand/arm vibration syndrome.
The degree of strain should be estimated depending on the work or use of the machine and appropriate work breaks should be taken. In this way, the degree of strain can be significantly
reduced during the entire working time. Minimise your risk of exposure to vibrations. Maintain this machine in accordance with the instructions in the operating manual.
A certain amount of noise pollution from this appliance is unavoidable. Move noisy work to authorised and designated times. If necessary, adhere to rest periods and limit the duration of work to what is absolutely necessary. Always wear suitable hearing protection for your personal protection and for the protection of persons in the vicinity.
- Safety symbols on the machine
| Symbol Explanation | |
 | READING THE OPERATING INSTRUCTIONSThe operating instructions must be read and understoodthoroughly before operating the machine. |
 | Use hearing and eye protection. |
 | ATTENTION: Safety instructions must be followed, otherwisepersonal injury or damage to property may occur. |
 | WARNING: ROTATING MILLING AUGERKeep hands and feet away from the auger conveyor androtating parts. The auger conveyor is able to cut off body parts. |
 | WARNING : ROTATING BLADESKeep hands away from the inside and from the dischargeopenings while the machine is running. There is a rotating bellinside. |
 | DANGER OF EJECTED OBJECTSThis machine is capable of picking up objects lying around andflinging them away. Serious personal injury is possible. |
 | Do not touch any rotating parts before the machine stops. |
 | Remove the spark plug before checking the machine. Do notremove protective covers. Contact your specialist dealer or themanufacturer. |
 | Children must stay at least 15 metres away from the work area. |
 | WARNING: ROTATING BLADESKeep hands away from the interior and ejection openings whilethe machine is running. There are rotating blades inside. |
 | Electrical waste should not be disposed of with householdwaste. Hand the devices in at the appropriate places. Ask yourlocal authority or dealer about disposal regulations. |
Manual_FX-SF210_Int24_rev14
 | WARNING: PETROL IS HIGHLY FLAMMABLEAllow the engine to cool down for at least 2 minutes before refuelling. |
 | WARNING: CARBON MONOXIDENever operate the motor in closed or poorly ventilated rooms.The exhaust gas contains carbon monoxide, an odourless and poisonous gas. |
 | WARNING: ELECTRIC SHOCK (for motors with electric starter)Do not use the electric starter in the rain. |
 | The gearbox has 2 reverse and 4 forward gears |
 | Lever for switching on the milling auger |
 | Lever for engaging the forward/reverse drive |
 | Lever for adjusting the ejection width |
Do not allow others to use this machine unless they are fully responsible and have read and understood the machine manual.
57. Important safety instructions for using the machine

WARNING! This symbol indicates important safety instructions which, if ignored, could jeopardise your personal safety and/or your own and other people's property. Read and follow the instructions in this manual before operating this machine. Failure to comply with these instructions may result in personal injury.

DANGER! This machine has been designed to be operated in accordance with the following safety instructions. As with any petrol-driven appliance, recklessness and errors in operation can lead to serious injury. This machine is capable of severing fingers, thumbs and legs and throwing foreign objects. Failure to observe the following safety instructions can result in serious injury or even death.
Instructions for handling the machine
- Read, understand and follow all explanations provided on the machine and in the operating instructions before installing or operating the machine. Keep these operating instructions in a safe place for later use and when ordering spare parts.
- Familiarise yourself with all the controls and their correct function. You must know how to stop the machine and switch it off quickly.
- Do not allow children under the age of 14 to operate this machine. Children aged 14 and over should read and understand the operating instructions and the safety instructions in these operating instructions and on the machine and be instructed and supervised by an adult.
- Never allow an adult to operate these machines without proper instruction.
- Ejected objects can cause serious personal injury. Select milling paths so that roads, bystanders, etc. cannot be hit by ejected objects.
- Keep bystanders, children and pets at least 25 metres away from the machine during operation.
- Be careful not to slip or trip, especially when reversing.
Preparation
Check the operating area thoroughly. Remove all door mats, newspapers, sledges, boards, cables and other objects that pose a tripping hazard or could be ejected by the tiller.
- Always wear safety goggles during operation, set-up and repair to protect your eyes. Flying objects can cause serious eye injuries.
- Do not work without wearing appropriate winter clothing. Do not wear jewellery, long scarves and other loose clothing that can be caught by moving parts. Wear sturdy shoes that improve your footing on smooth surfaces.
- Use earthed, three-wire extension cables and sockets for all machines with electric starters.
- Adjust the height of the collection housing to clear gravel or crushed stone soils.
- Release all operating levers before starting the engine.
- Never attempt to change settings while the engine is running unless this is expressly recommended in the operating instructions.
- Allow the engine and the machine to adjust to the outside temperature before you start clearing snow.
Safe handling of petrol
Be particularly careful when handling petrol to avoid personal injury and damage to property. Petrol is highly flammable and the vapours are explosive. Petrol can cause serious personal injury if it gets on your body or clothing and ignites. Wash yourself immediately and change your clothes if you come into contact with petrol.
- Only use approved petrol cans.
- Extinguish all cigarettes, cigars, pipes and other sources of ignition.
- Never refuel the machine indoors.
- Never open the fuel filler cap or refuel the engine while it is running or hot.
- Allow the engine to cool down for at least two minutes before refuelling.
- Never overfill the tank. Fill up to a maximum of 2 cm from the bottom edge.
- Replace the fuel filler cap and screw it on securely.
- If petrol has leaked, wipe off the engine and the machine. Move the machine to another area and wait five minutes until you start the engine.
- Never store the machine or the petrol can in a room with an open flame, sparks or pilot flames (e.g. heating stoves, water boilers, heaters, dryers, etc.).
- Allow the machines to cool down for at least five minutes before cleaning them up.
- Never fill the canister in a vehicle, on a lorry or on a low-loader with plastic lining. Always place the canister on the ground away from your vehicle before filling it.
- If possible, remove petrol-powered equipment from the truck and refuel it on the ground. If this is not possible, refuel such equipment with a canister instead of a petrol nozzle.
- Keep the fuel nozzle in contact with the edge of the fuel tank or the canister opening until refuelling is complete. Do not use a fuelling nozzle without an automatic shut-off device.
Operation
- Keep hands and feet away from rotating parts, the milling auger housing or the discharge chute. Contact with rotating parts can lead to hands and feet being cut off.
- The control lever of the tiller is a safety component. Never bypass its function. This can make the machine unsafe and lead to personal injury.
- The control lever must be easy to operate and return automatically to the starting position when released.
- Never work without or with a damaged ejection chute. All safety-relevant parts must be functional and used.
- Never operate the motor in closed or poorly ventilated rooms. The exhaust gas contains carbon monoxide, an odourless and deadly gas.
- Do not work with the machine under the influence of alcohol or drugs.
- The exhaust and engine can become very hot and cause burns. Do not touch either. Keep children away.
- Be especially careful when working on or crossing gravelled surfaces. Be alert for hidden dangers.
- Be careful when changing direction on an embankment.
- Avoid throwing snow towards windows, walls, cars, etc. This will prevent people or objects from being damaged.
- Never direct the snow towards children, bystanders or pets. Do not leave anyone standing in front of the machines.
- Do not overload the capacity of the machines by clearing snow too quickly.
- Never work in poor visibility or poor lighting conditions. Always ensure that you are standing securely and always hold the handles firmly. Move slowly while working - please do not run.
- Switch off the drive of the milling auger when transporting it or when not in use.
- Never work at high speeds on smooth floors. Look backwards and downwards when reversing.
- If the machine starts to vibrate unusually strongly, switch off the engine, disconnect the ignition cable and earth it to the engine. Carefully inspect the machine for damage. Repair any damage before restarting the engine.
- Release all operating levers and switch off the engine before leaving the machine (behind the handles). Wait until the auger comes to a complete standstill before removing the discharge chute, changing any settings or carrying out inspections.
- Never put your hand in the ejection or collection opening. Always use the tool supplied to loosen the discharge chute. Never loosen the discharge chute while the motor is still running. Switch off the motor and wait behind the handles until all moving parts have come to a standstill.
- Only use accessories approved by the manufacturer (e.g. equalising weights, snow chains, cabs, etc.)
- To start the motor, pull the rope slowly until you feel resistance and then pull the rope quickly. If the starter rope is pulled back too quickly from the start, your hand and arm will be pulled towards the motor faster than you can let go. This can result in injuries, sprains and fractures.
- In situations not described in these operating instructions, special care and good judgement are required. Contact Customer Care for assistance and the name of the nearest service dealer.
Maintenance and storage (see also chapter 10)
- Never make unauthorised modifications to safety parts. Check their function regularly in accordance with the "Maintenance and cleaning" section.
- Before cleaning, repairing or checking the machine, release all control levers and switch off the motor. Wait until the milling auger has come to a complete standstill. Disconnect the ignition cable and earth it to the engine to prevent unintentional starting.
- Check bolts and screws at regular intervals for correct tightness in order to be able to work safely with the machine. Also check the machine visually for damage.
- Do not change the controller setting or overspeed the motor. The controller controls the maximum permitted speed of the motor.
- The guide rails and scuff plates of the snow blower are wearing parts and will wear out. For your own safety, check all components regularly and only replace them with original spare parts (OEM). The use of parts that do not fulfil the manufacturer's specifications can lead to reduced performance and a lack of safety.
- Check the control lever regularly for correct engagement and disengagement and adjust if necessary. The explanation can be found in the "Settings" section of these operating instructions.
- Maintain the safety and information signs and replace them if necessary.
- Follow the laws and regulations for handling petrol, oil, etc. to protect the environment from pollution.
- Before storage, let the machine run for a few minutes and remove any ice from the machine. This prevents the milling auger from freezing.
- Never store the machine or the petrol can in a room with an open flame, sparks or pilot lights such as water heaters, ovens, dryers, etc.
- Follow the instructions in the operating instructions for storage outside the operating period.
- Check the fuel line, tank, tank cap and seals regularly for breakage or leaks. Replace if necessary.
- Never start the engine with the spark plug removed.
- Please check the machine annually to ensure that all mechanical and safety-related functions are working correctly and are not worn. Failure to do so can lead to accidents, injuries or even death.
Do not modify the engine
To avoid serious injury or death, the motor must not be modified in any way. Tampering with the manufacturer's settings can cause the engine to overspeed, which can result in the engine reaching a critical speed. Never tamper with the manufacturer's settings of the engine speed sensor.
Read the manual carefully. Fully familiarise yourself with the controls and the correct use of the machine. Understand how to stop and switch off the machine. Understand how to stop and switch off the machine. Understand how to quickly release a clamped attachment.
Do not allow anyone to use the machine without proper instruction. Ensure that the user wears foot, leg, eye, face and ear protection. Keep the area clear of bystanders, children and pets. Never allow children to operate or play with the machine.
Do not allow anyone to enter the DANGER ZONE. The DANGER ZONE is an area with a 15 metre radius (approximately 16 paces) or 50 feet. Insist that people in the DANGER ZONE wear eye
protection beyond the DANGER ZONE due to ejected objects. If the machine must be used where there are unprotected people, use it at a low throttled speed to reduce the risk of thrown objects.
WARNING DANGER
In addition, wear head, eye, face and ear protection and shoes against slippery surfaces. Do not wear loose belts, jewellery or loose, dangling clothing that could get caught in the machine.
Do not wear footwear with unprotected toes and do not work barefoot or without leg protection. You must wear head protection in certain situations.
58. Overview of snow blower components
text_image
A B C D E F G J H I K L M FUXTECa. Drive lever
b. Height adjustment of ejection chute
c. gear selector lever
d. Screw drive
e. motor
f. Ejection chute
g. Reaning tool for ejection chute
h. Frässchnecke
i. G skids
j. Belt guard cover
k. Crank rod for ejection direction
I. Adjustment rod for ejection direction
m. Mounting the adjustment rod
59. Position of the motor parts
text_image
SN210 SNOW ENGINE COVID-19 1 2 3 4 5 6 7 8 ZENCKHEN- Choke lever
- Engine start/stop key
- Engine speed lever
- Oil filler neck with dipstick
- Primer pump
- Hand starter
- Fuel filler cap
- Electrical starter
60. Mounting the snow blower
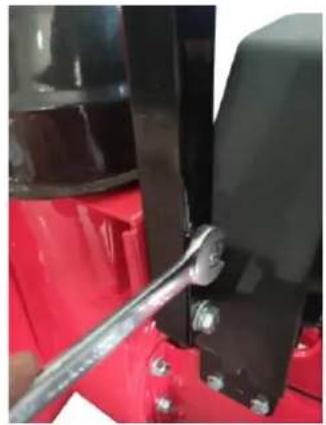
- Fit the lower part of the linkage to the frame using the screws supplied. Use an open-end spanner for this.
natural_image
Close-up of a hand using a wrench to adjust or install a mechanical component (no visible text or symbols)- Hold the upper linkage in alignment with the holes. Slide the screws inwards from the outside. From the inside, first place the washer and then screw the two rods firmly together with the plastic rotary knobs.
CAUTION: Be careful - Do not bend or kink cables bend
natural_image
Close-up of a metallic mechanical component with two curved arms and mounting holes (no text or symbols visible)- Carefully slide the ejection chute onto the chassis.

natural_image
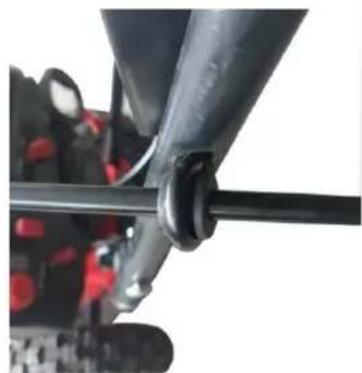
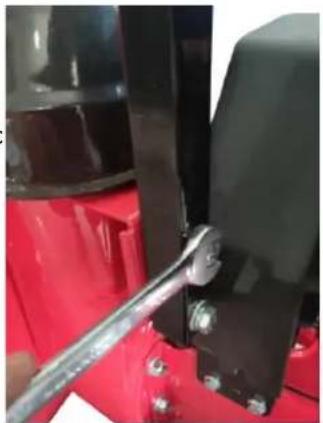
Close-up of a black mechanical component with metallic clamps and mounting brackets (no visible text or symbols)• Install the support rod of the snow chute and secure the nut with a spanner.
natural_image
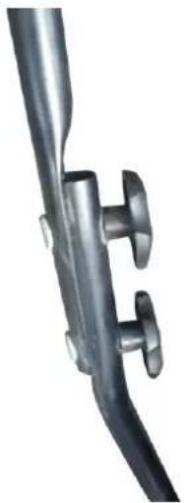
Close-up of a mechanical clamp or bracket component with red base and black components (no visible text or symbols)- Now fit the upper part of the adjustment rod of the ejection chute. To do this, push it through the rubber ring.
natural_image
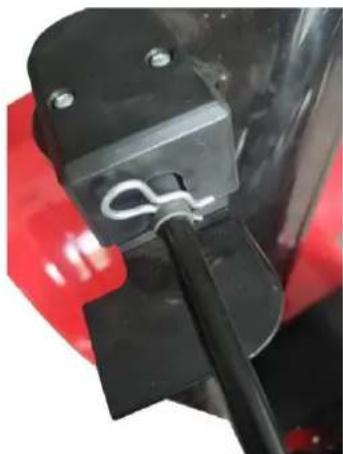
Close-up of a mechanical assembly with black components and red accents (no visible text or symbols)- Slide the upper part of the adjustment rod into the holder of the counterpart and align the holes.
- Now insert the safety splint as shown.
natural_image
Close-up of a black mechanical component with a white wire and black cable, mounted on a red vehicle (no visible text or symbols)
CAUTION: It is not recommended to use the snow blower on gravel, as it can pick up and eject loose gravel. This can lead to injuries or damage to the snow blower and surrounding objects.
- For thorough snow clearing on smooth surfaces, move the skids on the housing to a higher position.
● Use the middle or low position if the area to be cleared is uneven, such as a gravel driveway.
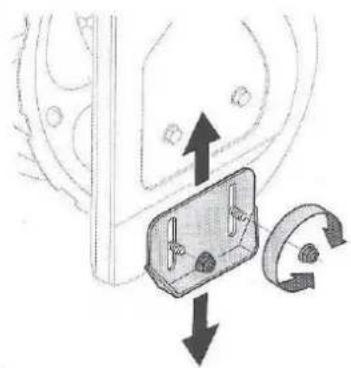
Adjusting the skids:
- Loosen the hexagon nuts and carriage bolts. Adjust the skids to the desired position.
natural_image
Diagram showing a mechanical component with directional arrows indicating movement or force (no text or symbols present)- Make sure that the entire lower surface of the skid presses on the floor to avoid uneven wear of the skids.
• Reattach the nuts and bolts.
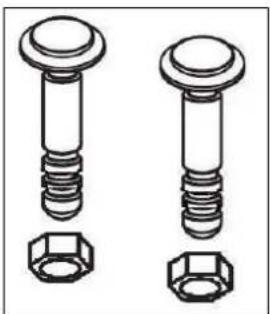
Shear pin
A spare pair of shear pins and nylon lock nuts are included with your snow blower. Store them in a safe place until you need them.
natural_image
Technical illustration of two bolted components with hexagonal nuts (no text or symbols)Cleaning tool for the ejection chute
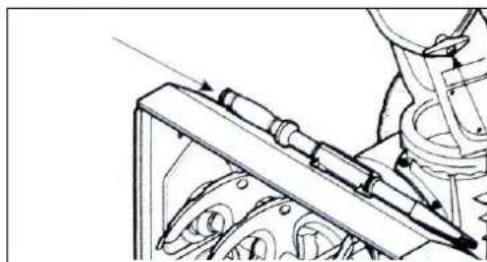
The cleaning tool is attached to the top of the auger housing with a retaining clip and a cable tie. Cut the cable tie before operating the snow blower.
natural_image
Mechanical assembly diagram showing a lever mechanism with gears and shafts (no text or labels)Tyre pressure
The correct tyre pressure is between 1.0 bar and 1.4 bar. Check the tyre pressure regularly and always set the same pressure in all tyres. Over-inflation (over 1.4 bar) can cause the tyre to burst. The resulting forces can lead to serious injuries. Use a manual pump or a portable electric pump to avoid over-inflating the tyres.
NEVER USE AN AIR COMPRESSOR
Fuel recommendations
Use car petrol (unleaded or low-lead to minimise pollutants in the exhaust gas) with at least 87 octane. Petrol with up to 10% ethanol or 15% MTBE (methyl tert-butyl ether) can be used. Never use an oil/petrol mixture or contaminated petrol. Avoid getting dirt, dust or water into the fuel tank. Do NOT use E85 fuel.
● Always refuel in a well-ventilated area with the engine switched off. Smoking, naked flames or sparks are not permitted in the vicinity where the engine is being refuelled or the petrol is being stored.
- Do not overfill the fuel tank. After refuelling, make sure that the fuel filler cap is properly closed.
- Refuel carefully so as not to spill any petrol. Spilt petrol or petrol vapour can ignite. If petrol has been spilled, make sure that the area is dry again before starting the engine.
● Avoid repeated or prolonged contact with the skin or inhalation of petrol vapours.
Refuelling

WARNING! Exercise extreme caution when handling petrol. Petrol is highly flammable and the vapours are explosive. Never refuel the machine indoors or when the engine is still hot or running. Extinguish cigarettes, cigars, pipes and other sources of ignition.

WARNING! Always keep hands and feet away from moving parts.
Do not use pressurised starting fluid. Vapours are flammable.
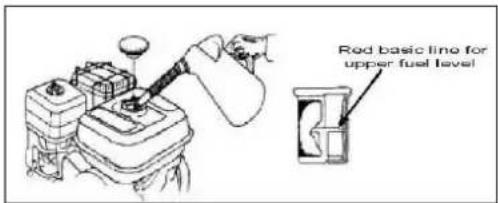
- Clean the filler neck before removing the filler cap.
- There is a tank detection system in the fuel tank. Refuel until the petrol reaches the red stop plate inside the filter. Be careful not to overfuel.
text_image
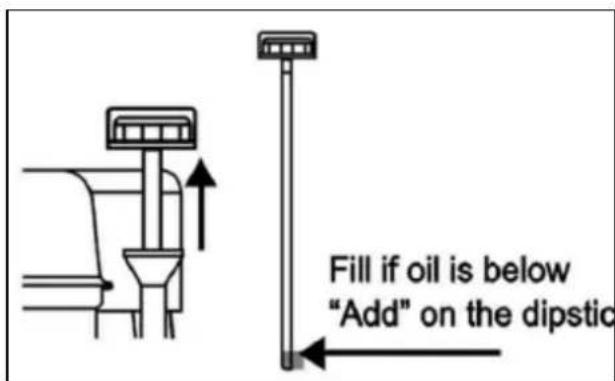
Red basic line for upper fuel levelCheck oil level

ATTENTION: The engine is supplied without oil. You must fill it with sufficient oil and check the oil level before operating the snow blower. If you operate the engine with too little oil, this can lead to engine damage and loss of warranty.
NOTE: Check the motor on level ground with the motor switched off.
- Remove the oil level cap/dipstick and wipe the dipstick clean.
text_image
Fill if oil is below "Add" on the dipstic- Insert the cap/dipstick into the filler neck and screw it in as far as it will go. Then screw the dipstick back on.
- Carefully pull out the dipstick. If the level is low, add oil slowly until the maximum level (H) and the minimum level (L). If the engine does not stand during operation, the oil level may be too low. Refer to the "Engine main the correct oil viscosity and oil quantity.
Top up the oil when the dipstick shows below "ADD".
- Replace the oil cap and screw it tight before starting the engine.
NOTE: Do not overfill. Overfilling can lead to engine smoke, difficult starting and soiling of the spark plug.
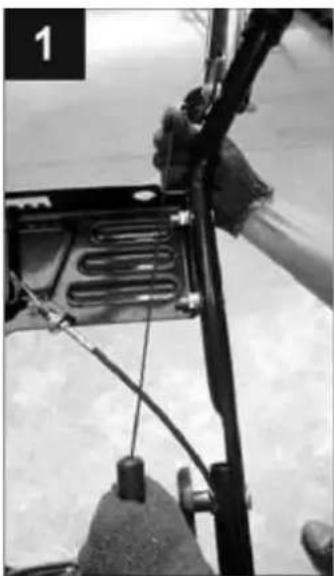
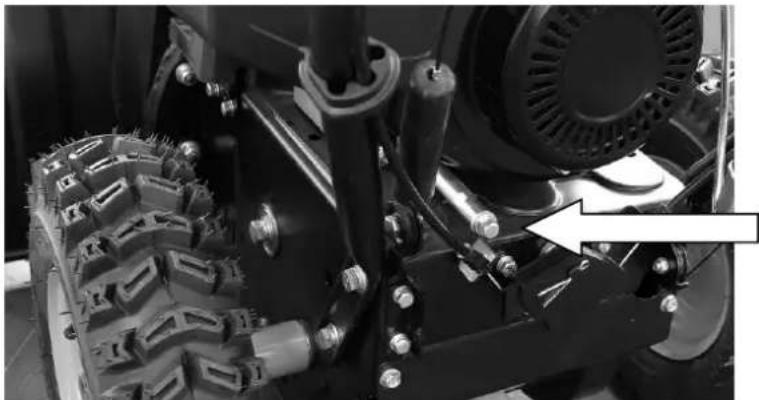
Milling auger adjustment
Regular adjustment of the auger timing may be necessary due to normal belt stretch and wear. Adjustment is necessary immediately if the milling auger
a. begins to rotate with the milling worm control released.
or
b. During operation, the auger rotates slowly while the motor maintains speed.
NOTE: Carry out this test before starting the machine for the first time and at the beginning of each winter season. Check the setting of the auger control as follows:
- When the auger control is released, the cable should sag slightly, it must not be tight.
- Start the snow blower in a well-ventilated area. Refer to the "Starting the engine" section of these operating instructions. Ensure that the drive lever is in the "FAST" position.
- When you are in the working position (behind the snow blower), start the auger.
- Leave the auger engaged for about 10 seconds before releasing the auger control. Repeat this several times.
- With the motor running in the "FAST" position and the milling auger control in the released "Up" position, run to the front of the machine.
• Make sure that the auger is completely stopped and shows NO sign of movement.
NOTE: If the auger even begins to move, immediately return to the working position and switch off the motor. Wait for all moving parts to stop before adjusting the auger control cable as follows:
-
Hold the protective cover firmly and pull the cable of the worm drive slightly until you can release the Bowden cable from the holder on the lever of the worm drive.
-
Move the protective cover upwards so that the adjustment plate is visible. Pull the upper Bowden cable out of the lower hole in the
natural_image
Close-up of a person's arm holding a metal frame with a mounted device, against a snowy sky background (no visible text or symbols)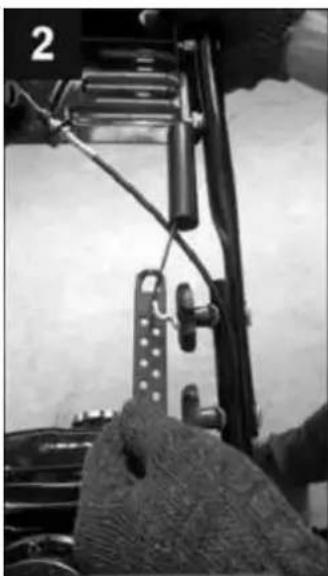
natural_image
Close-up of a mechanical device with wires and components, no visible text or symbolsplate and reinsert the end into one of the upper holes in the plate.
- Slide the protective cover back over the adjustment plate and lock the Bowden cable again on the handle of the worm drive.
• After you have tightened the Bowden cable, test whether the drive runs smoothly again.
NOTE: If the auger continues to rotate with the auger control disconnected, switch off the motor and readjust the cable.
If the auger is reluctant to rotate during operation, the cable is too loose and the coupling end must be turned anti-clockwise to reduce the slack in the cable. Follow the steps above to readjust the coupling end of the cable.

WARNING! Do not overstretch the cable. Overtensioning can prevent the auger from loosening and jeopardise the safety of the snow blower.
61. Starting/stopping the engine
Starting the engine with the manual starter

WARNING! Always keep hands and feet away from moving parts.
Do not use pressurised starting fluid. Vapours are flammable.
NOTE: Allow the engine to warm up for a few minutes after starting. The engine will develop its full power when it reaches its operating temperature.

CAUTION: Do not pull the starter rope when the engine is running.

WARNING: To avoid unexpected movements of the snow blower, never leave the engine running unattended. Switch off the engine after use and remove the ignition key.
• Make sure that the key (2) is inserted
- Set the throttle lever (3) to increased engine speed (hare).
- Set the choke to || (for cold starts). When the engine is or becomes warm, set the throttle to position |||
- Press the primer pump (5) three to five times. If the engine is warm, only press the primer pump once or twice. In cool weather, priming may have to be repeated.
- Pull gently on the starter handle until resistance is felt; then pull quickly and forcefully to overcome the compression. Do not let go of the handle as it could snap back. SLOWLY return the rope to its original position. If necessary, repeat this step.

natural_image
Illustration of four sequential actions: hand grip, pushing a cart, pulling a motorcycle, and using a golf stick (no text or symbols)- When the engine warms up, slowly move the choke switch (1) to the position || . If the engine jerks, restart the engine and set the choke to the half position for a short time and then to the ||
62. Starting with the electric starter
Make sure that your home has a three-wire system. Ask an electrician if you are not sure. If your home is not a three-wire system, you must not use the electric starter under any circumstances.

WARNING: The electric starter is equipped with an earthed cable and plug and is designed for operation on 230V AC alternating current. It must always be operated with a correctly earthed
three-wire connection to prevent the risk of an electrical short circuit. Read all explanations before using the electric starter.
If your domestic power supply is earthed but does not have a three-wire connection, you should have one installed by an electrician before using the electric starter.
If you have an earthed three-wire connection, proceed as follows:
- Make sure that the key (2) is inserted
- Set the throttle lever (3) to increased engine speed (hare).
- 3 Set the choke to (for cold starts). When the engine is or becomes warm, set the throttle to position |||
- Press the primer pump (5) three to five times. If the engine is warm, only press the primer pump once or twice. In cool weather, priming may have to be repeated.
- 5 Connect the power cable to the control box on the motor. Plug the other end into an earthed three-wire socket with 230V AC.
- Press the electric starter button(8) on the control box to start the motor. Continuous pressing can damage the electric starter. Release the button immediately once the motor is running. The electric starter is equipped with thermal overload protection; the system will temporarily shut down and allow the starter to cool down if the electric starter is overloaded.
- When the engine warms up, slowly move the choke switch (1) to the position ||. If the engine jerks, restart the engine and set the choke to the half position for a short time and then to the position once the engine has warmed up.
- When disconnecting the power cable, first unplug the end at the socket and then the end at the snow blower.
63. Stopping the motor
The procedure for switching off is the same for manual starters and electric starters.

WARNING: To avoid unexpected movements of the snow blower, never leave the engine running unattended. Release the throttle lever and reduce the engine speed. Leave the engine running for a few minutes to dry out any moisture in the engine.
- Switch off the motor after use by removing the key plug (2).
- Wipe away any moisture from the control unit on the motor.
64. Engage forward or reverse gears

Important: Please only shift gears when stationary (release drive lever "A"). If this is not observed, considerable damage can be caused.
- Set the throttle lever to "FAST" (Hare).
- To change gear, pull the gear lever fully towards you and push it into the desired position. Your device has 2 reverse and 4 forward gears, which have different ratios and therefore different movement speeds.
- Only press the drive lever "A" down once the gear change has been completed. The machine starts moving depending on the selected gear.
65. Starting the milling auger
To start the auger, press the auger drive "D" all the way down. To stop the auger, release the auger drive "D" by letting go of it.
- Problem solutions
| Problem | Reason | Solution |
| Engine does not start when cold | - Fuel tank is empty or poor quality petrol- Blocked fuel line- Spark plug cable disconnected- Defective spark plug- Engine flooded due to excessive suction- Choke is set to |↑| | - Fill the tank with fresh petrol- Clean the fuel line- Connect spark plug cable- Clean spark plug, readjust gap or replace- Suction four times.- Wait at least 10 minutes before starting the engine- Set the choke to |↓| |
| Engine runs unevenly | - Engine runs with choke- Fuel tank is almost empty or poor quality petrol- Water or dirt in the fuel system.- Carburettor not adjusted correctly. | - Set the choke to half position until the engine warms up- Fill the tank with fresh petrol- See engine maintenance- See engine maintenance |
| Motor overheats | - Carburettor not adjusted correctly. | - See engine maintenance |
| Power loss | - Ignition cable loose- Ventilation with petrol cap blocked. | - Connect the ignition cable correctly.- Clear the vent. |
| Strong vibrations | - Loose parts or damaged milling auger | - Stop the engine immediately and disconnect the ignition cable. Check for possible damage. Tighten all pins and nuts. Repair if necessary. If the problem persists, take the appliance to an authorised service centre |
| Device does not drive itself | - Drive belt loose or damaged | - Replace drive belt |
| Milling auger continues to rotate | - Cable not set correctly | - Set the auger control cable correctly. See "Adjusting the auger". |
| The appliance becomes clogged with snow. | - The discharge chute is blocked.- Shear pins are sheared off.- Foreign object is stuck in the milling auger.- Milling auger control cable not set correctly.- Milling auger belt is loose or damaged. | - Switch off the engine and remove the spark plug cable. Clean the inside and outside of the shaft with the cleaning tool.- Replace shear pin(s).- Stop the engine immediately and disconnect the spark plug cable. Remove the object from the auger.- Set the milling auger control cable.- Replace the milling auger belt. |
67. Maintenance and cleaning
General recommendations
- Follow the safety rules for all maintenance.
- The warranty does not cover damage resulting from misuse or negligence. To obtain the full scope of the warranty, the user must maintain the snow blower as described in these operating instructions.
- Check regularly that all fastenings and system parts are tight.

WARNING! Before servicing, repairing, lubricating or checking, disconnect all controls and switch off the motor. Wait until all moving parts have come to a complete standstill. Remove the ignition cable and earth it to the engine to prevent unintentional starting. Always wear safety goggles during work or when servicing or making adjustments to the machine.
Engine
General recommendations for the maintenance of your motor are listed below. For further details, please contact the manufacturer.
- Check the oil level before starting work.
- Change the engine oil after the first 5 hours of operation and then every 25 hours.
- Clean the spark plug at least once per season or every 100 working hours and reset the electrode gap to 0.7 mm; replace the spark plug every 200 working hours.
Wheel air pressure
Before starting work, check the air pressure and set it to 1.0 to 1.4 bar. Read the "Fitting" and "Settings" sections of these operating instructions for the correct inflation process. If the air pressure in both tyres is not the same, the device may pull in one direction.
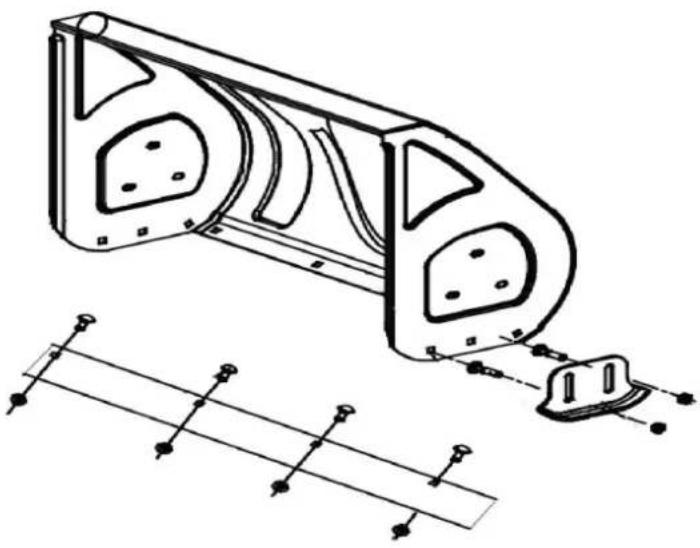
Scuff plate and sliding carriage
The scuff plates and the sliding carriages at the end of the snow blower are used parts. They should be checked regularly and replaced if necessary.
Replacing the sliding carriage
- Remove the connecting pin and nut from each sliding carriage on the milling worm housing.
natural_image
Technical line drawing of a car body panel with mounting holes and structural details (no text or symbols)- Insert new sliding carriages and secure them with the old screws. Ensure that the sliding carriages are evenly aligned.
Removing the scuff plate
- Remove both sliding carriages as well as the connecting pins and nuts that hold the scuff plate to the milling auger housing. You can see the position of the scuff plates in the picture above.
- Insert the new scuff plate and make sure that the heads of the connecting pins are inside the housing.
- Reinstall the sliding carriages. Tighten all connections.
Storage out of season
If the snow blower is not used for more than 30 days or the end of the snow season has been reached, the device must be stored correctly. Follow the storage instructions to ensure performance for many years.
- Store the appliance in a clean and dry place.
- If you store the appliance in an unventilated place, check the machine for rust by coating the cutter with light oil or silicone.
- Clean the outside of the motor and the snow blower.
Preparing the motor

WARNING! Never store the snow blower with petrol in the tank in a closed room or in a poorly ventilated place where petrol vapours could reach an open flame, an ignition spark or a pilot light such as water heaters, heaters, dryers, etc.
NOTE: It is important to prevent rubber deposits in the main fuel components such as the carburettor, fuel filter, fuel hose or tank during storage.
CAUTION: Fuels with added alcohol (e.g. ethanol or methanol) can attract moisture. This can lead to separation and the formation of acids during storage. Acidic fuel can damage the fuel system during storage.
To avoid engine problems, the tank system should be emptied if the machine is to be stored for 30 days or more. Follow the instructions to prepare your snow blower for storage.

WARNING! Drain the fuel into a canister outside enclosed spaces, away from naked flames.
Ensure that the engine is cold. Do not smoke. Remaining petrol can lead to starting problems in warm weather.
- Leave the engine running until the tank is empty and it stops due to lack of fuel.
- Remove the spark plugs and pour 30ml of oil into the cylinder through the spark plug hole. Cover the hole with a rag and turn the engine a few times to distribute the oil. Refit the spark plug.
Preparing the snow blower
- If the snow blower is stored in an unventilated place or in a metal shed, care should be taken to ensure that the equipment is resistant to rust. Use a light oil or silicone to treat the device, especially chains, springs, bearings and cables.
- Remove any dirt from the engine and system.
- Follow the lubrication recommendations in the "Maintenance" section of these operating instructions.
- Store the appliance in a clean, dry place.
Lubrication
- Lubricate the axle points on the auger control and the drive control with light oil once a season.
Milling worm axle
Remove the shear pins from the milling auger axle at least once a season, spray lubricant into the axles, around the bushes and flange bearings at the end of the axle. See picture
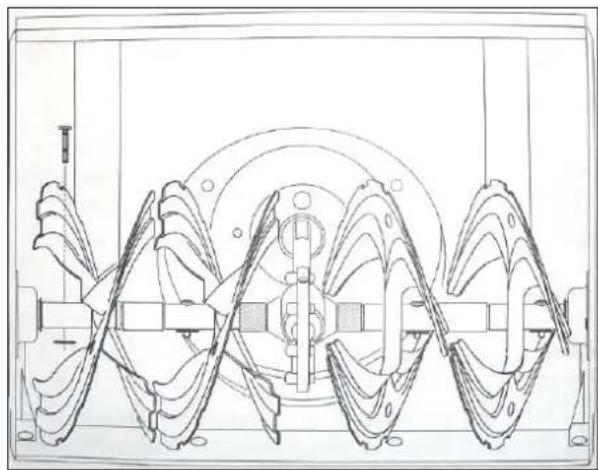
natural_image
Technical line drawing of a mechanical pump or turbine assembly (no text or symbols)Wheels
Remove both wheels at least once a season. Clean and lubricate the axles with a multi-purpose lubricant before refitting the wheels.
Engine maintenance

WARNING! To prevent an accidental start, remove the start key (2) before starting
maintenance.
Regular inspection and adjustment of the motor is essential to ensure maximum performance and a long service life. The required service intervals and the type of maintenance are described in the table below. Follow the time or calendar intervals, whichever comes first. If you are working in adverse conditions, more frequent maintenance is required.
Maintenance schedule
| Tasks | First 5 hours | With every use or every 5 hours | Every season or every 25 hours | Every season or every 50 hours | Every season or every 100 hours | Date of maintenance |
| Check engine oil | ● | |||||
| Engine oil change | ● | ● | ||||
| Check spark plug | ● | |||||
| Spark plug maintenance | ● | |||||
| Clean the exhaust area | ● |
Engine oil change
NOTE: Check the oil level before each use and every five working hours to ensure the oil level is correct. Read "Checking the oil level" in the "Operation" section.
• Empty the petrol in the tank by running the engine until it is empty.
- Place a suitable oil canister under the oil drain plug.
- Open the oil drain plug.
- Tilt the engine to empty the oil into the canister. Used oil must be disposed of at the prescribed location.
- Replace the oil drain plug and fasten it securely.
- Top up with the recommended oil and check the oil level as described in the "Operation" section.
- Replace the oil cap/dipstick securely.
Oil drain plug
natural_image
Close-up of a mechanical vehicle showing tire tracks and mounting flanges (no visible text or symbols)
CAUTION: Wash your hands thoroughly with soap and water as soon as possible after
handling used oil.
NOTE: Please dispose of used oil in an environmentally friendly manner. Take it to a recycling centre or to the appropriate collection points.
Oil recommendations
When topping up oil, refer to the viscosity diagram below. See Fig. 23. The oil capacity of the engine is 0.5 litres. Do not overfill. Use a 4-stroke or similar premium oil with detergent additives that fulfils the requirements of the automotive industry.

bar
| Range | Value | |---|---| | 5W-30 | -20 | | 10W-30 | -10 | | 30 | 80 |
CAUTION: DO NOT use 2-stroke oil or oil without detergent additives. It could reduce the service life of your engine.
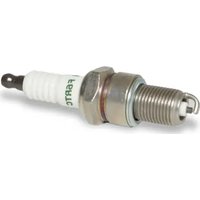
Spark plug

WARNING! DO NOT check the sparks when the spark plug is removed. DO NOT turn the engine when the spark plug is removed.

WARNING! When the engine is running, the exhaust will be very hot. Be careful not to touch the exhaust.
To ensure that the engine operates correctly, the spark plug must be inserted correctly and be free of deposits.
- Remove the spark plug cable and use a spark plug spanner to remove the spark plug.
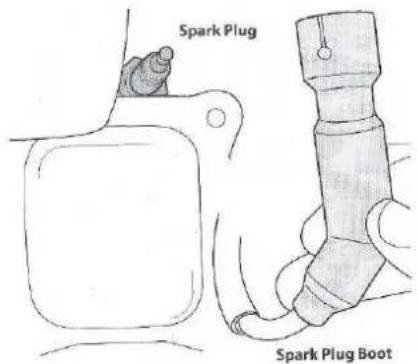
text_image
Spark Plug Spark Plug BootPicture 24
- Check the spark plug visually. Dispose of the spark plug if it is obviously worn or the insulator is cracked or chipped. Clean the spark plug with a wire brush if it is to be reused.
- Measure the electrode gap with a caliper gauge. If necessary, correct the distance by bending the electrode. Fig. 25 The distance should be 0.6-0.8 mm.
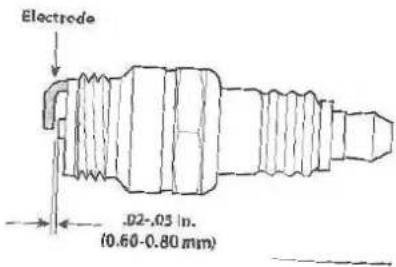
text_image
Electrode .02-05 in. (0.60-0.80 mm)Picture 25
- Check that the spark plug gasket is in good condition and turn the spark plug in by hand to prevent it from jamming.
- Once the spark plug is in place, tighten it with a spark plug spanner to compress the seal.
NOTE: When inserting a new gasket, turn the spark plug 1/2 turn to compress the gasket. With a used spark plug, 1/8 to 1/4 turn is sufficient.

CAUTION: The spark plug must be firmly seated. A loose spark plug can become very hot and age the engine.
Cleaning the motor
If the engine was previously running, allow it to cool down for at least half an hour before you start cleaning. Regularly remove the accumulated dirt from the engine.

CAUTION: DO NOT spray the engine with water for cleaning. The water could contaminate the petrol. Using a garden hose or pressure washer can flush water into the exhaust port. Water can enter the cylinder via the exhaust and cause damage.

WARNING! The accumulation of foreign objects around the exhaust can cause a fire. Check and clean it before each use.
Storage out of season
For engines stored for longer than 30 days, the fuel must be drained to prevent ageing and gum deposits in the fuel system or in essential carburettor components. If the petrol ages during storage in the engine, you may have to repair or replace the carburettor or other components of the fuel system.
- Remove the petrol by running the engine until it runs out.
- Change the engine oil.
- Remove the spark plug and empty about 30 ml of clean engine oil into the cylinder through the spark plug opening. Pull the starter handle several times to distribute the oil. Then reinsert the spark plug.
- Clean deposits around the engine and under/around/behind the exhaust. Apply a light film of oil to areas that are susceptible to rust.
- Store the machine in a clean, dry and well-ventilated place, away from any appliances that work with an open flame or pilot light.
Avoid rooms in which spark-producing electric motors or electrical appliances are used.
- If possible, avoid rooms with high humidity.
• Store the engine level. Tilting the engine can lead to petrol or oil leaks.
Maintenance of your snow blower
Maintenance of the milling auger
The augers are secured to the spiral axles with two shear pins with nylon hexagon nuts. If the augers collide with a foreign object or a block of ice, the snow blower is designed so that the pins shear off. If the auger does not rotate, check whether the pins are bent. If necessary, replace them with new shear pins.

IMPORTANT: NEVER replace the shear pins of the auger with standard pins or holders. Any resulting damage to the gearbox or other components is NOT covered by the warranty
68. Customer service
Only have your purchased appliance repaired by qualified specialists and only with original spare parts. This will ensure that the safety of the appliance is maintained.
If you have any questions, please contact FUXTEC GmbH customer service.
69. Guarantee
The warranty period is 24 months from the date of purchase. Please keep your proof of purchase in a safe place. Excluded from the warranty are wearing parts and damage caused by improper use, use of force, technical modifications, use of incorrect accessories or non-original spare parts and repair attempts by unqualified personnel. Warranty repairs may only be carried out by us.
70. Disposal instructions
Please contact your local municipality for the disposal of the appliance. Please dispose of all operating materials such as petrol and oil in advance.
71. EU Declaration of Conformity
We, FUXTEC GmbH, hereby declare
Herewith we,
Kappstraße 69, 71083 Herrenberg-Gültstein, Germany
that the machine designated below complies with the relevant, basic safety and health requirements of the EC directives (see point 4) due to its design and construction as well as the version placed on the market by us.
declare that the following Appliance complies with the appropriate basic safety and health requirements of the EC Directives (see item 4) based on its design and type, as brought into circulation by us.
This declaration refers only to the machine in the condition in which it was placed on the market; parts and/or modifications subsequently fitted by the end user are not taken into account.
This declaration relates exclusively to the machinery in the state in which it was placed on the market, and excludes components which are added and/or operations carried out subsequently by the final user.
-
product designation / function: Snowthrower, Gasoline powered / used to clear snow Designation/ function: Snowthrower, Gasoline powered / used to throw snows
-
type designation: FX-SF210
-
serial number:
2021XXX --- 2021XXXX Serialnumber:
- relevant EC Directives: - Machinery Directive 2006/42/EC Applicable EC
Directives: - Machinery Directive 2006/42/EC
- harmonised standards applied:
Used harmonised standards:
ISO/DIS 8437: 2008, EN 60335-1: 2012+A11:2014, EN ISO 12100: 2010
- person responsible for documentation: GmbH
Responsible for documentation: Kappstraße 69, 71083 Herrenberg-Gültstein, Germany
Co-applied EC Directives: - Directive 2012/46/EU on combating the emission of gaseous and particulate pollutants
Additional used EC Directives: shaped pollutants and air pollutant particles from
Internal combustion engines for mobile machines and devices
- Directive 2012/46/EU against the emission of gaseous and particulate pollutants from internal combustion engines to be installed in non-road mobile machinery
- EMC Directive 2014/30/EU
- EMC Directive 2014/30/EU
- Noise Emission Directive 2000/14/EC for appliances and machinery intended for use outdoors. - Outdoor Noise Directive 2000/14/EC
- Directive on ROHS 2011/65/EU /ROHS Directive 2011/65/EU
Measured sound power level 102.4 dB(A)
Guaranteed sound power level 102 dB(A)
Conformity procedure according to Annex VI Directive 2000/14/EC
Measured sound power level 102.4 dB(A)
Guaranteed sound power level 102 dB(A)
Conformity assessment method to Annex VI Directive 2000/14/EC
Storage of technical documents:
Technical file keeper : FUXTEC GmbH ; Kappstrasse 69 ; 71083 Herrenberg ; T. Gumprecht

Manufacturer's signature/date:
Authorised Signature/Date/
Place: Tim Gumprecht ; Herrenberg, 11 August 2021
Details of the signatory: Title of Managing Director
Signatory: Managing Director
VERSION ESPANOLA
natural_image
Top-down view of a black snowplow tractor with orange wheels and visible exhaust pipe (no text or symbols)
Manual_FX-SF210_Int24_rev14
text_image
A B C D L M F E G J H I FUXTECnatural_image
Close-up of a hand using a wrench to adjust or install a mechanical component (no visible text or symbols)natural_image
Close-up of a metallic mechanical component with two curved arms and mounting holes (no text or symbols visible)natural_image
Close-up of a black mechanical component with metallic clamps and mounting brackets (no visible text or symbols)natural_image
Close-up of a red industrial machine component with metal clamps and bolts, showing mechanical assembly (no visible text or symbols)natural_image
Close-up of a black mechanical component with a white wavy line and red base, no visible text or symbols
natural_image
Diagram showing a mechanical component with directional arrows indicating movement or force (no text or symbols present)natural_image
Technical illustration of two bolted components with hexagonal nuts (no text or symbols)natural_image
Mechanical assembly diagram showing a lever mechanism with gears and shafts (no text or labels)text_image
Red basic line for upper fuel levelnatural_image
Close-up of a person's hand holding a vehicle hood with attached sensors and a mounted panel (no visible text or symbols)
natural_image
Close-up of a hand adjusting a mechanical component with wires and a textured cloth (no visible text or symbols)natural_image
Illustration of four sequential actions of a person using a golf club, shown in different poses (no text or symbols)Manual_FX-SF210_Int24_rev14
natural_image
Technical line drawing of a mechanical housing assembly with mounting brackets and structural details (no text or symbols)natural_image
Technical line drawing of a mechanical pump or turbine assembly (no text or symbols)Ruedas
natural_image
Close-up of a mechanical assembly with visible tire tracks and mounting flanges (no text or symbols)text_image
Electrode .02-.03 in. (0.60 - 0.80 mm)Imagen 25
natural_image
Black FUKTEC snowplow tractor with orange wheels and visible blades (no text or symbols on the vehicle itself)CE
Manual_FX-SF210_Int24_rev14
text_image
A B C D L M F E G J H I FUXTECnatural_image
Close-up of a hand using a wrench to adjust or install a mechanical component (no visible text or symbols)natural_image
Close-up of a metallic mechanical component with two clamps and a curved shaft (no text or symbols visible)natural_image
Close-up of a black mechanical component with metallic clamps and mounting brackets (no visible text or symbols)•
nstale a barra de suporte da calha de nevee fixe a porca c
natural_image
Close-up of a red industrial machine with black components and a metal tool inserted (no visible text or symbols)natural_image
Close-up of a mechanical assembly with black components and red accents (no visible text or symbols)natural_image
Close-up of a black mechanical clamp with a white wire and black cable inserted, against a red background (no text or symbols visible)
natural_image
Diagram showing a mechanical component with directional arrows indicating movement or force (no text or symbols present)natural_image
Technical illustration of two bolted components with hexagonal nuts, shown from different angles (no text or symbols)natural_image
Technical line drawing of a mechanical assembly with gears and shafts (no text or symbols)Pressão dos pneus
text_image
Red basic line for upper fuel levelnatural_image
Close-up of a mechanical component with attached parts and wires, no visible text or symbols
natural_image
Close-up of a mechanical device with attached components and a textured surface (no visible text or symbols)natural_image
Illustration of a person using a golf forward motion controller, showing five sequential actions (no text or symbols)Manual_FX-SF210_Int24_rev14
natural_image
Technical line drawing of a mechanical assembly with mounting holes and structural brackets (no text or symbols)natural_image
Technical line drawing of a mechanical gear or turbine assembly (no text or symbols)Rodas
natural_image
Close-up of a mechanical vehicle's wheel and suspension system, showing tire tracks and mounting hardware (no visible text or symbols)
natural_image
Black and orange FUKTEC snowplow tractor with visible blade and mounting bracket (no text or symbols on body)CE
Manual_FX-SF210_Int24_rev14
text_image
A B C D E F G J H I M L K FUXTECnatural_image
Close-up of a hand using a wrench to adjust or install a mechanical component (no visible text or symbols)natural_image
Close-up of a metallic mechanical component with two clamps and a curved shaft (no text or symbols visible)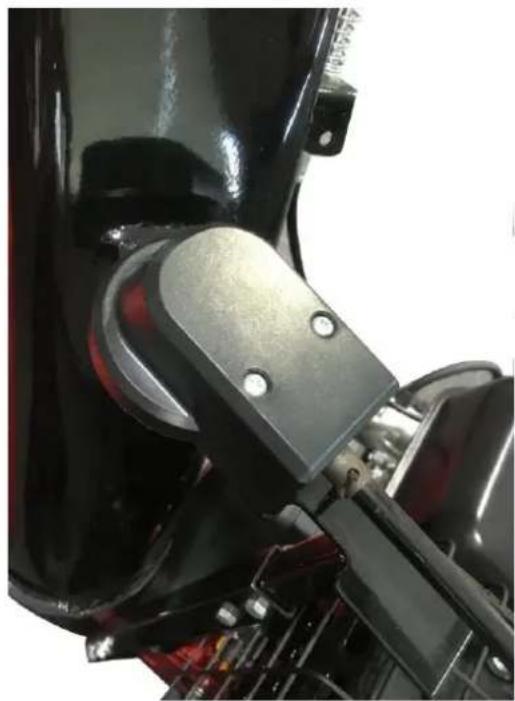
natural_image
Close-up of a black mechanical component with metallic clamps and mounting brackets (no visible text or symbols)natural_image
Close-up of a mechanical assembly with black components and red accents (no visible text or symbols)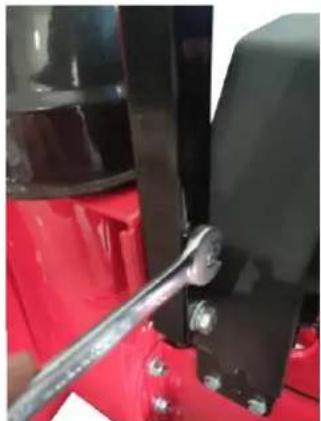
natural_image
Close-up of a red industrial machine with black components and a metal tool inserted (no visible text or symbols)natural_image
Close-up of a black mechanical component with a white wire and black cable, mounted on a red vehicle (no visible text or symbols)
natural_image
Diagram showing a mechanical component with arrows indicating direction, no text or symbols presentnatural_image
Technical illustration of two bolted components with hexagonal nuts, shown from different angles (no text or symbols)natural_image
Mechanical assembly diagram showing gear and shaft components (no text or labels)Bandenspanning
text_image
Rod basic line for upper fuel levelOliepeil controleren

natural_image
Close-up of a hand holding a black mechanical component with visible springs and connectors (no text or symbols)
natural_image
Close-up of a robotic arm gripping a mechanical component, with a gloved hand visible (no text or symbols)natural_image
Illustration of a person using a golf forward motion controller, showing five sequential actions (no text or symbols)natural_image
Technical line drawing of a mechanical assembly with mounting holes and structural elements (no text or symbols)natural_image
Technical line drawing of a mechanical pump or turbine assembly (no text or symbols)Wielen
natural_image
Close-up of a mechanical assembly with visible tire tracks and mounting flanges (no text or symbols)
text_image
Electrode .02-.03 in. (0.60-0.80 mm)Afbeelding 25
natural_image
Black and orange FUKTEC snowplow tractor with visible blade and mounting bracket (no text or symbols on body)CE
Manual_FX-SF210_Int24_rev14
text_image
A B C D E F G J H I M L K FUXTECnatural_image
Close-up of a hand using a wrench to adjust or install a mechanical component (no visible text or symbols)natural_image
Close-up of a metallic mechanical component with two circular fasteners (no text or symbols visible)natural_image
Close-up of a mechanical component with glossy black body and metallic bracket (no visible text or symbols)•
natural_image
Close-up of a red industrial machine with black components and metal fittings (no visible text or symbols)natural_image
Close-up of a mechanical assembly with black components and red accents (no visible text or symbols)natural_image
Close-up of a black mechanical clamp with a white wire and screw, mounted on a red vehicle (no visible text or symbols)
natural_image
Diagram showing a mechanical component with directional arrows indicating movement or force (no text or symbols present)natural_image
Technical illustration of two bolted components with hexagonal nuts (no text or symbols)natural_image
Mechanical assembly diagram showing a lever mechanism with gears and shafts (no text or labels)Däcktryck
text_image
Rod basic line for upper fuel levelnatural_image
Close-up of a person's arm holding a black cable and attached mechanical components, with no visible text or symbols.
natural_image
Close-up of a mechanical device with wires and components, no visible text or symbolsnatural_image
Illustration of four sequential actions: hand grip, tool path, camera rig, and stick (no text or symbols)natural_image
Technical line drawing of a car body panel with mounting holes and structural details (no text or symbols)natural_image
Technical line drawing of a mechanical pump or turbine assembly (no text or symbols)Hjul
natural_image
Close-up of a mechanical vehicle showing tire tracks and mounting flanges (no visible text or symbols)
text_image
Electrode .02-.03 in. (0.60-0.80 mm)Bild 25
POLSKA WERSJA JEZYKOWA
ORYGINALNA INSTRUKCJA OBSŁUGI
natural_image
Black and orange FUKTEC snowplow tractor with visible blade, wheels, and control panel (no text or symbols on body)CE
Manual_FX-SF210_Int24_rev14
text_image
A B C D E F G J H I M L K FUXTECnatural_image
Close-up of a hand using a wrench to adjust or install a mechanical component (no visible text or symbols)natural_image
Close-up of a metallic mechanical component with two curved arms and mounting holes (no text or symbols visible)natural_image
Close-up of a black mechanical component with metallic clamps and mounting brackets (no visible text or symbols)•
natural_image
Close-up of a red industrial machine with black components and a metal tool inserted (no visible text or symbols)natural_image
Close-up of a mechanical assembly with black components and red accents (no visible text or symbols)natural_image
Close-up of a black mechanical component with a white wire and screw, mounted on a red vehicle (no visible text or symbols)
natural_image
Diagram showing a mechanical component with directional arrows indicating movement or force (no text or symbols present)natural_image
Technical illustration of two bolted components with hexagonal nuts (no text or symbols)natural_image
Mechanical assembly diagram showing a lever mechanism with gears and shafts (no text or labels)Ciśnienie w oponach
text_image
Red basic line for upper fuel levelnatural_image
Close-up of a person's hand holding a black metal frame with attached wires and a small component, no visible text or symbols.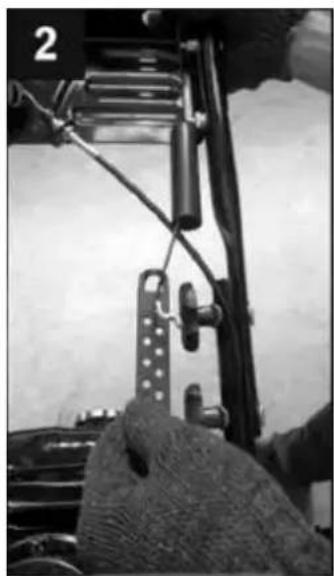
natural_image
Close-up of a mechanical device with wires and components, no visible text or symbolsnatural_image
Illustration of a person using a golf club to shoot positions, showing hand motion and posture (no text or symbols)Manual_FX-SF210_Int24_rev14
natural_image
Technical line drawing of a car body panel with mounting holes and structural details (no text or symbols)natural_image
Technical line drawing of a mechanical pump or turbine assembly (no text or symbols)Koła
natural_image
Close-up of a mechanical vehicle showing tire tracks and mounting flanges (no visible text or symbols)