FX-EV480D - Leaf blower Fuxtec - Free user manual and instructions
Find the device manual for free FX-EV480D Fuxtec in PDF.
| Brand | Fuxtec |
| Model | FX-EV480D |
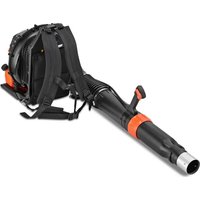
| Product type | Cordless leaf blower / vacuum |
| Battery voltage | 40 V |
| Included battery capacity | 2 Ah (Lithium-ion) |
| Maximum air speed (blower) | 187 km/h |
| Maximum air speed (vacuum) | 165 km/h |
| Maximum air volume (blower) | 4.4 m³/min |
| Maximum air volume (vacuum) | 9.8 m³/min |
| Shredding ratio | 30:1 |
| Total weight (with 2 Ah battery) | 4.9 kg |
| Weight in blower mode (with battery) | 4.3 kg |
| Weight in vacuum mode (with battery) | 4.5 kg |
| Sound pressure level (LPA) | 89.9 dB(A) (K=3.0 dB(A)) |
| Sound power level (LWA) | 105.8 dB(A) (guaranteed 110 dB(A)) |
| Operating modes | Blower, Vacuum with shredding |
| Included accessories | Upper and lower blower tubes, upper and lower vacuum tubes, collection bag, harness, guide wheels |
| Safety | Eye and ear protection recommended, minimum safety distance of 15 m |
| Maintenance | Clean with a dry soft cloth after each use, check fastenings regularly |
| Spare parts | Use only original Fuxtec parts |
Frequently Asked Questions - FX-EV480D Fuxtec
User questions about FX-EV480D Fuxtec
0 question about this device. Answer the ones you know or ask your own.
Ask a new question about this device
Download the instructions for your Leaf blower in PDF format for free! Find your manual FX-EV480D - Fuxtec and take your electronic device back in hand. On this page are published all the documents necessary for the use of your device. FX-EV480D by Fuxtec.
USER MANUAL FX-EV480D Fuxtec
natural_image
Line drawing of a handgun with 'FUXTLEC' branding on its side (no other text or symbols)natural_image
Orange FUXTEC air cleaner with black base cover (no visible text or symbols on device)CE
text_image
Warning sign with pictogram of falling person and human figure, indicating hazard or accident warningnatural_image
Close-up of a hand inserting a black 400-inch battery into an orange power supply unit (no visible text or symbols)natural_image
Close-up of a hand using an orange EV4800 electric shaver with black buttons and a visible brand logo (no text or symbols on the device itself)text_image
EVAMO 100% 75% 50% 25%natural_image
Black and orange FUXTEC 20M battery with ribbed top and label (no readable text beyond branding)2Ah EP20

natural_image
Black rectangular electronic device labeled 'FUOTEC V 4.0dB' with orange branding (no readable text beyond label)4Ah EP40

natural_image
Black electronic device labeled 'FUTEC 8.0dB' with orange branding, no visible text beyond branding and labels6Ah EP60

natural_image
Black and orange FUTSC-4 40W power supply unit (no visible text or symbols on body)9Ah EP90
40V Ladegeräte:

natural_image
Orange and black power supply unit with charging cable and terminal panel (no visible text or symbols)natural_image
Orange and black electric vehicle charging station with power cord and terminal block (no visible text or symbols)natural_image
Close-up of hands holding a black firearm with a wrist strap, partially open by a black plastic bag (no text or symbols visible)natural_image
Close-up of hands holding a black lever with a grip, against a plain white background (no text or symbols visible)natural_image
Close-up of a hand holding a black cylindrical device next to an orange electric shaver (no visible text or symbols)natural_image
Close-up of hands using an orange power tool with a green arrow indicating direction (no text or symbols visible)natural_image
Close-up of hands holding a black cylindrical device with green circular annotations, no visible text or symbolsnatural_image
Close-up of hands holding a black cylindrical device with green directional arrows indicating motion (no text or symbols)natural_image
Close-up of a hand adjusting an orange electric shaver with a mesh grille (no visible text or symbols)natural_image
Close-up of a hand holding a black plastic component next to an orange 40V power shaver (no visible text or symbols)text_image
5 Stiftverriegelung Cordless Blower/vacuumnatural_image
Close-up of an orange industrial fan or blower with black blades and a green number 6 visible (no text or symbols on the device itself)natural_image
Close-up of a hand using an orange 40V power<|im_start|> Greenland blower on a black cylindrical component, with green arrows indicating adjustment areas (no text or symbols visible)natural_image
Close-up of a hand using an orange electric shaver with a green arrow indicating the handle (no text or symbols visible)natural_image
Close-up of an orange electric shaver with a hand adjusting the part, showing no visible text or symbols.natural_image
Close-up of a hand adjusting a black cylindrical device with an orange base, showing a green directional arrow (no text or symbols)natural_image
Close-up of a hand adjusting a black cylindrical object with green arrows pointing to the part (no text or symbols visible)natural_image
Close-up of a hand pressing down on a black cylindrical object with three small icons on its surface, no visible text or symbols.natural_image
Close-up of a hand adjusting a black cylindrical object with a green circle highlighting a small feature, no text or symbols visible.natural_image
Close-up of a hand pressing down on a black cylindrical device with a green circular arrow highlighting a component (no text or symbols visible)natural_image
Close-up of a hand operating an orange power tool with a black grip, showing a green circular annotation (no text or symbols on the tool itself)natural_image
Close-up of a hand holding a black plastic component next to an orange power tool, with a green circle highlighting a small part (no visible text or symbols)natural_image
Close-up of hands operating an orange power tool with a black plastic component, no visible text or symbolsnatural_image
Close-up of mechanical components with a green circle highlighting a specific part (no text or symbols visible)natural_image
Close-up of a person using an orange power tool to adjust or install a black cylindrical component, with a green circle highlighting the part (no text or symbols visible)natural_image
Close-up of hands adjusting a black belt on a fitness equipment (no visible text or symbols)natural_image
Close-up of a hand adjusting a black and orange object with a metal hook, no visible text or symbolsnatural_image
Close-up of hands using a black-handled electric shaver to clean or adjust the orange electric shaver (no text or symbols visible)natural_image
Close-up of hands using black plastic clips to cut a red-orange plastic component (no text or symbols visible)40V Cordless Leaf Blower/Vacuum
EV480D

natural_image
Orange FUXTEC air cleaner with black base cover (no visible text or symbols on device)CE
Your new device has been developed and designed to meet FUXTEC's high standards, such as easy operation and user safety. Properly treated, this device will serve you well for years to come.

WARNING: To reduce the risk of injury, the user must read and understand this manual before operating the device.
FUXTEC GmbH
KAPPSTRAße 69, 71083 HERRENBERG-GÜLTSTEIN, DEUTSCHLAND
CONTENT
-
TECHNICAL DATA....35
-
INTRODUCTION AND SAFETY ......36
2.1 SAFETY AND WARNING ....37
2.2 GENERAL SAFETY WARNINGS....38
2.3 BATTERY TOOL USE AND CARE 40
2.4 ADDITIONAL SAFETY RULES AND WARNING....40
2.5 BLOWER SAFETY WARNINGS ....41
2.6 VACUUM SAFETY WARNINGS .... 41
2.7 TRANSPORTATION AND STORAGE 42
2.8 MAINTENANCE....42
-
PRESENTATION......43
-
INSTALLATION OF BATTERY ....44
4.1 ACCESSORIES OPTIONAL 45
- ASSEMBLY....46
5.1 Assembling the leaf blower....46
5.2 Disassembling the leaf blower....47
5.3 Assembling the leaf vacuum cleaner 48
5.4 Assembly of the bag....53
5.5 Assembly of harness....55
- USE ....56
6.1 Adjustment of handle....56
6.2 Choose working mode....57
7. DECLARATION OF CONFORMITY ....58
We are continually striving to improve our products. Therefore technical data and illustrations may change!
8. TECHNICAL DATA
| Typ | EV480D |
| Max. air speed in Blower | 187 km/h |
| Max. air speed in Vacuum | 165 km/h |
| Max. air volume in Blower | 4,4 m3/min |
| Max. air volume in Vacuum | 9,8 m3/min |
| Mulching ratio | 30:1 |
| Total weight (incl. 2Ah Battery) | 4,9 kg |
| Weight Leaf blower (incl. 2Ah Battery | 4,3 kg |
| Weight Vacuum (incl. 2Ah Battery) | 4,5 kg |
| Noise | LWA: 105,8 dB(A) |
| Rated Air pressure | LPA: 89,9 dB(A), K=3,0 dB(A) |
| Garanteed sound power level | 110 dB (A)Z |
9. INTRODUCTION AND SAFETY
Thank you for purchasing the product of our company. The present manual explains how to handle it well. Before using it, please read this instruction manual carefully, operate the machine correctly and engage in your task with safety.
Specifications, descriptions and illustrative material in this manual are as accurate as known at the time of publication, but are subject to change without notice. Illustrations may include optional equipment and accessories, and may not include all standard equipment.
Intended use
The machine is intended to blow leafs away or to vacuum. This machine may not be used to do other thing out of the described safety warnings.
For safety reasons it is essential to read the entire instruction manual before first operation and to observe all the instructions therein. This product is intended for private domestic use only, not for any commercial use. It must not be used for any purposes other than those described.
Even if you are operating this product in accordance with all the safety requirements, potential risks of injury and damage remain. The following dangers can arise in connection with the structure and design of this product:
-
Health defects resulting from vibration emission if the product is being used over long periods of time or not adequately managed and properly maintained.
-
Injuries and damage to property due to broken attachments or the sudden impact of hidden objects during use.
-
Danger of injury and property damage caused by flying objects.
-
Prolonged use of this product expose the operator to vibrations and may produce 'whitefinger' disease. In order to reduce the risk, please wear gloves and keep your hands warm. If any of the 'whitefinger' symptoms appear, seek medical advice immediately. 'Whitefinger' symptoms include: numbness, loss of feeling, tingling, pricking, pain, loss of strength, changes in skin colour or
condition. These symptoms normally appear in the fingers, hands or wrists. The risk increases at low temperatures.
WARNING! This product produces an electromagnetic field during operation! This field may under some circumstances interfere with active or passive medical implants! To reduce the risk of serious or fatal injury, we recommend persons with medical implants to consult their doctor and the medical implant manufacturer before operating this product!
2.1 SAFETY AND WARNING
On the product, the rating label and within these instructions you will find among others the following symbols and abbreviations. Familiarize yourself with them to reduce hazards like personal injuries and damage to property.
| Warnings | |
 | WARNING! IMPROPER OPERATION MAYCAUSE SERIOUS INJURIES |
 | READ AND UNDERSTAND THIS MANUAL BEFORE USE. |
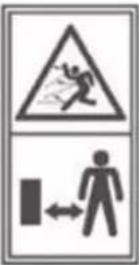 | Keep all bystanders, especially children and pets, at least 15 m away from the operating area. |
 | Rotating fans. Keep hands and feet out of open-ings while the product is running. |
 | Do not use during rain or damp condition. |
 | WEAR ALWAYS EYE PROTECTION! |
 | WEAR ALWAYS EAR PROTECTION! |
 | BLOWER MODE |
 | VACCUM MODE |
 | When repair - battery must be removed from the machine |
2.2 GENERAL SAFETY WARNINGS
WARNING
When using battery-operated tools, necessary safety precautions should always be followed to reduce the following risk.
- Do not allow children or untrained individuals to use this product.
- Wear heavy lang trousers, non-slip safety footwear and gloves.
- Never operate product while barefoot or wearing open shoes.
- Do not wear loose clothing or jewellery that might get entangled in this product.
- Do not touch the fan when operating this product.
- Keep all bystanders, children, and pets at least 15 m (50 feet) away. Remember that the operator or user is responsible for accidents occurring to bystanders, their property, as well as themselves.
- Check for damaged parts. Before further use of the product, any part that is damaged should be carefully checked to determine that it will operate properly and perform its intended function.
- Check for breakage of parts and any other conditions that may affect its operation. A guard or other damaged part should be properly repaired or replaced by an authorised service centre. Following this rule will reduce the risk of shock, fire, or severe injury.
- Do not force the product. Use the correct tool for your application. The right tool will do the job better and safer at the rate for which it is designed.
- Do not over-reach. Keep proper footing and balance at all times. Right footing and balance enable better control of the product in unexpected situations.
- Secure long hair so it cannot become entangled in moving parts or air intake.
- Do not operate this product when you are tired, ill, or under the influence of alcohol, drugs, or medication.
- Do not operate in low lighting.
- Never let anyone use the product that has not received adequate instructions in its proper use.
- Keep the handles dry and clean.
- Consider work area environment. Do not expose power tools to rain. Do not use power tools in damp or wet locations. Keep work area lit. Do not use power tools where there is a risk to cause fire or explosion.
- Store battery or idle tools, when not in use. Tools and batteries should be stored separately in dry, high or locked up areas out of reach of children. Ensure those battery terminals cannot be shorted by other metal parts such as screws, nails, etc.
- Disconnect the product from its battery pack when not in use, disconnecting the blower tube before before carrying out maintenance. Avoid unintentional starting. Do not carry the product with a finger on the switch.
- Stay alert. Watch what you are doing. Use common sense. Do not operate product when you are tired.
• Have your product repaired by a qualified person. - This product is in accordance with the relevant safety requirements. Repairs should only be carried out by qualified persons using original spare parts,
otherwise this may result in considerable danger to the user.
WARNING
Use only the manufacturer's replacement parts. Failure to do so may cause poor performance, possible injury and may void your warranty.
2.3 BATTERY TOOL USE AND CARE
- Ensure the switch is in the off position before inserting the battery.
- Inserting the battery into power tools with the switch in position "on" can cause accidents.
- Recharge only with the charger specified by the manufacturer. A suitable charger for one type of battery may create a fire risk when used with another battery.
- Use power tools only with specifically designated battery. Use of any other battery may create a risk of injury and fire.
- When the battery is not in use, keep it away from other metal objects like paper clips, coins, keys, nails, screws, or other small metal objects that can make a connection from one terminal to another. Shorting the battery terminals together may cause burns or a fire.
- Under abusive conditions, liquid may be ejected from the battery; avoid contact. If contact accidentally occurs, flush with water. If liquid contacts eyes seek medical help. Fluid removed from the battery may cause irritation or burns.
- Save these instructions. Refer to them frequently and use them to instruct others who may use this product. If you loan someone this product, loan them these instructions also.
WARNING
Injuries may be caused, or aggravated, by prolonged use of a tool. When using any tool for pro- longed periods, ensure you take regular breaks.
2.4 ADDITIONAL SAFETY RULES AND WARNING
The product is not intended for use by persons (including children) with reduced physical, sensory or mental capabilities, or lack of experience and knowledge. Children should be supervised to ensure that they do not play with the product.
WARNING
Your blower/vacuum may be supplied with a harness. Carefully adjust the harness to help support the product's weight comfortably.
Identify the quick release mechanism and practice using it before using the product. Its correct use may prevent serious injury in the case of an emergency. Never wear additional clothing over the harness or otherwise restrict access to the quick-release mechanism.
2.5 BLOWER SAFETY WARNINGS
- Wear a face filter mask in dusty conditions to reduce the risk of injury associated with dust inhalation.
- Do not point the blower nozzle in the direction of people or pets
• Never place objects inside the blower tubes. - Do not operate the product near open windows, etc.
- Slightly dampen surfaces in dusty conditions.
- Use the full blower nozzle extension so the air stream can work close to the ground.
- Do not place blower on top of or near loose debris.
- Debris may be sucked into intake vent resulting in possible damage to the product.
2.6 VACUUM SAFETY WARNINGS
WARNING
Never operate the vacuum with only the upper vacuum increased if you fail to follow this warning.
- Do not operate vacuum without vacuum bag assembly installed; flying debris could cause serious injury. Make sure the vacuum bag is completely zipped closed before operating.
- Move the vacuum from side to side along the outer edge of debris. To avoid clogging, do not place the vacuum tube directly into the debris pile.
- Hold the motor higher than the inlet end of the vacuum tube.
• Always point vacuum tube downhill when working on a hillside. - To avoid serious injury to the operator or damage to the product, do not try to vacuum up rocks, broken glass, bottles, or other similar object s.
- Avoid situations that could cause a fire in the vacuum bag. Do not operate near an open flame. Do not vacuum warm ash from fireplaces, barbecue pits, etc.
2.7 TRANSPORTATION AND STORAGE
- Do not vacuum discarded cigars or cigarettes unless the cinders are entirely cold.
- Stop the product, remove the battery, and cool before storing or transporting.
- Clean all foreign material from the product. Store it in a cool, dry and well-ventilated place inaccessible to children. Keep away from corrosive agents such as garden chemicals and de-icing salts. Do not store outdoors.
- For transportation, secure the product against movement or falling to prevent injury to persons or damage to the product.
• Transport the battery following local and national provisions and regulations. - Follow all special packaging and labelling requirements when transporting batteries by a third party. Ensure that no batteries can contact other batteries or conductive materials while in transport by protecting exposed connectors with insulating, non-conductive caps or tape.
- Do not transport batteries that are cracked or leak ing. Check with the forwarding company for further advice.
2.8 MAINTENANCE
WARNING
Use only the original manufacturer's replacement parts, accessories and attachments. Failure to do so can cause possible injury, poor performance and may void your warranty.
WARNING
Servicing requires extreme care and knowledge technician: For any information please contact our customer services.
- You may make adjustments and repairs described here. For other repairs, contact the authorised service agent.
• After each use, clean the product with a soft dry cloth. - Check all nuts, bolts and screws at frequent intervals for proper tightness to ensure the product is safe working condition. Any damaged part should be properly repaired or replaced by an authorised service centre.
10. PRESENTATION

text_image
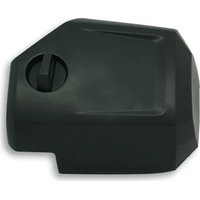
1. Fan cover 2. Upper vacuum pipe 3. Lower vacuum pipe 4. Lower blowpipe 5. Guide wheels 6. Upper blowpipe 7. Vacuum bag 8. Blower / vacuum mode selection lever 9. Bag adaptor 10. Rear Handle 11. Start/Stop switch 12. Suspension for harness 13. Front handle FUXTEC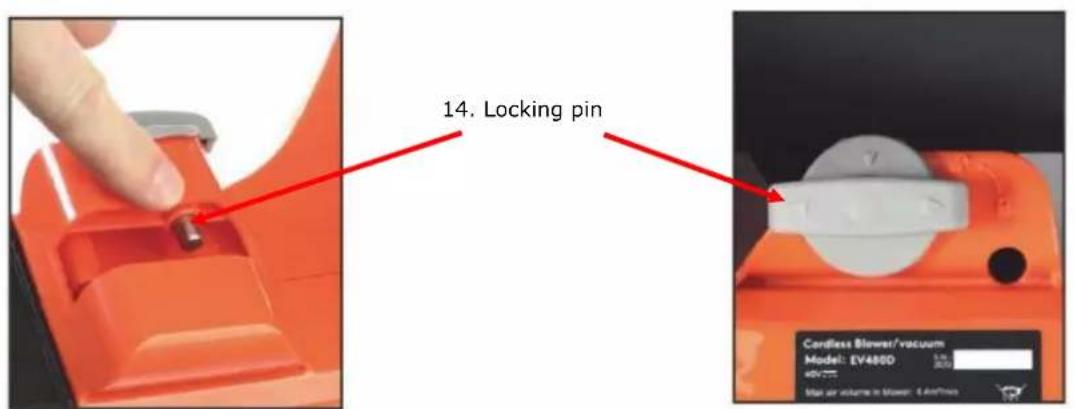
text_image
14. Locking pin Cordless Blower/vacuum Model: EV480D 5.0 40V Max air volume in blower: 4 Airflow11. INSTALLATION OF BATTERY

natural_image
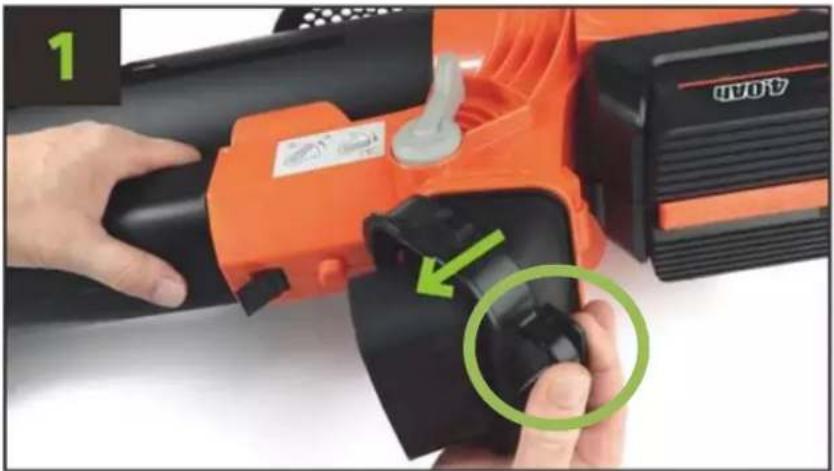
Close-up of a hand inserting a black 100% power bank into an orange cylindrical device (no visible text or symbols)Press the battery pack fully into the power tool until it is locked by the unlocking button ("Click"-sound).

natural_image
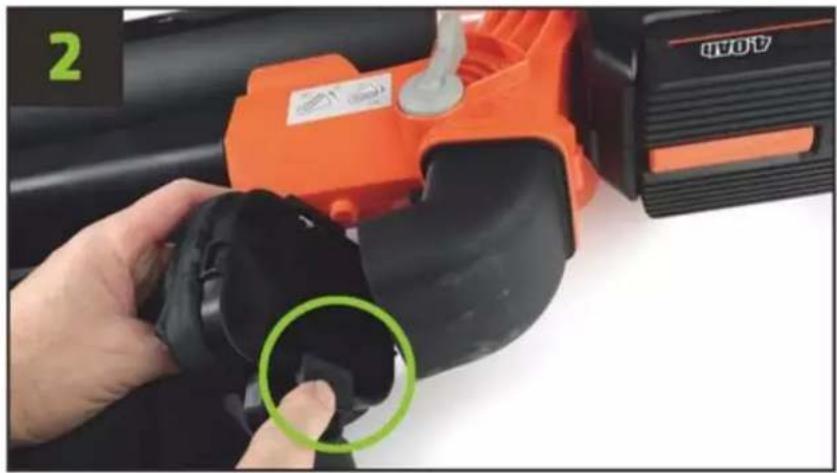
Close-up of a hand using an orange EV4500 electric shaver with black buttons (no visible text or symbols)To remove the battery, press the rear orange release button and then pull the battery out of the guide rail while holding the button

text_image
EVAMO 100% 75% 50% 25%Maintenance of battery pack
If the battery is empty and the product has switched off automatically, do not press the start/stop lever.
Do not recharge the battery until it has cooled down.
If you do not intend to use the battery for a longer period of time, please charge it completely before storing it. If the battery is to be stored for a longer period of time, it should be charged at least every 6 months to ensure that the battery maintains its optimum capacity.
4.1 ACCESSORIES OPTIONAL
The following batteries and chargers are optionally available for all 40V battery-powered devices from FUXTEC at
40V Batteries:

natural_image
Black rectangular electronic device labeled 'FUXTEC 2.0AR' with orange branding (no readable text beyond branding)2Ah EP20

natural_image
Black rectangular electronic device labeled 'FUOTECV 40M' with orange branding (no readable text beyond label)4Ah EP40

natural_image
Black electronic device labeled 'FUJTEC-V 8.0dB' with visible power lines and branding (no readable text beyond label)6Ah EP60

natural_image
Black FLEXTECH 400M3 power supply unit with visible branding and mounting bracket (no readable text beyond branding)9Ah EP90
40V Charger:

natural_image
Orange and black electric vehicle charging station with power cord and terminal block (no visible text or symbols)EC20 - 2A Fast-Charger

natural_image
Orange and black power bank charger with charging cable (no visible text or symbols)EC50 - 5A Ultra-Fast-Charger
12. ASSEMBLY
5.1 Assembling the leaf blower

natural_image
Close-up of hands holding a black mechanical device with a wrist strap (no visible text or symbols)Attach the wheel to the lower side of the blowpipe.

natural_image
Close-up of hands holding a black metal object with a black handle, no visible text or symbolsPress both elements together until the latches make a clicking sound. The wheel is now firmly connected to the lower blowpipe.

natural_image
Close-up of a hand holding a black cylindrical device next to an orange handheld device (no visible text or symbols)Take the upper blowpipe (with the number 3 printed on it) and insert it into the opening provided for it in the appliance.

natural_image
Close-up of hands using an orange power tool with a black handle and green arrow indicator (no text or symbols)Push the tube in firmly until you feel the latches engage.

natural_image
Close-up of a hand holding a black cylindrical object with two green circles highlighting the side, being handled by an orange handheld device (no text or symbols visible)Take the lower blowpipe (with the number 4 printed on it) and slide it over the upper blowpipe. Please pay attention to the correct positioning of the recess on the side for locking (see picture 5).

natural_image
Close-up of hands holding a black cylindrical device with green directional arrows (no text or symbols visible)Press the tubes firmly together until the latch engages.
5.2 Disassembling the leaf blower

text_image
1 ReleaseTo remove the upper suction tube, press the release lever (see picture) and pull the tube out of the guide.

text_image
2 ReleaseImportant note: If the intake manifolds are mounted, they must be removed first. Afterwards, please be sure to press the release lever, otherwise there is a risk of damage!
5.3 Assembling the leaf vacuum cleaner

natural_image
Close-up of a hand using an orange electric shaver on a workbench, no visible text or symbolsLoosen the screw of the fan cover counterclockwise.

natural_image
Close-up of a hand holding a black perforated circular component next to an orange 40V lithosphere tool (no visible text or symbols)Carefully pull the fan cover upwards until it is fitted in a noch.

text_image
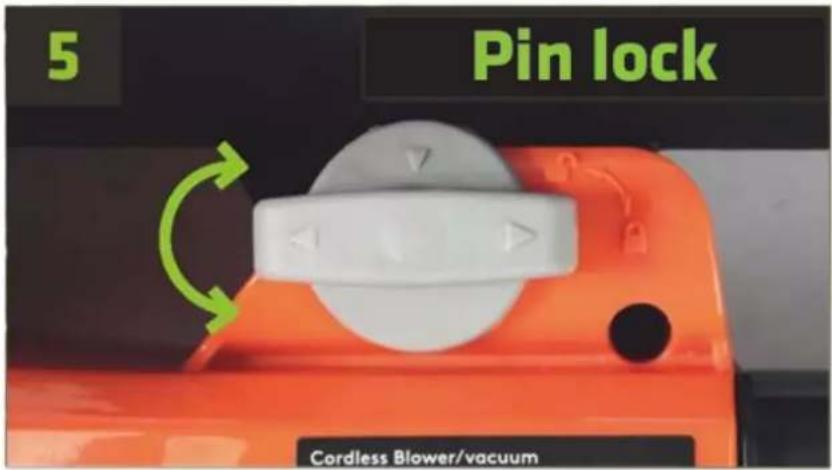
3 Pin lockLocking tap will fix blower pipe no. 1

text_image
4 Pin lockLocking tap is turnable, so the tap can be pulled backwards.
text_image
5 Pin lock Cordless Blower/vacuumWhen assembling pipe no. 1, control lever must be in unlock position.

natural_image
Close-up of an orange industrial fan or blower with black blades and a green number 6 visible (no text or symbols on the device itself)Turn the pipe no. 1 as pictured
natural_image
Close-up of a hand using an orange 40V power<|im_start|> Greenland blower on a black cylindrical component, with green arrows indicating adjustment areas (no text or symbols visible)The control tap has to be aligned with the notch.
natural_image
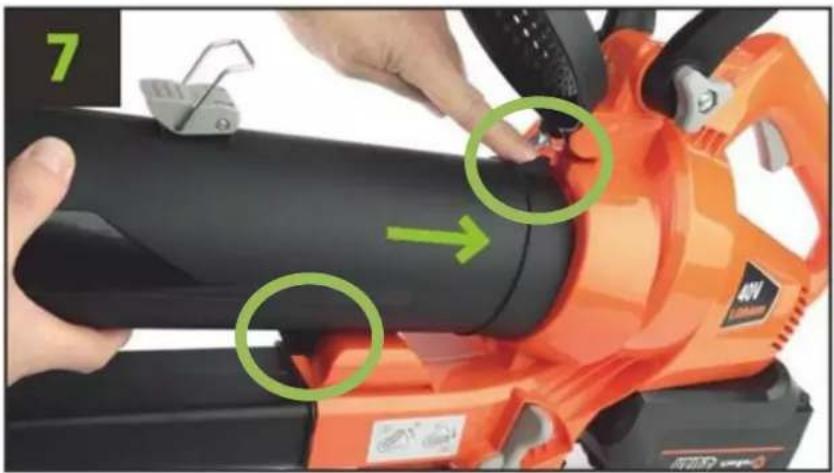
Close-up of a hand using an orange electric shaver with a green arrow indicating the handle (no text or symbols visible)Push the pipe carefully until locked. Check pin lock is closed (picture 5).

natural_image
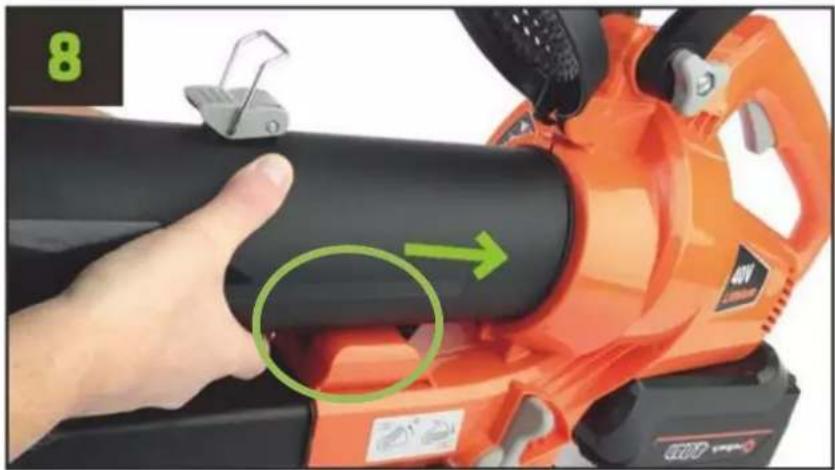
Close-up of an orange electric shaver with a hand using a tool to clean or adjust the body (no text or symbols visible)Cover for blower pipe pushed down and lock clips in the slot on the cover. Press the lock clips into position until locked.

natural_image
Close-up of a black cylindrical device being adjusted with a red camera, showing green directional arrow (no text or symbols)Turn the pipe no. 2 as pictured.

natural_image
Close-up of a hand adjusting a black cylindrical device with green arrows pointing to the ports (no text or symbols visible)Turn and push pipe no. 2 with control taps carefully as pictured.

natural_image
Close-up of a hand pressing down on a black cylindrical object with three small lock icons, no visible text or symbols.Note the symbols on the pipe.
natural_image
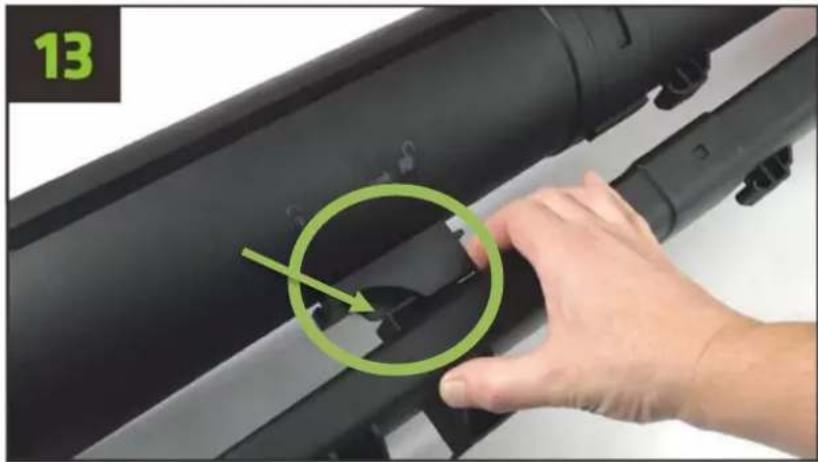
Close-up of a hand adjusting a black cylindrical object with a green circle highlighting a small feature, no text or symbols visible.The bottom guide pin to be pushed in position so it is next to the locking slot.
natural_image
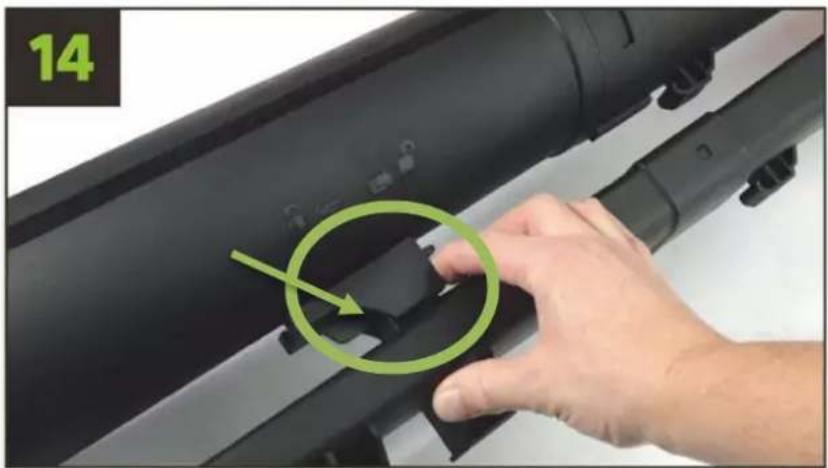
Close-up of a hand pressing down on a black cylindrical device with a green circular arrow highlighting a small component (no text or symbols visible)Then push the bottom guide until it is locked (watch marked parts in picture 13 + 14).
5.4 Assembly of the bag
natural_image
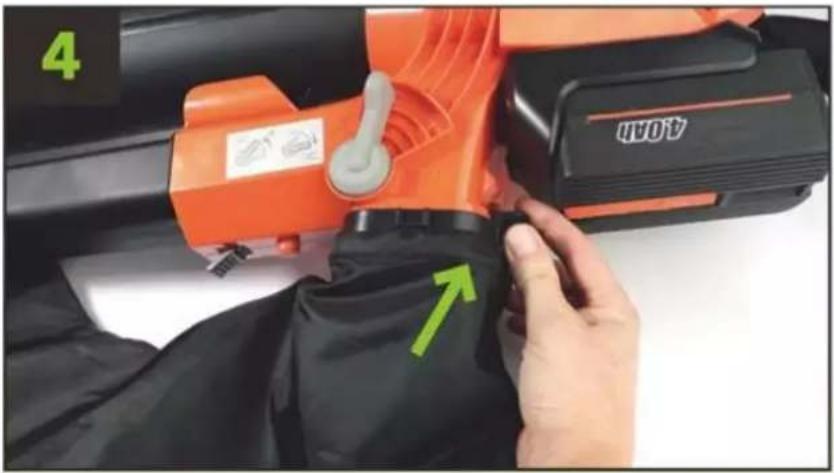
Close-up of a hand operating an orange power tool with a black grip, showing a green circular annotation (no text or symbols on the tool itself)Eventually, disassemble the existing lock for the machine's bag by holding the lock tap down and pull down.
natural_image
Close-up of a hand holding a black plastic component next to an orange industrial machine (no visible text or symbols)Fit the bag by keeping the bag opening towards the battery chamber.

natural_image
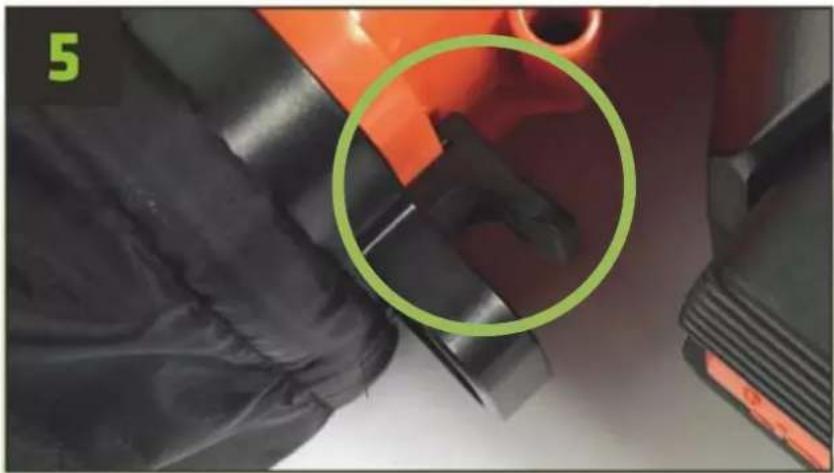
Close-up of hands operating an orange BAN industrial machine with a green circular annotation highlighting a specific part (no text or symbols on the machine itself)Locking tap must grasp the edge of the housing.
text_image
4 AOPAKeep down the locking tap, while pushing the bag opening into position.
natural_image
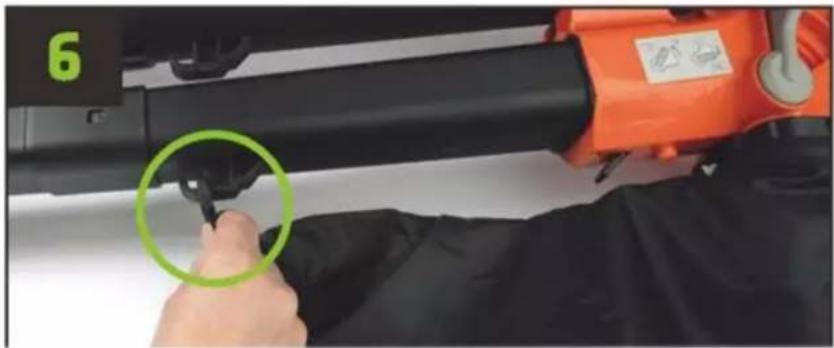
Close-up of mechanical components with a green circle highlighting a specific part (no text or symbols visible)Bag is fitted correctly, when the lock is fallen into place as shown. When removing the bag, press the locking tap before the bag is pulled out as shown in picture 1.
natural_image
Close-up of a person using an orange power tool to adjust or install a black cylindrical component, with a green circle highlighting the part (no text or symbols visible)Fit the bag in the opposite position of pipe no. 3.
natural_image
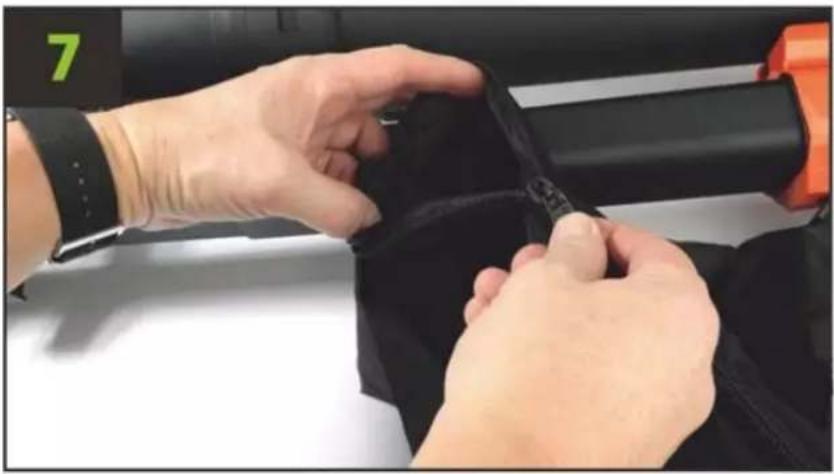
Close-up of hands adjusting a black belt on a fitness equipment (no visible text or symbols)Empty the bag by using the zipper. Remember to close the zipper, before a new start.
5.5 Assembly of harness

natural_image
Close-up of a hand adjusting a black and orange safety harness with a metal clip (no text or symbols visible)Fit the harness as pictured.
text_image
2 40V Lithium13. USE
6.1 Adjustment of handle

natural_image
Close-up of hands using a power tool to clean an orange electric shaver (no text or symbols visible)Handle tobe adjusted by the finger nut anticlockwise.

natural_image
Close-up of hands using black and orange plastic kitchen tools to adjust a white grater (no text or symbols visible)Choose the most comfortable position and lock the finger nut clockwise.
6.2 Choose working mode
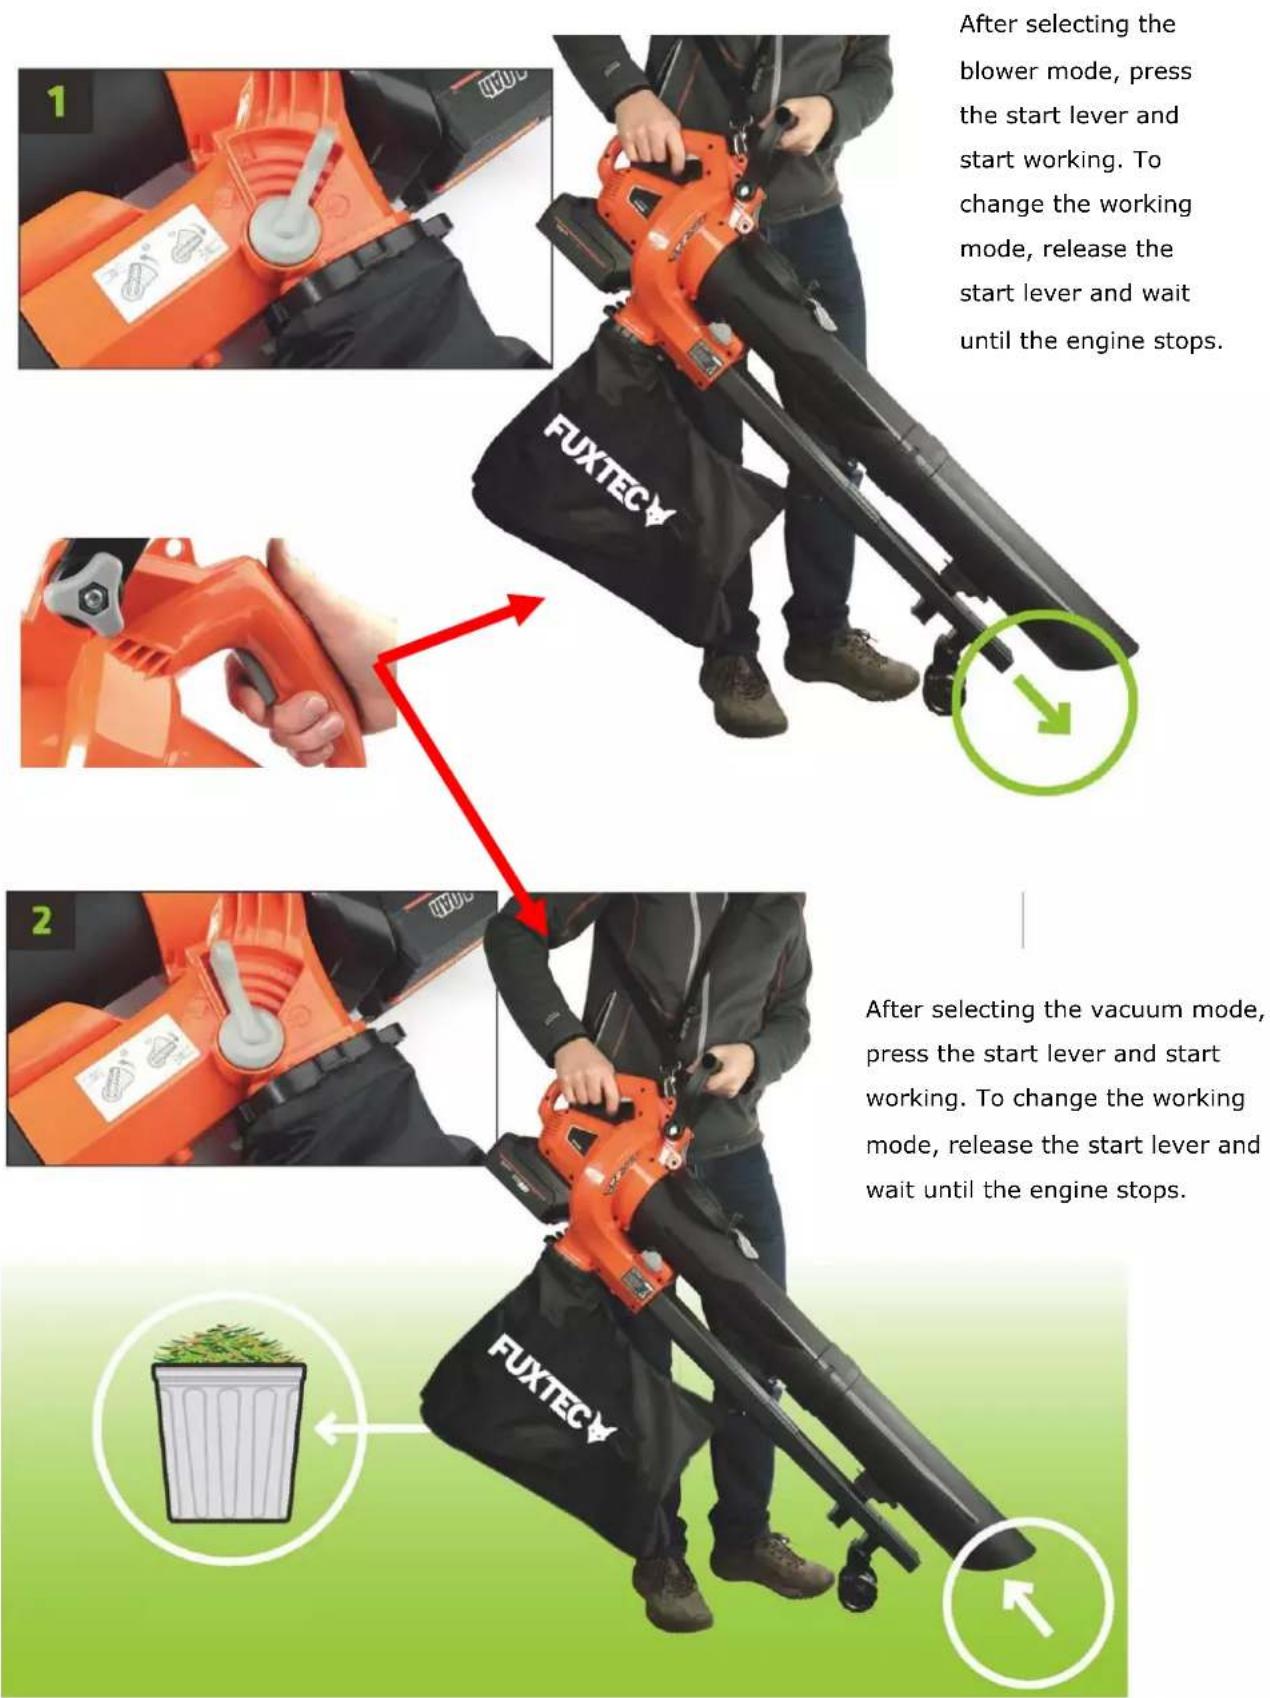
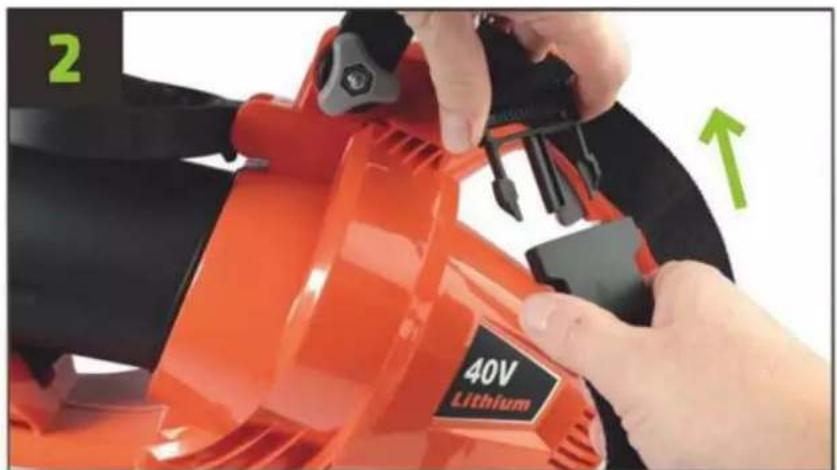
text_image
After selecting the blower mode, press the start lever and start working. To change the working mode, release the start lever and wait until the engine stops. FUXTECY After selecting the vacuum mode, press the start lever and start working. To change the working mode, release the start lever and wait until the engine stops. FUXTECY14. DECLARATION OF CONFORMITY
We hereby declare that the product EV480D complies with the following directives:
Hersteller:
FUXTEC GmbH. Kappstrasse 69, 71083 Herrenberg / Germany
Machinery Directive 2006/42/EG
EMV-Directive 2014/30/EU
nd in accordance to the following applicable harmonized standards:
EN 60335-1:2012+A11:2014+A13:2017+A1:2019+A2:2019+A14:2019
EN 50636-2-100:2014
EN 62233:2008
EN 55014-1:2017
EN 55014-2:2015
The conformity with the Machinery Directive is verified by the conformity assessment procedure according to the Directive 2006/42/EC.
The conformity with the Noise Emission of Outdoor Equipment Directive is verified by the conformity assessment procedure according to annex VI, and the Directive 2000/14/ECt.
Tui Gumpredet
Tim Gumprecht, responsible for documentation.
natural_image
Black and orange FUXTEC air purifier with a black base cover (no visible text or symbols on the device body)CE
-
DONNÉES TECHNIQUES....62
-
INTRODUCTION ET SÉCURITÉ ....63
2.1 SÉCURITÉ ET AVERTISSEMNET....64
2.2 AVERTISSEMENTS DE SÉCURITÉ GÉNÉRAUX....66
2.3 UTILISATION ET ENTRETIEN DE L'OUTIL A BATTERIE 68
2.4 AVERTISSEMENT DES RÈGLES DE SÉCURITÉ SUPPLÉMENTAIRES ......68
2.5 AVERTISSIMENTS DE SÉCURITÉ DU SOUFFLEUR....69
2.6 AVERTISSIMENTS DE SÉCURITÉ DE L'ASPIRATEUR 69
2.7 TRANSPORT ET STOCKAGE....70
2.8 MAINTENANCE....71
-
PRÉSENTATION....72
-
INSTALLATION DE LA BATTERIE....73
4.1 ACCESSOIRES OPTIONNELS 74
- ASSEMBLÉE....75
- DÉCLARATION DE CONFORMITÉ CE....87
text_image
Warning sign with pictogram of falling object and human figure, indicating hazard or accident risknatural_image
Close-up of a hand inserting a black 300Ω battery into an orange power tool (no visible text or symbols)natural_image
Close-up of a hand holding an orange EV400D power shaver with black buttons (no visible text or symbols)text_image
EV4800 100% 75% 50% 25%natural_image
Orange and black electric vehicle charging station with power cord and plug (no visible text or symbols)natural_image
Orange and black power supply unit with charging cable and terminal labels (no readable text or symbols)EC50 - 5A SUPER CHARGEUR
19. ASSEMBLÉE
natural_image
Close-up of hands holding a black mechanical device with a strap, no visible text or symbolsnatural_image
Close-up of hands holding a black lever handle and grip against white background (no text or symbols)natural_image
Close-up of a hand holding a black cylindrical device next to an orange handheld device (no visible text or symbols)natural_image
Close-up of hands using an orange power tool with a black handle and green directional arrow (no text or symbols visible)natural_image
Close-up of a hand holding a black cylindrical object with two green circles highlighting the side (no text or symbols visible)natural_image
Close-up of hands holding a black cylindrical device with green directional arrows (no text or symbols visible)natural_image
Close-up of a hand using an orange electric shaver tool to adjust the power button (no text or symbols visible)natural_image
Close-up of a hand holding an orange 40V battery cleaner with a black perforated cover (no visible text or symbols)natural_image
Close-up of an orange industrial fan or blower with black handle and green label (no readable text or symbols)natural_image
Close-up of hands operating a 40V printer with green arrows indicating adjustment (no text or symbols on the device itself)natural_image
Close-up of a hand using an orange electric shaver with a green arrow indicating the handle (no text or symbols visible)natural_image
Close-up of an orange electric shaver with a hand adjusting the blade (no visible text or symbols)natural_image
Close-up of a black cylindrical device being adjusted with a red camera, showing green directional arrow (no text or symbols)natural_image
Close-up of a hand adjusting a black cylindrical device with a green arrow pointing to the component (no text or symbols visible)natural_image
Close-up of a hand pressing down on a black cylindrical object with three lock icons, no visible text or symbolsnatural_image
Close-up of a hand adjusting a black cylindrical object with a green circle highlighting a small feature, no text or symbols visible.natural_image
Close-up of a hand adjusting a black cylindrical device with a green circular arrow highlighting a component (no text or symbols visible)natural_image
Close-up of a hand operating an orange OVOI power tool with a green circular annotation highlighting the grip (no text or symbols on the tool itself)natural_image
Close-up of a hand holding a black plastic component next to an orange industrial machine (no visible text or symbols)natural_image
Close-up of hands operating an orange BAN industrial machine with a green circular annotation highlighting a specific part (no text or symbols on the machine itself)natural_image
Close-up of mechanical components with a green circle highlighting a specific part (no text or symbols visible)natural_image
Close-up of a person using an orange power tool to adjust or install a black cylindrical component, with a green circle highlighting the part (no text or symbols visible)natural_image
Close-up of hands adjusting a black belt on a fitness equipment (no visible text or symbols)natural_image
Close-up of a hand adjusting a black and orange safety harness with a metal clip (no text or symbols visible)natural_image
Close-up of hands using a black-handled electric shaver to clean an orange electric scooter (no text or symbols visible)natural_image
Close-up of hands using black plastic clips to cut a red-orange plastic fan (no text or symbols visible)natural_image
Orange FUXTEC air cleaner with black base cover (no visible text or symbols on device)CE
natural_image
Close-up of a hand pressing a red button on an orange plastic component (no text or symbols visible)natural_image
Close-up of a hand inserting a black battery into an orange power drill machine (no visible text or symbols)natural_image
Close-up of a hand using an orange EV4800 electric shaver with black buttons (no visible text or symbols)text_image
EVAMO 100% 75% 50% 25%natural_image
Orange and black electric vehicle charging station with power cord and plug (no visible text or symbols)EC20 - 2A Caricabatterie rapido

natural_image
Orange and black power supply unit with charging cable and terminal indicators (no visible text or symbols)EC50 - 5A Super Caricabatteria