
16390054 - Iron Melissa - Free user manual and instructions
Find the device manual for free 16390054 Melissa in PDF.
| Product type | Steam iron |
| Brand | Melissa |
| Model | 16390054 |
| Water tank capacity | 160 ml |
| Power supply | 230 V, 50 Hz |
| Functions | Dry ironing, steam ironing, steam shot, water spray, self-cleaning function |
| Integrated thermal protection | Yes, automatic shut-off in case of overheating |
| Steam adjustment | By rotary button from 0 to max |
| Temperature adjustment | Thermostat with low, medium, high settings (dots) |
| Indicator light | Indicates when ready |
| Water spray | Front nozzle, press dedicated button |
| Steam shot | Can be used at maximum temperature, including vertically |
| Self-cleaning | Fill with water to max, heat to max, then activate steam over sink |
| Soleplate cleaning | Wipe with a warm damp cloth; do not scratch |
| Storage | Empty water, hold nozzle downward, press steam shot to empty completely |
| Safety | Do not leave unattended; keep out of reach of children under 8; do not use with timer |
| Warranty | Void if not following instructions, modification, or misuse |
Frequently Asked Questions - 16390054 Melissa
User questions about 16390054 Melissa
0 question about this device. Answer the ones you know or ask your own.
Ask a new question about this device
Download the instructions for your Iron in PDF format for free! Find your manual 16390054 - Melissa and take your electronic device back in hand. On this page are published all the documents necessary for the use of your device. 16390054 by Melissa.
USER MANUAL 16390054 Melissa
text_image
Labeled diagram of a blue iron iron with numbered parts for identificationtext_image
Labeled diagram of a blue iron iron with numbered parts for identificationtext_image
Labeled diagram of a blue iron with numbered parts for identificationtext_image
Labeled diagram of a blue iron iron with numbered parts for identificationTo get the best out of your new steam iron, please read this user guide carefully before using the appliance for the first time. Take particular note of the safety precautions. We also recommend that you keep the instructions for future reference, so that you can refer to them later.
GENERAL SAFETY INSTRUCTIONS
- This appliance may only be used by children aged from 8 years and above and persons with reduced physical, sensory or mental capabilities or lack of experience and knowledge if they are supervised or have been given instructions concerning use of the appliance in a safe way and understand the hazards involved. Children must not play with the appliance. Cleaning and user maintenance must not be performed by children without supervision.
- Keep the appliance under constant supervision while in use. Keep an eye on any children in the vicinity of the appliance when it is in use. The appliance is not a toy.
- Incorrect use of this appliance may cause personal injury or damage the appliance.
- Use for its intended purpose only. The manufacturer is not responsible for any injury or damage resulting from incorrect use or handling (see also Warranty Terms).
- For domestic use only. Not for outdoor or commercial use.
- Remove all packaging and transport materials from the inside and outside of the appliance.
UK
- Check that the appliance has no visible damage and that no parts are missing.
- Do not use with any cords other than that supplied.
- Check that it is not possible to pull or trip over the cord or any extension cord.
- The appliance must not be used together with a timer switch or a separate remote control system.
- Turn off the appliance and remove the plug from the socket before cleaning, or when the appliance is not in use.
-
Avoid pulling the cord when removing the plug from the socket. Instead, hold the plug.
-
Keep the cord and appliance away from heat sources, hot objects and naked flames.
- Ensure that the cord is fully extended.
- The cord must not be twisted or wound around the appliance.
- Check regularly that neither the cord nor plug is damaged and do not use the appliance if there is any damage, or if it has been dropped on the floor, dropped in water or damaged in any other way.
- If the appliance, cord or plug has been damaged, have the appliance inspected and if necessary repaired by an authorised repairer.
- Connect to 230 V, 50 Hz only. The warranty is not valid if the appliance is connected to incorrect voltage.
UK
- Never try to repair the appliance yourself. Please contact the store where you bought the appliance for repairs under warranty.
- Unauthorised repairs or modifications will invalidate the warranty.
- Caution! Some parts of this appliance can become very hot and cause burns. Particular attention should be paid where children and vulnerable people are present.
- Keep the appliance and its cord out of reach of children aged less than 8 years.
SPECIAL SAFETY INSTRUCTIONS
- The appliance will be very hot during and after use! Make sure not to touch the iron's soleplate and do not leave the appliance standing on its soleplate!
• Always protect the soleplate, and never run it over zips, metal buttons or similar surfaces, as this may damage it. - Unplug the appliance when filling it with or emptying it of water.
- The appliance must be used and placed on a flat, heat-resistant surface.
- If the appliance overheats, the built-in thermal protection turns the appliance off. The appliance can be used again once it has cooled down.
UK
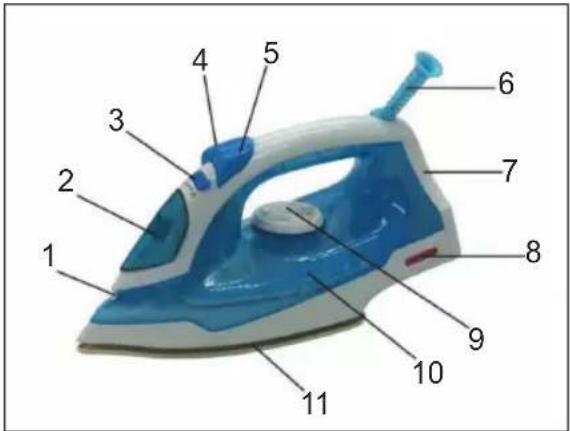
MAIN COMPONENTS
- Spray nozzle
- Cover
- Steam adjustment button
- Spray button
- Steam shot button
- Power cord and plug
- Base
- Indicator light
- Temperature control button
- Water reservoir
- Soleplate
PRIOR TO FIRST USE
- Ensure that all stickers and labels have been removed from the soleplate (11).
- Some parts of the appliance were oiled during manufacture and these will therefore smoke slightly when the iron is first used. This is not dangerous. Allow the appliance to heat up and iron a piece of damp cloth until the soleplate is completely clean.
- The first few shots of steam should not be directed towards clothing, as the steam may contain material particles left over from the production process.
REFILLING THE WATER
- Remove the plug from the socket.
- Turn the steam quantity button (3) to position 0.
text_image
Labeled diagram of a blue iron iron with numbered parts for identification- Open the cover (2) on the nozzle for water refilling and carefully fill with tap water until the water level has reached the MAX mark on the side of the appliance. Never fill past this mark. The appliance can hold 160 ml of water.
- Never use chemically distilled water or perfumed water. Close the cover.
• Always pour the excess water away after use.
ADJUSTING THE TEMPERATURE
- Read any ironing instructions on the garment. As a rule, there will be a pictogram of an iron and a number of dots. These dots indicate the setting that should be selected on the appliance's thermostat dial (9). See table below.
| Material Symbol Temperature | ||
| Synthetic, silk | • Low | |
| Wool | •• Medium | |
| Cotton, linen | ••• High | |
UK
- If there are no ironing instructions on the garment, but you know what fabric it is made of, the table can be used. The table only applies to the relevant material and is for guidance only.
- Garments with printed and sewn-on features are best ironed on the reverse of the material at low temperature.
- For fabrics made of several different materials, you should always adjust the temperature to suit the material that can tolerate the least heat. If, for instance, a product consists of 60% polyester and 40% cotton, adjust the temperature of the appliance for ironing polyester.
- Sort the items to be ironed according to the temperature at which they are to be ironed.
- The appliance will get hot quicker than it cools down. Therefore always start with garments to be ironed at the lowest temperature.
USE
Insert the plug (6) into an electrical socket and place the appliance upright on its base (7) on the ironing board.
Dry ironing
- The appliance can be used for dry ironing, even if there is water in the water reservoir.
- Turn the steam adjustment button (3) to position 0.
-
Turn the thermostat button (9) to the required setting. The indicator light (8) will come on.
-
Once the indicator light goes out, the required temperature has been reached and you can start to dry iron. The indicator light will go on and off during use, which merely indicates that it is maintaining the selected temperature.
- Do not fill the appliance with water if it is to be used as a dry iron for a prolonged period.
Steam ironing
- Fill with water.
- Turn the thermostat dial (9) to position •• or •••. The indicator light (8) will come on.
- Once the indicator light goes out, the required temperature has been reached and you can start to steam iron. The indicator light will go on and off during use, which merely indicates that it is maintaining the selected temperature.
- Turn the steam quantity button (3) to the required setting. Constant steam will be emitted from the holes in the soleplate (11) when you hold the appliance horizontal. Place the appliance on its base (7) or turn the steam quantity button to position 0 to stop the steam.
Steam shot
- The steam shot function for smoothing out stubborn creases can only be used when the thermostat dial is turned to the maximum setting and the indicator light is not on.
- Press the steam shot button (5) to spray steam onto the garment through the holes in the soleplate. Wait a few seconds before the next steam shot.
UK
- You can also hold the appliance vertical to give hanging curtains, clothing on hangers, etc. a shot of steam.
Water spray
- Press the water spray button (4) to spray water out of the spray nozzle (1) on the front of the appliance. Please note that you may have to press the button a few times to get it to work. Press the button slowly or quickly, depending on how you want the spray.
- Do not use this function on dry clothes. Instead, moisten the clothing before ironing, or place a damp cloth between the clothing and the soleplate.
SELF-CLEANING FUNCTION
The appliance must be cleaned at regular intervals, depending on the hardness of the water and how often the appliance is used.
- Fill with water to the MAX mark.
- Turn the steam adjustment button (3) to position 0.
- Turn the thermostat button (9) to the highest setting (MAX).
- Plug the appliance in and allow it to heat up until the indicator light goes out. Remove the plug from the socket.
- Hold the appliance horizontally over a sink.
-
Turn the steam adjustment button (3) to the highest position. Boiling water and steam will be emitted from the soleplate, washing out all the limescale deposits. Move the appliance back and forwards over the sink at the same time.
-
Turn the steam adjustment button to position 0 once the water reservoir is empty.
- Unplug the appliance and allow it to cool before putting it away.
CLEANING
- Press the steam shot button (2) a few times and carefully shake the appliance after use to ensure there is no more water in the appliance.
- Wipe the soleplate with a damp cloth while it is still lukewarm. Any limescale deposits on the soleplate can be removed with a little vinegar on a cloth. Do not scrape the soleplate, as this may damage it.
- The outside of the appliance can be wiped down with a well-wrun cloth.
STORAGE
- Empty the appliance of water before storing it. Hold the appliance with the spray nozzle (1) facing down so all the water runs out. Press the steam shot button (5) a few times to empty the water reservoir completely.
UK
INFORMATION ON DISPOSAL AND RECYCLING OF THIS PRODUCT
Please note that this Adexi product is marked with this symbol:
This means that this product must not be disposed of along with ordinary household waste, as electrical and electronic waste must be disposed of separately.
According to the WEEE directive, every member state must ensure correct collection, recovery, handling and recycling of electrical and electronic waste. Private households in the EU can take used equipment to special recycling stations free of charge.
In some member states you can in certain cases return used equipment to the retailer from whom you purchased it, if you are purchasing new equipment. Contact your retailer, distributor or the municipal authorities for further information on what to do with electrical and electronic waste.
WARRANTY TERMS
The warranty does not apply:
- if the above instructions have not been followed
- if the appliance has been interfered with
- if the appliance has been mishandled, subjected to rough treatment, or has suffered any other form of damage
- if the appliance is faulty due to faults in the electricity supply.
Due to the constant development of our products in terms of function and design, we reserve the right to make changes to the product without prior warning.
FREQUENTLY ASKED QUESTIONS
If you have any questions regarding the use of the appliance and cannot find the answer in this user guide, please try our website at www.adexi.eu.
You can also see contact details on our website if you need to contact us for technical questions, repairs, accessories or spare parts.
MANUFACTURED IN CHINA FOR
Adexi A/S
Lægårdsvej 9C
DK-8520 Lystrup
www.adexi.eu
We cannot be held responsible for any printing errors