641052 - Iron Melissa - Free user manual and instructions
Find the device manual for free 641052 Melissa in PDF.


| Product Type | Travel Steam Iron |
| Brand | Melissa |
| Model | 641052 |
| Voltage Compatibility | 115V / 230V (switchable) |
| Power Rating | 1000-1400 W (approximate) |
| Soleplate Material | Metal (non-stick coated) |
| Steam Output | Steam shot button |
| Spray Function | Yes, spray button |
| Dry Ironing | Yes (no water in reservoir) |
| Water Reservoir | Removable, capacity approx. 100 ml |
| Temperature Settings | Adjustable dial for synthetic, wool/cotton, linen |
| Handle | Foldable with release button |
| Dimensions (L x W x H) | Approx. 20 x 10 x 12 cm (folded) |
| Weight | Approx. 0.7 kg |
| Cord Length | Approx. 1.8 m |
| Safety Features | Auto-off? Not specified; unplug when filling, keep from children |
| Cleaning | Wipe with damp cloth; use plastic scourer for burnt residue |
| Storage | Cool down, fold handle |
| Warranty | Standard, void if unauthorized repairs |
| Compliance | WEEE directive, UK plug BS1363 |
Frequently Asked Questions - 641052 Melissa
User questions about 641052 Melissa
0 question about this device. Answer the ones you know or ask your own.
Ask a new question about this device
Download the instructions for your Iron in PDF format for free! Find your manual 641052 - Melissa and take your electronic device back in hand. On this page are published all the documents necessary for the use of your device. 641052 by Melissa.
USER MANUAL 641052 Melissa
natural_image
White steam iron with gray handle and black base, no visible text or symbolsUK Travel steam iron 14
VIGTIGE SIKKERHEDSFORANSTALTNINGER
To get the best out of your travel steam shot iron, please read these instructions carefully before using it for the first time. We also recommend that you save them in case you need them at a later point to remind yourself of the iron's functions.
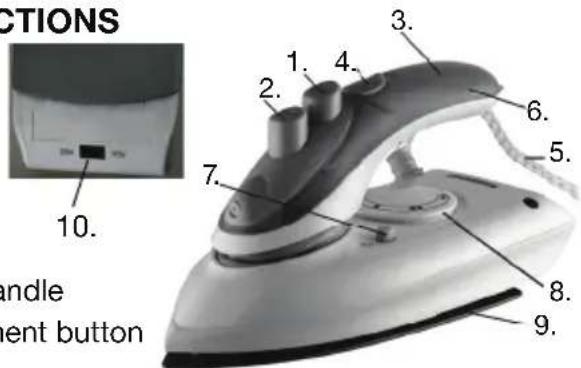
OVERVIEW OF FUNCTIONS
-
Steam button
-
Spray button
-
Handle
-
Water fill hole
-
Cord
-
Water reservoir
-
Release button for handle
-
Temperature adjustment button
-
Soleplate
-
Mains voltage switch - 115V or 230V
IMPORTANT SAFETY MEASURES
- Read the user instructions all the way through.
- Never pull on the cord; grasp the plug firmly and pull it carefully out of the socket.
- Keep the cord away from hot surfaces. Allow the iron to cool down completely before putting it away.
- Always unplug the iron when filling it with water.
- Should the cord become damaged, it must be replaced at a workshop specified by the manufacturer, as special tools are required.
- If the appliance is subjected to unauthorised repairs the guarantee will become void.
- The appliance should be kept out of the reach of children.
- Touching hot metal, hot water or steam can result in burns.
- This iron is suitable for household use only – not for commercial use.
- Note: Always remember to check that the setting on the mains voltage switch is correct for the local mains voltage!
PRIOR TO FIRST USE
To get the best from your new iron, follow the instructions below
- Ensure that all stickers and labels have been removed from the iron. Some parts of the iron were oiled during manufacture and these will therefore smoke slightly when the iron is first used.
- This is entirely safe and will stop after the iron has been used a few times.
- Always try to protect the soleplate and NEVER run it over metal or similar surfaces, as this will damage it.
USE
- The handle of the iron must be folded out before commencing ironing. Pull the handle carefully until it is in the top position. A click will indicate that the handle is securely locked.
- The handle can be folded down by pressing the release button while pushing the handle down.
- The appliance can be used with both 115V and 230V. Remember to choose the correct setting for the local mains voltage on the mains voltage switch.
STEAM IRONING
- Open the reservoir lid behind the handle to fill the iron with water.
- Fill the reservoir with cold water until the water level reaches the opening.
- Replace the lid.
- Plug the iron in and switch it on.
- Adjust the temperature dial to indicate the material to be ironed:
- Temperature for nylon, acetate and other synthetic fabrics •
- Temperature for wool and cotton ••
- Temperature for linen •••
- Press and release the steam shot button to use the steam shot function. Repeat the procedure as required. If you need to fill up with water during ironing, remember to unplug the iron first.
SPRAY FUNCTION
Press the spray button to dampen the fabric before you start ironing.
DRY IRONING
Use the same procedure as for steam ironing, but do not put any water in the reservoir. Check that the temperature dial is at "Min" before plugging in. Allow the iron to heat up according to the table given below. Test the iron on a small piece of the item to be ironed to make sure you have the right temperature.
AFTER USE
- Turn the temperature dial to "Min".
- Unplug the iron and pour any remaining water away.
CLEANING
If the iron gets dirty or anything gets burnt onto it, scrub it with a plastic scourer and then wipe with a cotton cloth. Do not use a metal scourer. The rest of the iron can be wiped with a slightly dampened cloth.
Do not immerse in any form of liquid!
STORAGE
- Allow the iron to cool down completely.
- Press the release button while pushing the handle down.
FOR UNITED KINGDOM ONLY
Plug wiring:
This product is fitted with a BS 1363 13-amp plug. If you have to replace the fuse, only those that are ASTA or BSI approved to BS1362 and with a rated current of 13 amps should be used. If there is a fuse cover fitted, this cover must be refitted after changing the fuse.
If the fuse cover is lost or damaged, the plug must not be used. You must also check if the socket outlets in your home fit with the plug of the appliance. If the socket outlet in your home does not fit with the plug, the plug must be removed and disposed of safely as insertion of the plug into the socket is likely to cause electric hazard. A replacement plug should be wired according to following description.
Important
This appliance must be earthed. The wires in the cord set are coloured
thus:
BLUE- Neutral, Brown-Live, Green& Yellow-earth (For detachable plug only)
As the colours of the wires in the mains lead of this appliance may not correspond with the coloured markings identifying the terminals in your plug, proceed as follows:
The wire that is coloured Green& Yellow must be connected to the terminal in the plug that is marked
The wire that is coloured blue must be connected to the terminal that is marked with the letter N or coloured black.
The wire that is couloured brown must be connected to the terminal that is marked with the letter L or coloured red.
INFORMATION ON THE DISPOSAL AND RECYCLING OF THIS PRODUCT
Please note that your Adexi product is marked with this symbol: 📋

This means that the product should not be mixed with normal household waste, as there are separate collection facilities for Waste Electrical and Electronic Equipment.
The WEEE Directive legislation requires each Member State to provide for the correct collection, recovery, handling and recycling of Waste Electrical and Electronic Equipment. Private households within the EU can return their used equipment to designated collection sites free of charge. In certain member
states, if you purchased the equipment through retail or a distributor, you can return your used equipment to them free of charge providing you purchase similar new equipment. Please contact your retailer, distributor or local authority for further details on the handling of Waste Electrical and Electronic Equipment.
THE GUARANTEE DOES NOT APPLY
- If the instructions given above are not observed.
- If the appliance has been mishandled, subjected to rough treatment, or has suffered any other form of damage.
- For faults that may have arisen as a result of faults in your electricity supply.
- If the appliance has been subject to unauthorised repairs.
Due to the constant development of our products in terms of function and design, we reserve the right to make changes to the product without prior warning.
IMPORTER
Adexi group
We take reservations for printing errors.
EINFÜHRUNG
ZASADY BEZPIECZNEGO UŻYTKOWANIA

- VIGTIGE SIKKERHEDSFORANSTALTNINGER
- OVERVIEW OF FUNCTIONS
- IMPORTANT SAFETY MEASURES
- PRIOR TO FIRST USE
- USE
- STEAM IRONING
- SPRAY FUNCTION
- DRY IRONING
- AFTER USE
- CLEANING
- STORAGE
- FOR UNITED KINGDOM ONLY
- Plug wiring:
- Important
- BLUE- Neutral, Brown-Live, Green& Yellow-earth (For detachable plug only)
- INFORMATION ON THE DISPOSAL AND RECYCLING OF THIS PRODUCT
- THE GUARANTEE DOES NOT APPLY
- IMPORTER
- EINFÜHRUNG
- ZASADY BEZPIECZNEGO UŻYTKOWANIA
Brand : Melissa
Model : 641052
Category : Iron