AF3 - Deep fryer JIMMY - Free user manual and instructions
Find the device manual for free AF3 JIMMY in PDF.
| Product type | Air fryer and grill |
| Model | AF3 |
| Brand | JIMMY |
| Rated voltage | 220-240 V~ |
| Rated frequency | 50-60 Hz |
| Rated power | 1100 W |
| Bowl capacity | 4 L |
| Cooking modes | Air frying, Grill |
| Temperature range (air) | 50-200 °C |
| Temperature range (grill) | 150-220 °C |
| Timer | 1-45 minutes (dehydration up to 8 h) |
| Preset functions | Fries, Bake, Wings, Dehydrate, Fish, Shrimp, Meat, DIY |
| Included accessories | Glass bowl, crispy plate, grill pan, glass lid |
| Tilt system | Switching between air and grill mode by rotating the head |
| Display | Digital screen with time and temperature |
| Cleaning | Bowl, plate and pan hand washable (hot water and mild detergent) |
| Safety | Auto shut-off if bowl removed, hot surfaces, indirect child lock |
| Warranty | 1 year on main body |
Frequently Asked Questions - AF3 JIMMY
User questions about AF3 JIMMY
0 question about this device. Answer the ones you know or ask your own.
Ask a new question about this device
Download the instructions for your Deep fryer in PDF format for free! Find your manual AF3 - JIMMY and take your electronic device back in hand. On this page are published all the documents necessary for the use of your device. AF3 by JIMMY.
USER MANUAL AF3 JIMMY
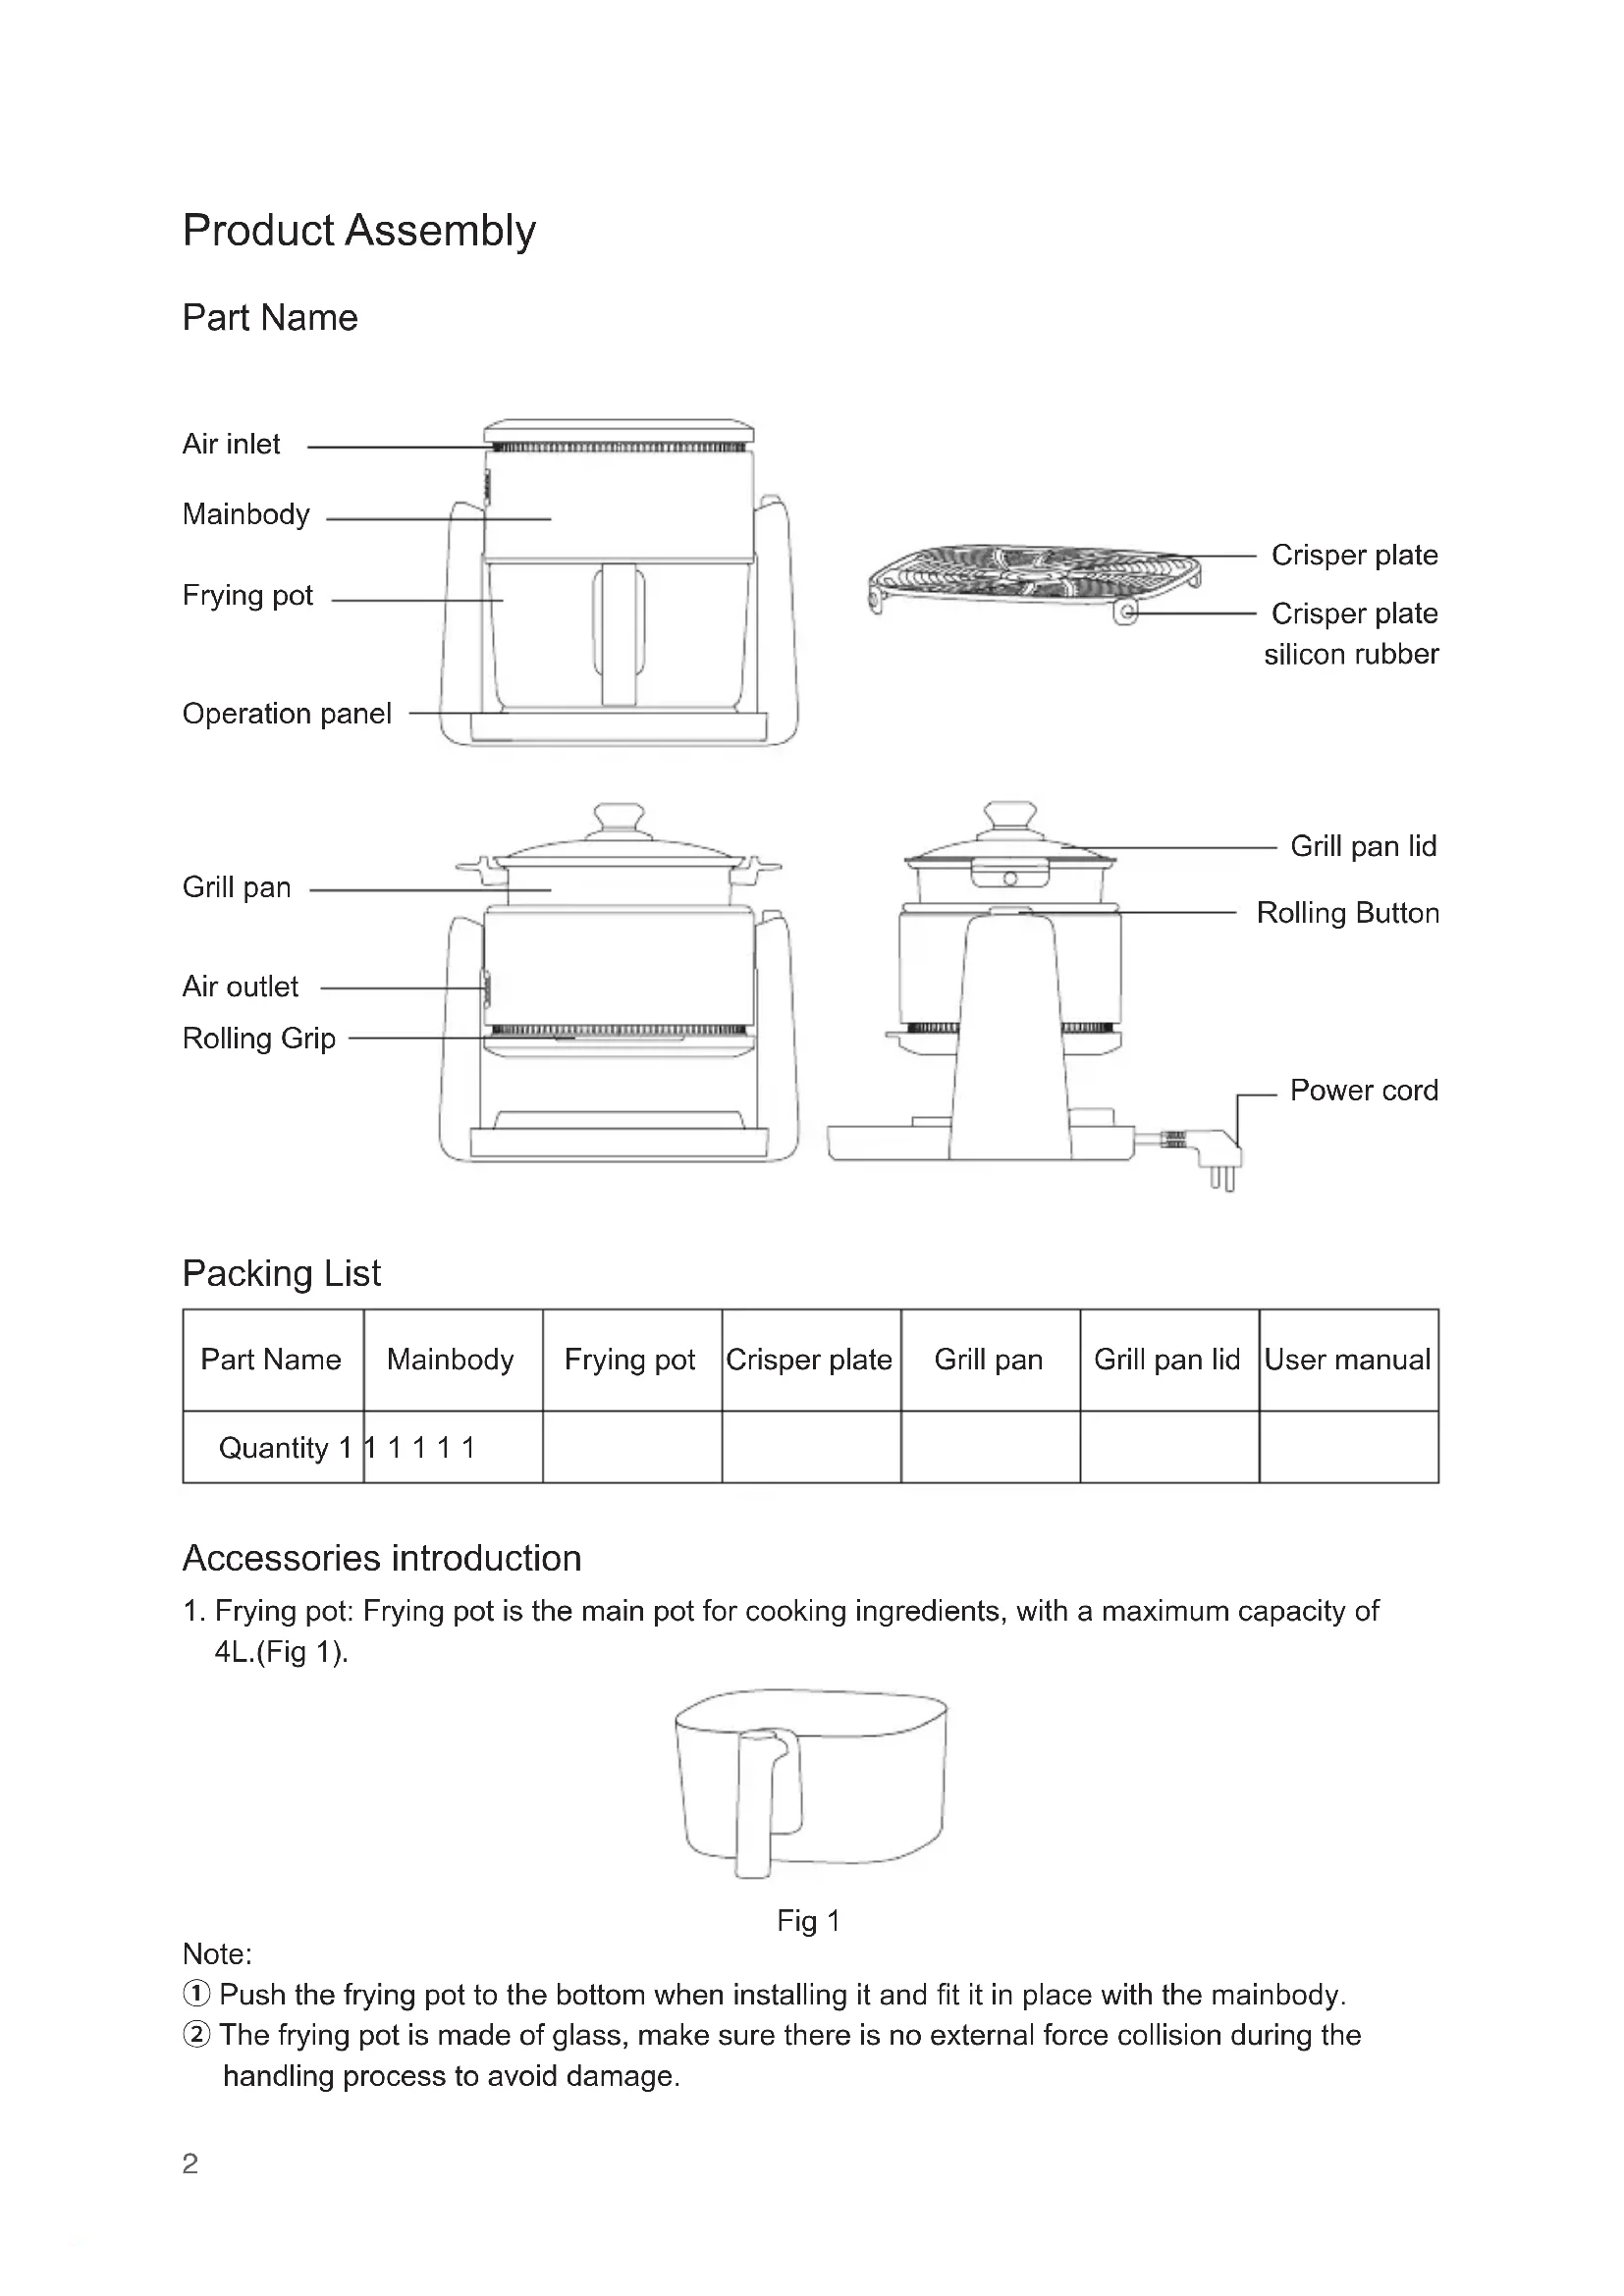
Accessories introduction
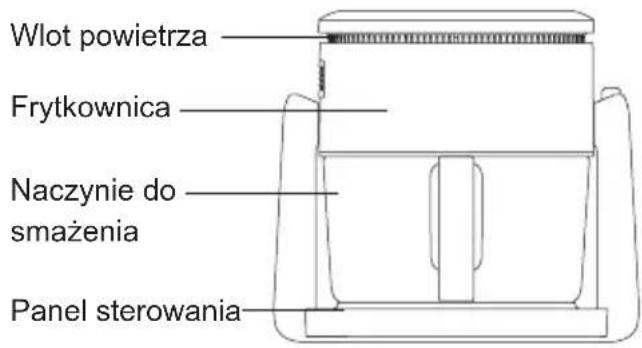
- Frying pot: Frying pot is the main pot for cooking ingredients, with a maximum capacity of 4L.(Fig 1).
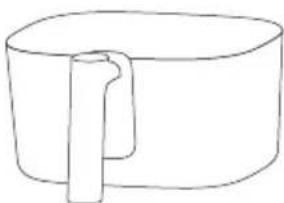
Fig 1
Note:
① Push the frying pot to the bottom when installing it and fit it in place with the mainbody.
② The frying pot is made of glass, make sure there is no external force collision during the handling process to avoid damage.
(3) During heating, the surface temperature of the pot is high. Do not touch it directly, otherwise it may cause burns.
④ Do not put the hot frying pot after cooking into water or refrigerator to avoid glass damage.
2.Crisper plate: The crisper plate is installed inside the frying pot (with its four legs facing downwards) and can be taken out for cleaning. Its main function is to lift the ingredients up, for better hot air circulation, and help them evenly heat up.

Fig 2
Note:
① Except for special requirements, crisper plate must be used during air frying, otherwise it may affect the cooking effect.
② Place the ingredients in a single layer on the crisper plate, do not stack them, otherwise it may affect the cooking effect.
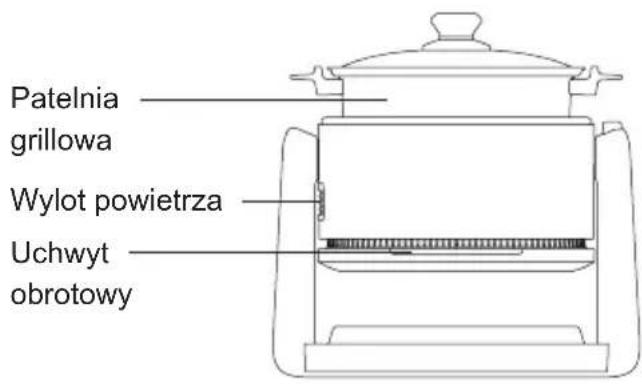
3.Grill pan: grill pan is mainly used to fry or grill food.(Fig 3)
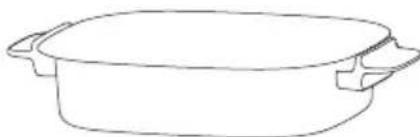
Fig 3
Note:
① When installing the grill pan, be sure to place it stably on mainbody.
② During heating, the surface temperature of the pan is high. Do not touch it directly, otherwise it may cause burns.
③ The grill pan is only used for frying and grilling. Do not use it to heat liquid.
- Grill pan lid: Grill pan lid is used together with grill pan to improve heating efficiency and prevent oil splashing.(Fig 4).

Fig 4
Note:
The grill pan lid is made of glass, make sure there is no external force collision during the handling process to avoid damage.
Use of product
Before first use, the following points should be noted:
1.Read this user manual carefully.
2. Place the product on a stable and flat counter top. Do not place it on heat-labile surface.
3. Before plugging into power socket, confirm that the power supply is 220V-240V~and ensure it is grounded.
4. Before initial use, wash the the frying pot, crisper bracket, grill pan, and grill pan lid with warm water, detergent, and non abrasive sponge.
5.During initial use, it is normal to have odors a small amount of smoke. After cleaning, the odor can be removed by heating at 200^ for 20 minutes under air frying mode.
6. Do not immerse the mainbody in water or rinse it under tap water, as there are electronic and heating components in mainbody.
7.Do not cover the air inlet and air outlet of the product during operation.
8. When the product is working, the surface temperature of the air outlet, frying pot, grill pan, and grill pan lid is high. Do not touch them to prevent burns.
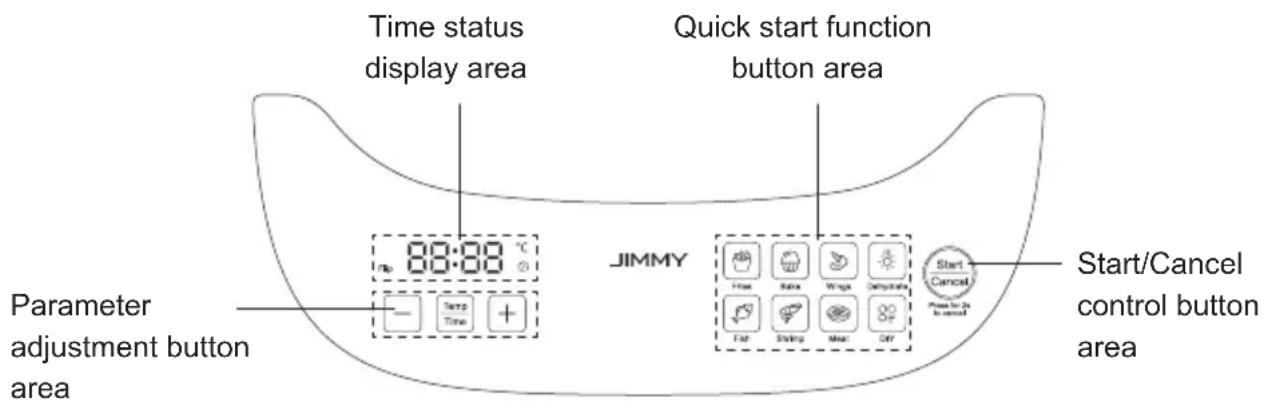
Function Description
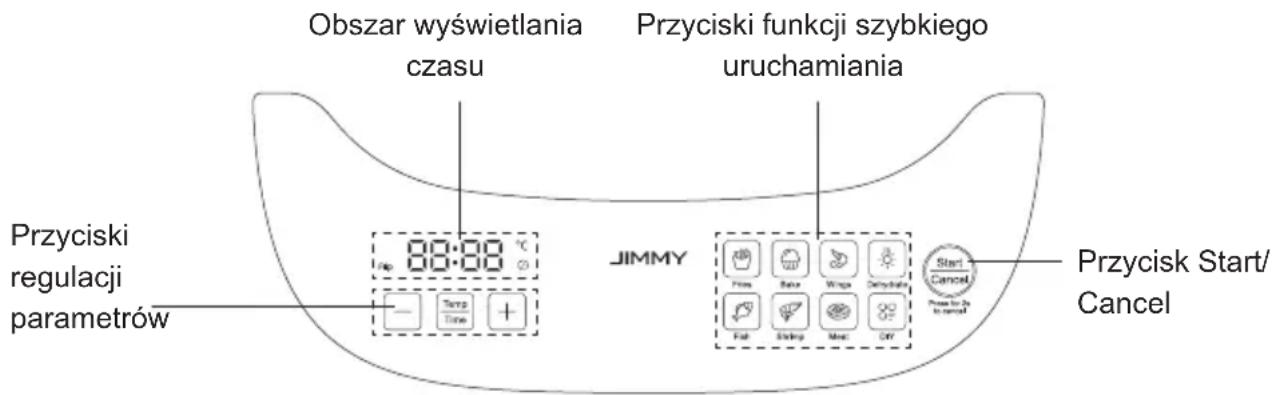
Time status display area
1.When " lights up, the screen displays the remaining time.
2.When" lights up, the screen displays the preset temperature.
3. When "Flip" lights up with 3 beeps, take out the frying pot, flip the food ingredients and then reinstall the frying pot into mainbody, and the product will automatically resume working.
4."show corresponding temperature and time
Quick start function button area
The product is preset with 7 quick start functions including French fries, Bake,Wings,Dehydrate, Fish,Shrimp, Meat and a DIY mode. You can directly select the quick start function or customize your cooking.
Note:
- In air frying mode, all quick start functions can be used.
2.In grilling mode, only fish, shrimp, meat and DIY can be used.
Parameter adjustment button area
- “ button:Used to display between temperature and time.
- “ 一 二 “”+ button: In time displaying mode: Press “ 一 二 or “ 一 二 to adjust cooking time. Adjustment range is 1-45 minutes. Long pressing the button can adjust time fast. In temperature displaying mode: Press “ 一 二 or “ 一 二 to adjust cooking temperature. The adjustment range under air frying mode is 50^ to 200^ , and the adjustment range under grilling mode is 150^-220^ . Long pressing the button can adjust temperature fast.
Start/Cancel control button area
- “按钮: After the function and parameters are set, press “按钮” button to start cooking.
- During parameter setting or cooking, press "and hold for two seconds to return to a standby state, and the display screen displays ---".
Function switch
This machine has two functions: air frying and grilling. Follow below steps to switch between the two functions.
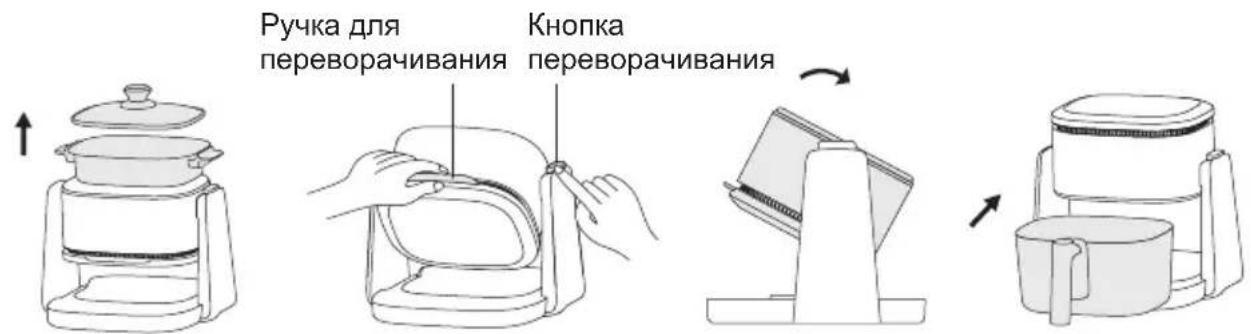
1.Air frying mode to grilling mode:
Take out the fryer (Fig5) first, press and hold the flip button while holding onto the flip grip (Fig6), flip the machine top in the arrow direction shown in picture(Fig 7). When a 'click' sound is heard, it indicates machine is flipped in place. Place the grill pan on mainbody for use (Fig 8).
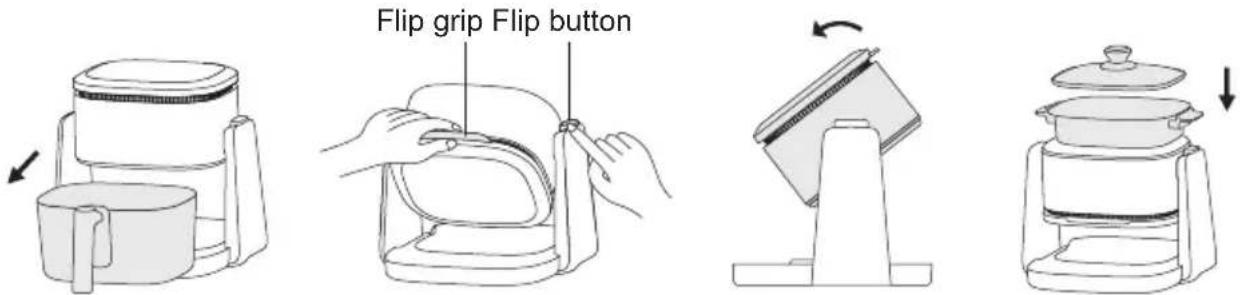
Fig 5 Fig 6 Fig 7 Fig 8
2.Grilling mode to air frying mode:
Remove the grill pan first(Fig 9), press and hold the flip button while holding the flip grip (Fig 10), and flip the machine top in the arrow direction shown in picture(Fig 11). When a "click" sound is heard, it indicates machine is flipped in place. Place the frying pot into machine for use (Fig 12).
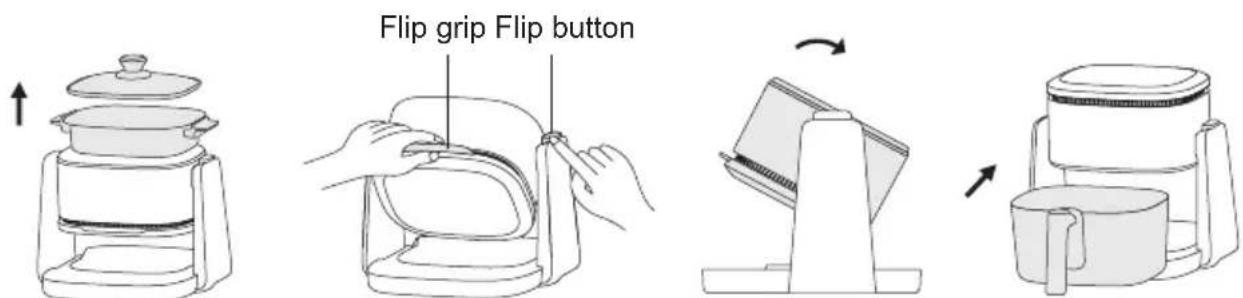
Fig 9 Fig 10 Fig 11 Fig 12
Note:
- Machine can only be flipped in the direction required in the picture, cannot be flipped in opposite direction.
- Do not use brute force during the flipping process. When it is found that the flipping cannot be done, please confirm whether the flip button is pressed and whether the flipping direction is correct.
- If the machine has just finished working, During flipping, be careful not to touch the heating tube and nearby metal parts to prevent burns.
Operation steps
1. Example of air frying mode "Wings"
① Adjust the machine to air frying status(Fig13)
② Make sure silicone rubber is on the crisper bracket, and place the crisper plate correctly in the frying pot (with four legs facing downward)(Fig 14).
③ Lay the marinated chicken wings flat on the crisper bracket(Fig 14).
④ Install the frying pot into mainbody and push it into place(Fig 15-16).
⑤ Press"按钮 in quick start function area, display screen shows 200 °C、20min.
⑥ Press "按钮 to start cooking, display screen starts to show remaining time.
When the cooking time is over half way, the product makes a beep and the "flip" indicator the display area keeps flashing. Please pull out the frying pan and the machine will pause cooking. After flipping the chicken wings and installing the frying pan in place, the machine will continue cooking.
⑧ When the product makes five beep sound, the cooking is completed and the display area shows "End". Carefully remove the frying pot and take out the ingredients.

Fig 13 Fig 14 Fig 15 Fig 16
Note:
- The machine does not have a pause button. If you need to pause, pull out the fryer to pause, and the display screen displays "OPEN". Machine resumes working after re-installing..
- When installing the frying pot, be sure to push it to the bottom and fit it in place with the mainbody.
2.Example of air frying mode "Fish"
① Adjust the machine to grilling status and assemble grill pan(Fig17)
② Press “按钮 in quick start function area, display screen shows 200 °C、20min.
③ Put oil into grill pan, press "按钮 to start preheating, display screen starts to show remaining time.
④ After 3 minutes, put fish into pan to grill (Fig 18), flip the fish in suitable time.
⑤ When the product makes five beep sound, the cooking is completed and the display area shows "End". Carefully remove the grill and take out the ingredients.
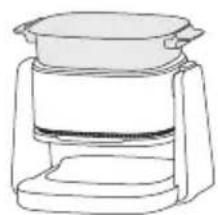
Fig 17

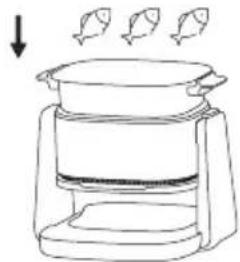
Fig 18
Note:
- When installing the grill pan, be sure to ensure that it is placed flat and free from warping.
- When using the grilling mode, please pay attention to the anti scalding label warning to prevent burns.
- The pan lid can improve heating efficiency and reduce water evaporation. You can choose whether to use the pan lid according to your need.
Recipe Comparison Table
The following table will help you choose the basic settings for the ingredients you want to cook, and these settings are for reference only. Due to the different sources, sizes, shapes, and brands of ingredients, there may be slight differences. You can adjust to the best state you want basing on your ingredients.
Air frying recipe
| No | Recipe type | Proposed volume | Default Temperature (℃) | Adjustable Temperature (℃) | Default Time (min) | Adjustable Time (min) | Flip at half time or not |
| 1 | Fries | 300g | 185 | 50-200 | 20 | 1~45 | Yes |
| 2 | Bake / 150 50 | -200 22 1~45 No | |||||
| 3 | Wings | 300g | 200 | 50-200 | 20 | 1~45 | Yes |
| 4 | Dehydrate / 70 | 50~80 | 3h 3~8h | No | |||
| 5 | Fish | 220g | 200 | 50-200 | 20 | 1~45 | Yes |
| 6 | Shrimp | 200g | 200 | 50-200 | 8 | 1~45 | No |
| 7 | Meat | 130g | 200 | 50-200 | 10 | 1~45 | Yes |
| 8 | DIY | / | 200 | 50-200 | 20 | 1~45 | / |
Grill recipe
| No | Recipe type | Proposed volume | Default Temperature (℃) | Adjustable Temperature (℃) | Default Time (min) | Adjustable Time (min) | Flip at half time or not |
| 1 | Fish 60g 220 | 150-220 20 | 1~45 / | ||||
| 2 | Shrimp 200g | 220 150-220 | 10 1~45 / | ||||
| 3 | Meat 130g 220 | 150-220 | 8 1~45 / | ||||
| 4 | DIY / 220 150 | -220 30 1~45 / |
Cleaning and maintenance
- Unplug the power plug from the socket and wait for the machine body to cool before cleaning and maintenance, otherwise it may cause danger such as electric shock, fire, and scalding.
- After cooking, wait for pot or pan to cool down before cleaning the remaining oil stains in the pot or pan.
- Do not immerse the mainbody in water or rinse it under the tap water. Instead, use a wet cloth to wipe the surface.
- It is recommended to use warm water, detergent, and non abrasive sponge to clean frying pot, grill pan, crisper bracket or grill pan lid.
- Do not use the dishwasher to wash frying pot.
- Do not put the hot frying pot, grill pan or grill pan lid that has just finished cooking into water or refrigerator, in order to prevent damage caused by cold and hot shock to the product.
Important Safety notes
Please read this manual carefully before using this product to prevent incorrect operation or any danger, and keep it properly for future reference. The following safety precautions must be followed when using this product:
This appliance shall not be used by children from 0 year to 8 years. This appliance can be used by children aged from 8 years and above if they are continuously supervised. This appliance can be used by people with reduced physical, sensory or mental capabilities or lack of experience and knowledge if they have been given supervision or instruction concerning use of the appliance in a safe way and understand the hazards involved. Keep the appliance and its cord out of reach of children aged less than 8 years. Cleaning and user maintenance shall not be made by children.
If the supply cord is damaged, it must be replaced by a special cord or assembly available from the manufacturer or its service agent.
The appliance is not intended to be operated by means of an external timer or a separate remote-control system.
The appliance must not be immersed.
This appliance is intended to be used in household and similar applications such as:
- staff kitchen areas in shops, offices and other working environments;
- farm houses;
- by clients in hotels, motels and other residential type environments;
- bed and breakfast type environments.
Precautions
- There may be slight differences between product design and specification data between user manual and the actual product. Please refer to the actual product for accuracy.
- If there are children nearby, use this product with extra caution and do not let children use it alone.
- When the product is powered on or under cooling, the product and its power cord should be placed out of reach of children under 8 years old.
- The product must be used under the care of adult.
- Do not let the power cord touch hot surfaces.
- If any malfunctions or abnormalities occur during use, please stop using immediately and wait until it is tested by after service of JIMMY local distributor before continuing to use. All repairing must be carried out by professional staff.
- Before use, please check if the power cord, plug, and other components are damaged. If any damage is found, please stop using the product.
-
Before use, please confirm whether the input voltage complies with product rating label, and confirm that power socket is grounded. Please use a separate power socket.
-
When taking out the product from box, take out machine and accessories separately to avoid machine falling and causing damage.
- The product must be placed on a stable desktop when suspended from use.
- Do not use the product on tilted or unstable desktop, and keep it away from heat sources to avoid damaging plastic components. Do not approach or place it on any electric appliances.
- The product should not be used near or under curtain and other combustible materials.
- Do not place the product against wall or other products. Leave at least 10cm of free space behind, on both sides, and above the product. Do not place other items on the product.
- The appliance has a heating surface. When using it for people who are not sensitive to heat (such as patients with diabetes), attention must be paid to using it with the help of normal people.
- During heating, do not cover the air inlet and outlet.
- During or after heating, if the frying pot or grill pan has not cooled down, do not touch them directly with hands to avoid burning.
- During heating, high-temperature steam will be released from the air outlet, hands and face should be kept at a safe distance from the air outlet to prevent burning.
- When taking out heated fryer pot from machine, pay attention to high-temperature steam and hot air to prevent burns.
- The product surface = with the high-temperature symbol “ ” may become hot during operation. Please pay special attention to avoid burns.
20.Do not move the machine while it is working.
21.Hold the frying pot and grill pan assembly when moving the machine, to prevent it from falling, causing injury or damaging. - Do not use accessories or components produced by other manufacturers without recommendation by JIMMY, otherwise warranty will become invalid.
- This product cannot be operated with an external timer or independent remote control system.
- Do not put the hot frying pot after cooking directly into cold water or refrigerator to prevent damage.
- Do not use big force to turn the machine head. When it is found that it cannot be turned, please confirm whether the release button is pressed and whether the turning direction is correct.
- After using the air frying function of the product, do not immediately flip the mainbody with hands to prevent them from touching the heating element and causing injury
- When the product is in grilling mode, do not place the fryer pot directly on the heating element to heat it, to prevent the fryer pot from cracking and causing injury.
Trouble shooting
Before sending the product to repair, please check below points first:
| Trouble Possible causes Solution | ||
| Machine cannot turn on | Not plugged to power socket. Insert plug into power socket. | |
| Not press start/cancel button. Press start/cancel button to start working. | ||
| Air frying pot not assembled in place. | Assemble air frying pot in place. | |
| PCB damage. Contact after service to repair. | ||
| Ingredients not fully cooked | Too many ingredients are put. Put less amount of ingredients. | |
| Cooking time too short. Increase cooking time. | ||
| Cooking temperature too low. Increase temperature setting. | ||
| Air frying pot not installed in place, air leakage causes temperature too low. | Inspect whether air frying pot is assemble in place without slant. | |
| Grilling pan not assembled in place and too far away from heater, causes grilling pan temperature too low. | Inspect whether grilling pan assembled in place with slant and bending. | |
| White smoke from the product | Product is cooking ingredients with rich oil. | When cooking rich oil ingredients, the oil will produce white smoke, and the fryer may be hotter than normal, which will not affect the final effect of the cooking. |
| There is still oil residue from the last use on the crisper bracket or frying pot. | Make sure crisper bracket and frying pot are correctly cleaned after each use. | |
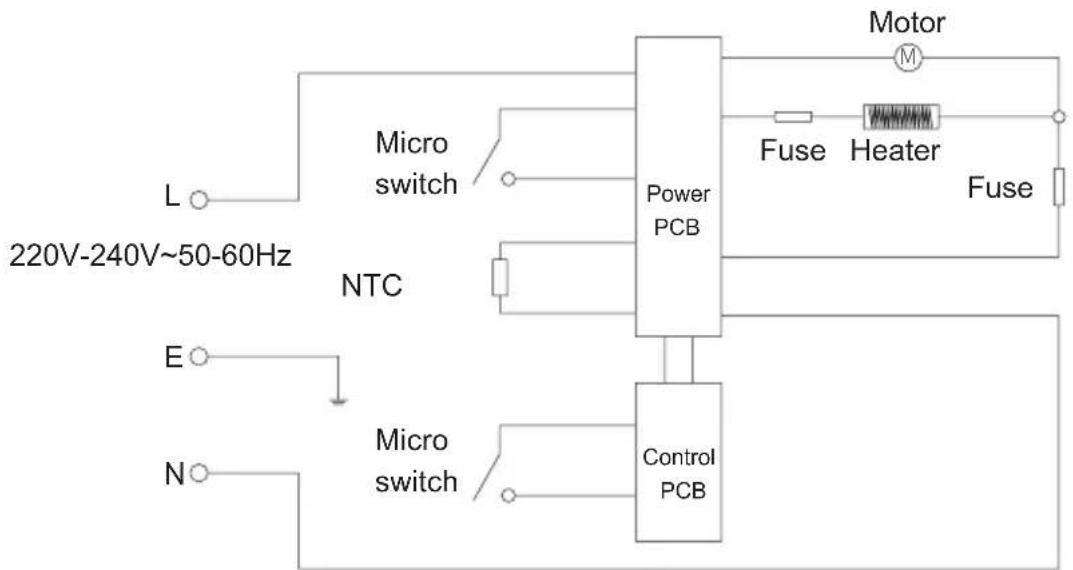
| Display screen shows E1 | NTC open circuit or short circuit. Contact after service for repairing. | |
Note: If there is other failure, since special tools is needed, please send to appointed repairing center for repairing or contact local JIMMY distributor for consultant.
Product Specification
Technical parameter
| Product name Air fryer | |
| Model No AF3 | |
| Rated voltage 220V-240V~ | |
| Rated frequency 50-60Hz | |
| Rated power 1100W | |
| Rated capacity | 4L |
Circuit Diagram
Manufacturer Information
| Manufacturer Kingclean Electric Co., Ltd | |
| Address | No.1 Xiangyang Road, Suzhou New District, Jiangsu Province 215009, China |
C
Disposal
The machine, accessories and packaging should be sorted for environmental-friendly recycling.

Do not dispose of the machine into household waste!
Subject to change without notice.
Warranty Information
Mainbody of this product enjoys one year warranty from the date of purchase.
Excluded from the guarantee is normal wear, commercial use, alterations to the appliance as purchased, cleaning activities, consequences of improper use or damage by the purchaser or a third person, damage that can be attributed to external circumstances (IE abnormal voltage, natural calamities etc).
Product Assembly
Part Name


Packing List
Function Description
Note: If there is other failure, since special tools is needed, please send to appointed repairing center for repairing or contact local JIMMY distributor for consultant.
| Producent Kingclean | Electric Co., Ltd |
| Adres | No.1 Xiangyang Road, Suzhou New District, Jiangsu Province 215009, China |
C E
Product Specification
Technical parameter

Fig 13 Fig 14 Fig 15 Fig 16
Remarque:
Before sending the product to repair, please check below points first:
| Fabricant Kingclean | Electric Co., Ltd |
| Adresse | No.1 Xiangyang road, Suzhou New District,Jiangsu province, 215009, China |
C
Mise au rebut
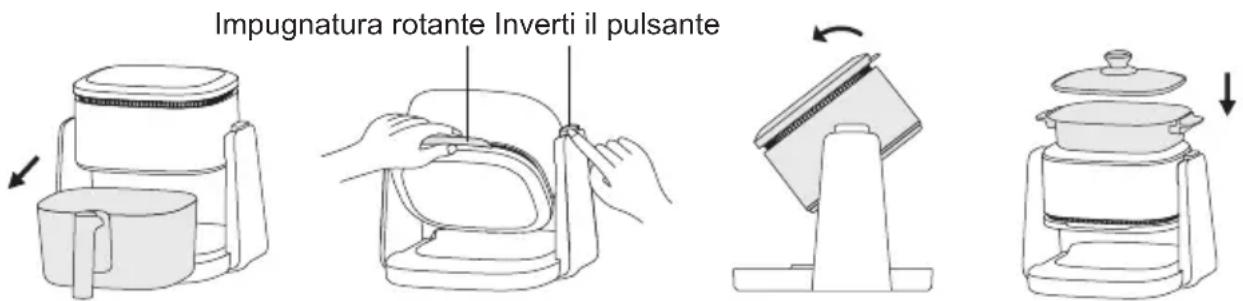
Fig 5 Fig 6 Fig 7 Fig 8

Fig 13 Fig 14 Fig 15 Fig 16
Nota:
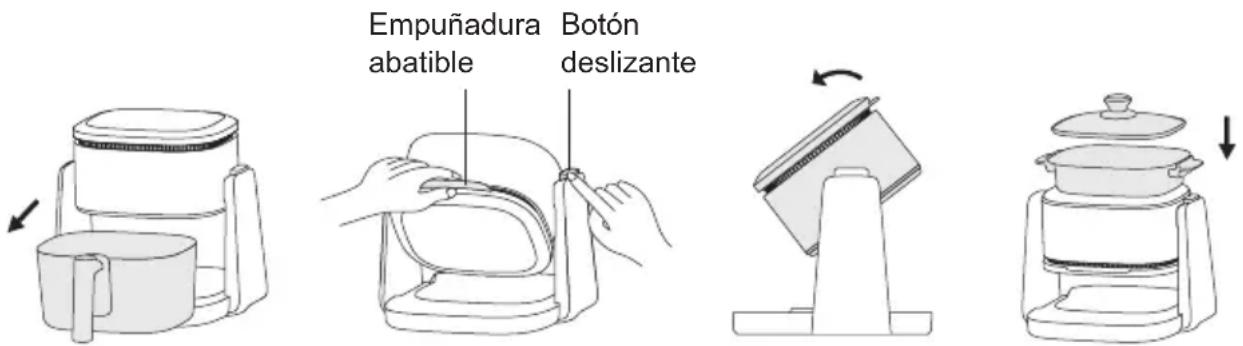
Fig 5 Fig 6 Fig 7 Fig 8
2. Modo grill a modo freir al aire:
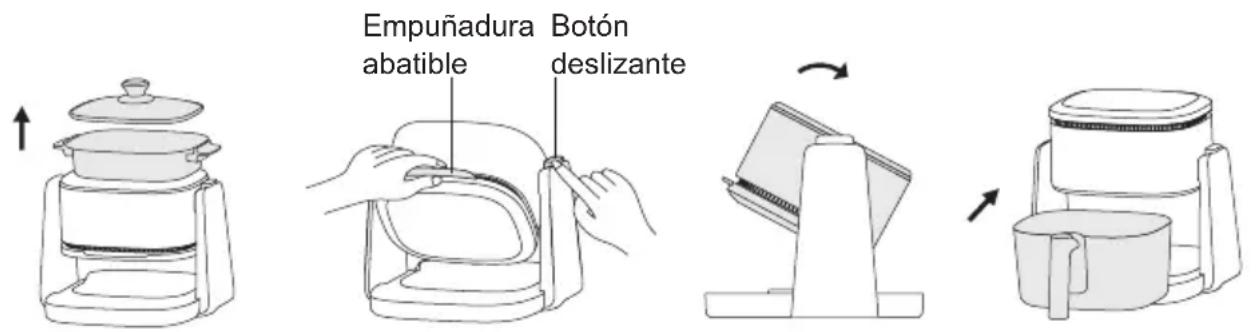
Fig 9 Fig 10 Fig 11 Fig 12
Nota:

Fig 13 Fig 14 Fig 15 Fig 16
Nota:
IcnoJb3OBaHne n3dJIy
Ipeed nepBbIM nCnOJb3OBaHHe m CJIeDyeT o6paTITb BHNMaHne Ha cJIeDyUoUne NyHKTbl:
- BHHMaTeIbHO npOuHTaIe daHHe pyKOBoIDCTBO NOIb3OBaTeJIa.
- Pa3mecntte n3dene Ha yctoynboi nnockoi ctoeunce. He pa3meaTe ero Ha NOBepxHocTn, He o6naiaoue CToIKOCTbIO K TeIIOBOmy BO3deIcTBIO.
- Пелд Tem КСВТАВИТь BИЛКУ B pOЗЕТКУ, yБeДиTEсь, YTO NICTOчнК ПИТаHЯ рACCЧИТан Ha Hanряжени 220-240 B~, a TAKKKe, YTO OH 3a3eMЛeH.
- Перд польбовимьпрвий ра3 Вьимоу КОЗИну Дяжарки, peшеткдя co3даняхустяшей корочи, чуши Глгий И Крышку чаши Дягеля ТЕПОН BODО C MOJOUM cpeдтбом, Incользу дя оТOrO Hea6pa3INBHyIry6ky.
- Пи пьовальбом Испьзовань BOЗмохно пяВлесни He6OBJшОг КOLИЧЕТВдыма. После очістки зах можно устразить nytem harpeваня ри Temперatype 200oC в Teчени 20 минут в ржиме жарк BO3dYxOM.
- He norpykaite Kopnyc B Bodu n He npombaiTe ero noD BOOnpoBODHO BDO, TAK KaK B Kopnyce HaxoJATcAJIeKTPOHHbIe I HarpeBaTeJIbHbIe KOMNoHEHTbl.
7.He 3akpbBaIe OTBepCTnI dIyBXOa I BbIXOa BO3dyxa BO BpeMa pa60tI u3dennr.
8.BoBpempa6oTbI n3dJIeNra TemnepaTypa nobepxHocTN OTBepCTnJa BbIXOda BO3dyxa, Kop3HHbl IJRA JapKn, Yauu Iprnna KpbIuKn Yauu Iprnna Bbcokar. TTo6bl He o6xeycs, He npNKacaiTecb K Hm.
OncaHne yHKn

O6IaCTb OTo6paXeHnBpeMeHHOro INHTepBaJa COCTOHNr
- Korda 3aropaetcra , Ha 3kpahe OTO6pkaetcra octabwceecr BpeMra.
- Korda 3aropaetcra ^ , Ha ekpahe oTo6paxaetcra 3aHaHHa TeMnepaTpa.
- Korda 3aropntc nHdikatop «Flip» (Ipepebpyt) n npo3ByuNT 3 BykoBbIX cnHaJa, DOCTaHbTe KOp3nHy dJIA JapKn, IpepebHnte INHpEneHTbl NIIeBbIX npOdyKTOB, 3aTeM CHOba yctahOBte KOp3nHy dJIA JapKn B Kopnyc, n np6Op aBTOMaTnueckn BO306HOBNT pa6OTy.
O6naCTb yHKunOHaJIbHbIX KHOJOK 6bICTpOro cTapTa
B npnbope npedbapntbno hactpoeho 7 yHKnB 6bictporo cTapTa, BkIouaay «KapTopeBfpn》,《Bbineka》,《Kpbblshkn》,《Cyka》,《Pbla》,《KpeBETkn》,《Mco》n pexm «CdenaamcAm》. Moxho cpa3y bblpaTb yHKnIO 6bictporo cTapTa nnn HacTpOHTb peXm rOtOBKn noKeJahnIO.
PpimmeaHne:
pnc.5 pnc.6 pnc.7 pnc.8
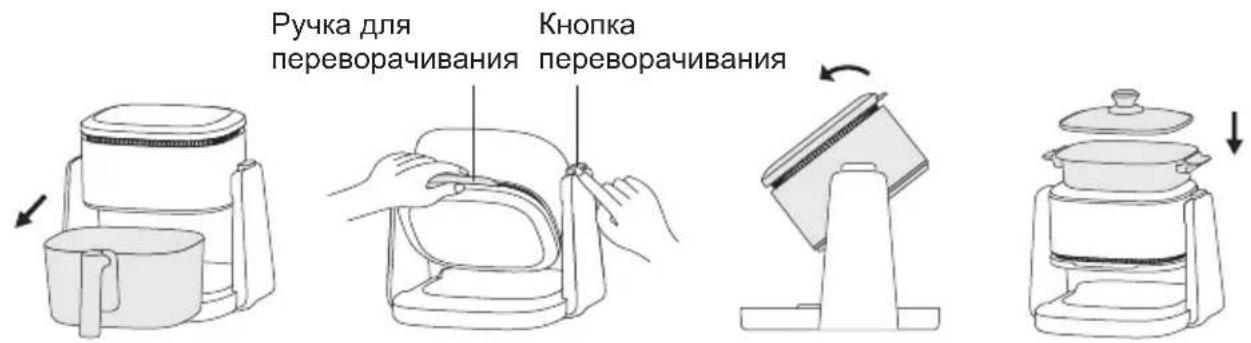
2.ПepeknIoueHne peKIma rpnIЯ ha peKIM JapKn BO3dYxOM:
Санача n3BнeКиTe yaу dny rpnIy (pnc. 9), haxmte u ydepxnBaIte KhoNky nepeBopauHbAHn, Depxac 3a pyuKy nepeBopauHbAHn (pnc. 10), n nepeBepHnTe BepxHIOU qactb yctpoiCTBa B haPpaBHeHn, poka3aHHOM cTpeJkoI Ha pncyHke (pnc. 11). Korda pa3dAcTc8 3Byk «UeJIuKa», 3TO O3Haayet, YTO yctpoiCTBO nepeBepHyTo Ha MeCTe. Дя ИспОьзOBaHnry UCTaHOBInTe KOp3nHy dny JapKn (pnc. 12).
pnc.9 pnc.10 pnc.11 pnc.12
Примеанne:
- YcTPOICTBO MOXHO IpeBOPaHbAaTb TOJIbKO B HAnpaBJIeHn, NOKa3aHHOM Ha pncyHke, HeNb3a IpeBOPaHbAaTb B IpOTUBOIOJoxHOM HApBaBNeHn
- He npilaraTe 3NaHTeJIbHoe ycJIne BO BpemnpeBopauBaHn. EcnHe ydaetc nepeBepHyb yCTpoiCTBO, npOBepbTe, y6eINTecb, YTO KHOJa nepeBopauBaHn HaxaTn BBpaHo HanpaBJeHne nepeBopauBaHn.
- Ecni yctpoiCTBO TOIbKO UTO 3aKOHnIO pa6O TY, TO BO BpEm IpeBOpauHBnIaCobIIOaIte OCTOPOXHOCb, UTObI He KOCHyTbCS HArpeBaTeIbHO Tpy6Kn I pacNOJoxEHHbIXPdOM MetaIIINueCKNX DetAJIe, UTObI He DONVCTNTb IOVUeHnOxOROB.
3tanbl BbINOJIHeHnOnepaun
Ponck nyctpaHHe HeNCnPaBHOCTeI
Ipeed Tem KaK OTdaTb N3dEJIne B peMOHT, npOBepbTe, cJeDyUOJne NyHKtbl:
Otpa6oTaHHbI np6opbl He doJIxHbI BbI6paCbIbA Tbca CoBMeCTHO 6bIToBBIMN OTxOdaMn!
HOpMaun o rapaHTn
TapaHTnHbI cPOK Ha n3deJInne coCTaBnEe T 0dNH) roD c daTbI NOKyPkn.
Cpok cnjxkbni3dennra coctablanet 5 (nTb) nTc daTbI NOKyNKn.
TapaHTnI He npedocTabIeTcB Cnyae eCTeCTBeHHORO n3HOca, INCNoJIb3OBaHnB KOMMepuecknx cIeJx, I3MeHeHn NepBOHaayIbHOro COCTOHaHn Pnp6Opa, pa6OT no OChCTke, PnIOscJIeDCTBnIx HnAdIeXaUeTo ObaIeHn IIN IOBpeXdEHN NOKyNaTeJIeM, IIN TpeTbIMN IInCaAMN, NOBpeXdEHN, BbI3BaHHbIMN BHeUHMN O6CTOaTeJIbCTBaMn.
Kak y3HaTb dAty npOn3BODCTBa n3 cepnHoro Homepa
3TNKeTka C cepHbIM HOMepom pa3MeUaETcHa ynaKOBke ycTroPcTBa, a TaKke Ha Kopnyce camoro ycTroPcTBa. Data npoN3BODCTBa 3akOINPOBaHa B erO cepHHom Homepe.
UTo6bI paCUnΦpOBAtB DaTy IpoN3BOJCTBa, O3HaKOMbTEcB C npIMepom cepHOro Homepa, KOTOpbI NOKa3aH HIXe:

B45H/03E
DBP800547
0742X
8- npOn3BOOCTBeHHaJIHHIA
00547 - co6cTBeHHO cepnHbI HOMep yCTpOncTba
B haem npimpe daT apon3bOndBa 23 hO8p 2019 roa.
BocnoIb3yIteCb HnΦopMauné, npuBeHHO B TaBnue HnKe dny paCUnΦpOBKn DaTbI npOn3BOcTBa DaHHoro yCTpoiCTBa.
Contact us -we'll get back within 1 business day.

Web:www.jimmyglobal.com Email:support@jimmyglobal.com