
GWS 10 - Navigation Accessories GARMIN - Free user manual and instructions
Find the device manual for free GWS 10 GARMIN in PDF.
| Product Type | Wind sensor for navigation |
| Brand | GARMIN |
| Model | GWS 10 |
| Dimensions (L × H × W) | 500-575 × 280 × 140 mm |
| Weight | 0.275 kg |
| Housing Material | PC/ABS (housing and base), polypropylene (vane and anemometer) |
| Integrated NMEA 2000 Cable Length | 46 cm |
| Operating Temperature Range | -15 °C to 70 °C |
| Power Supply | 9 to 16 V DC via NMEA 2000 network |
| Power Consumption | 100 mA (2 NMEA 2000 load units) |
| Communication Protocol | NMEA 2000 |
| Main Functions | Wind speed and direction measurement, configurable filters, mounting angle offset |
| Recommended Mounting | At the top of the mast, facing forward, parallel to the boat's axis |
| Configuration | Via a compatible NMEA 2000 Garmin chartplotter or generic configuration with text commands |
| Certifications | NMEA 2000 certified |
| Package Contents (Standard) | GWS 10 sensor, anemometer cups, mounting kit (screws), documentation, NMEA 2000 kit (terminals, surge protector, cables) |
| Maintenance and Cleaning | Clean with a soft cloth and soapy water. Avoid solvents. |
| Safety | Use the supplied gray inline surge protector to protect against indirect lightning. Wear protective gear during installation (drilling, cutting). |
| Repairability | Contact Garmin support or a professional installer. Do not disassemble except for repair. |
| Warranty | Standard Garmin warranty (see terms) |
| Product Registration | Online at www.garmin.com/registration |
Frequently Asked Questions - GWS 10 GARMIN
User questions about GWS 10 GARMIN
0 question about this device. Answer the ones you know or ask your own.
Ask a new question about this device
Download the instructions for your Navigation Accessories in PDF format for free! Find your manual GWS 10 - GARMIN and take your electronic device back in hand. On this page are published all the documents necessary for the use of your device. GWS 10 by GARMIN.
USER MANUAL GWS 10 GARMIN
Part Number 190-01169-92 Rev. A
Printed In Taiwan


GWS™ 10 Wind Sensor Installation Instructions
To obtain the best possible performance, install your GWS 10 Wind Sensor according to the following instructions. If you experience difficulty during the installation, contact Garmin® Product Support, or seek the advice of a professional installer.
The GWS 10 communicates with NMEA 2000^® -compatible chartplotters and displays. Refer to www.garmin.com for a list of compatible devices and for more information about NMEA 2000.
NOTE: If you are unfamiliar with NMEA 2000, be sure to read the "NMEA 2000 Network Fundamentals" chapter of the Technical Reference for Garmin NMEA 2000 Products on the included CD (GWS 10 with GMTM 10 bundle package only) or click on the "Manuals" hyperlink on the GWS 10 page at www.garmin.com/products/gws10/.
WARNING
See the Important Safety and Product Information guide in the product box for product warnings and other important information.
CAUTION
Always wear safety goggles, ear protection, and a dust mask when drilling, cutting, or sanding.
Use caution when working from heights.
NOTICE
When drilling or cutting, always check the opposite side of the surface. Be aware of fuel tanks, electrical cables, and hydraulic hoses.
Connect the gray in-line lightning arrester to help prevent lightning strike-related damage to the NMEA 2000 network. The lightning arrester is designed to help prevent damage due to nearby lightning strikes, but it is not able to protect against direct lightning strikes. Garmin is not responsible for lightning strike-related damage.
Packing List, Tools Needed, and Optional Accessories
Before installing your unit, confirm that your package includes the following items. If any parts are missing, contact your Garmin dealer immediately.
GWS 10 Basic Package:
- GWS 10 Wind Sensor unit (and anemometer cups)
- GWS 10 Wind Sensor mounting hardware (screws)
- GWS 10 documentation
NMEA 2000 hardware (see below)
GWS 10 with GMI 10 Bundle Package:
- GWS 10 basic package
- GMI 10 unit with protective cover
- GMI 10 flush-mount hardware (screws)
GMI 10 NMEA 0183 data wiring harness - GMI 10 documentation
NMEA 2000 hardware (see below)
NMEA 2000 Hardware:
| NMEA 2000 female terminator (supplied in the GWS 10 with GMI 10 bundle package only) | NMEA 2000 inline terminator (black) NMEA 2000 lightning arrestor (gray) | NMEA 2000 male field-installable connector | NMEA 2000 T-connector (×2) (supplied in the GWS 10 with GMI 10 bundle package only) |
| NMEA 2000 backbone cable • 30 meter spool (98.5 feet) • Requires the included field-installable male NMEA 2000 connector. | NMEA 2000 drop-cable • 2 meters (6.5 feet) • Supplied in the GWS 10 with GMI 10 bundle package only | ||
| NMEA 2000 power cable (yellow) • 2 meters (6.5 feet) (3 A fuse included) • Supplied in the GWS 10 with GMI 10 bundle package only | |||
Tools Needed (not included):
Phillips screwdriver
- Drill and 1/8 in. (3.3mm) drill bit
Additional Optional Items (not included):
Additional NMEA 2000 network components
Installing the GMI 10 (GWS 10 with GMI 10 Bundle Package Only)
If you purchased the GWS 10 with GMI 10 bundle package, use the included GMI 10 Installation Instructions to install the GMI 10.
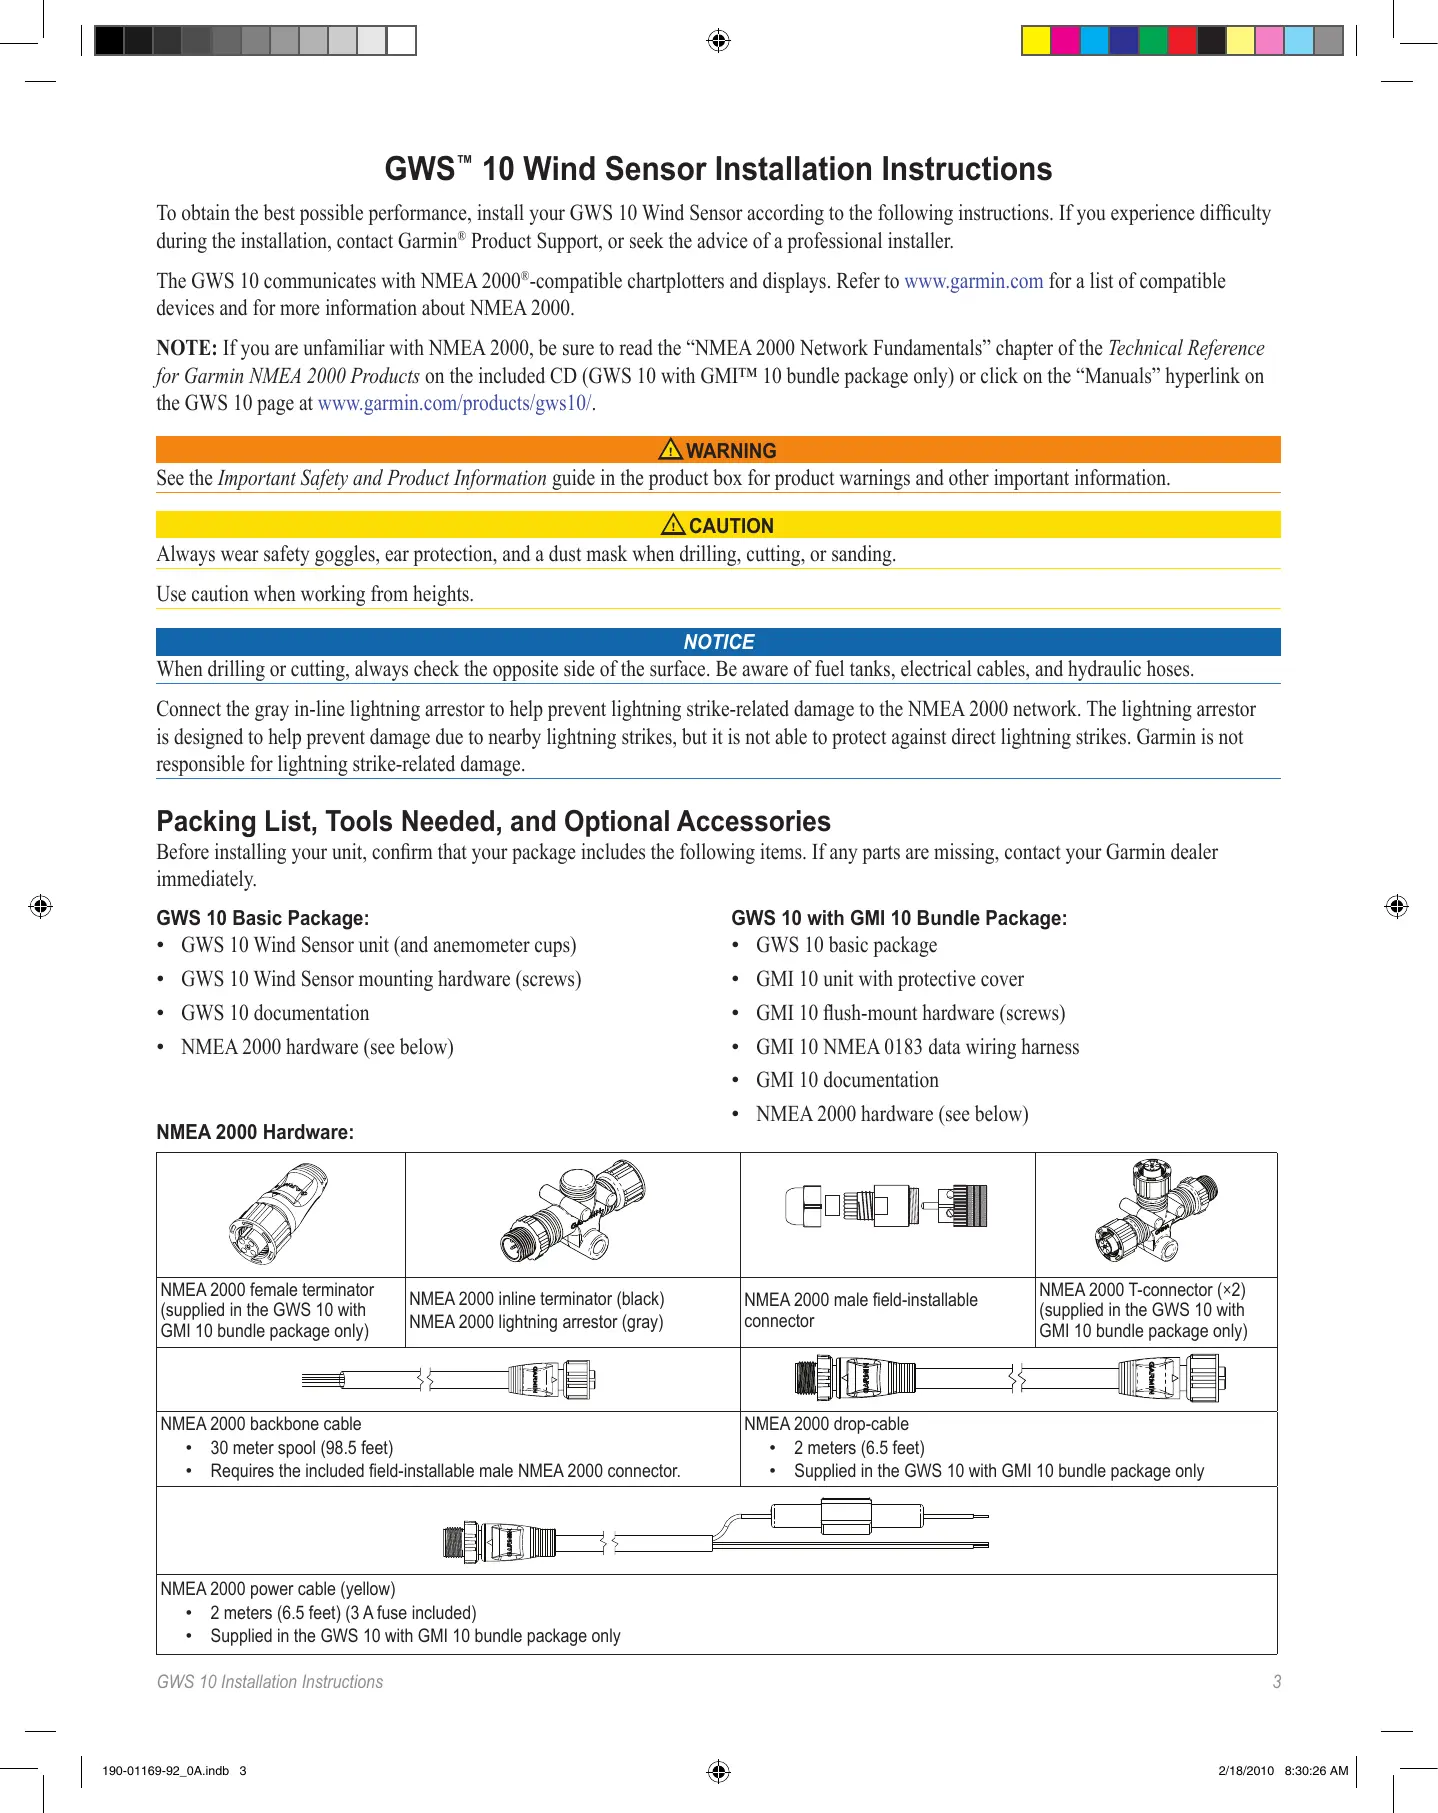
Assembling the GWS 10
- Ensure that the shaft lines up correctly with the slot on the anemometer. The socket on the anemometer only fits one way on the shaft.
- Press on the anemometer until it is seated securely.
NOTE: After the wind sensor is assembled, disassemble it for repair purposes only.
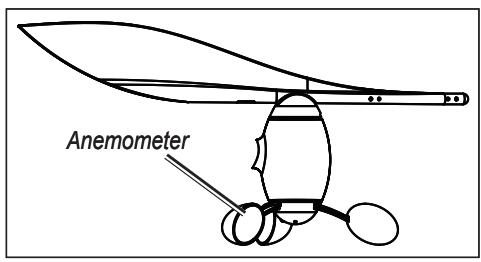
Mounting the GWS 10 on the Mast
- Route the bare-wire end of the NMEA 2000 backbone cable downward inside or along the mast, leaving an appropriate amount of slack.
- Drill 1/8 in. (3.3 mm) pilot holes and use the provided screws to mount the GWS 10 in the appropriate orientation (refer to the diagram). If there is not a horizontal surface at the top of the mast, fashion a wedge to mount the unit horizontally. Use the included adhesive-backed mounting template to help position the pilot holes.
- At the top of the mast, connect the in-line terminator to the backbone cable and to the GWS 10.
- Secure the in-line terminator to the mast with the provided screws.
- Pull the cable at the bottom of the mast to remove the slack.
- Run the bare-wire end of the cable to the existing NMEA 2000 network or to the area where the NMEA 2000 network will be installed.
NOTE: If you do not mount the GWS 10 facing the exact front of the boat, configure the software to the appropriate wind-angle offset (page 5).
Mount the GWS 10 at the top of the mast facing the front of the boat, and parallel with the boat center line
Connecting the GWS 10 to an Existing NMEA 2000 Network
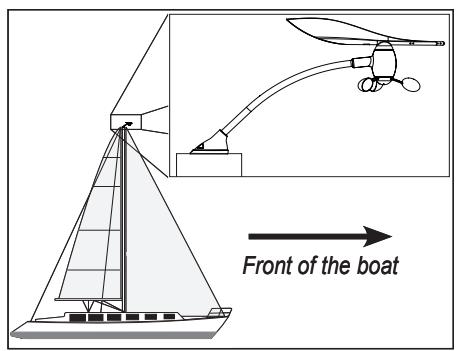
- Cut the NMEA 2000 backbone cable to the proper length. Ensure that the cable reaches the existing NMEA 2000 network, and leave enough slack cable for routing and attaching the field-installable connector.
- Assemble and wire the field-installable connector as shown in the diagrams.
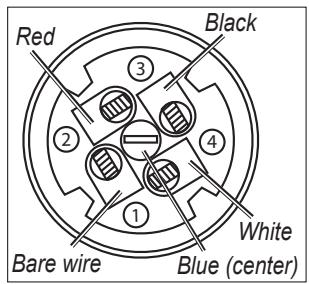
Field-Installable Connector Wiring Assignments
- Attach the field-installable connector to the gray in-line lightning arrestor.
- Disconnect the male terminator from the backbone of the existing NMEA 2000 network on your boat.
NOTICE
Connect the gray in-line lightning arrester to help prevent lightning strike-related damage to the NMEA 2000 network. The lightning arrestor is designed to help prevent damage due to nearby lightning strikes, but it is not able to protect against direct lightning strikes. Garmin is not responsible for lightning strike-related damage.
5. Connect the in-line lightning arrester to the T-connector at the location from which you removed the male terminator in step 3.
Creating a Basic NMEA 2000 Network for the GWS 10 and the GMI 10
If you do not have an existing NMEA 2000 network, you must install a NMEA 2000 network on your boat to use the GWS 10. For more information on NMEA 2000, visit www.garmin.com.
- Connect the two included T-connectors together by their sides.
- The NMEA 2000 power cable must be connected to a 9-16 Vdc power source through the ignition switch of the boat or through an appropriate additional switch (not included).
NOTICE
Connect the included NMEA 2000 power cable to the ignition switch of the boat or through an external switch. The NMEA 2000 network will drain the boat battery if it is connected directly to the battery.
- Connect the NMEA 2000 power cable to one of the two T-connectors.
- Connect the included NMEA 2000 drop cable to the other T-connector and to the GM1 10.
- Add additional T-connectors (not included) for each additional sensor or display device (not included) that is added to the NMEA 2000 network, and connect each sensor or display device to a T-connector with the appropriate drop cable (not included).
- Connect the female terminator to the appropriate end of the combined T-connectors.
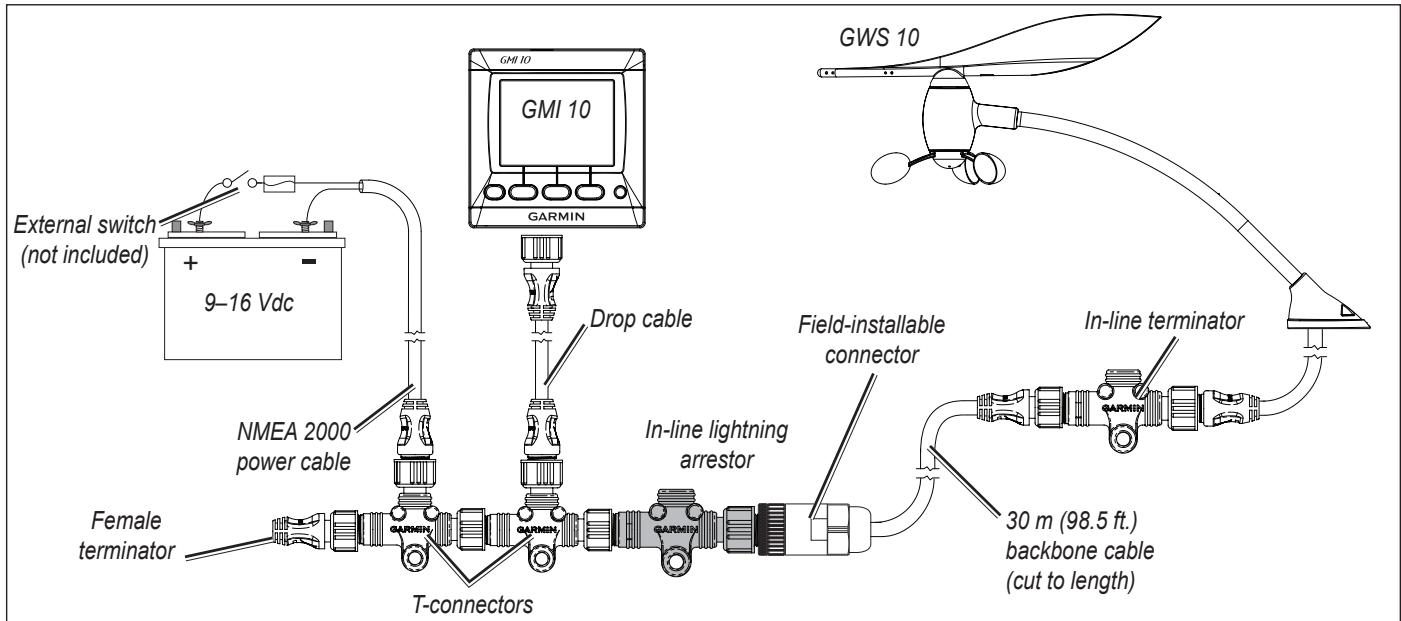
Basic NMEA 2000 Network with a GMI 10 and a GWS 10
Configuring the GWS 10
Refer to your Garmin Chartplotter or marine instrument owner's manual for specific instructions regarding configuring NMEA 2000 devices.
To configure the orientation:
- Select Wind Angle Offset if you did not orient the GWS 10 facing the exact front of the boat.
- Select the angle (in degrees) to adjust for the difference in orientation.
TIP: The angle is configured clockwise around the mast of the boat. For example, 90 degrees is starboard, and 270 degrees is port.
To adjust the Wind Angle Filter setting:
1. Select Wind Angle Filter.
-
Choose from the following settings to adjust the filter:
-
Off—turn off the filter to make the display more responsive to changes in the wind angle.
- On—select a higher number to increase the responsiveness of the display to changes in the wind angle, or select a lower number to decrease the responsiveness.
- Auto—automatically adjusts the filter settings based on wind conditions.
To adjust the Wind Speed Filter setting:
1. Select Wind Speed Filter.
-
Choose from the following settings to adjust the filter:
-
Off—turn off the filter to make the display more responsive to changes in the wind speed.
- On—select a higher number to increase the responsiveness of the display to changes in the wind speed, or select a lower number to decrease the responsiveness.
- Auto—automatically adjusts the filter settings based on wind conditions.
Configuring the GWS 10 if the Filter and Offset Selections Are Not Shown
Refer to your Garmin Chartplotter or marine instrument owner's manual for instructions regarding configuring NMEA 2000 devices.
To configure the orientation:
- Calculate the degree of offset of the GWS 10 from the front of the boat.
TIP: The angle is calculated clockwise around the mast of the boat. For example, 90 degrees is starboard while 270 degrees is port - Select Generic Configuration to specify data for the filter and offset settings.
- Enter: "ANGLEOFFSET=" followed by the value you calculated in step 1 (for example: ANGLEOFFSET=180).
To configure the wind angle filter:
- Calculate the time constant value for the wind angle filter.
TIP: The time constant value is a number between 0 and 254, which represents the amount of time, in quarter-second increments, that the wind angle must change before it is updated on your display. For example, a value of 40 means that the display will not update the wind angle unless it changes for more than 10 seconds. To use the Auto setting, which adjusts the filter automatically based on wind conditions, use a value of 255.
- Select Generic Configuration to specify data for the filter and offset settings.
- Enter the following command: "ANGLEFILTER=" followed by the value you calculated in step 1 (for example: "ANGLEFILTER=12").
To configure the wind speed filter:
- Calculate a time constant value for the wind speed filter.
TIP: The time constant value is a number between 0 and 254, which represents the amount of time, in quarter-second increments, that the wind speed must change before it is updated on your display. For example, a value of 40 means that the display will not update the wind speed unless it changes for more than 10 seconds. To use the Auto setting, which adjusts the filter automatically based on wind conditions, use a value of 255.
- Select Generic Configuration to specify data for the filter and offset settings.
- Enter the following command: "SPEEDFILTER=" followed by the value you calculated in step 1 (for example: "SPEEDFILTER=215").
NMEA 2000 PGN Information
Use the tables to determine the approved NMEA 2000 PGN information that can be received and transmitted by a GWS 10 when communicating with a NMEA 2000-compliant device.
| Transmit | Receive | ||
| 059392 | ISO Acknowledgment | 059392 | ISO Acknowledgment |
| 060928 | ISO Address Claim | 059904 | ISO Request |
| 126208 | NMEA - Command/Request/Acknowledge Group Function | 060928 | ISO Address Claim |
| 126464 | Transmit/Receive PGN List Group Function | 126208 | NMEA - Command/Request/Acknowledge Group Function |
| 126996 | Product Information | The GWS 10 is NMEA 2000 certified | |
| 130306 | Wind Data | ||
| 130312 | Temperature | ||
| 130314 | Actual Pressure | ||
Specifications
Physical
NOTE: The width of this sensor varies with the positioning of the wind vane.
Unit Dimensions: W × H × D : 19^11/16 - 22^5/8 × 11^1/32 × 5^1/2 in. (500 - 575 × 280 × 140~mm)
Weight: 0.6lb (0.275kg)
Cable: Attached NMEA 2000 cable length is 18 in. (46 cm)
Temperature Range: From 5^ to 158^ (from -15^ to 70^ )
Case Material:
Housing and Base: PC/ABS
Wind vane and Anemometer: Polypropylene
Tubing: 6063 Aluminum
Shafts: 304 SS
Power
Power Input Source: 9-16 Vdc via NMEA 2000
NMEA 2000 Load Equivalency Number (LEN): 2 (100 mA)
Updating the Software
If you have an existing NMEA 2000 network and a NMEA 2000-compatible Garmin chartplotter, ensure that you have updated the software on all devices to the latest version. For more information, refer to www.garmin.com.
If you have an existing NMEA 2000 network and do not have a NMEA 2000-compatible Garmin chartplotter, contact Garmin product support or locate a Garmin dealer.
Product Registration
Help us better support you by completing our online registration at www.garmin.com/registration/. Go to http://my.garmin.com. Keep the original sales receipt, or a photocopy, in a safe place.
For future reference, write the serial number assigned to your GWS 10 in the space provided. It is located on a sticker on the unit.
Serial number
Contact Garmin
Contact Garmin Product Support if you have any questions while using your GWS 10. In the USA, go to www.garmin.com/support, or contact Garmin USA by phone at (913) 397-8200 or (800) 800-1020.
In the UK, contact Garmin (Europe) Ltd. by phone at 0808 2380000.
In Europe, go to www.garmin.com/support and click Contact Support for in-country support information, or contact Garmin (Europe) Ltd. by phone at +44 (0) 870.8501241.
Software License Agreement
BY USING THE GWS 10, YOU AGREE TO BE BOUND BY THE TERMS AND CONDITIONS OF THE FOLLOWING SOFTWARE LICENSE AGREEMENT. PLEASE READ THIS AGREEMENT CAREFULLY.
Garmin Ltd. and its subsidiaries ("Garmin") grant you a limited license to use the software embedded in this device (the "Software") in binary executable form in the normal operation of the product. Title, ownership rights, and intellectual property rights in and to the Software remain in Garmin and/or its third-party providers.
You acknowledge that the Software is the property of Garmin and/or its third-party providers and is protected under the United States of America copyright laws and international copyright treaties. You further acknowledge that the structure, organization, and code of the Software, for which source code is not provided, are valuable trade secrets of Garmin and/or its third-party providers and that the Software in source code form remains a valuable trade secret of Garmin and/or its third-party providers. You agree not to decompile, disassemble, modify, reverse assemble, reverse engineer, or reduce to human readable form the Software or any part thereof or create any derivative works based on the Software. You agree not to export or re-export the Software to any country in violation of the export control laws of the United States of America or the export control laws of any other applicable country
© 2010 Garmin Ltd. or its subsidiaries
All rights reserved. Except as expressly provided herein, no part of this manual may be reproduced, copied, transmitted, disseminated, downloaded or stored in any storage medium, for any purpose without the express prior written consent of Garmin. Garmin hereby grants permission to download a single copy of this manual onto a hard drive or other electronic storage medium to be viewed and to print one copy of this manual or of any revision hereto, provided that such electronic or printed copy of this manual must contain the complete text of this copyright notice and provided further that any unauthorized commercial distribution of this manual or any revision hereto is strictly prohibited.
Information in this document is subject to change without notice. Garmin reserves the right to change or improve its products and to make changes in the content without obligation to notify any person or organization of such changes or improvements. Visit the Garmin Web site (www.garmin.com) for current updates and supplemental information concerning the use and operation of this and other Garmin products.
Garmin® and GPSMAP® are trademarks of Garmin Ltd. or its subsidiaries, registered in the USA and other countries. GWS™ and GMITM are trademarks of Garmin Ltd. or its subsidiaries. These trademarks may not be used without the express permission of Garmin. NMEA 2000® is a registered trademark of the National Marine Electronics Association.
GWS 10 Installation Instructions
Pack standard GWS 10 :
Paquete Basics GWS 10:
Copyright 2010 Garmin Ltd. or its subsidiaries
Garmin International, Inc.
1200 E 151st Street, Olathe, Kansas 66062 USA
Tel. 913/397.8200
Fax. 913/397.8282
Garmin (Europe) Ltd
Liberty House, Hounsdown Business Park, Southampton, Hampshire, SO40 9LR UK.
Tel. 44/0870.8501241 (outside the UK.) or 0808 2380000 (UK only)
Fax. 44/0870.8501251
Garmin Corporation
No. 68, Jangshu 2nd Road, Sijhih, Taipei County, Taiwan
Tel. 886/2.2642.9199
Fax. 886/2.2642.9099
Part Number 190-01169-92 Rev. A