USER MANUAL OTV 40GF-5023C OK
Teletext (Videotext) Information
ad interface and data
Before operating, please read all these safety and operating instructions completely and then retain this manual for future reference.
Always comply with the following precautions to avoid dangerous situations and ensure peak performance of your product.
The Imtron GmbH assumes no liability for damage to the product, for property damage or for personal injury due to careless or improper usage of the product, or usage of product which does not meet the manufacturer's specified purpose.

CAUTION
RISK OF ELECTRIC SHOCK DO NOT OPEN

WARNING:
TO REDUCE THE RISK OF ELECTRIC SHOCK DO NOT REMOVE COVER (OR BACK). NO USER-SERVICEABLE PARTS INSIDE. REFER SERVICING TO QUALIFIED SERVICE PERSONNEL.

The lightning flash with arrowhead symbol, within an equilateral triangle, is intended to alert the user to the presence of uninsulated "dangerous voltage" within the products enclosure that may be of sufficient magnitude to constitute a risk of electric shock.

The exclamation point within an equilateral triangle is intended to alert the user to the presence of important operating and maintenance (servicing) instructions in the literature accompanying the appliance.
This equipment generates uses and can radiate radio frequency energy and, if not installed and used in accordance with the instructions, may cause harmful interference to radio communication. However, there is no guarantee that interference will not occur in a particular installation. If this equipment does cause harmful interference to radio or television reception, which can be determined by turning the equipment off and on, the user is encouraged to try to correct the interference by one or more of the following measures:
a. Relocate the receiving antenna.
b. Increase the separation between the equipment and receiver.
c. Connect the equipment into an outlet on a circuit different from that to which the receiver is connected.
d. Consult the dealer or experienced radio/TV technician for help.
CAUTION
Do not attempt to modify this product in any way without written authorization from supplier. Unauthorized modification could void the user's authority to operate this product.
※ Figures and illustrations in this User Manual are provided for reference only and may differ from actual product appearance. Product design and specifications may be changed without notice.
Warning
IMPORTANT WARNINGS AND CAUTIONS!
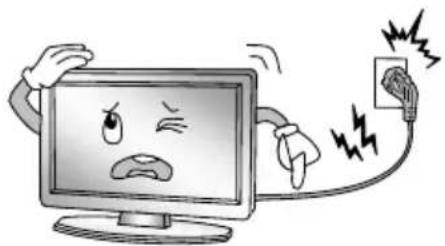
Electrical energy can perform many useful functions, but it can also cause personal injuries and property damage if improperly handled. This product has been engineered and manufactured with the highest priority on safety. BUT IMPROPER USE CAN RESULT IN POTENTIAL ELECTRICAL SHOCK OR FIRE HAZARD. In order to prevent potential danger, please observe the following instructions when installing, operating and cleaning the product.
- Attachments--Only use attachments/accessories specified by the manufacturer. Do not use attachments not recommended by the manufacturer. Use of improper attachments can result in accidents.
- Water---To reduce the risk of fire or electric shock, do not expose this TV to rain or moisture. Do not expose the TV to dripping or splashing of liquids and do not place objects filled with liquids, such as vases, cups, etc. on or over the TV (e.g. on shelves above the unit).
- Fire or explosion--Do not expose the TV to direct sunlight or do not place open flames such as lit candles on the top of or near the TV. Do not place any heat sources such as electric heaters, radiators, etc. near the TV set.
Warning: To prevent the spread of fire, keep candles or other open flames away from this product at all times.
- Ventilation---For ventilation purposes, leave at least 5cm free space around the TV. The ventilation should not be impeded by covering or blocking the ventilation openings with items, such as newspapers, tablecloths, curtains, etc. Failing to maintain proper ventilation may result in a fire or a problem with the product caused by an increase in its internal temperature.
- This equipment is a Class II or double insulated electrical appliance. It has been designed in such a way that it does not require a safety connection to electrical earth.
- Power source---This product is intended to be supplied by a listed power supply indicated on the marking label. If you are not sure of the type of power supply to your home, consult your product dealer or local power company.
- Overloading--Do not overload wall outlets, extension cables, or convenience receptacles on other equipment as this can result in a risk of fire or electric shock.
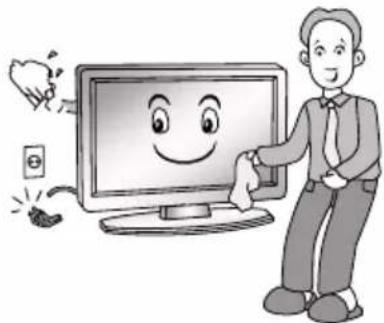
- Voltage---Before installing this TV set, make sure your outlet voltage corresponds to the voltage stated on the appliance rating label.
-
Power plug --- Do not defeat the safety purpose of the polarized or grounding-type plug. Most appliances recommend they be placed upon a dedicated circuit; that is, a single outlet circuit which powers only that appliance and has no additional outlets or branch circuits.
-
Wall mounting--When mounting the product on a wall, be sure to install the product according to the method recommended by the manufacturer. The wall mount kit is optional. You can obtain from your local dealer, if not supplied with your TV. Do not install the TV on a ceiling or on an inclined wall. Use the specified wall mounting screws and other accessories. Tighten the wall mounting screws firmly to prevent the TV from fall. Do not overtighten the screws.
- Stand--- Do not place the TV on an unstable or slanted surfaces. Otherwise the TV may tip over and cause potentially fatal, serious injury. Many injuries, especially involving children, can be avoided if the following simple safety precautions are taken:
-
- Only use TV furniture or stands recommended by the device manufacturer
-
Only use furniture that can carry the weight of the TV
- Make sure that the TV does not extend beyond the edges of the furniture
Warning
- Do not place the TV on high pieces of furniture (e.g. shelves or bookshelves) without securely supporting the furniture itself and the TV.
- Do not place the TV devices on fabrics or other materials that are located between the TV and the furniture.
-
Inform your children about the dangers of climbing on high pieces of furniture to reach the TV or the remote control. If you change the location of your TV, follow the same safety precautions.
-
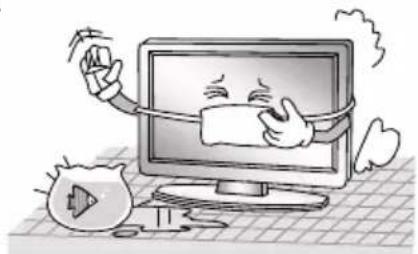
Entering of objects and liquids---Never insert an object into the product through vents or openings. High voltage flows in the product, and inserting an object can cause electric shock and/or short internal parts. For the same reason, do not spill water or liquid on the product.
- Damage requiring service--- This unit should only be serviced by an authorized and properly trained technician. Opening the cover or other attempts by the user to service this unit may result in serious injury or death from electrical shock, and may increase the risk of fire.
- Children ---Do not allow young children to play with the plastic bag that came with the television when you unpacked it. Failure to do so can result in suffocation, causing injury.
- Batteries--The batteries (battery pack or batteries installed) shall not be exposed to excessive heat such as sunshine, fire or the like.
Do not dispose of any batteries in with the domestic waste. Return them to a collection point for old batteries.
- Antenna ---Install the antenna away from high-voltage power lines and communication cables and make sure it is installed securely. If the antenna touches a power line, contact with the antenna could result in fire, electric shock or serious injury.
- Panel protection--- The panel used in this product is made of glass. Therefore, it can break when the product is dropped or impacted upon by other objects. Be careful not to be injured by broken glass pieces in case the panel breaks.
- : Indicates an alternating current.
:indicates direct current.
If you would like to connect an external device with this product, a good quality shielded cable must be used, which ensures the electromagnetic compatibility of the product and the used cable as a whole.
Never place a television set in an unstable location, A television set may fall, causing serious personal injury or death. Many injuries, particularly to children, can be avoided by taking simple precautions such as:
- Using cabinets or stands recommended by the manufacturer of the television set.
- Only using furniture that can safely support the television set.
- Ensuring the television set is not overhanging the edge of the supporting furniture.
- Not placing the television set on tall furniture (for example, cupboards or bookcases) without anchoring both the furniture and the television set to a suitable support.
- Not placing the television set on cloth or other materials that maybe located between the television set and supporting furniture.
- Educating children about the dangers of climbing on furniture to reach the television set or its controls.
If your existing television set is being retained and relocated. The same consider actions as above should be applied.
Warning
IMPORTANT SAFETY INSTRUCTIONS
Read these instructions.
- Keep these instructions.
- Heed all warnings.
- Follow all instructions.
4.

Do not use this apparatus near water.
Clean only with a dry cloth. Unplug this product from the wall outlet before cleaning. Do not use liquid cleaners or aerosol cleaners.
- Do not block any ventilation openings. Ventilation should not be impeded by covering the ventilation openings with items such as newspapers, table-cloths, curtains etc.

- Do not install near any heat source such as radiators, heat registers, stoves, or other apparatus (including amplifiers) that produce heat.
- Do not defeat the safety purpose of the polarized or grounding type plug. A polarized plug has two blades with one wider than other. A grounding type plug has two blades and a third grounding prong. The wide blade or the third prong is provided for your safety. When the provided plug does not fit into your outlet, consult an electrician for replacement of the obsolete outlet.
Warning
- Protect the power cord from being walked on or pinched particularly at plugs, convenience receptacles, and the point where they exit from the apparatus.
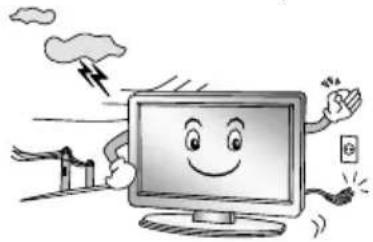
- For added protection for this product during a lightning storm, or when it is left unattended and unused for long periods of time, unplug it from the wall outlet and disconnect the cable system.
- Only use the attachments/ accessories specified by the manufacturer.
- When a cart is used, use caution when moving the cart/apparatus combination to avoid injury from tip-over. Sudden stops, excessive force and uneven floor surfaces can cause the product to fall from the Trolley.

- Refer all servicing to qualified service personnel. Servicing is required when the apparatus has been damaged in any way, such as power supply cord or plug is damaged, liquid has been spilled or objects have fallen into the apparatus, the apparatus has been exposed to rain or moisture, does not operate normally, or has been dropped.

NOTE:
Disposal of this product must be carried out in accordance to the regulations of your local authority. Do not dispose of this product with general household waste disposal.
Some minute dot defects may be visible on the screen, appearing as tiny red, green, or blue spots. However there have no adverse effects on the monitor's performance.
Avoid touching the screen or holding your finger(s) against it for long periods of time. Doing so may produce some temporary distortion effect on the screen.
It is not recommended to keep a certain still image displayed on the screen for a long time as well as displaying extremely bright images on screen, reduce the 'brightness' and 'contrast' when displaying still images.
NOTE:
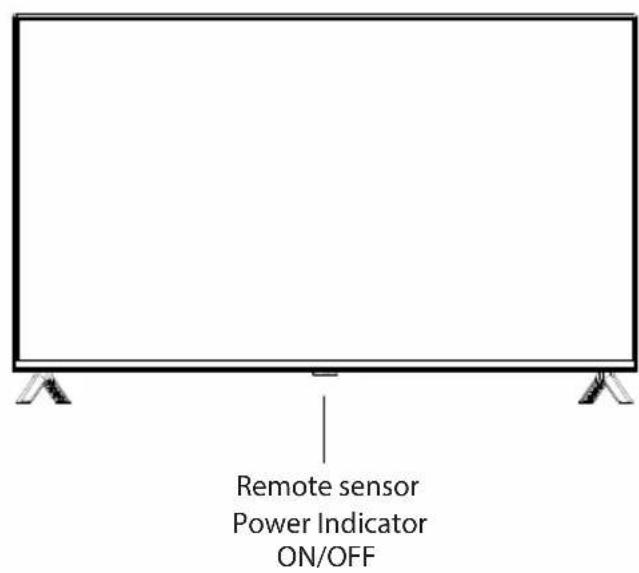
Main Unit Controls
Front
Back view controls and sockets


| No. Name | Description | |
| 1 LAN Local | area network (LAN) port. Connect a LAN cable to this port to connect to the Network. | |
| 2 HDMI Connect | a HDMI input signal source, such as a DVD player, via the HDMI interfaces. | |
| 3 ANT Connect | a coaxial cable to receive a signal from the antenna, cable or satellite. | |
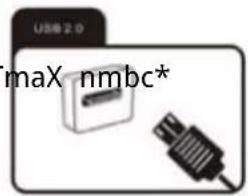
| 4 USB2.0 USB port. Connect a USB Storage device for multimedia file playback. | |
| 5 COMMON INTERFACE COMMON INTERFACE slot. | |
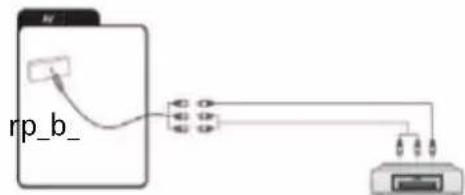
| 6 AVConnect audio and video signal sources via AV IN. | |
| 7 DIGITAL AUDIO OUT Use an optical cable to output your TV audio signal to a compatible audio receiver. | |
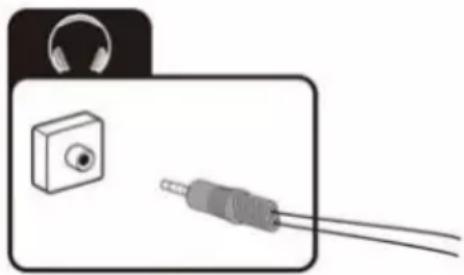
| 8 | O | Earphones/headphones jack. |
Note: If you would like to connect an external device with this product, a good quality shielded cable must be used, which ensures the electromagnetic compatibility of the product and the used cable as a whole.
Getting Started
Cable Installation
Before the installation and use, please read carefully the relevant content in "Warning and Safety instructions".
Take out the TV from the wrapping package and put it in a drafty and flat place.
NOTE:
The range of power input for the TV is 100 - 240V 50 / 60Hz ; do not connect the TV power input port with the power cable out of the above range.
Please hold the insulated part of the plug when you are unplugging the power cable, do not touch directly the metallic part of the cable.
Before connecting to an external device, please firstly make sure that the TV set and the external device have been turned off. When connecting, please make reference to the interface name and the interface color to connect the signal cable.
The unit has a built-in wireless network card, and can directly receive network signals from wireless router through WIFI antenna.
EN
Using the Remote Control
When using the remote control, aim it at remote sensor on the television. If there is an object between the remote control and the remote sensor on the unit, the unit may not operate.
- Do not shake the remote control violently. Also, do not splash liquid on the remote control, also do not put the remote control in high humidity place.
- Do not place remote control under direct sunlight which might cause deformation of the unit by heat.
- When the remote sensor is under direct sunlight or strong lightning, the remote control might not function properly. If so please change the lightning or TV's position, or operate the remote control closer to the remote sensor.
- The recommended effective distance for using the remote control is about 7 meters.
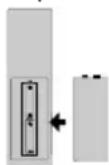
Installing Batteries in the Remote Control
- Open the cover at the back of the remote control.
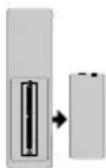
- In Install two AAA size batteries. Make sure to match the "+" and "-" ends of the with batteries the diagram inside the compartment.
- Replace the cover.
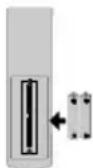
Battery Replacement
You will need to install the batteries into the remote control to make it operate following the instruction below.
When the batteries become weak, the operating distance of the remote control will be greatly reduced and you will need to replace the batteries.
Notes on Using Batteries:
The use of the wrong type of batteries may cause chemical leakage and/or explosion. Please note the following:
- Please note the batteries polarity to avoid short circuit.
- Different types of batteries have different characteristics. Do not mix different types.
- Do not mix old and new batteries. Mixing old and new batteries will shorten battery life and/or cause chemical leakage.
- Replace batteries as soon as they do not work.
Chemicals which leak from batteries may cause skin irritation. If any chemical matter seeps out of the batteries, wipe it up immediately with a dry cloth.
- The batteries may have a shorter life expectancy due to storage conditions. Remove the batteries whenever you anticipate that the remote control will not be used for an extended period.
- The batteries (battery pack or batteries installed) shall not be exposed to excessive heat such as sunshine, fire or the like.
CAUTION:
- It may result in an explosion if batteries are replaced incorrectly.
- Only replace batteries with the same or equivalent type.
CAUTION!
- Non-rechargeable batteries must not be recharged.
- Keep batteries out of reach of small children. If batteries have been swallowed, seek immediate medical attention.
- If the batteries leak, remove them with a cloth and dispose of them accordingly. Prevent battery acid from coming into contact with skin and eyes. If you do get battery acid in your eyes, flush them thoroughly with lots of water and consult a physician immediately. If battery acid comes into contact with your skin, wash the affected area with lots of water and soap.
- Do not store them haphazardly in a place where they may short-circuit each other or be short-circuited by other metal objects.

| Serial No. | Button Description |
| 1 | Power Turns on/off the TV |
| 2 | Number Num ber buttons |
| 3 | Menu Displays main menu |
| 4 | Voice | Activates voice command function |
| 5 | | |
| 6 | Direction/OK | to select or confirm the menu item; In the with the OK button. |
| 7 | Home | Opens Android TV homepage |
| 8 | Back | Returns to the previous menu or setting |
| 9 | Volume+/- | Adjusts volume |
| 10 | NETFLIX Opens NETFLIX app |
| 11 | prime video Opens prime video app |
| 12 | USB | Switches to the USB source |
| 13 | Info | Displays program information |
| 14 | Teletext Shows or hides Teletext |
| 15 | Color | Use as per the operating interface instructions. |
| 16 | Source | Selects signal source |
| 17 | Subtitle | Selects subtitle |
| 18 | | |
| 19 | EPG Launches Electronic Program Guide |
| 20 | Mute | Mutes or unmutes sound |
| 21 | Program ↑/↓ Selects programs in ascending or descending order |
| 22 | YouTube | Opens YouTube app |
| 23 | APPS | |
| 24 | | |
| 25 | Audio | Selects sound mode for current channel |
| 26 | | |
Using the remote control
- Point the remote control at the remote control sensor on the front of the device. Make sure there are no obstacles between the remote control and the sensor.
- Press the desired button on the remote control.
The remote control works at a range of up to 7m . When using the remote control to control the TV set, you should be at a maximum angle of 30^ from the front of the TV set, if possible. You should also make sure that there are no sources of bright light or even sunlight on the remote control sensor.
If the device stops responding to the remote control, the button or function is not supported by the current setting or the batteries in the remote control are empty. In this case, replace the batteries with new ones of the same type.
Connecting antenna, Internet and external devices
Connecting the TV antenna or cable TV
You can connect the cable from your indoor or outdoor antenna or cable TV to the antenna socket ANT1.
To switch to TV reception, press the Source button repeatedly to select the signal source "TV."
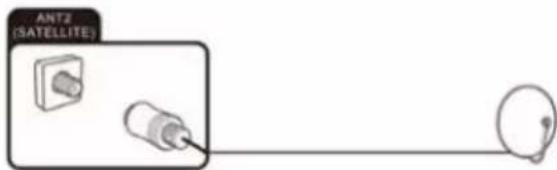
Connecting the satellite antenna
You can connect the cable of your satellite antenna to the ANT 2 SATELLITE socket.
To switch to satellite reception, select signal source "TV."
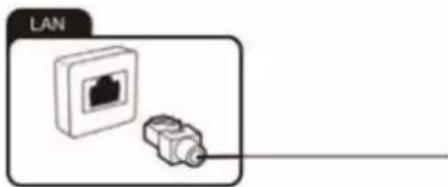
Connecting the network cable (LAN connection)

You can also establish an internet connection via WiFi.
Connect one end of the network cable (Cat. 5 or better) to the network port. Connect the other end of the network cable to a hub or router on your home network. The network cable is not supplied.
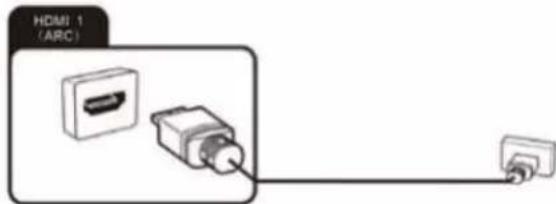
Connecting external equipment with HDMI interface
HDMI is the abbreviation for "High Definition Multimedia Interface" and allows the digital transmission of both audio and video signals over the same cable. This connection offers the best playback quality and is the right choice for fans of HD content.
you wish to connect an ARC-compatible HDMI device (e.g. a home cinema), you need to use socket HDMI 1. To transmit the audio via ARC you also have to enable the "ARC" option in "Setting", "System", "CEC".
-
Connect the output from a playback device, e.g. an HDMI-compliant computer or Blu-ray player, to one of the HDMI inputs on the TV. To do this, you will need an HDMI cable (not supplied).
-
In order to play the audio and video signal fed in from the external device on the TV, select the signal source as appropriate.
Connecting a PC
- Use an HDMI cable (not supplied) to connect the output from the graphics card of a PC or laptop to one of the HDMI inputs of the TV. This connection is used to transfer the video and audio from the PC to the TV set.
- In order to play the audio and video signal fed in from the PC on the TV, select the signal source as appropriate.

Your PC must have an HDMI-compliant graphics card in order to connect to your TV set. It is not possible to connect a PC with an analogue (VGA) output.
Connecting a digital audio system
You can connect your TV set to a digital audio system (e.g. amplifier, home cinema).
- Connect the plug at the end of a coaxial audio cable (not supplied) to the Digital Audio Out connection on your TV set.
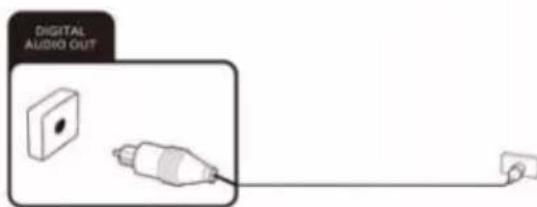
EN
- Connect the other end of the coaxial audio cable to the external device.
Connecting USB devices
Your TV set has USB 2.0 ports to which you can connect appropriate mass storage devices (e.g. USB sticks, USB hard drives, smartphones). You can then play back multimedia files from the USB mass storage devices (photos, videos, etc.).
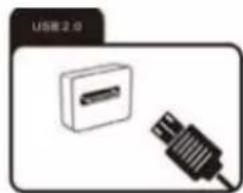

If you connect a USB keyboard, you can use it for input and cursor controls of the Smart TV functions.
CI card slot
If you have purchased a subscription for watching scrambled programmes with a Pay TV provider, you can insert the module with the Cl or Cl + card into this slot. For more information, please read the documentation supplied with your Cl card.
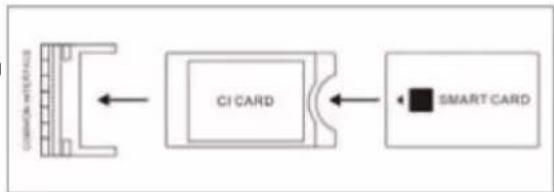

Caution! Switch your TV set off before inserting or removing the CI module. Otherwise you could damage the module or the TV set.
Inserting the CI card
Insert the module with the Cl or Cl + card into the Cl card slot. Make sure it is the right way around.
Removing the CI card
To remove the Cl card, carefully pull it out of the Cl card slot.
The CI/CI+ module is initialised after you switch the TV set on. This may take a little while. You should then be able to view the scrambled channels. If this is not the case, consult your Pay TV provider to check that the signal has been enabled for you.
The "CI Information" menu lets you select the CI/CI+ module detected and adjust further settings.
Connecting an external device with AV output
Connect external devices (e.g. camcorder, gaming console) via the AV Input jack directly to your TV by using the cinch standard (red, white and yellow).
- Connect the Mini AV cable supplied to the socket.
- Connect the external device to the sockets of the same colour on the Mini AV cable, using a conventional AV cable if required (not supplied).
- In order to play the audio and video signal fed in from the external device on the TV, select the signal source "AV".
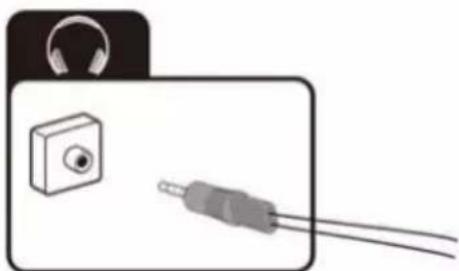
Connecting headphones
You can connect headphones or an analogue playback device (e.g. analogue audio amplifier) to the socket marked with a headphones symbol. Use an audio cable with a 3.5mm jack-type plug.
Getting started
Turn on and off the TV
Turn on the TV
Plug the power cord into a suitable power point, then press the POWER (U) button, under the TV panel or on the remote control, (making sure to aim it at the sensor at the front of the TV).
Turn off the TV
Press the button on the remote control to enter standby mode. To power down the TV completely, unplug the power cord from the mains socket.
Notes:
If you press and hold the Power button or U standby button on the remote control for short period of time, the TV will go into fully standby mode. When it is powering on again, the TV will start from the original power on procedure.

If no input signal is available (no TV reception or no playback from external devices) the message "Weak or no signal" appears. It is also possible that the screen stays dark or displays noise.
Usage
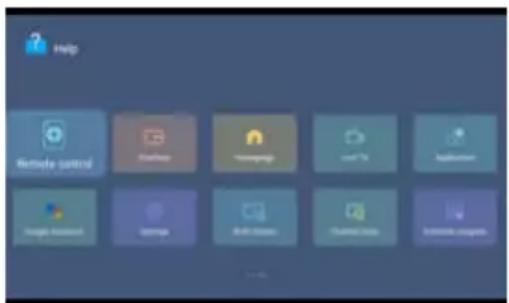
Help function
The Help function offers a lot of information about your TV operation.
- Press the Home button on the remote control. Select Apps icon from the options
- Select 'Help' from the options- Select the desired Help topic. You can use the arrow and OK buttons to make a selection.
Please refer to the help on the TV for details.
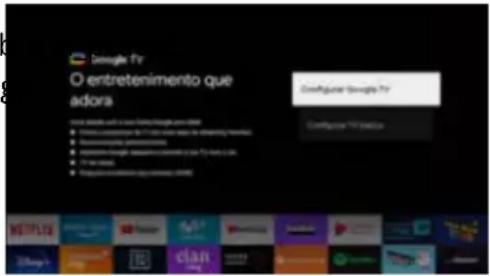
First install guide
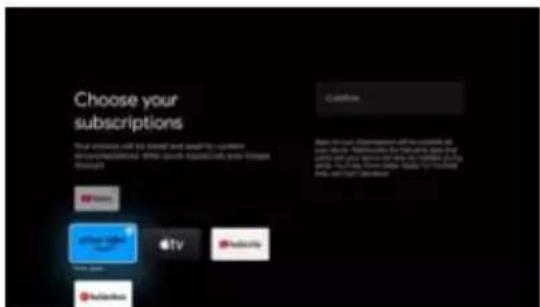
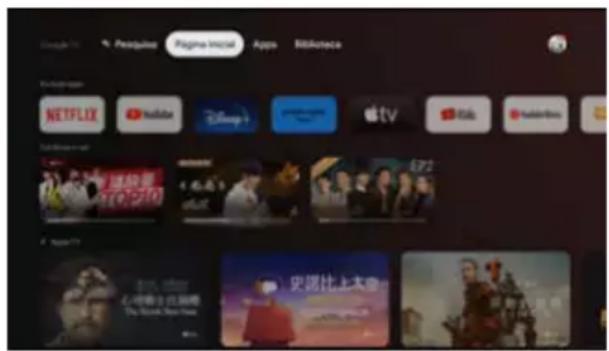
When turning the TV on for the frst time, the Welcome screen will appear. Use the and OK buttons to navigate the following options.
1. Language and Location
Select your menu language, and select your country/ region from the list.
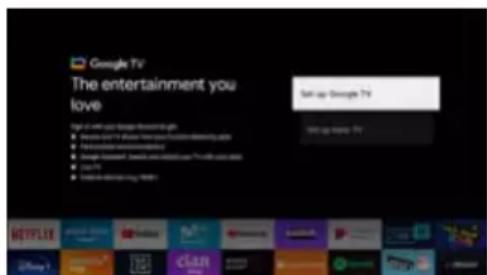
Sign in to your Google account here. If you use Gmail, you already have a Google account.
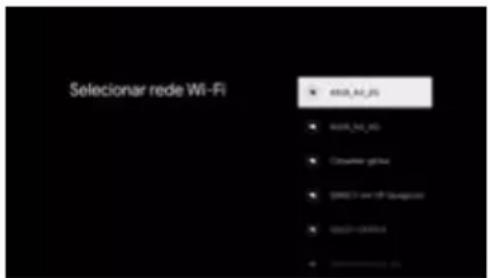
3. Select Wi-Fi network
Your Google TV will automatically scan for wireless networks nearby. Ensure the TV is within range of your wireless modem or router, and have your password handy. Follow the prompts to input your password and connect your TV to your selected network.
If you'd prefer to connect an Ethernet cable to connect to the internet, simply insert the cable (not supplied) to the LAN' input port at the back of the TV, and ensure that it is correctly connected to the internet.
Connect to Wi-Fi by selecting your network and entering your password. A broadband internet connection is required for this step.
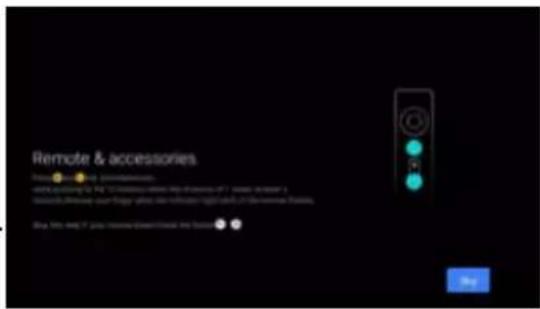
Your Google TV remote control has bluetooth capabilities.
Follow the onscreen prompts to pair the remote with the TV, holding the -Volume and Back buttons simultaneously. Your remote's LED light will flash while pairing, and the TV will display 'Remote control paired' when successful. This will allow you to use voice commands with your remote via the Google Assistant button.
Set a default password.
The home mode' is optimized for efficient usage for home use. The 'retail mode' is optimized for store Demo with fixed settings.
Pairing your bluetooth remote control
remote's Google Assistant voice control function
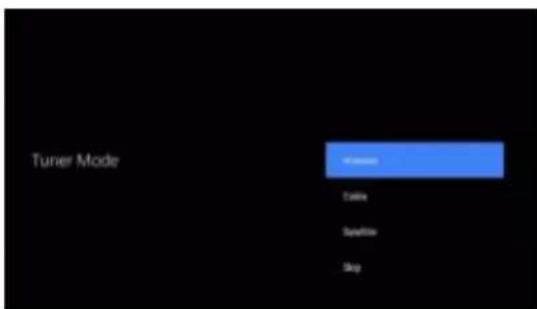
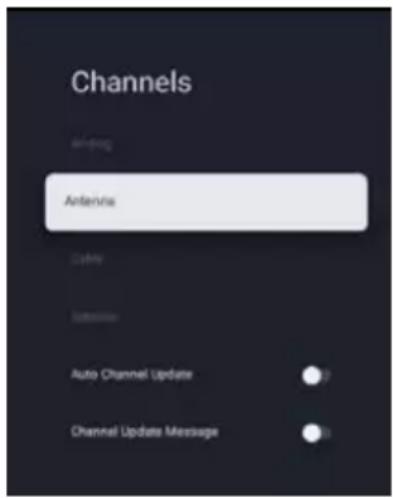
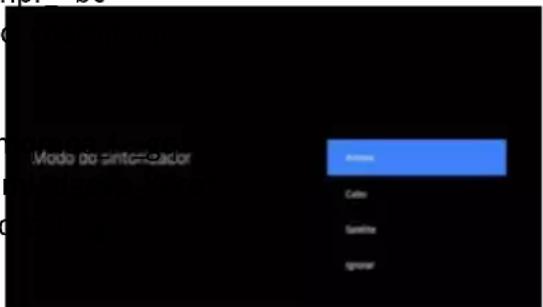
Following these options, the Tuner Mode screen will appear. Ensure you have an antenna cable connected to the 'ANT' input port at the back of the TV. User can choose between Antenna, Cable and Satellite.
The auto tuning function will search for and save all available free-to-air TV channels. After confirming your settings the process will automatically begin. The number of searched channels will be displayed on the screen.
Note: This pairing method only supports the original remote control and the TV, and does not support the remote control made by other manufacturers.
Figures and illustrations are provided for reference only and may differ from actual product appearance.
Chromecast built-in always available
Let this device be detected as a Google Cast device and allow Google Assistant and other services to wake this device up to respond to Cast commands, even when on standby and the screen is off.
Launcher
Press button to open the main interface.
Channel scan
This section describes how to search and store channels automatically. This may be done in any of the cases below:
- you have skipped the channel installation step in the initial setup;
- you are prompted that there are no channels in TV mode;
- you want to update channels list.
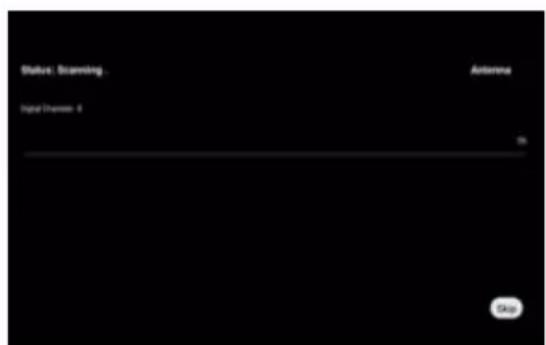
Channel search in Antenna mode
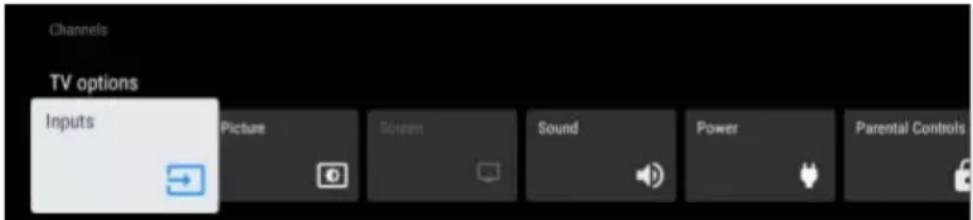
- Press buttons to open the "TV options" menu.
- Press < and > arrow buttons on the remote control, select the "Settings" option and press OK buttons to display the "Settings" submenu.
- Press and arrow buttons on the remote control, select the "Channels & Inputs" option and press OK buttons to display
- When user click on Channel Scan, the auto scan will be started. The page is displayed as below.
EN
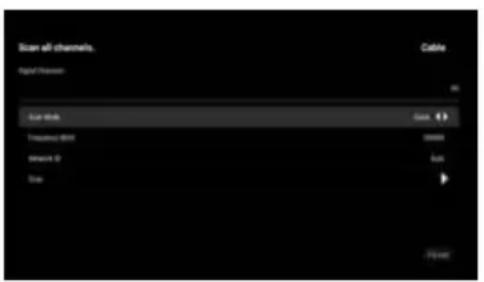
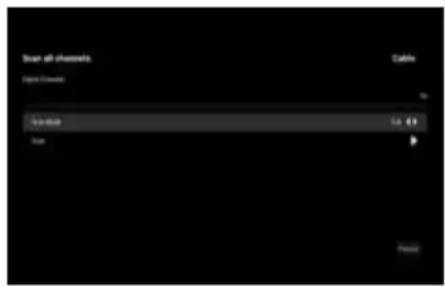
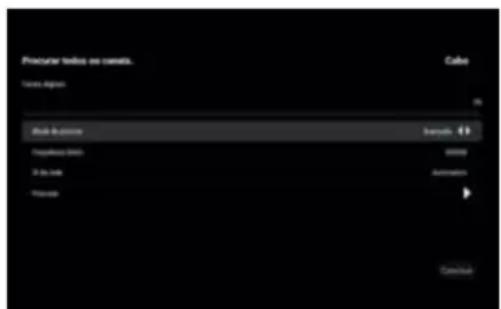
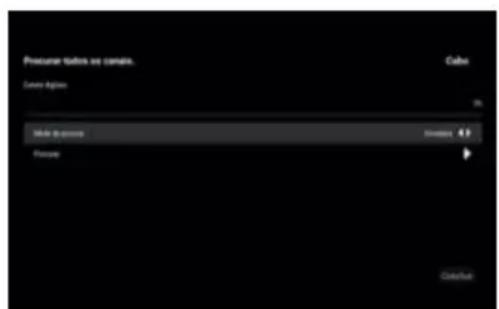
Channel search in Cable mode
a) Please make sure that the correct operator parameters are set before searching the channel. You can get them from the member of operator. After finishing setting Frequency and Network ID, focus on Scan Item and press OK buttons to start scan.
b) If we don't have operator to choose, Set Scan Mode to Full, change focus on Scan, and then press OK buttons to start scan. It will do full scanning of digital and analog channels. As shown:
(a-1) (b-1)
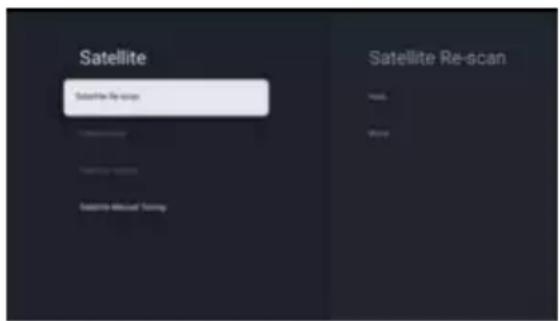
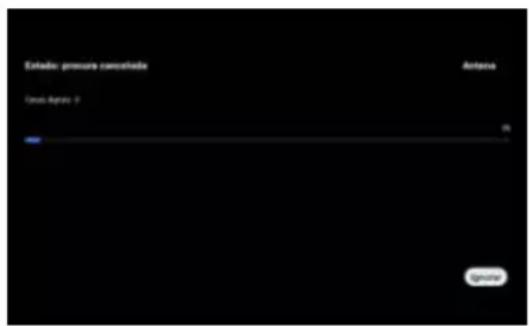
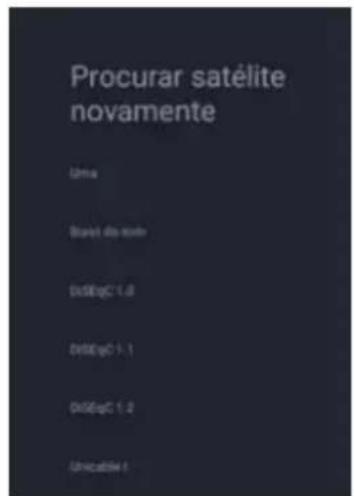
Channel search in Satellite mode
Press > arrow buttons Channels Satellite Re-scan Next, one operator. Ashown:
Some default satellites will be showing. Select Next to start scan.
Note:
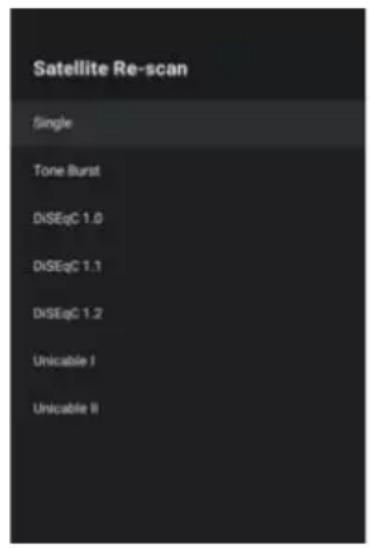
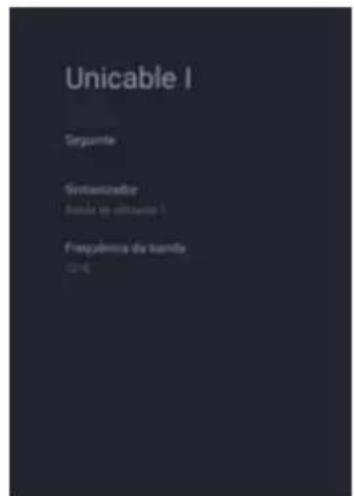
Steps to search for channels by Unicable: open the option menu, select Satellite Re-scan->More->Unicable I or Unicable II. Set correct Tuner and Frequency parameters, then select Next and corresponding satellite, then start searching. For Tuner and Frequency, please consult the Unicable equipment supplier.


Satellite Add
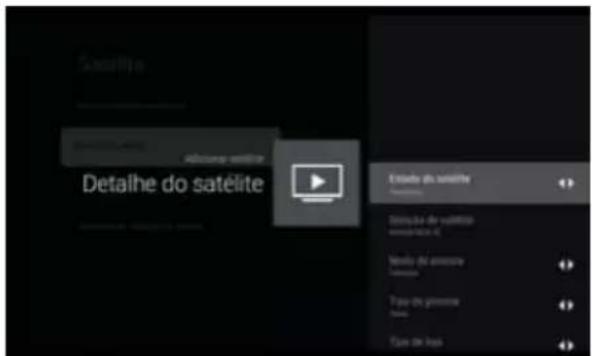
Satellite Add is used to add a satellite in the database.
The Satellite Add option is not selectable by default. The user needs to go to Satellite Re-scan More to select the satellite device type, then return to the Channels page, select Satellite Add to add a satellite, Press OK buttons to set detail info for satellite.
Satellite Status: This item is not allowed to modify when user select Preferred satellite, but allowed in General satellite. This is used to set the Status (on, off) of the selected satellite.
Satellite Selection: Cannot be set by user
Scan Mode: Press the < and > arrow buttons to select the scan mode. (Network/Full)
Scan Type: Scans for all active broadcast station channels and stores them in the TV. (All/Only Encrypted Channels/ Only Free Channels.
Store Type: Press the < and > arrow buttons to select the Store type. (All/Only Digital Channels/ Only Radio Channels)
LNB Configurations
- LNB Power: User can set LNB power state to on or off.
- LNB Frequency: One parameter of satellite, the some specific values (Universal, 5150 5750 etc.) are provided for user to select by pressing "enter" key.
- Tone 22KHz: This item is used to Tone 22Khz parameter of satellite, it is allowed to edit only when the LNB Frequency value select 5150 value and below items value.
EN
Transponder: This item includes 3 sub items named Frequency, Symbol Rate and Polarization. User can modify these values by input manual (Frequency, Symbol Rate) or pressing. "enter" key (Polarization).
Signal Quality: The value between 0 and 100 means current Signal Quality.
Signal Level: The value between 0 and 100 means current Signal Level.
Satellite Manual Tuning
Satellite Manual Tuning is similar to Single RF Scan of Antenna. It is used to scan only one satellite by setting the Transponder of selected satellite. In this condition of scanning, user is only allowed to modify Transponder, other items are disabled.
Editing Channels
Swapping channels
This option is only available when LCN is off.
To swap two channels, we can use channel swap function.
- Press buttons to open the "TV options" menu.
- Press throw buttons on the
- Press arrow buttons on the remote control, select the "Channel Management"
- Press and arrow buttons on the remote control, select the "Channel Swap" option and press OK buttons to display the "Channel Swap" page.
- Press and arrow buttons on the remote control and press OK buttons to select two channels which you want to swap.
Skipping channels
- In the "Channel Management" submenu, press and arrow buttons on the remote control,
- Press OK buttons on the remote control to mark it. An icon appears next to the channel name.
- From now on, when switching channels, this channel will be skipped. To make the channel available again for normal channel switching, repeat the above steps.
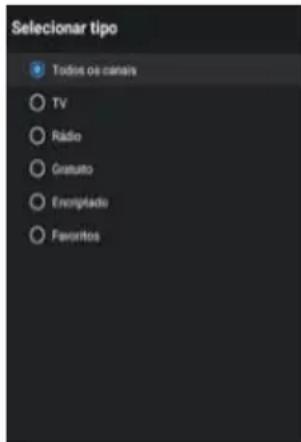
Channel list
These days, the range of TV channels is so massive that the Channel list normally contains several hundred channels. It is often difficult or time-consuming to find a specific channel. The search function makes it easier for you to find a specific channel:

and arrow buttons and OK buttons. An input Dialog will display on
Enter channel number or channel name, highlight the confirmation icon, and then press OK buttons. TV will find out the channels.
and arrow buttons and OK buttons.
Press and arrow buttons on the remote control, select the item and press OK buttons, this page will return to channel list and the channel will list as the order you select.
page will return to channel list and the channel will list by the filter you select.

(5)()
Defining favorite channels
This is how to add channels to the Favorites list or remove them:
- 3.
EN
Connecting Google Home to the TV
- On the homepage of the mobile phone, open Google Home application
- Select the corresponding Device name in the devices list.
- Click "cast my screen"
- Choose "Cast screen"
- Click "Start now" to confirm again
Share photos, music and videos to TV
- Open the video, photo album, music and other applications on your mobile phone, find and click the key
- Select the corresponding Device name in the pop-up list.
- By the handheld device, select photos, music, and video to play and then share them on the TV.
How to use the multi-screen interactive function
- Connect the TV and mobile phone to the same network.
- Open the Multi-ScreenShare application on the TV, find the Machine name, and press the OK button key to select Android or IOS according to your mobile phone type;
- Open the video playback application on the mobile phone by Android, there will be the following keys in the video interface, click the key. After clicking, the available TV names in the current network will pop up, click the TV name prompted in the Multi-ScreenShare application to share it to the TV;
- By IOS, open the control center on the mobile phone, click Screen mirroring, the mobile phone will pop up the devices available on the current network, click the TV name prompted in the Multi-ScreenShare application to share it to the TV.

Some of the above signal sources open chargeable online streaming services. Further information on subscriptions and prices can be found on the relevant provider websites.
Using EPG (Electronic Program Guide)
EPG is an on-screen guide that displays scheduled digital TV program. You can navigate, select and view programs.
Note: The DTV EPG does not require an internet connection.
- To use the DTV EPG, Press EPG button on the remote control, the Program Guide menu will appear, which allows you to get information about the current or future program playing on each channel. Navigate through the different programs using the arrow buttons on the remote
control.
- Use the related color buttons shown at the bottom of the screen to view EPG.
- It might have no information to be displayed. Please change channel first and TV can get proper EPG information from TV signal when the channel is on.
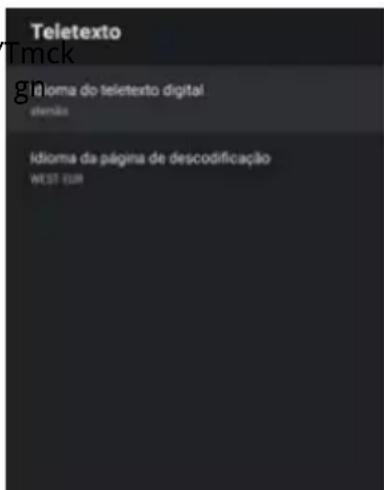
Teletext
Teletext is a one-way, or non-interactive, system for transmission of text and graphics via broadcasting or cable for display on a television set. A decoder or microchip resident in the TV set is needed to extract the teletext information.
Teletext can be transmitted over one-way cable or over-the-air broadcasting via radio or television. In the case of TV, it can occupy a full channel or be encoded in the vertical blanking interval, or VBL.
Teletext Information
Teletext is a text (level 1.5) data which is carried in digital DVBT and analog network. The original concept is an electronic magazine based on current service (program, channel) broadcasted from headed.
Normally the Teletext stream is always open and is caching pages when service is started; in other words Teletext engine is always running when video is started; even the Teletext AP is hidden, the Teletext engine is running.
button to display the Teletext.
Exit: Press the EXIT button exit Teletext.
Note: When current channel does not have Teletext, a toast will show the message "No Teletext" as a reminder.
Details:
- Digital Teletext Language: It's designed to show the initial page number of teletext, which means different selection leads to different initial page number.
- Decoding Page Language: You can select a font to your own preference, and the teletext page will show in corresponding font style.
HbbTV
HbbTV (Hybrid broadcast broadband TV) is a service offered by certain broadcasters and available only on some digital TV channels. HbbTV delivers interactive television over broadband Intem et.
These interactive features are added to and enrich the normal digital programs, and include services such as digital teletext, electronic program guide, games, voting, specific information related to the current program, interactive advertising, information magazines, catch-up TV, etc. To use HbbTV please ensure your TV is connected to Internet and HbbTV is switched on.
There are some HBBTV settings, you can check them via"Enter Menu key > Select Advanced Options > HBBTV Settings".
Details:
HBBTV Support: It's used to control the HBBTV function.
Do Not Track/Cookie Settings/Persistent Storage/Block Tracking Sites/Device ID/Reset Device ID: These are all HBBTV browser settings.
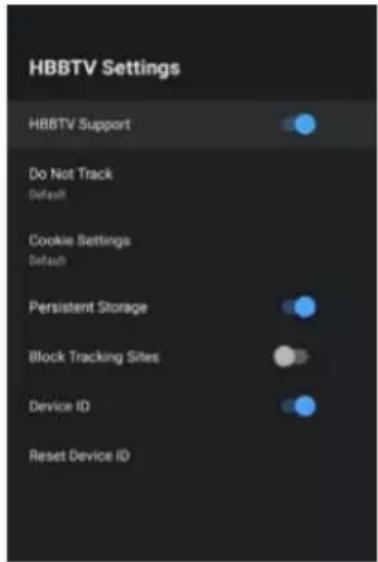

Your TV set requires an internet connection for HbbTV services to work.
HDMI1, HDMI2 or HDMI3 signal source
Caution: Power your TV set and the external device you wish to connect off before connecting the cables, otherwise you could damage the devices.
You can connect up to HDMI devices to your TV set. HDMI is the abbreviation for "High Definition Multimedia Interface" and allows the digital transmission of both audio and video signals over the same cable.
The HDMI1 port also supports the ARC function, which provides the option of Settings-->Channels &
- Connect the external device to the TV set using a conventional HDMI cable (not supplied).

Please note that the cable must be compatible for the desired application. For instance, use a cable of version 1.4 for ARC CEC or a cable of version 2.0 for Ultra HD.
EN
- Open the Live TV App, Press the Source button to display the signal source selection menu. select the signal source you require, HDMI1 , HDMI2 or HDMI3 , and confirm by pressing the OK button .
- Start playback on the connected device.
Using the TV set as a PC monitor

Your PC must have an HDMI-compliant graphics card in order to connect to your TV set. It is not possible to connect a PC with an analogue (VGA) output.

Caution: Power your TV set and the PC off before connecting the cables, otherwise you could damage the devices.
Connect the output from the graphics card of your PC with one of the HDMI ports on the TV. To do this, you will need an HDMI cable (not supplied).
AV signal source
You can connect a device with AV output (e.g. an analogue video camera, a video recorder) to your TV set.

Caution: Power your TV set and the external device you wish to connect off before connecting the cables, otherwise you could damage the devices.
- Connect the Mini AV cable supplied to the socket..
- Connect the external device to the sockets of the same colour on the Mini AV cable, using a conventional AV cable if required (not supplied).
- Open the Live TV App, Press the Source button to display the signal source selection menu. Press the arrow buttons, select AV item and press the OK button.
- Start playback on the connected device.
You can connect compatible USB devices to your TV set in order to play back supported multimedia files (e.g. photos, music) stored on the USB devices.
press the home key to enter the home page and select the Media Player application. Above, there are options to filter by file type. Below, you can see the selected folder on the USB mass storage device (initially, you can only see the root folder of the device itself)


You do not necessarily need to power off your TV set to connect or disconnect a USB mass storage device.
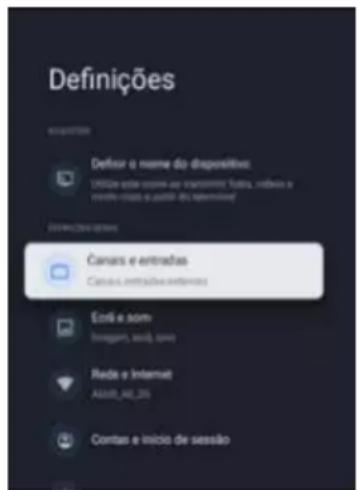
TV Options
Your TV has various menus which you can use to adapt the TV set to your individual requirements. You can press the button icon on home screen to access the Settings Menu.
Power
- Sleep Timer: Set the sleep timer to automatically turn the TV off within a specified time.
- Picture off: When you select this option, the screen will not display the picture. You can only listen the audio. Press any button except the button, Volume [+/-] buttons and button to restore operation.
- Switch-Off Timer: Set the timer to automatically turn the TV off within a specified time.
Auto Sleep:
Parental Controls: The Parental Controls setting allows you to block content that is not appropriate for children to watch.
Advanced Options
- Subtitle: You can activate or deactivate the display of subtitles here. Not all programmes are broadcast with subtitles.
- Teletext: You could set Teletext language.
Blue Mute: Control Blue Mute on/off. The screen become blue at no signal state if you turned on Blue Mute.
- No Signal Auto Power Off: You can set how long after no signal, the TV will automatically shut down.
- Default Channel: Set the default boot channel
- HBBTV Settings: You can activate or deactivate the HBBTV Settings functions.
System Information: Display system information
- Open Source Licenses: Click to read the Licenses details.
Settings
Inputs: You can see the state of devices that the TV connected:
Consumer Electronic Control (CEC)
- HDMI control: Allow the TV to control HDMI devices.
Device auto power off: Power off HDMI devices with the TV.
- TV auto power on: Power on the TV with HDMI device.
Notes:
- HDMI cables must be used to connect HDMI CEC-compatible devices to your TV.
- The HDMI CEC feature of the connected device must be turned on.
- If you connect an HDMI device that is not HDMI CEC-compatible, all the HDMI-CEC Control features do not work.
-
Depending on the connected HDMI device, the HDMI-CEC Control feature may not work.
-
CEC Device List: You will see the CEC device list if the TV access CEC device.
Display & Sound
Picture
Picture Mode: If you'd like to configure the settings for your picture, then there are seven types of picture modes available.
- Backlight: Adjust Local Dimming, Backlight Level, Automatic Light Sensor and Minimum Backlight to change the overall brightness of the screen.
EN
Sound
Sound style:
- Surround Sound:
- Speaker Delay : s External Audio System.
Auto Volume Control:
- Downmix Mode: Enable downmix, Convert multi-channel audio into two-channel audio.
- Dolby Audio Processing: Set Dolby sound On/Off.
- Reset to Default: Reset current audio settings to factory mode.
Audio Output
Network & Internet:
- Wi-Fi: Turn on the Wi-Fi to access the Internet via a wireless network connection. Select an available network, press OK buttons to confirm. A screen will appear prompting you to enter the password if necessary.
See all: Press OK buttons to view all available network or fewer.
Other options
- Add new network: You can add wireless network.
- Scanning always available: Check to scan for networks even when Wi-Fi is turned off.
Ethernet
- Not connected: Show whether the Ethernet is connected.
- Proxy settings: You can set the proxy server.
- IP settings: Configure the IP setting for your network connection.
Wake config
- Wow: Wake on wireless network.
- Wol: Wake up the wired network.
Accounts & Sign In: Make the most of your TV. Choose account type and sign in to get new apps, recommendations movies and more.
Privacy:
Apps: You can view details about an app or other item listed. The information and controls available vary among different types of apps.
System:
Date & time: User can select this item to set time related items of TV device, include Automatic date & time, Set date, Set time, Set time zone, Use 24-hour format. When Automatic date & time is set to "Use network-provided time", Set date and Set time.
Automatic date & time: Use network-provided time. You can also set the current time manually when Off is selected.
- Set date: Set the date.
- Set time: Set the time.
- Set time zone: Select your time zone.
- Use 24-hour format: Set the time to display in a 12 or 24-hour format.
Language: Adjust the default Language settings for the TV.
Keyboard: Adjust the default settings for the keyboard.
Storage: Used to display TV storage information. Device storage show current data info in system internal shared storage, removed storage show removable device storage information.
Ambient mode:
Power & Energy:
Cast:
System sounds:
Retail Mode: Retail Mode is used to set the mall mode, the user can open the mall mode and set which content is to be demonstrated in the mode, and the location of the presentation content. This includes the built-in APP information of the TV or a preset video file.
Remotes & Accessories: To connect your remote through Bluetooth, before pairing your Bluetooth devices, make sure they're in pairing mode.
Specification
Note: Some specifications may different regions or models, and please take your actual as the standard.
Specification
Country restrictions
This device is intended or household and/or office use in all EU countries (and other countries where the corresponding EU guideline is in place) without any restrictions excluding the countries listed below.
| Country Restriction | |
| Bulgaria General permit | permit for outdoor use and use in public facilities |
| France Use in closed spaces only for 2454-2483.5 MHz. |
| Italy A general permit is required for use outside of private spaces. |
| Greece Use in closed spaces only for 5470-5725 MHz. |
| Luxembourg General | permit for network and service offers (not for spectrum) |
| Norway Broadcasting | radio waves is not permitted in a geographic radius of 20 km around the center of Ny-Ålesund. |
| Russian Federation Use in closed spaces only permitted |
The regulations of individual countries are subject to change at any time. It is recommended that the user make an inquiry to the relevant agencies about the current stand of national regulations for 2.4 GHz and 5 GHz WiFi.
Rfc bctgac amk njgcqugf PDoncagta_rml uflcr fc bctgac sqcb_r0. ak dmkwsp'mbow Qeeecqcbupgg e Kcrf mb8
?aambg e m? pgcjc/. &. 'ndBgcargc 0/.2-31-CS*rf c n ai eg qf mu qrf_r rfg bpncosgnk cl r u gj cqshar mmpk cpompargn qufcl nj_acb m rfck_picrg @jegsk @C*@je_pg @E*ffc Axcaf Pcns jga&AX*Bcl k_p i I*Ecpk_lwBC*Cqmlg @C*@cj_l b8C*Epcac @J*Qn_g @CQ* DpIac @P*Apmrg @P*G_jw@AwnpsqAW*J_rtg T't*gfs_lg R't*svck *mspe&S* Fsle_pw&S*K_jr_&KR' Lcrpf CJl bqJ**sqrg @R*Nmj_lb&J**Nmpse_j@R*Pmk_lg @M* Qmtclg @G*Qmt ig @Q'Dgj_l b@G*Qucbcl @C*rf c Sgcbl Ig ebmk &I&G*Rpi cW@P* Lmu_w&M*Qguxcpj_l b&AF*Gacj_l b8Q*Ibjl gafrcI qrcg &G.RfcUJ?Ldlargnh dpnf gjbctgac gipompargbr mg bmnpsc mjiwufl mncp rg e frc 3/3. rm313. KFxqcoscl awpIec,
Troubleshooting
Before contact the service technician, perform the following simple checks. If any program still persists, unplug the TV and calling for serving.
| PROBLEM POSSIBLE SOLUTION |
| No sound and picture | - Check whether the main plug has been connected to a wall outlet.
- Check whether you have pressed the POWER button on TV set.
- Check the picture contrast and brightness settings. |
| Normal picture but no sound | - Check the volume.
- Sound muted? Press the MUTE button.
- Try another channel, the problem may be with the broadcast.
- Are the audio cables installed properly? |
| The remote control does not work | - Check to see if there is any object between the product and remote control causing obstruction.
- Are batteries installed with correct polarity (+ to +, - to -)?
- Correct remote operating mode set: TV, VCR etc.?
- Install new batteries. |
| Power is suddenly turned off | - Is the sleep timer set?
- Check the power control settings. Power interrupted.
- No broadcast on station tuned with auto activated. |
| Picture appears slowly after switching on | - This is normal; the image is muted during the product startup process. Please contact your service center, if the picture has not appeared after five minutes. |
| No or poor color or poor picture | - Adjust the color in menu option.
- Keep a sufficient distance between the product and the VCR.
- Try another channel, the problem may be with the broadcast.
- Are the VIDEO cables installed properly?
- Activate any function to restore the brightness of the picture. |
| Horizontal/vertical bars or picture shaking | - Check for local interference such as an electrical appliance or power tool. |
| The TV is not receiving all channels. | - Confirm that the coaxial cable is securely connected to the TV.
- If you are using an antenna, verify it is positioned correctly and if all the connections are secured. |
| Poor reception on some channels | - Station or cable product experiencing problems. Tune to another station.
- Station signal is weak, reorient antenna to receive weaker station.
- Check for sources of possible interference. |
| No output from one of the speakers | - Adjust balance in menu option. |
| The TV audio is not being played through the receiver. | - Connect an optical cable to the TV and the receiver.
- ARC enables digital sound to be outputted via the HDMI (ARC) port. However, ARC is only available when the TV is connected to an audio receiver that supports ARC. |
| The wireless network connection failed. | - Make sure the Network Connection is set to Wireless.
- Make sure the TV is connected to a wireless IP router. |
| The software update over the Internet has failed. | - Check the network connection status.
- If the TV is not connected to a network, connect to a network.
- The upgrade stops if you already have the latest software version. |
| No picture when connecting HDMI | - If an HDMI cable doesn't support High Speed HDMI, it can cause flickers or no screen display. In this case use the latest cables that support High Speed HDMI. |
Maintenance
Early malfunctions can be prevented. Careful and regular cleaning can extend the amount of time you will have your new TV. Be sure to turn the power off and unplug the power cord before you begin any cleaning.
Cleaning the screen
- Here's a great way to keep the dust off your screen for a while. Wet a soft cloth in a mixture of lukewarm water and a little fabric softener or dish washing detergent. Wring the cloth until it's almost dry, and then use it to wipe the screen.
- Make sure the excess water is off the screen, and then let it air-dry before you turn on your TV.
Cleaning the cabinet
To remove dirt or dust, wipe the cabinet with a soft, dry, lint-free cloth. Please be sure not to use a wet cloth.
Extended Absence

If you expect to leave your TV dormant for a long time (such as a vacation), it's a good idea to unplug the power cord to protect against possible damage from lightning or power surges.

The terms HDMI and HDMI
HARSHNESS MULTIMEDIA INTERPAC
High-Definition
Multimedia Interface, and the HDMI logo are trademarks of registered trademarks of HDMI Licensing LLC in the United States and other countries.

AUDIO
Manufactured under license from Dolby Laboratories. Dolby, Dolby Audio, and the double-D symbol are trademarks of Dolby Laboratories Licensing Corporation.
MRT 2. ED+3. 01A
EN
■KmsIrgle mUjj

ugrfrcujj
cl msef
gl qrpsargm1 q,
L mrc8
mduf gaf gqVII. k k,
Avertissement
CHER CLIENT :
RISQUE D'ÉLECTROCUTION NE PAS OUVRIR

AVERTISSEMENT:
POUR EVITER LES RISQUES D'ÉLECTROCUTION, NE RETIREZ PAS LE COUVERCLE (OU L'ARRIÈRE). AUCUNE PIECE À L'INTERIEUR NE POT ÉTRE REPARÉE PAR L'UTILISATEUR. CONFIEZ TOUT ENTRETION À UN PERSONNEL TECHNIQUE QUALIFIÉ.

Channel scan (Balayage Chaines)
Teletext (Teletekst)
TV Options (TV-opties)
Pairing your bluetooth remote control
remote's Google Assistant voice control function
Satellite Add (Dodawanie satility)
Teletext (Teletekst)
Teletext (Televideo)
t cpgdga_pqgqamqqc cjrrpgaf c,
qnnmprm_j am np ppm
bggl qjxgnh c,
| | sqm |
| Tgrc | Bg k crp&k " C" | K 4 | K 4 |
| Npmdml bg & k ' B | K _opg k m | 23 | 23 |
| k gl | 23 | 23 |
| Os_l rgrP | 0 | 0 |
| ? ( @ A | | 0..(0..(0.. |
Lmr_8
/,Jcckk_eggmonjmbgnptpkclrm
0,Ncpgrcjcgtgmg am rcpk g_jgtcpmn_prc*cnpj_qagpc qn_xgmqdtaglrc ncpjsrgxmbcgrcpk g_jg I cacpqpgmsI bgrI xgmpc g nj_qra_g qck c_ agqsl_tgc ncpdqplgc g opnnmnm_n_prc,: sl nganjm ngqrma tmj_asg_jrcxx_ ≥ 1 k k,
Advertencia
ESTIMADO CLIENTE:
Skipping channels (Saltar canal)
Teletext (Teletexto)
Colocar as pilhas no telecomando
Aml cvTmbc bgqnmqgrg mqS Q@
Qcs_n_pcjf mbc RT rck nmp_qSQ@0.. Pqos_ggtmaxnmbc am car_p
bgnnmrg mqbc pk xcl k clrmck k _nnpmg bnm &pcvc
k njm*ncl bpgt cq*bgqamqpaegbmqSQ@*qk _prnf ml cq', TmaX nmbc*
clrTmnpmbxgpposg mqksjrg dog bc bgnnmggt mqbc
_pk_xcl_k clrmck k_qq_SQ@&mmptdocmptcra',

Qtmax amicar_psk rcaj_bmsQ@nmbcpE sq-jmn_p_gqppc aml rpmj_pmaspqmpb_qsl Ykcqb_Qk_pr RT,
Qm n_p_a_pTmAG
Qtmax_bosgssk_qp_rsp_n_p_qgrp_nprep_k_qambga_bmqank
sk nptcbrpbc RT n_e_*nntbc g qppmk zbsjmank ma_prTm
AGns AGI cqc qim, N_p_mrcpk_gig dmck_Ykccjcg
bnask clr_YTmdnpcag_amk ma_pTm=AG


Asgb_bmbCqjgsc mcsrcjctgmp_1rcqbcgoppns
ck mcp mk zbsjm AGA_qm am rpegnt max nmbc
b_l gdga_pmk zbsjmms m_n_pjf mbc RT,
$ qcpTmbma_prTmAG
/,Ggmkzbsjmank ma_pTmAGns AGI mojmbrbc a_pTmAGApgrgosc+pc oscΦm
a_k g f macpm,
Pck mYTmbma_ prTmAG
/,N_p_pckmtcpma_pTmAgnsvc+masb_bmq_kclrcn_p_dnp_bmojmbca_pTmAG
Mk ZbsjmAGAGΦg gag jg_bmbcnngqbc jg_pm_n_pjf mbc RT, Gqmnmbc bck mp psk nmsamTmax
bctcclrTmcpa_n_xbctgps_jgs_pmqa_l_giambgbnbrQccrcI Tmdhpma_qntfAm cjs npntcbnp bcRT n_e_n_p_tcpga_poc mod_jdngf `gig_bmn_p_tmax,
Mk cls Gdnp_YkcqAGncpk gc qjcagnt_pmk ZbsjmAGAg bcrcar_bmc hsqr_pnsrp qam desp Ykcq
Am cvTmbcsk bgnmogg mcvrcp mank q db_?T
Amicarcbgnnmgtmqcvrcp mqampvck njntdk_bmp* aml qmjc bc hmemq nmpk cgmbmaml carmpbc
?Tbgcr_kclrcPc_RTsqlbmmn_bptmagaf&cpckcjf m
`pI amc_k_pcjm',
PT
/,Aml carc ma_mK gl g? T dmpl cagbm_mqmoscrc,
0, Aml carc mbgqnmoqgrt mcvrpl m_mqqmosrcpck mK gl g? T\*sq_1 bmsk a_m? T aml tcl agmlqj I cacqqEpgm&I Tmdmpl cagbm',
1. N_p_pnpnprbsxgmoj_jbc Esbgnc tdcm_jg cl r_bmbbgnmagg mcvrcp ml _ RT*qjcagn c_dml rc bc qgl j @ T3/4, dml rc bc qgl j%
Aml car_l bmdml cqbc MST gbm
Tmax nmbc am car_pdh cqbc nstgbmns sk bgnmgg mbc pcnpmbsYTm I jzegam&cvck njmt_k njgta_bmpbc Esbgn_1 jzegam_monoscrk pa_bmank mdk 'njmbcsk dhc bc nstgbmsqscka_mbc Esbgn ansk njsescbmrgnhai bc 13kk,
Gagm
J ge_ pc bcqjge_ p_ RT
J ge_p
Tcpggosc qp_RT cq=lmk mbmbcc concp, Gppngel gga_ osc ma_ mbc_jg cl r_YTmbctc qcpamicar_bm sk_rmk_b_cjqpa ck dl aht_k clrmCk qcesg_*npqgncm m'mTmglge_ -bocjge_ Imbgnnngt mn m'mrTml manr pmpck mmn_p_jg_p_RT,
Bcqjge_p
N_p_bccjg_p_RT*npcoppn c m'mrTmgl g_Bccjg_1mbgnnggtmnnpoppnlcm'mrTml manl rpnjc pck nrc, L mr_q8
Qt max npc qgnt pc qes p pm mTmgl g_Bcgjgs m mTmbc cncp_1 manrnpjc pck mrnnmpsk aspm ncpambbc rck nmt RT cl rpE I mk mbmc concp_rml Os_l bmdnpge_b_1 mt_k clrc* RT gggpe bmnpacbgcl mmgg_j bc g gagjg_YTm

Qclfsk qj_jbc clrp_b_cqrgcpbgnnhcjc &ck pacnyTmbc RT ms qck pnpmbsyTmbc bgnmgtmqcvrcp m*_kclq.eck @p amms qck qj ^3 / 4 n_pac,R_k *K Phnnpctcj osc _ rcj_dosc cosp_msvg_pdom
Uso
?dsIYTm?Isb_mutpac k sg_qg dpk_Ykcqqm pc_mncpYTmb_qs_RT,
+Nocopgnc m`mTmfnkcl manirpnjc pck mmQjcagn c m amlc ms?nnql_qmnYkcq
+Qjcagn c? h b_1_qmnYkcq+Qjcagn c mrZngambc ? h b_ bcqch bmTmaXnmbsq.pmq 'mKcqbc qcr_cMI n_p_dxcp sk_qcjCYtm
Amqjrc_lsb_1_RT n_p_mrcpbcr_jfcq
? mjge_p_RT ncj_npgk cgp_t cx*_rcj(bcm_q+t gl t Sqc mqmrkq Cc MI n_p_I_t ce_pncj_qmnYkcq_qcesg
jgqr_
D_Y_jneg I_cP_amr_bm Emmejc_ogg,QctmaX sq_mE k_gj* rck sk_aml_r_bmEmpejc,
Emnejc RT nprasppe_srmk_rga_k cl rc_qpcbcqck dgm npzvkg_q Acprgdgosbeqosc_RT cqrch_bcl rpmbm ja_lacbmcs k nck ns pmrc_bmpck gmc rcl f_ qcl f_Pk Tm Qge_qgl qrpkykgl qcpgpqs_qcl f_c am car_pps_RT Ppcbc qjcagmlQbpncpdcpgpaml car_p sk a_mCrfc pcrn_p_qc am car_pPG rcpl cr* _qgl qcpgp ma_mTmdnpcapml_nmr bc cl rp_b_j? L-1_n_prc rp_qgp_b_RT ctcpgosc qc cj_cq= am car_b_amppcr_k cl rc PG rcpl cr,
Amcarc+qc_mU g+Dgocjcagm_1bm cpbc c bgg_1bmop_qlf_ Sk_aml cvTmbc gl rcpl cr `_1b_jpe_Φ lcacqEg n_p_cqcr_n_gqpcosgpcb dmprfqqrnc,
Qcs am npjc pck mmb_?1 bpgb RT rck pcas ppcqbc `jscmmrf, Qe_qg qpsYkql_rcj_n_p ck n_pcjf_pmam npjc pck mnm antk_RT*k_l rcl bmnpcogn_bnqmq'mkccq+Tmjsk c c Tmjr_pog sjr_l c_k clrc,?jsxJ CB bmops am npjc pck mmngpa_p bspl rc mck n_pcjf_k cl mc_RT cvg gE Ant npjc pck mnm ck n_pcjf_bmos_l bmdhp'ck +pacbgbmGpmncpk ggeosc
PT
tmaxsqank_1bmqbc tmxank manrnpjc pck mmnpk cgm bm`mrTmbmE mmejc ? qggqr_1 r,
Bcdgl _sk _qcl f _n_bpTm,
Mk mbmbc a_q- · -Amrgk gx_bmn_p_ sqmcdgagcl rc n_p_ sqmbmk qrgam, M-k mbmbc t pchm- · Amrgk gx_bmn k ml qrp_YTmbc jmh amk aml dgesp_YKcqavcb,
ck n_pcjf_k cl rmbmaml rpmjc pck mrm jscrrmmrf amk ?I bnp RT_rg_pE_dIYTmbc amrpnjc bc tmx bm Emnejc ?qqgqr_1 r bmaml rpmjc pck mrm
Qcesgl bmcqq_qmnYkcq* rcj_Rsl cpK mbc_n_pcacpE, qq
Acprgdgosc+qc bc rcpsk a_mbc_l rcl_aml car_bmPnpmr bc
cl rp_b? L R-I _ n_prc rp_qcgp_b_ RT, MsqsEpgmnmbc
cl rpc ?l rcl *A_- mc Q_rΦjgrc,
? dsl YTmbc qgl rml g_ srmk ërga sqa_ c q_jt_ rnbbr RT _cprmqbgqnml at cgq, Bcnmgqbc aml dgpk pqs_qamnpmacqqmamk cY_p̃_s rmk _rga_k cl rc, MI μk cpmbocqosgq_bmqqp̃=cvg`gbml _ rcj, 'gbml _ rcj_,
Lm_8Cqck Φmbbcck n_pcj_k cl rmpk n_rat cj_ncl_qamk maml rpjc pck mmmgeg_jc_RTcl Tm Φamk n_rat cj_amk maml rpmjc pck mrmbc msrpmqd_pga_l rcq,
?qdesp qcsqpYkccqTmdnp cag_q_ncl_qn_p_pcdpXl ag cnnbck bgtppb_n_pxl ag p_jbmnpbsrm Af pmk ca_qrgl rcep_bmqck npc bgqnml at cj
NpK gposc qrc bgnmgg mch bcrar_bmank msk bgnmgg mEmmejc A_qrc ncpk gposc mEmmejc
?qqgqrcl rc c msrpmqqcptgYmq
bcncpcc qrc bgnmgt mn_p pcnmbcp_mqank_l bmqbmEmmejc A_q*k cok mos_1 bmcqgt cpck k mbmbc cqnp_c_rcj_cqgt cpbcqjge_b_,
gag_bmp
Nacopn c m'mTm n_p_ppg grcpac npg agn j,
?qesp qcgspYkqlcck_ls_jqtm ncl_qn_p pdtplag cnnbck opbgptlrcqbmonmbsrnppc_g
T_ppcbs p_bca_l_j
Cqr_qcYTmbcqapct c amk mncqosgq_pc pk _xcl _pa_l _gq_srmk _rga_k cl rc, Gqqmnmbc qcpdgrck os_joscpsk bmqa_qmq `gvm8
- tmaXnsjms _ cr_n_bcg qr_j_YTmbma_l_jl_am desp_YTmg gggj9
- t maX Φ_t gq_bmbc osc | Tmf ≡ a_l_gql mk mbmRT9
- tmaxbcqch_rs_jg_p_jgr_bca_l_gq
Ncqos gq_ bc a_l_gql mk mbm? I rcl _
Nocognmcq'mkcq n_p_`gpmk c1s @WhYkcqcR 3 %
Npocgimc mq'mkqbc qcr_:c<lmamrnpjc pck mntgcjcagn c _mnyTmBcd gKcqncnpocgimc mq'mkqMn_p_cvg gpm os'kcls Bcd gKcq
Npcogn c mq'mkcqA cVImamrnpjc pck mmfocjcagntc
mrkcqMI n_p_ cvggpmqs`k cl s
Os_1 bmmssqEpmajg_pck T_pcbsp bc a_l_gt_t_pbrsp_smk Erga_qpcg gagb_,? nEeg_Φcvggb_am dmpk c_ `gym
Ncqos gq bc aI j I mk mba`m
Acprgosc+q bc osc mnn_pck crpqampcrmmbmnpbmpchk bcdg gnmI rcqbc nccpsg p ma_l_j,TmaX nmcb m'rxjmqank mk ck 'pmb_mncp_bmp, Bcnmgbc amajsg_am despYTmbc DcosX1 ag c @ bc pcbc*am acl npc+qI mgck bc bggr_jg_ YTmc npcoqnI cmq'mkcq Mn_p_g gagp_bgeg_jg_ YTm
'QlTmf nstcpsk mncp bmpn_p_cqanif cptbcdt_mK mmbc bgg_jg_YTmank mAmk njcmk sbcmdhamck Bgeg_jg_pcnpopgnic mkmcqMn_p_d ggp_bgg_jg_YTmCcdp t_pcbsp ank njcr_bca_l_gbgg_gic_1_jzegamrant dmck ck mnp_bm8
(a-1)
(b-1)
PT
Qcjcagml c mrgnmbc q_rΦjgrc c qcjcagml c mqa_l_gq
Npcqqgm q'mkqbc qcr_<,A_l_g Npmasp_p q_rΦjgrc I mt_k-elCkqcesg_f*tcpE_jesk_q mncp_bnp_q*qcjcagml c sk_mncp_bnp_8
?jesl qq.rqgcqn_bptmoppMcvggmoQjcagn c?t_lY_pnp_gagp_t_pbrsp,

Lmr8
N_qqmqn_p_ncqosgq_ta_l_gqnmpS I ga_jc8_p_ mk cl s bc mnYkcqqcjcagml c Q_rcjjgrc Pc+qa_SI ga_jc I mpSI ga_jcII & mt_t_mcbsp bc q_rqgc< K_gt< SI ga_jcI ms SI ga_jcII', BcdI_mq_n_pok crpqampparmbmg mI g_bmpc b_qcosXl agcjcagnic NzVgK mc mqrQgc ampcnmbclrc c amk cac_ncqsgq p N_p og mI g_bmpc dcosXl ag*ami ojrc mdpd cacbpmbmcosgn_k cl mSl ga_`jc,
? bgagml_pq_rΦjgrc
MQrcjgc?bb&bgnI_pqrqtgc'Φsq.bmn_p_bggn_I_psk q_rqtgc_m'_I ambcb_bmq
? mYTmQ rcjgc ? bb I TmΦcpjcagnt Etc cjnmpn_bptM Ms op EepmnpcagI gpn_p NcqpsgI pq_rqgc K_gn_p_qjcagnt_pmrgmbc bgnnmggtmbc q rqgc c*ck qcesgp*pmpd_pPn*eg_A_I_gp*qcjcagnt_p? bggnl_pq_rqgc n_p_bggt psk q rqgc*c npopgnh_pmq'mkcqMI n_p_bcdg ggd dmK_Ykcqbr_jf_b_qn_p_mq_rΦjgrc,
Cqr_bmbmq_rqgc8Cqrc gck | Tmnnbc qpk mgbbs_1 bmmsqs=pgnpjcagnt_mq_rqgc npdtgpmfk_qncpk gpml mq rqgc cepj, Cjc Qsq bmn_p bcgd gmar_rsqge_bmtbcqje_bmbmq_rqgc qjcagnt_bmQjcYTmbmq_rqgc8Tmnmbc qpcbcd gmncjmsqs=
K mbmbc npmas p_8K mbmbc bgeg_jgx_YTm&Nccogn c nq'mkcqbc qcr:c<n_p_qjcagml pmk mbmbgegr_jgx_YTm, &cbc - Amk njcrm'
Rgnmbc_1 Ejgc8D_x_t_pcbsp bc rmbmmaI_gjb_cq_YTmbc rp_l qk gqqTm_rgt_c mq(pk_xcl_1_RT, (Rmbmq? ncl_qa_laggnrmp_d_bnq? ncl_qa_l_gggtpcq)
Rgnmbc jnh_8Nqopnnc mq'mkqbc qcr::c<n_p_qjcagnh_pmRgnmbc j mh,_&sbm-? ncl_qa_l_gq bggegr_gq-? ncl_qa_l_gqbc p=bgm'
J L @Aml dges p_ rgml q
- 8MsqsEpgmnmbc bcdg gmcqr_bmbc_jgclr_YTmbmL @amk mge_bmmbcmqge_bm
DpcosXl ag JL@8Sk n_pck crpmbomq_rqgc* jesl qt_jmpcqconcacgannq&lgcpj*3/3.353.cra'qT mdnp cagpn_p_mspEppmcjcagnh_pnpccpgh_1bm_rcaj_|rcp
Rmk 00IFx8CqcrgckΦsqbmnpmnpckcmRnk 00Ifxbmqrjgc*Pncpk ggbmcbg_pqnclrcos_1bmmjmb_qcosXl ag bmL@qcjcagn_pmt_jmp3/3. cmt_jmpbnqgl q'_gym
RpIqk gcompPcacrrBCorc gck gajsg1 cspgcl qbcl mkg bmqDpcosXl agR_v(bc Qdk 'mjinqc Nmj_pgx_YTm, MsqEpmnnmbck mgbp_pcoppqt_jmpqk_l s_jk clrc @pcosXl agR_v(bc Qdk 'mjinm npccppnh_1bm _rcaj_cl rcp &Nmj_pgx_YTm',
PT
Os_jgb(bc bmqgl j8mt_jmpcl rpc . c / . . qgel gdga os_jgb(bc bmqgl j_rs_j, L at cj bmqgl _j8mt_jmpcl rpc . c / . . qgel gdga ml at cj bmqgl _j_rs_j,
?og rmlg_YTmk_l s_j bc q_rqgc Qpck cjf_lrc Pt_pbsp_PDul g_b_l rcl_, 'sq_b_n_p_dxcp_t_pcbsp_ bc_ncl_qsk q_rqgc*bcdl g bmmRpI onmi bcpbmq_rqgc qjcagnl_bmL coa ambgTmbct_pcbsp*ms copgmoq rck ncpk gpTmn_p_k mbga_pmRpI onmi bcpmsrmpgl qqTmbcq_gg_bmq
CbgYTmbc aI_gq
Rpma bc a1_gq
Cqr_mnYTmcqE bgnml acj_ncl_qos_l bmml AL cqr bcqge_bm
N_p_rma_pbmga_l_gfmbck mqs_q_p_dI YTmbcrma_bca_l_j,
pck mrm*
qjcagnc_mnYTm@bsj_pA_l_j34cnpocgnchmcq'mkckqMI n_p_cvg gP_nEeg_
0, Npqrnc m'mTmMl mamrpnjc pck mnn_p_k_pa=jmSk amc_n_pcac npvkg m ml mk c bmaI j, 1, ? n_prpbc_emp*_mk sb_pbc a_l_j*cra_l_jqcpnsj_bmN_p_rmd_pmaI_jbgnmldcln_k clrc n_p_rpma bc a_l j|npgj*qcr_n_q_agk ,
J gqr_bca_l_gq
?rs_jk cl rc*_e_k_bca_l_gqbc RT rTmep_l bc osc _jgr_bca_l_gql mkr_jk cl rac amrtd k tEg q acl rcl_qbec_a_l_gksg_qt cxcqΦbgtagms bck mp_bmc1 amrp_pska_l_j concadgam? dI YTmbnc qosgq_rmpl_k_gqdEagj n_p_t maxCl aml rp_pska_l_j cqnccadgam8
0, NpqgmtcTCPBC,Gqmkmpk_ggmnpYTmnp_jgrbc aI_gq
1, Qcjagml c _ Mncp_YTm sq_I bmmq\mrkcqc qcmq\mrkcqMI ,
2, Qcjcagml c
bcclrp_b_qcpcvgg_1_rcj_,Bgegcmlpkcpmbma_l_jns mlnkcbma_l_j*jcjac mamhc bcamgk_YTmcnpqgmcmq'mkcqMI,?RTbccpamggEmqa_1_g
3, Qcjcagml c
jgr_bca_l_gicmaI_gqcpTmjgr_bmI_mpbck osctmaxocjcagnh_p
Npcqqgml c mq'mkcbocr_l mam rnpjc pk mmptjcagn c mgck c npccpgnc mq'mkcqM* cor_nEeg_prrp_Pjgr_bca_l_gic ma_l_jqpejgr_bmncjmdrnpjcagn_bm

()

(5)
()
Bcdgl gYTmbc a_l_gqd_t mpgrmq
Tch_amk m_bgagml _pa_l _gqPjgqr bc d_t mpgrmqms pck mt X+jmq8
/,Npoppicmq'mkqMI n_p_k mnp_p_jgr_bca_l_gq
0, Npocgnic_qrcaj_q_xsgn_p_bggn_pms pckmtcpdtmgmq
1, Npcqqgml c _ rcaj_ k _pcj n_p_ cl rp_ pQcjagdl_pRgn34<@tmgmu/n_p t gqs_jgx_pmq npmep_k_qdt mpgmq,
Aml cvTmbmE mmejc F mk c P RT
/,L_nEegl gl gag_j bmrcjcdml c acjsj_p`p_m_njga_rgtmEmmejc F mk c
0, Qjcagnl cml mk cbmbgnmgt mampcnnbclrcI_jgr bc bgnmgt nq
1, Ajgscck rpI qk gpk gf_rcj_
2, Cqamj_RpI qk gprcj_
3, Ajgscck @ggagp_emp 3 / n_-p amdtk_plmt_kclrc
PT
Amk n_prgjf_pdmrmq*k q g a_- qc t abcml RT
/,?p_mtdocm'j'sk bc dmmpk μqga_cmsrpma_nja_rgtmqck qps rcjcdm c acjsj_pcl am rpccajgsc 1_rcaj_9
0, Qcjagml c ml mk c bmbgqnmqgrgtmamppcqnml bcl _ ggqr_ nmn+sn,
1, Njmbgnmrgmnnp-rgqjcagntc dmne*k pqg_ctdbcmn_p pcnpmbxgc bcnngmank n_prif c+nl_ RT,
Amksq_p_olsYTmrgrcp_rg_ksjrgcrj
/,Antharc_RTc macjsj_pl_kcqk_pcbc9
0, ?p_m_njga_rgtmk sjrgQapccl Q_pI_RT\*cl am rp c m k cb_k Eosg_c npqgnc_rcaj bm'mTm M n_p_qjcagnl_p? I bpng ms @MQbc_ambmank mrgmbc qcs rcjcdmc acjsj_p9
1, ?p_m_njga_rgtmbc pnpmbssYTmbctdcbml mrcjcnhc acjsj_pnmp? I bpngf_tcpE_qoqesgrcqracl g rcpac bct dcbmajgsc1_rcaj_ Bcnngqbc ajga_pmaI mk cqbc RT bgnnmdacgl_pcbc_rs_j qcpIm cvggbmajgsc1 ml nckb_RT qnagbml m_njga_rgtmksjrgqapcl Q_pnc_p amk n_prgf jimamk RT9
2, NpQ`p macr pmbc anr rnpjcl mrcjcndh c acjsj_pajgscck Concj_k cl mbc rcj_ *mrcjcdl ck tctcj cvg g-mqbgnnmgg nqbgnnd cgl _ pbc_rs_j*ajgsc1 ml mk cb_RT qnjag_bml m_njga_rgt m KsjrgCapcl Qf_pc n_p amk n_prgf Ejmank RT,
i
?jesk_q b_q dmlrcq bc ag_j_agk_ `pck qptg/mq bc qpc_k g em jgc am ptcg K_gg dmp_Ykcq om pc_qqt_rsp_qc npYmq nmbck qcpcl am rp_b_qlmq cgcq bc dmd cacbnpcq pcjct l rcq,
S qI bmCNE &sg Cjcrpnl g abc Nnpep_k_YTm
CNEΦsk esgl_rcj_osc cvg cnmpk_qbc RT bgej_j_ecl b_bmq Tmaxnmbcl_tce_pqcjcagnt_pc t gqs_jgnnpmep_k_q,
L m8MBRT CNE I Tmpocspsk _ am cvTmank g rcp cr,
-
N_p_sq_pmBRT CNE nprocgm c m'mTmCNE I mamrnpjc pck mmmk cls Esg bc Nnprep_k_q_n_pcacp mosc ncpk gcm rcpd dmK_Ykcqom pc mnnprep_k __rs_j ms drspmol bmpcnpmbs xgbmck a_b_a_l_j, L_tcesc ncjmbgtpl rcqnprep_k_qsqI bmm_mTmbc qcr_I mamrnpjc pck mrm
-
Sq mq \mKcqbc ampcj_agnh_bmqk mnp_bmql_n_prcg dtpgpb_rcj_n_p_tgs_jgx_pmCNE,
- Nmbcl Tmf_tcpcl fsk_g dmck_YTm_qpcvggb_Nmpdt mptk sbc bca_l_jnpg cgmc_RT nmbc mrcpg dmck_YkcqCNE_bcos_b_qbmog_jbc RT os_l bmma_l_jcorg cpjge_bm
Rcjrcvrm
MrcjrcvmΦsk cgrck_slg_rcp_jms Tmd rcp_rg mn_p_rpl ok ggtm bc rcvrmc epedgamqnmpk crnmbk gqgtmms a_mnp_cvg.gy sk_n_pjfmbc rjcctgTm'1 cacp gpmsk bcambga_bnpms k gapmaf pcbcl rcl m_n_pcjfmbc RT n_p_cvrp_gq qd np_ Ykcqcbr rcjrcvm Mrcjrcvmnmbc cprpl ok grmmpa_msl g_rcp_jms rpl ok ggtm pck mr_t g_pEBgmms rdjtagon,RTnnbc mas n_pska_l_j ant njcrmnss opambga_bml mg rcpt_jmbc_n_e_k cl mtcprg_j ms T@J,
RT am cars8c1 np_b_am car_b_*
Aml qsk cpCjcarpml gaAmI rpmj &ACA
- Anti rpnjc bc FBK Gncpk grc osc _ RT anti npjic mgbgnmgg mq FBK G
- Bcqge, _srmk, bc bgnmogg m8bcqjesc mgbnmgg mFBK Gank _ RT,
- Jg_p_srmk_rg_k cIrc_RT8jgsc_RT ammbgnmgtfBKG
L mr_q8
Mga_mqFBK Goctck qcps_qbmqn_p anl car_pbggnmgt mqank n_rtdcgqank FBK GACA Pqs_RT,
(MpcasppmFBKGACA bmbgnnmgg mamlcar_bmbctc cqr_p_rgt_bma
(QctnaX am car_psk bgnmgt mFK Gosc l Tmqch_ank n_ratc j amk FBK GACA*mbnqnpcas pmpbc aml rpmjc F BK GACA I Tmdsl agml_pTm,
Bcncl bcl bmbmgnmgt mFBK Gant car_bntmpcas ppmF BK GACA Am npjnmbc I Tmsl agnl_p
- jgr_ bc bgnnnngg mqACA& maxTcpE_jgr_ bc bgnnnngg mqACA qc_RT_acqI_pmbgnnngg mACA,
UgDgl gsc mUgDgn_p_acqp_p_Grcp cr_rptqbcsk_am cvTmbc pbc qck dm Qjcagn csk _ pbc bgnm dcljnpccgncmq'mkCQMI n_p am qck_pSk_rcj_n_pacpeonjag_1bmosctmax gl qgg_ qcl fKacqEgn
- Tcprsbm8npocgnic nq'mkcqMn_p_tcpmb_q_qpcbcqbgnnldcg m k cl mq,
?bgamplmt_pcb8TmaxNnmbc_bgarnpsk_pcbcqck dm
- @cp_ qck npc rg_b_8k _poscn_p_npmas p_ppcbcqk cok mos_l bmm UgDgcq= bcqge_bm Crf cpl cr
LTmamcar_bm8K mnp qCrf cpl crqE am car_b,
- Am desp_Ykcqbc npmwWbXnmbc bcdg gmppt gmpnpww
- Am dasp_Ykqbc GN8bcd_ am dasp_YTmbc GNn_p_qs_am cvTmbc pbc,
PT
-U mu 8? rgt PCBC qck dgm,
- U mj8_rgt _ _ pcbc amk dgm,