
DAB 7F90 R - Radio Trevi - Free user manual and instructions
Find the device manual for free DAB 7F90 R Trevi in PDF.

| Product Type | DAB/DAB+/FM Radio |
| Brand | Trevi |
| Model | DAB 7F90 R |
| Power Supply | Rechargeable Li-ion battery 800 mAh (included), 3 AAA 1.5 V batteries (not included) or 5 V USB adapter (not supplied) |
| DAB/DAB+ Frequency Range | 174 - 240 MHz |
| FM Frequency Range | 87.5 - 108 MHz |
| Output Power | 0.8 W RMS |
| Speaker | 1.5 inches, 8 Ω |
| Display | LCD Screen |
| Preset Memory | 10 stations (DAB and FM) |
| Connectivity | 3.5 mm headphone jack, 5 V power input (micro USB) |
| Antenna | Telescopic |
| Main Functions | Automatic and manual scanning, preset, key lock, sleep timer, RDS/DLS information |
| Maintenance | Soft cloth slightly damp; avoid solvents and abrasives |
| Safety | Do not expose to water, open flames, magnetic fields, excessive heat or dust |
| Battery Life | Rechargeable Li-ion battery 800 mAh (battery life not specified) |
| Warranty | 24 months (parts and labor) |
Frequently Asked Questions - DAB 7F90 R Trevi
User questions about DAB 7F90 R Trevi
0 question about this device. Answer the ones you know or ask your own.
Ask a new question about this device
Download the instructions for your Radio in PDF format for free! Find your manual DAB 7F90 R - Trevi and take your electronic device back in hand. On this page are published all the documents necessary for the use of your device. DAB 7F90 R by Trevi.
USER MANUAL DAB 7F90 R Trevi
In modalità DAB: Manual tune, Station Order, Sleep, Factory Reset, FW Version;
- Do not use power supply with a voltage higher than 5V, cause damage the item.
- Listen at high volume for long periods of time, may damage your hearing.
- Avoid placing the player:
- Near magnetic fields.
- Near any heat sources such as heaters and stoves.
- In very damp places like bathrooms, swimming pools, etc...
- In very dusty places.
-
In places subject to strong vibrations.
-
Place the appliance so that its sides there is always enough room for free air circulation (at least 5cm).
- If liquids enter the appliance, disconnect the batteries immediately and take the appliance to the nearest authorized TREVI service center..
- No naked flame sources, such as lighted candles, should be placed on the appliance.
- The appliance must not be exposed to dripping or splashing water and no objects filled with liquids, such as vases, must be placed on the appliance.
- Keep this manual for future reference.
CARE AND MAINTENANCE
For cleaning it is recommended to use a soft, slightly damp cloth. Avoid solvents or abrasive substances.
IMPORTANT
The construction of this device guarantees long flawless o However, if come some problem, you should consult your nearest authorized service center.
TREVI pursues a policy of continuous research and development. Therefore, the products may show different characteristics from those described.


To avoid possible hearing damage, limit the time listening at high volume
DESCRIPTION AND CONTROLS
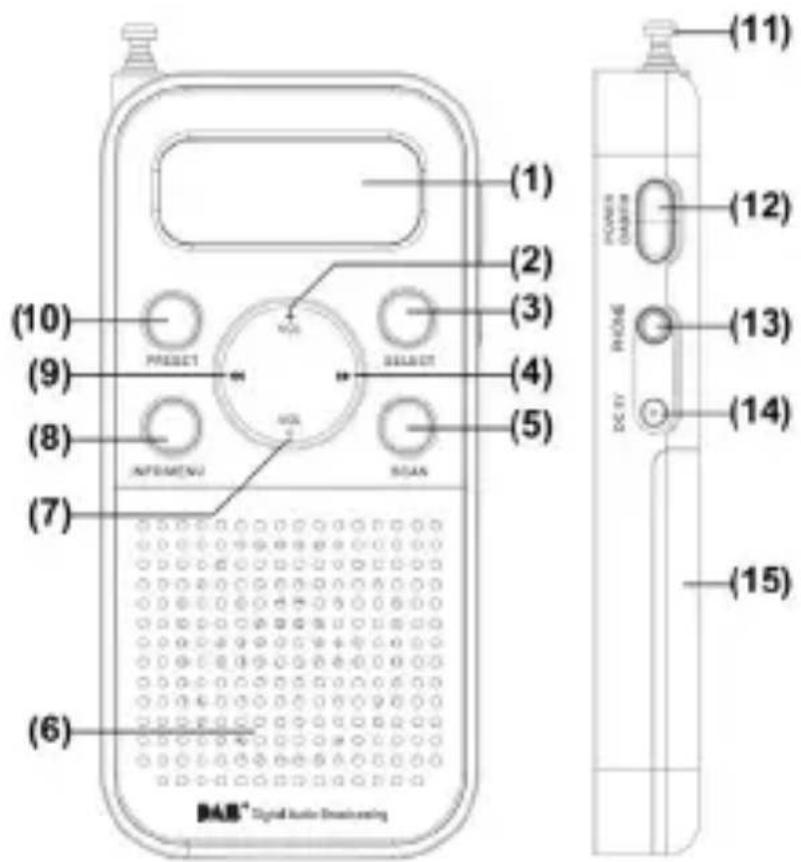
- LCD Display
- VOL + buttons
- SELECT button
-
(Next) buttons
- SCAN button
- Speaker
- VOL - buttons
-
INFO/MENU button
-
< (Prev) buttons
- PRESET button
- Rod Antenna
- POWER/ DAB+/ FM button
- Headphone Jack
- DC 5V=socket
- Battery compartment cover
Battery Charging (rechargeable battery supplied)
- Insert the rechargeable battery into the unit;
- Connect the charging cable (supplied) to the 5V power socket (14) and inserting the other USB end into a USB power supply (not supplied) or to a PC;
- The icon of the battery being charged is shown on the display;
- With the battery running out, a warning message is shown on the display and after a certain time the radio switches off automatically.
Note: with a low battery, the radio may have abnormal behavior; in this case, recharge the battery.
DC Adapter (not included)
The appliance can also be operated using a 5V power supply (not supplied).
- Connect the charging cable (supplied) to the 5V power socket (14) and inserting the other USB end into a USB power supply (not supplied).
POWER ON/OFF
- Adjust the antenna (11) extension;
- Press POWER button (12) once to switch ON the unit;
- Press POWER button (12) once to enter DAB/FM Mode
- Press and hold POWER button (12) to switch OFF the unit.
VOLUME ADJUSTMENT
Adjust the volume with the controls VOL + (2) or VOL - (7). You may connect headphones with 3.5mm, plug to socket HEADPHONE (13). The loudspeaker is then muted.
KEY LOCK
Press and hold SELECT button(3)ve seconds to activate key lock function (display shows a lock logo), all keys will be no function. To deactivate the key lock function, press and hold SELECT button(3)ve seconds (lock logo disappear from display).
RADIO FM
- Press the POWER button (12) to switch ON the unit;
- Press the POWER button (12) again to select FM mode;
- Select your station by using > (4) or < (9) button repeatedly to increase or decrease the frequency of 0.05MHz and perform a step-by-step search;
- Press and hold > (4) or < (9) button for a few seconds to tune to the next or previous radio station with the best signal received; or press SCAN button (5) for Auto tuning:
- Press SCAN once to forward search next station.
- Hold SCAN to backward search previous station.
Radio Stations Preset
You can store the frequencies of up to 10 radio stations in the memory. A stored frequency can be erased from the memory by storing another frequency in its place.
- In FM mode, move to the frequency to be stored, hold PRESET button (10);untilthedisplayPresetEmptywithashing1-10(1-10isthepreset
position number);
- If the preset number is empty, "Preset Empty" is shown.
-
If the position is saved with station, station frequency is shown.
-
Press > (4) or < (9) button to select the desired memory location;
- Press SELECT button (3) once to confirm and save the selected station.
To listen to a present station:
- Press PRESET button (10) once;
- Press the > (4) or < (9) button for selecting your desired station;
- Press SELECT button (3) to confirm.
FM TRANSMISSION INFORMATION
In FM mode, the display will show information about the current radio station.
- Press the INFO/MENU button (8) to change the displayed information.
Note: Not all DAB stations provide the information displayed by the device.
RDS info: displays information about the song broadcast (artist, track title, etc...).
PTY, Program Type: Displays information about the FM station.
Transmitter Name: displays information about the sender of the service.
Time/Date: displays information relating to the hours and date of the current transmission.
Number/transmitter frequency: displays the transmission frequency.
Reception: displays whether the reception is Mono or Stereo.
DAB/DAB+ MODE
Auto Scan
- Adjust the antenna extension and angle to have the best reception;
- Press POWER button (12) to switch ON the unit;
- The first time the radio is powered and switched on, it will automatically select DAB mode and start a quick scan of the DAB channels to search for available stations. Please leave it to complete this process;
- Press > (4) or < (9) button to select desired station;
Note:
- You may have to wait for the unit to tune into the new channel.
- In DAB mode, the date and time of the device are synchronized with those of the station being listened to.
- Press SCAN button (5) can fully scan the available channels again.
Manual Scan
- Hold INFO/MENU button (8), press > (4) or < (9) button and select "MANUAL TUNE", then press SELECT button (3);
- Press > (4) or < (9) button to select desired channel (5A-13F), press SELECT button (3) to enter the channel;
- Select station by using > (4) or < (9) button.
DAB Radio Stations Preset
You can store the frequencies of up to 10 radio stations in the memory. A stored frequency can be erased from the memory by storing another frequency in its place.
-
In DAB mode, move to the frequency to be stored, hold PRESET button (10); until the display Preset Empty with flashing 1-10 (1-10 is the preset position number);
-
If the preset number is empty, "Preset Empty" is shown.
-
If the position is saved with station, station frequency is shown.
-
Press > (4) or < (9) button to select the desired memory location;
- Press SELECT button (3) once to confirm and save the selected station.
To listen to a present station:
- Press PRESET button (10) once;
- Press the > (4) or < (9) button for selecting your desired station;
- Press SELECT button (3) to confirm.
DAB/DAB+ INFORMATION
In DAB mode, the display will show informations about the current radio station.
- Press the INFO/MENU button (8) repeatedly to change the displayed information.
Note: Not all DAB stations provide the information displayed by the device. DLS: displays information about the song broadcast (artist, track title, etc...).
Program Type: Displays information about the type of material being broadcast.
Transmitter Name: displays information about the sender of the service.
Number/transmitter frequency: displays information relating to the number and frequency of DAB/DAB+ broadcast station.
BitRate: Displays information related to the transmission of the current compression ratio. The higher the value, the better the quality of the transmission.
Signal Strength: displays information about the signal strength via a bar on the display, the more the signal is stronger, the bar becomes full.
Time/Date: displays information relating to the hours and date of the current transmission.
RADIO DAB/DAB+/FM MENU
- In DAB or FM radio mode, hold down the INFO/MENU button (8) for a few seconds;
- Press > (4) or < (9) button and select the desired item from:
DAB mode: Manual tune, Station Order, Sleep, Factory Reset, FW Version;
FM mode: Factory reset, Sleep, FW Version;
- Press SELECT button (3) to enter the settings of the selected item.
Manual tune: allows you to manually scan a single DAB/DAB+ frequency. Press > (4) or < (9) button to select the channel number relating to the frequency to be scanned and then press the SELECT (3) key to start the scan.
Sleep: To set the auto-off (Sleep off, 10min, 30min, 60min and 90min).
Factory Reset: allows you to reset the device to the factory settings.
At the end of the reset an automatic scan of the DAB/DAB+ stations will be performed. Move with > (4) or < (9) button to YES and confirm with the SELECT button (3).
FW version: allows you to view the software version of the device.
TECHNICAL SPECIFICATIONS
Power: .... Rech. Li-ion Battery 800mAh .... 3x 1,5V "AAA" size
DAB/+ band: 174 - 240 MHZ
FM band: 87,5 - 108 MHZ
Speaker: 1,5 pollici,8Ω
Power Output: 0,8W RMS
Size: 58x120x22mm
WARRANTY
- This unit is guaranteed for a period of 24 months from the date of production printed on the product itself or on label on product.
- The warranty is valid only if the unit has not been tampered with. The warranty is valid only at authorized TREVI assistance centres, that will repair manufacturing defects, excluded replacement of labels and removable parts.
- TREVI is not liable for damage to people or things caused by the use of this unit or by the interruption in the use of this unit.
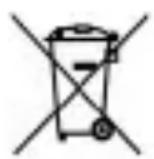
USERS INFORMATION pursuant to Legislative Decree No. 49 of March 14, 2014 "Implementation of Directive 2012/19/EU on Waste Electrical and Electronic Equipment (WEEE)"
This wheeled bin symbol on the product indicates that at the end of its life must be collected separately from other waste. The user must, therefore, take the remote control integrates the essential components that got to its life to the appropriate differentiated collection centers for electronic and electro-technical waste, or return it to the dealer when purchasing a new appliance of equivalent type, in terms of one to one, or one to zero for equipment having longer side of less than 25cm. Appropriate separate collection for the decommissioned equipment for recycling, processing and environmentally compatible disposal helps prevent negative impact on the environment and human health and promotes recycling of the materials making up the product. Illegal dumping of the product by the user entails the application of administrative sanctions stated in Legislative Decree n. Legislative Decree No. 49 of March 14, 2014.
NOTES D'EMPLOI
Dimensions: 58x120x22mm
CONDITIONS DE GARANTIE
SIMPLIFIED EU DECLARATION OF CONFORMITY
Hereby TREVI Spa declares that the radio equipment type DAB 7F90 R is in compliance with directive 2014/53/EU.
The full text of the EU declaration of conformity is available at the following internet address
https://www.trevi.it/dms/zidi/TREVI/DOCDAB7F90R.pdf
EN If you will not find your language on the instruction manual, please go on our website www.trevi.it to find it


- CARE AND MAINTENANCE
- IMPORTANT
- DESCRIPTION AND CONTROLS
- Battery Charging (rechargeable battery supplied)
- DC Adapter (not included)
- POWER ON/OFF
- VOLUME ADJUSTMENT
- KEY LOCK
- RADIO FM
- Radio Stations Preset
- To listen to a present station:
- FM TRANSMISSION INFORMATION
- DAB/DAB+ MODE
- Auto Scan
- Note:
- Manual Scan
- DAB Radio Stations Preset
- DAB/DAB+ INFORMATION
- RADIO DAB/DAB+/FM MENU
- TECHNICAL SPECIFICATIONS
- WARRANTY
- USERS INFORMATION pursuant to Legislative Decree No. 49 of March 14, 2014 "Implementation of Directive 2012/19/EU on Waste Electrical and Electronic Equipment (WEEE)"
- NOTES D'EMPLOI
- CONDITIONS DE GARANTIE
- SIMPLIFIED EU DECLARATION OF CONFORMITY
Brand : Trevi
Model : DAB 7F90 R
Category : Radio