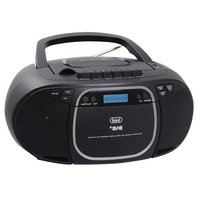
USER MANUAL DR 7F40 BT Trevi
eng Digital Radio FM/Wireless/Mp3 Rechargeable
fra Radio Numérique FM/Wireless/Mp3 Rechargeable
esp Radio Digital FM/Wireless/Mp3 Recargable
Do not use power supplies with a voltage higher than 5V, it will damage the player.
This is a precision electronic appliance; avoid using it in the following cases:
- Near magnetic fields.
- Near heat sources such as heaters and stoves.
- In very humid places such as bathrooms, swimming pools, etc...
• In very dusty places.
• In places subject to strong vibrations.
- Do not bring your ear close to the speaker during the setting up and volume adjustment phases, and in particular to keep the volume to a minimum in the ignition phase.
- Position the appliance so that there is always enough space on its sides for the free circulation of air (at least 5 cm).
- If liquids penetrate inside the appliance, immediately disconnect the plug from the socket and take the appliance to the nearest authorized TREVI service center.
- Always check before recharging the appliance, that the power and connection cables are installed correctly.
- No naked flame sources, such as lighted candles, should be placed on the appliance.
- The appliance must not be exposed to dripping or splashing water and no objects filled with liquid, such as vases, must be placed on the appliance.
- Before turning on the appliance, always check that the power cable and the connection cable are installed correctly.
- The power adapter must be connected to an outlet near the device and must be easily accessible.
- If you notice excessive heat on the device or on the power adapter, immediately disconnect the plug from the main power socket.
- Do not pull on the power cable
- Keep this manual for future reference.
To avoid possible hearing damage, limit your listening time to high volumes.
CARE AND MAINTENANCE
Use a slightly damp soft cloth for cleaning. Do not use solvents and abrasive substances.
IMPORTANT
This device is designed for home use (not professional use). This appliance has been carefully built to ensure long-lasting perfect performance. However, should any inconvenience occur, please contact your local authorised TREVI Service Centre.

TREVI follows a policy of ongoing research and development. Therefore products may have different features from those described.
WARNING FOR THE CORRECT USE OF THE RECHARGEABLE BATTERY
- Recharge the battery at a temperature between 5°C and 35°C.
- Do not prolong recharging beyond the times indicated to avoid the risk of overheating and bursting.
- Do not recharge the battery for more than 4 hours.
- Recharging the battery beyond the times indicated or a prolonged period of inactivity may reduce its life.
- The rechargeable battery is subject to wear and its capacity gradually decreases.
- To extend the life of the battery, use it when it is fully charged until it is completely discharged, then fully recharge it again before using it again. Charging a battery that is not completely depleted will shorten its life. In this case, repeat the full upload/download cycle several times.
- Avoid keeping the battery under charge all night.
COMMANDS
text_image
Tavni
Bluetooth
16
17
18
19

text_image
13
12
11
10
9
8
1 2 3 4
5 6 7 8
9 0 FM
U S C M ►
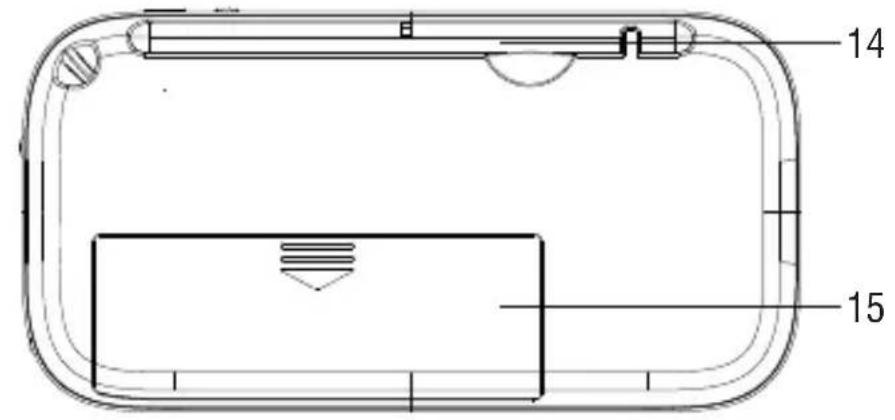
text_image
14
15
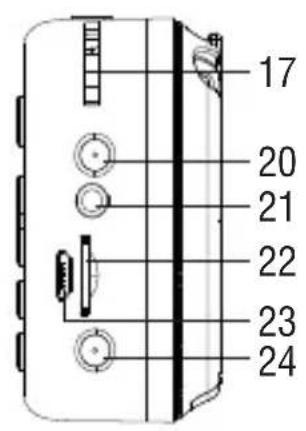
text_image
17
20
21
22
23
24
- Speaker
-
button, Mute
-
button, Allarm
-
button, timer shutdown
- button, repeat
- button, FM radio
- Mutton, function
- ▶ button, Play/Pause
- Button, Previous track
- ▶ button, Next track
- 0-9 numeric keyboard
- ▶ button, On/Off night light
-
Display
-
Antenna
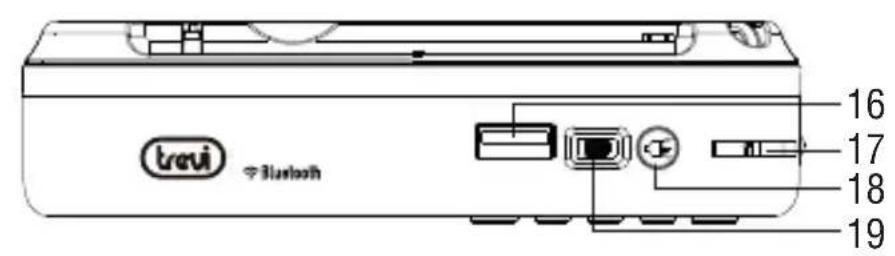
- USB socket
- Volume
- <button, On/Off Flashlight
- ON/OFF switch
- Night light Led
- Earphone socket
- TF card
-
5V -1A type-C charging socket
-
Rechargeable battery compartment
-
Flashlight Led + charge status indicator
CHARGING THE BATTERY
At the first use of the device, charge it for 3 hours.
- Connect the USB/type-C cable to the USB type-C power socket (23) of the device, connect the other end to the USB port of a 5V 1A power supply (not supplied) with USB socket;
- During the charging phase, the LED indicator (24) will be steady red to indicate the charging status;
- When charging is complete, the LED indicator (24) will turn green.
ON/OFF
Move the "OFF/ON" switch (19) left/right to turn Off/On the unit.
VOLUME ADJUSTMENT
You can adjust the volume of the device using the volume control.
-
Rotate upwards (17) to decrease the volume.
-
Rotate downwards (17) to increase the volume.
SOURCE SELECTION
Press the Mutton (7) several times to select the Wireless/USB (if inserted)/MicroSD (if inserted)/Radio/Clock function.
FM RADIO MODE
Extend the rod antenna, press the M button (7) to switch to the radio mode (or directly short press the FM button to quickly switch to the radio mode).
Before the user uses it for the first time, please press and hold the button (8) to perform an automatic station search, and the system will automatically save the found FM stations; during the station search, you can short press button (8) to stop the automatic station search. After automatically searching all local FM radio programs, it will automatically play the first stored radio program, Short press the (3) and (10) button to choose your favorite radio program, after automatic channel search, you can short press 0-9 to input the number
of the target track to listen to the radio program.
For example, to select channel 10, you can quickly press the "1" and "0" keys; and so on.
When the selected target channel plays the program.
Note:
- If the channel number you choose exceeds the total number of stored programs found by radio, your choice will be invalid.
- When listening to “FM radio”, please pull out the retractable antenna to get better reception results.
- When the receiving station signal is not good, please adjust the direction of the device to get better reception results.
TF CARD/USB MODE
When the TF/USB disk is inserted, the system will automatically play the songs in the TF card/U disk. Insert the TF card and U disk at the same time to play in the order of inserting first and reading first.
When the last music of the TF card is played, it will directly skip to the music in the U disk, and vice versa.
In this mode, short press the (8) button to play.
Press (C) and (10) button to select previous or next track.
Press (5) button to Switch between “ONE” (single cycle), “ALL” (all cycle) music playback mode.
TF card or USB disk to play the 10th song, you can quickly press the “1” and “0” keys; and so on. When the selection is complete, the screen will display the target track you selected, and it will directly jump to the target track you selected to play.
Note: If the target track you choose will directly jump to the target track you choose, if it exceeds the total number of tracks, then the target track you choose will be invalid; TF card/U disk only supports MP3 format music playback.
FAST FORWARD AND REWIND
When using a USB or TF card to play music, long press (9) button to rewind, long press ▶▶(10) button to fast forward.
MUTE
Short press the (2) “MUTE” button in normal playback state, the device enters the mute mode, the speaker has no sound, short press the “MUTE” button again to exit the mute mode.
WIRELESS CONNECTION
- Press the key (M7) several times and select the Wireless function;
- Follow the instructions of your device to search for the device;
- Search for the device named "DR 7F40 BT", perform the pairing and enter the PIN "0000" if required;
- Once paired, the device will emit a confirmation sound;
- Start playing the music track from your device to start listening; press keys (9) and
▶▶(10) to select the previous/next track;
- Press the key ▶(8) to suspend song playback, press it again to resume playback.
TIME SETTING
- Short press the (3) key or press the (7) key to switch to the clock mode in the power-on state,
- Then long press the (3) key to enter the hour setting, press the (9) key or (10) key to select the hour time, and then short press the (3) key Enter the minute setting;
- Press the (3) key or (10) key to select the minute time, and then short press the (3) key to end the time setting.
ALLARM CLOCK SETTING
- In the power-on state, in the clock mode, short press the (3) key to enter the alarm clock hour setting;
- Press the (3) key or (10) to select the alarm clock hour setting, then short press the (3) key to enter the alarm clock minute setting;
- Press the (3) key or (10) button to select the alarm clock minute setting;
- Then short press (3) key to enter the alarm ring "1", or alarm radio "2";
- After setting, short press the (9) key or (10) button to choose to turn off and turn on the alarm, and then short press the (3) button to end the alarm clock setting.
SET TIMER SHUTDOWN
In any state after starting up, press the (4) key to set the power off after 10 minutes; press the (4) key again to enter the setting and then power off after 20 minutes, press the (4) key again to set the power off after 30 minutes, and so on, up to 60 minutes can be set. Press the (4) key 7 times, and the display will display "OFF" to cancel the timer shutdown function.
FLASHLIGHT
Short press the (18) button after power on, the flashlight LED light is on, and short press (18) again to turn off the flashlight LED light.

TECHNICAL FEATURES
Power supply: 3,7V, 1200mAh rechargeable lithium battery via USB type-C 5V-1A socket
Audio Power:....1W
Impedance: 4Ω
FM band: 87,5-108MHz
Wireless transmission power:......2,5mW
Wireless transmission frequency:.....2,4GHz
Dimensions: 128x82x33mm
Weight: 208 gr.
Attention: the removal and disposal operation is reserved exclusively to specialized technical personnel!
- Remove the plastic door (15) located on the back of the cabinet;
- Remove the battery from its compartment.
Regardless of the type of used battery, it must not be disposed of with household waste, fire or water. Each type of used battery must be recycled or disposed of at the appropriate dedicated collection centres.
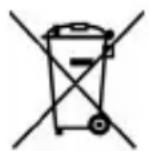
Precautions for correct disposal of the product.
The symbol shown on the equipment indicates that waste must be disposed of in “separate collection” and so the product must not be disposed of together with urban waste.
The user must take the product to special “separate waste collection centres” provided by local government, or deliver it to the retailer against the purchase of a new product.
Separate collection of waste and subsequent treatment, recycling and disposal operations promotes the production of equipment with recycled materials and limits negative effects on the environment and on health caused by improper handling of waste.
Illegal disposal of the product leads to the enforcement of administrative penalties.
NOTES D'EMPLOI
text_image
Warning symbol with a triangle containing a stylized 'e' and sound waves, indicating noise or alert.
natural_image
Warning symbol with a triangle containing a stylized 'e' and sound waves (no text or numbers)
natural_image
Warning symbol with a triangle containing a stylized ear and sound waves (no text or numbers)
Hereby TREVI Spa declares that the radio equipment type DR 7F40BT is in compliance with directive 2014/53/EU.
The full text of the EU declaration of conformity is available at the following internet address https://www.trevi.it/dms/zidi/TREVI/DOCDR7F40BT.pdf
Trevi S.p.A.
Strada Consolare Rimini-San Marino, 62 47924 Rimini (RN) Italy
Tel. 0541/756420 - Fax 0541/756430 - www.trevi.it - e-mail: info@trevi.it