
DS 1976 V - Radio Trevi - Free user manual and instructions
Find the device manual for free DS 1976 V Trevi in PDF.


| Product type | Retro portable radio |
| Brand | Trevi |
| Model | DS 1976 V |
| Dimensions (W x H x D) | Approx. 200 x 120 x 80 mm |
| Weight | Approx. 0.5 kg (without batteries) |
| Power supply | 4 R14/UM-2 batteries or AC adapter (not included) |
| Frequency bands | FM (87.5-108 MHz) and AM (530-1600 kHz) |
| Main functions | FM/AM radio, volume control, analog tuning, built-in speaker |
| Connectivity | 3.5 mm headphone jack, external antenna socket (FM) |
| Antenna | Telescopic antenna for FM |
| Housing material | Wood and plastic (vintage finish) |
| Color | Wood brown and cream (depending on variant) |
| Care and cleaning | Clean with a soft, dry cloth; do not use abrasive products |
| Safety | Do not expose to moisture; remove batteries if not used for a long time |
| Spare parts and repairability | Parts available on request; repairable by a qualified technician |
| General information | Radio designed for home use; suitable for listening to classic radio programs |
Frequently Asked Questions - DS 1976 V Trevi
User questions about DS 1976 V Trevi
0 question about this device. Answer the ones you know or ask your own.
Ask a new question about this device
Download the instructions for your Radio in PDF format for free! Find your manual DS 1976 V - Trevi and take your electronic device back in hand. On this page are published all the documents necessary for the use of your device. DS 1976 V by Trevi.
USER MANUAL DS 1976 V Trevi
Do not listen at high volume for a long time, can damage your hearing.
Avoid placing the player:
- Near magnetic fields.
- Near sources of heat such as heaters and stoves.
- In places with high humidity such as bathrooms, swimming pools, etc...
- In dusty places.
- In areas subject to strong vibration.
- Place the unit so that its sides there is always enough space for the free movement of air (at least 5 cm).
- If liquids penetrate inside the device immediately disconnect the plug from the socket and take it to the nearest an authorized TREVI assistance.
CARE AND MAINTENANCE
For cleaning we recommend the use of a soft, slightly damp cloth. Avoid solvents or abrasives.
IMPORTANT
The good construction of this machine guarantees the perfect functioning for a long time. However, should any problem arise, you should consult the nearest authorized service center.
TREVI
It pursues a policy of continuous research and development. Therefore the products may show different characteristics from those described.
DESCRIPTION OF CONTROLS
Control panel:
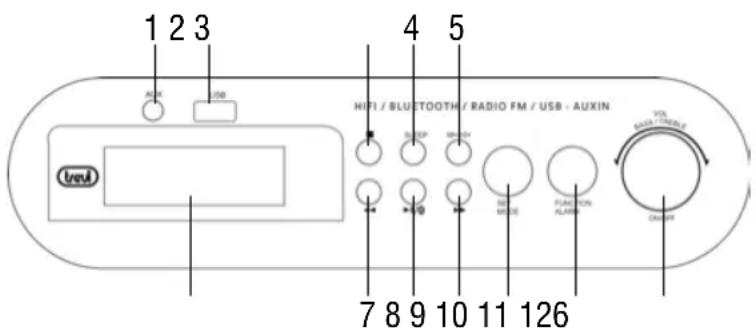
- AUX-IN jack
- USB port
- STOP key
- SLEEP key
- M+/10+ key, storage/progress +10
- LCD Display
- ◀ key, track/previous station
-
▶ II / *key, Play-Pause/pairing Bluetooth
-
▶▶ key, track/next station
- SET/MODE key, settings/storage/repeat
- FUNCTION/ALARM key, functions/alarm setting
- ON/OFF, VOL, BASS/TREBLE knob. Standby, volume, bass and treble setting
DESCRIPTION OF CONTROLS
Back panel: Remote control:


- Telescopic antenna
- Bass reflex
- Socket DC IN, 9V
- Main switch
- STANDBY key
- ALARM1 key
- CLOCK key
- ALARM2 key
- TREB+ key, increase treble
- M+/10+ key torage/progress +10
- TREB-key, decrease treble
- ◀ key, track/previous station
-
▶ II key, Play/Pause
-
SNOOZE key
- VOL- key
- STOP key
- ▶▶ key, track / next station
- VOL+ key
- BASS-key, decrease bass
- BASS+ key, increase bass
- MEM key
- MODE key, Rep1/ALL, Rand
- SLEEP key
- MUTE key
- FUNC key, selection functions
LITHIUM BATTERY INSTALLATION OF REMOTE CONTROL

The remote control includes one CR2025 lithium battery. To replace the battery:
- Gently push the clasp to the right direction accordingly to the instruction.
- Pull out the battery compart.
- Take the drained battery out and install a new lithium battery in the compartment with the positive polarity upwarded.
- Push compartment back to its position with a "click" sound indicating install finished.
POWER
The supplied power adapter works with voltage 100-240V \~ 60 / 50Hz.
Insert the plug into the socket for DC power (15) and the plug into a power outlet.
Note: Use only the supplied power adapter, several devices may have polarities and/or different voltages.
Unless otherwise specified, the command descriptions are for the remote control.
ON/OFF
- Set the main switch (16) to "I" to turn on the device.
- Set the main switch (16) to "0" to turn off the device completely.
STAND-BY FUNCTION
Once the main switch to "I" position, the unit will go into standby mode (display lit with indication time).
- To turn on/off the unit using the knob on the unit (ON/OFF knob, VOL, BASS/TREBLE (12)) press it for about two seconds.
- The stand-by function is activated only if the main switch (16) is in "I" position.
VOLUME ADJUSTMENT
Turn the volume knob VOL(12) on the unit to increase or decrease the overall volume of playback or press the VOL + (30) or VOL - (27) on the remote control to increase or decrease the volume.
MUTE FUNCTION
You can also press the MUTE(36) button on the remote control to turn off the sound temporarily (the volume level will flash on display); press the MUTE button again to cancel the mute function and restore the sound.
SOURCE BUTTON
Press the FUNC(37) button repeatedly to switch among BLUETOOTH/RADIO FM/USB/AUX-IN modes.
BLUETOOTH OPERATION
Prior to use Bluetooth function, your system should be paired firstly with your Bluetooth device ("Pairing" means establish connection between Bluetooth device such as mobile phone, Tablet, PC, etc...)
- First press FUNC(37) button until you see the display of "BT"; the unit will go into research for connection with other devices BT (marked "BT" on the display will flash).
- Enable the Bluetooth® connection on the external device (phone, tablet, etc...) with reference to its Operating Manual.
- From the external device search of devices and select "DS 1976 V"; if required, type the code "0000".
- When the connection with the external device will be the case, the "BT" on the display will remain on steadily.

Now you can start playing music from your device.
With the keys on the remote control ◀(24), ▶(29) or the main unit ◀(7), ▶(9) you can control the playback of tracks on the device (phone, tablet).
- Press ▶ II (25) button to play or pause the song.
- Press ◀◀(24) button to previous track.
- Press key ▶▶(29) button to next track.
Notes:
- This function only works on Bluetooth® devices that support AVRCP.
- Due to the continuous evolution of Bluetooth® technology, some devices may not be compatible or fully compatible with the device TREVI DS 1976 V.
To connect a new device you need to switch the power to search mode:
- Press and hold the button ▶ II (25) on the remote control for a few seconds, the “BT” on the display will blink.
- Repeat steps 2 to 4 above.
Note: A paired device, it may happen that the connection is interrupted (for example, when we wander too far from the unit); Normally the connection is restored automatically, otherwise you need to back pairing.
RADIO FUNCTION
Auto Search
- Press the FUNC(37) button repeatedly until the display will show FM radio frequency.
- Press MEM key(33) for a few seconds on the remote control, or press for a few seconds the SET/MODE(10) button on the unit to activate the "AUTOSCAN" or the automatic tuning (the radio starts an automatic station search stereo radio and automatically saves in memory). They are saved in the top 20 issuers radio.
- Press the M+/10+(22) key on remote control to call and listen to the various radio stations saved in memory.
Manual Search
- Press and hold buttons ◀◀(24), ▶▶(29) for a few seconds to perform a manual scan of radio frequencies; The search will stop when a radio station is received stereo.
- Press once the keys ◀◀(24), ▶▶(29) for a shift step by step and make a fine tuning.
- To save the received station, press MEM(33) button, the display will flash the memory location; using the keys ◀◀(24), ▶▶(29) select the desired memory number and press again MEM(33) to confirm. The radio station is now saved in memory location choice. You can save up to 20 radio stations.
Note: For the best FM reception extend the antenna. If the reception is not good try to adjust the antenna length otherwise, however the quality of the FM reception depends on the place where you place the unit.
The proximity of TV sets, fluorescent lamps or other appliances may cause interference in the reception of radio programs, in this case removed the device.
USB FUNCTION
- Insert the USB memory to the USB socket(2).
- First press the button FUNC(37) until you see the entry USB; wait a few seconds for the player loads all MP3 files.
- Playback will start automatically.
- To enter a pause, press the button ▶ II (25) once.
- To release the pause, press the button ▶ II (25) a second time.
- To switch to playback of the previous/next track press the ◀◀(24) o ▶▶(29).
- To fast forward in order of tens on the track number appears, press the M+/10+(5) on the unit. Each press will increase the number of ten numbers at a time.
UNINTERRUPTED REPRODUCTION OF A SINGLE TRACK / ALL SONGS
In playback mode (USB), press more 'times MODE(34) button on the remote control to activate in sequence:
- Listening to a single track (the display shows the word "REP 1").
- Continuous playback of all songs in memory (the display shows the word "REP ALL").
To cancel continuous playback repeatedly press the button MODE(34) until no lettering on the display. - Shuffle Playback (the display shows the word "RAND").
To cancel the repeatedly function press the button MODE(34) until no lettering on the display.
AUX-IN FUNCTION
- Connect via cable (not supplied) audio output of smartphones, tablets, multimedia players to AUX IN(1) jack of the unit.
- Press FUNC (37) button until you see the "AU" on display.
- Start playing the external source (see its manual).
CLOCK SETTING
To set the time, please, to follow next steps:
- Put the unit in standby mode.
- Use ◀◀(7) o ▶▶(9) on the unit to set the time correctly.
- Press SET/MODE(10) to confirm and go to the minute setting.
- Use keys again ◀◀(7) o ▶▶(9) to set the correct minutes.
-
Press the SET/MODE(10) on the unit to confirm.
-
Press and hold for a few seconds SET/MODE(10) button on the unit, indicating the hours will start flashing.
ALARM SETTING
The device is equipped with 2 alarms. To set the alarm 1, 2 or both, follow the steps below:
- Put the unit in Stand-by mode.
- Press the button ALARM1(18) on the remote control. The word "Alarm1" blink and appear "OFF".
- Press and hold for a few seconds the FUNCTION/ALARM button (11) on the unit, the word "OFF" blinks.
- Press the ◀◀(7) or ▶▶(9) on the unit to activate the alarm function by shifting the writing of "ON".
- Press the FUNCTION/ALARM button (11) to confirm.
- Press the ◀◀(7) or ▶▶(9) on the unit to select the source (Radio, USB, Buzzer) from use as an alarm clock. Press the FUNCTION/ALARM button (11) to confirm.
- Use the ◀◀(7) or ▶▶(9) to set the hour. Press the FUNCTION/ALARM button (11) to confirm.
- Use the buttons ◀◀(7) or ▶▶(9) to set the minutes. Press the FUNCTION/ALARM (11) to confirm. The word “Alarm 1” remains fixed on the display to indicate its activation
To set the alarm 2, press and hold the button for a few seconds ALARM2(20) on the remote control and repeat steps 3 through 8 above.
To disable the alarm
- Press and hold for a few seconds the ALARM1 button (18) on the remote control. There written "Alarm1" and the word "ON" will flash.
- Press the ◀◀(7) o ▶▶(9) n the unit to select "OFF".
- Press ALARM1(18) on the remote control to confirm.
OFF THE ALARM
To disarm the alarm (Buzzer, USB or Radio), press FUNCTION/ALARM(11) on the unit to stop completely.
If you want to silence the alarm, press the ON/OFF, VOL, BASS/TREBLE(12) knob on the unit; the interruption lasts 9 minutes, after which the alarm will turn on again.
SLEEP FUNCTION
The SLEEP(35) button on the remote control allows you to program the automatic shutdown of the unit up to 90 minutes after activation. This function is activated when the unit is turned on.
Adjust the sleep time by pressing SLEEP(35) several times; the minutes are allowed: 90, 80, 70, 60, 50, 40, 30, 20, 10, 00 (SLEEP OFF).
SPECIFICATIONS
RADIO SECTION
Tuning Range: FM 87.5 - 108.0 MHz
AMPLIFICATION
Audio Output Power: 25W (7,5W x2+10W Subwoofer)
IMPUT
Bluetooth® Profile:....A2DP, AVRCP
USB: 2.0
AUX IN: Jack 3.5mm
GENERAL
Power source: ......DC 9V - 2A with AC/DC adaptor 100-240V\~included
Power consumption....18W
Dimensions: 160X300x170mm
Weight: 2,650 Kg.

Precautions for correct disposal of the product.
The symbol shown on the equipment indicates that waste must be disposed of in “separate collection” and so the product must not be disposed of together with urban waste.
The user must take the product to special “separate waste collection centres” provided by local government, or deliver it to the retailer against the purchase of a new product.
Separate collection of waste and subsequent treatment, recycling and disposal operations promotes the production of equipment with recycled materials and limits negative effects on the environment and on health caused by improper handling of waste.
Illegal disposal of the product leads to the enforcement of administrative penalties.
NOTES D'EMPLOI
natural_image
Diagram of a layered structure with directional arrows indicating movement or force (no text or symbols present)FONCTIONNEMENT AUX-IN


- CARE AND MAINTENANCE
- IMPORTANT
- TREVI
- DESCRIPTION OF CONTROLS
- LITHIUM BATTERY INSTALLATION OF REMOTE CONTROL
- POWER
- ON/OFF
- STAND-BY FUNCTION
- VOLUME ADJUSTMENT
- MUTE FUNCTION
- SOURCE BUTTON
- BLUETOOTH OPERATION
- Notes:
- RADIO FUNCTION
- Auto Search
- Manual Search
- USB FUNCTION
- UNINTERRUPTED REPRODUCTION OF A SINGLE TRACK / ALL SONGS
- AUX-IN FUNCTION
- CLOCK SETTING
- ALARM SETTING
- To disable the alarm
- OFF THE ALARM
- SLEEP FUNCTION
- SPECIFICATIONS
- RADIO SECTION
- AMPLIFICATION
- IMPUT
- GENERAL
- Precautions for correct disposal of the product.
- NOTES D'EMPLOI
- FONCTIONNEMENT AUX-IN
Brand : Trevi
Model : DS 1976 V
Category : Radio