
DAB 791 R - Radio Trevi - Free user manual and instructions
Find the device manual for free DAB 791 R Trevi in PDF.

| Product Type | DAB/DAB+ and FM digital radio |
| Brand | Trevi |
| Model | DAB 791 R |
| Dimensions (W x H x D) | 135 x 145 x 41 mm |
| Power supply | 5V mains adapter (not included) or internal rechargeable lithium battery |
| Battery | Internal rechargeable lithium, charges via mains adapter |
| DAB/DAB+ frequency range | 174 - 240 MHz |
| FM frequency range | 87.5 - 108 MHz |
| Main functions | DAB/DAB+ and FM radio, alarm, sleep timer, preset of 10 stations per band, LCD display, RDS info, auto scan |
| Controls | Buttons: Power/Mode, Info/Menu, Preset, Scan, Prev, Next, Enter/Snooze, Volume +/- |
| Connectivity | Headphone jack (3.5 mm), mains adapter input |
| Care and cleaning | Use a soft, slightly damp cloth. Avoid solvents or abrasives. Do not expose to moisture, dust, excessive heat or magnetic fields. |
| Safety | Do not use a power supply >5V. Do not listen at high volume for too long. Unplug if liquid enters. Leave at least 5 cm of space around for ventilation. |
| Repairability | Contact an authorized TREVI service center for any repairs |
| Warranty | 24 months from date of manufacture |
| General information | Manual available in several languages at notice-facile.com |
Frequently Asked Questions - DAB 791 R Trevi
User questions about DAB 791 R Trevi
0 question about this device. Answer the ones you know or ask your own.
Ask a new question about this device
Download the instructions for your Radio in PDF format for free! Find your manual DAB 791 R - Trevi and take your electronic device back in hand. On this page are published all the documents necessary for the use of your device. DAB 791 R by Trevi.
USER MANUAL DAB 791 R Trevi
Do not use power supply with a voltage higher than 5V, cause damage to the player.
Listen at high volume for long periods of time, may damage your hearing.
Avoid placing the player:
- Near magnetic fields.
- Near any heat sources such as heaters and stoves.
- In very damp places like bathrooms, swimming pools, etc...
- In very dusty places.
- In places subject to strong vibrations.
Place the appliance so that its sides there is always enough room for free air circulation (at least 5 cm).
If liquids penetrate into the appliance immediately disconnect the plug from the wall socket and set the appliance to your nearest authorised TREVI Service Centre.
Always check before charging, power cables and connection are installed properly.
CARE AND MAINTENANCE
For cleaning it is recommended to use a soft, slightly damp cloth. Avoid solvents or abrasive substances.
IMPORTANT
The construction of this device guarantees long flawless operation. However, if come some problem, you should consult your nearest authorized service center.
TREVI pursues a policy of continuous research and development. Therefore, the products may show different characteristics from those described.
WARNING FOR A CORRECT USE OF RECHARGEABLE BATTERY
- Recharge the battery in an ambient temperature between 5°C and 35°C.
- Don't recharge more than the suitable period to prevent the risk of overheating and burst.
- Don't recharge the battery for more than 4 hours.
- Recharging the battery over the suitable period or an extended period of inactivity may reduce battery duration.
- Rechargeable battery is liable to wear and tear and its performance will reduce gradually.
- To extend the duration of the battery use it when is completely charged up to the complete discharging, then recharge it fully before use it again. Recharge a battery not completely consumed, will result a reduced duration. In this case, repeat the full charging/discharging cycle many times.
- Avoid recharge the battery for the whole night.
DESCRIPTION AND CONTROLS

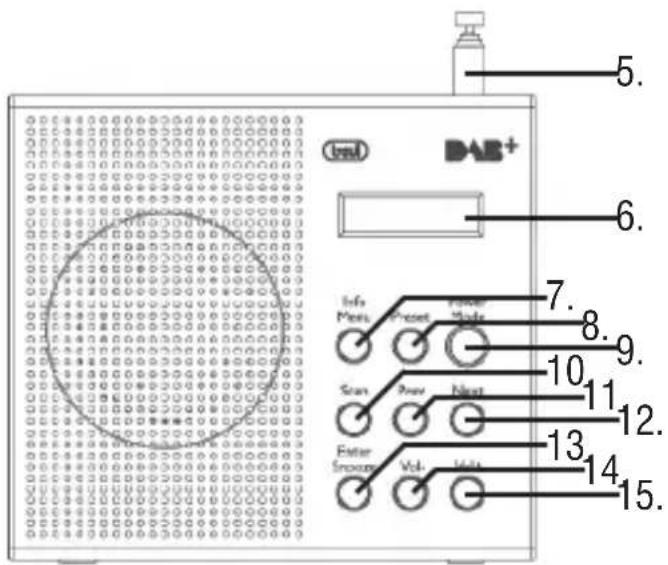
- Headphone jack
- LED charge indicator
- Input for power adapter
- ON / OFF switch
- Telescopic Antenna
- LCD Display
- INFO / MENU button
- PRESET button
- POWER / MODE button
- SCAN button
- PREV button
- NEXT Button
- ENTER / SNOOZE button
- VOL- Button
- VOL + Button
natural_image
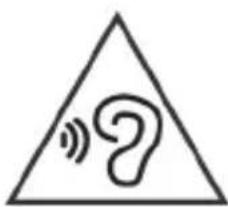
Warning symbol with a sine wave and a question mark inside a triangle (no text)To avoid possible hearing damage, limit the time listening at high volumes
CHARGING THE BATTERY
- Connect the power adapter to input(3).
- The LED charge indicator (2) will light up red to indicate charging.
Note: For a good battery life it is recommended to keep the unit switched off during charging. - When charge is completed, LED(3) will turn blue.
Note: With low battery display will flash Low Power.
POWER / STANDBY
- Extend the telescopic antenna (5).
- Turn the ON / OFF switch (4) to ON.
- Press the POWER / MODE button (9) to turn on the device.
- Press the POWER / MODE button (9) to switch between the receiving system DAB / DAB + and FM receiving system.
Note: When first turned on or after a reset to factory settings, the unit will automatically scan the stations DAB / DAB +.
- Hold for a few seconds, the POWER/MODE button (9) to switch the system to standby mode.
- Turn the ON / OFF switch (4) to the OFF position to turn off the device completely.
VOLUME ADJUSTMENT
- Press the VOL (14) or VOL + (15) to decrease or increase the volume.
SETTINGS MENU
- In radio mode, press and hold the INFO / MENU button (7), the display will show Menu Set.
- Press the PREV (11) and NEXT (12) and select the desired item among: Time / Date, Alarm 1 Set, Alarm 2 set, Sleep Set, Factory Reset, System version and FM Scan set (only in Radio FM).
- Press the ENTER / SNOOZE button (13) to enter the settings of the selected item.
Menu Set
Time / Date: Press the ENTER / SNOOZE button (13) to set Time (Hour) -> Minutes (Min) -> Year (Year) -> Month (Month) -> Data (Date). Press the PREV (11) and NEXT (12) to change the parameters.
Note: If the unit is turned off using the ON / OFF switch, the settings for Time / Date will be reset. After turning the unit on, the settings for Time / Date will be synchronized with the broadcast station.
Alarm 1/2 Set: press the ENTER / SNOOZE button (13) to set ON / OFF Alarm (Alarm 1 or 2) -> Time (Hour) -> Minutes (Min) -> Alarm Volume (Vol) -> Alarm mode DAB / FM / alarm (mode). Press the PREV (11) and NEXT (12) to change the parameters. When alarms are activated, standby the display shows the icon of a bell (two icons if the alarms are active simultaneously).
Sleep Set: allows you to select a time after which the radio will automatically shut down. Press the ENTER / SNOOZE button (13) to set the Sleep function; Press the PREV (11) and NEXT (12) to change the parameters of Sleep (OFF function, 120, 90, 60, 45, 30, 15, 5 minutes). When and 'enables the function, the display shows the letter S followed by the number of minutes off the car missing.
System version: To view the software version.
Factory Reset: press the ENTER / SNOOZE button (13) and select "Yes" if you want the device to return to their factory settings.
FM Scan setting (FM mode only): Press the ENTER / SNOOZE button (13) to enter the function and choose from:
Only: to start the search of the only stations with stronger signal.
All: to start the search of all stations (with weak and strong signal).
SWITCHING OFF THE ALARM
To disarm the alarm (radio or buzzer), press the POWER/MODE button (9) to stop it completely. If you want to silence the alarm, press the ENTER / SNOOZE button (13); the interruption lasts nine minutes, after which the alarm on again.
RADIO DAB / DAB +
- Press the POWER / MODE button (9) to select the DAB mode (DAB mode). At the first installation, the device will automatically activate the station search. If no signal, the screen will display “No station.”
i2. Press the SCAN button (10) to start the scan of DAB stations. During scanning, the display will show the progress bar and the number of stations stored. - Press the PREV (11) and NEXT (12) to display the list of received stations. Press the ENTER / SNOOZE button (13) to select the desired station.
Note: In DAB mode, the date and time of the device are synchronized with those of the station that is being listening.
TRANSMISSION INFORMATION DAB / DAB +
In DAB mode, the display will show a series of information about the current radio station.
- Press the MENU / INFO button (7) to change the displayed information.
Note: Not all DAB stations provide the information displayed by the device.
DLS: displays information about the song broadcast (artist, track title, etc ...).
Signal Strength: displays information about the signal strength via a bar on the display, the more the signal is stronger, the bar becomes full.
Program Type: Displays information about the type of material being broadcast.
Transmitter Name: displays information about the sender of the service.
Number / transmitter frequency: displays information relating to the number and frequency of DAB / DAB + broadcast station.
Signal Error index: Displays information about the level of signal errors in the current transmission. The lower the number, the better the signal quality.
Bit Rate: Displays information related to the transmission of the current compression ratio. The higher the value, the better the quality of the transmission.
Time: displays information relating to the hours of the current transmission.
Date: displays information about the date of the current transmission.
STORING STATIONS RADIO DAB / DAB +
- Press for a few seconds the PRESET (8), the display will show "Preset Store"
- Press the PREV (11) and NEXT (12) to select the number (1 through 10) where you want to save the radio station.
- Press the ENTER / SNOOZE (13) key to save, the display will show "Stored".
Note: You can save 10 stations Function DAB / DAB + and 10 FM radio stations in function.
SELECTING RADIO STATIONS STORED
- Press the PRESET (8), the display will show "Preset Recall".
- Press the PREV (11) and NEXT (12) to select the radio station number (1 to 10) stored that you want to recall.
- Press the ENTER / SNOOZE button (13).
RADIO FM
- Press the POWER / MODE button (9) to select FM mode.
- Press the PREV (11) and NEXT (12) to move backward or forward to 0.05MHz to make
a fine adjustment.
- Press and hold the PREV button (11) or NEXT (12) to move backward or forward quickly.
- Press the SCAN button (10) to tune to the next station with acceptable signal. Press and hold the SCAN button (10) for a few seconds to tune to the previous station with a better signal.
Note: The automatic scanning sensitivity can be adjusted in the menu “Settings” under “FM Scan Setting”.
TRANSMISSION INFORMATION FM
In FM mode, the display will show a series of information about the current radio station.
- Press the MENU / INFO button (7) to change the displayed information.
Note: Not all FM stations provide the information displayed by the device.
RDS Information: Displays information about the FM station.
PTY, Programme Type: displays information about the type of material being broadcast.
sender's name: Displays information about the FM station (name and frequency).
Time: displays information relating to the hours of the current transmission.
Date: displays information about the date of the current transmission.
STORAGE / FM RADIO STATIONS SELECTION
To store FM radio stations, refer to the paragraph “Storing stations Radio DAB / DAB +”.
CARE AND MAINTENANCE
This device is an electronic precision instrument; it is therefore recommended not to use it in a humid, dusty, with excessive temperature changes, and do not expose it to direct sunlight. For cleaning we recommend the ‘use of a soft, slightly damp cloth. Avoid solvents or abrasives.
TECHNICAL SPECIFICATIONS
Power: 5V ---
Battery: .... internal rechargeable Lithium battery
Frequency range DAB / +: ... 174-240 MHZ
Frequency range FM: 87.5-108MHz
Dimensions: 135x145x41 mm
INFORMATION ON THE REMOVAL AND DISPOSAL OF BATTERIES
Warning: the operation of removal and disposal is reserved to technical personnel!
- Remove the 5 screws that fasten the cabinet.
- Raise the rear moving.
- Disconnect the connector and remove the battery from its compartment.
Whatever type of battery used up, it should never be placed in household waste, fire or water. Each type of used battery must be recycled or disposed of at an appropriate dedicated collection points.
■ USERS INFORMATION pursuant to Legislative Decree No. 49 of March 14, 2014 "Implementation of Directive 2012/19 / EU on Waste Electrical and Electronic Equipment (WEEE)"
This wheeled bin symbol on the product indicates that at the end of its life must be collected separately from other waste. The user must, therefore, take the remote control integrates the essential components that got to its life to the appropriate differentiated collection centers for electronic and electro-technical waste, or return it to the dealer when purchasing a new appliance of equivalent type, in terms of one to one, or one to zero for equipment having longer side of less than 25 cm. Appropriate separate collection for the decommissioned equipment for recycling, processing and environmentally compatible disposal helps prevent negative impact on the environment and human health and promotes recycling of the materials making up the product. Illegal dumping of the product by the user entails the application of administrative sanctions stated in Legislative Decree n. Legislative Decree No. 49 of March 14, 2014.
WARRANTY
- This unit is guaranteed for a period of 24 months from the date of production printed on the product itself or on label on product.
- The warranty is valid only if the unit has not been tampered with. The warranty is valid only at authorized TREVI assistance centres, that will repair manufacturing defects, excluded replacement of labels and removable parts.
- TREVI is not liable for damage to people or things caused by the use of this unit or by the interruption in the use of this unit.
NOTES D'EMPLOI
CONDITIONS DE GARANTIE
SIMPLIFIED EU DECLARATION OF CONFORMITY
Hereby TREVI Spa declares that the radio equipment type DAB 791 R is in compliance with directive 2014 / 53 / EU.
The full text of the EU declaration of conformity is available at the following internet address www.trevi.it


- CARE AND MAINTENANCE
- IMPORTANT
- WARNING FOR A CORRECT USE OF RECHARGEABLE BATTERY
- DESCRIPTION AND CONTROLS
- CHARGING THE BATTERY
- POWER / STANDBY
- VOLUME ADJUSTMENT
- SETTINGS MENU
- Menu Set
- SWITCHING OFF THE ALARM
- RADIO DAB / DAB +
- TRANSMISSION INFORMATION DAB / DAB +
- STORING STATIONS RADIO DAB / DAB +
- SELECTING RADIO STATIONS STORED
- RADIO FM
- TRANSMISSION INFORMATION FM
- STORAGE / FM RADIO STATIONS SELECTION
- TECHNICAL SPECIFICATIONS
- INFORMATION ON THE REMOVAL AND DISPOSAL OF BATTERIES
- ■ USERS INFORMATION pursuant to Legislative Decree No. 49 of March 14, 2014 "Implementation of Directive 2012/19 / EU on Waste Electrical and Electronic Equipment (WEEE)"
- WARRANTY
- NOTES D'EMPLOI
- CONDITIONS DE GARANTIE
- SIMPLIFIED EU DECLARATION OF CONFORMITY
Brand : Trevi
Model : DAB 791 R
Category : Radio