imageRUNNER ADVANCE 4545i III - Printer CANON - Free user manual and instructions
Find the device manual for free imageRUNNER ADVANCE 4545i III CANON in PDF.

User questions about imageRUNNER ADVANCE 4545i III CANON
0 question about this device. Answer the ones you know or ask your own.
Ask a new question about this device
Download the instructions for your Printer in PDF format for free! Find your manual imageRUNNER ADVANCE 4545i III - CANON and take your electronic device back in hand. On this page are published all the documents necessary for the use of your device. imageRUNNER ADVANCE 4545i III by CANON.
USER MANUAL imageRUNNER ADVANCE 4545i III CANON
Please read "Important Safety Instructions" before operating this product. P.38
After you finish reading this guide, store it in a safe place for future reference.
The information in this document is subject to change without notice.


You can access canon.com/oip-manual to read the User's Guide that describes all functions of this machine.
English
Français
Deutsch
Italiano
Español
What is Your Question?
Contents
What's Your Problem?
The Machine Does Not Operate
P.6

natural_image
Illustration of a printer with a speech bubble containing three dots (no text or symbols on the printer itself)Check the Following First 6
The Machine Does Not Respond to the Computer....7
The Authentication Screen (Logon Screen) Is Displayed and You Cannot Go Further.... 7
If Paper Jams Occur
P.18

natural_image
Illustration of a printer with a speech bubble showing a folded paper (no text or symbols present)Paper Jams Occur 18
Paper Jams Occur Frequently 19
How to Load Paper
P.8
natural_image
Illustration of a printer emitting stacked documents (no text or symbols present)Loading Paper in the Paper Drawer ....8
When You Have Loaded a Different Type of Paper than the Preset One....9
Loading Paper in the Multi-Purpose Tray..... 10
Loading Paper with Printed Logos 12
Loading Envelopes 13
Scan/Fax Cannot Be Performed Successfully
P.24
text_image
Illustration of a printer with a printer icon and a question mark indicating unknown internal content, suggesting confusion or inquiry.If You Cannot Send Documents to a Server Using [Scan and Send]....24
Stopping Scanning/Faxing....24
Scanned Documents Cannot Be E-Mailed.....25
If You Cannot Send/Forward Faxes....26
If You Cannot Receive Faxes 27
natural_image
Illustration of a printer with an exclamation mark speech bubble (no text or symbols on the printer itself)Printing Results Are Not Satisfactory
P.15
text_image
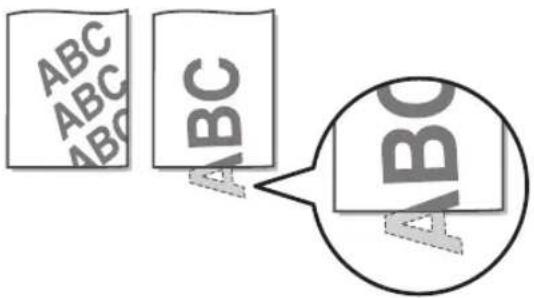
ABC ABC ABC ABCImages Are Shifted/Slanted.... 15
Irregularities Appear in Images/ Images Are Faint .... 15
Black Streaks Appear in Images 16
Bleed-through Occurs 17
Loading Paper or Paper Settings Cannot Be Done Successfully
P.20

flowchart
graph TD
    A["ABC"] --> B["ABC"]
    B --> C["ABC"]
    style A fill:#f9f,stroke:#333
    style B fill:#ccf,stroke:#333
    style C fill:#cfc,stroke:#333
Paper Is Not Fed 20
If the "Load paper." Message Is Displayed ..... 21
Printing Cannot Be Performed on the Expected Side of Paper....22
Printing Cannot Be Performed with the Expected Size....22
In Two-Sided Printing, the Print Direction Differs between the Front and Back Sides of the Paper 23
Canceling Copy/Print Jobs P.28
Installing the Printer Driver P.29
Replacement Parts P.30
An Error Screen is Displayed P.32
Illustrated Index P.34
Appendix P.38
Do You Want to Know More? P.43
You Can Consult the User's Guide....43
If You Notice a Search Number .....43
The Machine Does Not Operate
Check the Following First
Check 1
Is a message displayed on the touch panel display?
text_image
MessageSimple MessageNOTE
If an error message is displayed
P.32
Check2
IsLit?
text_image
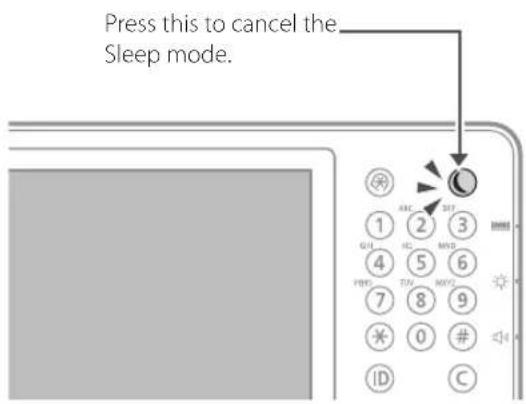
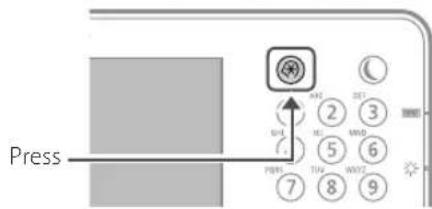
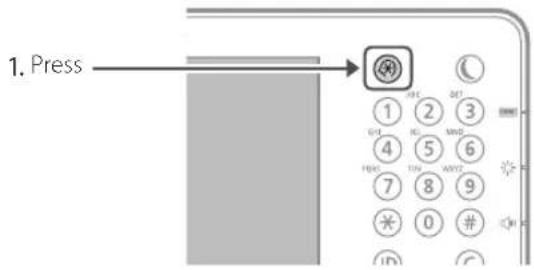
Press this to cancel the Sleep mode.Check3
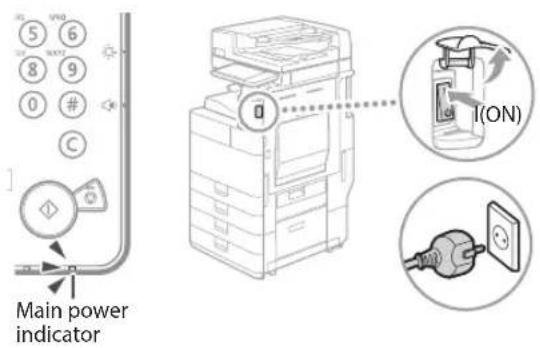
Is the main power indicator Off?
If the main power indicator does not light when you turn the main power ON, check the power plug.
text_image
Main power indicatorCheck4
Is the machine correctly connected to the computer?
Check the network connection.
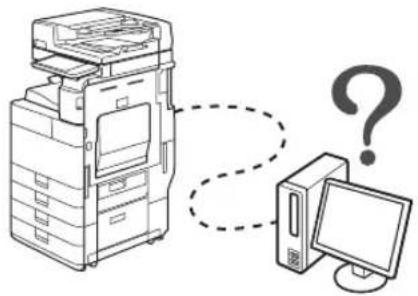
natural_image
Illustration of a desktop computer with a tower, tower case, and monitor connected by a dashed line with a question mark (no text or symbols present)Setting the network environment
User's Guide
0YRY-006
Search
How to use the search number → P.43
The Machine Does Not Respond to the Computer
Solution 1
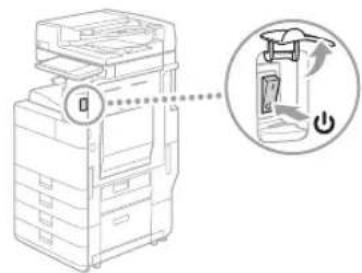
Restart the machine.
- Press the main power switch to turn off the machine.
CAUTION!
Note that turning OFF the machine deletes the data that is waiting to be printed.
text_image
Diagram showing a printer stack with a magnified view of the device's electrical switch mechanism.
text_image
1 2 3 4 5 6 7 8 9 * 0 # ID C + / - ◇ +-
Check that the main power indicator has turned off.
-
Press the power switch again.
Solution2
Install the printer driver again.
NOTE
For more information
P.29
Solution3
Set the IP address again.
Setting the IP address
User's Guide
0YRY-00K


How to use the search number → P.43
The Authentication Screen (Logon Screen) Is Displayed and You Cannot Go Further
Solution
Log on to the machine using a registered user ID.
To continue the operation when the authentication screen (logon screen) is displayed, it is necessary to log on with a registered user ID.
Logging on to the Machine
User's Guide
0YRY-022


How to use the search number → P.43
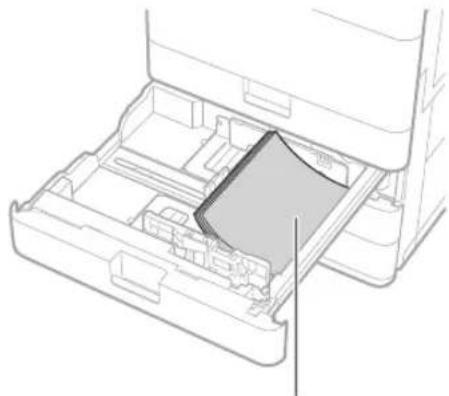
How to Load Paper
Loading Paper in the Paper Drawer
1
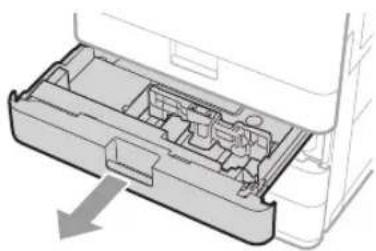
natural_image
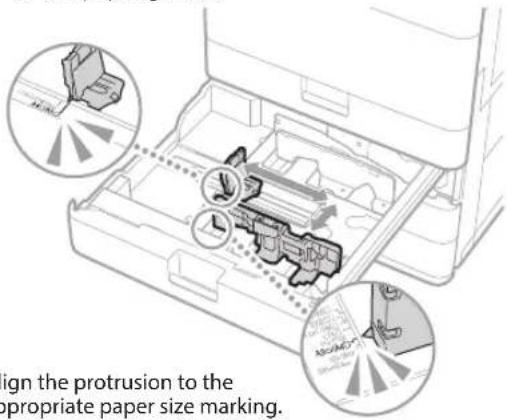
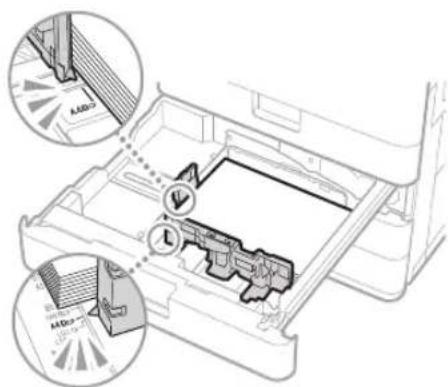
Diagram of a printer internal structure showing internal compartments and a downward arrow indicating orientation (no text or symbols)2
Slide the light blue knobs to adjust the positions of the paper guides.
text_image
sign the protrusion to the appropriate paper size marking.3
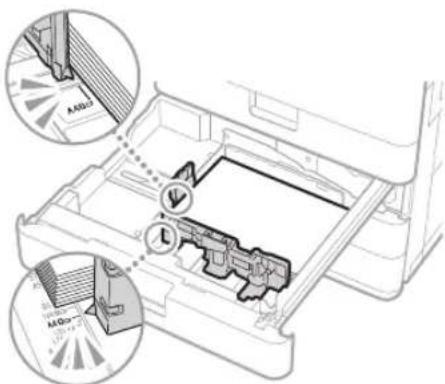
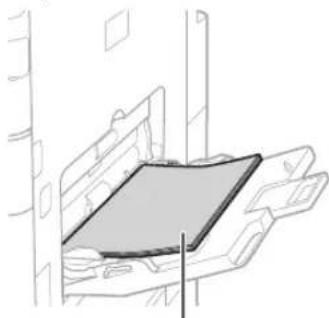
First fan the paper stack well and then load it.
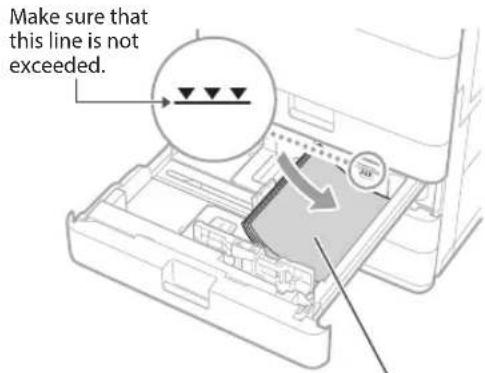
text_image
Make sure that this line is not exceeded.The print side face up
Paper Orientation
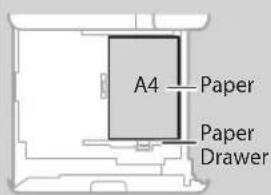
text_image
A4 Paper Paper Drawer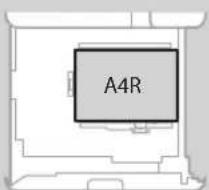
text_image
A4R4
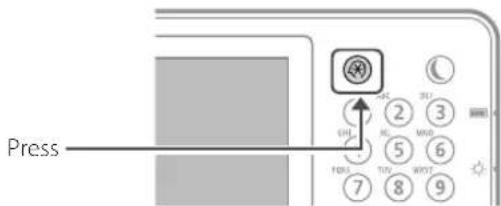
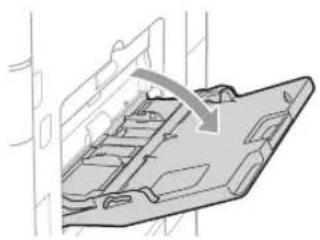
Place the paper drawer back into the machine.
CAUTION!
Be careful not to get your fingers caught between the paper drawer and the machine.
POINT
When you have changed the paper size, replace the paper size label with an appropriate one, as necessary. P.34
When you have loaded a different type of paper than the preset one, be sure to change the paper type setting. P.9
For available paper, see the following.
Hardware Specifications
OYRY-OKK
Search

How to use the search number P.43
When You Have Loaded a Different Type of Paper than the Preset One
1
text_image
Press CHL 2 3 RL MND 5 6 7 TUR WDT 8 92
Press [Preferences] [Paper Settings] [Paper Settings] on the touch panel display.
3

flowchart
graph LR
    A["Select the paper source."] --> B["1 A4"]
    A --> C["2 A4"]
    A --> D["3 A4"]
    A --> E["4 A4"]
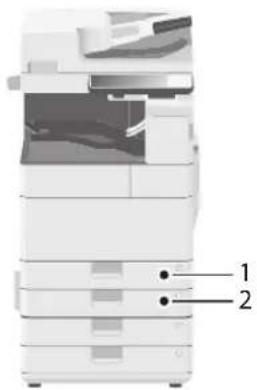
natural_image
Stacked printer or scanner device with labeled parts (1 and 2), no visible text or symbols on the device itself.POINT
Any paper source other than 1 and 2 is optional.
For more information

User's Guide
4
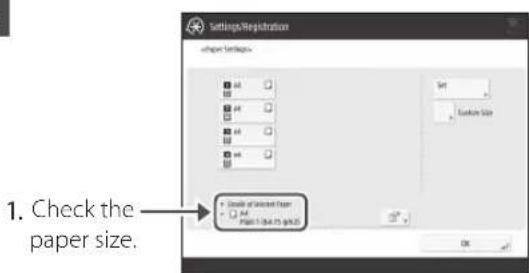
text_image
Settings/Registration wpap Settings Set Custom Size 1. Check the paper size. Create a Selected Paper Page 1 (File 25.ppt) OKPOINT
If the displayed paper size is different from the loaded paper size, adjust the paper guides.
- Press [Set].
5
- Select the - paper type.
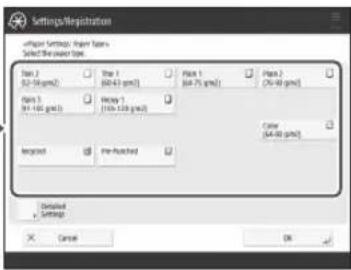
text_image
Settings/Registration Unique Settings: Insign Name= Select the power type. Plan 1 (52-58 pmol) Plan 2 (60-63 pmol) Plan 3 (61-65 pmol) Plan 4 (64-67 pmol) Plan 5 (65-69 pmol) Fines: (64-68 pmol) Recorded Pre-Peached Details Settings Cancel OKCAUTION!
Make sure to select paper type that matches the basis weight of the loaded paper.
- Press [OK].
6
Press [OK].
When you have loaded custom size paper
Specify the paper size manually.
Specifying free size paper (custom size paper) ↗ User's Guide
0YRY-02C
Search

How to use the search number → P.43
How to Load Paper
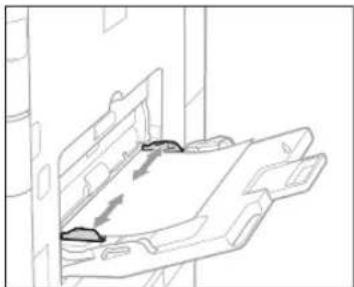
Loading Paper in the Multi-Purpose Tray
CAUTION!
When using coated paper or paper that does not feed well, load one sheet at a time.
1
natural_image
Technical diagram of a mechanical component with an arrow indicating direction (no text or symbols present)2
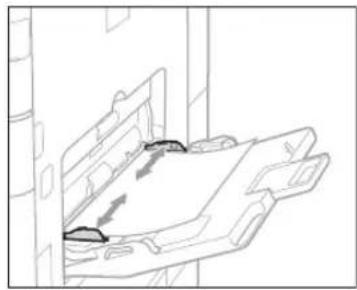
Adjust the position of the paper guides.
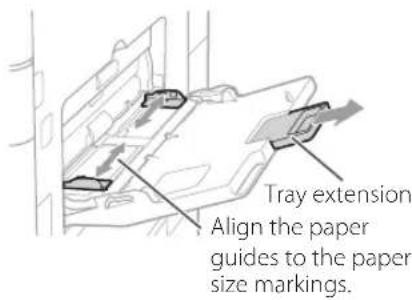
text_image
Tray extension Align the paper guides to the paper size markings.POINT
Pull out the tray extension when loading large-sized paper.
3
Fan the paper stack well, align the edges on a flat surface, and then load it.
Make sure that this line is not exceeded.
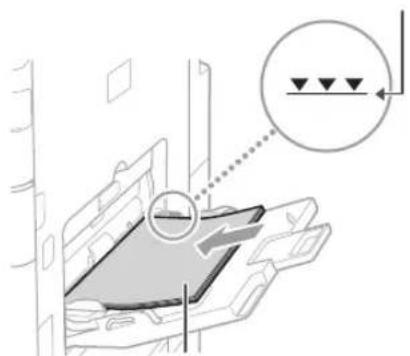
natural_image
Diagram of a device interior with directional arrows and a circular annotation (no text or symbols)The print side face down
4
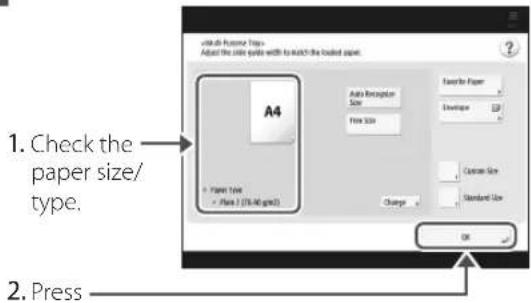
text_image
1. Check the paper size/ type. 2. PressIf the paper size/type setting does not match the paper you have loaded
In the screen for this step 4, change the setting manually.
1
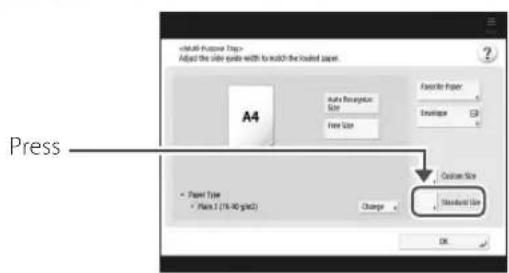
text_image
Adjust Purpose Traps Adjust the size guide width to match the loaded paper. A4 Auto Receptor Size Free Size Favorite Paper Envelope Press • Paper Type • Paper 1 (10x80 pixels) Change Custom Size Standard Size OK2
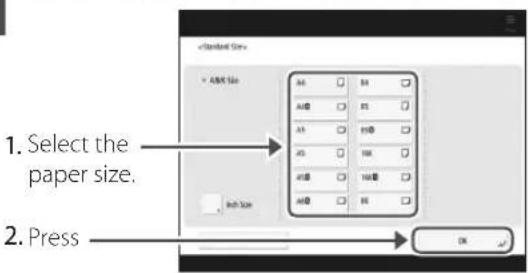
text_image
1. Select the paper size. 2. Press3
Press [Change] in [Paper Type].
4
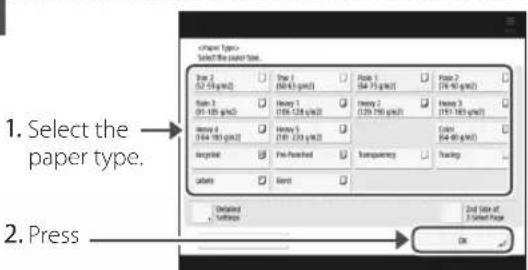
text_image
1. Select the paper type. 2. Press 确定 取消
For available paper, see the following.
Hardware Specifications
OYRY-OKK
Search

How to use the search number P.43
When you have loaded custom size paper
Specify the paper size manually.
Specifying free size paper (custom
size paper)

User's Guide
OYRY-02E
Search

How to use the search number → P.43
Printing on the back side of printed paper
- Load paper in the multi-purpose tray the print side face down.
- In the [Paper Type] selection screen, press [2nd Side of 2-Sided Page].
CAUTION!
For this operation, paper can only be loaded in the multi-purpose tray.
POINT
You can use only paper printed with this machine.
How to Load Paper
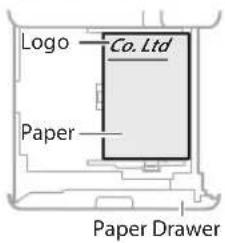
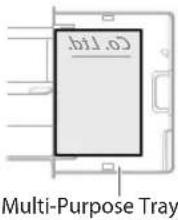
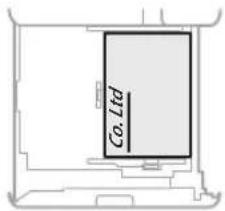
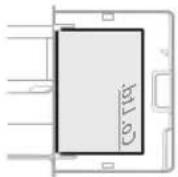
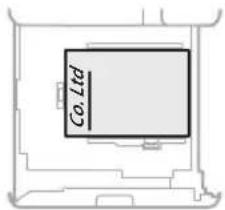
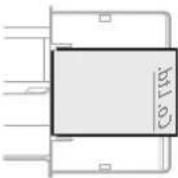
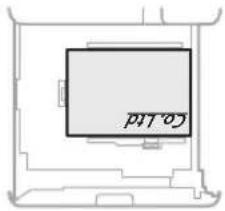
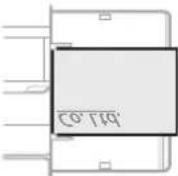
Loading Paper with Printed Logos
Refer to the table below to load paper with printed logos.
Example: When printing on A4 size paper
| Orientation | Printing result | |
| Paper Drawer Multi-Purpose Tray | ||
 |  |  |
 |  |  |
 |  |  |
 |  |  |
NOTE
When copying to paper with printed logos ↗ User's Guide
NOTE
Basic Paper Loading Operations
- For paper drawer

- For multi-purpose tray

Loading Envelopes
CAUTION!
- You can load envelopes in the paper drawer 2 or multi-purpose tray.
- Do not use envelopes that have glue attached to their flaps, as the glue may melt due to the heat and pressure of the fixing unit.
- Do not print on the reverse side of the envelopes (the side with the glued areas).
- For the paper drawer 2, load envelopes the front side face up, and for the multi-purpose tray, load them the front side face down. For the loading orientation, see the table below.
| Paper Drawer 2 Multi-Purpose Tray | ||
| ISO-C5 Monarch COM10 No.10 DL | 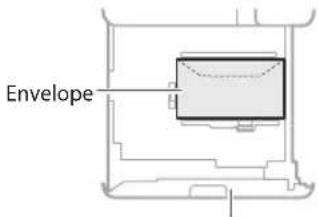 Paper Drawer 2 Paper Drawer 2 | 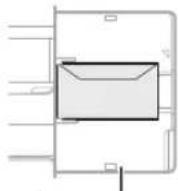 Multi-Purpose Tray Multi-Purpose Tray |
| Yougatanaga 3 | 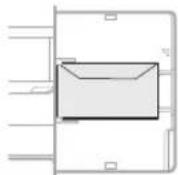 | |
| Nagagata 3 | 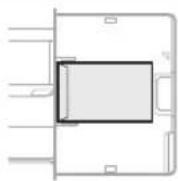 | |
| Kakugata 2 | 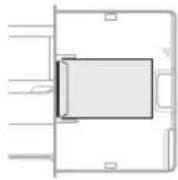 | |
Preparation before Loading Envelopes
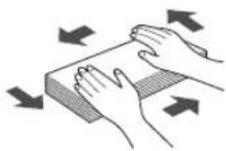
1 Take five or so pieces of envelopes, fan them well to eliminate curls, and level the stack flat.
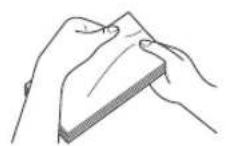
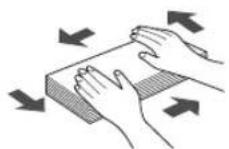
Press the stack along the four side edges.
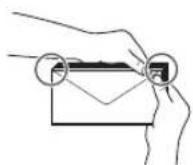
2 To prevent the sealing edge of the seal flap from floating from the body of the envelope, press the envelope in the four corners and expel the air.
How to Load Paper
When loading envelopes in the multi-purpose tray
1 Check the orientation of the stack of envelopes, and load it in the multi-purpose tray.
NOTE
Basic Handling Operations for the Multi-
Purpose Tray P.10
2
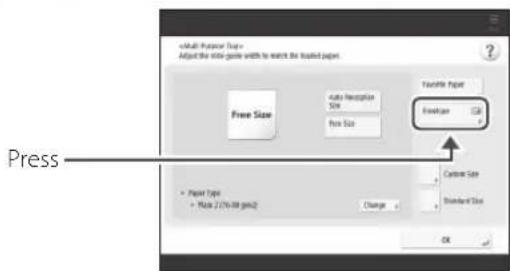
text_image
select Fourier Type Adjust the write game width to match the installed paper. Free Size Auto Receptible Size Free Size Text Paper English Press • Print Type • Print 2 (70x-89 pm2) Change Custom Size Standard Size OK3
text_image
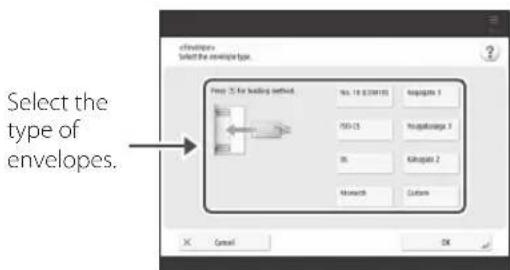
Select the type of envelopes. Prop 12 for loading method. No. 18 (2019) Regrates 1 PSI-15 Hapakamaya 3 B6 Kikugato 2 Network Custom OK Cancel4 Press [OK].
Loading custom size envelopes
You can load custom size envelopes only in the multi-purpose tray.
Making Settings for Custom Size
Envelopes → User's Guide
0YRY-02E


How to use the search number → P.43
When loading envelopes in the paper drawer 2
1 Check the orientation of the stack of envelopes, and load it in the paper drawer 2.
NOTE
Envelope Feeder Attachment-D1
User's Guide
2
text_image
Press PWR 2 3 5 6 7 8 93 Press [Preferences] [Paper Settings] [Register Envelope Drawer].
4

text_image
1. Select [ENV.1] or [ENV.2]. 2. Select the envelope type.Printing Results Are Not Satisfactory

Images Are Shifted/Slanted
Solution
Adjust the paper guides.
text_image
Technical diagram showing assembly of an LCD panel with labeled components and magnified views of the component.Adjust the guide exactly.
Multi-purpose tray
natural_image
Technical line drawing of a mechanical component or bracket assembly (no text or symbols)
Irregularities Appear in Images/Images Are Faint
Solution 1
The paper may have absorbed moisture. Replace it with paper that has not absorbed moisture.
Solution2
Perform gradation adjustment.
text_image
1. Press OK 1 2 3 UH HC MND 4 5 6 FREQ TIN AWTC 7 8 9 * 0 # (D) C- Press [Adjustment/Maintenance] ▶ [Adjust Image Quality] ▶ [Auto Adjust Gradation] on the touch panel display.
Follow the instructions in the screen to perform gradation adjustment.
For more information, see the User's Guide.
Adjusting gradation

User's Guide
OYRY-OHL


How to use the search number

P.43
Printing Results Are Not Satisfactory

Black Streaks Appear in Images
Solution
Clean the document feed scanning areas.
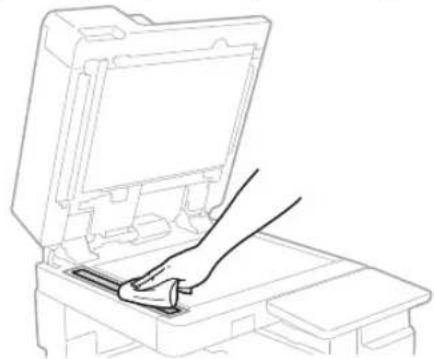
If the Single Pass DADF-A is attached:
- Turn OFF the machine, and unplug the power plug from the AC power outlet.
- Open the feeder, and clean the lower side document feed scanning area using the supplied glass-cleaning sheet.
NOTE
Do not use glass cleaner or an alcohol solution, etc., as they will strip away the stain-proof coating.
natural_image
Line drawing of a hand inserting a component into an open device (no text or symbols)- Open the cover.
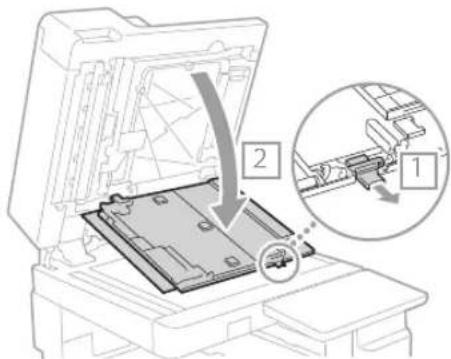
text_image
Diagram showing a printer's internal structure with labeled parts and a magnified view of the device's internal components.- Open the inner cover.
natural_image
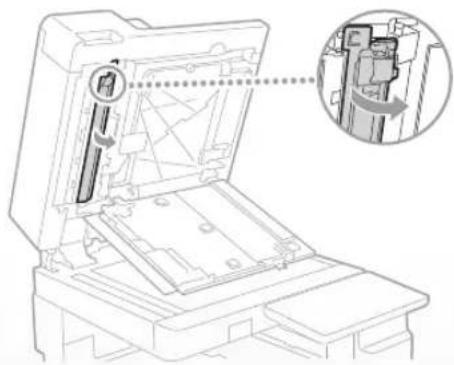
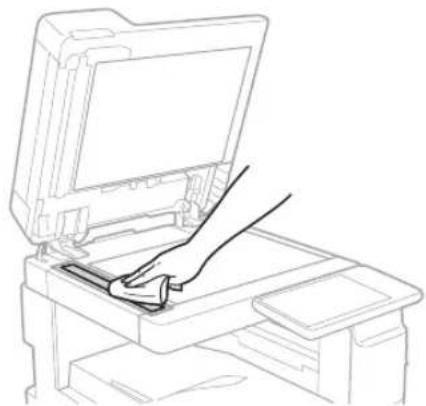
Technical line drawing of a printer or scanner with an inset showing internal components (no text or symbols)- Wipe the original scanning area.
Wipe the thin and long glass area.

text_image
long glass area.- Close the cover and inner cover.
- Close the feeder.
- Insert the power plug into the power outlet, and turn the power ON.
NOTE
If black streaks still appear after dirt removal, perform the following procedure to execute [Clean Feeder].
For more information → User's Guide
If the DADF-AV is attached:
- Open the feeder, and clean the lower side document feed scanning area using the supplied glass-cleaning sheet.
NOTE
Do not use glass cleaner or an alcohol solution, etc., as they will strip away the stain-proof coating.
natural_image
Line drawing of a hand cleaning a printer's tray (no text or symbols)- Close the feeder.
NOTE
If black streaks still appear after dirt removal, perform the following procedure to execute [Clean Feeder].
For more information

User's Guide

Bleed-through Occurs
Solution 1
Set the type of original properly.
If bleed-through is observed with the copy result, setting the type of original can improve the problem, giving a neat copy.
- Press [Copy (Prevent Bleed-Thru)] on the Home screen.

text_image
PowerPoint Red PowerPoint Red (8 or 12 selected) PowerPoint Red (8 or 12 selected) PowerPoint Red (8 or 12 selected)- Press [Yes].
Solution2
Set a lower background density.
text_image
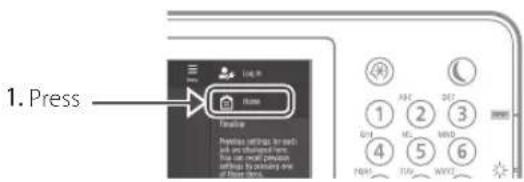
1. Press Home Press Presses: specifics to send and go on shared items Use on off record with the following one of these items: 1 2 3 4 5 6- Select the function on the touch panel display.
- Press [Options].
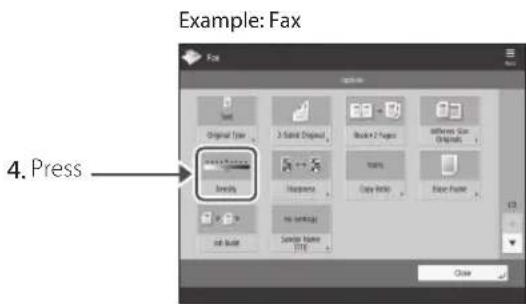
text_image
Example: Fax 4. Press Sendily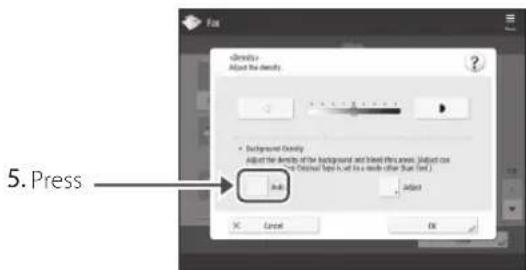
text_image
5. Press Add Cancel OK- Press [OK].
If Paper Jams Occur
Paper Jams Occur
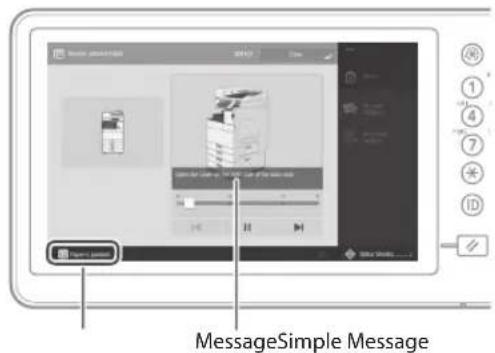
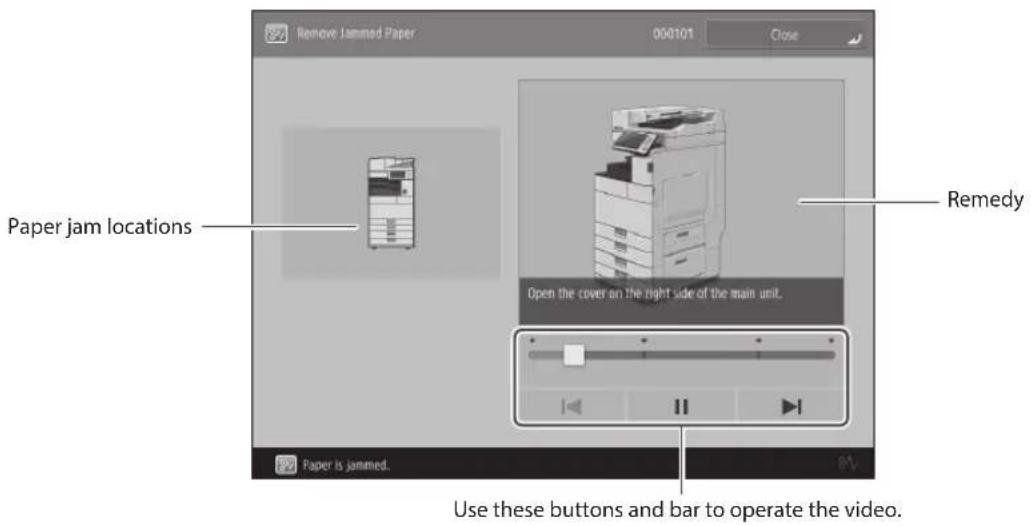
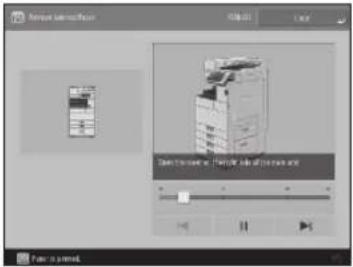
If paper jams occur, a screen like the following appears on the touch panel display.
Follow the instructions in the screen to remove the jammed paper.
text_image
Remove Jammed Paper 000101 Close Paper jam locations Remedy Open the cover on the right side of the main unit. Paper is jammed. Use these buttons and bar to operate the video.POINT
The screen disappears once all the jammed paper is removed and all the machine's covers and drawers are closed correctly.
If you do not understand the remedy by referring to the screen
See the User's Guide to make sure of the remedy.
Paper jams

User's Guide
OYRY-OJX


How to use the search number → P.43
Paper Jams Occur Frequently
Solution 1
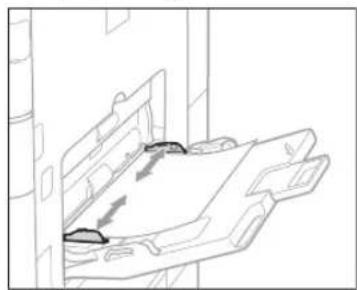
Adjust the paper guides.

text_image
Technical diagram of a printer internal structure with labeled parts and magnified views showing component detailsAdjust the guide exactly.
Multi-purpose tray
natural_image
Line drawing of a mechanical component or bracket with no visible text or symbolsSolution2
Check the paper feed.
If paper jams occur due to overlapping of sheets of paper when being fed, reload the paper by changing the orientation.
Solution3
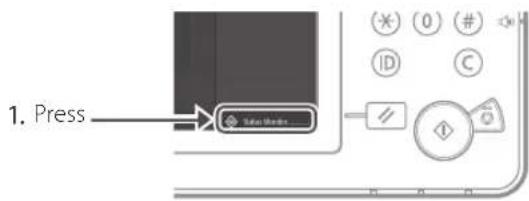
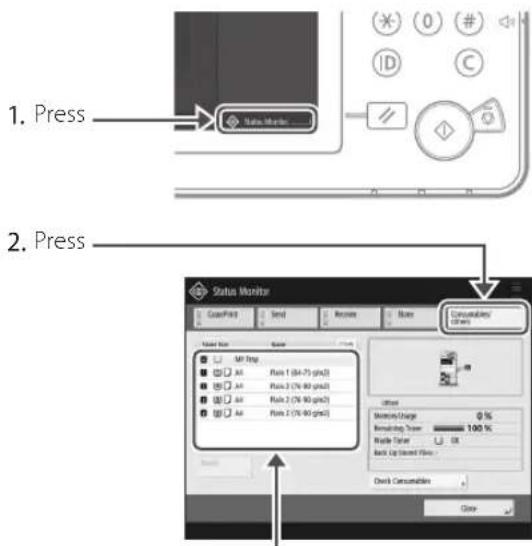
Check the paper type setting.
text_image
1. Press Send Books
text_image
2. Press Status Monitor Consumption Others OK Sensit/Usage 0 % Imaging Time 100% Route Taper OK Back Up Closed Film Check Consipation Close-
If the paper type setting does not match the loaded paper, change the setting.
-
For paper drawer P.8
- For multi-purpose tray P.10
- For optional paper sources ➞ User's Guide
Solution4
Remove paper fractures.
If you forcibly remove the jammed paper, torn scraps of paper may remain in the main unit or optional devices. If paper tears, check that there are no scraps of paper inside and try to remove all of the scraps (Do not try to pull out the jammed paper forcibly).
Loading Paper or Paper Settings Cannot Be Done Successfully

Paper Is Not Fed
Solution 1
Open the paper source to check whether paper has been loaded properly.
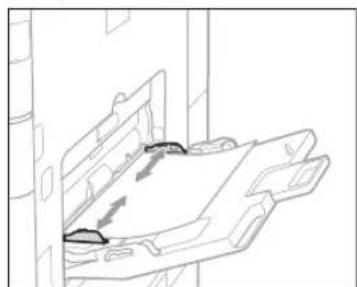
- Adjust the paper guides

text_image
Technical diagram of a printer with labeled components and directional arrows indicating flow or movementAdjust the guide exactly.
Multi-purpose tray
natural_image
Technical line drawing of a mechanical component or bracket assembly (no text or symbols)- Check if the paper is sticking together. First fan the paper stack well and then load it.
- Check whether the appropriate paper has been loaded in the paper source. For available paper, see the following.
Hardware Specifications

User's Guide
OYRY-0KK


How to use the search number

- Remove the excess amount of paper. Make sure that the paper stack does not exceed the load limit line (▼).
- Load paper of the same size and same type in the same paper source.
You cannot load paper of different sizes or different types in one paper source.
Solution 2
Check the paper type setting.
text_image
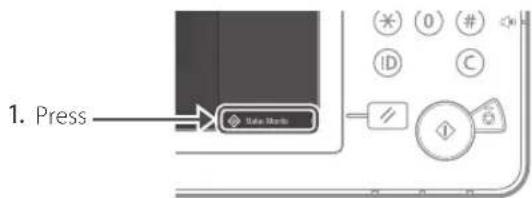
1. Press State March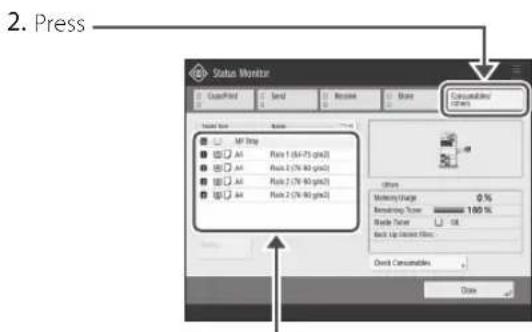
text_image
2. Press Status Monitor GazgFirst Send Remove Share Consumables Users MF Ship Alt Alt Alt Alt Alt Alt Rate 1 (64-75 gmx2) Alt Alt Alt Alt Rate 2 (75-80 gmx2) Alt Alt Rate 2 (75-80 gmx2) Alt Rate 2 (75-80 gmx2) Outflow Networking Charge 0 % Remaining Time 100% Trade Order Alt Back Up Offset Filter... Check Consumables Close-
If the paper type setting does not match the loaded paper, change the setting.
-
For paper drawer ➞ P.8
- For multi-purpose tray P.10
- For optional paper sources ➞ User's Guide

If the "Load paper." Message Is Displayed
Solution 1
Replenish paper.
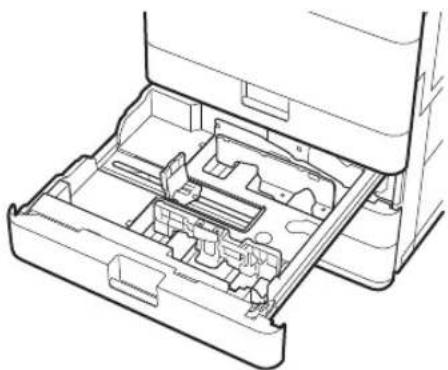
natural_image
Technical line drawing of an open mechanical device with internal compartments and housing (no text or symbols)If the paper source is vacant, replenish paper.
Solution2
Adjust the paper guides.
text_image
Technical diagram of a printer internal structure with labeled parts and magnified views showing component detailsAdjust the guide exactly.
Multi-purpose tray
natural_image
Technical line drawing of a mechanical component or bracket assembly (no text or symbols)Solution3
Check the paper type setting.
text_image
1. Press 2. Press Status Monitor Count/Point Send Record Main Conservative/ others Main Box Main Mtl Trip All All All All Pass 1 (84-75 gpm2) Pass 2 (76-80 gpm2) Pass 3 (76-80 gpm2) Pass 2 (76-80 gpm2) Pass 3 (76-80 gpm2) Close Consumable Close-
If the paper type setting does not match the loaded paper, change the setting.
-
For paper drawer ➞ P.8
- For multi-purpose tray ➞ P.10
• For optional paper sources ➕ User's Guide
Solution4
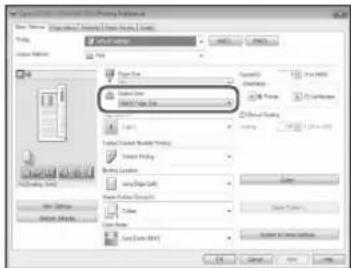
Make sure that the original size and output paper size are correct.
- Check the original size and possible output sizes on the [Printing Preferences] screen of the printer driver.
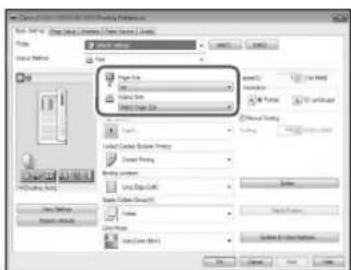
text_image
File Edit View Insert Options File Edit View Insert Options Project Project Data Project Name Project Type Project Status Project Details Project Settings Project Tools Project Options Project Details Project Settings Project Details Project Settings Project Details Project Settings Project Details Project Settings Project Details Project Settings Project Details Project Settings Project Details Project Settings Project Details Project Settings Project Details Project Settings Project Details Project Settings Project Details Project Settings Project Details Project Settings Project Details Project Settings Project Details Project Settings Project Details Project Settings Project Details Project Settings Project Details Project Settings Project Details- Load paper of the size matching the original size setting.
POINT
To print on paper of a size different from that of the original, manually specify the paper size to print on with [Output Size].
Loading Paper or Paper Settings Cannot Be Done Successfully

Printing Cannot Be Performed on the Expected Side of Paper

Printing Cannot Be Performed with the Expected Size
Solution
Load paper in the correct orientation and with the correct side face up/down.
- Check the loaded paper for correct orientation and correct printing side.
Paper Drawer
natural_image
Line drawing of an open drawer with a highlighted internal component (no text or symbols)The print side face up
Multi-Purpose Tray
natural_image
Technical line drawing of a mechanical component or bracket with no visible text or symbolsThe print side face down
NOTE
For optional paper sources → User's Guide
- If the check result indicates that the paper is not loaded correctly, reload the paper correctly.
Solution
Make sure that the paper size setting matches the size of the loaded paper.
- Replace the loaded paper with paper of the size you want to print.
POINT
If you want to print on the loaded paper, skip this step 1.
- Change the printer driver's setting of [Output Size] so as to match with the paper to be printed on.
text_image
File Edit View Insert All Files File Edit View Insert All Files Format: Layout File Layout File Layout File Layout File Layout File Layout File Layout File Layout File Layout File Layout File Layout File Layout File Layout File Layout File Layout File Layout File Layout File Layout File Layout File Layout File Layout File Layout File Layout File Layout File Layout File Layout File Layout File Layout File Layout File Layout File Layout File Layout File Layout File Layout File <|box_start|>100% (100%) (100%) (100%) (100%) (100%) (100%) (100%) (100%) (100%) (100%) (100%) (100%) (100%) (100%) (100%) (100%) (100%) (100%) (100%) (100%) (100%) 45.256.256.256.256.256.256.256.256.256.256.256.256.256.256.256.256.256.256.256.256.256.256.256.256.256.257.257.257.257.257.257.257.257.257.257.257.257.257.257.257.257.257.257.257.257.257.258.258.258.258.258.258.258.258.258.258.258.258.258.258.258.258.258.258.258.259.259.259.259.259.259.259.259.259.259.259.259.259.259.259.259.259.259.259.260.260.260.260.260.260.260.260.260.260.260.260.260.260.260.260.260.261.
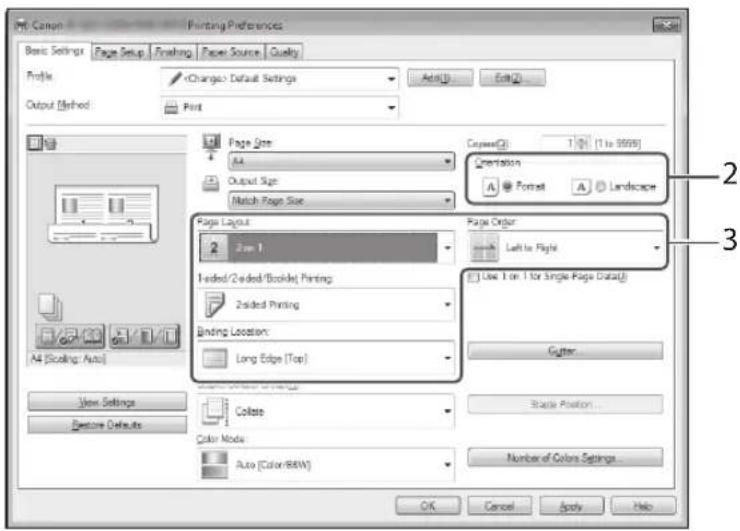
In Two-Sided Printing, the Print Direction Differs between the Front and Back Sides of the Paper
Solution
Make settings for two-sided printing.
- In the application's print setting screen, select the print direction.
- In the [Printing Preferences] screen of the driver, set [Orientation] for the direction selected in step 1.
- While viewing the preview image, make settings in the order of: [Page Layout] ▶ [Page Order]* ▶ [1-sided/2-sided/Booklet Printing] ▶ [Binding Location].
POINT
*: [Page Order] is only displayed when you set [Page Layout] to [2 on 1] or other option for printing multiple pages on one physical.
text_image
Canon Printing Preferences Basic Settings Page Setup Fishing Paper Source Quality Profile: Change: Default Settings Auto(I) Edit(O) Output (Method): Port Page Size A4 Output Size: Match Page Size Orientation A Portrait A Landscape Page Layout 2 Zoom 1 Ordered/Ordered/Booklet Printing Ordered Printing Binding Location: Long Edge (Top) Page Order Left to Right Low 1 on 1 for Single Page Data(0) Gutter Colate Paste Position... Color Mode Auto (Color/BBW) Number of Colors Settings... OK Cancel Apply Help A4 (Scaling: Auto) View Settings Restore Defaults| Orientation | |||
| Portrait Landscape | |||
| Binding Location | Short Edge |  |  |
| Long Edge |  |  | |
Scan/Fax Cannot Be Performed Successfully
If You Cannot Send Documents to a Server Using [Scan and Send]
Solution
Check the server information.
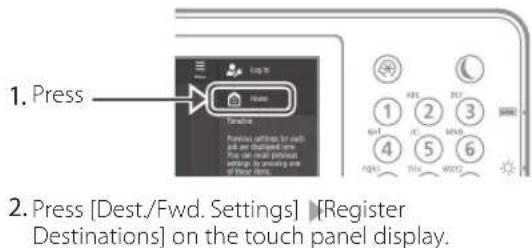
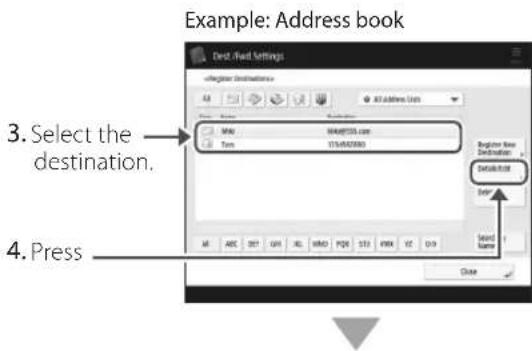
If you have updated something including the login password for the server (computer), change the information registered to the address book/one-touch buttons.
text_image
1. Press Press Presses waiting for next 200 on keyboard This can use a previous software to press any all other devices.- Press [Dest./Fwd. Settings] [Register Destinations] on the touch panel display.
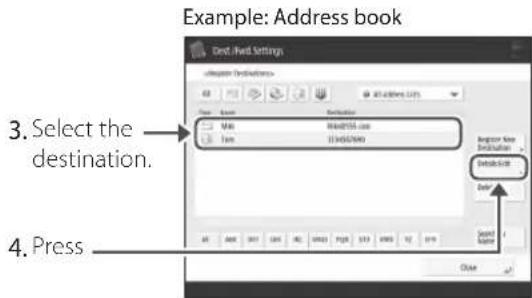
text_image
Example: Address book 3. Select the destination. 4. Press
text_image
5. Change the registered information. 6. PressPOINT
To check the connection after changing the registered information, press [Check Connection].
NOTE
For more information P.25 "To change registered information"
Stopping Scanning/Faxing
To stop the paper feed
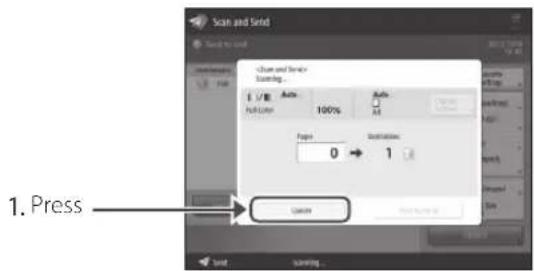
text_image
Scan and Send Check up and end Close and Send Sampling... 100% Auto... Auto... Auto... Auto... Auto... Auto... Auto... Auto... Auto... Auto... Auto... Auto... Auto... Auto... Auto... Auto... Auto... Auto... Auto... Auto... Auto... Auto... Auto... Auto... Auto... Auto... Auto... Auto... Auto... Auto... Auto... Auto... Auto... Auto... Auto... Auto... Auto... Auto... Auto... Auto... Auto... Auto... Auto... Auto... Auto... Auto... Auto... Auto... Auto... Auto... Auto 1. Press Cancel OK Cancel- Press [Yes].
POINT
You can also stop the paper feed by pressing on the control panel.
To cancel the sending of scanned data
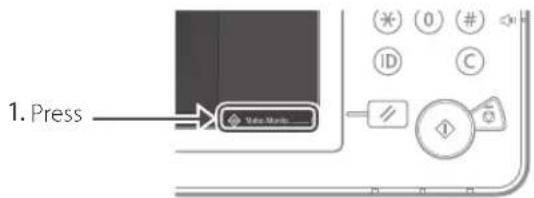
text_image
1. Press View Menu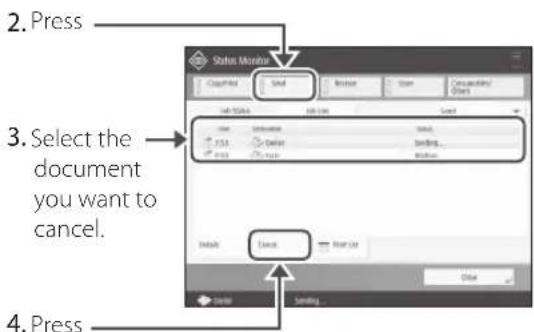
text_image
2. Press 3. Select the document you want to cancel. 4. Press- Press [Yes].
POINT
From the "Fax" or "Scan and Send" screen, press to switch to the send status screen.
Scanned Documents Cannot Be E-Mailed
Solution 1
Check the information of the destination.
If any update has been done, change the information registered to the address book/one-touch buttons.
text_image
1. Press 2. Press [Dest./Fwd. Settings] | Register Destinations] on the touch panel display.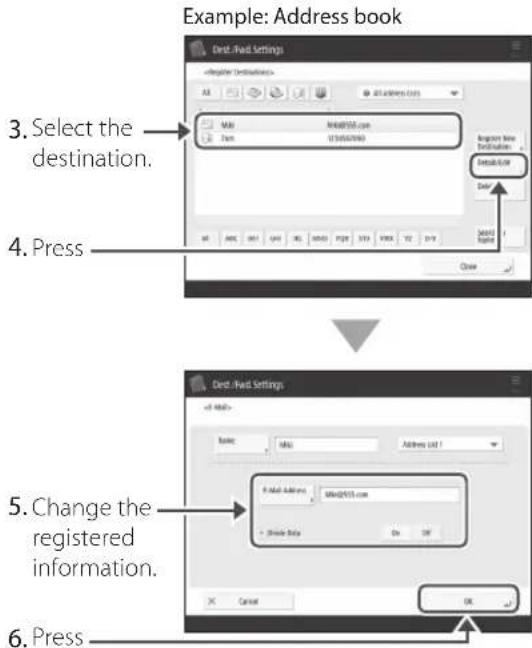
text_image
Example: Address book 3. Select the destination. 4. Press 5. Change the registered information. 6. PressNOTE
For more information ➤ "To change registered information" on the right
Solution2
If e-mailing of documents is not possible at all, make correct communication settings for the SMTP/ DNS server. For the setting procedures, see the User's Guide.
To specify the port number for SMTP TX/POP RX
- Press
- On the touch panel display, press [Function Settings] ▶ [Send] ▶ [E-Mail/ I-Fax Settings] ▶ [Specify Port Number for SMTP TX/POP RX].
- Specify the port number.
- Press [OK].
E-mail/l-fax communication settings

text_image
User's Guide 0YRY-017 SearchConfiguring DNS

text_image
User's Guide 0YRY-00X SearchHow to use the search number → P.43
To change registered information
When the information registered to the address book/one-touch buttons, edit and re-register it.
Editing the address book

text_image
User's Guide 0YRY-039 SearchEditing the one-touch buttons

text_image
User's Guide 0YRY-03C SearchHow to use the search number → P.43
Scan/Fax Cannot Be Performed Successfully
If You Cannot Send/Forward Faxes
If no faxes can be sent
Check if the telephone line is not connected to a wrong location.
- Call the destination fax number from this machine.
If no beep (dial tone) is heard
The modular cable (the telephone line for faxing) is not connected or is plugged into a wrong connector. Check the modular cable, and plug it into the appropriate connector.
text_image
LINE 1If audio guidance is heard or if the machine cannot be connected to the destination fax number (no fax dial tone is heard)
There may be a problem with the destination or your telephone carrier. Contact the destination.
If you cannot forward faxes
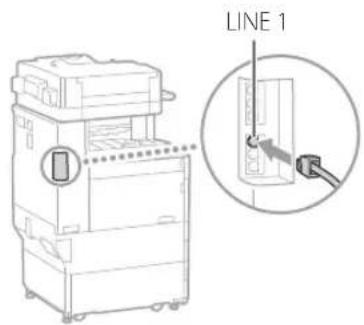
Check the information of the forwarding destination registered to the address book/one-touch buttons. If anything is wrong with the information, correct it.
text_image
1. Press Press Presses settings for each unit on the following: This can read previous settings to be placed one of these units.- Press [Dest./Fwd. Settings] [Register Destinations] on the touch panel display.
text_image
Example: Address book 3. Select the destination. 4. Press Add. Red Settings Register Destination Add. Red Register New Destination Default Add Save Name Close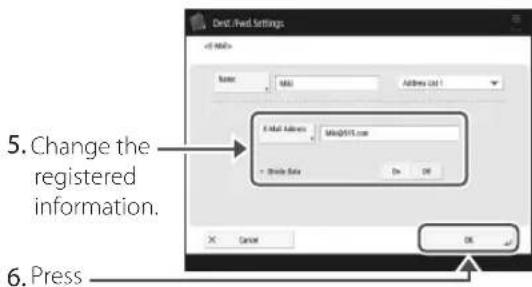
text_image
Direct/Fixed Settings <1 Mail> Name: M&U Address List 1 E-mail Address: Mw@fxt.com Show Data Do OK Cancel OK 5. Change the registered information. 6. PressNOTE
For more information ➕ P.25 "To change registered information"
If You Cannot Receive Faxes
If you are using an optical line or IP telephone line
Communication errors may occur depending on the line quality.
For more information, contact your telephone carrier.
Reduce the fax transmission speed.
Reducing the fax transmission speed may result in a communication error reduction.
text_image
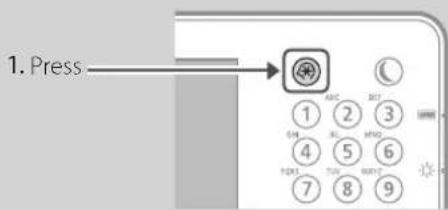
1. Press ① ABC ② SET ③ ④ ⑤ ⑥ ⑦ TUL MINT- Press [Function Settings] [Send] ▶ [Fax Settings] on the touch panel display.
- Press [TX Start Speed].
- Select a slower speed than the current one.
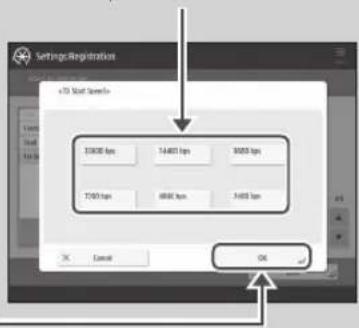
text_image
Settings Registration +10 Start Speeds $3000 bps $4400 bps $6000 bps $7000 bps $8000 bps $9000 bps OK- Press
POINT
You can also set the transmission speed from the preferences for the address book or one-touch buttons. For more information → User's Guide
Solution 1
Delete unnecessary documents in the memory to increase the free space.
text_image
1. Press Press Presses settings for each Job can be designed to You can check personal with your own use of their home.- Press [Fax/I-Fax Inbox] ▶ [Memory RX Inbox] ▶ [Memory RX Inbox] on the touch panel display.
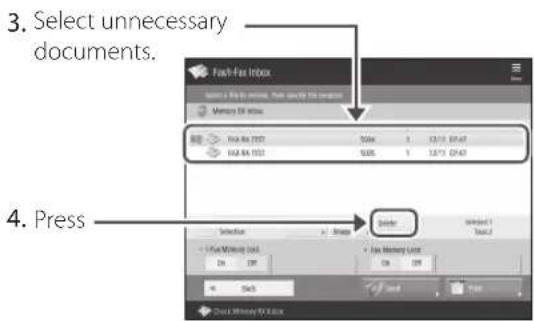
text_image
3. Select unnecessary documents. 4. Press- Press [Yes].
Solution 2
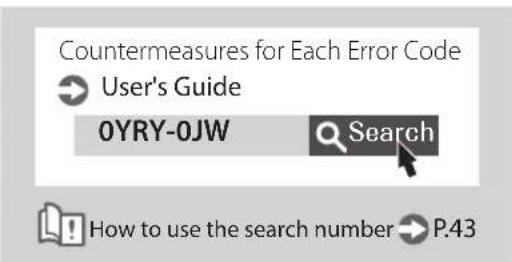
Find the remedy using the number that follows the letter "#."
If sending or receiving of a fax fails, a number following "#" (error code) is displayed on the touch panel display or in the communication management report. You can find the remedy using the error code.
text_image
Countermeasures for Each Error Code User's Guide 0YRY-0JW Search How to use the search number P.43Canceling Copy/Print Jobs
Canceling a Copy Job Canceling a Print Job
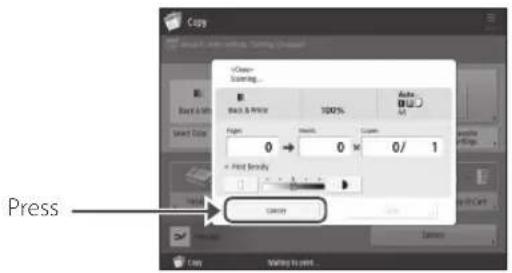
To stop the paper feed
text_image
Copy +/- Back & Print 100% Auto BUT All Page 0 → 0 × 0/ 1 + Print Density 1 Cancel PressPOINT
You can also stop the paper feed by pressing on the control panel.
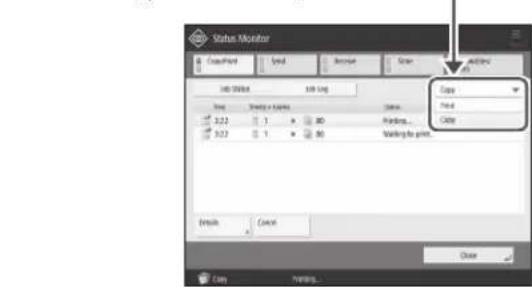
To cancel a copy job waiting to be output
text_image
1. Press Data Menu- Select [Copy] from the drop-down list.
text_image
Status Monitor Couch Print Symbol Remove Close Add/Remove File Path Edit Path Copy Print Copy 10.22 1 80 Printing... 10.22 1 80 Marking to print... Details Cancel Close Help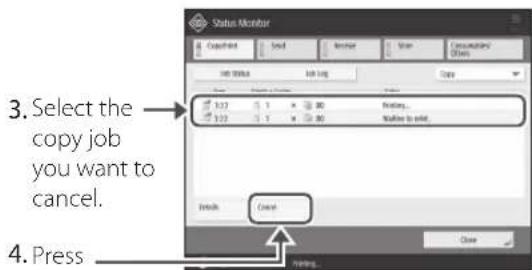
text_image
3. Select the copy job you want to cancel. 4. Press- Press [Yes].
For Windows OS
- In the computer screen, double-click the printer icon.

text_image
Customize...- Select the file you want to cancel.
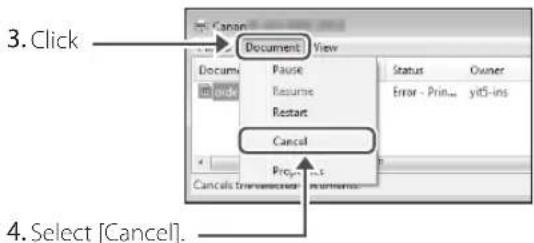
text_image
3. Click Document View Pause Resume Restart Status Owner Error - Print... yt5-ins Cancel Cancel 4. Select [Cancel]- Click [Yes].
For Mac OS
- In the computer screen, click the printer icon on the Dock.

-
Select the file you want to cancel.
-
Click [Delete].
Installing the Printer Driver
Installing the Printer Driver
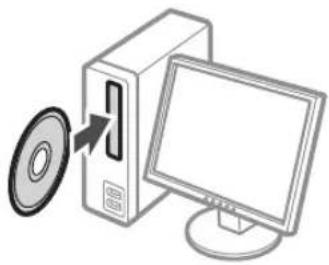
Using the User Software CD-ROM/DVD-ROM
By using the User Software CD-ROM/DVD-ROM supplied with the machine, you can install the printer driver on your computer with ease.
natural_image
Illustration of a desktop computer with a CD and monitor, no text or symbols presentPOINT
For details of printer driver installation, see the Driver Installation Guide. The Guide can be downloaded from, or viewed on, the Canon website (http://www.canon.com/).
Downloading from the Canon website
You can download the latest printer driver from the Canon website (http://www.canon.com/).

flowchart
graph TD
    A["Saturn"] --> B["Download Icon"]
    B --> C["Computer Monitor"]
POINT
For details of printer driver installation, see the Driver Installation Guide. The Guide can be downloaded from, or viewed on, the same page of the Canon website as for the printer driver.
Latest OS support information
See the Canon website (http://www.canon.com/).
If a printer driver for this machine is already installed on your computer
Depending on your system environment, it is necessary to uninstall the old driver and install the new one. For the uninstallation procedure, see the Driver Installation Guide.
Replacement Parts
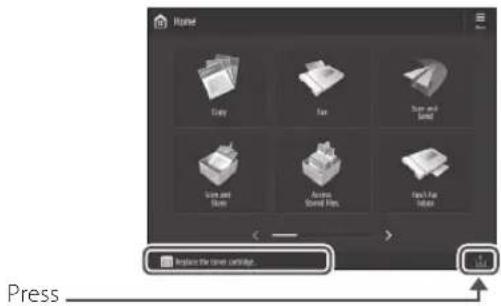
Replacing Consumables by Referring to a Motion Video
When a consumable used in the machine is nearing the time for replacement, a screen prompting you to replace it appears on the touch panel display. Replace the consumable in question by referring to the screen.
1
Example: Toner cartridge
text_image
Home Etsy Fox New and New Sina and Sina Acacia, Normal Files New & New Press PressPOINT
Depending on the condition of the consumable, a screen like the one shown under step 2 may appear first.
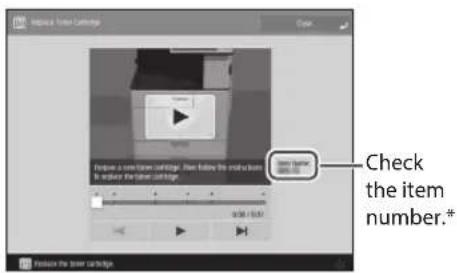
2
Prepare the consumable.
text_image
Replace a lower cartridge Check the item number.* Save Button Check the item number.** This is an item number identifying a Canon genuine consumables. For high quality printouts, we recommend that you use Canon genuine consumables.
NOTE
List of Consumables

P.31
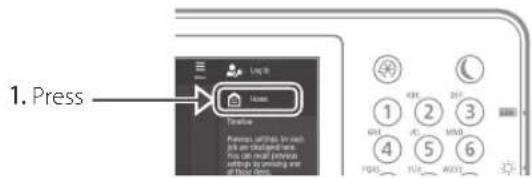
To check the item number of a consumable in the normal operation screen
- Press on the touch panel display.
- Check [Consumables/ Others] ▶ [Check Consumables] on the touch panel display.
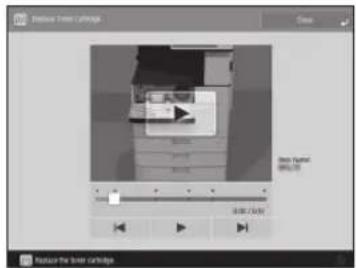
3
Replace the consumable by referring to the screen.
text_image
Release Time Catalogs File Bench Bench Bench / Action Add to: 100% Add to: 100%POINT
The screen and messages may vary depending on the consumable.
List of Consumables
| Type Item number | Replacement procedureIf video guidance does not help you understandthe replacement procedure, see the User's Guide | |
Toner Cartridge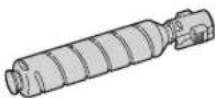 | Canon genuine toner cartridge.Canon C-EXV 53 Toner Black | Replacing the Toner CartridgeUser's Guide0YRY-OH4SearchHow to use the search numberP.43 |
Stamp Cartridge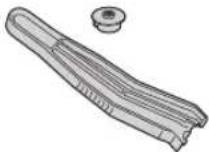 | Stamp Ink Cartridge-C1This can be used with the following options. Stamp Unit-B* | Replacing the Stamp CartridgeUser's Guide0YRY-OH6SearchHow to use the search numberP.43 |
Staple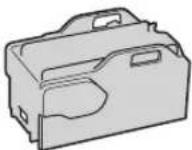 | Staple-P1This can be used with the following options.Staple Finisher-YBooklet Finisher-YInner Finisher-J | Replacing the StaplesUser's Guide0YRY-OH7SearchHow to use the search numberP.43 |
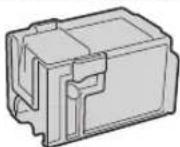 | Staple Cartridge-Y1This can be used with the following options.Booklet Finisher-Y | |
* Depending on the machine you are using, the Stamp Unit-B is standard-equipped.
CAUTION!
- Avoid storing toner cartridges vertically.
- Store toner cartridges in a cool place, not exposed to direct sunlight. A preferable environment is one where temperature is not higher than 30^ and humidity is not higher than 80% .
[Be careful of counterfeit toners]
Please be aware that there are counterfeit Canon toners in the marketplace. Use of counterfeit toner may result in poor print quality or machine performance. Canon is not responsible for any malfunction, accident or damage caused by the use of counterfeit toner.
For more information, see global.canon/ctc.
Genuine Consumables
Canon continuously develops technology innovations in Canon manufactured Toner, Cartridge, and Parts, specifically designed for use in Canon Multi-Functional machines.
Experience the benefits of optimal print performance, print volume and high quality outputs, achieved through Canon's new advanced technologies. Therefore, the use of genuine consumables is recommended for your Canon Multi-Functional machines.

CANON
GENUINE
TONER, CARTRIDGE & PARTS
An Error Screen is Displayed
An Error Message Is Displayed
If an error occurs during scanning or printing or if a problem occurs with network connection or setting, a message is displayed on the touch panel display or the Remote UI.
Touch Panel Display
text_image
Newark Lab File Edit View Help Save As... Save As... Save As... Save As... Save As... Save As... Save As... Save As... Save As... Save As... Save As... Save As... Save As... Save As... Save As... Save As... Save As... Save As... Save As... Save As... Save As... Save As... Save As... Save As... Save As... Save As... Save As... Save As... Save As... Save As... Save As... Save As... Save As... Save As... Solve as... Solve as... Solve as... Solve as... Solve as... Solve as... Solve as... Solve as... Solve as... Solve as... Solve as... Solve as... Solve as... Solve as... Solve as... Solve as... Solve as... Solve as... Solve as... Solve as... Solve as... Solve as... Solve as... Solve as... Solve as... Solve 100%Remote UI
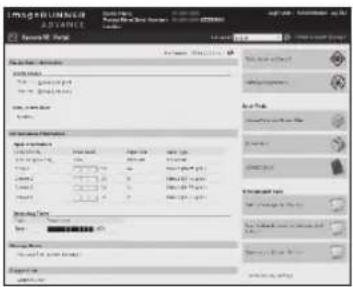
text_image
ADWARD Accession Path File Path: 1000000000000000000000000000000000000000000000000000000000000000000000000000000000000000000000000000 Name: 123456789 Description: Name: 123456789 Description: Name: 123456789 Description: Name: 123456789 Description: Name: 123456789 Description: Name: 123456789 Description: Name: 123456789 Description: Name: 233456789 Description: Name: 233456789 Description: Name: 233456789 Description: Name: 233456789 Description: Name: 233456789 Description: Name: 233456789 Description: Name: 23345789 Description: Name: 23345789 Description: Name: 23345789 Description: Name: 23345789 Description: Name: 23345789 Description: Name: 23345789 Description: Name: 23345789 Description: Name: -23345789 Description: Name: -23345789 Description: Name: -23345789 Description: Name: -23345789 Description: Name: -23345789 Description: Name: -23345789 Description: Name: -23345789 Explanation: - Name: 123456789 - Description: - Name: 123456789 - Description: - Name: 123456789 - Description: - Name: 123456789 - Description: - Name: 123456789 - Description: - Name: 123456789 - Description: - Name: 12345789 - Description: - Name: 12345789 - Description: - Name: 12345789 - Description: - Name: 12345789 - Description: - Name: 12345789 - Description: - Name: 12345789 - Description: - Name: 121456789 - Description: - Name: 121456789 - Description: - Name: 121456789 - Description: - Name: 121456789 - Description: - Name: 121456789 - Description: - Name: 121456789 - Description: - Note to change the name in the image. - Note to change the name in the image. - Note to change the name in the image. - Note to change the name in the image. - Note to change the name in the image. - Note to change the name in the image. - Note to change the name in the image. - Note to change the name in the image. - Note to change the name in the image. - Note to change the name in the image. - Note to change the name in the image.For the meaning of each message and a remedy to take, see the User's Guide.
When an error message is displayed

User's Guide
OYRY-OJR


How to use the search number
P.43
If the "Contact your service representative" Message Is Displayed
When the machine ceases to operate normally due to a trouble, a message appears, asking you to contact the service representative. Perform the following procedure.

text_image
Turn the main power ON and hit (using the switch on the right side of the main unit). • If the device will not operate manually, contact your service representative with the end user below. Save Guide: *1 Restart the machine.
Press the power switch to turn OFF the machine. When 10 or more seconds have elapsed after the main power indicator turned off, turn ON the machine again.
CAUTION!
- Note that turning OFF the machine deletes the data that is waiting to be printed.
2 If the message does not disappear, follow the procedure below to contact the service representative.
- Make a note of the code number displayed on the screen.
POINT
Multiple code numbers may be displayed.
- Turn the machine OFF, and disconnect the power plug from the power outlet.
- Contact the service representative.
CAUTION!
For any inquiries, have the following information ready:
- Product name
- Dealer where you purchased the machine
• Details of your problem (such as what you did and what happened as a result)
• Code number displayed on the screen
When the [Limited Functions Mode] button is displayed
You can use the machine with part of functions restricted even before the problem is resolved.
![CANON imageRUNNER ADVANCE 4545i III - When the [Limited Functions Mode] button is displayed - 1](/content/2026/04/653832/images/bb9c09136da1995d24a7d6db6de5ebed435272cbac25edbce12a054442f5cab2.jpg)
text_image
1. Press • Find the main power (IP) and DIP using the switch at the right side of the main unit. • If the device still does not operate manually, contact your service organization with the other code below. • Unit Code • The function submission cannot move on or then. Make sure that objects are not allowed in the range of your movement. • • Press: Limited function (labeled) to continue operation using fixed functions. If the device is not functioning currently after the system was turned into the next page, the right page of the main unit • United Function Under- Press [Yes] to restart the machine.
The machine enters the limited functions mode. When the problem is resolved, the [Call service representative.] message disappears in the screen at the bottom left.
![CANON imageRUNNER ADVANCE 4545i III - When the [Limited Functions Mode] button is displayed - 2](/content/2026/04/653832/images/46449fd98ea80a46a0d6631c16dccb06da28c7c8ea30ed7e96da7caeedd62193.jpg)
text_image
Functions available in the limited functions mode User's Guide 0YRY-OJS Search How to use the search number P.43POINT
When you select a restricted function in the limited functions mode, the following screen appears.
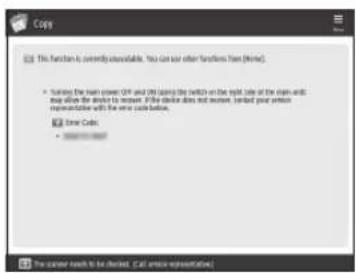
text_image
This function is currently available. You can use other functions from [Home] • Turning the main power OFY and the taking by switch on the right side of the main words: I may allow the device to measure. If the device does not want, I cannot put your version to any other function. • New Color The career needs to be checked. Call service representative!Press 📂 on the touch panel display to return to the Home, and then select a different function.
Illustrated Index
You can easily identify the name of a part and find the page where that part is described.
* The illustrations assume that the machine is equipped with a Cassette Feeding Unit-AN
Main Unit
Cassette Feeding Unit-AN

text_image
Paper size label P. 8 Attach the paper size label so that it aligns with the cassette number indicator horizontally. Separate by approx. 5 mm A4D 1 Cassette number indicator (1-4)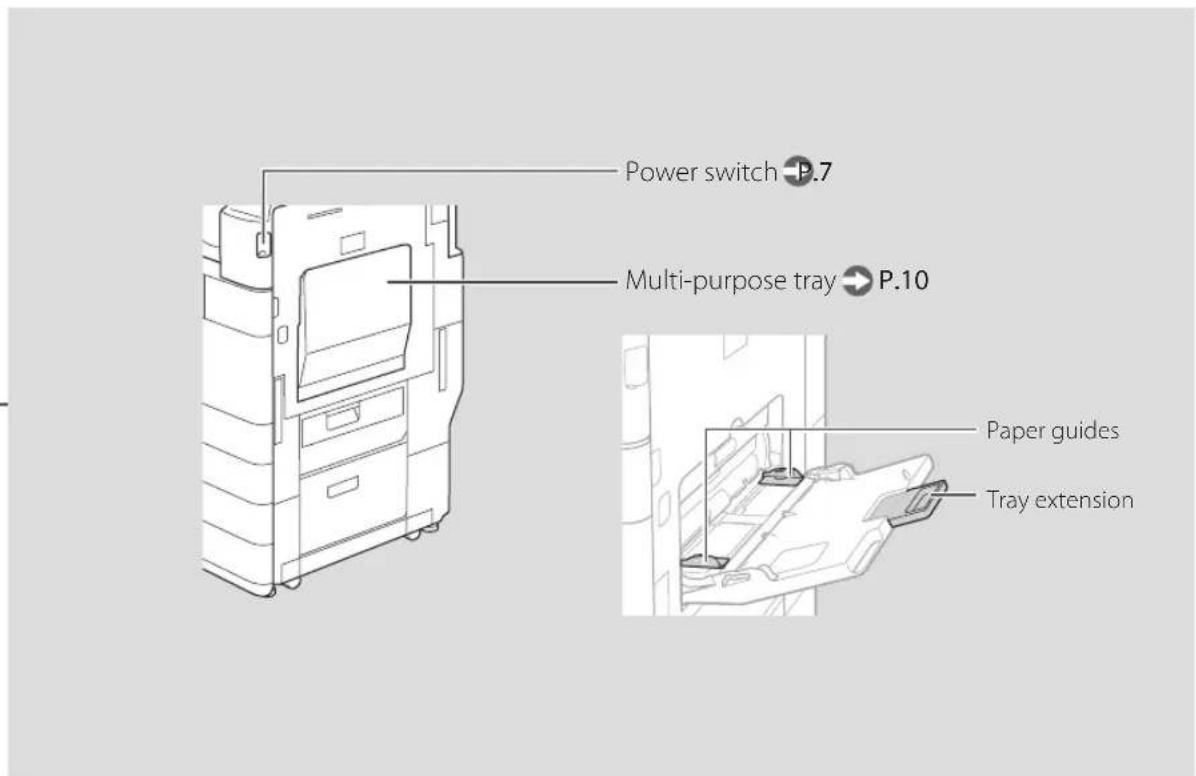
text_image
Power switch P.7 Multi-purpose tray P.10 Paper guides Tray extension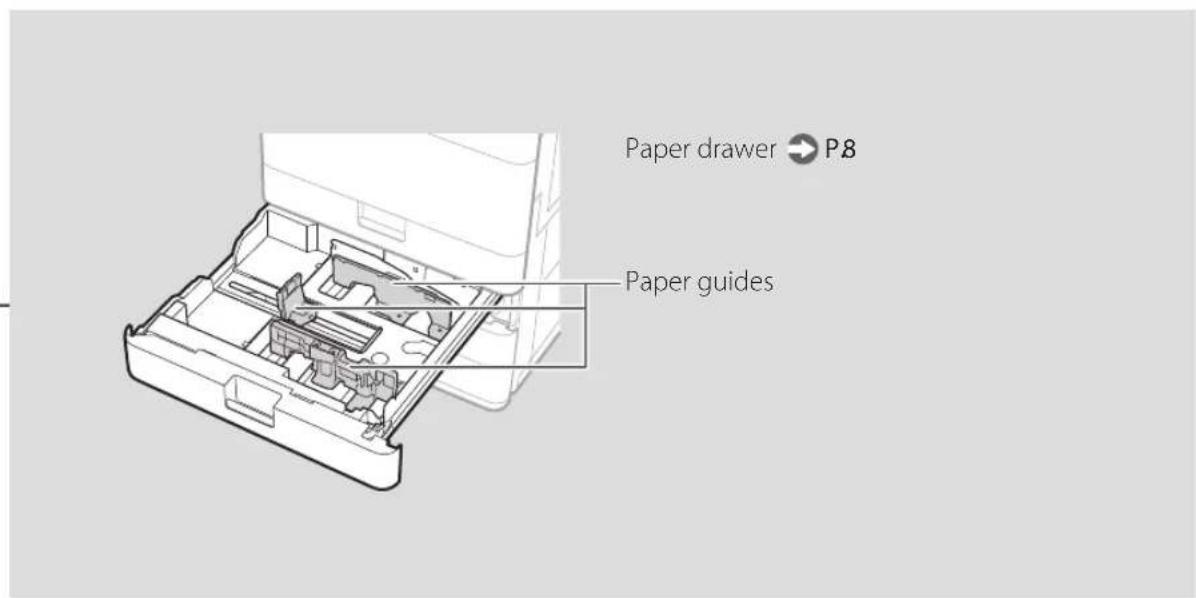
text_image
Paper drawer P8 Paper guidesIllustrated Index
Control Panel
text_image
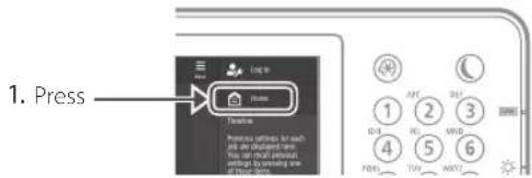
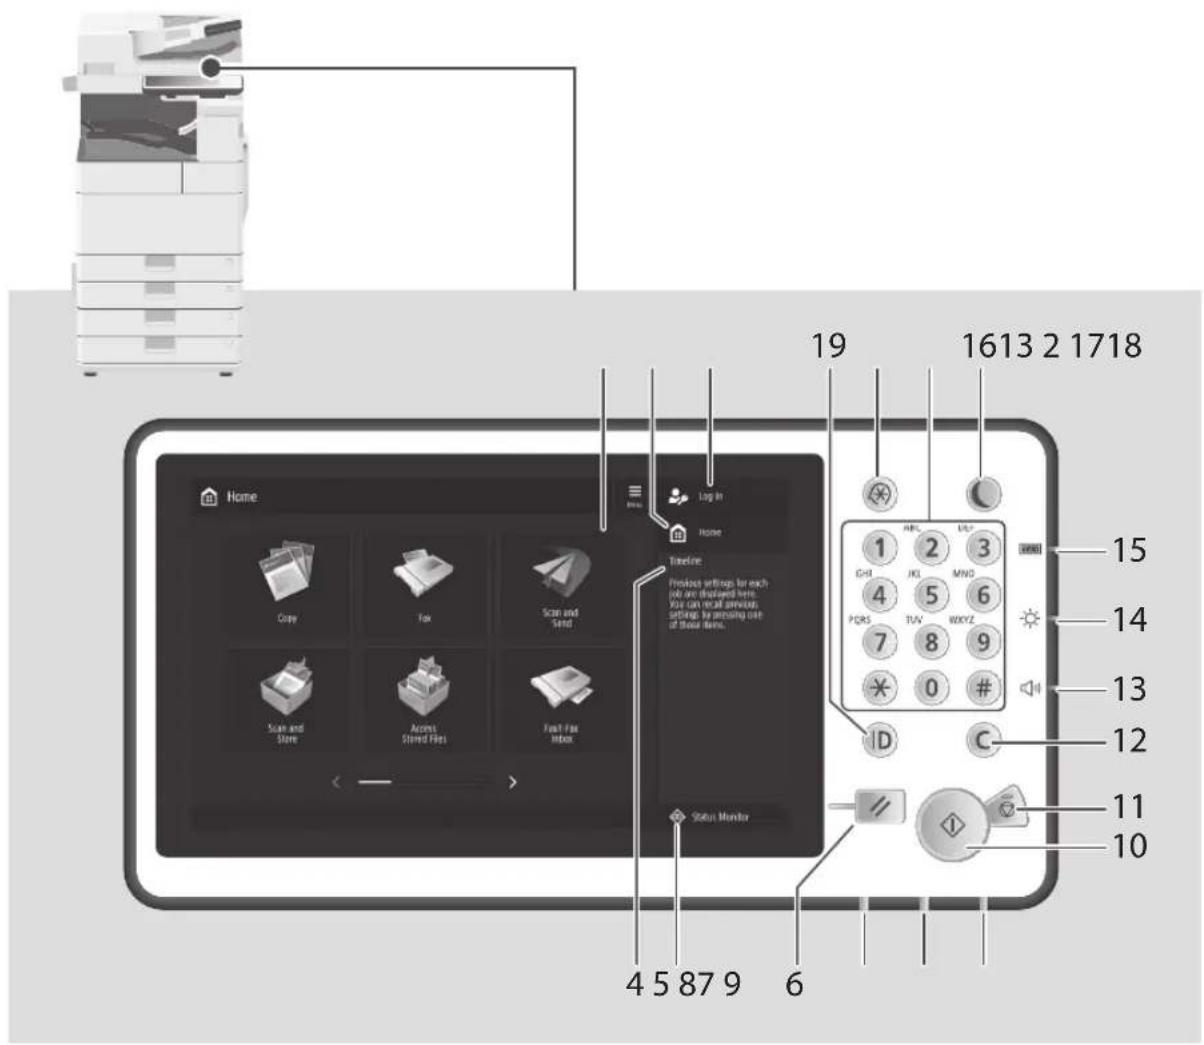
Home Copy Fax Scan and Send Scale and Store Access Stored Files Foot-Fax Inbox Log In Timeline: Produces settings for each job are displayed here. You can read any user. settings by pressing out of these items. Status Monitor 19 1613 2 1718 15 14 13 12 11 10 4 5 87 9 61 Login user name
The user name that is currently logged in is displayed.
2 Home Key ➕ P.17
Press to display the Home screen.
3 Touch panel display ➕ P.6
Displays the settings screen and messages. Touch the panel to perform setting and other operations.
4 Timeline
Displays a log for settings specified in Copy/Scan and Send.
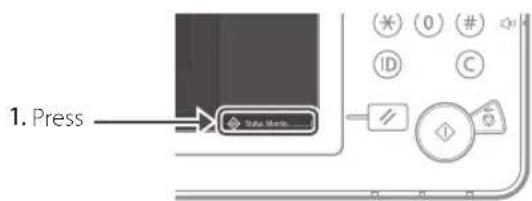
5 Status Monitor key ➕ P.19
Press to check the status of a job or cancel a job.
6 Reset key
Press to cancel the settings and restore the previously specified settings.
7 Processing/Data indicator
• Flashes when the machine is operating.
- Lights when the machine is waiting for a command.
8 Error indicator
Flashes or lights if there is an error in the machine.
※ When the Error indicator maintains a steady red light, contact your local authorized Canon dealer.
9 Main Power indicator ➕ P.6
Lights when the power is turned ON.
10 Start key
Press this to start an operation (or data reading).
11 Stop key P.24
Press to stop the current operation.
12 Clear key
Press to clear the entered values or characters.
13 Volume Settings key
Press to adjust the sound volume.
14 Brightness Adjustment key
Adjusts the brightness of the screen.
15 Counter/Device Information key
Press to display the copy and print count totals on the touch panel display.
16 Energy Saver key P.6
Press to set or cancel the Sleep mode.
• Lights when the machine enters Sleep mode.
- Turns off when the machine exits Sleep mode.
17 Numeric keys
Press to enter numerical values.
18 Settings/Registration key ➕ P.9
Press to specify settings or make a registration.
19 ID (Log In/Out) key
Press this to log in/out (when a login service has been set).
Appendix
Important Safety Instructions
This chapter describes important safety instructions for the prevention of injury to users of this machine and others, and damage to property. Read this chapter before using the machine, and follow the instructions to use the machine properly. Do not perform any operations not described in this manual. Canon will not be responsible for any damages resulting from operations not described in this manual, improper use, or repair or changes not performed by Canon or a third party authorized by Canon. Improper operation or use of this machine could result in personal injury and/or damage requiring extensive repair that may not be covered under your Limited Warranty.
WARNING
Indicates a warning concerning operations that may lead to death or injury to persons if not performed correctly. To use the machine safely, always pay attention to these warnings.
CAUTION
Indicates a caution concerning operations that may lead to injury to persons if not performed correctly. To use the machine safely, always pay attention to these cautions.
IMPORTANT
Indicates operational requirements and restrictions. Be sure to read these items carefully to operate the machine correctly and avoid damage to the machine or property.
Installation
To use this machine safely and comfortably, carefully read the following precautions and install the machine in an appropriate location.
WARNING
Do not install in a location that may result in a fire or electrical shock
- A location where the ventilation slots are blocked (too close to walls, beds, sofas, rugs, or similar objects)
• A damp or dusty location
• A location exposed to direct sunlight or outdoors
• A location subject to high temperatures
• A location exposed to open flames - Near alcohol, paint thinners or other flammable substances
Other warnings
- Do not connect unapproved cables to this machine. Doing so may result in a fire or electrical shock.
- Do not place necklaces and other metal objects or containers filled with liquid on the machine. If foreign substances come in contact with electrical parts inside the machine, it may result in a fire or electrical shock.
- If any foreign substance falls into this machine, unplug the power plug from the AC power outlet and contact your local authorized Canon dealer.
CAUTION
Do not install in the following locations
The machine may drop or fall, resulting in injury.
• An unstable location
• A location exposed to vibrations
Leveling feet (only for products with leveling feet)
Do not remove the machine's leveling feet after the machine has been installed, as this may cause the machine to fall or tip over, resulting in personal injury.
IMPORTANT
Do not install in the following locations
Doing so may result in damage to the machine.
• A location subject to temperature and humidity extremes, whether low or high
• A location subject to dramatic changes in temperature or humidity
- A location near equipment that generates magnetic or electromagnetic waves
• A laboratory or location where chemical reactions occur
- A location exposed to corrosive or toxic gases
- A location that may warp from the weight of the machine or where the machine is liable to sink (a carpet, etc.)
Avoid poorly ventilated locations
This machine generates a slight amount of ozone and other emissions during normal use. These emissions are not harmful to health. However, they may be noticeable during extended use or long production runs in poorly ventilated rooms. To maintain a comfortable working environment, it is recommended that the room where the machine operates be appropriately ventilated. Also avoid locations where people would be exposed to emissions from the machine.
Do not install in a location where condensation occurs
Water droplets (condensation) may form inside the machine when the room where the machine is installed is heated rapidly, and when the machine is moved from a cool or dry location to a hot or humid location. Using the machine under these conditions may result in paper jams, poor print quality, or damage to the machine. Let the machine adjust to the ambient temperature and humidity for at least 2 hours before use.
Avoid installing the machine near computers or other precision electronic equipment.
Electrical interference and vibrations generated by the machine while printing can adversely affect the operation of such equipment.
Avoid installing the machine near televisions, radios, or similar electronic equipment.
The machine might interfere with sound and picture signal reception. Insert the power plug into a dedicated power outlet, and maintain as much space as possible between the machine and other electronic equipment.
Motion sensor
In an environment like the following, the operation of the machine's motion sensor may become unstable.
• An object is placed near the motion sensor.
- The machine is installed in a location where people and objects pass by often.
- Another sensor device, such as a sensor light is being used nearby.
- Ultrasonic waves are generated.
If you feel that something is wrong with the operation of the motion sensor, change the sensitivity setting in Settings/Registration > [Preferences] > [Timer/Energy Settings] > [Use Motion Sensor] > [Sensor Sensitivity].
In altitudes of above sea level 3,000 m or higher Machines with a hard disk may not operate properly when used at high altitudes of about 3,000 meters above sea level, or higher.
Connecting the Telephone Line (Only for Products with a Fax Function)
This machine conforms to a analog telephone line standard. The machine can be connected to the public switched telephone network (PSTN) only. If you connect the machine to a digital telephone line or a dedicated telephone line, it might impede proper operation of the machine and could be the cause of damage. Make sure to confirm a type of telephone line before connecting the machine. Contact your optical fiber line or IP telephone line service providers if you want to connect the machine to those telephone lines.
When using wireless LAN (only for products with a wireless LAN function)
• Install the machine at a distance of 50 meters or less from the wireless LAN router.
- As far as possible, install in a location where communication is not blocked by intervening objects. The signal may be degraded when passing through walls or floors.
- Keep the machine as far as possible from digital cordless phones, microwave ovens, or other equipment that emits radio waves.
- Do not use near medical equipment. Radio waves emitted from this machine may interfere with medical equipment, which may result in malfunctions and accidents.
If the operating noise concerns you
Depending on the use environment and operating mode, if the operating noise is of concern, it is recommended that the machine be installed in a place other than the office.
Moving the Machine
If you intend to move the machine, even to a location on the same floor of your building, contact your local authorized Canon dealer beforehand. Do not attempt to move the machine yourself.
Power Supply
AWARNING
- Use only a power supply that meets the specified voltage requirements. Failure to do so may result in a fire or electrical shock.
- The machine must be connected to a socket-outlet with grounding connection by the provided power cord.
- Do not use power cords other than the one provided, as this may result in a fire or electrical shock.
- The provided power cord is intended for use with this machine. Do not connect the power cord to other devices.
- Do not modify, pull, forcibly bend, or perform any other act that may damage the power cord. Do not place heavy objects on the power cord. Damaging the power cord may result in a fire or electrical shock.
- Do not plug in or unplug the power plug with wet hands, as this may result in an electrical shock.
- Do not use extension cords or multi-plug power strips with the machine. Doing so may result in a fire or electrical shock.
- Do not wrap the power cord or tie it in a knot, as this may result in a fire or electrical shock.
- Insert the power plug completely into the AC power outlet. Failure to do so may result in a fire or electrical shock.
- Remove the power plug completely from the AC power outlet during a thunder storm. Failure to do so may result in a fire, electrical shock, or damage to the machine.
• Make sure that the power supply for the machine is safe, and has a steady voltage. - Keep the power cord away from a heat source; failure to do this may cause the power cord coating to melt, resulting in a fire or electrical shock.
Avoid the following situations:
If excessive stress is applied to the connection part of the power cord, it may damage the power cord or the wires inside the machine may disconnect. This could result in a fire.
- Connecting and disconnecting the power cord frequently.
• Tripping over the power cord.
- The power cord is bent near the connection part, and continuous stress is being applied to the power outlet or the connection part.
- Applying excessive force on the power plug.
CAUTION
Install this machine near the power outlet and leave sufficient space around the power plug so that it can be unplugged easily in an emergency.
IMPORTANT
When connecting power
- Do not connect the power cord to an uninterruptible power source. Doing so may result in malfunction of or damage to the machine at power failure.
- If you plug this machine into an AC power outlet with multiple sockets, do not use the remaining sockets to connect other devices.
- Do not connect the power cord to the auxiliary AC power outlet on a computer.
Other precautions
Electrical noise may cause this machine to malfunction or lose data.
Handling
WARNING
- Immediately unplug the power plug from the AC power outlet and contact an authorized Canon dealer if the machine makes an unusual noise, emits an unusual smell, or emits smoke or excessive heat. Continued use may result in a fire or electrical shock.
- Do not disassemble or modify this machine. There are high-voltage and high-temperature components inside the machine. Disassembly or modification may result in a fire or electrical shock.
- Place the machine where children will not come in contact with the power cord and other cables or gears and electrical parts inside the machine. Failure to do so may result in unexpected accidents.
- Do not use flammable sprays near this machine. If flammable substances come into contact with electrical parts inside this machine, it may result in a fire or electrical shock.
- When moving this machine, be sure to turn OFF the power of this machine, and then unplug the power plug and interface cables. Failure to do so may damage the power cord or interface cables, resulting in a fire or electrical shock.
- When plugging or unplugging a USB cable when the power plug is plugged into an AC power outlet, do not touch the metal part of the connector, as this may result in an electrical shock.
If you are using a cardiac pacemaker
This machine generates a low level magnetic flux and ultrasonic waves. If you use a cardiac pacemaker and feel abnormalities, please move away from this machine and consult your physician immediately.
CAUTION
- Do not place heavy objects on this machine as they may fall, resulting in injury.
- For safety, unplug the power plug if the machine will not be used for a long period of time.
- Use caution when opening and closing covers to avoid injury to your hands.
- Keep hands and clothing away from the rollers in the output area. If the rollers catch your hands or clothing, this may result in personal injury.
- The inside of the machine and the output slot are very hot during and immediately after use. Avoid contact with these areas to prevent burns. Also, printed paper may be hot immediately after being output, so use caution when handling it. Failure to do so may result in burns.
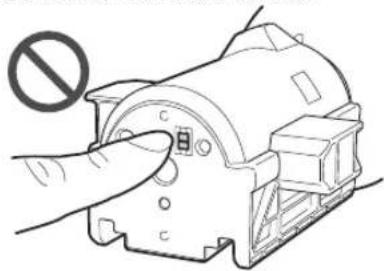
Feeder or platen glass cover
- Do not press down hard on the feeder or the platen glass cover when using the platen glass to make copies of thick books. Doing so may damage the platen glass and result in personal injury.
- Close the feeder or the platen glass cover gently to avoid catching your hands, as this may result in personal injury.
- Be careful not to put your hands or fingers into the feeder or the platen glass cover. Otherwise, you may be injured.

natural_image
Illustration of a hand pressing a stack of cards into a box with a prohibition symbol (no text or labels)Finisher (only for products with a finisher)
- Do not place your hands in the part of the tray where stapling is performed (near the rollers), especially pay careful attention to the sharp staples, as this may result in personal injury.
Paper drawer (only for products with a paper drawer)
- Do not insert your hand into the machine while the paper drawer is removed, as this may result in personal injury.
Energy Saver key (only for products with an Energy Saver key)
- Press (Energy Saver) for safety when the machine will not be used for a long period of time, such as overnight. Also, turn OFF the main power switch, and disconnect the power cord for safety when the machine will not be used for an extended period of time, such as during consecutive holidays.
Laser Safety
This product is confirmed as a Class 1 laser product in IEC60825-1:2014 and EN60825-1:2014.
CLASS 1 LASER PRODUCT
LASER KLASSE 1
APPAREIL À LASER DE CLASSE 1
APPARECCHIO LASER DI CLASSE 1
PRODUCTO LASER DE CLASE 1
APARELHO A LASER DE CLASSE 1
LUOKAN 1 LASER-TUOTE
LASERPRODUKT KLASS 1
The laser beam can be harmful to human bodies. Since radiation emitted inside the product is completely confined within protective housings and external covers, the laser beam cannot escape from the machine during any phase of user operation. Read the following remarks and instructions for safety.
- Never open covers other than those instructed in the manuals for this machine.
• If the laser beam should escape and enter your eyes, exposure may cause damage to your eyes. - Use of controls, adjustments, or performance of procedures other than those specified in this manual may result in hazardous radiation exposure
Laser Safety Caution
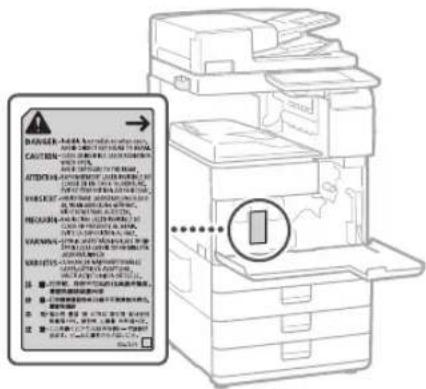
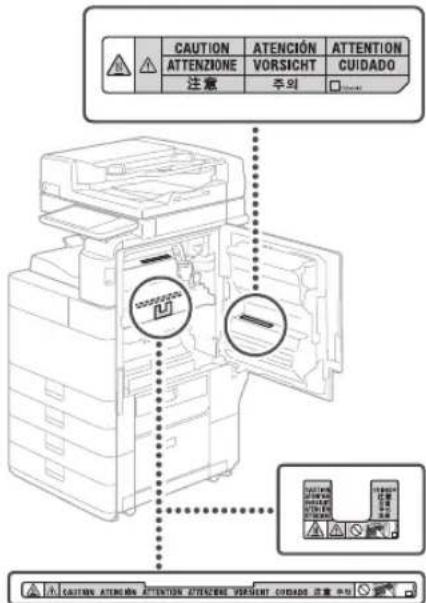
When removing jammed paper or when inspecting the inside of the machine, do not expose yourself to the heat emitted from the fixing unit and its surroundings for a prolonged period of time. Doing so may result in low temperature burns, even though you did not touch the fixing unit and its surroundings directly.
text_image
CAUTION ATTENZIONE 注意 ATENCIÓN VORSICHT 주외 ATTENTION CUIDADO CAUTION ATENCIÓN ATTENTION ATTENCIÓN VORSICHT CUIDADO 注章 P-10IMPORTANT
- Follow the instructions on the caution label attached to this machine.
- Do not subject the machine to strong shocks or vibration.
- Do not forcibly open and close doors, covers, and other parts. Doing so may result in damage to the machine.
- Do not turn the main power switch OFF or open the covers while the machine is in operation. This may result in paper jams.
- Use a modular cable that is shorter than 3 meters.
• Use a USB cable that is shorter than 3 meters.
Appendix
Safety-Related Symbols
Power switch: "ON" position
Power switch: "OFF" position
Power switch: "STAND-BY" position
① Push-push switch "ON" "OFF"
Protective earthing terminal
Dangerous voltage inside. Do not open covers other than instructed.
CAUTION: Hot surface. Do not touch.
Class II equipment
Moving parts: Keep body parts away from moving parts
CAUTION: An electrical shock may occur. Remove all the power plugs from the power outlet.
There are sharp edges. Keep body parts away from sharp edges.
[NOTE]
Some of symbols shown above may not be affixed depending on the product.
Maintenance and Inspections
Clean this machine periodically. If dust accumulates, the machine may not operate properly. When cleaning, be sure to observe the following. If a problem occurs during operation, see "Troubleshooting" in the User's Guide.
WARNING
- Before cleaning, turn OFF the power and unplug the power plug from the AC power outlet. Failure to do so may result in a fire or electrical shock.
- Unplug the power plug periodically and clean with a dry cloth to remove dust and grime. Accumulated dust may absorb humidity in the air and may result in a fire if it comes into contact with electricity.
- Use a damp, well wrung-out cloth to clean the machine. Dampen cleaning cloths with water only. Do not use alcohol, benzine, paint thinner, or other flammable substances. Do not use tissue paper or paper towels. If these substances come into contact with electrical parts inside the machine, they may generate static electricity or result in a fire or electrical shock.
- Check the power cord and plug periodically for damage. Check the machine for rust, dents, scratches, cracks, or excessive heat generation. Use of poorly-maintained equipment may result in a fire or electrical shock.
CAUTION
- The inside of the machine has high-temperature and high-voltage components. Touching these components may result in burns. Do not touch any part of the machine that is not indicated in the manual.
- When loading paper or removing jammed paper, be careful not to cut your hands with the edges of the paper.
Consumables
WARNING
- Do not throw toner cartridges or waste toner containers into open flame, or do not store them or printing/copy paper in a place exposed to open flame. This may cause them to ignite, resulting in burns or fire.
- If you accidentally spill or scatter toner, carefully gather the toner particles together
or wipe them up with a soft, damp cloth in a way that prevents inhalation. Never use a vacuum cleaner that does not have safeguards against dust explosions to clean up spilled toner. Doing so may cause a malfunction in the vacuum cleaner, or result in a dust explosion due to static discharge.
ACAUTION
- Keep toner and other consumables out of the reach of small children. If these items are ingested, consult a physician immediately.
- If toner touches your clothes or skin, wash it away with water immediately. Do not use warm water, as this may cause toner to fix, resulting in a permanent stain.
- Do not dismantle the toner cartridge, as doing so may cause toner to fly out and enter your eyes or mouth. If toner gets into your eyes or mouth, wash them immediately with cold water and immediately consult a physician.
- If toner escapes from the toner cartridge, make sure not to ingest the toner or allow it to directly touch your skin. If your skin still feels irritated after washing it, or you ingest toner, consult a physician immediately.
- When pulling out the waste toner container, be careful not to let it fall. This may result in injury.
- When replacing the stamp ink cartridge, be careful that your clothes or skin does not get stained with ink. If your clothes or skin has been stained, immediately wash out the stain with water.
- Do not touch the electrical contacts.
natural_image
Hand operating a mechanical device with a prohibition symbol (no text or labels)IMPORTANT
- Store toner cartridges in a cool location, away from direct sunlight.
- Do not store toner cartridges in an upright position.
Recycling of product
This product should be disposed of appropriately, according to your national and local legislation.
Notices
Product Name
Safety regulations require the product's name to be registered. In some regions where this product is sold, the following name(s) in parentheses () may be registered instead.
imageRUNNER ADVANCE 4551i III (F192400) imageRUNNER ADVANCE 4545i III/4535i III (F192500) imageRUNNER ADVANCE 4525i III (F192600)
EMC requirements of EC Directive
This equipment conforms with the essential EMC requirements of EC Directive. We declare that this product conforms with the EMC requirements of EC Directive at nominal mains input 230 V, 50 Hz, although the rated input of the product is 220 to 240 V, 50/60 Hz. Use of shielded cable is necessary to comply with the technical EMC requirements of EC Directive.
EU WEEE and Battery Directives
You can see the WEEE and Battery Directives information in the latest User's Guide (HTML manual) from the Canon website (canon.com/oip-manual).
Wireless LAN Regulatory Information
Regulatory information for users in Jordan
imageRUNNER ADVANCE 4551i III/4545i III/4535i III/4525i III includes approved Wireless LAN Module (Model name: FM1M944). Contains Wireless LAN Module approved by TRC/LPD/2015/5
Regulatory information for users in UAE
imageRUNNER ADVANCE 4551i III/4545i III/4535i III/4525i III includes approved Wireless LAN Module (Model name: FM1M944).
TRA
REGISTERED No: ER38576/15
DEALER No: DA39360/15
RE Directive
(Only for European radio equipment)
RE Declaration of Conformity
English (EN) Hereby, Canon Inc. declares that this equipment is in compliance with Directive 2014/53/EU. The full text of the EU declaration of conformity is available at the following internet address: http://www.canon-europe.com/ce-documentation Wireless LAN Specifications Frequency band(s):2412-2472MHz Maximum radio-frequency power: 18.21 dBm
Legal Limitations on the Usage of Your Product and the Use of Images
Using your product to scan, print or otherwise reproduce certain documents, and the use of such images as scanned, printed or otherwise reproduced by your product, may be prohibited by law and may result in criminal and/or civil
Appendix
liability. A non-exhaustive list of these documents is set forth below. This list is intended to be a guide only. If you are uncertain about the legality of using your product to scan, print or otherwise reproduce any particular document, and/or of the use of the images scanned, printed or otherwise reproduced, you should consult in advance with your legal advisor for guidance.
- Paper Money
- Travelers Checks
- Money Orders
- Food Stamps
• Certificates of Deposit
- Passports
- Postage Stamps (canceled or uncanceled)
• Immigration Papers
• Identifying Badges or Insignias
- Internal Revenue Stamps (canceled or uncanceled)
- Selective Service or Draft Papers
• Bonds or Other Certificates of Indebtedness
- Checks or Drafts Issued by Governmental Agencies
• Stock Certificates
• Motor Vehicle Licenses and Certificates of Title
• Copyrighted Works/Works of Art without Permission of Copyright Owner
Disclaimers
- The information in this document is subject to change without notice.
• CANON INC. MAKES NO WARRANTY OF ANY KIND WITH REGARD TO THIS MATERIAL, EITHER EXPRESS OR IMPLIED, EXCEPT AS PROVIDED HEREIN, INCLUDING WITHOUT LIMITATION, THEREOF, WARRANTIES AS TO MARKETABILITY, MERCHANTABILITY, FITNESS FOR A PARTICULAR PURPOSE OF USE, OR NON-INFRINGEMENT. CANON INC. SHALL NOT BE LIABLE FOR ANY DIRECT, INCIDENTAL, OR CONSEQUENTIAL DAMAGES OF ANY NATURE, OR LOSSES OR EXPENSES RESULTING FROM THE USE OF THIS MATERIAL.
About This Manual
Screens
Screens of the touch panel display used in this manual are those taken when the imageRUNNER ADVANCE 45511 III has the following optional equipment attached to it:
- Single Pass DADF-A
• Cassette Feeding Unit-AN
• Super G3 FAX Board
Note that functions that cannot be used depending on the model or options do not appear on the touch panel display.
Illustrations
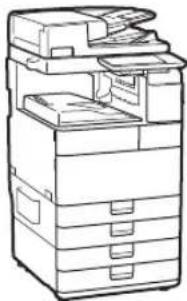
Illustrations used in this manual are those displayed when the imageRUNNER ADVANCE 4551i III has the following optional equipment attached to it:
- Single Pass DADF-A
• Cassette Feeding Unit-AN
natural_image
Line drawing of a multi-tiered office or filing cabinet with drawers and folders (no text or symbols)If your machine is of the model dedicated to printing only
The machine dedicated to printing only cannot be used for any other functions than printing. Although this Guide contains the descriptions of the functions and operations for copying, faxing, and scanning as well as printing, please read only the necessary descriptions to use your machine.
Trademarks
Mac is a trademark of Apple Inc. Microsoft, Windows, Windows Vista, Windows Server, Internet Explorer, Excel, and PowerPoint are either registered trademarks or trademarks of Microsoft Corporation in the United States and/or other countries.
Other product and company names herein may be the trademarks of their respective owners.
Third Party Software
This Canon product (the "PRODUCT") includes third-party software modules. Use and distribution of these software modules, including any updates of such software modules (collectively, the "SOFTWARE") are subject to license conditions (1) through (9) below.
(1) You agree that you will comply with any applicable export control laws, restrictions or regulations of the countries involved in the event that this PRODUCT including the SOFTWARE is shipped, transferred or exported into any country.
(2) Rights holders of the SOFTWARE retain in all respects the title, ownership and intellectual property rights in and to the SOFTWARE. Except as expressly provided herein, no license or right, expressed or implied, is hereby conveyed or granted by rights holders of the SOFTWARE to you for any intellectual property of rights holders of the SOFTWARE.
(3) You may use the SOFTWARE solely for use with the PRODUCT.
(4) You may not assign, sublicense, market, distribute, or transfer the SOFTWARE to any third party without prior written consent of rights holders of the SOFTWARE.
(5) Notwithstanding the foregoing, you may transfer the SOFTWARE only when (a) you assign all of your rights to the PRODUCT and all rights and obligations under the license conditions to transferee and (b) such transferee agrees to be bound by all these conditions.
(6) You may not decompile, reverse engineer, disassemble or otherwise reduce the code of the SOFTWARE to human readable form.
(7) You may not modify, adapt, translate, rent, lease or loan the SOFTWARE or create derivative works based on the SOFTWARE.
(8) You are not entitled to remove or make separate copies of the SOFTWARE from the PRODUCT.
(9) The human-readable portion (the source code) of the SOFTWARE is not licensed to you.
Notwithstanding (1) through (9) above, the PRODUCT includes third-party software modules accompanying the other license conditions, and these software modules are subject to the other license conditions.
Please check Platform Version of the PRODUCT and refer to the other license conditions of third-party software modules described in Appendix of Manual for the corresponding Platform Version. This Manual is available at http://canon.com/oip-manual.
By using the PRODUCT, you shall be deemed to have agreed to all applicable license conditions. If you do not agree to these license conditions, please contact your service representative.
V_180705
Do You Want to Know More?

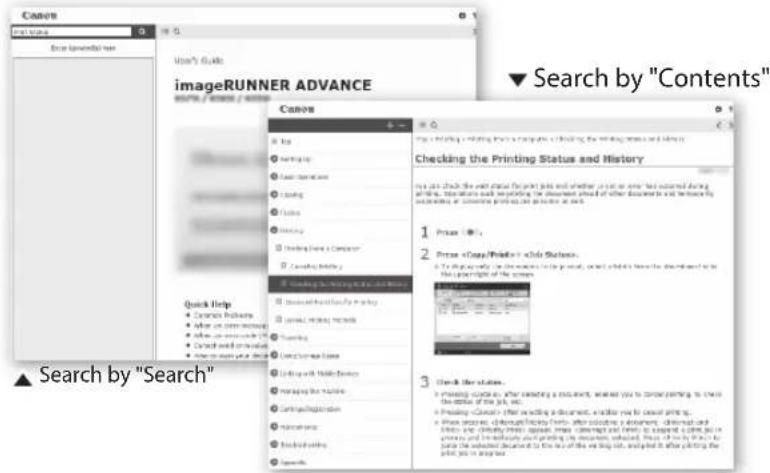
You Can Consult the User's Guide!
The User's Guide describes all functions of the machine.
text_image
Canes Image RUNNER ADVANCE Search by "Contents" ▲ Search by "Search"Opening the User's Guide
- Display the online manual website canon.com/oip-manual

- Select the appropriate user's guide [imageRUNNER ADVANCE] ▶ [Black & White] ▶ Select this machine
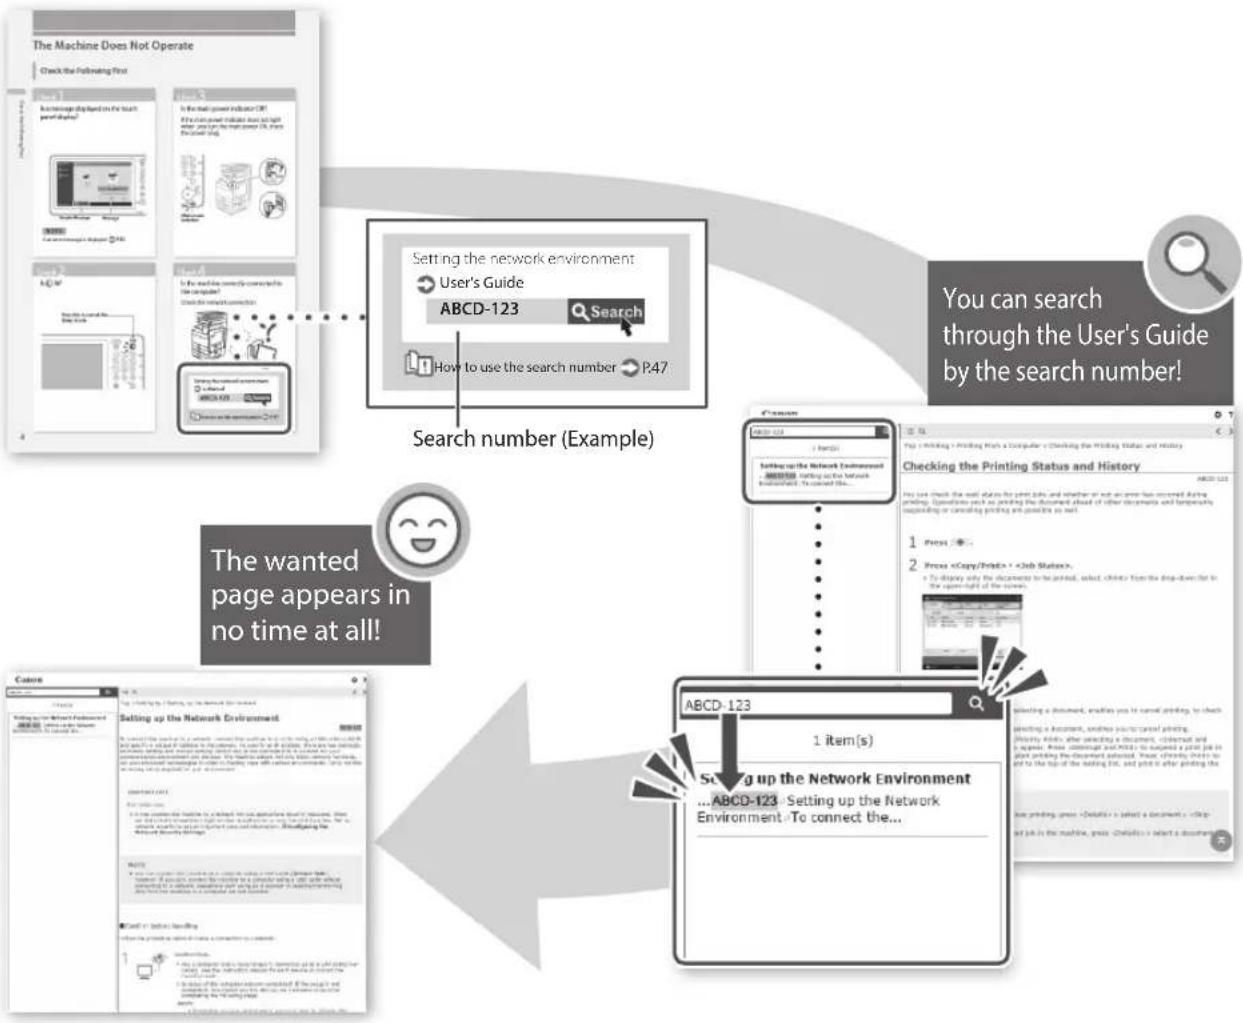
If you notice a search number in a topic in this guide you are reading...
flowchart
graph TD
    A["The Machine Does Not Operate"] --> B["Check the Following You"]
    B --> C["Setting the network environment"]
    C --> D["User's Guide"]
    D --> E["ABCD-123 Search"]
    E --> F["How to use the search number P47"]
    F --> G["Search number (Example)"]
    G --> H["The wanted page appears in no time at all!"]
    H --> I["Setting up the Network Environment"]
    I --> J["Selecting up the Network Environment"]
    J --> K["Selecting up the Network Environment"]
    K --> L["Selecting up the Network Environment"]
    L --> M["Selecting up the Network Environment"]
    M --> N["Selecting up the Network Environment"]
    N --> O["Selecting up the Network Environment"]
    O --> P["Selecting up the Network Environment"]
    P --> Q["Selecting up the Network Environment"]
    Q --> R["Selecting up the Network Environment"]
    R --> S["Selecting up the Network Environment"]
    S --> T["Selecting up the Network Environment"]
    T --> U["Selecting up the Network Environment"]
    U --> V["Selecting up the Network Environment"]
    V --> W["Selecting up the Network Environment"]
    W --> X["Selecting up the Network Environment"]
    X --> Y["Selecting up the Network Environment"]
    Y --> Z["Selecting up the Network Environment"]
    Z --> AA["Selecting up the Network Environment"]
    AA --> AB["Selecting up the Network Environment"]
    AB --> AC["Selecting up the Network Environment"]
    AC --> AD["Selecting up the Network Environment"]
    AD --> AE["Selecting up the Network Environment"]
    AE --> AF["Selecting up the Network Environment"]
    AF --> AG["Selecting up the Network Environment"]
    AG --> AH["Selecting up the Network Environment"]
    AH --> AI["Selecting up the Network Environment"]
    AI --> AJ["Selecting up the Network Environment"]
    AJ --> AK["Selecting up the Network Environment"]
    AK --> AL["Selecting up the Network Environment"]
    AL --> AM["Selecting up the Network Environment"]
    AM --> AN["Selecting up the Network Environment"]
    AN --> AO["Selecting up the Network Environment"]
    AO --> AP["Selecting up the Network Environment"]
    AP --> AQ["Selecting up the Network Environment"]
    AQ --> AR["Selecting up the Network Environment"]
    AR --> AS["Selecting up the Network Environment"]
    AS --> AT["Selecting up the Network Environment"]
    AT --> AU["Selecting up the Network Environment"]
    AU --> AV["Selecting up the Network Environment"]
    AV --> AW["Selecting up the Network Environment"]
    AW --> AX["Selecting up the Network Environment"]
    AX --> AY["Selecting up the Network Environment"]
    AY --> AZ["Selecting up the Network Environment"]
    AZ --> BA["Selecting up the Network Environment"]
    BA --> BB["Selecting up the Network Environment"]
    BB --> BC["Selecting up the Network Environment"]
    BC --> BD["Selecting up the Network Environment"]
    BD --> BE["Selecting up the Network Environment"]
    BE --> BF["Selecting up the Network Environment"]
    BF --> BG["Selecting up the Network Environment"]
    BG --> BH["Selecting up the Network Environment"]
    BH --> BI["Selecting up the Network Environment"]
    BI --> BJ["Selecting up the Network Environment"]
    BJ --> BK["Selecting up the Network Environment"]
    BK --> BL["Selecting up the Network Environment"]
    BL --> BM["Selecting up the Network Environment"]
    BM --> BN["Selecting up the Network Environment"]
    BN --> BO["Selecting up the Network Environment"]
    BO --> BP["Selecting up the Network Environment"]
    BP --> BQ["Selecting up the Network Environment"]
    BQ --> BR["Selecting up the Network Environment"]
    BR --> BS["Selecting up the Network Environment"]
    BS --> BT["Selecting up the Network Environment"]
    BT --> BU["Selecting up the Network Environment"]
    BU --> BV["Selecting up the Network Environment"]
    BV --> BW["Selecting up the Network Environment"]
    BW --> BX["Selecting up the Network Environment"]
    BX --> BY["Selecting up the Network Environment"]
    BY --> BZ["Selecting up the Network Environment"]
    BZ --> CA["Selecting up the Network Environment"]
    CA --> CB["Selecting up the Network Environment"]
    CB --> CC["Selecting up the Network Environment"]
    CC --> CD["Selecting up the Network Environment"]
    CD --> CE["Selecting up the Network Environment"]
    CE --> CF["Selecting up the Network Environment"]
    CF --> CG["Selecting up the Network Environment"]
    CG --> CH["Selecting up the Network Environment"]
    CH --> CI["Selecting up the Network Environment"]
    CI --> CJ["Selecting up the Network Environment"]
    CJ --> CK["Selecting up the Network Environment"]
Foire aux questions
imageRUNNER
ADVANCE
4551iⅢ/4545iⅢ
4535iⅢ/4525iⅢ
natural_image
Illustration of a printer with a speech bubble containing three dots (no text or symbols on the printer itself)natural_image
Illustration of a printer with a speech bubble showing a folded paper (no text or symbols present)natural_image
Illustration of a printer with a stack of papers inside, showing the paper being inserted (no text or symbols present)text_image
ABC ABC ABCtext_image
Diagram showing a server rack connected to a computer with a question mark, illustrating a data or system interaction.text_image
Diagram showing a printer stack with a magnified view of its internal mechanism, including a power button and directional arrows.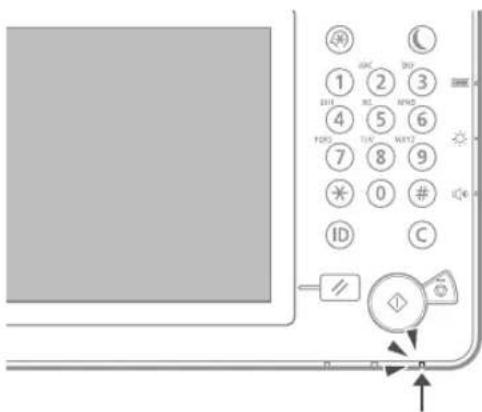
text_image
Diagram showing a door panel with numbered keypad and control buttons, including icons for lighting, ventilation, and function.natural_image
Diagram of a mechanical device interior showing internal compartments and a downward arrow indicating flow or movement (no text or symbols present)2
natural_image
Stacked printer or scanner device with labeled parts (1 and 2), no visible text or symbols on the device itself.A NOTER
natural_image
Diagram of a vehicle's rear panel showing internal compartments and structural elements (no text or labels)2
natural_image
Diagram of a device interior with a magnified view showing internal components and directional arrows (no text or symbols)text_image
eF100x multidiscern Weight is longer for paste given in paper change. A4 Recombinu auto format Format Size Paper Set Developer Format • Uncommodul Format • Standard Type of paper • Indicate 2 (CM-98 gen3) Model: OK- Appuyez sur
text_image
Technical diagram showing assembly of an ADO printer with labeled parts and directional arrows indicating flow or movement.natural_image
Technical line drawing of a mechanical component or bracket with no visible text or symbols
natural_image
Line drawing of a hand inserting a component into an open storage tray (no text or symbols)- Ouvrez le capot.
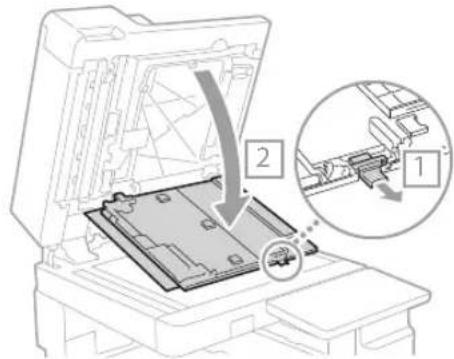
text_image
Diagram showing a printer's internal structure with labeled parts and a magnified view of the device's internal components.natural_image
Technical line drawing of a printer or scanner with an inset showing internal components (no text or symbols)natural_image
Line drawing of a hand cleaning a printer's tray (no text or symbols)- Fermez le chargeur.
REMARQUE
text_image
Close to Home Close to Home Close to Home- Appuyer sur [Oui].
Solution 2
text_image
5. Appuyez- Appuyez sur [OK].
text_image
Technical diagram of a printer internal structure with labeled parts and magnified views showing component detailsnatural_image
Technical line drawing of a mechanical component or bracket assembly (no text or symbols)Solution 2
text_image
2. Appuyez sur Save status Layer Environment Times Recognition Monochrome Customize Actions File name: 0 % Tender name: 100 % Timer capacity: 0 % Sangering in Italian cities: Within the convention Transfertext_image
Technical diagram of a printer internal structure with labeled components and directional arrows indicating flow or movement.natural_image
Line drawing of a hospital bed with medical equipment (no text or symbols)text_image
New address- Appuyez sur
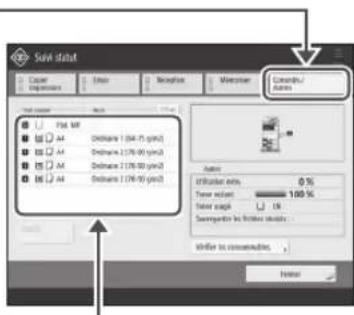
text_image
Savi IDM Caser Impression File Edit View Insert Remove Create/Import File list Post MP Add: Add: 1 (84.75 px/s) Add: Add: End: 2 (76.90 px/s) Add: Add: End: 2 (76.90 px/s) Add: Add: End: 2 (76.90 px/s) Add: Add: End: 2 (76.90 px/s) Add: Add: End: 2 (76.90 px/s) Add: Add: End: 2 (76.90 px/s) Add: Add: End: 2 (76,90 px/s) Add: Add: End: 2 (76,90 px/s) Add: Add: End: 2 (76,90 px/s) Add: Add: End: 2 (76,90 px/s) Add: Add: End: 2 (76,90 px/s) Add: Add: End: 2 (76,90 px/s) Add: Add: End: 2 (TAX) Add: Add: End: 2 (TAX) Add: Add: End: 2 (TAX) Add: Add: End: 2 (TAX) Add: Add: End: 2 (TAX) Add: Add: End: 2 (TAX) Add: Add: End: 2 (TAX) Add: Add: End: 2 (TAX) Add: Add: End: 2 (TAX) Add: TAX Add: Add: End: 2 (TAX) Add: Add: End: 2 (TAX) Add: Add: End: 2 (TAX) Add: Add: End: 2 (TAX) Add: Add: End: 2 (TAX) Add: Add: End: 2 (TAX) Add: Add: End: 2 (TAX) Add: Add: End: 2 (TAX) Add: Add: Add to continue Finishnatural_image
Technical line drawing of an open mechanical device with internal compartments (no text or symbols)text_image
Technical diagram of a printer internal structure with labeled parts and magnified views showing component detailsnatural_image
Technical line drawing of a mechanical component or bracket assembly (no text or symbols)Solution 3
text_image
Settings for the following settings: Settings for: 1.0000 (1.0000) Settings for: 1.0000 Settings for: 1.0000 Settings for: 1.0000 Settings for: 1.0000 Settings for: 1.0000 Settings for: 1.0000 Settings for: 1.0000 Settings for: 1.0000 Settings for: 1.0000 Settings for: 1.0000 Instructions to choose to select or group other categories. Settings for: 1.0000 Settings for: 1.0000 Settings for: 1.0000 Settings for: 1.0000 Settings for: 1.0000 Settings for: 1.0000 Settings for: 1.0000 Settings for: 1.0000 Settings for: 1.0000 Methods for: 1.0000 Methods for: 1.0000 Methods for: 1.0000 Methods for: 1.0000 Methods for: 1.0000 Methods for: 1.0000 Methods for: 1.0000 Methods for: 1.0000 Methods for: 1.0000 Methods to choose to select or group other categories. Methods to choose to select or group other categories. Methods to choose to select or group other categories. Methods to choose to select or group other categories. Methods to choose to select or group other categories. Methods to choose to select or group other categories. Methods to choose to select or group other categories. Methods to choose to select or group other categories. Methods to choose to select or group other categories. Methods to choose to select or group other categories. Methods to choose to select or group other categories.natural_image
Line drawing of an open printer drawer with internal compartments and a highlighted cover (no text or symbols)natural_image
Technical line drawing of a mechanical component or bracket with no visible text or symbolstext_image
File Edit View Insert Help Format: 100% Name: Size: 5 px Size: 5 px Size: 5 px Size: 5 px Size: 5 px Size: 5 px Size: 5 px Size: 5 px Size: 5 px Size: 5 px Size: 5 px Size: 5 px Size: 5 px Size: 5 px Size: 5 px Size: 5 px Size: 5 px Size: 10 px Size: 10 px Size: 10 px Size: 10 px Size: 10 px Size: 10 px Size: 10 px Size: 10 px Size: 10 px Size: 10 px Size: 10 px Size: 10 px Size: 10 px Size: 10 px Size: 10 px
text_image
Automotive 1 2 3 4 5 6text_image
Sulvi statul Copy Impression Paste Recognition Interactions Sulvi statul Name Positioning Sulvi 11.53 0.1 0.00 Impression... 11.53 0.1 0.00 Altered image Copy Impression Copy Details Analog Format Customs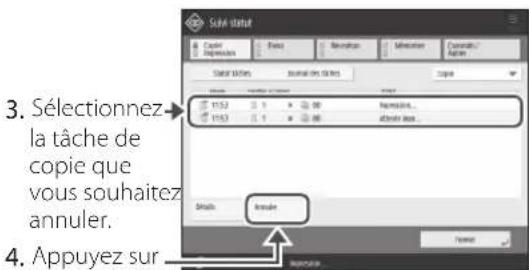
natural_image
Illustration of a desktop computer with a CD and monitor, no text or symbols presentA NOTER
flowchart
graph TD
    A["Satellite with orbital"] --> B["Download"]
    B --> C["Computer"]
A NOTER
text_image
Accriff Cable Max Line of design Line of introduction Line of process Line of process Line of process Transpater in Computer Kit SystemAppuyez sur
A NOTER
TONER, CARTRIDGE & PARTS
text_image
Change to 100% Change S: 2000 Change to 100% Change Change to 100% Change Change to 100% Change Change to 100% Change Change to 100% Change Change to 100% Change Change to 100% Change Change to 100% Change Change to 100% Change Change to 100% Change Change to 100% Change Change to 100% Changetext_image
Cope • Cope function not adjustment indiknolide. Enables functions not affiliates do (check). • Weise possible to determine perceived job role or the security and use your job, you can make it a complete job newed pay, confactor for all jobs to code these references. • Cope name : • Support usernatural_image
Illustration of a hand pressing a stack of cards into a tray with a warning symbol (no text or labels)CLASS 1 LASER PRODUCT
LASER KLASSE 1
APPAREIL À LASER DE CLASSE 1
APPARECCHIO LASER DI CLASSE 1
PRODUCTO LÁSER DE CLASE
APARELHO A LASER DE CLASSE 1
LUOKAN 1 LASER-TUOTE
LASERPRODUKT KLASS 1
natural_image
Illustration of a hand pressing a button on an electric motor (no text or symbols present)IMPORTANT
Regulatory information for users in Jordan imageRUNNER ADVANCE 4551I III/4545I/III/4535I III/4525I III includes approved Wireless LAN Module (Model name: FM1M944). Contains Wireless LAN Module approved by TRC/LPD/2015/5
Regulatory information for users in UAE imageRUNNER ADVANCE 4551i III/4545i III/4535i III/4525i III includes approved Wireless LAN Module (Model name: FM1M944).
TRA
REGISTERED No: ER38576/15
DEALER No: DA39360/15
RE Directive
RE Declaration of Conformity
English (EN) Hereby, Canon Inc. declares that this equipment is in compliance with Directive 2014/53/EU.
The full text of the EU declaration of conformity is available at the following internet address: http://www.canon-europe.com/ce-
documentation
Wireless LAN Specifications
Frequency band(s):2412-2472MHz
Maximum radio-frequency power: 18.21 dBm
natural_image
Line drawing of a multi-tiered office or paper filing cabinet with drawers and folders (no text or symbols)natural_image
Illustration of a printer with a speech bubble containing three dots (no text or symbols on the printer itself)natural_image
Illustration of a printer with a speech bubble containing a folded paper (no text or symbols on the printer itself)natural_image
Illustration of a printer emitting stacked documents (no text or symbols present)natural_image
Illustration of a printer with a printer icon and a question mark, accompanied by a printer icon with an arrow (no text or symbols present)natural_image
Illustration of a printer with an exclamation mark icon (no text or symbols on the device itself)text_image
ABC ABC ABC ABCnatural_image
Illustration of a desktop computer setup with tower, monitor, and question mark (no text or symbols)text_image
Diagram showing a printer with a magnified view of its internal mechanism, including a power button and directional arrows.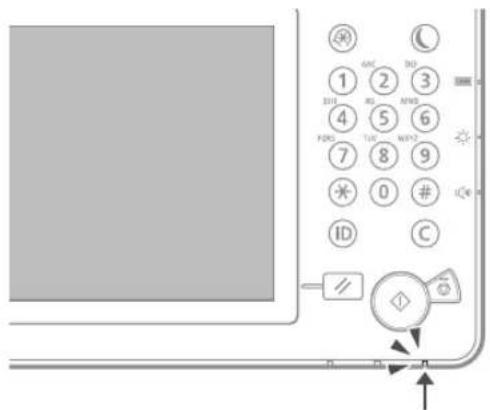
text_image
1 2 3 DTL R0 MWS 4 5 6 FDS TAC WTS 7 8 9 米 0 # ID C + / + ✓ ↓natural_image
Diagram of a printer internal structure showing internal compartments and a downward arrow indicating orientation (no text or symbols present)2
natural_image
Diagram of a multi-layered printer or scanner with labeled parts (1 and 2), showing internal structure without any readable text or symbols.HINWEIS
natural_image
Technical diagram of a mechanical component with an arrow indicating direction (no text or symbols present)2
natural_image
Diagram of a device interior with a magnified circular view showing a measurement or alignment (no text or symbols present)text_image
Technical diagram showing assembly of an ADO printer with labeled parts and directional arrows indicating flow or movement.natural_image
Technical line drawing of a mechanical component or bracket assembly (no text or symbols)
natural_image
Line drawing of a hand inserting a component into an open device (no text or symbols)text_image
Diagram showing a printer's internal structure with labeled parts and a magnified view of the device's internal components.natural_image
Technical line drawing of a printer or scanner with an inset showing internal components (no text or symbols)natural_image
Line drawing of a hand inserting a component into a printer (no text or symbols)text_image
Technical diagram of a printer with labeled parts and zoomed-in insets showing component detailsnatural_image
Technical line drawing of a mechanical component or bracket with no visible text or symbolsLösung 2
text_image
Technical diagram of a printer or printer with labeled parts and magnified views showing internal structure and measurement indicators.natural_image
Line drawing of a mechanical component or housing with no visible text or symbolsnatural_image
Technical line drawing of an open mechanical device with internal compartments and housing (no text or symbols)text_image
Technical diagram of a printer with labeled parts and directional arrows indicating flow or movementnatural_image
Technical line drawing of a mechanical component or bracket assembly (no text or symbols)Lösung 3
text_image
File Edit View Insert Options Help Name: File Edit View Insert Options Help Actions: Actions: Actions: Actions: Actions: Actions: Actions: Actions: Actions: Actions: Actions: Actions: Actions: Actions: Actions: Actions: Actions: Actions: Actions: Actions: Actions: Actions: Actions: Actions: Actions: Actions: Actions: Actions: Actions: Actions: Actions: Actions: Actions: Actions: Conditions: 1. Adjusted 2. Adjusted 3. Adjusted 4. Adjusted 5. Adjusted 6. Adjusted 7. Adjusted 8. Adjusted 9. Adjusted 10. Adjusted 11. Adjusted 12. Adjusted 13. Adjusted 14. Adjusted 15. Adjusted 16. Adjusted 17. Adjusted 18. Adjusted 19. Adjusted 20. Adjusted 21. Adjusted 22. Adjusted 23. Adjusted 24. Adjusted 25. Adjusted 26. Adjusted 27. Adjusted 28. Adjusted 29. Adjusted 30. Adjusted 31. Adjusted 32. Adjusted 33. Adjusted 34. Adjusted 35. Adjusted 36. Adjusted 37. Adjusted 38. Adjusted 39. Adjusted 40. Adjusted 41. Adjusted 42. Adjusted 43. Adjusted 44. Adjusted 45. Adjusted 46. Adjusted 47. Adjusted 48. Adjusted 49. Adjusted 50. Adjusted 51. Adjusted 52. Adjusted 53. Adjusted 54. Adjusted 55. Adjusted 56. Adjusted 57. Adjusted 58. Adjusted 59. Adjusted 60. Adjusted 61. Adjusted 62. Adjusted 63. Adjusted 64. Adjusted 65. Adjusted 66. Adjusted 67. Adjusted 68. Adjusted 69. Adjusted 70. Adjusted 71. Adjusted 72. Adjusted 73. Adjusted 74. Adjusted 75. Adjusted 76. Adjusted 77. Adjusted 78. Adjusted 79. Adjusted 80. Adjusted 81. Adjusted 82. Adjusted 83. Adjusted 84. Adjusted 85. Adjusted 86. Adjusted 87. Adjusted 88. Adjusted 89. Adjusted 90. Adjusted 91. Adjusted 92. Adjusted 93. Adjusted 94. Adjusted 95. Adjusted 96. Adjusted 97. Adjusted 98. Adjusted 99. Adjustednatural_image
Line drawing of an open drawer with a highlighted internal component (no text or symbols)natural_image
Line drawing of a mechanical component or bracket with no visible text or symbolstext_image
File Edit View Insertion / Create New Document Help Properties Options Name: 100% Description: Form Name: 100% Description: Form Name: 100% Description: Form Name: 100% Description: Form Name: 100% Description: Form Name: 100% Description: Form Name: 100% Description: Form Name: 100% Description: Form Name: 100% Description: Form Name: 100% Description: Form Name: 100% Description: Form Name: 100% Description: Form Name: