USER MANUAL GSM32HSBEH LG
Scan the QR code to see the manual.
OWNER'S MANUAL
FRIDGE & FREEZER

Before beginning installation, read these instructions carefully. This will simplify installation and ensure that the product is installed correctly and safely. Leave these instructions near the product after installation for future reference.
ENGLISH

MFL71986431
Rev.00_090723
www.lg.com
Copyright © 2023 LG Electronics Inc. All Rights Reserved.

natural_image
Pure geometric lines and shapes without any text, numbers, or symbols
natural_image
Pure geometric diagram with intersecting lines and shapes, no text or symbols present
TABLE OF CONTENTS
This manual may contain images or content that may be different from the model you purchased.
This manual is subject to revision by the manufacturer.
SAFETY INSTRUCTIONS
READ ALL INSTRUCTIONS BEFORE USE....3
WARNING....3
CAUTION 9
CARING FOR THE ENVIRONMENT....11
INSTALLATION
Before Installation ....12
Removing the Fridge and Freezer Door....13
Levelling and Door Alignment....17
Turning on the Power....18
Moving the Appliance for Relocation ....18
OPERATION
Before Use 19
Product Features....22
Control Panel....25
Ice and Water Dispenser....27
Automatic Icemaker 29
Drawer....32
Shelf 32
Door Basket ....33
MAINTENANCE
Cleaning 34
TROUBLESHOOTING
Before Calling for Service....35


natural_image
Pure geometric lines and shapes without any text, numbers, or symbols


natural_image
Pure geometric diagram with intersecting lines and shapes, no text or symbols present
SAFETY INSTRUCTIONS
READ ALL INSTRUCTIONS BEFORE USE
The following safety guidelines are intended to prevent unforeseen risks or damage from unsafe or incorrect operation of the appliance. The guidelines are separated into 'WARNING' and 'CAUTION' as described below.
Safety Messages

This symbol is displayed to indicate matters and operations that can cause risk. Read the part with this symbol carefully and follow the instructions in order to avoid risk.

WARNING
This indicates that the failure to follow the instructions can cause serious injury or death.

CAUTION
This indicates that the failure to follow the instructions can cause the minor injury or damage to the product.
WARNING

WARNING
To reduce the risk of explosion, fire, death, electric shock, injury or scalding to persons when using this product, follow basic precautions, including the following:
Technical Safety
- This appliance can be used by children aged from 8 years and above and persons with reduced physical, sensory or mental capabilities or lack of experience and knowledge if they have been given supervision or instruction concerning use of the appliance in a safe way and understand the hazards involved. Children shall not play with the
4 SAFETY INSTRUCTIONS
appliance. Cleaning and user maintenance shall not be made by children without supervision.
- This appliance is not intended for use by persons (including children) with reduced physical, sensory or mental capabilities, or lack of experience and knowledge, unless they have been given supervision or instruction concerning use of the appliance by a person responsible for their safety. Children should be supervised to ensure that they do not play with the appliance.
• Children aged from 3 to 8 years are allowed to load and unload refrigerating appliances.
-
This appliance is intended to be used in household and similar applications such as:
-
staff kitchen areas in shops, offices and other working environments;
- farm houses and by clients in hotels, motels and other residential type environments;
- bed and breakfast type environments;
- catering and similar non-retail applications.
- This refrigerating appliance is not intended to be used as a built-in appliance.
This symbol alerts you to flammable materials that can ignite and cause a fire if you do not take care.
- This appliance contains a small amount of isobutane refrigerant (R600a), but it is also combustible. When transporting and installing the appliance, care should be taken to ensure that no parts of the refrigerating circuit are damaged.
- The refrigerant and insulation blowing gas used in the appliance require special disposal procedures. Consult with service agent or a similarly qualified person before disposing of them.
- Do not damage the refrigerant circuit.
- If the power cord is damaged or the hole of the outlet socket is loose, do not use the power cord and contact an authorized service centre.
SAFETY INSTRUCTIONS
5
- Do not locate multiple portable socket-outlets or portable power supplies at the rear of the appliance.
- Securely plug the power plug in the outlet socket after completely removing any moisture and dust.
- Never unplug the appliance by pulling on the power cable. Always grip the power plug firmly and pull straight out from the outlet socket.
- Keep ventilation openings, in the appliance enclosure or in the built-in structure, clear of obstruction.
- Do not store explosive substances such as aerosol cans with a flammable propellant in this appliance.
- Do not tilt the appliance to pull or push it when transporting.
- When positioning the appliance, ensure the supply cord is not trapped or damaged.
- Do not use mechanical devices or other means to accelerate the defrosting process.
- Do not use a hair drier to dry the inside of the appliance or place a candle inside to remove the odours.
- Do not use electrical appliances inside the food storage compartments of the appliance, unless they are of the type recommended by the manufacturer.
- Make sure not to get a body part such as a hand or foot stuck while moving the appliance.
- Disconnect the power cord before cleaning the appliance interior or exterior.
- Do not spray water or inflammable substances (toothpaste, alcohol, thinner, benzene, flammable liquid, abrasive, etc.) over the interior or exterior of the appliance to clean it.
- Do not clean the appliance with brushes, cloths or sponges with rough surfaces or which are made of metallic material.
- Only qualified service personnel from LG Electronics service centre should disassemble, repair, or modify the appliance. Contact an LG Electronics customer information centre if you move and install the appliance in a different location.


natural_image
Pure geometric lines and crosshair symbols without any text or labels


natural_image
Pure geometric diagram with intersecting lines and shapes, no text or symbols present
6 SAFETY INSTRUCTIONS
Risk of Fire and Flammable Materials
- If a leak is detected, avoid any naked flames or potential sources of ignition and air the room in which the appliance is standing for several minutes. In order to avoid the creation of a flammable gas air mixture if a leak in the refrigerating circuit occurs, the size of the room in which the appliance is used should correspond to the amount of refrigerant used. The room must be 1 ~m^2 in size for every 8 g of R600a refrigerant inside the appliance.
- Refrigerant leaking out of the pipes could ignite or cause an explosion.
- The amount of refrigerant in your particular appliance is shown on the identification plate inside the appliance.
Installation
- This appliance should only be transported by two or more people holding the appliance securely.
• Install the appliance on a firm and level floor.
- Do not install the appliance in a damp and dusty place. Do not install or store the appliance in any outdoor area, or any area that is subject to weathering conditions such as direct sunlight, wind, rain, or temperatures below freezing.
- Do not place the appliance in direct sunlight or expose it to the heat from heating appliances such as stoves or heaters.
- Be careful not to expose the rear of the appliance when installing.
• Install the appliance in a place where it is easy to unplug the power plug of the appliance.
- Be careful not to let the appliance door fall during assembly or disassembly.
- Be careful not to pinch, crush, or damage the power cable during assembly or disassembly of the appliance door.
- Be careful not to point the power plug up or let the appliance lean against the power plug.
- Do not connect a plug adapter or other accessories to the power plug.
SAFETY INSTRUCTIONS
7
- Do not modify or extend the power cable.
- Ensure that the outlet socket is properly grounded, and that the earth pin on the power cord is not damaged or removed from the power plug. For more details on grounding, inquire at an LG Electronics customer information centre.
- This appliance is equipped with a power cord having an equipment-grounding conductor and a grounding power plug. The power plug must be plugged into an appropriate outlet socket that is installed and grounded in accordance with all local codes and ordinances.
- Never start up an appliance showing any signs of damage. If in doubt, consult your dealer.
- Dispose of all packaging materials (such as plastic bags and styrofoam) away from children. The packaging materials can cause suffocation.
- Do not plug the appliance into a multi socket adapter which does not have a power cable (mounted).
- The appliance should be connected to a dedicated power line which is separately fused.
- Do not use a multi socket outlet which is not properly grounded (portable). In case of using a properly-grounded multi socket outlet (portable), use the multi socket outlet with the current capacity of the power cord rating or higher and use the multi socket outlet only for the appliance.
- Do not use the appliance for any purpose (storage of medical or experimental materials or shipping) other than any domestic household food storage use.
- If water penetrates electrical parts of the appliance, disconnect power plug and contact an LG Electronics customer information centre.
- Unplug the power plug during a severe thunderstorm or lightening or when not in use for a long period of time.
Operation
8 SAFETY INSTRUCTIONS
- Do not touch the power plug or the appliance controls with wet hands.
- Do not bend the power cable excessively or place a heavy object on it.
- Immediately unplug the power plug and contact an LG Electronics customer information centre if you detect a strange sound, odour, or smoke coming from the appliance.
- Do not place hands or metallic objects inside the area emitting the cold air, cover or heat releasing grille on the back.
- Do not apply excessive force or impact to the back cover of the appliance.
- Be careful of nearby children when you open or close the appliance door. The door may bump the child and cause injury.
- Avoid the danger of children getting trapped inside the appliance. A child trapped inside the appliance can cause suffocation.
- Do not put animals, such as pets into the appliance.
- Do not place heavy or fragile objects, containers filled with liquid, combustible substances, flammable objects (such as candles, lamps, etc.), or heating devices (such as stoves, heaters, etc.) on the appliance.
- Do not place any electronic appliance (such as heater and mobile phone) inside the appliance.
- If there is a gas leakage (isobutane, propane, natural gas, etc.), do not touch the appliance or power plug and ventilate the area immediately. This appliance uses a refrigerant gas (isobutane, R600a). Although it uses a small amount of the gas, it is still combustible gas. Gas leakage during appliance transport, installation or operation can cause fire, explosion or injury if sparks are caused.
- Do not use or store flammable or combustible substances (ether, benzene, alcohol, chemical, LPG, combustible spray, insecticide, air freshener, cosmetics, etc.) near the appliance.
- This appliance incorporates an earth connection for functional purposes.
- Connect to potable water supply only.


natural_image
Pure geometric lines and crosshair symbols without any text or labels


natural_image
Pure geometric diagram with intersecting lines and shapes, no text or symbols present
SAFETY INSTRUCTIONS
9
- If connected to a water supply, connect to a potable water supply only.
- Fill with potable water only.
- If using an icemaker or dispenser water tank, make sure to fill it with potable water only.
Disposal
- When discarding the appliance, remove the door gasket while leaving the shelves and baskets in place and keep children away from the appliance.
CAUTION

CAUTION
To reduce the risk of minor injury to persons, malfunction, or damage to the product or property when using this product, follow basic precautions, including the following:
Installation
• After unpacking, check the appliance for any damage that may have occurred during transit.
- Wait for at least 3 to 4 hours in order to ensure the refrigerant circuit is fully efficient.
- This appliance does not require changes in installation or use based on altitude.
Operation
- Do not touch frozen food or the metal parts in the freezer compartment with wet or damp hands. It may cause frostbite.
- Do not place glass containers, bottles or cans (especially those containing carbonated drinks) in the freezer compartment, shelves or ice bin that will be exposed to temperatures below freezing.


natural_image
Pure geometric lines and shapes without any text, numbers, or symbols


natural_image
Pure geometric diagram with intersecting lines and shapes, no text or symbols present
10 SAFETY INSTRUCTIONS
- The tempered glass on the front side of the appliance door or the shelves can be damaged by an impact. If it is broken, do not touch it with hands.
- Do not hang from the appliance doors, storage room, shelf or climb up into it.
- Do not store an excessive amount of water bottles or containers for side dishes on the door baskets.
- Do not open or close the appliance door with excessive force.
- If the hinge of the appliance door is damaged or operates improperly, stop using the appliance and contact an authorized service centre.
- Prevent animals from nibbling on the power cable or water hose.
- Never eat frozen foods immediately after they have been taken out in the freezer compartment.
- Make sure not to get a hand or foot stuck upon opening or closing the appliance door or door in door.
Maintenance
- This appliance is equipped with maintenance-free LED interior light. Do not remove cover or LED lamp in any attempt to repair or change it. Contact an LG Electronics customer information centre.
- Do not clean glass shelves or covers with warm water when they are cold. They may shatter if exposed to sudden temperature changes.
- Do not insert the shelves upside down. The shelves may fall.
• To remove frost from the appliance, contact an LG Electronics customer information centre.
- Dispose of the ice inside the ice bin in the freezer compartment during an extended power outage.


natural_image
Pure geometric lines and crosshair symbols without any text or labels


natural_image
Pure geometric diagram with intersecting lines and shapes, no text or symbols present
CARING FOR THE ENVIRONMENT Disposal of Your Old Appliance
- This crossed-out wheeled bin symbol indicates that waste electrical and electronic products (WEEE) should be disposed of separately from the municipal waste stream.
- Old electrical products can contain hazardous substances so correct disposal of your old appliance will help prevent potential negative consequences for the environment and human health. Your old appliance may contain reusable parts that could be used to repair other products, and other valuable materials that can be recycled to conserve limited resources.
- You can take your appliance either to the shop where you purchased the product, or contact your local government waste office for details of your nearest authorised WEEE collection point. For the most up to date information for your country please see www.lg.com/global/recycling.


natural_image
Pure geometric lines and shapes without any text, numbers, or symbols


natural_image
Pure geometric diagram with intersecting lines and shapes, no text or symbols present
12 INSTALLATION
INSTALLATION
Before Installation
Dimensions and Clearances
Too small of a distance from adjacent items may result in the degradation of freezing capability and increased electricity costs. Allow over 50 mm of clearance between the back of the appliance and the wall when installing the appliance.

| - Size (mm) |
| A | 910 |
| B 1 787 | |
| C | 693 |
| D | 605 |
| E | 617 |
| F | 693 |
| G | 1 |
| H | 1 |
NOTE
- You can determine what type of appliance it is by looking at the label inside the appliance.
Ambient Temperature
- The appliance is designed to operate within a limited range of ambient temperatures, depending on the climate zone.
- The internal temperatures could be affected by the location of the appliance, the ambient temperature, the frequency of door opening and so on.
- The climate class can be found on the rating label.
| Climate Class Ambient Temperature Range °C |
| SN (Extended Temperate) | +10 - +32 |
| N (Temperate) +16 - +32 |
| ST (Subtropical) +16 - | +38 / +18 - +38** |
| T (Tropical) +10 - +43* | / +16 - +43 / +18 - +43** |
* Australia, India, Kenya
** Argentina
NOTE
- The appliances rated from SN to T are intended to be used at an ambient temperature between 10 °C and 43 °C.


natural_image
Pure geometric lines and shapes without any text, numbers, or symbols


natural_image
Pure geometric diagram with intersecting lines and shapes, no text or symbols present
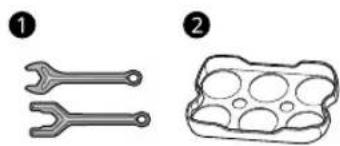
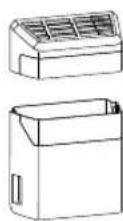
Accessories
*1 This accessory is only available on some models.
natural_image
Two mechanical tools and a plastic housing, labeled 1 and 2 (no text or symbols on the objects themselves)
① Spanner*1
② Egg Tray
Removing the Fridge and Freezer Door
If your entrance door is too narrow for the appliance to pass through, remove the appliance doors and pass the appliance laterally.
WARNING
- Disconnect the power cord, house fuse or circuit breaker before installing, removing the doors, or cleaning the appliance. Failure to follow these instructions may result in death, fire or electric shock.
Removing the Freezer Door
CAUTION
- When lifting the hinge free of the hinge lever latch, be careful that the door does not fall forward. It is recommended that two or more people carry out the door removal and refitting.
- Place the door on a non-scratching surface with the inner side facing up.
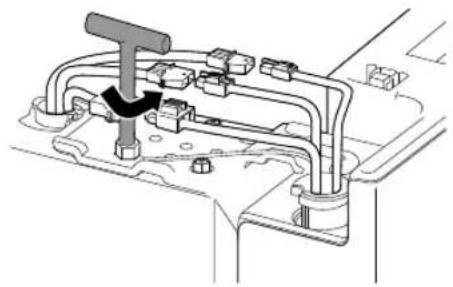
Separating the connectors for the water tubes
1 Pull out the two connectors for the water tubes.
- You can get the connectors in the case under the beam.
natural_image
Diagram showing a hand operating a device with a magnified inset highlighting the mechanism (no text or symbols present)
ENGLISH
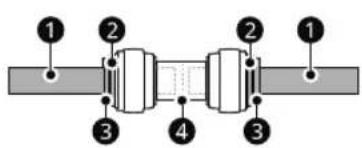
2 Separate the connectors.
CAUTION
- Do not pull the tubes out straightway without pulling the clips. It will damage the tubes and connectors.
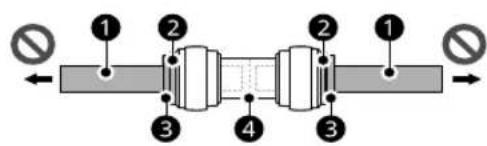
① Tube
② Clip
③ Coupler
4 Connector
- The white tubes are used for water and the blue tubes for ice.
- When reconnecting the tubes back, make sure the colours of the two tubes for one connector are the same. (White to white, blue to blue)
- When reconnecting the tubes back, make sure the tubes are fully inserted into the end of the connectors.
14 INSTALLATION
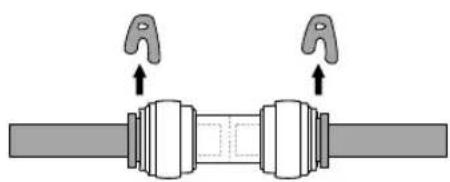
- First, pull the clips out of the connectors.
natural_image
Mechanical assembly diagram showing two hanging clips mounted on a shaft (no text or symbols)
Then, pull the water tubes out by pressing the couplers at the same time.

Removing the upper hinge parts
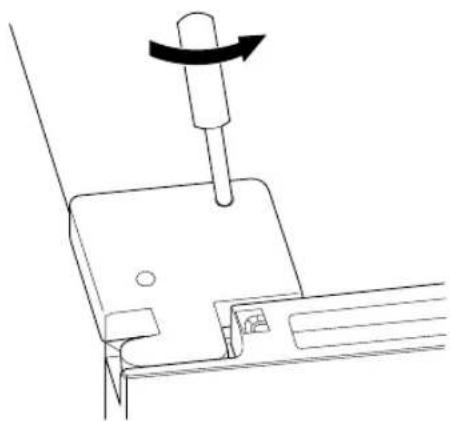
1 Remove the cover screws using a Philips screwdriver, disconnect the electrical wire terminal on the cover, then remove the hinge cover.
natural_image
Technical line drawing of a mechanical component with a rotating shaft and base (no text or symbols)

natural_image
Technical line drawing of a mechanical bracket with an upward arrow indicating motion (no text or symbols)
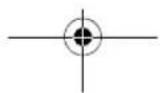
2 Disconnect the other electrical wire terminals.
CAUTION
- Do not pull the terminals out straightway without pressing the plastic hook①. Otherwise, it will damage the terminals.
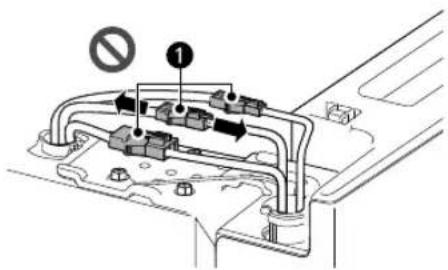
- First, press the plastic hooks ① of the terminals holding one side of the terminal with one hand. At the same time, pull the other side out.


natural_image
Pure geometric lines and shapes without any text, numbers, or symbols


natural_image
Pure geometric diagram with intersecting lines and shapes, no text or symbols present

natural_image
Technical diagram of a mechanical assembly with directional arrows indicating flow or movement (no text or symbols present)
3 Remove the hinge screws using a socket wrench, then remove the hinge.
natural_image
Technical diagram of a mechanical assembly with no visible text or symbols

natural_image
Technical line drawing of a mechanical assembly with no visible text or symbols
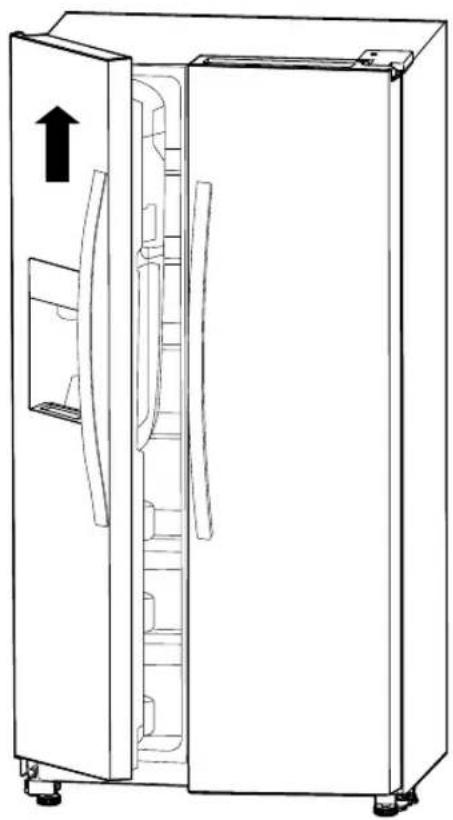
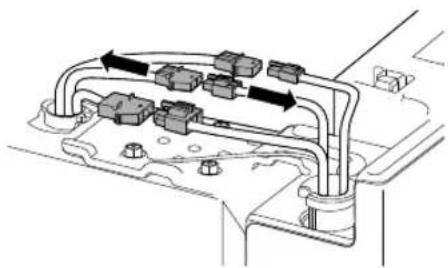
Be careful not to damage the tubes through the lower hinge.
natural_image
Line drawing of a refrigerator with open door and side panel, showing internal compartments and a black upward arrow indicating direction (no text or symbols)
ENGLISH
CAUTION
- You must uplift the freezer door slowly to protect the tubes since the tubes need to pass through the lower hinge.
Uplifting the freezer door from the fridge
Open the freezer door for a small angle, then uplift the door with your hands.
16 INSTALLATION
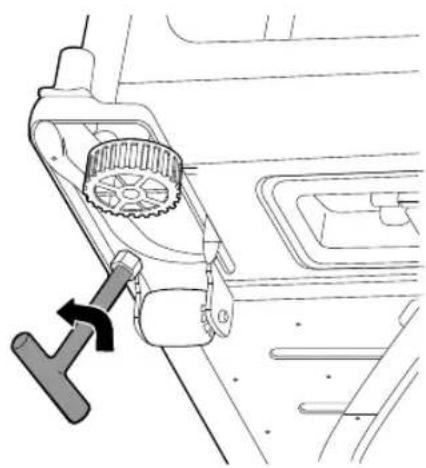
Removing the lower hinge parts
Incline the fridge, remove the hinge screws using a socket wrench, then remove the hinge.
natural_image
Diagram of a vehicle's rearview and dashboard components, showing a gear shift and handle mechanism (no text or labels)

natural_image
Technical line drawing of a car interior component with a circular fan and directional arrow (no text or symbols)
Removing the Fridge Door
The steps to remove the fridge door are similar to the freezer door without step 1 since the fridge door has no tubes, and also much easier to be removed with less wire connectors. So you could just follow the steps above to remove the fridge door.
CAUTION
- When lifting the hinge free of the hinge lever latch, be careful that the door does not fall
forward. It is recommended that two or more people carry out the door removal and refitting.
- Place the door on a non-scratching surface with the inner side facing up.
NOTE
- The number of wire harnesses may vary depending on the model.
Refitting the Fridge and Freezer Door
Refit the doors in the reverse sequence of their removal once the appliance has been passed through all access doors.
CAUTION
• Install the fridge door first.
NOTE
• Disassembling/Assembling the water lines
① Tube ② Clip ③ Coupler ④ Connector
- If the water tube end is damaged, it should be trimmed to ensure it does not leak when refitted.
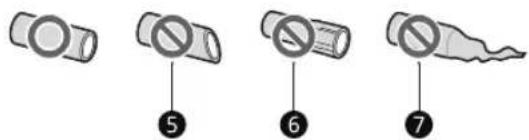
⑤ Not straight ⑥ Damaged ⑦ Stretched
Levelling and Door Alignment
Before Beginning
When the appliance doors appear to be uneven, follow the instructions below to align the doors.
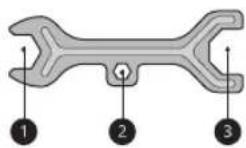
NOTE
- The spanner may differ depending on the model. You will be provided with either spanner type A or B.
- Spanner Type A

flowchart
graph TD
    A["1"] --> B["2"]
    C["3"] --> D["2"]
- Spanner Type B
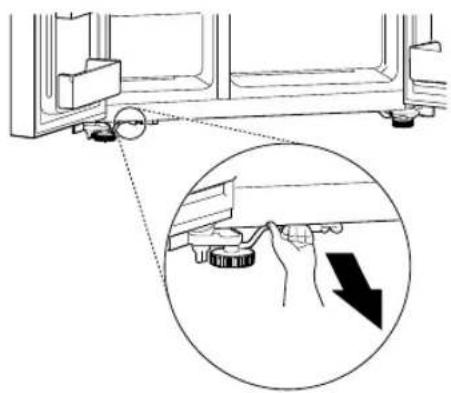
Levelling the Appliance
The appliance has two front levelling legs. Adjust the legs to alter the tilt from front to back or side to side. If the appliance seems unsteady, or the doors do not close easily, adjust the appliance's tilt using the instructions below.
Use your fingers or a spanner to adjust the height by turning the levelling leg to the left to raise it or to the right to lower it.
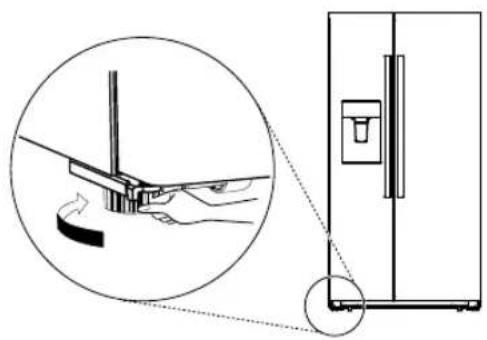
natural_image
Diagram showing a hand holding a tool near a refrigerator, with an inset close-up of the handle and a close-up of the door (no text or symbols present)
To allow the doors to self-close, tilt back the top backwards for about 15 mm or 0.5° by turning the adjustable feet.
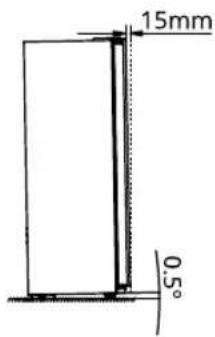
NOTE
- When you want to move the appliance, remember to turn the feet back up so that the appliance can roll freely. Reinstall the appliance when relocating.
- Leveling the doors may not be possible when the floor is not leveled, or is of weak or poor construction.
- The refrigerator is heavy and should be installed on a rigid and solid surface.
- Some timber flooring may cause levelling difficulties if it flexes excessively.


natural_image
Pure geometric lines and shapes without any text, numbers, or symbols


natural_image
Pure geometric diagram with intersecting lines and shapes, no text or symbols present
18 INSTALLATION
Turning on the Power
Connecting the Appliance
To turn on the appliance, connect the power plug into the outlet socket. Do not double up with other appliances on the same outlet.
NOTE
• After connecting the power supply cord (or plug) to the outlet, wait 3 or 4 hours before you put food into the appliance. If you add food before the appliance has cooled completely, your food may spoil.
• To turn off the appliance, disconnect the power plug from the outlet socket.
5 After installing the appliance, connect the power plug into a mains outlet socket and switch it on.
Moving the Appliance for Relocation
Moving the Appliance
CAUTION
- The rollers should be only used for forward or backward movement. Moving the refrigerator sideways may damage your floor and the rollers.
1 Remove all food from inside the appliance.
2 Pull the power plug out, insert and fix it into the power plug hook at the rear or on top of the appliance.
3 Tape parts such as shelves and the door handle to prevent from falling off while moving the appliance.
4 Move the appliance with more than two people carefully. When transporting the appliance over a long distance, keep the appliance upright.


natural_image
Pure geometric lines and crosshair symbols without any text or labels


natural_image
Pure geometric diagram with intersecting lines and shapes, no text or symbols present
OPERATION
Before Use
Notes for Operation
- Users should keep in mind that frost can form if the door is not closed completely or if the humidity is high during the summer.
- Ensure there is sufficient space between food stored on the shelf or door basket to allow the door to close completely.
- Opening the door for long periods can cause a significant increase of the temperature in the compartments of the appliance.
- If the refrigerating appliance is left empty for long periods, switch off, defrost, clean, dry, and leave the door open to prevent mould developing within the appliance.
- Note that a temperature rise after defrosting has a permissible range in the appliance specifications. If you wish to minimise the impact on the food storage due to a temperature rise, seal or wrap the stored food in several layers.
Door Open Alarm
This feature is only available on some models. The alarm sounds if the door is left open or not completely closed. The door alarm feature cannot be disabled.
NOTE
- Contact the LG Electronics customer information centre if the alarm sound continues even after closing all doors.
Failure Detection
The appliance can automatically detect problems during the operation.
NOTE
- If a problem is detected, the appliance may not operate and an error code is displayed even when any button is pressed.
- If an error code is indicated on the display, do not turn off the power. Immediately contact the LG Electronics customer information centre and report the error code. If you turn off the power, the repair technician from the our information centre may have difficulty finding the problem.
Suggestion for Energy Saving
- For the most efficient use of energy, keep all inner parts (e.g. door bins, drawers and shelves) on their original location.
- Ensure there is sufficient space between stored foods. This allows cold air to be circulated evenly and lowers electricity bills.
- Store hot food only after it has cooled in order to prevent dew or frost.
- When storing food in the freezer compartment, set the freezer temperature lower than the temperature indicated on the food.
- Do not set the temperature of the appliance lower than needed.
- Do not put food near the temperature sensor of the fridge compartment. Keep a distance of at least 3 cm from the sensor.
Storing Foods Effectively
- Food may freeze or spoil if stored at the wrong temperature. Set the refrigerator to the correct temperature for the food being stored.
- Store frozen food or refrigerated food inside sealed containers.
- Check the expiration date and label (storage instructions) before storing food in the appliance.


natural_image
Pure geometric lines and shapes without any text, numbers, or symbols


natural_image
Pure geometric diagram with intersecting lines and shapes, no text or symbols present
20 OPERATION
- Do not store food for a long period of time if it spoils easily at a low temperature.
- Do not place unfrozen food in direct contact with food that is already frozen. It could be necessary to reduce the quantity to be frozen if freezing every day is anticipated.
- Place the refrigerated food or frozen food in each fridge or freezer compartment immediately after purchasing.
- Store raw meat and fish in suitable containers in the refrigerator, so that it is not in contact with or drip onto other food.
- Refrigerated foods and other food items can be stored on top of the vegetable drawer.
- Avoid refreezing any food which has been completely thawed. Freezing any food which has been completely thawed again will lower its taste and nutrition.
- Do not overfill the appliance. Cold air can not circulate properly if the appliance is overfilled.
- Cool hot food before storing. If too much hot food is placed inside, the internal temperature of the appliance can increase and negatively affect other foods stored in the appliance.
- If you set an excessively low temperature for food, it may become frozen. Do not set a temperature lower than the required temperature for the food to be stored correctly.
- If there are chill compartments in the appliance, do not store vegetables and fruits with higher moisture content in the chill compartments as they may freeze due to the lower temperature.
• In the event of a blackout, call the electricity company and ask how long it is going to last.
- You should avoid door openings while the power is off.
- When the power supply gets back to normal, check the condition of the food.
Maximum Freezing Capacity
- For maximum freezing capacity, set the freezer temperature to the coldest temperature setting.
-
Express Freeze function will allow the freezer to reach its maximum freezing capacity. This generally takes up to 52 hours and automatically switches off.
-
Express Freeze must be switched on for 6 hours before fresh products are placed in the freezer compartment.
• To freeze food items quickly, store the food on the left side of the top shelf. If you need to store more food, store it on the shelves in order starting from the top shelf. Food items will freeze most quickly in the zone.
• To get better air circulation, insert all inner parts like baskets, drawers, and shelves.
NOTE
- The max freezing capacity of your appliance is stated on the rating label inside the fridge compartment.
Freezing the Maximum Amount of Food
If large quantities of food are to be stored, all the freezer drawers should be taken out of the appliance and the food should be stacked directly on the freezer shelves in the freezer compartment.
CAUTION
• To remove the drawers, first remove the food from drawers and then pull out the drawers carefully. Not doing so could cause injury or damage to the drawers.
NOTE
- The shape of each drawer may be different, insert in the right position.
Two Star Compartment
- Two star (**) basket or drawer can be used to store ice and food from -12 °C to -18 °C for short periods.
- Two star frozen food compartments are suitable for storing pre-frozen food, storing or making icecream and making ice cubes.


natural_image
Pure geometric lines and shapes without any text, numbers, or symbols


natural_image
Pure geometric diagram with intersecting lines and shapes, no text or symbols present

natural_image
Pure electrical circuit lines without any symbols
global_main.book.book Page 21 Monday, August 28, 2023 4:01 PM
OPERATION
21
- Two star compartments are not suitable for the freezing of fresh food.
ENGLISH


natural_image
Pure geometric lines and shapes without any text, numbers, or symbols


natural_image
Pure geometric diagram with intersecting lines and shapes, no text or symbols present

natural_image
Pure electrical circuit lines without any symbols
global_main.book.book Page 22 Monday, August 28, 2023 4:01 PM

natural_image
Pure geometric diagram with intersecting lines and circles, no text or symbols present
22 OPERATION
Product Features
The appearance or components of the appliance may differ from model to model.
Exterior
natural_image
Line drawing of a refrigerator with a door and front panel, no text or symbols present
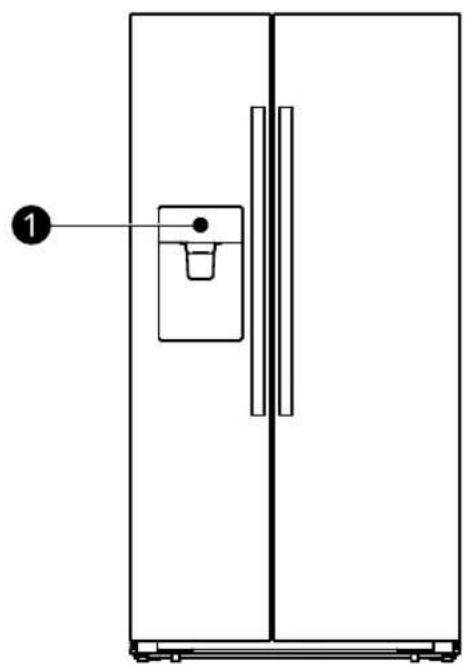
① Control Panel
Sets the refrigerator temperature, freezer temperature, and the dispenser mode.

natural_image
Pure geometric lines and shapes without any text, numbers, or symbols


natural_image
Pure geometric diagram with intersecting lines and shapes, no text or symbols present
Interior

ENGLISH
① Freezer LED Lamp
The LED lamp inside the appliance lights up when you open the door.
② Icemaker Front Cover Assembly
③ Automatic Icemaker
This is where ice is automatically produced and stored.
4 Freezer Shelf
Stores frozen food such as meat, fish, and ice cream.
⑤ Freezer Door Basket
Stores small packages of frozen food. Do not store ice cream or food which will be stored for a long period of time.
⑥ Upper Freezer Drawer
Stores frozen food for longer storage.
⑦ Lower Freezer Drawer
Stores frozen food for longer storage.


natural_image
Pure geometric lines and crosshair symbols without any text or labels


natural_image
Pure geometric diagram with intersecting lines and shapes, no text or symbols present
natural_image
Pure electrical circuit lines without any symbols

natural_image
Pure geometric diagram with intersecting lines and circles, no text or symbols present
24 OPERATION
⑧ Adjustable Leg
⑨ Fridge LED Lamp
The LED lamp inside the appliance lights up when you open the door.
10 Fridge Door Basket
Stores small packages of refrigerated foods, drinks and sauce containers.
11 Fridge Shelf
Stores refrigerated foods and fresh foods.
- Stores the foods with higher moisture content at the front of the shelf.
⑫ Water Tank
Stores water to supply the dispenser. It requires manual filling.
⑬ Upper Fridge Drawer
Stores fruits and vegetables to keep fresh for as long as possible.
14 Lower Fridge Drawer
Stores fruits and vegetables to keep fresh for as long as possible.
15 Adjustable Leg


natural_image
Pure geometric lines and shapes without any text, numbers, or symbols


natural_image
Pure geometric diagram with intersecting lines and shapes, no text or symbols present
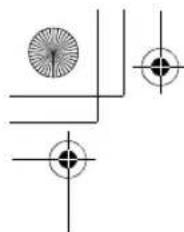
Control Panel
The actual control panel may differ from model to model.
Control Panel and Functions
① Alarm
The alarm sounds 3 times per minute if the door is left open or not completely closed for 2 minutes. Press the button or close the door to turn off the alarm. Otherwise, the alarm will stop after 10 minutes.
② Lock
This locks the buttons on the control panel.
- To lock the control panel buttons, press and hold the Lock button for 3 seconds until the 🔊 icon appears and the function is activated.
- To disable the function, press and hold the Lock button for 3 seconds until the 🔔 icon appears and the function is deactivated.
③ Ice On/Off
Press the button to turn the automatic icemaker On/Off.
4 Freezer
Press this button repeatedly to select a desired temperature between -24 °C and -14 °C.
• The initial freezer temperature is -19 °C.
⑤ Express Freeze
This function can quickly freeze a large amount of ice or frozen foods.
Press and hold the button for three seconds to enable the function.
Press the Freezer button to turn off the Express Freeze function. Then it will revert to the previous temperature setting.
- This function automatically terminates after 52 hours have passed.
⑥ Fridge
Press this button repeatedly to select a desired temperature between 2 °C and 8 °C.
• The initial fridge temperature is 4 °C.

natural_image
Pure geometric lines and crosshair symbols without any text or labels


natural_image
Pure geometric diagram with intersecting lines and shapes, no text or symbols present
26 OPERATION
NOTE
- The actual inner temperature varies depending on the food status, as the indicated setting temperature is a target temperature, not actual temperature within the appliance.
⑦ Express Cool
This function can quickly cool a large amount of foods such as vegetable, fruit and so on.
Press and hold the button for three seconds to enable the function.
Press the Fridge button to turn off the Express Cool function. Then it will revert to the previous temperature setting.
• This function automatically terminates after 3 hours have passed.
⑧ Vacation
This function is useful when you are away on a vacation. When this function is on, the fridge temperature is set to 6 °C and the freezer temperature to -17 °C. When this function is off, the temperatures return to the previous temperature settings.
- This function is enabled and disabled in turn each time you press the button.
CAUTION
- When this function is on, be careful about storing foods that require a lower temperature than the default temperature.
- When you return home, remember to turn this function off and return the refrigerator to its previous temperature settings.
⑨ Non Plumbing
The Non Plumbingicon is illuminated when the water dispenser tank is not installed correctly and the alarm will sound.
Press and hold the button for three seconds to stop the alarm.
10 Holiday Mode
This function is useful when you are away on a holiday. When this function is on, the fridge temperature is set to 15 °C and the freezer temperature to -18 °C. When this function is off, the temperatures return to the previous temperature settings.
- This function is enabled and disabled in turn each time you press the button.
- When this function is on, the icemaker will automatically turn off.
CAUTION
- Do not store any food in the fridge during the Holiday Mode, or it will quickly deteriorate.
- When this function is on, be careful about storing foods that require a lower temperature than the default temperature.
- When you return home, remember to turn this function off and return the refrigerator to its previous temperature settings.
⑪ Water & Ice Type


natural_image
Pure geometric lines and shapes without any text, numbers, or symbols


natural_image
Pure geometric diagram with intersecting lines and shapes, no text or symbols present
Select a desired dispenser mode from the buttons on the control panel. Press the dispenser switch with a glass or other container to dispense cubed ice, water or crushed ice.
NOTE
- The control panel automatically turns off for energy saving.
- If there is any finger or skin contacts to the control panel while cleaning it, the button function may operate.
- For optimal food preservation, increasing or decreasing 1 °C from the default temperature is recommended for each compartment.
- The actual temperature inside the appliance depends on the following factors: room temperature, the amount of food and how often the doors are opened, where the appliance is. Set the temperatures by considering these factors.
Ice and Water Dispenser
Before Using the Ice and Water Dispenser
CAUTION
- Keep children away from the dispenser to prevent children playing with or damaging the controls.
- Throw away the first few batches of ice (about 20 cubes and 7 cups of water). This is also necessary if the appliance has not been used for a long time.
- Clean the water dispensing system if they have not been used for 48 hours.
• To clean the water dispensing system, flush the water through the dispenser about 5 minutes and throw away the first few batches of ice.
- Do not use a thin crystal cup or chinaware when dispensing water or ice.
NOTE
- If you open the freezer door while water, cubed ice or crushed ice is being dispensed, dispensing will be paused. When you close the door, the selected item will continue to be dispensed.
-
If the cup rim is small, water may splash out of the glass or miss it completely.
-
Use a cup with a rim of over 68 mm in diameter when dispensing water, cubed ice or crushed ice.
- When the ice maker produces smaller ice cubes, or the cubes become lumped together, the amount of water supplied to the ice maker may be low due to insufficient water in the water tank. If ice is not used frequently or the freezer set temperature is too warm, it may also lump together.
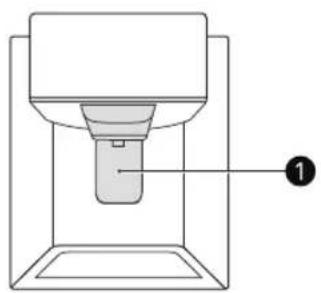
Using the Ice and Water Dispenser
Press the dispenser selection button repeatedly until the light above the icon that you want illuminates.
Press the dispenser paddle ① with a glass or other container to dispense cubed ice, water or crushed ice.
natural_image
Diagram of a mechanical device with a central component and labeled part (1), no text or symbols present.


natural_image
Pure geometric lines and crosshair symbols without any text or labels


natural_image
Pure geometric diagram with intersecting lines and shapes, no text or symbols present
28 OPERATION
Cleaning the Dispenser
Cleaning the Ice and Water Outlet
Wipe the water outlet ① or ice outlet ② frequently with a clean cloth as it may get dirty easily.
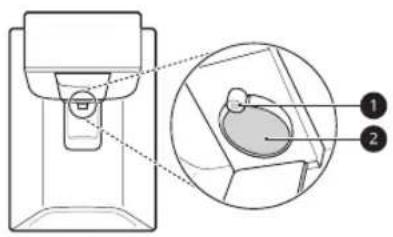
NOTE
- Lint from a cloth may adhere to the outlets.
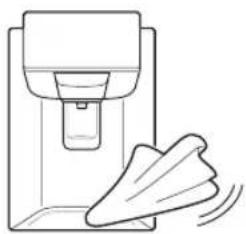
Cleaning the Dispenser Tray
Wipe the entire area with a damp cloth. The dispenser tray may become wet easily due to spilled ice or water.
natural_image
Simple line drawing of a device with a funnel and a leaf-like object below (no text or symbols)
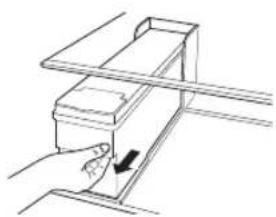
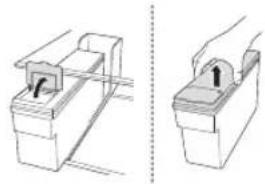
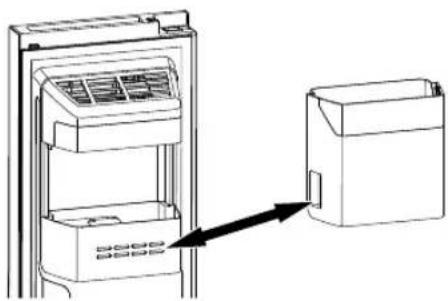
Filling the Water Tank with Water
This feature is only available on some models. The water tank holds the water to be dispensed or used by the automatic icemaker to make ice.
1 Remove the water dispenser tank by pulling it out while holding the handle.
natural_image
Hand placing a tray into a storage bin with an arrow indicating the motion (no text or symbols)
2 Open the cover or cap of the water dispenser tank.
natural_image
Technical line drawing of a mechanical component with two views (no text or symbols)
3 Fill with bottle filtered or clean filtered water up to the reference line indicated inside the water dispenser tank. (Total capacity: 4,5 ℓ)
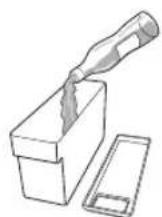
CAUTION
• Make sure to keep at least 0,5 litre of water in the water tank. Otherwise, it may cause malfunctions.
4 After filling with water, close the cover or cap of the water dispenser tank.

natural_image
Technical line drawing of a mechanical assembly with two views (no text or symbols)
5 Refit the water dispenser tank on the fridge shelf.

natural_image
Hand placing a component into a rack with an arrow indicating motion (no text or symbols)
- If there is an insufficient amount of water in the water dispenser tank, ice cube size and quantity may be affected and may result in no ice being made.
- If there is no water in the water dispenser tank, the cold water and ice dispensing function of the dispenser cannot be used. Check if there is water in the water dispenser tank and then fill it with water if there is not.
- Wait at least 15 seconds before removing the water tank after having dispensed water or ice from the dispenser.
- Sound from the water tank will be normal when supplying water to the dispenser and the Automatic Ice Maker. It is not a sign of malfunction.
WARNING
- Fill with potable water only into icemaker or dispenser water tank.
- Do not fill the water tank with drinks other than water or fill with hot water.
CAUTION
- Do not apply excessive force or impact when removing or assembling the water dispenser tank. Doing so can cause appliance damage or injury.
• Children should not be allowed near the dispenser tank.
NOTE
- Before using the water dispenser tank after installing the appliance, it should be washed before filling it with water.
- Check if the water dispenser tank has been placed on the appliance correctly. If it is not assembled correctly, water may leak from the tank into the appliance.
Automatic Icemaker
This feature is only available on some models. This feature may vary depending on model purchased.
Before Using the In-Door Icemaker
• The icemaker produces ice normally when approximately 48 hours have passed after the appliance is initially installed.
- If the ice bin is completely filled with ice, ice production will stop.
• Sound of ice dropping into the ice bin is normal.
- If ice cubes are stored in the ice bin for a long period of time, they may clump together and may not be separated easily. In such a case, empty the ice bin and allow fresh ice to be made.
CAUTION
- The first ice and water dispensed may include particles or odour from the water tank.
- If discolored ice is dispensed, check the water tank for a possible source. If the problem continues, contact the LG Electronics customer information centre. Do not use the ice or water until the problem is corrected.


natural_image
Pure geometric lines and crosshair symbols without any text or labels

natural_image
Pure geometric diagram with intersecting lines and shapes, no text or symbols present
30 OPERATION
CAUTION
- Do not touch the ice outlet or the automatic icemaker with your hand or a tool.
- Dispense ice into a glass before filling it with water or other beverages. Splashing will occur if ice is dispensed into a glass that already contains liquid.
- Never use a glass that is exceptionally narrow or deep. Ice may jam in the ice passage, affecting the performance of the appliance.
- Keep the glass at a proper distance from the ice outlet. A glass held too close to the outlet may prevent ice from dispensing.
- Dispose of the ice inside the ice bin if you go on vacation or if an extended power outage occurs. Water from melting ice may drop from the dispenser onto the floor.
Freezer Icemaker
The automatic icemaker can automatically make 40-84 cubes at a time, within a 24-hour period if conditions are favorable. This amount may vary according to the environment (ambient temperature around the appliance, frequency of the door being opened, amount of food stored in the appliance, etc.).
CAUTION
- Do not insert your hands into the mechanical part of the automatic icemaker such as the ice bin or the ice dispenser.
- Do not remove the cover of the automatic icemaker. Touching any mechanical part of the automatic icemaker. It may result in injury.
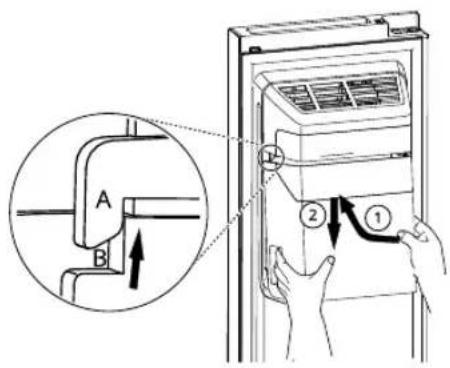
Removing/Refitting the Ice Storage Bin
The ice dispensing chute may become blocked with frost if only crushed ice is used. Remove the frost that accumulates by removing the ice bin and clearing the passage with a rubber spatula.
Dispensing cubed ice periodically can also help prevent frost buildup.
1 To remove, lift up the ice bin.
Pull out the Ice storage bin slowly.
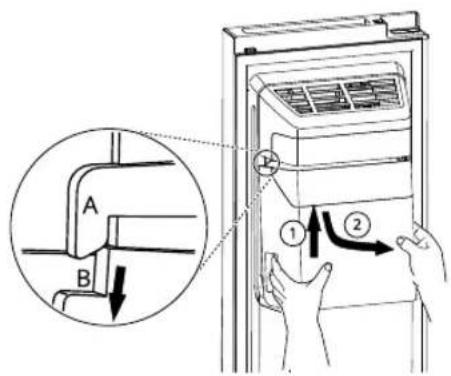
NOTE
- When you put it back, please make sure the two sides (B&B') of the ice bin are wedged into the buckles(A&A').
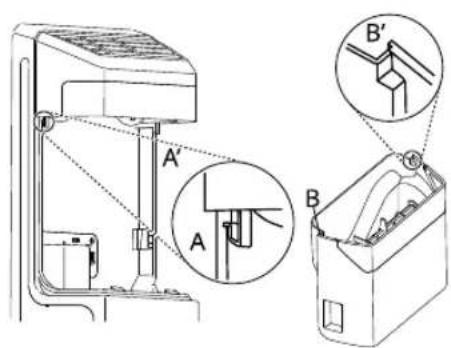
2 To refit, push the ice bin up, and make the two sides (B&B') of the ice bin wedge into the buckles (A&A').
Pull the ice bin down, and make sure the ice bin is fixed firmly.
- Pull out the ice bin, check for any ice cubes clump and remove them.

natural_image
Cross-sectional diagram of an appliance showing internal components (no text or symbols)
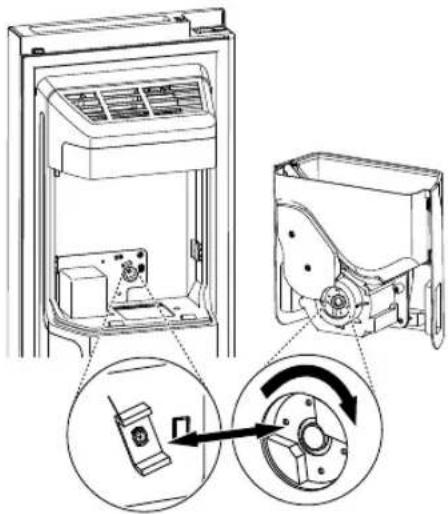
- Before refitting the ice bin, check the two couplers are at a suitable angle to connect correctly. If not, turn the ice bin coupler to the right angle to match the motor coupler.
CAUTION
- Do not touch the automatic icemaker's mechanical parts with your hand or a tool. Otherwise, appliance damage or injury may occur.
- Do not disassemble, repair or alter the automatic icemaker. These tasks should only be done by a service technician.
- Caution should be taken, as the automatic icemaker operates continuously after the freezer door is opened when the automatic icemaker is set to the ON.
- Keep children away from the dispenser.
- When refitting the ice bin, ensure that it is placed correctly. If it is tilted or unlevel, it may not continue to make ice due to sensor disruption.
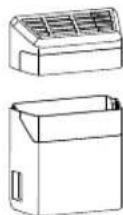
- If you want more space to store foods, you can replace the ice bin with an storage box. The storage box may not be provided depending on model purchased.
NOTE
- If ice doesn't come out:
- Check for any ice stuck in the chute and remove it.
natural_image
Diagram of a refrigerator with an attached paper airplane, showing airflow direction (no text or symbols)


natural_image
Pure geometric lines and shapes without any text, numbers, or symbols

natural_image
Pure geometric diagram with intersecting lines and shapes, no text or symbols present
32 OPERATION
Drawer
CAUTION
• Always empty the drawers before removing them, and use both hands when removing and refitting them.
• Make sure that the fridge doors are fully open before removing and refitting the drawers.
Removing/Refitting Drawers
1 Remove the contents of the drawer. Hold the handle of the vegetable drawer and gently pull it out.
2 Lift the vegetable drawer up and remove it by pulling it out.
natural_image
Diagram of a door handle with an arrow indicating clockwise motion (no text or symbols)
3 Refit the drawer in the reverse order of the removal process.
CAUTION
• Always empty the drawers before removing them, and use both hands when removing and refitting them.
• Make sure that the fridge doors are fully open before removing and assembling the drawers.
Shelf
CAUTION
• Glass shelves are heavy. Use special care when removing them.
- Do not clean glass shelves with warm water while they are cold. Shelves may break if exposed to sudden temperature changes or impact.
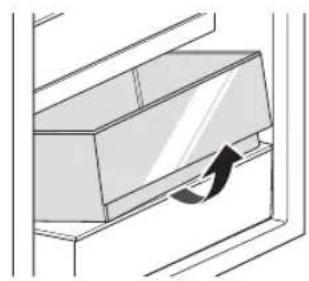
Removing/Refitting the Shelf
1 Tilt up the front of the shelf and then lift the shelf straight up.
2 Pull the shelf out.
natural_image
Illustration of hands holding a tray with a black arrow pointing to the tray (no text or symbols)
3 Mount the shelves in the reverse order of the removal process.
CAUTION
• Make sure that shelves are level from one side to the other. Failure to do so may result in the shelf falling or food spilling.


natural_image
Pure geometric lines and shapes without any text, numbers, or symbols


natural_image
Pure geometric diagram with intersecting lines and shapes, no text or symbols present
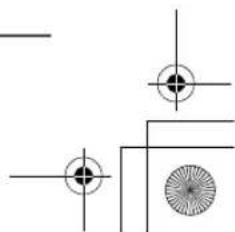
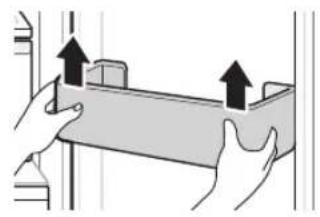
Door Basket
Removing/Refitting the Door Basket
1 Hold both edges of the basket and remove it by lifting it upward.
natural_image
Illustration of hands holding a rectangular object with two upward arrows indicating motion or force (no text or symbols)
2 Refit the door baskets in the reverse order of the removal process.


natural_image
Pure geometric lines and shapes without any text, numbers, or symbols


natural_image
Pure geometric diagram with intersecting lines and shapes, no text or symbols present
34 MAINTENANCE
MAINTENANCE
Cleaning
General Cleaning Tips
- Performing manual defrosting, maintenance or cleaning of the appliance while food is stored in the freezer can raise the temperature of the food and reduce its storage life.
- Regularly clean any surfaces that can come in contact with food.
- When cleaning the inside or outside of the appliance, do not wipe it with a rough brush, toothpaste, or flammable materials. Do not use cleaning agents containing flammable substances. This may cause discolouration or damage to the appliance.
- Flammable substances: alcohol (ethanol, methanol, isopropyl alcohol, isobutyl alcohol, etc.), thinner, bleach, benzene, flammable liquid, abrasive, etc.
• After cleaning, check if the power cable is damaged.
Cleaning the Interior
- When removing a shelf or drawer from inside the appliance, remove all stored foods from the shelf or drawer to prevent injury or damage to the appliance. Otherwise, injury may occur due to the weight of stored foods.
- Detach the shelves and drawers and clean them with water, and then dry them sufficiently, before replacing them.
- Regularly wipe the door gaskets with a wet soft towel.
- Door basket spills and stains should be cleaned as they can compromise storage ability of the basket and could even be damaged.
- Never clean the shelves or containers in the dishwasher. The parts may become deformed due to the heat.
- The automatic defrosting system in the appliance ensures that the compartment remains free of ice buildup under normal operating conditions. Users do not need to defrost it manually.
Cleaning the Exterior
- When cleaning the outside air vents of the appliance by means of vacuuming, then the power cord should be unplugged from the outlet to avoid any static discharge that can damage the electronics or cause an electric shock. Regular cleaning of the rear and side ventilation covers is recommended to maintain reliable and economical operation of the unit.
- Keep the air vents on the exterior of the appliance clean. Blocked air vents can cause fire or appliance damage.
- For the appliance exterior, use a clean sponge or soft cloth and a mild detergent in warm water. Do not use abrasive or harsh cleaners. Dry thoroughly with a soft cloth. Do not use contaminated cloths when cleaning the stainless steel doors. Always use a dedicated cloth and wipe in the same direction as the grain. This helps reduce surface staining and tarnishing.
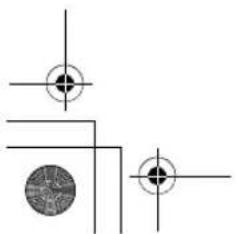
Cleaning the Condenser Cover
Use a vacuum cleaner with a brush to clean the condenser cover and vents. Do not remove the panel covering the condenser coil area.
We strongly recommend that this be done every 12 months to maintain operating efficiency. Failing to do so could cause loss of cooling, higher energy usage and compressor overheating.
natural_image
Hand inserting a component into a server rack (no text or symbols visible)


natural_image
Pure geometric lines and shapes without any text, numbers, or symbols


natural_image
Pure geometric diagram with intersecting lines and shapes, no text or symbols present
TROUBLESHOOTING
Before Calling for Service
Ice & Water
| Symptoms Possible Cause & Solution |
| The automatic icemaker does not produce ice or produces a small amount of ice. | Did you install the appliance recently?The ice maker produces ice normally when approximately 48 hours have passed after the appliance is installed. |
| Have you dispensed a large amount of ice recently?It takes approximately 24 hours to produce more ice in the automatic icemaker. Please wait. |
| Did you set the ice maker switch or the automatic icemaker button on the control panel to ON?Press I on the automatic icemaker switch or set ON for the automatic icemaker button on the control panel. (For more details on how to use, visit LG Electronics website or use your smart device.) |
| Is the temperature of the freezer compartment set too high?If the set temperature is too warm, ice will be produced slowly or not at all. Set the Freezer temperature to -18 °C for normal operation of the automatic icemaker. |
| Have you been opening the appliance door frequently?If you open the appliance door frequently, cold air will escape, lowering the speed of ice production. Do not open and close the appliance door frequently. |
| Is the appliance door completely closed?If the appliance door is not completely closed, the temperature of the freezer compartment will increase, slowing down the ice production speed. Close the appliance door completely. |
| Ice is not dispensed. Unable to hear the sound of ice coming out?In the control panel, select the modes for cubed ice and crushed ice alternately to dispense the ice. |
|
|
| Water does not come out. | The water dispenser tank may be empty. (Non plumbed models only)Fill the water dispenser tank. |


natural_image
Pure geometric lines and shapes without any text, numbers, or symbols


natural_image
Pure geometric diagram with intersecting lines and shapes, no text or symbols present
36 TROUBLESHOOTING
| Symptoms Possible Cause & Solution |
| Water tastes strange. | Is the taste of water different when comparing it with the taste of water from the previous water purifier?Has the purified water or cold water not been used for an extended period of time? |
| Has the purified water or cold water not been used for an extended period of time?The taste of old water may change due to bacterial growth. Use the product after dispensing and discharging approximately 5 litres (approximately three minutes) from the water dispenser. |
Cooling
| Symptoms Possible Cause & Solution |
| There is no refrigeration or freezing. | Is there a power interruption?Check the power of other appliances. |
| Appliance is unplugged.Plug the power plug in the outlet properly. |
| A fuse in your home may be blown or the circuit breaker tripped. Or the appliance is connected to a GFCI (Ground Fault Circuit Interrupter) outlet, and the outlet's circuit breaker has tripped.Check the main electrical box and replace the fuse or reset the circuit breaker. Do not increase fuse capacity. If the problem is a circuit overload, have it corrected by a qualified electrician.Reset the circuit breaker on the GFCI. If the problem persists, contact an electrician. |
| There is poor refrigeration or freezing. | Is the fridge or freezer temperature set to its warmest setting?Set the fridge or freezer temperature to a colder setting. |
| Is the appliance in direct sunlight, or is it near a heat generating object such as cooking oven or heater?Check the installation area and reinstall it away from heat generating objects. |
| Did you store hot food without cooling it first?Cool the hot food first before putting it in the fridge or freezer compartment. |
| Did you put in too much food?Maintain an appropriate space between food. |


natural_image
Pure geometric lines and shapes without any text, numbers, or symbols


natural_image
Pure geometric diagram with intersecting lines and shapes, no text or symbols present
| Symptoms Possible Cause & Solution |
| There is poor refrigeration or freezing. | Are the appliance doors completely closed?Completely close the door and make sure that stored food is not obstructing in the door. |
| Is there enough space around the appliance?Adjust the installation position to make enough space around the appliance. |
| The appliance contains a bad smell. | Is the fridge or freezer temperature set to 'Warm'?Set the fridge or freezer temperature to a colder setting. |
| Did you put in food with a strong smell?Store foods with strong smells in sealed containers. |
| Vegetables or fruit may have spoiled in the drawer.Strow away rotten vegetables and clean the vegetable drawer. Do not store vegetables too long in the vegetable drawer. |
Condensation & Frost
| Symptoms Possible Cause & Solution |
| There is condensation inside the appliance or on the bottom of the vegetable drawer cover. | Did you store hot food without cooling it first?Cool the hot food first before putting it inside the fridge or freezer. |
| Did you leave the appliance door open?Although the condensation will disappear soon after you close the appliance door, you can wipe it with a dry cloth. |
| Do you open and close the appliance door too frequently?Condensation can form due to the temperature difference from the outside. Wipe out the dampness with a dry cloth. |
| Did you put warm or moist food inside without sealing it in a container?Store food in a covered or sealed container. |
| Frost has formed in the freezer compartment. | Doors may not be closed properly.Check if the food item inside the appliance is blocking the door and make sure that the door is tightly closed. |
| Did you store hot food without cooling it first?Cool the hot food first before putting it in the fridge or freezer compartment. |


natural_image
Pure geometric lines and shapes without any text, numbers, or symbols


natural_image
Pure geometric diagram with intersecting lines and shapes, no text or symbols present
38 TROUBLESHOOTING
| Symptoms Possible Cause & Solution |
| Frost has formed in the freezer compartment. | Is the air entry or exit of the freezer compartment blocked?Make sure that air entry or exit is not blocked so that the air can circulate inside. |
| Is the freezer compartment overfilled?Maintain an appropriate space between items. |
| Frost or condensation has formed inside or outside the appliance. | Did you open and close the appliance door frequently or is the appliance door improperly closed?Frosts or condensation can form if the outside air penetrates inside the appliance. |
| Is the installation environment humid?Condensation can appear on the exterior of the appliance if the installation area is too humid or on a humid day such as a rainy day. Wipe off any moisture with a dry cloth. |
| The side or front of the appliance is warm. | There are anti condensation pipes fitted to these areas of the appliance to reduce condensation forming from around the door area.The heat releasing pipe to prevent condensation is installed on the front and side of the appliance. You may feel it particularly hot right after the appliance is installed or during the summer. You can be assured that this is not a problem and is quite normal. |
| There is water inside or outside of the appliance. | Is there water leakage around the appliance?Check if the water has leaked from a sink or another place. |
| Is there water on the bottom of the appliance?Check if the water is from the thawed frozen food or a broken or dropped container. |
Parts & Features
| Symptoms Possible Cause & Solution |
| The appliance door is not closed tightly. | Is the appliance leaning forward?Adjust the front feet to raise the front side slightly. |
| Were the shelves properly assembled?Refit the shelves if needed. |
| Did you close the door with excessive force?If you apply too much force or speed when closing the door, it may remain briefly open before closing. Make sure that you do not slam the door closed. Close the door gently. |
| It is difficult to open the appliance door. | Did you open the door right after you closed it?If you try to open the appliance door within one minute after you closed it, you may have difficulties because of the pressure inside the appliance. Try to open the appliance door again in a few minutes so that the internal pressure stabilizes. |
| The inside lamp in the appliance does not turn on. | Lamp failureClose the door and re-open. If the lamp does not turn on, please contact the LG Electronics customer information centre. Do not attempt removal of the lamp. |
Noises
| Symptoms Possible | Cause & Solution |
| The appliance is noisy and generates abnormal sounds. | Is the appliance installed on a weak floor or improperly levelled?• Install the appliance on a solid and flat area. |
| Does the rear of the appliance touch the wall?• Adjust the installation position to allow enough clearance around the appliance. |
| Are objects scattered behind the appliance?• Remove the scattered objects from behind the appliance. |
| Is there an object on top of the appliance?• Remove the object on top of the appliance. |
| Clicking noises The defrost control will click when the automatic defrost cycle begins and ends. The thermostat control (or appliance control on some models) will also click when cycling on and off.• Normal Operation |
| Rattling noises Rattling noises may come from the flow of appliance, the water line on the back of the unit (for plumbed models only), or items stored around the appliance.• Normal Operation |
|
|
|
|


natural_image
Pure geometric lines and shapes without any text, numbers, or symbols


natural_image
Pure geometric diagram with intersecting lines and shapes, no text or symbols present
40 TROUBLESHOOTING
| Symptoms Possible Cause & Solution |
| Whooshing noises Evaporator fan motor is circulating air through the fridge and freezer compartments.· Normal Operation |
|
|
| Gurgling noises Appliance flowing through the cooling system.· Normal Operation |
| Popping noises Contraction and expansion of the inside walls due to changes in temperature.· Normal Operation |
| Vibrating If the side or back of the appliance is touching a cabinet or wall, some of the normal vibrations may make an audible sound.· To eliminate the noise, make sure that the sides and back do not make any contact with any wall or cabinet. |
Customer Care and Service
Contact an LG Electronics customer information centre.
• To find information on LG authorized service centre, visit our website at www.lg.com.
- Only qualified service personnel from LG authorized service centre should disassemble, repair, or modify the appliance.
- The minimum warranty period of this refrigerating appliance is 24 months.
- Spare parts referenced in Regulation EU 2019/2019 are available for 7 years (only door gaskets are available for 10 years).
• To purchase spare parts, contact an LG Electronics customer information centre or our website at www.lg.com.
NOTE
- Regulation EU 2019/2019, valid from 1st March 2021, is related to the Energy Efficiency classes by Regulation EU 2019/2016.
- For more information about the energy efficiency of the appliance, visit https://ec.europa.eu and search using the model name (valid from 1st March 2021).
- Scan the QR code on the energy label supplied with the appliance, which provides a web link to the information related to the performance of the appliance in the EU EPREL database. Keep the energy label for reference and all other documents supplied with the appliance (valid from 1st March 2021).
- The model name can be found on the rating label of the appliance.


natural_image
Pure geometric lines and shapes without any text, numbers, or symbols


natural_image
Pure geometric diagram with intersecting lines and shapes, no text or symbols present

natural_image
Pure electrical circuit lines without any symbols
global_main.book.book Page 41 Monday, August 28, 2023 4:01 PM
TROUBLESHOOTING
41
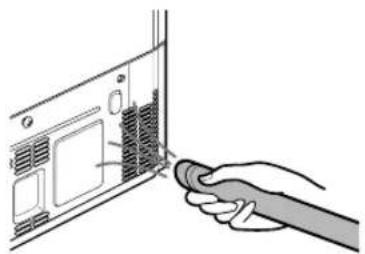
• This product contains a light source of energy efficiency class G.
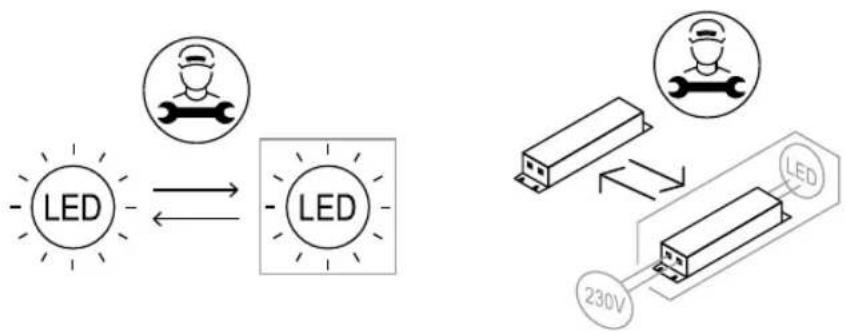
flowchart
graph LR
    A["LED"] <--> B["LED"]
    C["LED"] <--> D["LED"]
    E["LED"] <--> F["230V"]
ENGLISH


natural_image
Pure geometric lines and shapes without any text, numbers, or symbols


natural_image
Pure geometric diagram with intersecting lines and shapes, no text or symbols present
Memo

LG
Life's Good
natural_image
Pure geometric lines and shapes without any text, numbers, or symbols


natural_image
Pure geometric diagram with intersecting lines and shapes, no text or symbols present
natural_image
Pure geometric lines and shapes without any text, numbers, or symbols


natural_image
Pure geometric diagram with intersecting lines and shapes, no text or symbols present
natural_image
Pure geometric lines and shapes without any text, numbers, or symbols


natural_image
Pure geometric diagram with intersecting lines and shapes, no text or symbols present
natural_image
Pure geometric lines and shapes without any text, numbers, or symbols


natural_image
Pure geometric diagram with intersecting lines and shapes, no text or symbols present
natural_image
Pure geometric lines and shapes without any text, numbers, or symbols


natural_image
Pure geometric diagram with intersecting lines and shapes, no text or symbols present
natural_image
Pure geometric lines and crosshair symbols without any text or labels


natural_image
Pure geometric diagram with intersecting lines and shapes, no text or symbols present
natural_image
Pure geometric lines and shapes without any text, numbers, or symbols

natural_image
Pure geometric diagram with intersecting lines and shapes, no text or symbols present
natural_image
Pure geometric lines and crosshair symbols without any text or labels


natural_image
Pure geometric diagram with intersecting lines and shapes, no text or symbols present
natural_image
Pure geometric lines and crosshair symbols without any text or labels


natural_image
Pure geometric diagram with intersecting lines and shapes, no text or symbols present
14 МОНТИРАНЕ
Аксесоари
natural_image
Illustration showing two wrenches and a tray with circular holes (no text or symbols)
① Гаечен ключ*1
② Поставка за яйца
natural_image
Diagram showing a hand operating a tool with a magnified inset highlighting the mechanism (no text or symbols present)
natural_image
Mechanical assembly diagram showing two hanging clips mounted on a shaft (no text or symbols)
natural_image
Pure mechanical assembly diagram showing two shafts connected via a central shaft, with directional arrows indicating movement (no text or symbols)
natural_image
Technical line drawing of a mechanical assembly with a rotating shaft and mounting bracket (no text or symbols)

natural_image
Technical line drawing of a mechanical bracket with an upward arrow indicating motion (no text or symbols)
БЪЛГАРСКИ
16 МОНТИРАНЕ
natural_image
Technical diagram of a mechanical assembly with multiple components and directional arrows indicating flow or movement (no text or labels)
natural_image
Technical diagram of a mechanical assembly with no visible text or symbols
natural_image
Technical line drawing of a mechanical assembly with no visible text or symbols
natural_image
Line drawing of a refrigerator with open door and side panel, showing internal compartments and a directional arrow (no text or symbols)
ВНИМАНИЕ
natural_image
Diagram of a vehicle's side panel showing a gear shift lever and adjustment arrow (no text or symbols)

natural_image
Line drawing of a car interior showing the dashboard and steering wheel (no text or symbols)
natural_image
Pure geometric lines and shapes without any text, numbers, or symbols


natural_image
Pure electrical circuit lines without any symbols
18 МОНТИРАНЕ
natural_image
Diagram showing a hand holding a tool near a refrigerator with a close-up inset of the handle (no text or symbols)
Нивелация на уреда
natural_image
Pure geometric lines and shapes without any text, numbers, or symbols


natural_image
Pure geometric diagram with intersecting lines and shapes, no text or symbols present
natural_image
Pure geometric lines and shapes without any text, numbers, or symbols


natural_image
Pure geometric diagram with intersecting lines and shapes, no text or symbols present
natural_image
Pure geometric lines and crosshair symbols without any text or labels


natural_image
Pure geometric diagram with intersecting lines and shapes, no text or symbols present
22 ЕКСПЛОАТАЦИЯ
natural_image
Pure geometric lines and shapes without any text, numbers, or symbols


natural_image
Pure geometric diagram with intersecting lines and shapes, no text or symbols present

natural_image
Pure electrical circuit lines without any symbols
bg-bg_main.book.book Page 23 Wednesday, August 30, 2023 7:18 AM
ЕКСПЛОАТАЦИЯ
23
natural_image
Line drawing of a refrigerator with a door and front panel, no text or symbols present
БЪЛГАРСКИ
① Контролен панел
natural_image
Pure geometric lines and shapes without any text, numbers, or symbols


natural_image
Pure geometric diagram with intersecting lines and shapes, no text or symbols present
24 ЕКСПЛОАТАЦИЯ
Вътрешна част

① LED лампа на фризера
natural_image
Pure geometric lines and crosshair symbols without any text or labels


natural_image
Pure geometric diagram with intersecting lines and shapes, no text or symbols present
natural_image
Pure geometric lines and shapes without any text, numbers, or symbols


natural_image
Pure geometric diagram with intersecting lines and shapes, no text or symbols present
26 ЕКСПЛОАТАЦИЯ
Контролен панел
① Alarm
natural_image
Pure geometric lines and shapes without any text, numbers, or symbols

natural_image
Pure geometric diagram with intersecting lines and shapes, no text or symbols present
natural_image
Pure geometric lines and crosshair symbols without any text or labels


natural_image
Pure geometric diagram with intersecting lines and shapes, no text or symbols present
28 ЕКСПЛОАТАЦИЯ
⑪ Тип вода и лед
natural_image
Diagram of a mechanical device with a central component and labeled part (1), no text or symbols present.
ЗАБЕЛЕЖКА
natural_image
Simple line drawing of a mechanical device with a falling blade (no text or symbols)
natural_image
Line drawing of a hand holding a shelf with an arrow indicating movement (no text or symbols)
natural_image
Technical line drawing of a mechanical component with two views (front and side), no text or symbols present.
natural_image
Pure geometric lines and shapes without any text, numbers, or symbols


natural_image
Pure geometric diagram with intersecting lines and shapes, no text or symbols present
30 ЕКСПЛОАТАЦИЯ
ВНИМАНИЕ
natural_image
Diagram showing two mechanical assembly steps: one with a handle and arrow indicating direction, the other with a handle and arrow indicating force (no text or symbols present)
natural_image
Hand placing a component into a rack with an arrow indicating motion (no text or symbols)
ПРЕДУПРЕЖДЕНИЕ
natural_image
Pure geometric diagram with intersecting lines and shapes, no text or symbols present
32 ЕКСПЛОАТАЦИЯ
ЗАБЕЛЕЖКА
natural_image
Cross-sectional diagram of an electronic device showing internal components (no text or symbols)
ВНИМАНИЕ
natural_image
Technical line drawing of an air conditioner unit showing internal components and a close-up view of the device's internal structure (no text or symbols present)
natural_image
Diagram showing a refrigerator with air vent and a paper holder, connected by an arrow indicating direction (no text or symbols present)
Чекмедже
ВНИМАНИЕ
natural_image
Diagram of a mechanical component with an arrow indicating rotation or movement (no text or symbols present)
natural_image
Pure geometric diagram with intersecting lines and shapes, no text or symbols present

natural_image
Pure electrical circuit lines without any symbols

natural_image
Pure geometric diagram with intersecting lines and circles, no text or symbols present
34 ЕКСПЛОАТАЦИЯ
natural_image
Illustration of two hands pressing down on a rectangular panel with a black arrow indicating downward motion (no text or symbols)
natural_image
Illustration of two hands holding a rectangular object with upward arrows indicating motion or force (no text or symbols)


natural_image
Pure geometric lines and shapes without any text, numbers, or symbols


natural_image
Pure geometric diagram with intersecting lines and shapes, no text or symbols present
ПОДДРЪЖКА
Почистване
natural_image
Pure geometric lines and shapes without any text, numbers, or symbols


natural_image
Pure geometric diagram with intersecting lines and shapes, no text or symbols present

natural_image
Pure electrical circuit lines without any symbols
bg-bg_main.book.book Page 36 Wednesday, August 30, 2023 7:18 AM

natural_image
Pure geometric diagram with intersecting lines and circles, no text or symbols present
36 ПОДДРЬЖКА
natural_image
Hand inserting a USB into a device panel (no text or symbols visible)


natural_image
Pure geometric lines and shapes without any text, numbers, or symbols


natural_image
Pure geometric diagram with intersecting lines and shapes, no text or symbols present
ОТСТРАНЯВАНЕ НА НЕИЗПРАВНОСТИ
natural_image
Pure geometric lines and shapes without any text, numbers, or symbols


natural_image
Pure geometric diagram with intersecting lines and shapes, no text or symbols present
38 ОТСТРАНЯВАНЕ НА НЕИЗПРАВНОСТИ
natural_image
Pure geometric lines and shapes without any text, numbers, or symbols


natural_image
Pure geometric diagram with intersecting lines and shapes, no text or symbols present
ОТСТРАНЯВАНЕ НА НЕИЗПРАВНОСТИ
natural_image
Pure electrical circuit lines without any symbols
natural_image
Pure geometric diagram with intersecting lines and circles, no text or symbols present
ОТСТРАНЯВАНЕ НА НЕИЗПРАВНОСТИ
43
natural_image
Pure geometric lines and shapes without any text, numbers, or symbols


natural_image
Pure geometric diagram with intersecting lines and shapes, no text or symbols present
Бележка

LG
Life's Good
natural_image
Pure geometric lines and shapes without any text, numbers, or symbols


natural_image
Pure geometric diagram with intersecting lines and shapes, no text or symbols present
BEZPEČNOSTNÍ POKYNY
PŘED POUŽITÍM SI PŘEČTĚTE VŠECHNY POKYNY
natural_image
Pure geometric lines and crosshair symbols without any text or labels


natural_image
Pure geometric diagram with intersecting lines and shapes, no text or symbols present
6 BEZPEČNOSTNÍ POKYNY
natural_image
Pure geometric lines and shapes without any text, numbers, or symbols


natural_image
Pure geometric diagram with intersecting lines and shapes, no text or symbols present
8 BEZPEČNOSTNÍ POKYNY
natural_image
Pure geometric lines and shapes without any text, numbers, or symbols


natural_image
Pure geometric diagram with intersecting lines and shapes, no text or symbols present
PÉČE O ŽIVOTNÍ PROSTŘEDÍ
natural_image
Pure geometric lines and shapes without any text, numbers, or symbols


natural_image
Pure geometric diagram with intersecting lines and shapes, no text or symbols present
12 INSTALACE
INSTALACE
Před instalací
Rozměry a odstupy
natural_image
Pure geometric lines and shapes without any text, numbers, or symbols


natural_image
Pure geometric diagram with intersecting lines and shapes, no text or symbols present
Příslušenství
natural_image
Two mechanical parts: a wrench and a tray with circular holes (no text or symbols)
natural_image
Diagram showing a hand operating a mechanical device with a magnified inset highlighting the mechanism (no text or symbols present)
DESTINA
2 Oddělte přípojky.
UPOZORNĚNÍ
The Ground Truth image displays a single, solid horizontal line. According to Rule 2 (UNDERSCORE & LINE RULES), this is a stylistic or background line, not a placeholder underscore. Therefore, the OCR result must ignore it and output nothing or only meaningful text. The provided OCR content is "____", which consists of four underscores. This is an incorrect interpretation of the line as a placeholder, violating the rule that stylistic lines must be ignored. The OCR has hallucinated placeholder underscores where none exist in the GT. Hence, the OCR result is inconsistent with the Ground Truth.
14 INSTALACE
natural_image
Mechanical assembly diagram showing two hanging clips mounted on a shaft (no text or symbols)
natural_image
Technical line drawing of a mechanical assembly with a rotating component (no text or symbols)

natural_image
Pure mechanical assembly diagram showing a bracket with an upward arrow, no text or symbols present

natural_image
Technical diagram of a mechanical assembly with multiple components and directional arrows indicating flow or movement (no text or labels)
natural_image
Technical line drawing of a mechanical assembly with no visible text or symbols
natural_image
Line drawing of a refrigerator with open door and side panel, showing internal shelves and ventilation slots (no text or symbols)
ČEŠTINA
⚠ UPOZORNĚNÍ
natural_image
Diagram of a car interior showing a hand operating a tool with a gear-like component (no text or symbols)
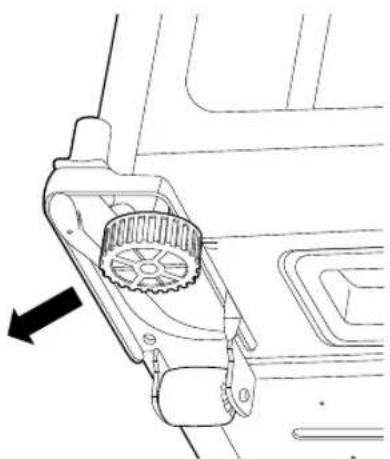
natural_image
Technical line drawing of a mechanical component with a circular feature and directional arrow (no text or symbols)
flowchart
graph TD
    A["1"] --> B["2"]
    C["3"] --> D["2"]
- Klíč typ B
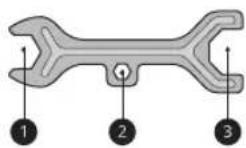
natural_image
Diagram showing a hand holding a tool interacting with a refrigerator, with an inset close-up of the handle (no text or symbols present)
natural_image
Pure geometric lines and shapes without any text, numbers, or symbols


natural_image
Pure geometric diagram with intersecting lines and shapes, no text or symbols present
18 INSTALACE
Zapnutí napájení
Zapojení spotřebiče
natural_image
Pure geometric lines and crosshair symbols without any text or labels


natural_image
Pure geometric diagram with intersecting lines and shapes, no text or symbols present
OBSLUHA
Před použitím
Pokyny pro obsluhu
natural_image
Pure geometric lines and shapes without any text, numbers, or symbols


natural_image
Pure geometric diagram with intersecting lines and shapes, no text or symbols present
20 OBSLUHA
natural_image
Pure geometric lines and shapes without any text, numbers, or symbols


natural_image
Pure geometric diagram with intersecting lines and shapes, no text or symbols present
natural_image
Pure geometric lines and shapes without any text, numbers, or symbols


natural_image
Pure geometric diagram with intersecting lines and shapes, no text or symbols present

natural_image
Pure electrical circuit lines without any symbols
cs-cz_main.book.book Page 22 Wednesday, August 30, 2023 7:25 AM

natural_image
Pure geometric diagram with intersecting lines and circles, no text or symbols present
22 OBSLUHA
Funkce výrobku
natural_image
Line drawing of a refrigerator with a door and front panel, no text or symbols present
① Ovládací panel
natural_image
Pure geometric lines and shapes without any text, numbers, or symbols


natural_image
Pure geometric diagram with intersecting lines and shapes, no text or symbols present
Vnitřní část

ČEŠTINA
natural_image
Pure geometric lines and crosshair symbols without any text or labels


natural_image
Pure geometric diagram with intersecting lines and shapes, no text or symbols present

natural_image
Pure electrical circuit lines without any symbols

natural_image
Pure geometric diagram with intersecting lines and circles, no text or symbols present
24 OBSLUHA
natural_image
Pure geometric lines and crosshair symbols without any text or labels


natural_image
Pure geometric diagram with intersecting lines and shapes, no text or symbols present
Ovládací panel
① Alarm
natural_image
Pure geometric lines and crosshair symbols without any text or labels


natural_image
Pure geometric diagram with intersecting lines and shapes, no text or symbols present
26 OBSLUHA
POZNÁMKA
natural_image
Pure geometric lines and shapes without any text, numbers, or symbols

natural_image
Pure geometric diagram with intersecting lines and shapes, no text or symbols present
POZNÁMKA
natural_image
Diagram of a mechanical device with a central component and labeled part (1), no text or symbols present.

natural_image
Pure electrical circuit lines without any symbols

natural_image
Pure geometric diagram with intersecting lines and circles, no text or symbols present
28 OBSLUHA
Čištění dávkovače
POZNÁMKA
natural_image
Simple line drawing of a device emitting powder into a container (no text or symbols)
natural_image
Line drawing of a hand using a tool to lift a tray (no text or symbols)
natural_image
Technical line drawing of a mechanical assembly with two views (no text or symbols)
natural_image
Technical line drawing of a mechanical assembly with two views (no text or symbols)
natural_image
Hand placing a component into a mechanical part with an arrow indicating motion (no text or symbols)
⚠️ VAROVÁNÍ
natural_image
Pure geometric lines and crosshair symbols without any text or labels


natural_image
Pure geometric diagram with intersecting lines and shapes, no text or symbols present
30 OBSLUHA
⚠ UPOZORNĚNÍ
POZNÁMKA
natural_image
Cross-sectional diagram of an appliance showing internal components (no text or symbols)

⚠ UPOZORNĚNÍ
POZNÁMKA
natural_image
Pure geometric lines and crosshair symbols without any text or labels


natural_image
Pure geometric diagram with intersecting lines and shapes, no text or symbols present
32 OBSLUHA
POZNÁMKA
natural_image
Line drawing of a refrigerator with airflow direction indicated by arrows (no text or symbols)
Zásuvka
⚠ UPOZORNĚNÍ
natural_image
Diagram of a door handle with an arrow indicating clockwise motion (no text or symbols)
natural_image
Illustration of two hands pressing down on a rectangular panel with a black arrow indicating the direction (no text or symbols present)
natural_image
Illustration of two hands holding a rectangular object with upward arrows indicating motion or force (no text or symbols)
natural_image
Pure geometric lines and shapes without any text, numbers, or symbols


natural_image
Pure geometric diagram with intersecting lines and shapes, no text or symbols present
34 ÚDRŽBA
ÚDRŽBA
Čištění
natural_image
Pure electrical circuit lines without any symbols
cs-cz_main.book.book Page 35 Wednesday, August 30, 2023 7:25 AM
ÚDRŽBA 35
natural_image
Hand inserting a plug into a device panel (no text or symbols visible)
ČEŠTINA


natural_image
Pure geometric lines and shapes without any text, numbers, or symbols


natural_image
Pure geometric diagram with intersecting lines and shapes, no text or symbols present
36 ODSTRAŇOVÁNÍ ZÁVAD
ODSTRAŇOVÁNÍ ZÁVAD
natural_image
Pure geometric lines and shapes without any text, numbers, or symbols


natural_image
Pure geometric diagram with intersecting lines and shapes, no text or symbols present
ODSTRAŇOVÁNÍ ZÁVAD
natural_image
Pure geometric lines and shapes without any text, numbers, or symbols


natural_image
Pure geometric diagram with intersecting lines and shapes, no text or symbols present
Poznámky

LG
Life's Good
Scan QR-koden for at se manualen.
BRUGERVEJLEDNING
K∅LESKAB & FRYSER

natural_image
Pure geometric lines and shapes without any text, numbers, or symbols


natural_image
Pure geometric diagram with intersecting lines and shapes, no text or symbols present
SIKKERHEDSINSTRUKTIONER
LÆS ALLE INSTRUKTIONER INDEN BRUG
natural_image
Pure geometric lines and circular shapes without any text, numbers, or symbols


natural_image
Pure geometric diagram with intersecting lines and shapes, no text or symbols present
6 SIKKERHEDSINSTRUKTIONER
natural_image
Pure geometric diagram with intersecting lines and shapes, no text or symbols present
SIKKERHEDSINSTRUKTIONER
7
natural_image
Pure geometric lines and crosshair symbols without any text or labels


natural_image
Pure geometric diagram with intersecting lines and shapes, no text or symbols present
8 SIKKERHEDSINSTRUKTIONER
Betjening
natural_image
Pure geometric lines and shapes without any text, numbers, or symbols


natural_image
Pure geometric diagram with intersecting lines and shapes, no text or symbols present
10 SIKKERHEDSINSTRUKTIONER
Betjening
natural_image
Pure geometric diagram with intersecting lines and shapes, no text or symbols present
SIKKERHEDSINSTRUKTIONER
natural_image
Pure geometric lines and shapes without any text, numbers, or symbols


natural_image
Pure geometric diagram with intersecting lines and shapes, no text or symbols present
12 INSTALLATION
INSTALLATION
Før installation
Mål og afstande
natural_image
Pure geometric lines and shapes without any text, numbers, or symbols


natural_image
Pure geometric diagram with intersecting lines and shapes, no text or symbols present
Tilbehør
natural_image
Two illustrations: a wrench and a plate with circular holes, labeled 1 and 2 (no text or symbols on the objects themselves)
natural_image
Diagram showing a hand operating a tool with a magnified inset highlighting the action (no text or symbols present)
DANSK
① Slange
② Klemme
③ Koblingsanordning
④ Tilslutning
natural_image
Mechanical assembly diagram showing two hanging clips mounted on a shaft (no text or symbols)
natural_image
Technical line drawing of a mechanical component with a rotating shaft and base (no text or symbols)
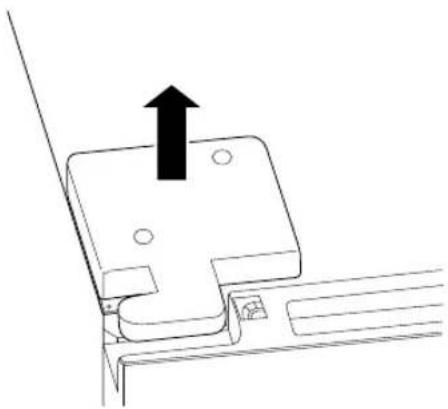
natural_image
Technical line drawing of a mechanical bracket with an upward arrow indicating motion (no text or symbols)
2 Frakobl de andre elektriske ledningsterminaler.
▲ FORSIGTIG


natural_image
Pure geometric lines and shapes without any text, numbers, or symbols


natural_image
Pure geometric diagram with intersecting lines and shapes, no text or symbols present

natural_image
Technical diagram of a mechanical assembly with directional arrows indicating flow or movement (no text or symbols present)
natural_image
Technical diagram of a mechanical assembly with a T-shaped tool inserted into a housing (no text or symbols visible)
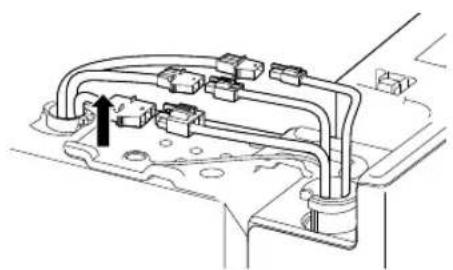
natural_image
Technical line drawing of a mechanical assembly with no visible text or symbols
natural_image
Line drawing of a refrigerator with open door and side panel, showing internal compartments and a black upward arrow indicating direction (no text or symbols)
DANSK
▲ FORSIGTIG
natural_image
Diagram of a car interior showing a mechanical component with a T-shaped tool inserted (no text or symbols)

natural_image
Technical line drawing of a mechanical component with a gear-like assembly and directional arrow (no text or symbols)
flowchart
graph TD
    A["1"] --> B["2"]
    C["3"] --> B["2"]
- Nøgle type B
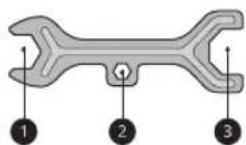
natural_image
Diagram showing a hand holding a clip next to a refrigerator with a close-up inset of the clip's motion (no text or symbols)
natural_image
Pure geometric lines and shapes without any text, numbers, or symbols


natural_image
Pure geometric diagram with intersecting lines and shapes, no text or symbols present
18 INSTALLATION
Tænd for strømmen
natural_image
Pure geometric lines and crosshair symbols without any text or labels


natural_image
Pure geometric diagram with intersecting lines and shapes, no text or symbols present
BETJENING
Før brug
natural_image
Pure geometric lines and crosshair symbols without any text or labels


natural_image
Pure geometric diagram with intersecting lines and shapes, no text or symbols present
20 BETJENING
natural_image
Pure geometric lines and shapes without any text, numbers, or symbols


natural_image
Pure geometric diagram with intersecting lines and shapes, no text or symbols present
To-stjernet rum
natural_image
Pure geometric lines and crosshair symbols without any text or labels


natural_image
Pure geometric diagram with intersecting lines and shapes, no text or symbols present

natural_image
Pure electrical circuit lines without any symbols
da-dk_main.book.book Page 22 Wednesday, August 30, 2023 9:13 AM

natural_image
Pure geometric diagram with intersecting lines and circles, no text or symbols present
22 BETJENING
Produktfunktioner
natural_image
Line drawing of a refrigerator with a door and front panel, no text or symbols present
① Betjeningspanel
natural_image
Pure geometric lines and shapes without any text, numbers, or symbols


natural_image
Pure geometric diagram with intersecting lines and shapes, no text or symbols present
Inderside

DANSK
natural_image
Pure geometric lines and shapes without any text, numbers, or symbols


natural_image
Pure geometric diagram with intersecting lines and shapes, no text or symbols present

natural_image
Pure electrical circuit lines without any symbols

natural_image
Pure geometric diagram with intersecting lines and dots, no text or symbols present
24 BETJENING
natural_image
Pure geometric lines and crosshair symbols without any text or labels


natural_image
Pure geometric diagram with intersecting lines and shapes, no text or symbols present
Betjeningspanel
① Alarm
natural_image
Pure geometric lines and crosshair symbols without any text or labels


natural_image
Pure geometric diagram with intersecting lines and shapes, no text or symbols present
26 BETJENING
BEMÆRK
natural_image
Pure geometric lines and crosshair symbols without any text or labels

natural_image
Pure geometric diagram with intersecting lines and shapes, no text or symbols present
natural_image
Diagram of a mechanical device with a central component and labeled part (1), no text or symbols present.


natural_image
Pure geometric lines and crosshair symbols without any text or labels

natural_image
Pure geometric diagram with intersecting lines and shapes, no text or symbols present

natural_image
Pure electrical circuit lines without any symbols

natural_image
Pure geometric diagram with intersecting lines and circles, no text or symbols present
28 BETJENING
BEMÆRK
natural_image
Simple line drawing of a device with a funnel and a blade, no text or symbols present
natural_image
Hand placing a tray into a storage bin with an arrow indicating the motion (no text or symbols)
natural_image
Diagram showing two views of a mechanical device with a handle and base, no text or symbols present
natural_image
Diagram showing two views of a mechanical device with a handle and base, no text or symbols present
natural_image
Hand holding a device with an arrow indicating motion (no text or symbols)
natural_image
Pure geometric lines and crosshair symbols without any text or labels

natural_image
Pure geometric diagram with intersecting lines and shapes, no text or symbols present
30 BETJENING
▲ FORSIGTIG
BEMÆRK
natural_image
Technical line drawing of an open refrigerator with internal compartments and doorways (no text or symbols)

natural_image
Technical line drawing of an air conditioner unit showing internal components and a close-up of the device's internal mechanism (no text or symbols present)
BEMÆRK
natural_image
Pure geometric lines and shapes without any text, numbers, or symbols


natural_image
Pure geometric diagram with intersecting lines and shapes, no text or symbols present
32 BETJENING
BEMÆRK
natural_image
Diagram of a refrigerator with air conditioner unit and adjacent air conditioner unit, showing airflow direction (no text or symbols)
Skuffe
▲ FORSIGTIG
natural_image
Diagram of a mechanical component with an arrow indicating direction (no text or symbols)
natural_image
Illustration of two hands holding a transparent panel with a black arrow pointing to it (no text or symbols present)
natural_image
Illustration of two hands holding a rectangular object with upward arrows indicating motion or force (no text or symbols)
natural_image
Pure geometric lines and shapes without any text, numbers, or symbols


natural_image
Pure geometric diagram with intersecting lines and shapes, no text or symbols present
34 VEDLIGEHOLDELSE
VEDLIGEHOLDELSE
Rengøring
Generelle rengøringstips
natural_image
Pure electrical circuit lines without any symbols
da-dk_main.book.book Page 35 Wednesday, August 30, 2023 9:13 AM
VEDLIGEHOLDELSE
35
natural_image
Hand inserting a plug into a device panel (no text or symbols visible)
DANSK


natural_image
Pure geometric lines and shapes without any text, numbers, or symbols


natural_image
Pure geometric diagram with intersecting lines and shapes, no text or symbols present
36 FEJLFINDING
FEJLFINDING
natural_image
Pure geometric lines and shapes without any text, numbers, or symbols


natural_image
Pure geometric diagram with intersecting lines and shapes, no text or symbols present
natural_image
Pure geometric lines and crosshair symbols without any text or labels


natural_image
Pure geometric diagram with intersecting lines and shapes, no text or symbols present
natural_image
Pure geometric lines and shapes without any text, numbers, or symbols


natural_image
Pure geometric lines and shapes without any text, numbers, or symbols
Kundeservice
Kontakt et LG Electronics-kundesupportcenter.
natural_image
Pure geometric lines and shapes without any text, numbers, or symbols


natural_image
Pure geometric diagram with intersecting lines and shapes, no text or symbols present

LG
Life's Good
natural_image
Pure geometric lines and shapes without any text, numbers, or symbols


natural_image
Pure geometric diagram with intersecting lines and shapes, no text or symbols present
natural_image
Pure geometric lines and shapes without any text, numbers, or symbols


natural_image
Pure geometric diagram with intersecting lines and shapes, no text or symbols present
natural_image
Pure electrical circuit lines without any symbols

natural_image
Pure geometric diagram with intersecting lines and circles, no text or symbols present


natural_image
Pure geometric lines and crosshair symbols without any text or labels


natural_image
Pure geometric diagram with intersecting lines and shapes, no text or symbols present
Installation
natural_image
Pure geometric lines and crosshair symbols without any text or labels


natural_image
Pure geometric diagram with intersecting lines and shapes, no text or symbols present
natural_image
Pure geometric lines and crosshair symbols without any text or labels


natural_image
Pure geometric diagram with intersecting lines and shapes, no text or symbols present
natural_image
Pure electrical circuit lines without any symbols


natural_image
Pure geometric lines and crosshair symbols without any text or labels

natural_image
Pure geometric diagram with intersecting lines and shapes, no text or symbols present
natural_image
Pure electrical circuit lines without any symbols


natural_image
Pure geometric lines and shapes without any text, numbers, or symbols


natural_image
Pure geometric diagram with intersecting lines and shapes, no text or symbols present
14 AUFSTELLEN
AUFSTELLEN
Vor dem Aufstellen
natural_image
Pure geometric lines and shapes without any text, numbers, or symbols


natural_image
Pure geometric diagram with intersecting lines and shapes, no text or symbols present
Zubehör
natural_image
Illustration showing two wrenches and a tray with circular holes (no text or symbols)
① Schraubenschlüssel ^*1
② Eierablage
natural_image
Diagram showing a hand operating a device with a magnified inset highlighting a downward force (no text or symbols present)
natural_image
Pure geometric lines and shapes without any text, numbers, or symbols


natural_image
Pure geometric diagram with intersecting lines and shapes, no text or symbols present
16 AUFSTELLEN
ACHTUNG
natural_image
Mechanical assembly diagram showing two hanging clips mounted on a shaft (no text or symbols)
natural_image
Pure mechanical assembly diagram showing two shafts connected via a central shaft, with directional arrows indicating movement (no text or symbols)
natural_image
Technical line drawing of a mechanical component with a rotating shaft and base (no text or symbols)

natural_image
Technical line drawing of a mechanical bracket with an upward arrow indicating motion (no text or symbols)

natural_image
Technical diagram of a mechanical assembly with directional arrows indicating flow or movement (no text or symbols present)
natural_image
Technical diagram of a mechanical assembly with a T-shaped tool inserted into a housing (no text or symbols visible)

natural_image
Technical line drawing of a mechanical component with no visible text or symbols
natural_image
Line drawing of a refrigerator with open door and side panel, showing internal compartments and a directional arrow (no text or symbols)
DEUTSCH
ACHTUNG
natural_image
Diagram of a vehicle interior showing a gear shift lever and dashboard (no text or symbols)

natural_image
Technical line drawing of a mechanical component with a circular feature and directional arrow (no text or symbols)
- Schraubenschlüssel A
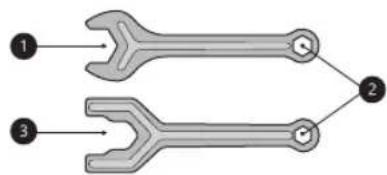
flowchart
graph TD
    A["1"] --> B["2"]
    C["3"] --> B["2"]
- Schraubenschlüssel B
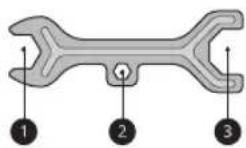
natural_image
Diagram showing a hand holding a tool near a refrigerator, with an inset close-up of the handle (no text or symbols present)
DEUTSCH
natural_image
Pure geometric lines and crosshair symbols without any text or labels


natural_image
Pure geometric diagram with intersecting lines and shapes, no text or symbols present
20 AUFSTELLEN
Gerät einschalten
natural_image
Pure geometric lines and crosshair symbols without any text or labels


natural_image
Pure geometric diagram with intersecting lines and shapes, no text or symbols present
BETRIEB
Vor der Verwendung
Bedienungshinweise
natural_image
Pure geometric lines and crosshair symbols without any text or labels


natural_image
Pure geometric diagram with intersecting lines and shapes, no text or symbols present
22 BETRIEB
natural_image
Pure geometric lines and shapes without any text, numbers, or symbols


natural_image
Pure geometric diagram with intersecting lines and shapes, no text or symbols present

natural_image
Pure electrical circuit lines without any symbols
de-de_main.book.book Page 24 Thursday, September 7, 2023 4:06 PM

natural_image
Pure geometric diagram with intersecting lines and circles, no text or symbols present
24 BETRIEB
natural_image
Line drawing of a refrigerator with a door and front panel, no text or symbols present
① Bedienfeld
natural_image
Pure geometric lines and shapes without any text, numbers, or symbols


natural_image
Pure geometric diagram with intersecting lines and shapes, no text or symbols present
Innenseite

DEUTSCH
natural_image
Pure geometric lines and shapes without any text, numbers, or symbols

natural_image
Pure geometric diagram with intersecting lines and shapes, no text or symbols present

natural_image
Pure electrical circuit lines without any symbols

natural_image
Pure geometric diagram with intersecting lines and circles, no text or symbols present
26 BETRIEB
① Alarm
natural_image
Pure geometric lines and shapes without any text, numbers, or symbols


natural_image
Pure geometric diagram with intersecting lines and shapes, no text or symbols present
28 BETRIEB
natural_image
Pure geometric lines and shapes without any text, numbers, or symbols


natural_image
Pure geometric diagram with intersecting lines and shapes, no text or symbols present
ACHTUNG
natural_image
Pure geometric lines and shapes without any text, numbers, or symbols


natural_image
Pure geometric diagram with intersecting lines and shapes, no text or symbols present
30 BETRIEB
HINWEIS
natural_image
Diagram of a mechanical device with a central component and labeled part (1), no text or symbols present.
HINWEIS
natural_image
Simple line drawing of a spray can with a droplet falling (no text or symbols)
natural_image
Line drawing of a hand pressing down on a mechanical component (no text or symbols)


natural_image
Pure geometric lines and shapes without any text, numbers, or symbols


natural_image
Pure geometric diagram with intersecting lines and shapes, no text or symbols present
natural_image
Diagram showing two mechanical components with arrows indicating motion, no text or symbols present
natural_image
Technical line drawing of a mechanical component with two views (no text or symbols)
natural_image
Line drawing of a hand pressing down on a mechanical component (no text or symbols)
WARNING
natural_image
Pure geometric lines and crosshair symbols without any text or labels


natural_image
Pure geometric diagram with intersecting lines and shapes, no text or symbols present
32 BETRIEB
HINWEIS
natural_image
Pure geometric lines and shapes without any text, numbers, or symbols


natural_image
Pure geometric diagram with intersecting lines and shapes, no text or symbols present
HINWEIS
ACHTUNG
natural_image
Pure geometric lines and crosshair symbols without any text or labels


natural_image
Pure geometric diagram with intersecting lines and shapes, no text or symbols present
34 BETRIEB
HINWEIS
natural_image
Cross-sectional diagram of an open refrigerator showing internal compartments and casing (no text or labels)
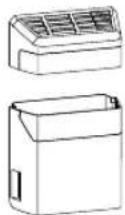
natural_image
Diagram showing a device with a door panel and a separate unit, connected by an arrow indicating direction (no text or symbols present)
natural_image
Technical line drawing of a refrigerator interior showing front and side views with a close-up of the door mechanism (no text or symbols)
natural_image
Diagram of a door handle with an arrow indicating clockwise motion (no text or symbols)
natural_image
Illustration of hands holding a tray with a black arrow pointing to the tray (no text or symbols)
natural_image
Illustration of hands holding a rectangular object with two upward arrows indicating motion or force (no text or symbols)
natural_image
Pure geometric lines and crosshair symbols without any text or labels

natural_image
Pure geometric diagram with intersecting lines and shapes, no text or symbols present
36 WARTUNG
WARTUNG
Reinigung
natural_image
Pure electrical circuit lines without any symbols
de-de_main.book.book Page 37 Thursday, September 7, 2023 4:06 PM
WARTUNG 37
natural_image
Hand inserting a plug into a device panel (no text or symbols visible)
DEUTSCH


natural_image
Pure geometric lines and shapes without any text, numbers, or symbols


natural_image
Pure geometric diagram with intersecting lines and shapes, no text or symbols present
38 FEHLERBEHEBUNG
FEHLERBEHEBUNG
natural_image
Pure geometric lines and shapes without any text, numbers, or symbols


natural_image
Pure geometric diagram with intersecting lines and shapes, no text or symbols present
natural_image
Pure geometric lines and shapes without any text, numbers, or symbols


natural_image
Pure geometric lines and shapes without any text, numbers, or symbols
40 FEHLERBEHEBUNG
natural_image
Pure geometric lines and shapes without any text, numbers, or symbols

natural_image
Pure geometric lines and shapes without any text, numbers, or symbols
42 FEHLERBEHEBUNG
natural_image
Pure geometric lines and shapes without any text, numbers, or symbols


natural_image
Pure geometric diagram with intersecting lines and shapes, no text or symbols present
flowchart
graph LR
    A["LED"] <--> B["LED"]
    C["Sensor icon with wrench"] --> B
    D["Sensor icon with wrench"] --> E["LED"]
    F["Sensor icon with wrench"] --> E
    G["Sensor icon with wrench"] --> H["LED"]
    I["Sensor icon with wrench"] --> H
    style A fill:#fff,stroke:#000
    style B fill:#fff,stroke:#000
    style C fill:#fff,stroke:#000
    style D fill:#fff,stroke:#000
    style E fill:#fff,stroke:#000
    style F fill:#fff,stroke:#000
    style G fill:#fff,stroke:#000
    style H fill:#fff,stroke:#000
    style I fill:#fff,stroke:#000
    style J fill:#fff,stroke:#000


natural_image
Pure geometric lines and shapes without any text, numbers, or symbols


natural_image
Pure geometric diagram with intersecting lines and shapes, no text or symbols present

LG
Life's Good
Copyright © 2023 LG Electronics Inc. All Rights Reserved.
natural_image
Pure geometric lines and shapes without any text, numbers, or symbols


natural_image
Pure geometric diagram with intersecting lines and shapes, no text or symbols present
ΟΔΗΓΙΕΣ ΑΣΦΑΛΕΙΑΣ
natural_image
Pure geometric lines and shapes without any text, numbers, or symbols


natural_image
Pure geometric diagram with intersecting lines and shapes, no text or symbols present
ΕΓΚΑΤΑΣΤΑΣΗ
natural_image
Pure geometric lines and shapes without any text, numbers, or symbols


natural_image
Pure geometric diagram with intersecting lines and shapes, no text or symbols present
14 ΕΓΚΑΤΑΣΤΑΣΗ
Εξαρτήματα
natural_image
Illustration of two wrenches and a tray with circular holes, labeled 1 and 2 (no text or symbols on the objects)
natural_image
Diagram showing a hand holding a tool near a vehicle, with an inset magnified view of the tool's handle and motion direction (no text or symbols)
natural_image
Mechanical assembly diagram showing two hanging clips mounted on a shaft (no text or symbols)
natural_image
Pure mechanical assembly diagram showing two shafts connected via a central shaft, with no text or symbols present.
natural_image
Technical line drawing of a mechanical assembly with a rotating shaft and base component (no text or symbols)

natural_image
Technical line drawing of a mechanical bracket with an upward arrow indicating motion (no text or symbols)
ΕΛΛΗΝΙΚΑ
16 ΕΓΚΑΤΑΣΤΑΣΗ

natural_image
Technical diagram of a mechanical assembly with multiple components and directional arrows indicating flow or movement (no text or labels)
natural_image
Technical diagram of a mechanical assembly with no visible text or symbols

natural_image
Technical line drawing of a mechanical assembly with no visible text or symbols
natural_image
Line drawing of a refrigerator with open door and side panel, showing internal compartments and a black upward arrow indicating direction (no text or symbols)
⚠️ ΠΡΟΣΟΧΗ
natural_image
Diagram of a vehicle interior showing a mechanical component with a T-shaped tool inserted (no text or symbols)

natural_image
Technical line drawing of a mechanical component with a circular feature and directional arrow (no text or symbols)
flowchart
graph TD
    A["1"] --> B["2"]
    C["3"] --> B["2"]
- Κλειδί τύπου Β
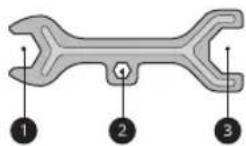
natural_image
Diagram showing a hand operating a mechanical device next to a refrigerator, with an inset magnified view of the device's handle (no text or symbols present)
ΣΗΜΕΙΩΣΗ
natural_image
Pure geometric lines and shapes without any text, numbers, or symbols


natural_image
Pure geometric diagram with intersecting lines and shapes, no text or symbols present
20 ΛΕΙΤΟΥΡΓΙΑ
ΛΕΙΤΟΥΡΓΙΑ
Πριν από τη χρήση
natural_image
Pure geometric lines and shapes without any text, numbers, or symbols


natural_image
Pure geometric diagram with intersecting lines and shapes, no text or symbols present
22 ΛΕΙΤΟΥΡΓΙΑ
ΣΗΜΕΙΩΣΗ
natural_image
Pure geometric lines and shapes without any text, numbers, or symbols


natural_image
Pure geometric diagram with intersecting lines and shapes, no text or symbols present

natural_image
Pure electrical circuit lines without any symbols
el-gr_main.book.book Page 23 Wednesday, August 30, 2023 7:34 AM
ΛΕΙΤΟΥΡΓΙΑ
23
natural_image
Line drawing of a refrigerator with a door and front panel, no text or symbols present
ΕΛΛΗΝΙΚΑ
① Πίνακας ελέγχου
natural_image
Pure geometric lines and shapes without any text, numbers, or symbols


natural_image
Pure geometric diagram with intersecting lines and shapes, no text or symbols present
24 ΛΕΙΤΟΥΡΓΙΑ
Εσωτερικό

① Alarm
natural_image
Pure geometric lines and crosshair symbols without any text or labels


natural_image
Pure geometric diagram with intersecting lines and shapes, no text or symbols present
⑥ Fridge
natural_image
Pure geometric diagram with intersecting lines and circles, no text or symbols present

natural_image
Pure geometric diagram with intersecting lines and circles, no text or symbols present
natural_image
Diagram of a mechanical device with a central component and labeled part (1), no text or symbols present.
natural_image
Technical diagram of a device with an inset close-up showing internal components (no text or symbols)
ΣΗΜΕΙΩΣΗ
natural_image
Simple line drawing of a spray can with a droplet on the surface (no text or symbols)
natural_image
Line drawing of a hand pressing down on a mechanical component (no text or symbols)
natural_image
Technical line drawing showing two views of a mechanical component with no visible text or symbols
natural_image
Pure geometric lines and crosshair symbols without any text or labels

natural_image
Pure geometric diagram with intersecting lines and shapes, no text or symbols present
30 ΛΕΙΤΟΥΡΓΙΑ
natural_image
Diagram showing two views of a mechanical component with arrows indicating direction (no text or symbols)
natural_image
Line drawing of a hand pressing down on a mechanical component with an arrow indicating motion (no text or symbols)
⚠️ ΠΡΟΕΙΔΟΠΟΙΗΣΗ
ΣΗΜΕΙΩΣΗ
natural_image
Interior view of a refrigerator showing internal compartments and casing (no text or symbols visible)

natural_image
Diagram showing a device with a fan and a printer, connected by an arrow indicating direction (no text or symbols present)
EVAHNIKA
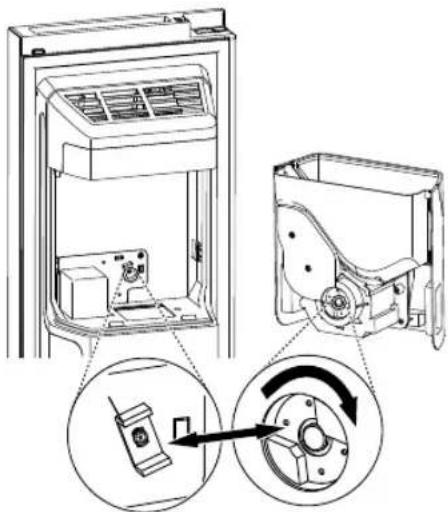
natural_image
Diagram of a mechanical component with an arrow indicating rotational motion (no text or symbols)


natural_image
Pure geometric lines and shapes without any text, numbers, or symbols


natural_image
Pure geometric diagram with intersecting lines and shapes, no text or symbols present
34 ΛΕΙΤΟΥΡΓΙΑ
natural_image
Illustration of hands holding a tray with a black arrow pointing to the tray (no text or symbols)
natural_image
Illustration of hands holding a rectangular object with two upward arrows indicating motion or force (no text or symbols)
natural_image
Pure geometric lines and shapes without any text, numbers, or symbols

natural_image
Pure geometric diagram with intersecting lines and shapes, no text or symbols present
ΣΥΝΤΗΡΗΣΗ
Καθαρισμός
natural_image
Pure electrical circuit lines without any symbols
el-gr_main.book.book Page 36 Wednesday, August 30, 2023 7:34 AM
36 ΣΥΝΤΗΡΗΣΗ
natural_image
Hand inserting a plug into a device panel (no text or symbols visible)


natural_image
Pure geometric lines and crosshair symbols without any text or labels


natural_image
Pure geometric diagram with intersecting lines and circles, no text or symbols present

natural_image
Pure geometric diagram with intersecting lines and shapes, no text or symbols present
ΕΠΙΛΥΣΗ ΠΡΟΒΛΗΜΑΤΩΝ
natural_image
Pure geometric lines and shapes without any text, numbers, or symbols


natural_image
Pure geometric diagram with intersecting lines and shapes, no text or symbols present
Υπόμνημα

LG
Life's Good
natural_image
Pure geometric lines and shapes without any text, numbers, or symbols


natural_image
Pure geometric diagram with intersecting lines and shapes, no text or symbols present
natural_image
Pure geometric lines and shapes without any text, numbers, or symbols


natural_image
Pure geometric diagram with intersecting lines and shapes, no text or symbols present
natural_image
Pure geometric diagram with intersecting lines and shapes, no text or symbols present
natural_image
Pure geometric lines and crosshair symbols without any text or labels


natural_image
Pure geometric diagram with intersecting lines and shapes, no text or symbols present
natural_image
Pure geometric lines and crosshair symbols without any text or labels


natural_image
Pure geometric diagram with intersecting lines and shapes, no text or symbols present
natural_image
Pure geometric lines and crosshair symbols without any text or labels


natural_image
Pure geometric diagram with intersecting lines and shapes, no text or symbols present
natural_image
Pure geometric lines and shapes without any text, numbers, or symbols


natural_image
Pure geometric diagram with intersecting lines and shapes, no text or symbols present
natural_image
Pure geometric lines and shapes without any text, numbers, or symbols


natural_image
Pure geometric diagram with intersecting lines and shapes, no text or symbols present
natural_image
Pure geometric lines and shapes without any text, numbers, or symbols


natural_image
Pure geometric diagram with intersecting lines and shapes, no text or symbols present
INSTALACIÓN
natural_image
Pure geometric lines and shapes without any text, numbers, or symbols


natural_image
Pure geometric diagram with intersecting lines and shapes, no text or symbols present
14 INSTALACIÓN
Accesorios
natural_image
Illustration showing two wrenches and a tray with circular holes (no text or symbols)
natural_image
Diagram showing a hand operating a device with a magnified inset highlighting a downward force (no text or symbols present)
natural_image
Pure geometric lines and crosshair symbols without any text or labels


natural_image
Pure geometric diagram with intersecting lines and shapes, no text or symbols present
natural_image
Mechanical assembly diagram showing two hanging clips mounted on a shaft (no text or symbols)
natural_image
Pure mechanical assembly diagram showing two shafts connected via a central shaft, with directional arrows indicating movement (no text or symbols)
natural_image
Technical line drawing of a mechanical assembly with a rotating shaft and base component (no text or symbols)

natural_image
Technical line drawing of a mechanical bracket with an upward arrow indicating motion (no text or symbols)
ESPAÑOL
16 INSTALACIÓN

natural_image
Technical diagram of a mechanical component with multiple ports and directional arrows indicating flow or movement (no text or symbols present)
natural_image
Mechanical assembly diagram showing a lever mechanism with no visible text or symbols

natural_image
Technical line drawing of a mechanical assembly with no visible text or symbols
natural_image
Line drawing of a refrigerator with open door and side panel, showing internal compartments and a directional arrow (no text or symbols)
PRECAUCIÓN
natural_image
Diagram of a vehicle interior showing a gear shift lever and dashboard (no text or symbols)

natural_image
Technical line drawing of a mechanical component with a circular feature and directional arrow (no text or symbols)
① Tubo ② Clip ③ Acoplador ④ Conector
natural_image
Pure geometric lines and shapes without any text, numbers, or symbols


natural_image
Pure geometric lines and shapes without any text, numbers, or symbols
18 INSTALACIÓN
natural_image
Diagram showing a hand holding a clip next to a refrigerator with a close-up inset of the clip (no text or symbols)
natural_image
Pure geometric lines and shapes without any text, numbers, or symbols

natural_image
Pure geometric diagram with intersecting lines and shapes, no text or symbols present
natural_image
Pure geometric lines and shapes without any text, numbers, or symbols


natural_image
Pure geometric diagram with intersecting lines and shapes, no text or symbols present
natural_image
Pure geometric lines and crosshair symbols without any text or labels


natural_image
Pure geometric diagram with intersecting lines and shapes, no text or symbols present
22 FUNCIONAMIENTO
natural_image
Pure geometric lines and shapes without any text, numbers, or symbols


natural_image
Pure geometric diagram with intersecting lines and shapes, no text or symbols present

natural_image
Pure electrical circuit lines without any symbols
es-es_main.book.book Page 23 Wednesday, August 30, 2023 7:38 AM
FUNCIONAMIENTO
23
natural_image
Line drawing of a refrigerator with a door and front panel, no text or symbols present
ESPAÑOL
① Panel de control
natural_image
Pure geometric lines and shapes without any text, numbers, or symbols


natural_image
Pure geometric diagram with intersecting lines and shapes, no text or symbols present
24 FUNCIONAMIENTO
Interior

natural_image
Pure geometric lines and crosshair symbols without any text or labels


natural_image
Pure geometric diagram with intersecting lines and shapes, no text or symbols present
natural_image
Pure geometric lines and crosshair symbols without any text or labels


natural_image
Pure geometric diagram with intersecting lines and shapes, no text or symbols present
26 FUNCIONAMIENTO
Panel de control
① Alarm
natural_image
Pure geometric lines and shapes without any text, numbers, or symbols


natural_image
Pure geometric diagram with intersecting lines and shapes, no text or symbols present
FUNCIONAMIENTO
27
natural_image
Pure geometric lines and crosshair symbols without any text or labels

natural_image
Pure geometric diagram with intersecting lines and shapes, no text or symbols present
28 FUNCIONAMIENTO
⑪ Tipo agua y hielo
natural_image
Diagram of a mechanical device with a central component and labeled part (1), no text or symbols present.
NOTA
natural_image
Simple line drawing of a device with a handle and a leaf, no text or symbols present
natural_image
Line drawing of a hand holding a tray with an arrow indicating direction (no text or symbols)
natural_image
Technical line drawing of a mechanical assembly with two views (no text or symbols)
natural_image
Technical line drawing of a mechanical component with two views (no text or symbols)
natural_image
Hand holding a mechanical component with an arrow indicating direction (no text or symbols)
NOTA
natural_image
Cross-sectional diagram of an appliance showing internal components (no text or symbols)
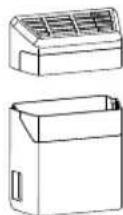
natural_image
Pure geometric lines and shapes without any text, numbers, or symbols


natural_image
Pure geometric diagram with intersecting lines and shapes, no text or symbols present
natural_image
Diagram of a refrigerator with a door panel and adjacent storage unit (no text or symbols)
natural_image
Diagram of a door handle with an arrow indicating clockwise motion (no text or symbols)
Bandeja
PRECAUCIÓN
natural_image
Illustration of hands holding a rectangular object with a black arrow pointing to it (no text or symbols present)
natural_image
Pure geometric lines and shapes without any text, numbers, or symbols


natural_image
Pure geometric diagram with intersecting lines and shapes, no text or symbols present
34 FUNCIONAMIENTO
PRECAUCIÓN
natural_image
Illustration of hands holding a rectangular object with upward arrows indicating motion or force (no text or symbols)
natural_image
Pure electrical circuit lines without any symbols
es-es_main.book.book Page 36 Wednesday, August 30, 2023 7:38 AM
natural_image
Pure geometric diagram with intersecting lines and circles, no text or symbols present
36 MANTENIMIENTO
natural_image
Hand inserting a plug into a device panel (no text or symbols visible)


natural_image
Pure geometric lines and crosshair symbols without any text or labels


natural_image
Pure geometric diagram with intersecting lines and shapes, no text or symbols present
natural_image
Pure geometric lines and shapes without any text, numbers, or symbols


natural_image
Pure geometric diagram with intersecting lines and shapes, no text or symbols present
natural_image
Pure geometric lines and shapes without any text, numbers, or symbols


natural_image
Pure geometric diagram with intersecting lines and shapes, no text or symbols present
natural_image
Pure geometric lines and shapes without any text, numbers, or symbols


natural_image
Pure geometric diagram with intersecting lines and shapes, no text or symbols present
natural_image
Pure geometric lines and shapes without any text, numbers, or symbols


natural_image
Pure geometric diagram with intersecting lines and shapes, no text or symbols present
Notas

LG
Life's Good
Enne paigaldamist ....12
natural_image
Pure geometric lines and shapes without any text, numbers, or symbols


natural_image
Pure geometric diagram with intersecting lines and shapes, no text or symbols present
OHUTUSJUHISED
ENNE KASUTAMIST LUGEGE KÕIKI JUHISEID
natural_image
Pure geometric lines and crosshair symbols without any text or labels


natural_image
Pure geometric diagram with intersecting lines and shapes, no text or symbols present
6 OHUTUSJUHISED
natural_image
Pure geometric lines and shapes without any text, numbers, or symbols

natural_image
Pure electrical circuit lines without any symbols
8 OHUTUSJUHISED
natural_image
Pure geometric lines and crosshair symbols without any text or labels

natural_image
Pure geometric diagram with intersecting lines and circles, no text or symbols present

natural_image
Pure geometric diagram with intersecting lines and shapes, no text or symbols present
OHUTUSJUHISED
9
natural_image
Pure geometric lines and crosshair symbols without any text or labels


natural_image
Pure geometric diagram with intersecting lines and shapes, no text or symbols present
10 OHUTUSJUHISED
natural_image
Pure geometric lines and shapes without any text, numbers, or symbols


natural_image
Pure geometric diagram with intersecting lines and shapes, no text or symbols present
HOOLITSEMINE KESKKONNA EEST
natural_image
Pure geometric lines and shapes without any text, numbers, or symbols


natural_image
Pure geometric diagram with intersecting lines and shapes, no text or symbols present
12 PAIGALDAMINE
PAIGALDAMINE
Enne paigaldamist
Mõõtmed ja vahemaad
natural_image
Pure geometric lines and shapes without any text, numbers, or symbols

natural_image
Pure geometric diagram with intersecting lines and shapes, no text or symbols present
Lisatarvikud
natural_image
Two mechanical wrench illustrations and a 3D diagram of a housing with circular components (no text or symbols)
① Mutrivōti*1
② Munakandik
natural_image
Diagram showing a hand operating a mechanical device with a magnified inset highlighting a downward force (no text or symbols present)
EESTI
natural_image
Pure geometric lines and shapes without any text, numbers, or symbols


natural_image
Pure geometric diagram with intersecting lines and shapes, no text or symbols present
14 PAIGALDAMINE
natural_image
Mechanical assembly diagram showing two hanging clips mounted on a shaft (no text or symbols)
natural_image
Technical line drawing of a mechanical assembly with a rotating component (no text or symbols)
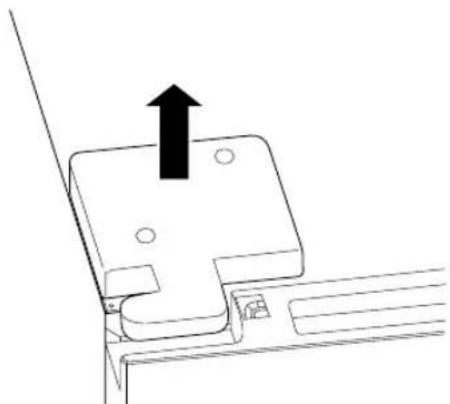
natural_image
Technical line drawing of a mechanical bracket with an upward arrow indicating motion (no text or symbols)

natural_image
Technical diagram of a mechanical assembly with multiple components and directional arrows indicating flow or movement (no text or labels)
natural_image
Line drawing of a refrigerator with open door and side panel, showing internal shelves and ventilation slots (no text or symbols)
EESTI

ETTEVAATUST
natural_image
Pure geometric lines and shapes without any text, numbers, or symbols


natural_image
Pure geometric diagram with intersecting lines and shapes, no text or symbols present
16 PAIGALDAMINE
natural_image
Diagram of a vehicle's internal gear shift lever and handle mechanism (no text or symbols)

natural_image
Diagram of a car interior showing the steering wheel and dashboard (no text or symbols)
Külmiku uste eemaldamine
flowchart
graph TD
    A["1"] --> B["2"]
    C["3"] --> B["2"]
- B-tüüpi mutrivõti

natural_image
Diagram showing a hand holding a clip next to a refrigerator with a close-up inset of the clip (no text or symbols)
Seadme loodimine
natural_image
Pure geometric lines and shapes without any text, numbers, or symbols


natural_image
Pure geometric diagram with intersecting lines and shapes, no text or symbols present
18 PAIGALDAMINE
Toite sisselülitamine
Seadme ühendamine
natural_image
Pure geometric lines and crosshair symbols without any text or labels


natural_image
Pure geometric diagram with intersecting lines and shapes, no text or symbols present
KASUTAMINE
Enne kasutamist
natural_image
Pure electrical circuit lines without any symbols
et-ee_main.book.book Page 21 Wednesday, August 30, 2023 7:42 AM
KASUTAMINE 21
21
natural_image
Pure geometric lines and crosshair symbols without any text or labels


natural_image
Pure geometric diagram with intersecting lines and shapes, no text or symbols present

natural_image
Pure electrical circuit lines without any symbols
et-ee_main.book.book Page 22 Wednesday, August 30, 2023 7:42 AM

natural_image
Pure geometric diagram with intersecting lines and circles, no text or symbols present
22 KASUTAMINE
Toote omadused
natural_image
Line drawing of a refrigerator with a door and front panel, no text or symbols present
① Juhtpaneel
natural_image
Pure geometric lines and shapes without any text, numbers, or symbols


natural_image
Pure geometric diagram with intersecting lines and shapes, no text or symbols present
Sisemus

EESTI
natural_image
Pure geometric lines and crosshair symbols without any text or labels


natural_image
Pure geometric diagram with intersecting lines and shapes, no text or symbols present

natural_image
Pure electrical circuit lines without any symbols

natural_image
Pure geometric diagram with intersecting lines and circles, no text or symbols present
24 KASUTAMINE
① Alarm
natural_image
Pure geometric lines and crosshair symbols without any text or labels


natural_image
Pure geometric diagram with intersecting lines and shapes, no text or symbols present
26 KASUTAMINE
TÄHELEPANU
natural_image
Pure geometric lines and shapes without any text, numbers, or symbols


natural_image
Pure geometric diagram with intersecting lines and shapes, no text or symbols present
TÄHELEPANU
natural_image
Diagram of a mechanical device with a central component and labeled part (1), no text or symbols present.
TÄHELEPANU
natural_image
Pure geometric lines and shapes without any text, numbers, or symbols


natural_image
Pure geometric diagram with intersecting lines and shapes, no text or symbols present
natural_image
Pure geometric diagram with intersecting lines and circular shapes, no text or symbols present

natural_image
Pure geometric diagram with intersecting lines and circles, no text or symbols present
28 KASUTAMINE
Veejaoturi puhastamine
TÄHELEPANU
natural_image
Simple line drawing of a spray can with a droplet falling (no text or symbols)
natural_image
Hand placing a tray into a rack with an arrow indicating motion (no text or symbols)
natural_image
Diagram showing two views of a mechanical device with a handle and a separate view (no text or symbols)
natural_image
Two technical line drawings showing a mechanical assembly or device, with no visible text or symbols.


natural_image
Pure geometric lines and crosshair symbols without any text or labels

natural_image
Pure geometric diagram with intersecting lines and shapes, no text or symbols present
natural_image
Hand placing a component into a mechanical assembly (no text or symbols visible)
OHT
natural_image
Pure geometric lines and crosshair symbols without any text or labels


natural_image
Pure geometric diagram with intersecting lines and shapes, no text or symbols present
30 KASUTAMINE
TÄHELEPANU
ETTEVAATUST
natural_image
Pure geometric lines and shapes without any text, numbers, or symbols


natural_image
Pure geometric diagram with intersecting lines and shapes, no text or symbols present
KASUTAMINE
natural_image
Technical line drawing of an open refrigerator interior showing internal components (no text or symbols)

natural_image
Technical line drawing of a refrigerator with internal components and a close-up view showing a rotary switch mechanism (no text or symbols)
natural_image
Diagram showing a device with a control panel connected to a rectangular unit, no text or symbols present
Sahtel
ETTEVAATUST
natural_image
Pure electrical circuit lines without any symbols
natural_image
Pure geometric diagram with intersecting lines and circles, no text or symbols present
32 KASUTAMINE
natural_image
Diagram of a door handle with an arrow indicating clockwise motion (no text or symbols)
natural_image
Illustration of hands holding a rectangular object with a black arrow pointing to it (no text or symbols present)
natural_image
Illustration of two hands holding a rectangular object with upward arrows indicating motion or force (no text or symbols)
natural_image
Hand inserting a USB into a device panel (no text or symbols visible)


natural_image
Pure geometric lines and shapes without any text, numbers, or symbols

natural_image
Pure geometric diagram with intersecting lines and shapes, no text or symbols present
34 VEA SELGITAMINE
VEA SELGITAMINE
Enne teenindusse helistamist
Jää ja vesi
natural_image
Pure geometric lines and shapes without any text, numbers, or symbols


natural_image
Pure geometric lines and shapes without any text, numbers, or symbols
natural_image
Pure geometric lines and shapes without any text, numbers, or symbols


natural_image
Pure geometric diagram with intersecting lines and shapes, no text or symbols present
36 VEA SELGITAMINE
natural_image
Pure geometric lines and shapes without any text, numbers, or symbols


natural_image
Pure geometric diagram with intersecting lines and shapes, no text or symbols present
natural_image
Pure geometric lines and shapes without any text, numbers, or symbols


natural_image
Pure geometric diagram with intersecting lines and shapes, no text or symbols present
38 VEA SELGITAMINE
Müra
natural_image
Pure geometric lines and shapes without any text, numbers, or symbols


natural_image
Pure geometric diagram with intersecting lines and shapes, no text or symbols present
Memo

LG
Life's Good
natural_image
Pure geometric lines and shapes without any text, numbers, or symbols


natural_image
Pure geometric diagram with intersecting lines and shapes, no text or symbols present
TURVALLISUUSOHJEET
LUE KAIKKI OHJEET ENNEN KÄYTTÖÄ
natural_image
Pure geometric lines and crosshair symbols without any text or labels


natural_image
Pure geometric diagram with intersecting lines and shapes, no text or symbols present
TURVALLISUUSOHJEET
5
natural_image
Pure geometric lines and crosshair symbols without any text or labels


natural_image
Pure geometric diagram with intersecting lines and shapes, no text or symbols present
6 TURVALLISUUSOHJEET
natural_image
Pure geometric lines and crosshair symbols without any text or labels


natural_image
Pure geometric diagram with intersecting lines and shapes, no text or symbols present
TURVALLISUUSOHJEET
7
natural_image
Pure geometric lines and crosshair symbols without any text or labels


natural_image
Pure geometric diagram with intersecting lines and shapes, no text or symbols present
8 TURVALLISUUSOHJEET
natural_image
Pure geometric lines and crosshair symbols without any text or labels


natural_image
Pure geometric diagram with intersecting lines and circles, no text or symbols present


natural_image
Pure geometric diagram with intersecting lines and shapes, no text or symbols present
TURVALLISUUSOHJEET
9
natural_image
Pure geometric lines and shapes without any text, numbers, or symbols


natural_image
Pure geometric diagram with intersecting lines and shapes, no text or symbols present
10 TURVALLISUUSOHJEET
natural_image
Pure geometric lines and shapes without any text, numbers, or symbols


natural_image
Pure geometric diagram with intersecting lines and shapes, no text or symbols present
YMPÄRISTÖSTÄ HUOLEHTIMINEN
natural_image
Pure geometric lines and shapes without any text, numbers, or symbols


natural_image
Pure geometric diagram with intersecting lines and shapes, no text or symbols present
12 ASENNUS
ASENNUS
Ennen asennusta
Mitat ja vapaa tila
natural_image
Pure geometric lines and shapes without any text, numbers, or symbols


natural_image
Pure geometric diagram with intersecting lines and shapes, no text or symbols present
Lisävarusteet
natural_image
Two types of wrenches and a plastic housing with circular holes (no text or symbols)
natural_image
Diagram showing a hand operating a mechanical device with a magnified inset highlighting the mechanism (no text or symbols present)
SUOMI
2 Erota liittimet.
VARO
natural_image
Pure geometric lines and shapes without any text, numbers, or symbols


natural_image
Pure geometric diagram with intersecting lines and shapes, no text or symbols present
14 ASENNUS
natural_image
Mechanical assembly diagram showing two hanging clips mounted on a shaft (no text or symbols)
natural_image
Pure mechanical assembly diagram showing a shaft and housing with directional arrows (no text or symbols)
natural_image
Technical line drawing of a mechanical assembly with a rotating component (no text or symbols)

natural_image
Technical line drawing of a mechanical bracket with an upward arrow indicating motion (no text or symbols)
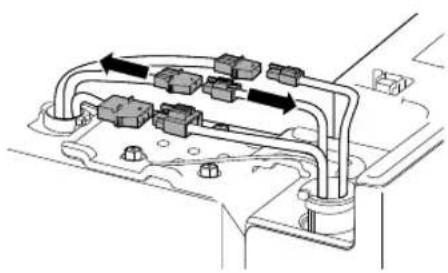
natural_image
Technical diagram of a mechanical assembly with multiple components and directional arrows indicating flow or movement (no text or labels)

natural_image
Pure electrical circuit lines without any symbols
3 Poista saranan ruuvit hylsyavaimella ja irrota sarana.
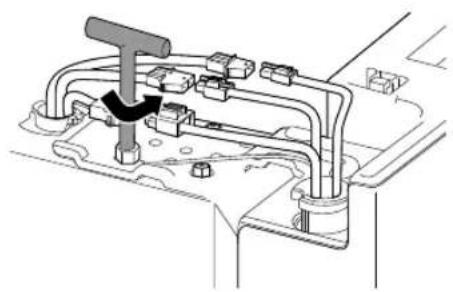
natural_image
Technical diagram of a mechanical assembly with no visible text or symbols

natural_image
Technical line drawing of a mechanical assembly with no visible text or symbols
natural_image
Line drawing of a refrigerator with open door and side panel, showing internal shelves and handle (no text or symbols)
SUOMI
VARO
natural_image
Pure electrical circuit lines without any symbols

natural_image
Pure geometric diagram with intersecting lines and circles, no text or symbols present
16 ASENNUS
Alasaranoiden irrottaminen
natural_image
Diagram of a vehicle's rearview and dashboard mechanism, showing a gear shift and valve assembly (no text or labels)

natural_image
Line drawing of a car interior showing the dashboard and seat (no text or symbols)
flowchart
graph TD
    A["1"] --> B["2"]
    C["3"] --> B["2"]
natural_image
Diagram showing a hand holding a clip next to a refrigerator with a close-up inset of the clip's motion (no text or symbols)
Laitteen tasaaminen
natural_image
Pure geometric lines and shapes without any text, numbers, or symbols


natural_image
Pure geometric diagram with intersecting lines and shapes, no text or symbols present
18 ASENNUS
natural_image
Pure geometric lines and shapes without any text, numbers, or symbols


natural_image
Pure geometric diagram with intersecting lines and shapes, no text or symbols present
KÄYTTÖ
Ennen käyttöä
natural_image
Pure geometric lines and shapes without any text, numbers, or symbols


natural_image
Pure geometric diagram with intersecting lines and shapes, no text or symbols present
natural_image
Pure electrical circuit lines without any symbols
fi-fi_main.book.book Page 22 Wednesday, August 30, 2023 7:55 AM

natural_image
Pure geometric diagram with intersecting lines and circles, no text or symbols present
22 KÄYTTÖ
natural_image
Line drawing of a refrigerator with a door and front panel, no text or symbols present
① Toimintopaneeli
natural_image
Pure geometric lines and shapes without any text, numbers, or symbols


natural_image
Pure geometric diagram with intersecting lines and shapes, no text or symbols present
Sisäpuoli
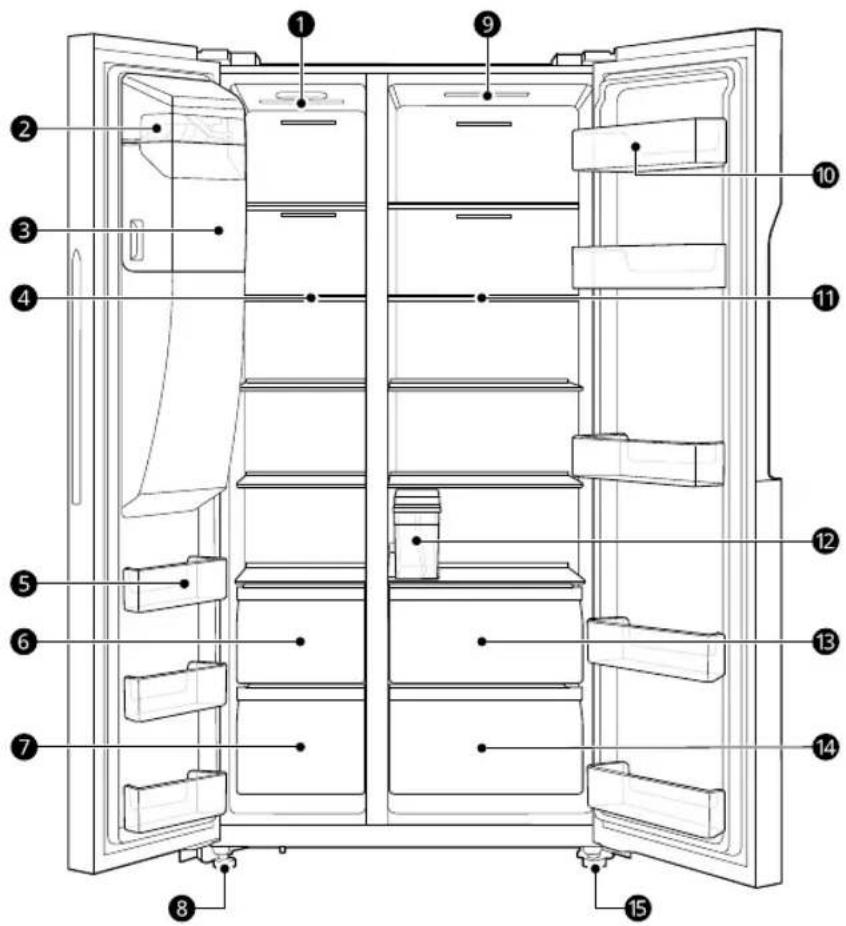
SUOMI
① Pakastimen LED-valo
natural_image
Pure geometric lines and shapes without any text, numbers, or symbols


natural_image
Pure geometric diagram with intersecting lines and shapes, no text or symbols present

natural_image
Pure electrical circuit lines without any symbols

natural_image
Pure geometric diagram with intersecting lines and circles, no text or symbols present
24 KÄYTTÖ
① Alarm
natural_image
Pure geometric lines and crosshair symbols without any text or labels


natural_image
Pure geometric diagram with intersecting lines and shapes, no text or symbols present
26 KÄYTTÖ
HUOMAUTUS
natural_image
Pure geometric lines and shapes without any text, numbers, or symbols


natural_image
Pure geometric diagram with intersecting lines and shapes, no text or symbols present
natural_image
Diagram of a mechanical device with a central component and labeled part (1), no text or symbols present.


natural_image
Pure geometric lines and shapes without any text, numbers, or symbols

natural_image
Pure geometric diagram with intersecting lines and shapes, no text or symbols present

natural_image
Pure electrical circuit lines without any symbols

natural_image
Pure geometric diagram with intersecting lines and circles, no text or symbols present
28 KÄYTTÖ
HUOMAUTUS
natural_image
Line drawing of a spray can with a droplet falling (no text or symbols)
natural_image
Hand placing a tray into a drawer with an arrow indicating the direction (no text or symbols)
natural_image
Technical line drawing of a mechanical assembly with two views (no text or symbols)
natural_image
Diagram showing two views of a mechanical device with a handle and base, no text or symbols present


natural_image
Pure geometric lines and shapes without any text, numbers, or symbols

natural_image
Pure geometric diagram with intersecting lines and shapes, no text or symbols present
natural_image
Hand placing a component into a mechanical assembly (no text or symbols visible)
⚠️ VAROITUS
natural_image
Pure geometric lines and shapes without any text, numbers, or symbols


natural_image
Pure electrical circuit lines without any symbols
30 KÄYTTÖ
VARO
HUOMAUTUS
natural_image
Cross-sectional diagram of an appliance showing internal components (no text or symbols)

HUOMAUTUS
natural_image
Pure geometric lines and shapes without any text, numbers, or symbols


natural_image
Pure geometric diagram with intersecting lines and shapes, no text or symbols present
32 KÄYTTÖ
HUOMAUTUS
natural_image
Diagram of a refrigerator with airflow direction indicated by arrows (no text or symbols)
Laatikko
VARO
natural_image
Diagram of a door handle with an arrow indicating clockwise motion (no text or symbols)
natural_image
Pure electrical circuit lines without any symbols
fi-fi_main.book.book Page 33 Wednesday, August 30, 2023 7:55 AM
KÄYTTÖ
33
2 Vedä hylly ulos.
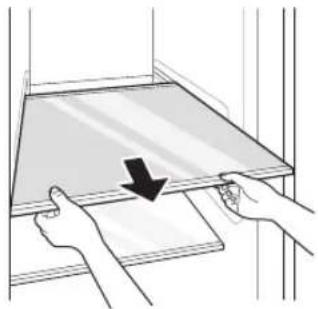
natural_image
Illustration of two hands holding a rectangular object with a black arrow pointing to it (no text or symbols present)
natural_image
Illustration of two hands holding a rectangular object with upward arrows indicating motion or force (no text or symbols)
natural_image
Pure geometric lines and crosshair symbols without any text or labels


natural_image
Pure geometric diagram with intersecting lines and shapes, no text or symbols present
34 HUOLTO
HUOLTO
Puhdistus
natural_image
Hand inserting a button into a computer drive panel (no text or symbols visible)


natural_image
Pure electrical circuit lines without any symbols


natural_image
Pure geometric diagram with intersecting lines and shapes, no text or symbols present
VIANMÄÄRITYS
natural_image
Pure geometric lines and shapes without any text, numbers, or symbols


natural_image
Pure geometric diagram with intersecting lines and shapes, no text or symbols present
36 VIANMÄÄRITYS
natural_image
Pure geometric lines and shapes without any text, numbers, or symbols


natural_image
Pure geometric diagram with intersecting lines and shapes, no text or symbols present
natural_image
Pure geometric lines and shapes without any text, numbers, or symbols


natural_image
Pure geometric diagram with intersecting lines and shapes, no text or symbols present
38 VIANMÄÄRITYS
natural_image
Pure geometric lines and shapes without any text, numbers, or symbols

40 VIANMÄÄRITYS
natural_image
Pure geometric lines and shapes without any text, numbers, or symbols


natural_image
Pure geometric diagram with intersecting lines and shapes, no text or symbols present

LG
Life's Good
natural_image
Pure geometric lines and shapes without any text, numbers, or symbols


natural_image
Pure geometric diagram with intersecting lines and shapes, no text or symbols present
CONSIGNES DE SÉCURITÉ
LISEZ TOUTES LES INSTRUCTIONS AVANT UTILISATION
natural_image
Pure geometric lines and crosshair symbols without any text or labels


natural_image
Pure geometric diagram with intersecting lines and shapes, no text or symbols present
CONSIGNES DE SÉCURITÉ
5
natural_image
Pure geometric lines and crosshair symbols without any text or labels


natural_image
Pure geometric diagram with intersecting lines and shapes, no text or symbols present
6 CONSIGNES DE SÉCURITÉ
natural_image
Pure geometric diagram with intersecting lines and shapes, no text or symbols present
CONSIGNES DE SÉCURITÉ
7
natural_image
Pure geometric lines and shapes without any text, numbers, or symbols


natural_image
Pure geometric diagram with intersecting lines and shapes, no text or symbols present
8 CONSIGNES DE SÉCURITÉ
natural_image
Pure geometric lines and crosshair symbols without any text or labels


natural_image
Pure geometric diagram with intersecting lines and shapes, no text or symbols present
CONSIGNES DE SÉCURITÉ
9
natural_image
Pure geometric lines and shapes without any text, numbers, or symbols


natural_image
Pure geometric diagram with intersecting lines and shapes, no text or symbols present
10 CONSIGNES DE SÉCURITÉ
ATTENTION

ATTENTION
natural_image
Pure geometric lines and shapes without any text, numbers, or symbols


natural_image
Pure geometric diagram with intersecting lines and shapes, no text or symbols present
CONSIGNES DE SÉCURITÉ
natural_image
Pure geometric lines and shapes without any text, numbers, or symbols


natural_image
Pure geometric diagram with intersecting lines and shapes, no text or symbols present
12 CONSIGNES DE SÉCURITÉ
natural_image
Pure geometric lines and shapes without any text, numbers, or symbols

natural_image
Pure geometric diagram with intersecting lines and shapes, no text or symbols present
14 INSTALLATION
Accessoires
natural_image
Two illustrations: a wrench and a plate with circular holes, labeled 1 and 2 (no text or symbols on the objects themselves)
natural_image
Diagram showing a hand operating a mechanical device with a magnified inset highlighting a downward force (no text or symbols present)
natural_image
Pure geometric lines and shapes without any text, numbers, or symbols


natural_image
Pure geometric diagram with intersecting lines and shapes, no text or symbols present
natural_image
Mechanical assembly diagram showing two hanging clips mounted on a shaft (no text or symbols)
natural_image
Pure mechanical assembly diagram showing two shafts connected via a central shaft, with directional arrows indicating motion (no text or symbols)
natural_image
Technical line drawing of a mechanical component with a rotating shaft and base (no text or symbols)
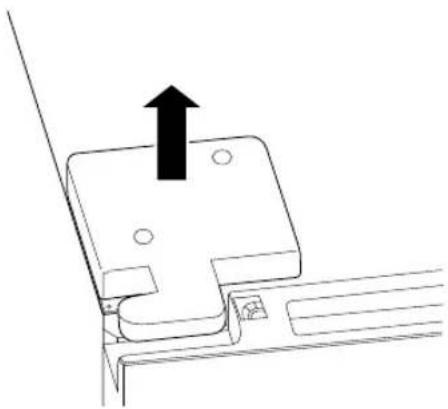
natural_image
Technical line drawing of a mechanical bracket with an upward arrow indicating motion (no text or symbols)
FRANÇAIS


natural_image
Pure geometric lines and crosshair symbols without any text or labels


natural_image
Pure geometric diagram with intersecting lines and shapes, no text or symbols present
16 INSTALLATION

natural_image
Technical diagram of a mechanical assembly with multiple components and directional arrows indicating flow or movement (no text or labels)
natural_image
Mechanical assembly diagram showing a lever mechanism with no visible text or symbols

natural_image
Technical line drawing of a mechanical assembly with no visible text or symbols
natural_image
Line drawing of a refrigerator with open door and side panel, showing internal compartments and a directional arrow (no text or symbols)
ATTENTION
natural_image
Diagram of a vehicle interior showing a gear shift lever and dashboard (no text or symbols)

natural_image
Technical line drawing of a car interior component with a gear-like mechanism and directional arrow (no text or symbols)
natural_image
Pure geometric lines and shapes without any text, numbers, or symbols


natural_image
Pure geometric diagram with intersecting lines and shapes, no text or symbols present
18 INSTALLATION
REMARQUE
flowchart
graph TD
    A["1"] --> B["2"]
    C["3"] --> B["2"]
- Clé de type B

natural_image
Diagram showing a hand holding a clip next to a refrigerator with a hanging handle, connected by a dotted line (no text or symbols present)
REMARQUE
natural_image
Pure geometric lines and shapes without any text, numbers, or symbols


natural_image
Pure geometric diagram with intersecting lines and shapes, no text or symbols present
natural_image
Pure geometric lines and shapes without any text, numbers, or symbols


natural_image
Pure geometric diagram with intersecting lines and shapes, no text or symbols present
Conservation efficace des aliments
natural_image
Pure geometric lines and crosshair symbols without any text or labels


natural_image
Pure geometric diagram with intersecting lines and shapes, no text or symbols present
22 UTILISATION
natural_image
Pure geometric lines and shapes without any text, numbers, or symbols


natural_image
Pure geometric diagram with intersecting lines and shapes, no text or symbols present

natural_image
Pure electrical circuit lines without any symbols
fr-fr_main.book.book Page 23 Wednesday, August 30, 2023 9:24 AM
UTILISATION
23
natural_image
Line drawing of a refrigerator with a door and front panel, no text or symbols present
FRANÇAIS
natural_image
Pure geometric lines and shapes without any text, numbers, or symbols


natural_image
Pure geometric diagram with intersecting lines and shapes, no text or symbols present
24 UTILISATION
Intérieur

natural_image
Pure geometric lines and crosshair symbols without any text or labels


natural_image
Pure geometric diagram with intersecting lines and shapes, no text or symbols present
natural_image
Pure geometric lines and crosshair symbols without any text or labels


natural_image
Pure geometric diagram with intersecting lines and shapes, no text or symbols present
26 UTILISATION
Panneau de commande
① Alarm
natural_image
Pure geometric lines and shapes without any text, numbers, or symbols


natural_image
Pure geometric diagram with intersecting lines and shapes, no text or symbols present
natural_image
Pure geometric lines and shapes without any text, numbers, or symbols


natural_image
Pure geometric diagram with intersecting lines and shapes, no text or symbols present
28 UTILISATION
ATTENTION
natural_image
Pure geometric lines and shapes without any text, numbers, or symbols

natural_image
Pure geometric lines and shapes without any text, numbers, or symbols
natural_image
Diagram of a mechanical device with a central component and labeled part (1), no text or symbols present.
REMARQUE
natural_image
Simple line drawing of a spray can with a droplet falling (no text or symbols)
natural_image
Line drawing of a hand pressing down on a mechanical device (no text or symbols)
natural_image
Technical line drawing of two mechanical components with no visible text or symbols
natural_image
Pure geometric lines and shapes without any text, numbers, or symbols

natural_image
Pure geometric diagram with intersecting lines and shapes, no text or symbols present
30 UTILISATION
natural_image
Two technical line drawings of a mechanical device with internal components, one showing a downward arrow and the other a close-up of a curved component (no text or symbols)
natural_image
Hand holding a tray with an arrow indicating motion or force (no text or symbols)
AVERTISSEMENT


natural_image
Pure geometric lines and crosshair symbols without any text or labels


natural_image
Pure geometric diagram with intersecting lines and shapes, no text or symbols present
32 UTILISATION
REMARQUE
natural_image
Cross-sectional diagram of an internal appliance or enclosure with no visible text or symbols

natural_image
Pure geometric lines and shapes without any text, numbers, or symbols


natural_image
Pure geometric diagram with intersecting lines and shapes, no text or symbols present
natural_image
Technical line drawing of an air conditioner unit showing internal components and a close-up of the device's internal structure (no text or symbols present)
natural_image
Diagram showing a refrigerator with air vent and a separate air conditioner unit (no text or symbols present)
Tiroir
ATTENTION
natural_image
Diagram of a door handle with an arrow indicating clockwise motion (no text or symbols)
natural_image
Pure electrical circuit lines without any symbols
fr-fr_main.book.book Page 34 Wednesday, August 30, 2023 9:24 AM

natural_image
Pure geometric diagram with intersecting lines and circles, no text or symbols present
34 UTILISATION
natural_image
Illustration of two hands holding a tray with a black arrow pointing to the tray (no text or symbols)
natural_image
Illustration of two hands holding a rectangular object with upward arrows indicating motion or force (no text or symbols)
natural_image
Pure geometric lines and crosshair symbols without any text or labels


natural_image
Pure geometric diagram with intersecting lines and shapes, no text or symbols present
MAINTENANCE
Nettoyage
natural_image
Pure electrical circuit lines without any symbols
fr-fr_main.book.book Page 36 Wednesday, August 30, 2023 9:24 AM

natural_image
Pure geometric diagram with intersecting lines and circles, no text or symbols present
36 MAINTENANCE
natural_image
Hand inserting a plug into a device panel (no text or symbols visible)


natural_image
Pure geometric lines and crosshair symbols without any text or labels


natural_image
Pure geometric diagram with intersecting lines and shapes, no text or symbols present
DÉPANNAGE
natural_image
Pure geometric lines and shapes without any text, numbers, or symbols


natural_image
Pure geometric diagram with intersecting lines and shapes, no text or symbols present
38 DÉPANNAGE
natural_image
Pure geometric lines and shapes without any text, numbers, or symbols


natural_image
Pure geometric diagram with intersecting lines and shapes, no text or symbols present
natural_image
Pure electrical circuit lines without any symbols
fr-fr_main.book.book Page 43 Wednesday, August 30, 2023 9:24 AM
DÉPANNAGE
43
natural_image
Pure geometric lines and crosshair symbols without any text or labels


natural_image
Pure geometric diagram with intersecting lines and shapes, no text or symbols present

LG
Life's Good
Skenirajte QR kod da biste vidjeli priručnik.
KORISNIČKI PRIRUČNIK
HLADNJAK & ZAMRZIVAČ

Prije početka postavljanja pažljivo pročitajte ove upute. One će vam pojednostaviti postavljanje i osigurati ispravno i sigurno postavljanje proizvoda. Spremite ove upute u blizini proizvoda nakon postavljanja za buduću upotrebu.
HRVATSKI
www.lg.com
Autorsko pravo © 2023 LG Electronics Inc. Sva prava pridržana
SADRŽAJ
Ovaj priručnik može sadržavati ilustracije ili sadržaj koji se razlikuju od modela koji ste kupili.
Ovaj je priručnik podložan izmjenama koje provodi proizvođač.
SIGURNOSNE UPUTE
PROČITAJTE SVE UPUTE PRIJE UPOTREBE 3
UPOZORENJE 3
OPREZ....9
ZAŠTITA OKOLIŠA....11
POSTAVLJANJE
Prije postavljanja....12
Uklanjanje vrata hladnjaka i zamrzivača....13
natural_image
Pure geometric lines and crosshair symbols without any text or labels


natural_image
Pure geometric diagram with intersecting lines and shapes, no text or symbols present
SIGURNOSNE UPUTE
PROČITAJTE SVE UPUTE PRIJE UPOTREBE
natural_image
Pure geometric lines and shapes without any text, numbers, or symbols


natural_image
Pure geometric diagram with intersecting lines and shapes, no text or symbols present
SIGURNOSNE UPUTE
5
natural_image
Pure geometric lines and shapes without any text, numbers, or symbols


natural_image
Pure geometric diagram with intersecting lines and shapes, no text or symbols present
6 SIGURNOSNE UPUTE
Rizik od požara i zapaljivih materijala
natural_image
Pure geometric lines and crosshair symbols without any text or labels


natural_image
Pure geometric diagram with intersecting lines and shapes, no text or symbols present
SIGURNOSNE UPUTE
7
- Provjerite je li strujna utičnica pravilno uzemljena i je li zatik za uzemljenje na kabelu za napajanje oštećen ili uklonjen sa strujnog utikača. Za više detalja o uzemljenju raspitajte se u informacijskom centru za korisnike tvrtke LG Electronics.
- Ovaj uređaj sadrži kabel za napajanje koji ima vodič za uzemljenje uređaja i utikač za uzemljenje. Utikač mora biti uključen u prikladnu strujnu utičnicu koja je pravilno postavljena i uzemljena u skladu sa svim lokalnim propisima i pravilnicima.
- Nikada ne uključujte uređaj koji pokazuje znakove oštećenja. Ako imate sumnji, obratite se dobavljaču.
- Odložite sav ambalažni materijal (kao što su plastične vrećice i stiropor) dalje od djece. Ambalažni materijal može izazvati gušenje.
- Nemojte priključivati uređaj u višestruki utični adapter koji nema kabel za napajanje (montiran).
- Uređaj treba biti povezan s namjenskom linijom za napajanje sa zasebnim osiguračima.
- Nemojte upotrebljavati višestruku utičnicu koja nije ispravno uzemljena (prijenosnu). U slučaju da upotrebljavate pravilno uzemljenu višestruku utičnicu (prijenosnu), upotrebljavajte je s naznačenim kapacitetom napajanja ili većim i upotrebljavajte je samo za dotični uređaj.
Rad
- Ne upotrebljavajte uređaj u druge svrhe (pohrana medicinskih ili eksperimentalnih materijala ili pošiljki), osim za upotrebu u domaćinstvu za čuvanje hrane.
- Ako voda prodre u električne dijelove uređaja, odspojite strujni utikač i obratite se informacijskom centru za korisnike tvrtke LG Electronics.
- Isključite strujni utikač kada jako grmi ili sijeva ili kada se uređaj ne upotrebljava duže vrijeme.
- Ne dirajte strujni utikač ili kontrole uređaja mokrim rukama.
- Nemojte prekomjerno savijati kabel za napajanje ili stavljati teške predmete na njega.


natural_image
Pure geometric lines and crosshair symbols without any text or labels


natural_image
Pure geometric diagram with intersecting lines and shapes, no text or symbols present
8 SIGURNOSNE UPUTE
natural_image
Pure geometric lines and crosshair symbols without any text or labels


natural_image
Pure geometric diagram with intersecting lines and shapes, no text or symbols present
- Ako koristite ledomat ili spremnik za vodu s dispenzerom, napunite ih isključivo pitkom vodom.
Odlaganje
- Prilikom odlaganja uređaja, uklonite brtvu s vrata i ostavite police i košare na mjestu te držite djecu podalje od uređaja.
OPREZ

OPREZ
Kako biste smanjili opasnost od manjih tjelesnih ozljeda, kvara ili oštećenja proizvoda ili imovine prilikom upotrebe ovog proizvoda, slijedite osnovne mjere opreza, uključujući sljedeće:
Postavljanje
natural_image
Pure geometric lines and crosshair symbols without any text or labels


natural_image
Pure geometric diagram with intersecting lines and shapes, no text or symbols present
10 SIGURNOSNE UPUTE
- Nemojte pohranjivati prekomjerne količine boca za vodu ili spremnika za jelo u košare vrata.
- Nemojte presnažno otvarati ili zatvarati vrata uređaja.
- Ako je šarka na vratima proizvoda oštećena ili neispravno radi, prekinite upotrebu i obratite se servisnom centru tvrtke LG Electronics.
- Spriječite životinje da glođu kabel za napajanje ili cijev za vodu.
- Nikada nemojte jesti zamrznutu hranu odmah nakon vađenja iz zamrzivača.
- Pazite da se dlan ili stopalo ne zaglave nakon otvaranja ili zatvaranja vrata uređaja ili vrata u vratima.
Održavanje
natural_image
Pure geometric lines and shapes without any text, numbers, or symbols


natural_image
Pure geometric diagram with intersecting lines and shapes, no text or symbols present
Pribor
natural_image
Two mechanical parts: a wrench and a tray with circular holes (no text or symbols)
① Ključ*1
② Pladanj za jaja
Uklanjanje vrata hladnjaka i zamrzivača
Ako su vaša ulazna vrata preuska za prolazak uređaja, uklonite vrata uređaja i bočno provucite uređaj.
⚠ UPOZORENJE
- Odspojite kabel za napajanje, osigurač ili prekidač strujnog kruga prije postavljanja, uklanjanja vrata ili čišćenja uređaja.
Nepridržavanje ovih uputa može uzrokovati smrt, požar ili strujni udar.
Uklanjanje vrata zamrzivača
OPREZ
natural_image
Diagram showing a hand operating a device with a magnified inset highlighting a downward force (no text or symbols present)
natural_image
Mechanical assembly diagram showing two hanging clips mounted on a shaft (no text or symbols)
Zatim izvucite cijevi za vodu istodobnim pritiskanjem spojki.
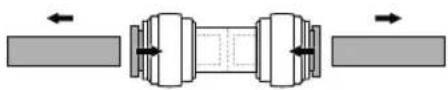
natural_image
Pure mechanical assembly diagram showing a shaft and housing with directional arrows (no text or symbols)
Uklanjanje gornjih dijelova šarko
1 Uklonite vijke poklopca imbus odvijačem, odvojite priključak električnog ožičenja na poklopcu, a zatim uklonite poklopac šarke.
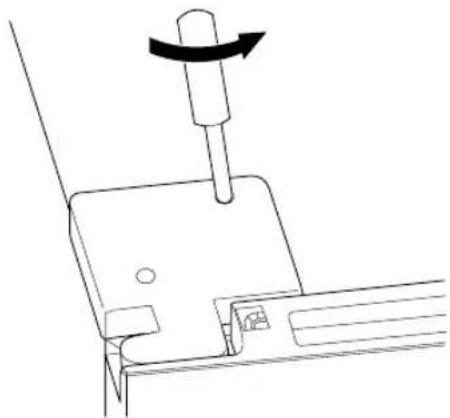
natural_image
Technical line drawing of a mechanical assembly with a rotating component (no text or symbols)

natural_image
Technical line drawing of a mechanical bracket with an upward arrow indicating motion (no text or symbols)
2 Odvojite druge priključe električnog ožičenja.
OPREZ
- Ne povlačite priključke van bez pritiskanja plastične kukice ①. U suprotnom to će oštetiti priključke.
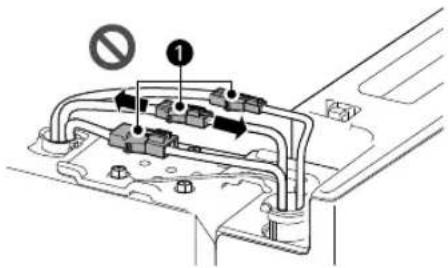
- Najprije pritisnite plastične kukice ① priključaka držeći rukom jednu stranu priključka. Istodobno povucite drugu stranu van.
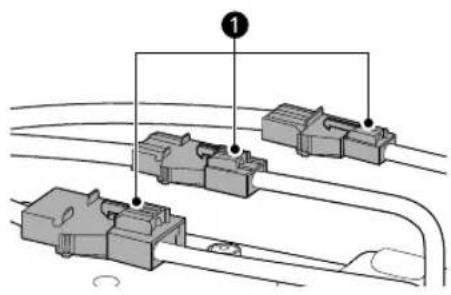

natural_image
Technical diagram of a mechanical assembly with multiple components and directional arrows indicating flow or movement (no text or labels)
3 Naglavnim ključem uklonite vijke šarke, a zatim uklonite šarku.

natural_image
Technical diagram of a mechanical assembly with no visible text or symbols
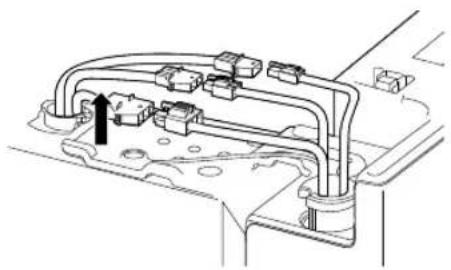
natural_image
Technical line drawing of a mechanical assembly with no visible text or symbols
natural_image
Line drawing of a refrigerator interior showing front and back views with no text or symbols
HRVATSKI
OPREZ
- Vrata zamrzivača morate polagano podizati da biste zaštitili cijevi jer one moraju proći kroz donju šarku.
16 POSTAVLJANJE
Uklonite dijelove donje šarke
Nagnite hladnjak, naglavnim ključem uklonite vijke šarke, a zatim uklonite šarku.
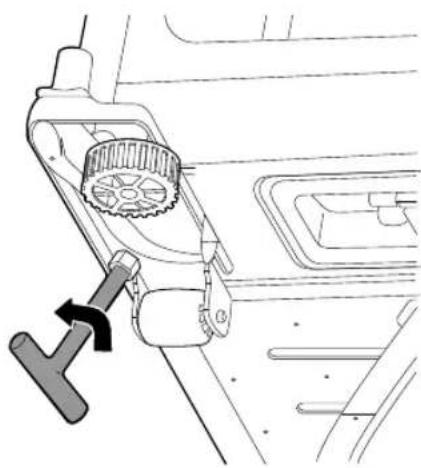
natural_image
Diagram of a car interior showing a hand valve and gear mechanism (no text or symbols)
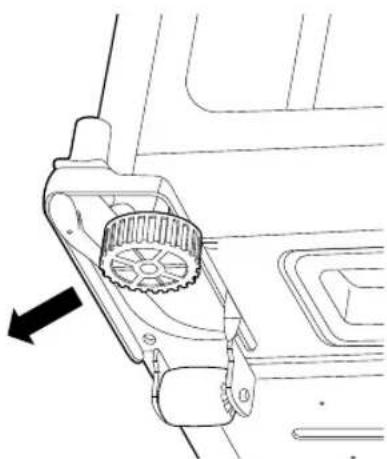
natural_image
Technical line drawing of a mechanical component with a gear-like structure and directional arrow (no text or symbols)
Uklanjanje vrata hladnjaka
natural_image
Diagram showing a hand holding a mechanical component connected to a refrigerator door, with an inset magnified view of the component being held (no text or symbols present)
Kako bi se vrata sama zatvarala, nagnite gornji dio prema natrag za oko 15 mm ili 0,5° okretanjem podesivih nožica.

natural_image
Pure geometric lines and shapes without any text, numbers, or symbols


natural_image
Pure geometric diagram with intersecting lines and shapes, no text or symbols present
18 POSTAVLJANJE
natural_image
Pure geometric lines and crosshair symbols without any text or labels


natural_image
Pure geometric diagram with intersecting lines and shapes, no text or symbols present
20 RAD
- Nemojte spremati hranu na duže vrijeme ako se lako kvari pri niskim temperaturama.
- Nezamrznutu hranu nemojte stavljati u izravan dodir s hranom koja je već zamrznuta. Možda će biti potrebno smanjiti količinu hrane za zamrzavanje ako očekujete da ćete hranu zamrzavati svaki dan.
- Ohlađenu ili zamrznutu hranu stavite u hladnjak ili zamrzivač odmah nakon kupnje.
- Sirovo meso i ribu pohranite u odgovarajuće odjeljke u hladnjaku kako ne bi dolazili u dodir s drugom hranom niti kapali na nju.
- Ohlađenu hranu i druge namirnice možete držati na ladici za povrće.
- Izbjegavajte ponovno zamrzavanje bilo koje hrane koja je potpuno odmrznuta. Ponovno zamrzavanje odmrznute hrane smanjit će njezin okus i nutritivne vrijednosti.
- Nemojte prepuniti uređaj. Hladan zrak ne može pravilno kružiti ako je uređaj prepun.
- Ohladite vruću hranu prije spremanja. Ako se u njega stavi previše vruće hrane, unutrašnja temperatura uređaja može se povećati i negativno utjecati na drugu hranu u uređaju.
- Ako postavite prenisku temperaturu za hranu, može se zamrznuti. Ne postavljajte temperaturu nižu od temperature potrebne za ispravno čuvanje hrane.
- Ako uređaj ima odjeljke za rashlađivanje, u njih ne stavljajte voće i povrće s većom količinom vlage jer se mogu smrznuti zbog niske temperature.
- U slučaju nestanka struje, nazovite tvrtku za opskrbu električnom energijom i raspitajte se o trajanju nestanka struje.
- Dok nema struje, trebali biste izbjegavati otvaranje vrata.
-
Kada se napajanje ponovno uspostavi, provjerite stanje hrane.
-
Funkcija Express Freeze omogućuje da zamrzivač postigne svoj maksimalan kapacitet zamrzavanja. To obično traje do 52 sata i automatski se isključuje.
- Funkcija Express Freeze mora biti uključena tijekom 6 sata prije nego što stavite svježe proizvode u odjeljak zamrzivača.
- Za brzo zamrzavanje hrane namirnice stavite na lijevu stranu najgornje police. Ako trebate pohraniti više hrane, stavite ih na police redom počevši od najgornje. Namirnice će se najbrže smrznuti u zoni.
- Da biste postigli bolje strujanje zraka, umetnite sve unutrašnje dijelove poput košara, ladica i polica.
NAPOMENA
natural_image
Pure electrical circuit lines without any symbols
hr-hr_main.book.book Page 21 Wednesday, August 30, 2023 8:00 AM
RAD 21
na kraće razdoblje na temperaturi od -12 °C do -18 °C.
natural_image
Pure geometric lines and shapes without any text, numbers, or symbols


natural_image
Pure geometric diagram with intersecting lines and shapes, no text or symbols present
natural_image
Pure electrical circuit lines without any symbols
hr-hr_main.book.book Page 22 Wednesday, August 30, 2023 8:00 AM
natural_image
Pure geometric diagram with intersecting lines and circles, no text or symbols present
22 RAD
Značajke proizvoda
natural_image
Line drawing of a refrigerator with a door and front panel, no text or symbols present
① Upravljačka ploča
Postavlja temperaturu hladnjaka, temperaturu zamrzivača i način doziranja.

natural_image
Pure geometric lines and shapes without any text, numbers, or symbols


natural_image
Pure geometric diagram with intersecting lines and shapes, no text or symbols present
Unutrašnjost

HRVATSKI
① LED žaruljica zamrzivača
natural_image
Pure geometric lines and crosshair symbols without any text or labels


natural_image
Pure geometric diagram with intersecting lines and shapes, no text or symbols present

natural_image
Pure electrical circuit lines without any symbols

natural_image
Pure geometric diagram with intersecting lines and dots, no text or symbols present
24 RAD
8 Podesiva nožica
⑨ LED žaruljica hladnjaka
natural_image
Pure geometric lines and crosshair symbols without any text or labels


natural_image
Pure geometric diagram with intersecting lines and shapes, no text or symbols present
Upravljačka ploča
Stvarna upravljačka ploča može se razlikovati od modela do modela.
① Alarm
natural_image
Pure geometric lines and shapes without any text, numbers, or symbols


natural_image
Pure geometric diagram with intersecting lines and shapes, no text or symbols present
26 RAD
- Početna je temperatura hladnjaka 4 °C.
NAPOMENA
- Stvarna unutrašnja temperatura razlikuje se ovisno o stanju hrane, s obzirom na to da je navedena postavka temperature ciljna temperatura, a ne stvarna temperatura u uređaju.
⑦ Express Cool
Uz pomoć ove funkcije mogu se brzo zamrznuti veće količine hrane kao što su povrće, voće itd. Pritisnite i tri sekunde držite tipku da biste omogućili funkciju.
Pritisnite tipku Fridge da biste isključili funkciju brzog hlađenja. Zatim će se vratiti na prethodnu postavku temperature.
- Ova se funkcija prekida automatski nakon 3 sata.
⑧ Vacation
Funkcija je korisna kada ste na odmoru. Kada je ova funkcija uključena, temperatura hladnjaka postavlja se na 6 °C, a temperatura zamrzivača na -17 °C. Kada je ova funkcija isključena, temperature se vraćaju se na prethodne postavke temperature.
- Funkcija se uključuje i isključuje svaki put kada pritisnete tipku.
OPREZ
- Kada je funkcija uključena pazite na pohranu hrane koja zahtijeva niže temperature od zadano postavljene temperature.
natural_image
Pure geometric diagram with intersecting lines and circles, no text or symbols present


natural_image
Pure geometric diagram with intersecting lines and shapes, no text or symbols present
Odaberite željeni način doziranja s pomoću tipki na upravljačkoj ploči. Pritisnite prekidač dispenzera čašom ili drugom posudom i dozirajte kockice leda, vodu ili smrvljeni led.
NAPOMENA
- Upravljačka ploča automatski se isključuje radi uštede energije.
- Ako prstom ili kožom dodirnete upravljačku ploču tijekom čišćenja, može se pokrenuti funkcija aktivirane tipke.
- Za optimalno čuvanje hrane za svaki se odjeljak preporučuje povećanje ili smanjenje temperature za 1 °C od zadane vrijednosti temperature.
- Stvarna temperatura unutar uređaja ovisi o sljedećim čimbenicima: temperatura prostorije u kojoj se uređaj nalazi, količina hrane u uređaju i učestalost otvaranja vrata uređaja. Temperature postavite uzimajući te čimbenike u obzir.
Dispenzer leda i vode
Prije upotrebe dispenzera leda i vode
OPREZ
natural_image
Diagram of a mechanical device with a central component and labeled part (1), no text or symbols present.


natural_image
Pure geometric lines and shapes without any text, numbers, or symbols


natural_image
Pure geometric diagram with intersecting lines and shapes, no text or symbols present

natural_image
Pure electrical circuit lines without any symbols

natural_image
Pure geometric diagram with intersecting lines and circles, no text or symbols present
28 RAD
Čišćenje dispenzera
NAPOMENA
natural_image
Simple line drawing of a device with a funnel and a folded paper airplane (no text or symbols)
Punjenje spremnika vode
natural_image
Hand placing a tray into a storage bin with an arrow indicating the motion (no text or symbols)
2 Otvorite poklopac ili kapicu spremnika dispenzera vode.
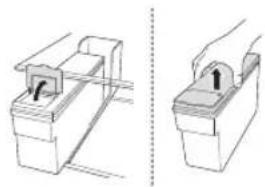
natural_image
Diagram showing two views of a mechanical device with a handle and base, no text or symbols present
3 Napunite ga filtriranom vodom u boci ili čistom filtriranom vodom do referentne oznake u spremniku dispenzera vode. (Ukupan kapacitet: 4,5 l).
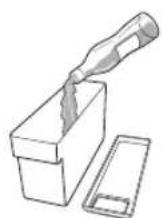
OPREZ
natural_image
Technical line drawing of a mechanical component with two views (no text or symbols)
5 Ponovno postavite spremnik dispenzera na policu hladnjaka.

natural_image
Hand placing a component into a rack with an arrow indicating motion (no text or symbols)
⚠ UPOZORENJE
- Ledomat ili spremnik za raspodjelu vode punite samo pitkom vodom.
- Nemojte puniti spremnik vode drugim pićem ili ga puniti vrućom vodom.
OPREZ
- Nemojte upotrebljavati prekomjernu silu i nemojte udarati uređaj prilikom uklanjanja ili pripajanja spremnika dispenzera vode. Tako možete oštetiti uređaj ili se ozlijediti.
- Djeca se ne smiju približavati spremniku dispenzera.
NAPOMENA
natural_image
Pure geometric lines and shapes without any text, numbers, or symbols


natural_image
Pure geometric diagram with intersecting lines and shapes, no text or symbols present
30 RAD
OPREZ
NAPOMENA
2 Za ponovno postavljanje gurnite posudu za led prema gore tako da se dvije strane posude za led (B i B') uglave u kopče (A i A').
natural_image
Cross-sectional diagram of an appliance showing internal components (no text or symbols)

NAPOMENA
natural_image
Pure geometric lines and shapes without any text, numbers, or symbols


natural_image
Pure geometric diagram with intersecting lines and shapes, no text or symbols present
32 RAD
NAPOMENA
natural_image
Diagram of a refrigerator with an air conditioner unit and a separate air conditioner unit, showing airflow direction (no text or symbols)
Ladica
OPREZ
- Uvijek ispraznite ladice prije uklanjanja i služite se objema rukama prilikom uklanjanja i ponovnog postavljanja.
- Pobrinite se da su vrata hladnjaka uvijek do kraja otvorena prije uklanjanja i ponovnog postavljanja ladica.
Uklanjanje/ponovno postavljanje ladica
1 Izvadite sadržaj ladice. Držite ručku ladice za povrće i lagano je izvucite.
natural_image
Diagram of a mechanical component with an arrow indicating direction (no text or symbols)
3 Ponovno postavite ladicu suprotnim redoslijedom od redoslijeda uklanjanja.
OPREZ
natural_image
Pure electrical circuit lines without any symbols
2 Izvucite policu.

natural_image
Illustration of hands pressing down on a rectangular panel with a black arrow indicating downward motion (no text or symbols)
3 Postavite police suprotnim redoslijedom od redoslijeda uklanjanja.
OPREZ
- Provjerite da su police u istoj ravnini s jedne i s druge strane. Nepridržavanje ovih uputa može uzrokovati padanje police ili prolijevanje hrane.

Košara vrata
Uklanjanje i ponovno postavljanje košare vrata
1 Držite oba ruba košare i uklonite je podizanjem prema gore.
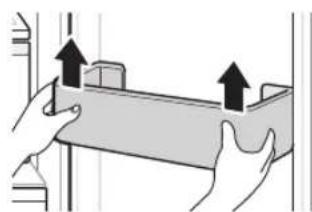
natural_image
Illustration of two hands holding a rectangular object with upward arrows indicating motion or force (no text or symbols)
natural_image
Pure geometric lines and crosshair symbols without any text or labels


natural_image
Pure geometric diagram with intersecting lines and shapes, no text or symbols present
34 ODRŽAVANJE
ODRŽAVANJE
Čišćenje
natural_image
Hand inserting a USB into a computer drive (no text or symbols visible)
RJEŠAVANJE PROBLEMA
natural_image
Pure geometric lines and shapes without any text, numbers, or symbols


natural_image
Pure geometric diagram with intersecting lines and shapes, no text or symbols present
38 RJEŠAVANJE PROBLEMA
natural_image
Pure geometric lines and crosshair symbols without any text or labels

natural_image
Pure geometric diagram with intersecting lines and shapes, no text or symbols present
Zvukovi
| Simptomi Mogući | uzrok i rješenje |
| Uređaj je bučan i proizvodi neuobičajene zvukove. | Je li uređaj postavljen na slaboj podlozi ili nije ravan?Postavite uređaj na čvrst i ravan pod. |
| Dodiruje li stražnja strana uređaja zid?Prilagodite položaj na kojem je postavljen da biste osigurali dovoljno prostora oko uređaja. |
| Ima li razasutih predmeta iza uređaja?Uklonite razasute predmete koji se nalaze iza uređaja. |
| Nalazi li se na uređaju neki predmet?Uklonite predmet koji se nalazi na uređaju. |
| Zvukovi škljocanja | Kontrola odmrzavanja škljocnut će kada započne i završi ciklus automatskog odmrzavanja. Kontrola termostata (ili kontrola uređaja u nekim modelima) također će škljocnuti kada ciklus započne i završi.Uobičajen rad |
| Zvukovi zveckanja | Zvuk zveckanja može se stvarati zbog protoka u uređaju, cijevi za vodu na stražnjoj strani uređaja (samo za modele s cijevima) ili predmeta postavljenih oko uređaja.Uobičajen rad |
| Uređaj ne stoji ravno na tlu.Pod je nedostatne nosivosti ili je neravan, ili treba podesiti nožice za poravnanje. Vidite odjeljak za poravnanje vrata. |
| Uređaj s kompresorom premješten je tijekom rada.Uobičajeni rad. Ako kompresor ne prestane zveckati nakon 3 minute, isključite napajanje uređaja, potom ga ponovno uključite. |
| Šumeći zvukovi | Motor ventilatora isparivača pokreće zrak koji kruži kroz odjeljak hladnjaka i zamrzivača.Uobičajen rad |
| Ventilator kondenzatora gura zrak preko kondenzatora.Uobičajen rad |
| Zvukovi klokotanja | Rashladno sredstvo protječe kroz sustav za hlađenje.Uobičajen rad |
| Zvukovi pucketanja Stezanje i rastezanje unutrašnjih stijenki zbog promjena temperature.Uobičajen rad |
| Vibriranje | Ako bočna ili stražnja strana uređaja dodiruje ormarić ili zid, uobičajene vibracije mogu uzrokovati jasne zvukove.Da biste otklonili zvukove, pobrinite se da bočne strane i stražnja strana ne dodiruju zid ili ormarić. |
40 RJEŠAVANJE PROBLEMA
Briga o kupcima i servis
Kontaktirajte LG Electronics informacijski centar za kupce.
natural_image
Pure geometric lines and shapes without any text, numbers, or symbols


natural_image
Pure geometric diagram with intersecting lines and shapes, no text or symbols present

LG
Life's Good
natural_image
Pure geometric lines and shapes without any text, numbers, or symbols

natural_image
Pure geometric diagram with intersecting lines and shapes, no text or symbols present
BIZTONSÁGI ELŐÍRÁSOK
HASZNÁLAT ELŐTT OLVASSA EL AZ ÖSSZES UTASÍTÁST
natural_image
Pure geometric lines and crosshair symbols without any text or labels


natural_image
Pure geometric diagram with intersecting lines and circles, no text or symbols present
6 BIZTONSÁGI ELŐÍRÁSOK
natural_image
Pure geometric lines and crosshair symbols without any text or labels


natural_image
Pure geometric diagram with intersecting lines and circles, no text or symbols present
8 BIZTONSÁGI ELŐÍRÁSOK
natural_image
Pure geometric lines and shapes without any text, numbers, or symbols


natural_image
Pure geometric diagram with intersecting lines and shapes, no text or symbols present
10 BIZTONSÁGI ELŐÍRÁSOK
natural_image
Illustration of two wrenches and a plastic housing with circular holes (no text or symbols)
natural_image
Diagram showing a hand holding a tool near a mechanical component, with an inset magnified view highlighting a downward force (no text or symbols present)
MAGYAR
natural_image
Mechanical assembly diagram showing two hanging clips mounted on a shaft (no text or symbols)
natural_image
Pure mechanical assembly diagram showing two shafts connected via a central shaft, with directional arrows indicating movement (no text or symbols)
natural_image
Technical line drawing of a mechanical component with a rotating shaft and base (no text or symbols)

natural_image
Technical line drawing of a mechanical bracket with an upward arrow indicating motion (no text or symbols)


natural_image
Pure geometric lines and shapes without any text, numbers, or symbols


natural_image
Pure geometric diagram with intersecting lines and shapes, no text or symbols present

natural_image
Technical diagram of a mechanical assembly with directional arrows indicating flow or movement (no text or symbols present)
natural_image
Technical diagram of a mechanical assembly with no visible text or symbols

natural_image
Technical line drawing of a mechanical assembly with no visible text or symbols
natural_image
Line drawing of a refrigerator with open door and side panel, showing internal compartments and a black upward arrow indicating direction (no text or symbols)
MAGYAR
VIGYÁZAT
natural_image
Diagram of a vehicle interior showing a gear shift lever and dashboard (no text or symbols)

natural_image
Technical line drawing of a mechanical component with a circular dial and directional arrow (no text or symbols)
natural_image
Pure geometric lines and shapes without any text, numbers, or symbols


natural_image
Pure geometric diagram with intersecting lines and shapes, no text or symbols present
natural_image
Diagram showing a hand holding a clip next to a refrigerator with a close-up inset of the clip's handle (no text or symbols present)
natural_image
Pure geometric lines and shapes without any text, numbers, or symbols


natural_image
Pure geometric diagram with intersecting lines and shapes, no text or symbols present
MEGJEGYZÉS
natural_image
Pure geometric lines and crosshair symbols without any text or labels


natural_image
Pure geometric diagram with intersecting lines and shapes, no text or symbols present

natural_image
Pure electrical circuit lines without any symbols
hu-hu_main.book.book Page 22 Wednesday, August 30, 2023 8:05 AM

natural_image
Pure geometric diagram with intersecting lines and circles, no text or symbols present
22 ÜZEMELTETÉS
Termék jellemzői
natural_image
Line drawing of a refrigerator with a door and front panel, no text or symbols present
① Vezérlőpanel
natural_image
Pure geometric lines and shapes without any text, numbers, or symbols

natural_image
Pure geometric diagram with intersecting lines and shapes, no text or symbols present
Belső

natural_image
Pure geometric lines and crosshair symbols without any text or labels


natural_image
Pure geometric diagram with intersecting lines and shapes, no text or symbols present

natural_image
Pure electrical circuit lines without any symbols

natural_image
Pure geometric diagram with intersecting lines and circles, no text or symbols present
24 ÜZEMELTETÉS
natural_image
Pure geometric lines and shapes without any text, numbers, or symbols


natural_image
Pure geometric diagram with intersecting lines and shapes, no text or symbols present
Vezérlőpanel
① Alarm
natural_image
Pure electrical circuit lines without any symbols


natural_image
Pure geometric diagram with intersecting lines and shapes, no text or symbols present
natural_image
Diagram of a mechanical device with a central component and labeled part (1), no text or symbols present.

natural_image
Pure geometric lines and shapes without any text, numbers, or symbols


natural_image
Pure geometric diagram with intersecting lines and shapes, no text or symbols present

natural_image
Pure electrical circuit lines without any symbols

natural_image
Pure geometric diagram with intersecting lines and circles, no text or symbols present
28 ÜZEMELTETÉS
MEGJEGYZÉS
natural_image
Simple line drawing of a device with a funnel and a blade, no text or symbols present
natural_image
Hand placing a tray into a storage bin with an arrow indicating the motion (no text or symbols)
natural_image
Technical line drawing of a mechanical assembly with two views (no text or symbols)
natural_image
Technical line drawing of a mechanical component with two views (no text or symbols)
natural_image
Hand placing a component into a rack with an arrow indicating motion (no text or symbols)
natural_image
Pure geometric lines and shapes without any text, numbers, or symbols


natural_image
Pure geometric diagram with intersecting lines and shapes, no text or symbols present
30 ÜZEMELTETÉS
VIGYÁZAT
MEGJEGYZÉS


natural_image
Pure geometric lines and shapes without any text, numbers, or symbols


natural_image
Pure geometric diagram with intersecting lines and shapes, no text or symbols present
natural_image
Cross-sectional diagram of an appliance showing internal components (no text or symbols)

MEGJEGYZÉS
natural_image
Pure geometric lines and shapes without any text, numbers, or symbols


natural_image
Pure geometric diagram with intersecting lines and shapes, no text or symbols present
32 ÜZEMELTETÉS
MEGJEGYZÉS
natural_image
Diagram of a refrigerator with an air conditioner unit and a separate air conditioner unit, showing no text or symbols.
Fiók
VIGYÁZAT
natural_image
Diagram of a door handle with an arrow indicating clockwise motion (no text or symbols)
natural_image
Illustration of two hands holding a rectangular object with a black arrow pointing to it (no text or symbols present)
natural_image
Illustration of two hands holding a rectangular object with upward arrows indicating motion or force (no text or symbols)
natural_image
Pure geometric lines and crosshair symbols without any text or labels


natural_image
Pure geometric diagram with intersecting lines and shapes, no text or symbols present
34 KARBANTARTÁS
KARBANTARTÁS
Tisztítás
natural_image
Pure electrical circuit lines without any symbols
hu-hu_main.book.book Page 35 Wednesday, August 30, 2023 8:05 AM
KARBANTARTÁS
35
natural_image
Hand inserting a plug into a device panel (no text or symbols visible)
MAGYAR


natural_image
Pure geometric lines and shapes without any text, numbers, or symbols


natural_image
Pure geometric diagram with intersecting lines and shapes, no text or symbols present
36 HIBAELHÁRÍTÁS
HIBAELHÁRÍTÁS
natural_image
Pure geometric lines and shapes without any text, numbers, or symbols

natural_image
Pure geometric lines and shapes without any text, numbers, or symbols
natural_image
Pure geometric lines and shapes without any text, numbers, or symbols


natural_image
Pure geometric diagram with intersecting lines and shapes, no text or symbols present
38 HIBAELHÁRÍTÁS
natural_image
Pure geometric lines and shapes without any text, numbers, or symbols


natural_image
Pure geometric diagram with intersecting lines and shapes, no text or symbols present
natural_image
Pure geometric lines and shapes without any text, numbers, or symbols


natural_image
Pure geometric diagram with intersecting lines and shapes, no text or symbols present
natural_image
Pure geometric lines and shapes without any text, numbers, or symbols


natural_image
Pure geometric diagram with intersecting lines and shapes, no text or symbols present

natural_image
Pure electrical circuit lines without any symbols
hu-hu_main.book.book Page 42 Wednesday, August 30, 2023 8:05 AM

natural_image
Pure geometric diagram with intersecting lines and circular shapes, no text or symbols present
42 HIBAELHÁRÍTÁS
MEGJEGYZÉS
natural_image
Pure geometric lines and shapes without any text, numbers, or symbols


natural_image
Pure geometric diagram with intersecting lines and shapes, no text or symbols present

LG
Life's Good
natural_image
Pure geometric lines and shapes without any text, numbers, or symbols


natural_image
Pure geometric diagram with intersecting lines and shapes, no text or symbols present
ISTRUZIONI PER LA SICUREZZA
LEGGERE TUTTE LE ISTRUZIONI PRIMA DELL'USO
natural_image
Pure geometric lines and crosshair symbols without any text or labels


natural_image
Pure geometric diagram with intersecting lines and shapes, no text or symbols present
ISTRUZIONI PER LA SICUREZZA
5
natural_image
Pure geometric lines and crosshair symbols without any text or labels


natural_image
Pure geometric diagram with intersecting lines and circles, no text or symbols present
6 ISTRUZIONI PER LA SICUREZZA
natural_image
Pure geometric lines and crosshair symbols without any text or labels

natural_image
Pure geometric diagram with intersecting lines and shapes, no text or symbols present
ISTRUZIONI PER LA SICUREZZA
7
natural_image
Pure geometric lines and crosshair symbols without any text or labels


natural_image
Pure geometric diagram with intersecting lines and shapes, no text or symbols present
8 ISTRUZIONI PER LA SICUREZZA
natural_image
Pure geometric lines and crosshair symbols without any text or labels


natural_image
Pure geometric diagram with intersecting lines and shapes, no text or symbols present
ISTRUZIONI PER LA SICUREZZA
natural_image
Pure geometric lines and crosshair symbols without any text or labels


natural_image
Pure geometric diagram with intersecting lines and shapes, no text or symbols present
10 ISTRUZIONI PER LA SICUREZZA
Smaltimento
natural_image
Pure geometric lines and shapes without any text, numbers, or symbols


natural_image
Pure geometric diagram with intersecting lines and shapes, no text or symbols present
ISTRUZIONI PER LA SICUREZZA
natural_image
Pure geometric lines and crosshair symbols without any text or labels


natural_image
Pure geometric diagram with intersecting lines and shapes, no text or symbols present
12 ISTRUZIONI PER LA SICUREZZA
natural_image
Pure geometric lines and crosshair symbols without any text or labels


natural_image
Pure geometric diagram with intersecting lines and shapes, no text or symbols present
INSTALLAZIONE
natural_image
Pure geometric lines and shapes without any text, numbers, or symbols


natural_image
Pure geometric diagram with intersecting lines and shapes, no text or symbols present
14 INSTALLAZIONE
Accessori
natural_image
Two labeled illustrations: one showing a wrench and the other a cross-section of a mechanical component (no text or symbols)
① Chiave*1
natural_image
Diagram showing a hand operating a mechanical device with a magnified inset highlighting the mechanism (no text or symbols present)
natural_image
Mechanical assembly diagram showing two hanging clips mounted on a shaft (no text or symbols)
natural_image
Pure mechanical assembly diagram showing two shafts connected via a central shaft with directional arrows indicating motion (no text or symbols)
natural_image
Technical line drawing of a mechanical component with a rotating shaft and base (no text or symbols)

natural_image
Technical line drawing of a mechanical bracket with an upward arrow indicating motion (no text or symbols)
ITALIANO


natural_image
Pure geometric lines and shapes without any text, numbers, or symbols


natural_image
Pure geometric diagram with intersecting lines and shapes, no text or symbols present
16 INSTALLAZIONE

natural_image
Technical diagram of an automotive engine bay with multiple components and directional arrows indicating flow or movement (no text or labels)
natural_image
Mechanical assembly diagram showing a lever mechanism with no visible text or symbols

natural_image
Technical line drawing of a mechanical assembly with no visible text or symbols
natural_image
Line drawing of a refrigerator with open door and side panel, showing internal compartments and a directional arrow (no text or symbols)
ATTENZIONE
natural_image
Diagram of a vehicle interior showing a gear shift lever and dashboard (no text or symbols)

natural_image
Technical line drawing of a mechanical component with a circular housing and arrow indicating direction (no text or symbols)
natural_image
Pure geometric lines and shapes without any text, numbers, or symbols

natural_image
Pure geometric lines and shapes without any text, numbers, or symbols
18 INSTALLAZIONE
natural_image
Diagram showing a hand holding a tool near a door, with an inset close-up of the tool interacting with the handle (no text or symbols present)
NOTA
natural_image
Pure geometric lines and crosshair symbols without any text or labels


natural_image
Pure geometric diagram with intersecting lines and shapes, no text or symbols present
natural_image
Pure geometric lines and shapes without any text, numbers, or symbols


natural_image
Pure geometric diagram with intersecting lines and shapes, no text or symbols present
natural_image
Pure geometric lines and shapes without any text, numbers, or symbols


natural_image
Pure geometric diagram with intersecting lines and shapes, no text or symbols present
22 USO
natural_image
Pure geometric lines and shapes without any text, numbers, or symbols


natural_image
Pure geometric diagram with intersecting lines and shapes, no text or symbols present

natural_image
Pure electrical circuit lines without any symbols
it-it_main.book.book Page 23 Wednesday, August 30, 2023 8:10 AM
USO 23
natural_image
Line drawing of a refrigerator with a door and front panel, no text or symbols present
ITALIANO
natural_image
Pure geometric lines and shapes without any text, numbers, or symbols

natural_image
Pure geometric diagram with intersecting lines and shapes, no text or symbols present
24 USO
Interno

① Lampada a LED Congelatore
natural_image
Pure geometric lines and crosshair symbols without any text or labels


natural_image
Pure geometric diagram with intersecting lines and shapes, no text or symbols present
natural_image
Pure geometric lines and crosshair symbols without any text or labels


natural_image
Pure geometric diagram with intersecting lines and shapes, no text or symbols present
26 USO
① Alarm
natural_image
Pure geometric lines and shapes without any text, numbers, or symbols

natural_image
Pure electrical circuit lines without any symbols
natural_image
Pure geometric lines and crosshair symbols without any text or labels


natural_image
Pure geometric diagram with intersecting lines and shapes, no text or symbols present
28 USO
natural_image
Diagram of a mechanical device with a central component and labeled part (1), no text or symbols present.
NOTA
natural_image
Simple line drawing of a device with a funnel and a folded paper or paper object, no text or symbols present.
natural_image
Line drawing of a hand holding a shelf with an arrow indicating movement (no text or symbols)
natural_image
Technical line drawing of a mechanical component with two views (no text or symbols)
natural_image
Pure geometric lines and shapes without any text, numbers, or symbols


natural_image
Pure geometric diagram with intersecting lines and shapes, no text or symbols present
30 USO
ATTENZIONE
natural_image
Technical line drawing of a mechanical assembly with two views (no text or symbols)
natural_image
Hand placing a component into a rack with an arrow indicating motion (no text or symbols)
NOTA
natural_image
Pure geometric lines and shapes without any text, numbers, or symbols


natural_image
Pure geometric diagram with intersecting lines and shapes, no text or symbols present
32 USO
NOTA
natural_image
Cross-sectional diagram of an internal appliance or enclosure with no visible text or symbols

natural_image
Pure geometric lines and shapes without any text, numbers, or symbols


natural_image
Pure geometric diagram with intersecting lines and shapes, no text or symbols present
natural_image
Technical line drawing of an air conditioner unit showing internal components and a close-up view of the device's internal structure (no text or symbols present)
natural_image
Diagram showing a refrigerator with air conditioner unit and adjacent air conditioner unit (no text or symbols)
Cassetto
ATTENZIONE
natural_image
Diagram of a mechanical component with an arrow indicating direction (no text or symbols)
natural_image
Pure geometric lines and crosshair symbols without any text or labels


natural_image
Pure geometric diagram with intersecting lines and shapes, no text or symbols present

natural_image
Pure electrical circuit lines without any symbols

natural_image
Pure geometric diagram with intersecting lines and circles, no text or symbols present
34 USO
natural_image
Illustration of two hands pressing down on a rectangular panel with a black arrow indicating downward motion (no text or symbols)
natural_image
Illustration of two hands holding a rectangular object with upward arrows indicating motion or force (no text or symbols)


natural_image
Pure geometric lines and shapes without any text, numbers, or symbols


natural_image
Pure geometric diagram with intersecting lines and shapes, no text or symbols present
MANUTENZIONE
Pulizia
natural_image
Pure geometric lines and shapes without any text, numbers, or symbols


natural_image
Pure geometric diagram with intersecting lines and shapes, no text or symbols present

natural_image
Pure electrical circuit lines without any symbols
it-it_main.book.book Page 36 Wednesday, August 30, 2023 8:10 AM

natural_image
Pure geometric diagram with intersecting lines and circles, no text or symbols present
36 MANUTENZIONE
natural_image
Hand inserting a plug into a device panel (no text or symbols visible)


natural_image
Pure geometric lines and shapes without any text, numbers, or symbols

natural_image
Pure geometric diagram with intersecting lines and shapes, no text or symbols present
natural_image
Pure geometric lines and shapes without any text, numbers, or symbols


natural_image
Pure geometric diagram with intersecting lines and shapes, no text or symbols present
natural_image
Pure geometric lines and shapes without any text, numbers, or symbols


natural_image
Pure geometric diagram with intersecting lines and shapes, no text or symbols present
natural_image
Pure geometric lines and shapes without any text, numbers, or symbols


natural_image
Pure geometric diagram with intersecting lines and shapes, no text or symbols present
natural_image
Pure geometric lines and shapes without any text, numbers, or symbols

natural_image
Pure geometric diagram with intersecting lines and shapes, no text or symbols present

natural_image
Pure electrical circuit lines without any symbols
natural_image
Pure geometric lines and shapes without any text, numbers, or symbols


natural_image
Pure geometric diagram with intersecting lines and shapes, no text or symbols present
Promemoria

LG
Life's Good
natural_image
Pure geometric lines and shapes without any text, numbers, or symbols


natural_image
Pure geometric diagram with intersecting lines and shapes, no text or symbols present
NURODYMAI DËL SAUGOS
PRIEŠ NAUDODAMI PERSKAITYKITE VISAS INSTRUKCIJAS
natural_image
Pure geometric lines and crosshair symbols without any text or labels


natural_image
Pure geometric diagram with intersecting lines and shapes, no text or symbols present
NURODYMAI DÉL SAUGOS
5
natural_image
Pure geometric lines and shapes without any text, numbers, or symbols


natural_image
Pure geometric diagram with intersecting lines and shapes, no text or symbols present
6 NURODYMAI DËL SAUGOS
natural_image
Pure geometric lines and crosshair symbols without any text or labels


natural_image
Pure geometric diagram with intersecting lines and shapes, no text or symbols present
NURODYMAI DËL SAUGOS
natural_image
Pure geometric lines and crosshair symbols without any text or labels


natural_image
Pure geometric diagram with intersecting lines and shapes, no text or symbols present
NURODYMAI DËL SAUGOS
9
natural_image
Pure geometric lines and shapes without any text, numbers, or symbols


natural_image
Pure geometric diagram with intersecting lines and shapes, no text or symbols present
RÜPINAMÈS APLINKA
natural_image
Pure geometric lines and crosshair symbols without any text or labels


natural_image
Pure geometric diagram with intersecting lines and shapes, no text or symbols present
12 MONTAVIMAS
MONTAVIMAS
Prieš montavimą
Matmenys ir tarpai
natural_image
Pure geometric lines and crosshair symbols without any text or labels


natural_image
Pure geometric diagram with intersecting lines and shapes, no text or symbols present
Priedai
natural_image
Illustration of two wrenches and a plastic housing with circular holes (no text or symbols)
natural_image
Diagram showing a hand operating a mechanical device with a magnified inset highlighting a downward force (no text or symbols present)
LIETUVIŲ
2 Atskirkite jungtis.
ATSARGIAI
① Vamzdelis
② Apkaba
③ Šakotuvas
④ Jungtis
natural_image
Mechanical assembly diagram showing two hanging clips mounted on a shaft (no text or symbols)
natural_image
Pure mechanical assembly diagram showing a shaft and flange with directional arrows (no text or symbols)
natural_image
Technical line drawing of a mechanical component with a rotating shaft and base (no text or symbols)

natural_image
Pure mechanical assembly diagram showing a bracket with an upward arrow, no text or symbols present

natural_image
Technical diagram of a mechanical assembly with multiple ports and directional arrows indicating flow or movement (no text or labels)
natural_image
Line drawing of a refrigerator with open door and side panel, showing internal compartments and ventilation slots (no text or symbols)
LIETUVIŲ
ATSARGIAI
natural_image
Diagram of a vehicle's rearview and dashboard compartment showing a handle mechanism (no text or symbols)

natural_image
Technical line drawing of a car interior component with a gear-like mechanism and directional arrow (no text or symbols)
① Vamzdelis ② Veržtukas ③ Šakotuvas ④ Jungtis
flowchart
graph TD
    A["1"] --> B["2"]
    C["3"] --> B["2"]
- Veržliaraktis tipas B
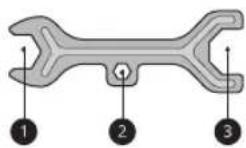
natural_image
Diagram showing a hand holding a mechanical component connected to a refrigerator door, with an inset magnified view of the component being held (no text or symbols present)
natural_image
Pure geometric lines and shapes without any text, numbers, or symbols


natural_image
Pure geometric diagram with intersecting lines and shapes, no text or symbols present
18 MONTAVIMAS
Energijos ijungimas
Prietaiso prijungimas
natural_image
Pure geometric lines and shapes without any text, numbers, or symbols


natural_image
Pure geometric diagram with intersecting lines and shapes, no text or symbols present
NAUDOJIMAS
Prieš naudojima
Naudojimo pastabos
natural_image
Pure geometric diagram with concentric circles and crosshairs, no text or symbols present
It-lt_main.book.book Page 21 Wednesday, August 30, 2023 8:15 AM
NAUDOJIMAS
21
natural_image
Pure geometric lines and shapes without any text, numbers, or symbols

natural_image
Pure geometric diagram with intersecting lines and shapes, no text or symbols present

natural_image
Pure geometric diagram with concentric circles and crosshairs, no text or symbols present
It-lt_main.book.book Page 22 Wednesday, August 30, 2023 8:15 AM

natural_image
Pure geometric diagram with intersecting lines and circular shapes, no text or symbols present
22 NAUDOJIMAS
Gaminio savybès
natural_image
Line drawing of a refrigerator with a door and front panel, no text or symbols present
① Valdymo skydelis
natural_image
Pure geometric lines and crosshair symbols without any text or labels


natural_image
Pure geometric diagram with intersecting lines and shapes, no text or symbols present
Vidus
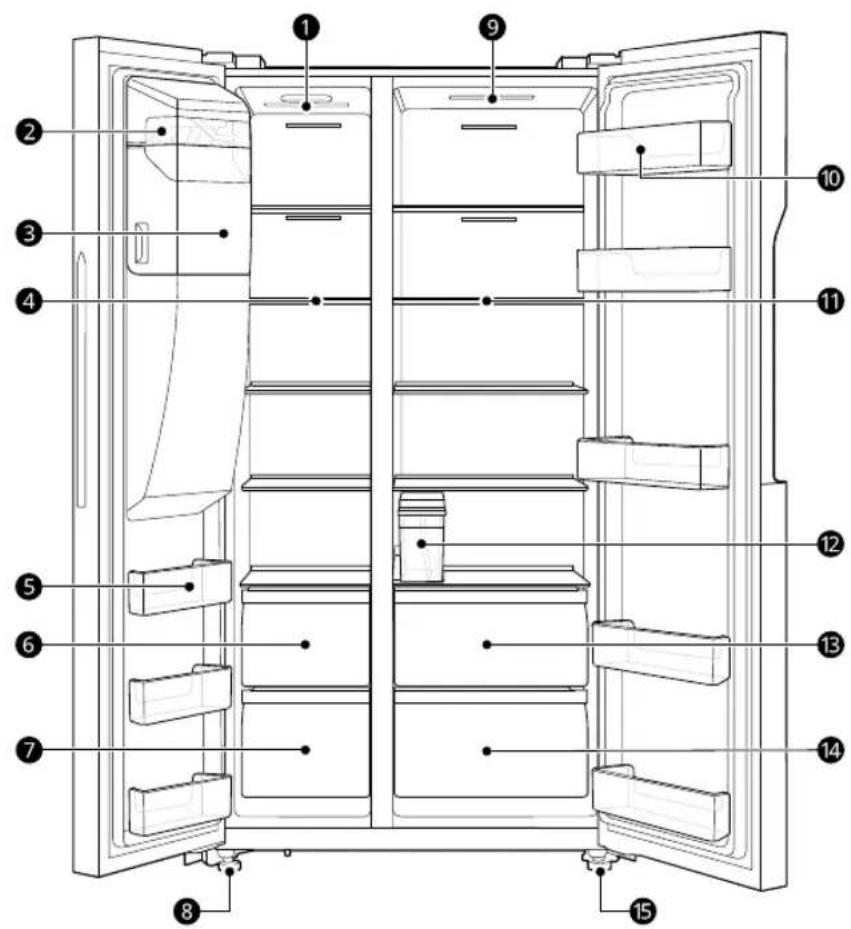
LIETUVIŲ
① Šaldiklio LED lemputė
natural_image
Pure geometric lines and symbols without any text, numbers, or labels


natural_image
Pure geometric diagram with intersecting lines and shapes, no text or symbols present

natural_image
Pure geometric diagram with concentric circles and crosshairs, no text or symbols present

natural_image
Pure geometric diagram with intersecting lines and circles, no text or symbols present
24 NAUDOJIMAS
① Alarm
natural_image
Pure electrical circuit lines without any symbols

natural_image
Pure geometric diagram with intersecting lines and shapes, no text or symbols present
natural_image
Diagram of a mechanical device with a central component and labeled part (1), no text or symbols present.


natural_image
Pure geometric lines and crosshair symbols without any text or labels


natural_image
Pure geometric diagram with intersecting lines and shapes, no text or symbols present

natural_image
Pure electrical circuit lines without any symbols

natural_image
Pure geometric diagram with intersecting lines and circles, no text or symbols present
28 NAUDOJIMAS
Dozatoriaus valymas
PASTABA
natural_image
Simple line drawing of a device with a funnel and a leaf-like object below (no text or symbols)
Vandens dozatoriaus talpyklos pripildymas
natural_image
Hand placing a component into a rack with an arrow indicating motion (no text or symbols)
2 Atidarykite vandens dozatoriaus talpyklos dangtelj.

natural_image
Technical line drawing of a mechanical assembly with two views (no text or symbols)
natural_image
Diagram showing two views of a mechanical device with a handle and a side view (no text or symbols)


natural_image
Pure geometric lines and shapes without any text, numbers, or symbols

natural_image
Pure geometric diagram with intersecting lines and shapes, no text or symbols present
natural_image
Hand placing a component into a mechanical device with an arrow indicating motion (no text or symbols)
⚠ ISPĖJIMAS
natural_image
Pure geometric lines and shapes without any text, numbers, or symbols


natural_image
Pure geometric diagram with intersecting lines and shapes, no text or symbols present
30 NAUDOJIMAS
ATSARGIAI
PASTABA
natural_image
Cross-sectional diagram of an appliance showing internal components (no text or symbols)

natural_image
Technical line drawing of an air conditioner unit showing internal components and a close-up view of the device's internal structure (no text or symbols present)
PASTABA
natural_image
Pure geometric lines and shapes without any text, numbers, or symbols


natural_image
Pure geometric diagram with intersecting lines and shapes, no text or symbols present
32 NAUDOJIMAS
PASTABA
natural_image
Diagram of a refrigerator with airflow direction indicated by arrows (no text or symbols)
Stalčius
ATSARGIAI
natural_image
Diagram of a door handle with an arrow indicating clockwise motion (no text or symbols)
natural_image
Illustration of hands holding a transparent panel with a black arrow pointing to it (no text or symbols present)
natural_image
Illustration of hands holding a rectangular object with two upward arrows indicating motion or force (no text or symbols)
natural_image
Pure geometric lines and shapes without any text, numbers, or symbols


natural_image
Pure geometric diagram with intersecting lines and shapes, no text or symbols present
34 PRIEŽIŪRA
PRIEŽIŪRA
Valymas
Bendrieji valymo patarimai
natural_image
Hand inserting a button into a computer monitor (no text or symbols visible)


natural_image
Pure geometric lines and shapes without any text, numbers, or symbols


natural_image
Pure geometric diagram with intersecting lines and shapes, no text or symbols present
TRIKČIŲ ŠALINIMAS
natural_image
Pure geometric lines and shapes without any text, numbers, or symbols


natural_image
Pure geometric diagram with intersecting lines and shapes, no text or symbols present
36 TRIKČIŲ ŠALINIMAS
natural_image
Pure geometric lines and crosshair symbols without any text or labels


natural_image
Pure geometric diagram with intersecting lines and shapes, no text or symbols present
38 TRIKČIŲ ŠALINIMAS
natural_image
Pure geometric lines and shapes without any text, numbers, or symbols


natural_image
Pure electrical circuit lines without any symbols
Triukšmas
natural_image
Pure geometric lines and shapes without any text, numbers, or symbols


natural_image
Pure geometric diagram with intersecting lines and shapes, no text or symbols present
40 TRIKČIŲ ŠALINIMAS
natural_image
Pure geometric lines and shapes without any text, numbers, or symbols


natural_image
Pure geometric diagram with intersecting lines and shapes, no text or symbols present

LG
Life's Good
natural_image
Pure geometric lines and shapes without any text, numbers, or symbols


natural_image
Pure geometric diagram with intersecting lines and shapes, no text or symbols present
DROŠĪBAS NORĀDĪJUMI
PIRMS LIETOŠANAS IZLASIET VISUS NORĀDĪJUMUS
natural_image
Pure geometric lines and shapes without any text, numbers, or symbols


natural_image
Pure geometric diagram with intersecting lines and shapes, no text or symbols present
DROŠĪBAS NORĀDĪJUMI
5
natural_image
Pure geometric lines and crosshair symbols without any text or labels


natural_image
Pure geometric diagram with intersecting lines and shapes, no text or symbols present
6 DROŠĪBAS NORĀDĪJUMI
natural_image
Pure geometric lines and shapes without any text, numbers, or symbols


natural_image
Pure geometric diagram with intersecting lines and shapes, no text or symbols present
DROŠĪBAS NORĀDĪJUMI
7
natural_image
Pure geometric lines and shapes without any text, numbers, or symbols


natural_image
Pure geometric diagram with intersecting lines and circles, no text or symbols present
8 DROŠĪBAS NORĀDĪJUMI
natural_image
Pure geometric lines and shapes without any text, numbers, or symbols


natural_image
Pure geometric diagram with intersecting lines and shapes, no text or symbols present
DROŠĪBAS NORĀDĪJUMI
9
natural_image
Pure geometric lines and crosshair symbols without any text or labels


natural_image
Pure geometric diagram with intersecting lines and shapes, no text or symbols present
10 DROŠĪBAS NORĀDĪJUMI
Ekspluatācija
natural_image
Pure geometric diagram with intersecting lines and shapes, no text or symbols present
natural_image
Pure geometric lines and shapes without any text, numbers, or symbols


natural_image
Pure geometric diagram with intersecting lines and shapes, no text or symbols present
12 UZSTĀDĪŠANA
UZSTĀDĪŠANA
Pirms uzstādīšanas
natural_image
Pure geometric lines and shapes without any text, numbers, or symbols

natural_image
Pure geometric diagram with intersecting lines and shapes, no text or symbols present
Piederumi
natural_image
Illustration showing two wrenches and a tray with circular holes (no text or symbols)
natural_image
Diagram showing a hand operating a control panel with a magnified inset highlighting the mechanism (no text or symbols present)
LATVIEŠU
natural_image
Pure geometric lines and crosshair symbols without any text or labels


natural_image
Pure geometric diagram with intersecting lines and shapes, no text or symbols present
14 UZSTĀDĪŠANA
natural_image
Mechanical assembly diagram showing two hanging clips mounted on a shaft (no text or symbols)
natural_image
Pure mechanical assembly diagram showing two shafts connected via a central shaft, with directional arrows indicating movement (no text or symbols)
natural_image
Technical line drawing of a mechanical component with a rotating shaft and base (no text or symbols)

natural_image
Technical line drawing of a mechanical bracket with an upward arrow indicating motion (no text or symbols)


natural_image
Pure geometric lines and shapes without any text, numbers, or symbols


natural_image
Pure geometric diagram with intersecting lines and shapes, no text or symbols present

natural_image
Technical diagram of a mechanical assembly with directional arrows indicating flow or movement (no text or symbols present)
natural_image
Technical diagram of a mechanical assembly with no visible text or symbols

natural_image
Technical line drawing of a mechanical component with no visible text or symbols
natural_image
Line drawing of a refrigerator with open door and side panel, showing internal compartments and a black upward arrow indicating direction (no text or symbols)
LATVIEŠU
⚠ UZMANĪBU!
natural_image
Diagram of a vehicle's internal gear shift lever with a T-shaped arrow indicating clockwise motion (no text or symbols)

natural_image
Technical line drawing of a mechanical component with a gear-like assembly and an arrow indicating direction (no text or symbols)
natural_image
Diagram showing a hand holding a tool near a refrigerator with a close-up inset of the handle (no text or symbols)
LATVIEŠU
PIEZIME
natural_image
Pure geometric lines and shapes without any text, numbers, or symbols


natural_image
Pure geometric diagram with intersecting lines and shapes, no text or symbols present
EKSPLUATĀCIJA
Pirms lietošanas
natural_image
Pure geometric lines and shapes without any text, numbers, or symbols


natural_image
Pure geometric diagram with intersecting lines and shapes, no text or symbols present

natural_image
Pure electrical circuit lines without any symbols
lv-lv_main.book.book Page 22 Wednesday, August 30, 2023 8:19 AM

natural_image
Pure geometric diagram with intersecting lines and circles, no text or symbols present
22 EKSPLUATĀCIJA
natural_image
Line drawing of a refrigerator with a door and front panel, no text or symbols present
① Vadības panelis
Iestata ledusskapja temperatūru, saldētavas temperatūru un dozatora režīmu.

natural_image
Pure geometric lines and shapes without any text, numbers, or symbols


natural_image
Pure geometric diagram with intersecting lines and shapes, no text or symbols present
Iekšpuse

natural_image
Pure geometric lines and crosshair symbols without any text or labels

natural_image
Pure geometric diagram with intersecting lines and shapes, no text or symbols present
24 EKSPLUATĀCIJA
① Alarm
natural_image
Pure geometric lines and crosshair symbols without any text or labels


natural_image
Pure geometric diagram with intersecting lines and shapes, no text or symbols present
26 EKSPLUATĀCIJA
PIEZIME
natural_image
Pure geometric lines and shapes without any text, numbers, or symbols


natural_image
Pure geometric diagram with intersecting lines and shapes, no text or symbols present
natural_image
Diagram of a mechanical device with a central component and labeled part (1), no text or symbols present.


natural_image
Pure geometric lines and shapes without any text, numbers, or symbols


natural_image
Pure geometric diagram with intersecting lines and shapes, no text or symbols present

natural_image
Pure electrical circuit lines without any symbols

natural_image
Pure geometric diagram with intersecting lines and circles, no text or symbols present
28 EKSPLUATĀCIJA
Dozatora tīrīšana
PIEZIME
- Pie izvades atveres var pielipt drānas pūkas.
natural_image
Simple line drawing of a device with a funnel and a folded paper or paper object (no text or symbols)
Üdens tvertnes piepildišana ar üdeni
natural_image
Hand placing a component into a rack with an arrow indicating motion (no text or symbols)
natural_image
Technical line drawing of a mechanical component with two views (no text or symbols)
natural_image
Technical line drawing of a mechanical component with two views (no text or symbols)
natural_image
Hand holding a mechanical component with an arrow indicating direction (no text or symbols)
⚠ BRĪDINĀJUMS!
natural_image
Pure geometric lines and shapes without any text, numbers, or symbols


natural_image
Pure geometric diagram with intersecting lines and shapes, no text or symbols present
30 EKSPLUATĀCIJA
⚠ UZMANĪBU!
PIEZIME
- Izvelciet ledus tvertni, pārbaudiet, ka nav salipuši ledus gabalini, un iznemiet tos.

natural_image
Cross-sectional diagram of an appliance showing internal components (no text or symbols)

natural_image
Technical line drawing of an air conditioner unit showing internal components and a close-up view of the device's internal structure (no text or symbols present)
PIEZIME
natural_image
Pure geometric lines and crosshair symbols without any text or labels

natural_image
Pure geometric diagram with intersecting lines and shapes, no text or symbols present
32 EKSPLUATĀCIJA
PIEZIME
natural_image
Diagram of a refrigerator with an air conditioner unit and a separate air conditioner unit, showing airflow direction (no text or symbols)
Atvilkte
⚠ UZMANĪBU!
natural_image
Diagram of a mechanical component with an arrow indicating direction (no text or symbols)
natural_image
Illustration of two hands holding a rectangular object with a black arrow pointing to it (no text or symbols present)
natural_image
Illustration of two hands holding a rectangular object with upward arrows indicating motion or force (no text or symbols)
natural_image
Pure geometric lines and shapes without any text, numbers, or symbols


natural_image
Pure geometric diagram with intersecting lines and shapes, no text or symbols present
34 APKOPE
APKOPE
Tīrīšana
natural_image
Hand inserting a USB into a computer drive (no text or symbols visible)


natural_image
Pure geometric lines and shapes without any text, numbers, or symbols


natural_image
Pure geometric diagram with intersecting lines and shapes, no text or symbols present
TRAUCĒJUMU MEKLĒŠANA
natural_image
Pure geometric lines and shapes without any text, numbers, or symbols


natural_image
Pure geometric diagram with intersecting lines and shapes, no text or symbols present
36 TRAUCĒJUMU MEKLĒŠANA
natural_image
Pure geometric lines and shapes without any text, numbers, or symbols


natural_image
Pure geometric diagram with intersecting lines and shapes, no text or symbols present
TRAUCĒJUMU MEKLĒŠANA
natural_image
Pure geometric lines and shapes without any text, numbers, or symbols


natural_image
Pure geometric diagram with intersecting lines and shapes, no text or symbols present
38 TRAUCĒJUMU MEKLĒŠANA
natural_image
Pure geometric lines and shapes without any text, numbers, or symbols


natural_image
Pure geometric diagram with intersecting lines and shapes, no text or symbols present
40 TRAUCĒJUMU MEKLĒŠANA
natural_image
Pure geometric lines and shapes without any text, numbers, or symbols

natural_image
Pure geometric diagram with intersecting lines and shapes, no text or symbols present

LG
Life's Good
natural_image
Pure geometric lines and shapes without any text, numbers, or symbols


natural_image
Pure geometric diagram with intersecting lines and shapes, no text or symbols present
natural_image
Pure geometric lines and crosshair symbols without any text or labels


natural_image
Pure geometric diagram with intersecting lines and shapes, no text or symbols present
natural_image
Pure geometric lines and crosshair symbols without any text or labels


natural_image
Pure geometric diagram with intersecting lines and shapes, no text or symbols present
natural_image
Pure geometric lines and shapes without any text, numbers, or symbols


natural_image
Pure geometric diagram with intersecting lines and shapes, no text or symbols present
natural_image
Pure geometric lines and crosshair symbols without any text or labels


natural_image
Pure geometric diagram with intersecting lines and shapes, no text or symbols present
natural_image
Pure geometric lines and symbols without any text, numbers, or labels


natural_image
Pure geometric diagram with intersecting lines and shapes, no text or symbols present
natural_image
Pure geometric lines and crosshair symbols without any text or labels


natural_image
Pure geometric diagram with intersecting lines and shapes, no text or symbols present
natural_image
Pure geometric lines and shapes without any text, numbers, or symbols


natural_image
Pure geometric diagram with intersecting lines and circles, no text or symbols present


natural_image
Pure geometric diagram with intersecting lines and shapes, no text or symbols present
МОНТАЖА
Пред монтажа
Димензии и дозволи
natural_image
Pure geometric lines and shapes without any text, numbers, or symbols


natural_image
Pure geometric diagram with intersecting lines and shapes, no text or symbols present
14 МОНТАЖА
Дополнителен прибор
natural_image
Illustration of two wrenches and a tray with circular holes (no text or symbols)
natural_image
Diagram showing a hand operating a device with a magnified inset highlighting a downward force (no text or symbols present)
natural_image
Pure geometric lines and crosshair symbols without any text or labels


natural_image
Pure geometric diagram with intersecting lines and shapes, no text or symbols present
natural_image
Mechanical assembly diagram showing two hanging clips mounted on a shaft (no text or symbols)
natural_image
Pure mechanical assembly diagram showing two shafts connected via a central shaft with directional arrows indicating motion (no text or symbols)
natural_image
Technical line drawing of a mechanical assembly with a rotating component (no text or symbols)

natural_image
Technical line drawing of a mechanical bracket with an upward arrow indicating motion (no text or symbols)
МАКЕДОНСКИ


natural_image
Pure geometric lines and shapes without any text, numbers, or symbols


natural_image
Pure geometric diagram with intersecting lines and shapes, no text or symbols present
16 МОНТАЖА

natural_image
Technical diagram of a mechanical assembly with multiple components and directional arrows indicating flow or movement (no text or labels)
natural_image
Mechanical assembly diagram showing a lever mechanism with no visible text or symbols
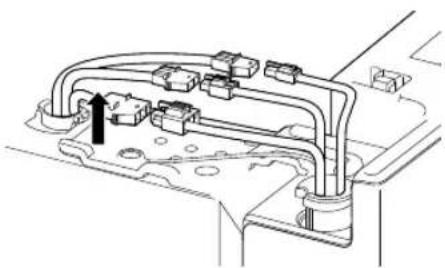
natural_image
Technical line drawing of a mechanical assembly with no visible text or symbols
natural_image
Line drawing of a refrigerator with open door and side panel, showing internal compartments and ventilation slots (no text or symbols)
ВНИМАНИЕ
natural_image
Diagram of a vehicle interior showing a hand holding a tool, with no visible text or symbols

natural_image
Technical line drawing of a mechanical component with a gear-like handle and arrow indicator (no text or symbols)
flowchart
graph TD
    A["1"] --> B["2"]
    C["3"] --> D["2"]
- Клуч тип В
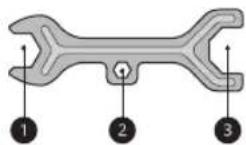
natural_image
Diagram showing a hand holding a tool near a refrigerator with a close-up inset of the handle (no text or symbols)
НАПОМЕНА
natural_image
Pure geometric lines and shapes without any text, numbers, or symbols


natural_image
Pure geometric diagram with intersecting lines and shapes, no text or symbols present
natural_image
Pure geometric lines and crosshair symbols without any text or labels


natural_image
Pure geometric diagram with intersecting lines and shapes, no text or symbols present
20 РАБОТЕЊЕ
РАБОТЕЊЕ
Пред употреба
natural_image
Pure geometric lines and crosshair symbols without any text or labels


natural_image
Pure geometric diagram with intersecting lines and shapes, no text or symbols present
22 РАБОТЕЊЕ
natural_image
Pure geometric lines and shapes without any text, numbers, or symbols

natural_image
Pure geometric diagram with intersecting lines and shapes, no text or symbols present
natural_image
Line drawing of a refrigerator with a door and front panel, no text or symbols present
① Контролна Табла
natural_image
Pure geometric lines and shapes without any text, numbers, or symbols


natural_image
Pure geometric diagram with intersecting lines and shapes, no text or symbols present
natural_image
Pure geometric lines and crosshair symbols without any text or labels


natural_image
Pure geometric diagram with intersecting lines and shapes, no text or symbols present
26 РАБОТЕЊЕ
Контролна табла
① Alarm
natural_image
Pure geometric lines and shapes without any text, numbers, or symbols

natural_image
Pure geometric diagram with intersecting lines and shapes, no text or symbols present
28 РАБОТЕЊЕ
⑪ Тип на вода и мраз
natural_image
Pure geometric lines and shapes without any text, numbers, or symbols


natural_image
Pure geometric diagram with intersecting lines and shapes, no text or symbols present
natural_image
Diagram of a mechanical device with a central component and labeled part (1), no text or symbols present.
НАПОМЕНА
natural_image
Simple line drawing of a device with a funnel and a folded paper or paper object (no text or symbols)
natural_image
Line drawing of a hand pressing down on a mechanical component (no text or symbols)
natural_image
Technical line drawing of a mechanical assembly with two views (no text or symbols)
natural_image
Pure geometric lines and shapes without any text, numbers, or symbols


natural_image
Pure geometric diagram with intersecting lines and shapes, no text or symbols present
30 РАБОТЕЊЕ
ВНИМАНИЕ
natural_image
Technical line drawing of a mechanical assembly with two views (no text or symbols)
natural_image
Hand placing a component into a rack with an arrow indicating motion (no text or symbols)
ПРЕДУПРЕДУВАЊЕ
natural_image
Pure geometric lines and crosshair symbols without any text or labels

natural_image
Pure geometric diagram with intersecting lines and shapes, no text or symbols present


natural_image
Pure geometric lines and shapes without any text, numbers, or symbols


natural_image
Pure geometric diagram with intersecting lines and shapes, no text or symbols present
32 РАБОТЕЊЕ
НАПОМЕНА
natural_image
Cross-sectional diagram of an appliance showing internal components (no text or symbols)

natural_image
Pure geometric lines and shapes without any text, numbers, or symbols


natural_image
Pure geometric diagram with intersecting lines and shapes, no text or symbols present
natural_image
Technical line drawing of an air conditioner unit showing internal components and a close-up of the device's internal structure (no text or symbols)
natural_image
Diagram showing a refrigerator with air vent and a paper holder, connected by an arrow indicating direction (no text or symbols present)
Фиока
ВНИМАНИЕ
natural_image
Diagram of a mechanical component with an arrow indicating direction (no text or symbols)
natural_image
Pure electrical circuit lines without any symbols

natural_image
Pure geometric diagram with intersecting lines and circles, no text or symbols present
34 РАБОТЕЊЕ
natural_image
Illustration of hands placing a black arrow on a rectangular object (no text or symbols)
natural_image
Illustration of hands holding a rectangular object with two upward arrows indicating motion or force (no text or symbols)
natural_image
Pure geometric diagram with intersecting lines and shapes, no text or symbols present
ОДРЖУВАЊЕ
Чистење
natural_image
Pure geometric lines and shapes without any text, numbers, or symbols


natural_image
Pure geometric diagram with intersecting lines and shapes, no text or symbols present

natural_image
Pure electrical circuit lines without any symbols
mk-mk_main.book.book Page 36 Wednesday, August 30, 2023 9:33 AM

natural_image
Pure geometric diagram with intersecting lines and circles, no text or symbols present
36 ОДРЖУВАЊЕ
natural_image
Hand inserting a plug into a device panel (no text or symbols visible)


natural_image
Pure geometric lines and shapes without any text, numbers, or symbols


natural_image
Pure geometric diagram with intersecting lines and shapes, no text or symbols present
РЕШАВАЊЕ ПРОБЛЕМИ
natural_image
Pure geometric lines and shapes without any text, numbers, or symbols


natural_image
Pure geometric diagram with intersecting lines and shapes, no text or symbols present
38 РЕШАВАНЬЕ ПРОБЛЕМИ
natural_image
Pure geometric lines and shapes without any text, numbers, or symbols


natural_image
Pure geometric diagram with intersecting lines and shapes, no text or symbols present
natural_image
Pure geometric lines and shapes without any text, numbers, or symbols


natural_image
Pure geometric diagram with intersecting lines and shapes, no text or symbols present
flowchart
graph TD
    A["LED"] --> B["LED"]
    style A fill:#fff,stroke:#000
    style B fill:#fff,stroke:#000
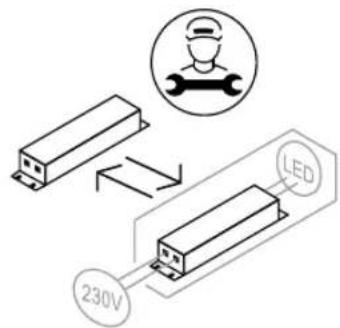


natural_image
Pure geometric lines and shapes without any text, numbers, or symbols


natural_image
Pure geometric diagram with intersecting lines and shapes, no text or symbols present

LG
Life's Good
Voor u service belt ....37


natural_image
Pure geometric lines and shapes without any text, numbers, or symbols


natural_image
Pure geometric diagram with intersecting lines and shapes, no text or symbols present
VEILIGHEIDSVOORSCHRIFTEN
LEES ALLE INSTRUCTIES VOOR HET GEBRUIK
natural_image
Pure geometric lines and shapes without any text, numbers, or symbols


natural_image
Pure geometric diagram with intersecting lines and shapes, no text or symbols present
VEILIGHEIDSVOORSCHRIFTEN
5
natural_image
Pure geometric lines and shapes without any text, numbers, or symbols


natural_image
Pure geometric diagram with intersecting lines and shapes, no text or symbols present
6 VEILIGHEIDSVOORSCHRIFTEN
natural_image
Pure geometric lines and crosshair symbols without any text or labels


natural_image
Pure geometric diagram with intersecting lines and shapes, no text or symbols present
VEILIGHEIDSVOORSCHRIFTEN
7
natural_image
Pure geometric lines and shapes without any text, numbers, or symbols


natural_image
Pure geometric diagram with intersecting lines and shapes, no text or symbols present
8 VEILIGHEIDSVOORSCHRIFTEN
natural_image
Pure geometric lines and crosshair symbols without any text or labels


natural_image
Pure geometric diagram with intersecting lines and shapes, no text or symbols present
natural_image
Pure geometric lines and shapes without any text, numbers, or symbols


natural_image
Pure geometric diagram with intersecting lines and shapes, no text or symbols present
VEILIGHEIDSVOORSCHRIFTEN
natural_image
Pure geometric lines and crosshair symbols without any text or labels


natural_image
Pure geometric diagram with intersecting lines and circles, no text or symbols present
12 VEILIGHEIDSVOORSCHRIFTEN
ZORG VOOR HET MILIEU
natural_image
Pure geometric lines and crosshair symbols without any text or labels

natural_image
Pure geometric diagram with intersecting lines and shapes, no text or symbols present
14 INSTALLATIE
Accessoires
natural_image
Illustration of two wrenches and a tray with circular holes (no text or symbols)
① Moersleutel*1
② Eierrekje
natural_image
Diagram showing a hand operating a device with a magnified inset highlighting a downward force (no text or symbols present)
natural_image
Pure geometric lines and crosshair symbols without any text or labels


natural_image
Pure geometric diagram with intersecting lines and shapes, no text or symbols present
natural_image
Mechanical assembly diagram showing two bracketed components with upward arrows indicating motion (no text or symbols)
natural_image
Pure mechanical assembly diagram showing two shafts connected via a central shaft with directional arrows indicating motion (no text or symbols)
natural_image
Technical line drawing of a mechanical component with a rotating shaft and base (no text or symbols)

natural_image
Technical line drawing of a mechanical bracket with an upward arrow indicating motion (no text or symbols)
NEDERLANDS


natural_image
Pure geometric lines and shapes without any text, numbers, or symbols


natural_image
Pure geometric diagram with intersecting lines and shapes, no text or symbols present
16 INSTALLATIE

natural_image
Technical diagram of a mechanical assembly with multiple components and directional arrows indicating flow or movement (no text or labels)
natural_image
Mechanical assembly diagram showing a lever mechanism with no visible text or symbols

natural_image
Technical line drawing of a mechanical assembly with no visible text or symbols
natural_image
Line drawing of a refrigerator with open door and side panel, showing internal compartments and a black upward arrow indicating direction (no text or symbols)
LET OP
natural_image
Diagram of a car interior showing a mechanical component with a directional arrow indicating rotation (no text or symbols present)

natural_image
Technical line drawing of a car interior showing the dashboard and steering wheel (no text or symbols)
① Buis ② Clip ③ Koppeling ④ Connector
natural_image
Diagram showing a hand holding a tool near a refrigerator with a close-up inset of the handle (no text or symbols)
OPMERKING
natural_image
Pure geometric lines and shapes without any text, numbers, or symbols


natural_image
Pure geometric diagram with intersecting lines and shapes, no text or symbols present
natural_image
Pure geometric lines and shapes without any text, numbers, or symbols


natural_image
Pure geometric diagram with intersecting lines and shapes, no text or symbols present
20 GEBRUIK
GEBRUIK
Voor het gebruik
natural_image
Pure geometric lines and shapes without any text, numbers, or symbols


natural_image
Pure geometric diagram with intersecting lines and shapes, no text or symbols present
natural_image
Pure geometric lines and shapes without any text, numbers, or symbols


natural_image
Pure geometric diagram with intersecting lines and shapes, no text or symbols present

natural_image
Pure electrical circuit lines without any symbols
nl-nl_main.book.book Page 23 Wednesday, August 30, 2023 8:31 AM
GEBRUIK
23
Producteigenschappen
natural_image
Line drawing of a refrigerator with a door and front panel, no text or symbols present
NEDERLANDS
① Bedieningspaneel
natural_image
Pure geometric lines and shapes without any text, numbers, or symbols


natural_image
Pure geometric diagram with intersecting lines and shapes, no text or symbols present

natural_image
Pure electrical circuit lines without any symbols

natural_image
Pure geometric diagram with intersecting lines and circles, no text or symbols present
24 GEBRUIK
Binnenkant
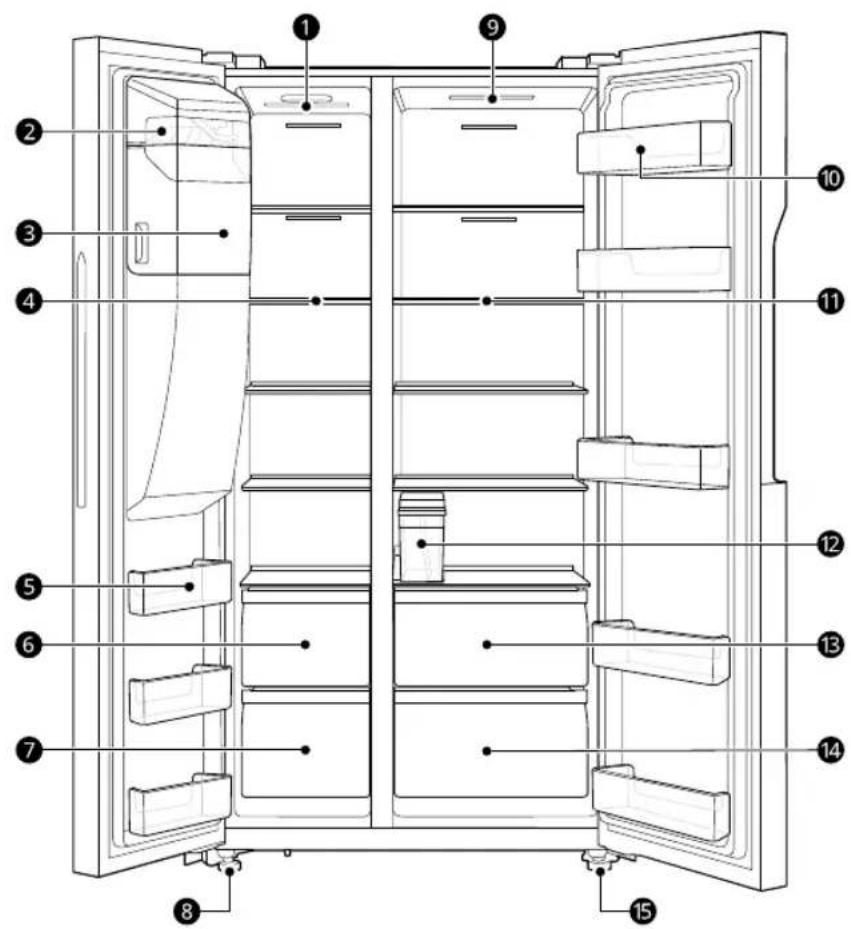
① Diepvries LED-lamp
natural_image
Pure geometric lines and shapes without any text, numbers, or symbols


natural_image
Pure geometric diagram with intersecting lines and shapes, no text or symbols present
8 Verstelbaar been
⑨ Koelkast LED-lamp
natural_image
Pure geometric lines and crosshair symbols without any text or labels


natural_image
Pure geometric diagram with intersecting lines and shapes, no text or symbols present
26 GEBRUIK
Bedieningspaneel
① Alarm
natural_image
Pure geometric lines and crosshair symbols without any text or labels


natural_image
Pure geometric diagram with intersecting lines and shapes, no text or symbols present
OPMERKING
natural_image
Pure geometric lines and crosshair symbols without any text or labels


natural_image
Pure geometric diagram with intersecting lines and shapes, no text or symbols present
28 GEBRUIK
natural_image
Diagram of a mechanical device with a central component and labeled part (1), no text or symbols present.


natural_image
Pure geometric lines and crosshair symbols without any text or labels


natural_image
Pure geometric diagram with intersecting lines and shapes, no text or symbols present
OPMERKING
natural_image
Simple line drawing of a mechanical device with a falling blade (no text or symbols)
natural_image
Line drawing of a hand pressing down on a mechanical device (no text or symbols)
natural_image
Technical line drawing of a mechanical device with two views (no text or symbols)
natural_image
Pure geometric lines and shapes without any text, numbers, or symbols


natural_image
Pure geometric diagram with intersecting lines and shapes, no text or symbols present
30 GEBRUIK
natural_image
Diagram showing two views of a mechanical device with a handle and base, no text or symbols present
natural_image
Hand placing a component into a mechanical assembly (no text or symbols visible)
WAARSCHUWING
natural_image
Pure geometric lines and crosshair symbols without any text or labels

natural_image
Pure electrical circuit lines without any symbols
OPMERKING
natural_image
Cross-sectional diagram of an appliance showing internal components (no text or symbols)

natural_image
Pure geometric lines and shapes without any text, numbers, or symbols


natural_image
Pure geometric diagram with intersecting lines and shapes, no text or symbols present
natural_image
Diagram of a refrigerator with a door panel and adjacent air conditioner unit (no text or symbols)
natural_image
Diagram of a door handle with an arrow indicating clockwise motion (no text or symbols)
Schap
LET OP
natural_image
Illustration of two hands pressing down on a rectangular panel with a black arrow indicating the motion (no text or symbols present)
natural_image
Pure electrical circuit lines without any symbols
nl-nl_main.book.book Page 34 Wednesday, August 30, 2023 8:31 AM

natural_image
Pure geometric diagram with intersecting lines and circles, no text or symbols present
34 GEBRUIK
LET OP
natural_image
Illustration of hands holding a rectangular object with two upward arrows indicating motion or force (no text or symbols)
natural_image
Pure geometric lines and shapes without any text, numbers, or symbols


natural_image
Pure geometric diagram with intersecting lines and shapes, no text or symbols present
ONDERHOUD
Reiniging
natural_image
Pure electrical circuit lines without any symbols
nl-nl_main.book.book Page 36 Wednesday, August 30, 2023 8:31 AM
36 ONDERHOUD
natural_image
Hand inserting a plug into a device panel (no text or symbols visible)


natural_image
Pure geometric lines and crosshair symbols without any text or labels


natural_image
Pure geometric diagram with intersecting lines and shapes, no text or symbols present
PROBLEEMOPLOSSING
Voor u service belt
Ijs en water
natural_image
Pure geometric lines and shapes without any text, numbers, or symbols


natural_image
Pure geometric diagram with intersecting lines and shapes, no text or symbols present
38 PROBLEEMOPLOSSING
natural_image
Pure geometric lines and shapes without any text, numbers, or symbols

natural_image
Pure geometric diagram with intersecting lines and shapes, no text or symbols present
40 PROBLEEMOPLOSSING
42 PROBLEEMOPLOSSING
natural_image
Pure geometric diagram with intersecting lines and shapes, no text or symbols present

natural_image
Pure electrical circuit lines without any symbols
nl-nl_main.book.book Page 43 Wednesday, August 30, 2023 8:31 AM
PROBLEEMOPLOSSING
43
natural_image
Pure geometric lines and shapes without any text, numbers, or symbols


natural_image
Pure geometric diagram with intersecting lines and shapes, no text or symbols present

LG
Life's Good
Skann QR-koden for å se manualen.
BRUKERHÅNDBOK
KJ∅LESKAP OG FRYSER

natural_image
Pure geometric lines and crosshair symbols without any text or labels


natural_image
Pure geometric diagram with intersecting lines and shapes, no text or symbols present
SIKKERHETSINSTRUKSJONER
LES ALLE INSTRUKSJONER F∅R BRUK
natural_image
Pure geometric lines and circular shapes without any text, numbers, or symbols


natural_image
Pure geometric diagram with intersecting lines and shapes, no text or symbols present
6 SIKKERHETSINSTRUKSJONER
natural_image
Pure geometric lines and crosshair symbols without any text or labels


natural_image
Pure geometric diagram with intersecting lines and shapes, no text or symbols present
SIKKERHETSINSTRUKSJONER
7
natural_image
Pure geometric lines and shapes without any text, numbers, or symbols


natural_image
Pure geometric diagram with intersecting lines and shapes, no text or symbols present
8 SIKKERHETSINSTRUKSJONER
natural_image
Pure geometric lines and crosshair symbols without any text or labels


natural_image
Pure geometric diagram with intersecting lines and circles, no text or symbols present


natural_image
Pure geometric diagram with intersecting lines and shapes, no text or symbols present
SIKKERHETSINSTRUKSJONER
9
- Hvis koblet til en vannforsyning, skal bare kobles til drikkevannforsyning.
natural_image
Pure geometric lines and shapes without any text, numbers, or symbols


natural_image
Pure geometric diagram with intersecting lines and shapes, no text or symbols present
10 SIKKERHETSINSTRUKSJONER
natural_image
Pure geometric lines and crosshair symbols without any text or labels


natural_image
Pure geometric diagram with intersecting lines and shapes, no text or symbols present
OMSORG FOR MILJ∅ET
natural_image
Pure geometric lines and shapes without any text, numbers, or symbols


natural_image
Pure geometric diagram with intersecting lines and shapes, no text or symbols present
12 MONTERING
MONTERING
Før montering
natural_image
Two types of wrenches and a plastic housing with circular holes (no text or symbols)
① Skrunøkkel*1
② Eggbrett
natural_image
Diagram showing a hand operating a device with a magnified inset highlighting a downward force (no text or symbols present)
NORSK
2 Skill koblingene.
FARE
① Rør
② Klips
③ Kobling
4 Kontakt
natural_image
Pure geometric lines and crosshair symbols without any text or labels

natural_image
Pure geometric diagram with intersecting lines and shapes, no text or symbols present
14 MONTERING
natural_image
Mechanical assembly diagram showing two hanging clips mounted on a shaft (no text or symbols)
natural_image
Technical line drawing of a mechanical assembly with a rotating shaft and base component (no text or symbols)

natural_image
Technical line drawing of a mechanical bracket with an upward arrow indicating motion (no text or symbols)
2 Koble fra de andre elektriske ledningsterminalene.
FARE
- Trykk først på plastkrokene ① på terminalene mens du holder den ene siden av terminalen med én hånd. Dra den andre siden ut samtidig.


natural_image
Pure geometric lines and shapes without any text, numbers, or symbols


natural_image
Pure geometric diagram with intersecting lines and shapes, no text or symbols present

natural_image
Technical diagram of a mechanical assembly with directional arrows indicating flow or movement (no text or symbols present)
natural_image
Technical diagram of a mechanical assembly with a T-shaped tool inserted into a housing (no text or symbols visible)

natural_image
Technical line drawing of a mechanical assembly with no visible text or symbols
natural_image
Line drawing of a refrigerator with open door and side panel, showing internal compartments and a black upward arrow indicating direction (no text or symbols)
NORSK
FARE
natural_image
Diagram of a vehicle's internal gear shift lever with a T-shaped arrow indicating clockwise motion (no text or symbols)
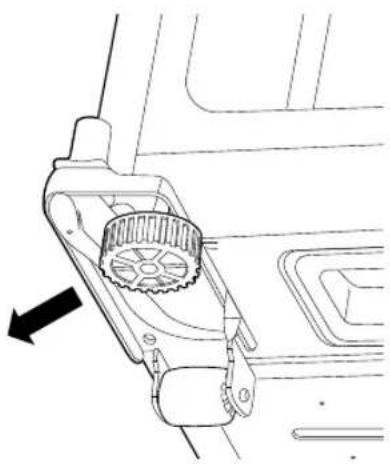
natural_image
Line drawing of a car interior showing the dashboard and steering wheel (no text or symbols)
① Rør ② Klemme ③ Kobling ④ Kontakt
natural_image
Diagram showing a hand holding a mechanical component connected to a refrigerator door, with an inset magnified view of the component being held (no text or symbols present)
natural_image
Pure geometric lines and shapes without any text, numbers, or symbols


natural_image
Pure geometric diagram with intersecting lines and shapes, no text or symbols present
18 MONTERING
Slå på strømmen
Koble til apparatet
natural_image
Pure geometric lines and crosshair symbols without any text or labels


natural_image
Pure geometric diagram with intersecting lines and shapes, no text or symbols present
BRUK
Før bruk
Bruksmerknader
Anbefalinger for strømsparing
natural_image
Pure geometric lines and crosshair symbols without any text or labels


natural_image
Pure geometric diagram with intersecting lines and shapes, no text or symbols present

natural_image
Pure electrical circuit lines without any symbols
nb-no_main.book.book Page 21 Wednesday, August 30, 2023 8:27 AM
BRUK 21
natural_image
Line drawing of a refrigerator with a door and front panel, no text or symbols present
NORSK
1 Kontrollpanel
natural_image
Pure geometric lines and shapes without any text, numbers, or symbols


natural_image
Pure geometric diagram with intersecting lines and shapes, no text or symbols present
22 BRUK
Innside

natural_image
Pure geometric lines and crosshair symbols without any text or labels


natural_image
Pure geometric diagram with intersecting lines and shapes, no text or symbols present
8 Justerbart ben
⑨ LED-lampe til kjøleskap
natural_image
Pure geometric lines and shapes without any text, numbers, or symbols

natural_image
Pure geometric diagram with intersecting lines and shapes, no text or symbols present
24 BRUK
Kontrollpanel
Det faktiske kontrollpanelet kan variere fra modell til modell.
① Alarm
natural_image
Pure geometric lines and crosshair symbols without any text or labels


natural_image
Pure geometric diagram with intersecting lines and shapes, no text or symbols present
MERK
- Den faktiske innvendige temperaturen varierer, avhengig av matstatus, da den angitte innstilte temperaturen er en måltemperatur, ikke den faktiske temperaturen i apparatet.
⑦ Express Cool
natural_image
Pure geometric lines and shapes without any text, numbers, or symbols


natural_image
Pure geometric diagram with intersecting lines and shapes, no text or symbols present
26 BRUK
MERK
natural_image
Diagram of a mechanical device with a central component and labeled part (1), no text or symbols present.

natural_image
Pure geometric lines and crosshair symbols without any text or labels


natural_image
Pure geometric diagram with intersecting lines and shapes, no text or symbols present
MERK
natural_image
Simple line drawing of a device with a handle and a leaf, no text or symbols present
natural_image
Hand placing a tray into a storage bin with an arrow indicating the motion (no text or symbols)
natural_image
Technical line drawing of a mechanical assembly with two views (no text or symbols)
3 Fyll med filtrert flaskevann eller rent filtrert vann opp til referanselinjen indikert inne i vanndispensertanken. (Total kapasitet: 4,5 L)
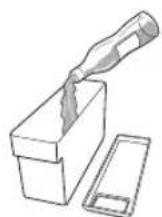
FARE
natural_image
Diagram showing two views of a mechanical device with a handle and a magnified inset (no text or symbols)


natural_image
Pure geometric lines and shapes without any text, numbers, or symbols

natural_image
Pure geometric diagram with intersecting lines and shapes, no text or symbols present
28 BRUK
natural_image
Line drawing of a hand pressing down on a mechanical component with an arrow indicating force (no text or symbols)
ADVARSEL
NORSK
MERK
natural_image
Technical line drawing of an air conditioner unit showing internal components and a close-up of the device's internal structure (no text or symbols)
FARE
natural_image
Diagram showing airflow or heat transfer between a vertical air vent and a rectangular device (no text or symbols)
MERK
natural_image
Technical line drawing of an open refrigerator interior showing internal compartments and casing (no text or symbols)
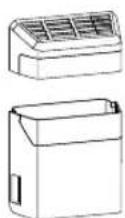
Skuff
FARE
natural_image
Diagram of a door handle with an arrow indicating clockwise motion (no text or symbols)
natural_image
Illustration of hands holding a transparent object with a black arrow pointing to it (no text or symbols present)
natural_image
Illustration of two hands holding a tray with upward arrows indicating movement (no text or symbols)
natural_image
Pure geometric lines and shapes without any text, numbers, or symbols


natural_image
Pure geometric diagram with intersecting lines and shapes, no text or symbols present
32 VEDLIKEHOLD
VEDLIKEHOLD
Rengjøring
natural_image
Hand inserting a button into a device panel (no text or symbols visible)


natural_image
Pure geometric lines and shapes without any text, numbers, or symbols


natural_image
Pure geometric diagram with intersecting lines and shapes, no text or symbols present
FEILS∅KING
natural_image
Pure geometric lines and shapes without any text, numbers, or symbols


natural_image
Pure geometric diagram with intersecting lines and shapes, no text or symbols present
34 FEILS∅KING
natural_image
Pure geometric lines and shapes without any text, numbers, or symbols


natural_image
Pure geometric diagram with intersecting lines and shapes, no text or symbols present
natural_image
Pure geometric lines and shapes without any text, numbers, or symbols


natural_image
Pure geometric diagram with intersecting lines and shapes, no text or symbols present
36 FEILS∅KING
natural_image
Pure geometric lines and crosshair symbols without any text or labels


natural_image
Pure geometric diagram with intersecting lines and shapes, no text or symbols present
Lyder
natural_image
Pure geometric lines and shapes without any text, numbers, or symbols


natural_image
Pure geometric diagram with intersecting lines and shapes, no text or symbols present

LG
Life's Good
natural_image
Pure geometric lines and crosshair symbols without any text or labels

natural_image
Pure geometric diagram with intersecting lines and shapes, no text or symbols present
INSTRUKCJE BEZPIECZEŃSTWA
PRZED UŻYCIEM NALEŻY ZAPOZNAĆ SIĘ ZE WSZYSTKIMI INSTRUKCJAMI
natural_image
Pure geometric lines and shapes without any text, numbers, or symbols


natural_image
Pure geometric diagram with intersecting lines and shapes, no text or symbols present
6 INSTRUKCJE BEZPIECZEŃSTWA
natural_image
Pure geometric lines and crosshair symbols without any text or labels


natural_image
Pure geometric diagram with intersecting lines and shapes, no text or symbols present
8 INSTRUKCJE BEZPIECZEŃSTWA
natural_image
Pure geometric lines and crosshair symbols without any text or labels


natural_image
Pure geometric diagram with intersecting lines and shapes, no text or symbols present
10 INSTRUKCJE BEZPIECZEŃSTWA
Utylizacja
natural_image
Pure geometric lines and shapes without any text, numbers, or symbols


natural_image
Pure geometric diagram with intersecting lines and shapes, no text or symbols present
INSTRUKCJE BEZPIECZEŃSTWA
natural_image
Pure geometric lines and shapes without any text, numbers, or symbols


natural_image
Pure geometric diagram with intersecting lines and shapes, no text or symbols present
12 INSTRUKCJE BEZPIECZEŃSTWA
TROSKA O ŚRODOWISKO
natural_image
Pure geometric lines and shapes without any text, numbers, or symbols


natural_image
Pure geometric diagram with intersecting lines and shapes, no text or symbols present
14 MONTAŻ
Akcesoria
natural_image
Two types of wrenches and a plastic housing with circular holes (no text or symbols)
① Klucz ^*1
② Tacka na jajka
natural_image
Diagram showing a hand operating a device with a magnified inset highlighting the mechanism (no text or symbols present)
natural_image
Mechanical assembly diagram showing two hanging clips mounted on a shaft (no text or symbols)
natural_image
Technical line drawing of a mechanical component with a rotating shaft and base (no text or symbols)

natural_image
Technical line drawing of a mechanical bracket with an upward arrow indicating motion (no text or symbols)
POLSKI


natural_image
Pure geometric lines and crosshair symbols without any text or labels


natural_image
Pure geometric diagram with intersecting lines and shapes, no text or symbols present
16 MONTAZ

natural_image
Technical diagram of a mechanical assembly with multiple components and directional arrows indicating flow or movement (no text or labels)
natural_image
Mechanical assembly diagram showing a lever mechanism with no visible text or symbols
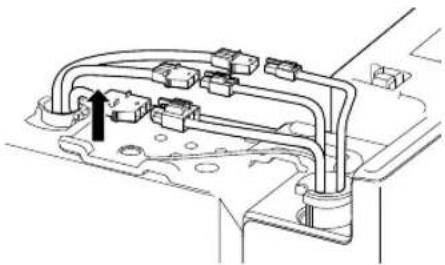
natural_image
Technical line drawing of a mechanical assembly with no visible text or symbols
natural_image
Line drawing of a refrigerator with open door and side panel, showing internal compartments and a black upward arrow indicating direction (no text or symbols)
⚠ UWAGA
natural_image
Diagram of a vehicle's rearview dashboard and steering wheel (no text or symbols)

natural_image
Technical line drawing of a mechanical component with a gear-like handle and arrow indicator (no text or symbols)
natural_image
Pure geometric lines and shapes without any text, numbers, or symbols


natural_image
Pure geometric diagram with intersecting lines and shapes, no text or symbols present
18 MONTAŻ
natural_image
Diagram showing a hand holding a tool near a door, with an inset magnified view of the tool interacting with the handle (no text or symbols present)
natural_image
Pure geometric lines and shapes without any text, numbers, or symbols


natural_image
Pure geometric diagram with intersecting lines and shapes, no text or symbols present
20 UŻYTKOWANIE
UŻYTKOWANIE
Przed użyciem
natural_image
Pure geometric lines and crosshair symbols without any text or labels


natural_image
Pure geometric diagram with intersecting lines and shapes, no text or symbols present
22 UŻYTKOWANIE
natural_image
Pure geometric lines and shapes without any text, numbers, or symbols


natural_image
Pure geometric diagram with intersecting lines and shapes, no text or symbols present

natural_image
Pure electrical circuit lines without any symbols
pl-pl_main.book.book Page 23 Wednesday, August 30, 2023 8:36 AM
UŻYTKOWANIE
23
natural_image
Line drawing of a refrigerator with a door and front panel, no text or symbols present
POLSKI
① Panel sterowania
natural_image
Pure geometric lines and shapes without any text, numbers, or symbols


natural_image
Pure geometric diagram with intersecting lines and shapes, no text or symbols present
24 UŻYTKOWANIE
Widok wewnątrz
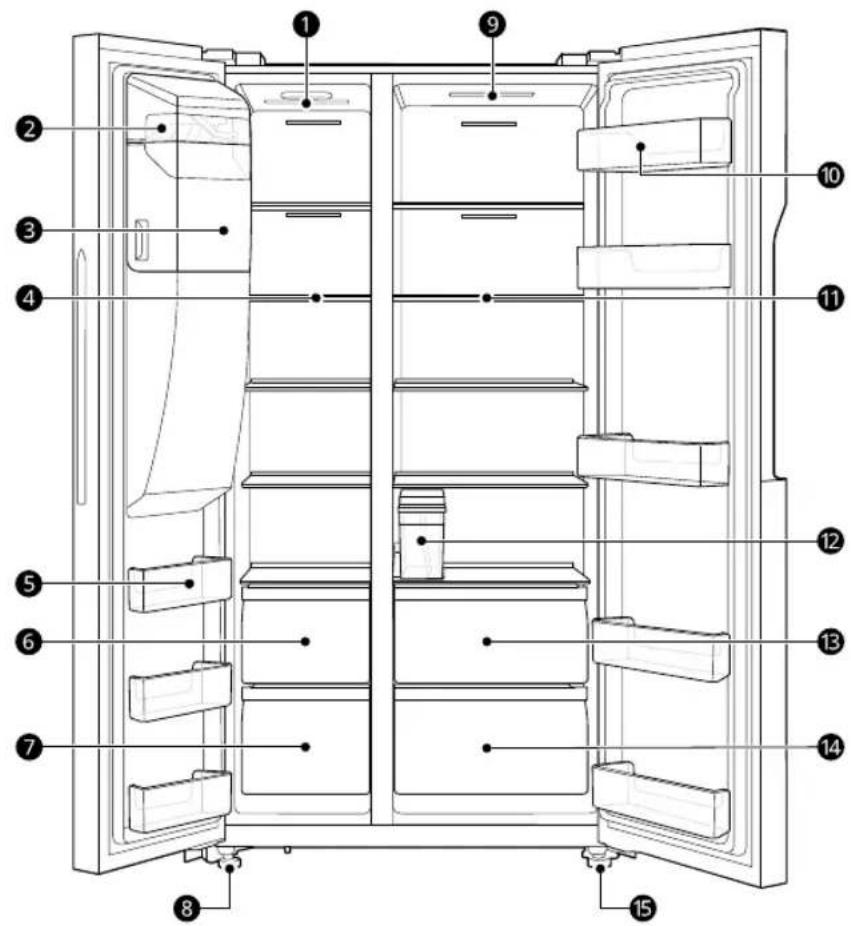
natural_image
Pure geometric lines and shapes without any text, numbers, or symbols


natural_image
Pure geometric diagram with intersecting lines and shapes, no text or symbols present
natural_image
Pure geometric lines and shapes without any text, numbers, or symbols


natural_image
Pure geometric diagram with intersecting lines and shapes, no text or symbols present
26 UŻYTKOWANIE
Panel sterowania
① Alarm
natural_image
Pure geometric lines and shapes without any text, numbers, or symbols


natural_image
Pure geometric diagram with intersecting lines and shapes, no text or symbols present
natural_image
Pure geometric lines and crosshair symbols without any text or labels


natural_image
Pure geometric diagram with intersecting lines and shapes, no text or symbols present
28 UŻYTKOWANIE
⚠ UWAGA
natural_image
Pure geometric lines and shapes without any text, numbers, or symbols


natural_image
Pure geometric diagram with intersecting lines and shapes, no text or symbols present
natural_image
Diagram of a mechanical device with a central component and labeled part (1), no text or symbols present.
UWAGA
natural_image
Simple line drawing of a mechanical device with a downward arrow, no text or symbols present
natural_image
Line drawing of a hand pressing down on a mechanical component (no text or symbols)
natural_image
Technical line drawing of a mechanical assembly with two views (no text or symbols)
natural_image
Pure geometric lines and shapes without any text, numbers, or symbols

natural_image
Pure geometric diagram with intersecting lines and shapes, no text or symbols present
30 UŻYTKOWANIE
natural_image
Diagram showing two mechanical components with arrows indicating motion, no text or symbols present
natural_image
Line drawing of a hand pressing down on a mechanical component (no text or symbols)
OSTRZEŻENIE
natural_image
Pure geometric lines and shapes without any text, numbers, or symbols


natural_image
Pure geometric diagram with intersecting lines and shapes, no text or symbols present


natural_image
Pure geometric lines and shapes without any text, numbers, or symbols


natural_image
Pure geometric diagram with intersecting lines and shapes, no text or symbols present
32 UŻYTKOWANIE
UWAGA
natural_image
Cross-sectional diagram of an appliance showing internal components (no text or labels)

natural_image
Pure geometric lines and shapes without any text, numbers, or symbols


natural_image
Pure geometric diagram with intersecting lines and shapes, no text or symbols present
natural_image
Technical line drawing of a refrigerator interior showing front and side views with a close-up inset illustrating the mechanism (no text or symbols present)
natural_image
Diagram of a refrigerator with an attached air conditioner unit, showing airflow direction (no text or symbols)
Szuflada
⚠ UWAGA
natural_image
Diagram of a door handle with an arrow indicating clockwise motion (no text or symbols)
natural_image
Pure geometric lines and crosshair symbols without any text or labels

natural_image
Pure geometric diagram with intersecting lines and shapes, no text or symbols present
34 UŻYTKOWANIE
natural_image
Illustration of two hands holding a rectangular object with a black arrow pointing to it (no text or symbols present)
natural_image
Illustration of hands holding a rectangular object with two upward arrows indicating motion or force (no text or symbols)
natural_image
Pure electrical circuit lines without any symbols
pl-pl_main.book.book Page 36 Wednesday, August 30, 2023 8:36 AM
36 KONSERWACJA
natural_image
Hand inserting a plug into a device panel (no text or symbols visible)


natural_image
Pure geometric lines and shapes without any text, numbers, or symbols


natural_image
Pure geometric diagram with intersecting lines and circles, no text or symbols present


natural_image
Pure geometric diagram with intersecting lines and shapes, no text or symbols present
ROZWIAZYWANIE PROBLEMÓW
natural_image
Pure geometric lines and shapes without any text, numbers, or symbols


natural_image
Pure geometric diagram with intersecting lines and shapes, no text or symbols present
38 ROZWIAZYWANIE PROBLEMÓW
natural_image
Pure geometric lines and shapes without any text, numbers, or symbols


natural_image
Pure geometric lines and shapes without any text, numbers, or symbols
ROZWIAZYWANIE PROBLEMÓW
natural_image
Pure electrical circuit lines without any symbols
pl-pl_main.book.book Page 43 Wednesday, August 30, 2023 8:36 AM
ROZWIAZYWANIE PROBLEMÓW
43
flowchart
graph LR
    A["LED"] --> B["Worker Icon"]
    B --> C["LED"]

POLSKI


natural_image
Pure geometric lines and shapes without any text, numbers, or symbols


natural_image
Pure geometric diagram with intersecting lines and shapes, no text or symbols present
Notatka

LG
Life's Good
natural_image
Pure geometric lines and shapes without any text, numbers, or symbols


natural_image
Pure geometric diagram with intersecting lines and shapes, no text or symbols present
INSTRUÇÕES DE SEGURANÇA
LEIA TODAS AS INSTRUÇÕES ANTES DE UTILIZAR
natural_image
Pure geometric lines and circular shapes without any text, numbers, or symbols


natural_image
Pure geometric diagram with intersecting lines and shapes, no text or symbols present
6 INSTRUÇÕES DE SEGURANÇA
natural_image
Pure geometric lines and crosshair symbols without any text or labels


natural_image
Pure geometric diagram with intersecting lines and circles, no text or symbols present
8 INSTRUÇÕES DE SEGURANÇA
natural_image
Pure geometric lines and crosshair symbols without any text or labels


natural_image
Pure geometric diagram with intersecting lines and shapes, no text or symbols present
10 INSTRUÇÕES DE SEGURANÇA
Eliminação
natural_image
Pure geometric lines and shapes without any text, numbers, or symbols


natural_image
Pure geometric diagram with intersecting lines and shapes, no text or symbols present
INSTRUÇÕES DE SEGURANÇA
natural_image
Pure geometric lines and crosshair symbols without any text or labels


natural_image
Pure geometric diagram with intersecting lines and shapes, no text or symbols present
12 INSTRUÇÕES DE SEGURANÇA
PROTEGER O AMBIENTE
natural_image
Pure geometric diagram with intersecting lines and shapes, no text or symbols present
14 INSTALAÇÃO
Acessórios
natural_image
Two types of wrenches and a plastic housing with circular holes (no text or symbols)
① Chave*1
② Porta-ovos
natural_image
Diagram showing a hand operating a tool with a magnified inset highlighting the action (no text or symbols present)
natural_image
Pure geometric diagram with intersecting lines and shapes, no text or symbols present
natural_image
Mechanical assembly diagram showing two hanging clips mounted on a shaft (no text or symbols)
natural_image
Pure mechanical assembly diagram showing two shafts connected via a central shaft with directional arrows indicating motion (no text or symbols)
natural_image
Technical line drawing of a mechanical component with a rotating shaft and base (no text or symbols)

natural_image
Technical line drawing of a mechanical bracket with an upward arrow indicating motion (no text or symbols)
PORTUGUÊS


natural_image
Pure geometric lines and shapes without any text, numbers, or symbols


natural_image
Pure geometric diagram with intersecting lines and shapes, no text or symbols present
16 INSTALAÇÃO

natural_image
Technical diagram of a mechanical assembly with multiple components and directional arrows indicating flow or movement (no text or labels)
natural_image
Mechanical assembly diagram showing a lever mechanism with no visible text or symbols

natural_image
Technical line drawing of a mechanical assembly with no visible text or symbols
natural_image
Line drawing of a refrigerator with open door and side panel, showing internal compartments and a black upward arrow indicating direction (no text or symbols)
CUIDADO
natural_image
Diagram of a car interior showing a mechanical component with a directional arrow indicating rotation (no text or symbols present)

natural_image
Technical line drawing of a car interior component with a circular vent and directional arrow (no text or symbols)
Remover a porta do frigorífico
natural_image
Pure geometric lines and shapes without any text, numbers, or symbols


natural_image
Pure geometric diagram with intersecting lines and shapes, no text or symbols present
18 INSTALAÇÃO
OBSERVAÇÃO
natural_image
Diagram showing a hand holding a tool near a refrigerator, with an inset close-up of the tool interacting with the door (no text or symbols present)
OBSERVAÇÃO
natural_image
Pure geometric lines and shapes without any text, numbers, or symbols


natural_image
Pure geometric diagram with intersecting lines and shapes, no text or symbols present
Ligar o aparelho
Ligar o aparelho
natural_image
Pure geometric lines and crosshair symbols without any text or labels


natural_image
Pure geometric diagram with intersecting lines and shapes, no text or symbols present
20 FUNCIONAMENTO
FUNCIONAMENTO
Antes de utilizar
natural_image
Pure geometric lines and shapes without any text, numbers, or symbols


natural_image
Pure geometric diagram with intersecting lines and shapes, no text or symbols present
natural_image
Pure geometric lines and crosshair symbols without any text or labels


natural_image
Pure geometric diagram with intersecting lines and shapes, no text or symbols present
22 FUNCIONAMENTO
natural_image
Pure geometric lines and shapes without any text, numbers, or symbols


natural_image
Pure geometric diagram with intersecting lines and shapes, no text or symbols present
natural_image
Line drawing of a refrigerator with a door and front panel, no text or symbols present
PORTUGUÊS
① Painel de controlo
natural_image
Pure geometric lines and shapes without any text, numbers, or symbols


natural_image
Pure geometric diagram with intersecting lines and shapes, no text or symbols present
natural_image
Pure geometric lines and crosshair symbols without any text or labels


natural_image
Pure geometric diagram with intersecting lines and shapes, no text or symbols present
26 FUNCIONAMENTO
Painel de controlo
① Alarm
natural_image
Pure geometric lines and shapes without any text, numbers, or symbols


natural_image
Pure geometric diagram with intersecting lines and shapes, no text or symbols present
OBSERVAÇÃO
natural_image
Pure geometric lines and crosshair symbols without any text or labels


natural_image
Pure geometric diagram with intersecting lines and shapes, no text or symbols present
28 FUNCIONAMENTO
natural_image
Pure geometric lines and crosshair symbols without any text or labels


natural_image
Pure geometric diagram with intersecting lines and shapes, no text or symbols present
natural_image
Diagram of a mechanical device with a central component and labeled part (1), no text or symbols present.
OBSERVAÇÃO
natural_image
Simple line drawing of a device with a funnel and a folded paper or paper nearby (no text or symbols)
natural_image
Line drawing of a hand holding a shelf with an arrow indicating movement (no text or symbols)
natural_image
Technical line drawing of a mechanical component with two views (no text or symbols)
natural_image
Pure geometric lines and crosshair symbols without any text or labels


natural_image
Pure geometric diagram with intersecting lines and shapes, no text or symbols present
30 FUNCIONAMENTO
CUIDADO
natural_image
Diagram showing two views of a mechanical device with no visible text or symbols
natural_image
Hand placing a component into a tray with an arrow indicating motion (no text or symbols)
AVISO
natural_image
Pure geometric lines and crosshair symbols without any text or labels

natural_image
Pure geometric diagram with intersecting lines and shapes, no text or symbols present
Máquina de gelo do congelador
natural_image
Pure geometric lines and shapes without any text, numbers, or symbols


natural_image
Pure geometric diagram with intersecting lines and shapes, no text or symbols present
32 FUNCIONAMENTO
OBSERVAÇÃO
natural_image
Cross-sectional diagram of an appliance showing internal components (no text or labels)

natural_image
Pure geometric lines and crosshair symbols without any text or labels

natural_image
Pure geometric diagram with intersecting lines and shapes, no text or symbols present
ângulo correto de forma a que corresponda ao acoplador do motor.

natural_image
Technical line drawing of a refrigerator interior showing front and side views with a close-up inset illustrating the mechanism (no text or symbols present)
natural_image
Diagram of a refrigerator with an attached air conditioner unit, showing airflow direction (no text or symbols)
Gaveta
CUIDADO
natural_image
Diagram of a door handle with an arrow indicating clockwise motion (no text or symbols)
natural_image
Pure geometric lines and shapes without any text, numbers, or symbols


natural_image
Pure geometric diagram with intersecting lines and shapes, no text or symbols present

natural_image
Pure electrical circuit lines without any symbols

natural_image
Pure geometric diagram with intersecting lines and circles, no text or symbols present
34 FUNCIONAMENTO
Retirar e reinstalar a prateleira
natural_image
Illustration of two hands pressing down on a rectangular panel with a black arrow indicating downward motion (no text or symbols)
natural_image
Illustration of hands holding a rectangular object with two upward arrows indicating motion or force (no text or symbols)


natural_image
Pure geometric lines and crosshair symbols without any text or labels


natural_image
Pure geometric diagram with intersecting lines and shapes, no text or symbols present
MANUTENÇÃO
Limpeza
Dicas de limpeza geral
natural_image
Pure electrical circuit lines without any symbols
pt-pt_main.book.book Page 36 Thursday, September 7, 2023 3:57 PM

natural_image
Pure geometric diagram with intersecting lines and circles, no text or symbols present
36 MANUTENÇÃO
natural_image
Hand inserting a plug into a device panel (no text or symbols visible)


natural_image
Pure geometric lines and crosshair symbols without any text or labels


natural_image
Pure geometric diagram with intersecting lines and shapes, no text or symbols present
natural_image
Pure geometric lines and shapes without any text, numbers, or symbols


natural_image
Pure geometric diagram with intersecting lines and shapes, no text or symbols present
natural_image
Pure geometric lines and shapes without any text, numbers, or symbols


natural_image
Pure geometric diagram with intersecting lines and shapes, no text or symbols present
natural_image
Pure electrical circuit lines without any symbols


natural_image
Pure geometric lines and shapes without any text, numbers, or symbols


natural_image
Pure geometric diagram with intersecting lines and shapes, no text or symbols present
natural_image
Pure geometric lines and shapes without any text, numbers, or symbols


natural_image
Pure geometric diagram with intersecting lines and shapes, no text or symbols present
Circular

LG
Life's Good
natural_image
Pure geometric lines and shapes without any text, numbers, or symbols


natural_image
Pure geometric diagram with intersecting lines and shapes, no text or symbols present
INSTRUCTIUNI DE SIGURANTĂ
CITITI TOATE INSTRUCTIUNILE ÎNAINTE DE UTILIZARE
natural_image
Pure geometric lines and crosshair symbols without any text or labels


natural_image
Pure geometric diagram with intersecting lines and shapes, no text or symbols present
6 INSTRUCTIUNI DE SIGURANTĂ
natural_image
Pure geometric lines and shapes without any text, numbers, or symbols


natural_image
Pure geometric diagram with intersecting lines and shapes, no text or symbols present
8 INSTRUCTIUNI DE SIGURANTĂ
natural_image
Pure geometric lines and crosshair symbols without any text or labels


natural_image
Pure geometric diagram with intersecting lines and shapes, no text or symbols present
INSTRUCTIUNI DE SIGURANTĂ
9
natural_image
Pure geometric diagram with intersecting lines and shapes, no text or symbols present
12 INSTALARE
INSTALARE
natural_image
Pure geometric lines and crosshair symbols without any text or labels


natural_image
Pure geometric diagram with intersecting lines and shapes, no text or symbols present
Accesorii
natural_image
Two mechanical parts: a wrench and a tray with circular holes, labeled 1 and 2 (no text or symbols on the parts themselves)
natural_image
Diagram showing a hand operating a mechanical device with a magnified inset highlighting a downward force (no text or symbols present)
2 Separati conectorii.
ATENTIE
natural_image
Pure geometric lines and shapes without any text, numbers, or symbols


natural_image
Pure geometric diagram with intersecting lines and shapes, no text or symbols present
14 INSTALARE
natural_image
Mechanical assembly diagram showing two hanging clips mounted on a shaft (no text or symbols)
natural_image
Technical line drawing of a mechanical component with a rotating shaft and base (no text or symbols)

natural_image
Technical line drawing of a mechanical bracket with an upward arrow indicating motion (no text or symbols)
2 Deconectati bornele celorlalte fire electrice.
ATENTIE


natural_image
Pure geometric lines and crosshair symbols without any text or labels


natural_image
Pure geometric diagram with intersecting lines and shapes, no text or symbols present

natural_image
Technical diagram of a mechanical assembly with directional arrows indicating flow or movement (no text or symbols present)
natural_image
Technical diagram of a mechanical assembly with a T-shaped tool inserted into a housing (no text or symbols visible)

natural_image
Technical line drawing of a mechanical assembly with no visible text or symbols
natural_image
Line drawing of a refrigerator with open door and side panel, showing internal compartments and a black upward arrow indicating direction (no text or symbols)
ROMÂNĂ
ATENTIE
natural_image
Diagram of a vehicle interior showing a gear shift lever and dashboard (no text or symbols)

natural_image
Technical line drawing of a car interior component with no visible text or symbols
flowchart
graph TD
    A["1"] --> B["2"]
    C["3"] --> B["2"]
- Cheie tip B
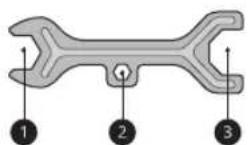
Reglarea aparatului
natural_image
Diagram showing a hand holding a clip next to a refrigerator with a close-up inset of the clip's handle (no text or symbols present)
NOTĂ
natural_image
Pure geometric lines and shapes without any text, numbers, or symbols


natural_image
Pure geometric diagram with intersecting lines and shapes, no text or symbols present
18 INSTALARE
natural_image
Pure geometric lines and shapes without any text, numbers, or symbols


natural_image
Pure electrical circuit lines without any symbols
20 OPERARE
natural_image
Pure geometric lines and shapes without any text, numbers, or symbols


natural_image
Pure geometric diagram with intersecting lines and shapes, no text or symbols present

natural_image
Pure electrical circuit lines without any symbols
ro-ro_main.book.book Page 22 Wednesday, August 30, 2023 8:44 AM

natural_image
Pure geometric diagram with intersecting lines and circles, no text or symbols present
22 OPERARE
natural_image
Line drawing of a refrigerator with a door and front panel, no text or symbols present
1 Panou de control
natural_image
Pure geometric lines and shapes without any text, numbers, or symbols


natural_image
Pure geometric diagram with intersecting lines and shapes, no text or symbols present
Interior

ROMÂNĂ
natural_image
Pure geometric lines and shapes without any text, numbers, or symbols


natural_image
Pure geometric diagram with intersecting lines and shapes, no text or symbols present

natural_image
Pure electrical circuit lines without any symbols

natural_image
Pure geometric diagram with intersecting lines and circles, no text or symbols present
24 OPERARE
8 Picior reglabil
⑨ Becul LED al frigiderului
natural_image
Pure geometric lines and shapes without any text, numbers, or symbols


natural_image
Pure geometric diagram with intersecting lines and shapes, no text or symbols present
Panou de control
Panoul de control efectiv poate diferi de la model la model.
① Alarm
natural_image
Pure geometric lines and crosshair symbols without any text or labels

natural_image
Pure geometric diagram with intersecting lines and shapes, no text or symbols present
natural_image
Pure geometric lines and shapes without any text, numbers, or symbols


natural_image
Pure geometric diagram with intersecting lines and shapes, no text or symbols present
28 OPERARE
natural_image
Diagram of a mechanical device with a central component and labeled part (1), no text or symbols present.
natural_image
Hand holding a shelf with an arrow indicating movement (no text or symbols)
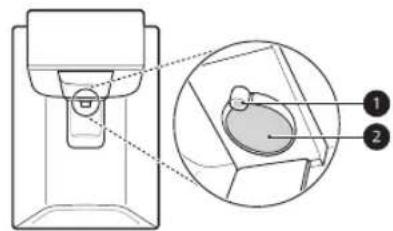
NOTĂ
natural_image
Technical line drawing of two mechanical components with no visible text or symbols
natural_image
Simple line drawing of a device emitting powder into a container (no text or symbols)
ATENTIE
natural_image
Technical line drawing of a mechanical component with two views (no text or symbols)
natural_image
Hand holding a mechanical component with an arrow indicating force or movement (no text or symbols)
AVERTISMENT
natural_image
Pure geometric lines and shapes without any text, numbers, or symbols


natural_image
Pure geometric diagram with intersecting lines and shapes, no text or symbols present
30 OPERARE
ATENTIE
NOTĂ
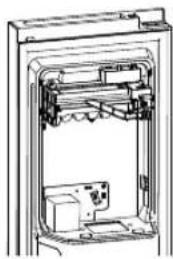
natural_image
Cross-sectional diagram of an internal appliance or enclosure showing internal components (no text or symbols)
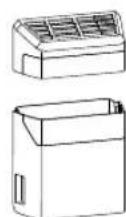
ATENTIE
natural_image
Pure geometric diagram with intersecting lines and shapes, no text or symbols present
32 OPERARE
NOTĂ
natural_image
Technical line drawing of an air conditioner unit showing internal components and a close-up view of the motor (no text or symbols present)
natural_image
Diagram of a refrigerator with a door panel and adjacent air conditioner unit (no text or symbols)
Sertarul
ATENTIE
natural_image
Diagram of a door handle with an arrow indicating clockwise motion (no text or symbols)
natural_image
Pure geometric lines and shapes without any text, numbers, or symbols


natural_image
Pure geometric diagram with intersecting lines and shapes, no text or symbols present
Raft
ATENTIE
natural_image
Illustration of two hands holding a transparent panel with a black arrow pointing to it (no text or symbols present)
natural_image
Illustration of two hands holding a rectangular object with upward arrows indicating motion or force (no text or symbols)
natural_image
Pure geometric lines and shapes without any text, numbers, or symbols


natural_image
Pure geometric diagram with intersecting lines and shapes, no text or symbols present
34 ÎNTRETINEREA
ÎNTRETINEREA
Curățare
natural_image
Pure electrical circuit lines without any symbols
ro-ro_main.book.book Page 35 Wednesday, August 30, 2023 8:44 AM
ÎNTRETINEREA
35
natural_image
Hand inserting a plug into a device panel (no text or symbols visible)
ROMÂNĂ


natural_image
Pure geometric lines and shapes without any text, numbers, or symbols


natural_image
Pure geometric diagram with intersecting lines and shapes, no text or symbols present
36 DEPANARE
DEPANARE
natural_image
Pure geometric lines and shapes without any text, numbers, or symbols


natural_image
Pure geometric diagram with intersecting lines and shapes, no text or symbols present
natural_image
Pure geometric lines and shapes without any text, numbers, or symbols


natural_image
Pure geometric diagram with intersecting lines and shapes, no text or symbols present
natural_image
Pure geometric lines and shapes without any text, numbers, or symbols


natural_image
Pure geometric diagram with intersecting lines and shapes, no text or symbols present
natural_image
Pure electrical circuit lines without any symbols
ro-ro_main.book.book Page 42 Wednesday, August 30, 2023 8:44 AM

natural_image
Pure geometric diagram with intersecting lines and circles, no text or symbols present
42 DEPANARE
natural_image
Pure geometric lines and shapes without any text, numbers, or symbols


natural_image
Pure geometric diagram with intersecting lines and shapes, no text or symbols present

LG
Life's Good
natural_image
Pure geometric lines and crosshair symbols without any text or labels


natural_image
Pure geometric diagram with intersecting lines and shapes, no text or symbols present
BEZPEČNOSTNÉ POKYNY
PRED POUŽITÍM SI PREČÍTAJTE VŠETKY POKYNY
natural_image
Pure geometric lines and shapes without any text, numbers, or symbols


natural_image
Pure geometric diagram with intersecting lines and shapes, no text or symbols present
6 BEZPEČNOSTNÉ POKYNY
natural_image
Pure geometric diagram with intersecting lines and shapes, no text or symbols present
BEZPEČNOSTNÉ POKYNY
7
natural_image
Pure geometric lines and shapes without any text, numbers, or symbols


natural_image
Pure geometric diagram with intersecting lines and shapes, no text or symbols present
8 BEZPEČNOSTNÉ POKYNY
Prevádzka
natural_image
Pure geometric lines and shapes without any text, numbers, or symbols

natural_image
Pure geometric diagram with intersecting lines and shapes, no text or symbols present
10 BEZPEČNOSTNÉ POKYNY
natural_image
Pure geometric lines and crosshair symbols without any text or labels


natural_image
Pure geometric diagram with intersecting lines and shapes, no text or symbols present
12 INŠTALÁCIA
INŠTALÁCIA
Pred inštaláciou
Rozmery a vzdialenosti
natural_image
Illustration showing two wrenches and a tray with circular holes (no text or symbols)
① Klúč*1
② Stojan na vajíčka
Vybratie dvierok chladničky a mrazničky
natural_image
Diagram showing a hand holding a tool near a mechanical component, with an inset magnified view of the tool's handle and downward arrow (no text or symbols)
STOVENQINA
2 Oddel'te konektory.
⚠ UPOZORNENIE
natural_image
Mechanical assembly diagram showing two hanging clips mounted on a shaft (no text or symbols)
- Najprv stlačte plastové háčiky ① svoriek, pričom jednou rukou držte jednu stranu svorky. Súčasne vytiahnite druhú stranu.
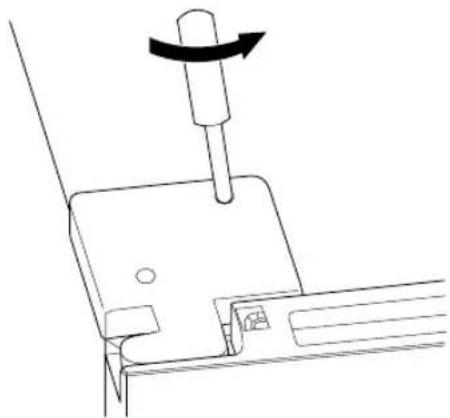
natural_image
Technical line drawing of a mechanical component with a rotating shaft and base (no text or symbols)

natural_image
Pure mechanical assembly diagram showing a bracket with an upward arrow, no text or symbols present
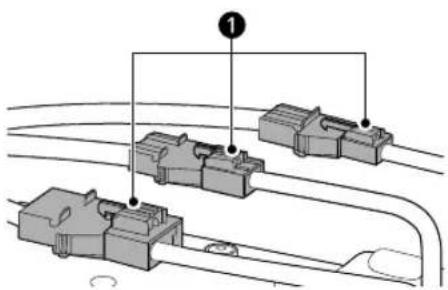

natural_image
Technical diagram of a mechanical assembly with multiple components and directional arrows indicating flow or movement (no text or labels)
natural_image
Line drawing of a refrigerator with open door and side panel, showing internal shelves and ventilation slots (no text or symbols)
SLOVENČINA
⚠ UPOZORNENIE
natural_image
Diagram of a car interior showing a hand tool interacting with a mechanical component (no text or symbols visible)

natural_image
Line drawing of a car interior showing the wheel and dashboard components (no text or symbols)
flowchart
graph TD
    A["1"] --> B["2"]
    C["3"] --> B["2"]
- Klúč typu B

natural_image
Diagram showing a hand holding a tool near a door, with an inset magnified view of the tool interacting with the handle (no text or symbols present)
Vyrovnanie spotrebiča
natural_image
Pure geometric lines and crosshair symbols without any text or labels


natural_image
Pure geometric diagram with intersecting lines and shapes, no text or symbols present
18 INŠTALÁCIA
Zapnutie napájania
Pripojenie spotrebiča
natural_image
Pure geometric lines and crosshair symbols without any text or labels


natural_image
Pure geometric diagram with intersecting lines and shapes, no text or symbols present
20 PREVÁDZKA
natural_image
Pure geometric lines and shapes without any text, numbers, or symbols


natural_image
Pure geometric diagram with intersecting lines and shapes, no text or symbols present
Dvojhviezdičková priehradka
natural_image
Pure geometric lines and shapes without any text, numbers, or symbols


natural_image
Pure geometric diagram with intersecting lines and shapes, no text or symbols present

natural_image
Pure electrical circuit lines without any symbols
sk-sk_main.book.book Page 22 Wednesday, August 30, 2023 8:49 AM

natural_image
Pure geometric diagram with intersecting lines and circles, no text or symbols present
22 PREVÁDZKA
Funkcie výrobku
natural_image
Line drawing of a refrigerator with a door and front panel, no text or symbols present
① Ovládací Panel
Slúži na nastavenie teploty chladničky, teploty mrazničky a režimu dávkovača.

natural_image
Pure geometric lines and shapes without any text, numbers, or symbols


natural_image
Pure geometric diagram with intersecting lines and shapes, no text or symbols present
Interiér

SLOVENČINA
① Žiarovka LED mrazničky
natural_image
Pure geometric lines and shapes without any text, numbers, or symbols


natural_image
Pure geometric diagram with intersecting lines and shapes, no text or symbols present

natural_image
Pure electrical circuit lines without any symbols

natural_image
Pure geometric diagram with intersecting lines and circles, no text or symbols present
24 PREVÁDZKA
① Alarm
natural_image
Pure geometric lines and crosshair symbols without any text or labels


natural_image
Pure geometric diagram with intersecting lines and shapes, no text or symbols present
26 PREVÁDZKA
POZNÁMKA
natural_image
Diagram of a mechanical device with a central component and labeled part (1), no text or symbols present.
28 PREVÁDZKA
Čistenie dávkovača
POZNÁMKA
natural_image
Simple line drawing of a device with a funnel and a folded paper or paper object (no text or symbols)
natural_image
Hand placing a component into a rack with an arrow indicating motion (no text or symbols)
natural_image
Technical line drawing of a mechanical component with two views (no text or symbols)
natural_image
Diagram showing two views of a mechanical device with a handle and a button, no text or symbols present.


natural_image
Pure geometric lines and shapes without any text, numbers, or symbols


natural_image
Pure geometric diagram with intersecting lines and shapes, no text or symbols present
natural_image
Simple line drawing of a mechanical device with a hand pressing a button (no text or symbols)
VAROVANIE
POZNÁMKA
2 Ak chcete nádobu na lad nasadit, potlačte ju nahor a uistite sa, že obe strany (B a B') nádoby na lad sa zakliesnia do spôn (A a A').
natural_image
Cross-sectional diagram of an appliance showing internal components (no text or symbols)
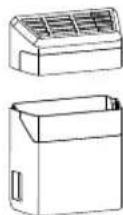
SLOVENČINA
POZNÁMKA
natural_image
Pure geometric lines and shapes without any text, numbers, or symbols


natural_image
Pure geometric diagram with intersecting lines and shapes, no text or symbols present
32 PREVÁDZKA
POZNÁMKA
natural_image
Diagram of a refrigerator with airflow indicators and a separate air conditioner unit (no text or symbols)
Zásuvka
⚠ UPOZORNENIE
natural_image
Diagram of a door handle with an arrow indicating clockwise motion (no text or symbols)
natural_image
Illustration of hands holding a tray with a black arrow pointing to the tray (no text or symbols)
natural_image
Illustration of hands holding a rectangular object with two upward arrows indicating motion or force (no text or symbols)
natural_image
Pure geometric lines and shapes without any text, numbers, or symbols


natural_image
Pure geometric diagram with intersecting lines and shapes, no text or symbols present
34 ÚDRŽBA
ÚDRŽBA
Čistenie
natural_image
Pure electrical circuit lines without any symbols
sk-sk_main.book.book Page 35 Wednesday, August 30, 2023 8:49 AM
ÚDRŽBA 35
natural_image
Hand inserting a USB into a device panel (no text or symbols visible)
SLOVENČINA


natural_image
Pure geometric lines and shapes without any text, numbers, or symbols


natural_image
Pure geometric diagram with intersecting lines and shapes, no text or symbols present
36 RIEŠENIE PROBLÉMOV
RIEŠENIE PROBLÉMOV
Kým zavoláte servis
L'ad a voda
natural_image
Pure geometric lines and shapes without any text, numbers, or symbols


natural_image
Pure geometric diagram with intersecting lines and shapes, no text or symbols present
natural_image
Pure geometric lines and shapes without any text, numbers, or symbols


natural_image
Pure geometric diagram with intersecting lines and shapes, no text or symbols present
38 RIEŠENIE PROBLÉMOV
natural_image
Pure geometric lines and crosshair symbols without any text or labels

natural_image
Pure geometric lines and shapes without any text, numbers, or symbols
natural_image
Pure electrical circuit lines without any symbols
sk-sk_main.book.book Page 42 Wednesday, August 30, 2023 8:49 AM

natural_image
Pure geometric diagram with intersecting lines and circles, no text or symbols present
42 RIEŠENIE PROBLÉMOV
POZNÁMKA
natural_image
Pure geometric lines and shapes without any text, numbers, or symbols


natural_image
Pure geometric diagram with intersecting lines and shapes, no text or symbols present

LG
Life's Good
Copyright © 2023 LG Electronics Inc. All Rights Reserved.
VSEBINSKO KAZALO
natural_image
Pure geometric lines and shapes without any text, numbers, or symbols


natural_image
Pure geometric diagram with intersecting lines and shapes, no text or symbols present
VARNOSTNA NAVODILA
PRED UPORABO PREBERITE VSA NAVODILA
natural_image
Pure geometric lines and crosshair symbols without any text or labels


natural_image
Pure geometric diagram with intersecting lines and shapes, no text or symbols present
6 VARNOSTNA NAVODILA
Tveganje požara in vnetljivi materiali
natural_image
Pure geometric lines and circular shapes without any text, numbers, or symbols


natural_image
Pure geometric diagram with intersecting lines and shapes, no text or symbols present
8 VARNOSTNA NAVODILA
- Če zaznate neobičajen hrup, vonj ali dim, takoj izključite vtič in se obrnite na informacijski center za stranke LG Electronics.
natural_image
Pure geometric lines and crosshair symbols without any text or labels


natural_image
Pure geometric diagram with intersecting lines and circles, no text or symbols present


natural_image
Pure geometric diagram with intersecting lines and circles, no text or symbols present
VARNOSTNA NAVODILA
9
natural_image
Pure geometric lines and shapes without any text, numbers, or symbols


natural_image
Pure geometric diagram with intersecting lines and shapes, no text or symbols present
10 VARNOSTNA NAVODILA
- Ne hranite pretirane količine steklenic z vodo ali posod za prilogo v košarah vrat.
• Vrat ne odpirajte ali zapirajte s pretirano silo.
- Če je tečaj vrat naprave poškodovan ali deluje nepravilno, prenehajte z uporabo in se obrnite na servisni center LG Electronics.
- Živalim preprečite grizljanje napajalnega kabla ali cevi za vodo.
- Nikoli ne jejte zamrznjene hrane takoj po tem, ko jo vzamete iz zamrzovalnika.
- Prepričajte se, da roka ali noga ne obtičita ob odpiranju ali zapiranju vrat naprave ali vrat v vratih.
Vzdrževanje
natural_image
Pure geometric lines and shapes without any text, numbers, or symbols


natural_image
Pure geometric diagram with intersecting lines and shapes, no text or symbols present
12 NAMESTITEV
NAMESTITEV
Pred namestitvijo
Dimenzije in razdalje
natural_image
Pure geometric lines and shapes without any text, numbers, or symbols


natural_image
Pure geometric diagram with intersecting lines and shapes, no text or symbols present
Dodatna oprema
natural_image
Two illustrations: a wrench and a tray with circular holes, labeled 1 and 2 (no text or symbols on the objects themselves)
natural_image
Diagram showing a hand operating a mechanical device with a magnified inset highlighting the mechanism (no text or symbols present)
natural_image
Pure geometric lines and shapes without any text, numbers, or symbols


natural_image
Pure geometric diagram with intersecting lines and shapes, no text or symbols present
14 NAMESTITEV
natural_image
Mechanical assembly diagram showing two hanging hook components connected to a central shaft (no text or symbols)
Nato izvlecite vodne cevi, tako da hkrati pritisnete na spojke.

natural_image
Pure mechanical assembly diagram showing two shafts connected via a central shaft, with directional arrows indicating movement (no text or symbols)
natural_image
Technical line drawing of a mechanical component with a rotating shaft and base (no text or symbols)

natural_image
Technical line drawing of a mechanical bracket with an upward arrow indicating motion (no text or symbols)


natural_image
Pure geometric lines and shapes without any text, numbers, or symbols


natural_image
Pure geometric diagram with intersecting lines and shapes, no text or symbols present

natural_image
Technical diagram of a mechanical component with arrows indicating flow or movement (no text or symbols present)
3 Z nasadnim ključem odvijte vijake tečaja in nato odstranite tečaj.

natural_image
Mechanical assembly diagram showing a lever mechanism with no visible text or symbols
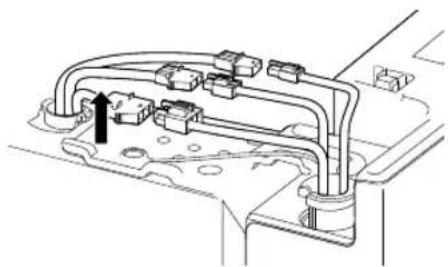
natural_image
Technical line drawing of a mechanical assembly with no visible text or symbols
natural_image
Line drawing of a refrigerator with open door and side panel, showing internal compartments and a directional arrow (no text or symbols)
SLOVENŠČINA
POZOR
- Vrata zamrzovalnika morate dvigniti počasi, da zaščitite cevi, saj morajo cevi iti skozi spodnji tečaj.
natural_image
Diagram of a car interior showing a mechanical component with a directional arrow indicating rotation (no text or symbols present)

natural_image
Technical line drawing of a mechanical component with a circular feature and directional arrow (no text or symbols)
flowchart
graph TD
    A["1"] --> B["2"]
    C["3"] --> B["2"]
- Vijačni ključ B

natural_image
Diagram showing a hand holding a clip next to a refrigerator with a close-up inset of the clip (no text or symbols)
natural_image
Pure geometric lines and shapes without any text, numbers, or symbols


natural_image
Pure geometric diagram with intersecting lines and shapes, no text or symbols present
18 NAMESTITEV
Vklop napajanja
natural_image
Pure geometric lines and shapes without any text, numbers, or symbols


natural_image
Pure geometric diagram with intersecting lines and shapes, no text or symbols present

natural_image
Pure geometric diagram with concentric circles and crosshairs, no text or symbols present
sl-si_main.book.book Page 21 Wednesday, August 30, 2023 8:53 AM
DELOVANJE 21
21
natural_image
Pure geometric lines and shapes without any text, numbers, or symbols


natural_image
Pure geometric diagram with intersecting lines and shapes, no text or symbols present
22 DELOVANJE
Funkcije izdelka
natural_image
Line drawing of a refrigerator with a door and front panel, no text or symbols present
① Nadzorna plošča
SLOVENŠČINA
natural_image
Pure geometric lines and crosshair symbols without any text or labels


natural_image
Pure geometric diagram with intersecting lines and shapes, no text or symbols present
24 DELOVANJE
① Alarm
natural_image
Pure geometric lines and shapes without any text, numbers, or symbols


natural_image
Pure geometric diagram with intersecting lines and shapes, no text or symbols present
26 DELOVANJE
OPOMBA
- Dejanska notranja temperatura je odvisna od stanja hrane, saj je navedena nastavljena temperatura ciljna temperatura, ne pa dejanska temperatura v napravi.
⑦ Express Cool
natural_image
Pure geometric lines and crosshair symbols without any text or labels


natural_image
Pure geometric diagram with intersecting lines and shapes, no text or symbols present
natural_image
Diagram of a mechanical device with a central component and labeled part (1), no text or symbols present.


natural_image
Pure geometric lines and crosshair symbols without any text or labels


natural_image
Pure geometric diagram with intersecting lines and shapes, no text or symbols present

natural_image
Pure electrical circuit lines without any symbols

natural_image
Pure geometric diagram with intersecting lines and circles, no text or symbols present
28 DELOVANJE
Čiščenje dozirnika
OPOMBA
natural_image
Simple line drawing of a device with a funnel and a blade, no text or symbols present
natural_image
Line drawing of a hand pressing down on a mechanical device (no text or symbols)
natural_image
Technical line drawing of a mechanical component with two views (no text or symbols)
natural_image
Diagram showing two views of a mechanical device with a handle and base, no text or symbols present
5 Posodo avtomata za vodo namestite nazaj na polico v hladilniku.
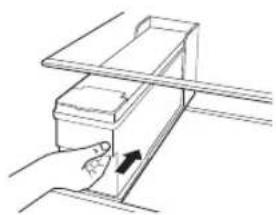
natural_image
Hand holding a mechanical device with an arrow indicating motion (no text or symbols)
OPOZORILO
natural_image
Pure geometric lines and crosshair symbols without any text or labels


natural_image
Pure geometric diagram with intersecting lines and shapes, no text or symbols present
30 DELOVANJE
POZOR
OPOMBA
- Ko posodo za led vstavite nazaj, se prepričajte, da sta obe stranici (B&B') zagozdeni v zaponki (A&A').
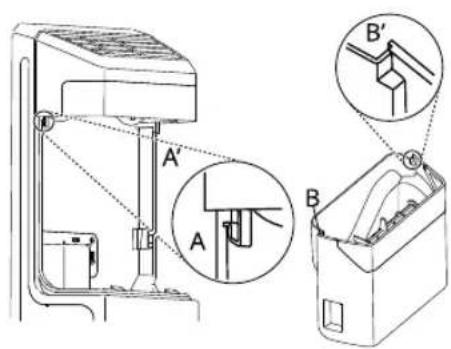
2 Za ponovno namestitev posodo za led potisnite navzgor in zagozdite obe stranici (B&B') posode za led v zaponki (A&A').
Posodo za led povlecite navzdol in se prepričajte, da je trdno pritrjena.
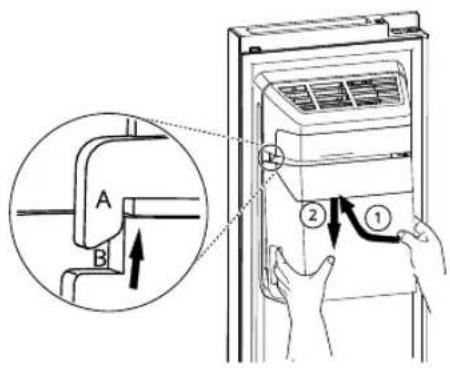
natural_image
Cross-sectional diagram of an appliance showing internal components (no text or symbols)

SLOVENŠČINA
- Preden ponovno vstavite posodo za led, preverite, ali sta obe spojki pod ustreznim kotom, da se bosta pravilno povezali. Če nista, obrnite spojko posode za led pod pravi kot, da se bo ujemala s spojko motorja.
POZOR
OPOMBA
- Če led ne pride ven:
- Preverite, ali se je v lijaku zagozdil led in ga odstranite.
32 DELOVANJE
OPOMBA
natural_image
Line drawing of a refrigerator with airflow direction indicated by arrows (no text or symbols)
Predal
POZOR
natural_image
Diagram of a door handle with an arrow indicating clockwise motion (no text or symbols)
natural_image
Illustration of two hands holding a transparent shelf with a black arrow pointing to the tray (no text or symbols)
natural_image
Illustration of two hands holding a rectangular object with upward arrows indicating motion or force (no text or symbols)
natural_image
Pure geometric lines and crosshair symbols without any text or labels


natural_image
Pure geometric diagram with intersecting lines and shapes, no text or symbols present
34 VZDRŽEVANJE
VZDRŽEVANJE
Čiščenje
natural_image
Hand inserting a plug into a computer drive (no text or symbols visible)
ODPRAVLJANJE TEŽAV
Preden pokličete servis
Led in voda
natural_image
Pure geometric lines and shapes without any text, numbers, or symbols


natural_image
Pure geometric diagram with intersecting lines and shapes, no text or symbols present
36 ODPRAVLJANJE TEŽAV
natural_image
Pure geometric diagram with intersecting lines and circular shapes, no text or symbols present
natural_image
Pure geometric diagram with intersecting lines and circles, no text or symbols present


natural_image
Pure geometric lines and shapes without any text, numbers, or symbols

natural_image
Pure geometric diagram with intersecting lines and shapes, no text or symbols present
natural_image
Pure geometric lines and shapes without any text, numbers, or symbols


natural_image
Pure geometric diagram with intersecting lines and shapes, no text or symbols present
38 ODPRAVLJANJE TEŽAV
natural_image
Pure geometric lines and crosshair symbols without any text or labels

natural_image
Pure geometric diagram with intersecting lines and shapes, no text or symbols present

LG
Life's Good
Copyright © 2023 LG Electronics Inc. All Rights Reserved.
TABELA E PËRMBAJTJES
natural_image
Pure geometric lines and shapes without any text, numbers, or symbols


natural_image
Pure geometric diagram with intersecting lines and shapes, no text or symbols present
UDHËZIME SIGURIE
LEXONI TË GJITHA UDHËZIMET PËRPARA PËRDORIMIT
natural_image
Pure geometric lines and crosshair symbols without any text or labels


natural_image
Pure geometric diagram with intersecting lines and circles, no text or symbols present
UDHËZIME SIGURIE
5
natural_image
Pure geometric lines and crosshair symbols without any text or labels


natural_image
Pure geometric diagram with intersecting lines and circles, no text or symbols present
6 UDHËZIME SIGURIE
natural_image
Pure geometric lines and shapes without any text, numbers, or symbols


natural_image
Pure geometric diagram with intersecting lines and circles, no text or symbols present


natural_image
Pure geometric diagram with intersecting lines and shapes, no text or symbols present
UDHËZIME SIGURIE
7
natural_image
Pure geometric lines and crosshair symbols without any text or labels


natural_image
Pure geometric diagram with intersecting lines and circles, no text or symbols present
8 UDHËZIME SIGURIE
Përdorimi
natural_image
Pure geometric lines and shapes without any text, numbers, or symbols


natural_image
Pure geometric diagram with intersecting lines and shapes, no text or symbols present
10 UDHËZIME SIGURIE
natural_image
Pure geometric lines and shapes without any text, numbers, or symbols


natural_image
Pure geometric diagram with intersecting lines and shapes, no text or symbols present
Aksesorët
natural_image
Two illustrations: a wrench and a tray with circular holes, labeled 1 and 2 (no text or symbols on the objects themselves)
① Çelësi*1
natural_image
Diagram showing a hand holding a tool near a mechanical component, with an inset magnified view of the tool's handle and downward arrow (no text or symbols)
SHQIP
2 Ndani bashkuesit.
KUJDES
natural_image
Mechanical assembly diagram showing two hanging clips mounted on a shaft (no text or symbols)
natural_image
Pure mechanical assembly diagram showing two shafts connected via a central shaft, with directional arrows indicating movement (no text or symbols)
natural_image
Technical line drawing of a mechanical component with a rotating shaft and base (no text or symbols)

natural_image
Technical line drawing of a mechanical bracket with an upward arrow indicating motion (no text or symbols)


natural_image
Pure geometric lines and shapes without any text, numbers, or symbols


natural_image
Pure geometric diagram with intersecting lines and shapes, no text or symbols present

natural_image
Technical diagram of a mechanical assembly with arrows indicating flow or movement (no text or symbols present)
natural_image
Mechanical assembly diagram showing a lever mechanism with no visible text or symbols

natural_image
Technical line drawing of a mechanical component with no visible text or symbols
natural_image
Line drawing of a refrigerator with open door and side panel, showing internal shelves and handle (no text or symbols)
SHQIP
KUJDES
natural_image
Diagram of a vehicle interior showing a gear shift lever and dashboard (no text or symbols)

natural_image
Technical line drawing of a mechanical component with a circular housing and arrow indicating direction (no text or symbols)
natural_image
Diagram showing a hand holding a tool near a refrigerator with a close-up inset of the handle (no text or symbols)
SHQIP
Nivelimi i pajisjes
natural_image
Pure geometric lines and shapes without any text, numbers, or symbols


natural_image
Pure geometric diagram with intersecting lines and shapes, no text or symbols present
18 INSTALIMI
Ndezja e pajisjes
Lidhja e pajisjes
natural_image
Pure geometric lines and crosshair symbols without any text or labels


natural_image
Pure geometric diagram with intersecting lines and shapes, no text or symbols present
20 PËRDORIMI
natural_image
Pure geometric lines and shapes without any text, numbers, or symbols


natural_image
Pure geometric diagram with intersecting lines and shapes, no text or symbols present

natural_image
Pure electrical circuit lines without any symbols
sq-al_main.book.book Page 22 Wednesday, August 30, 2023 8:57 AM

natural_image
Pure geometric diagram with intersecting lines and circles, no text or symbols present
22 PËRDORIMI
natural_image
Line drawing of a refrigerator with a door and front panel, no text or symbols present
① Paneli i kontrollit
natural_image
Pure geometric lines and shapes without any text, numbers, or symbols


natural_image
Pure geometric diagram with intersecting lines and shapes, no text or symbols present
Pjesa e brendshme

SHQIP
① Llamba LED e ngrirësit
Llambat LED brenda pajisjes ndizen kur hapni derën.
natural_image
Pure geometric lines and shapes without any text, numbers, or symbols

natural_image
Pure geometric diagram with intersecting lines and shapes, no text or symbols present
24 PËRDORIMI
① Alarm
natural_image
Pure geometric lines and shapes without any text, numbers, or symbols


natural_image
Pure geometric diagram with intersecting lines and shapes, no text or symbols present
26 PËRDORIMI
natural_image
Pure geometric lines and shapes without any text, numbers, or symbols


natural_image
Pure geometric diagram with intersecting lines and shapes, no text or symbols present
natural_image
Diagram of a mechanical device with a central component and labeled part (1), no text or symbols present.
Pastrimi i dispenserit
SHËNIM
natural_image
Simple line drawing of a device with a funnel and a triangular shape below (no text or symbols)
natural_image
Hand holding a tray with an arrow indicating direction (no text or symbols)
natural_image
Technical line drawing of a mechanical assembly with two views (no text or symbols)
natural_image
Technical line drawing of a mechanical component with two views (no text or symbols)
natural_image
Hand holding a mechanical component with an arrow indicating direction (no text or symbols)
PARALAJMËRIM
natural_image
Pure geometric lines and shapes without any text, numbers, or symbols


natural_image
Pure geometric diagram with intersecting lines and shapes, no text or symbols present