
VRW 80318 VB - Vacuum Cleaner BEKO - Free user manual and instructions
Find the device manual for free VRW 80318 VB BEKO in PDF.

| Product type | Vacuum cleaner (stick) |
| Brand | Beko |
| Model | VRW 80318 VB |
| Power | Rechargeable battery 22 V, 1 A with external charger ZD-024M220100EU |
| Input voltage | 100-240 V, 50/60 Hz |
| Rated power | 250 W |
| Battery life | 16 min (max speed), 25 min (min speed) |
| Charging time | 4 to 5 hours |
| Clean water tank capacity | 740 ml |
| Dirty water tank capacity | 500 ml |
| Functions | Vacuuming, washing, self-cleaning |
| Filter type | Washable HEPA (replacement recommended every 2-3 months) |
| Brush roller | Motorized, removable (replacement recommended every 2-3 months) |
| Protection rating | IPX4 |
| Included accessories | Storage station, charger, replacement filter |
| Safety | Automatic shutdown in case of blockage, LED indicators, use only with provided charger |
| Maintenance | Self-cleaning of brush roller, cleaning of filter and dirty water tank after each use |
| Weight | Not specified |
| Dimensions | Not specified |
Frequently Asked Questions - VRW 80318 VB BEKO
User questions about VRW 80318 VB BEKO
0 question about this device. Answer the ones you know or ask your own.
Ask a new question about this device
Download the instructions for your Vacuum Cleaner in PDF format for free! Find your manual VRW 80318 VB - BEKO and take your electronic device back in hand. On this page are published all the documents necessary for the use of your device. VRW 80318 VB by BEKO.
USER MANUAL VRW 80318 VB BEKO
Wet & Dry Upright Vacuum Cleaner
User Manual

natural_image
Simple line drawing of a decorative pattern with circular motifs inside a square frame (no text or symbols)VRW 80318 VB
EN - FR - IT - PL - RO - SR - BG - BS - HR - MK - SL - SQ
Please read this guide first!
Dear Customer,
Thank you for choosing a Beko product. We would like you to achieve the optimal efficiency from this high quality product which has been manufactured with the state of the art technology. Please make sure you read and understand this guide and supplementary documentation fully before use and keep it as a reference. Include this guide with the unit if you hand it over to someone else. Observe all warnings and information herein and follow the instructions.
Symbols and their meanings
These symbols are used in this manual:

Important information and advice on using the device.

CAUTION: Warnings against personal injury and property damage.

Protection class against electric shock.
CONTENTS
| ENGLISH | 03-21 |
| FRANÇAIS | 22-40 |
| ITALIANO | 41-61 |
| POLSKI | 62-83 |
| ROMANIAN | 84-106 |
| SRPSKI | 107-125 |
| БЪЛГАРСКИ | 126-145 |
| BOSANSKI | 146-165 |
| HRVATSKI | 166-185 |
| MAKEДОНСКИ | 186-209 |
| SLOVENŠČINA | 210-228 |
| SHQIPTAR | 229-248 |
1 Important safety and environmental instructions
1.1 General safety
To reduce the risk of fire, electric shock or injury, please follow these requirements:
Children under 8 years of age should not use this product. Adults with disabilities, mental illness, or lack of sensory experience and knowledge should use this device properly and safely under the supervision of normal adults and be aware of the potential risks. Children should not use the product alone and should not clean and maintain the product without adult supervision;
- This appliance is not intended for use by persons (including children) with reduced physical, sensory or mental capabilities, or lack of experience and knowledge, unless they have been given supervision or instruction concerning use of the appliance by a person responsible for their safety.
- This appliance can be used by children aged from 8 years and above if they have been given supervision or instruction concerning use of the appliance in a safe way and understand the hazards involved. Cleaning and user maintenance shall not be made by children unless they are aged from 8 years and above and supervised. Keep the appliance and its cord out of reach of children aged less than 8 years.
- This appliance can be used by children aged from 8 years and above and persons with reduced physical, sensory or mental capabilities or lack of experience and knowledge if they have been given supervision or instruction concerning use of the appliance in a safe way and understand the hazards involved.
1 Important safety and environmental instructions
Children shall not play with the appliance. Cleaning and user maintenance shall not be made by children without supervision.
- Please store the appliance indoor to avoid being wet;
- Please do not immerse the machine in water or other liquids;
- Please do not use the appliance with wet hands;
- Please do not use the appliance if it falls, breaks, or falls into the water, please send the appliance to an authorized aftersales service center for repair;
- Please do not use the appliance if the power cord or plug is damaged;
- Please pull out the cable gently;
- Please do not damage the power cord: Do not lift the appliance with power cord, or clamp the power cord, or pull the power cord to a sharp edge or
corner. Do not use the appliance over the power cord. Keep cables away from heated surfaces;
- Please do not use extension cords. The plug should be directly inserted into the power socket;
- Please do not block the inlet of the appliance to avoid limiting the airflow;
- Please do not operate the appliance when the inlet is blocked;
- Please keep hair, loose clothing, fingers or any part of the body away from the inlet to avoid the risk of danger;
- Please do not clean up anything that is burning or smoking, such as cigarettes, matches or hot ashes;
- Please do not clean up any flammable substances, such as lighter fluid, gasoline or kerosene, or in the case of explosive liquid or steam;
1 Important safety and environmental instructions
- Please do not clean up any paint, paint thinner, some mothproof materials or vapors released by flammable dust or other explosive or toxic vapors;
- Please do not clean up any toxic substances, such as chlorine bleach, ammonia, pipe dredge or gasoline;
- Please do not operate the appliance for any other purpose not listed in this Manual;
- Please use accessories only recommended by the manufacturer. Using parts not provided or sold by the manufacturer may cause fire, electric shock or injury;
- Please use the official power cord;
- Please avoid dust, lint, hair and other material accumulating the inlet;
-
Please clean up the stairs carefully;
-
If the adapter is damaged, it must be replaced by an official maintenance department from the manufacturer;
- Please make sure to install the water tank and the brush roll properly;
- Please do not operate or store the appliance under inappropriate conditions such as high temperature or low humidity. Please store the appliance in a ventilated place to avoid direct sunlight;
- Please keep children away from the appliance when the appliance is powered on or cooling down;
- Please do not clean up on leather, waxed furniture or floors, synthetic fibers, velvet or other vulnerable and steam sensitive materials;
- Keep fingers, hair and loose clothing from moving parts and openings whilst using product.
1 Important safety and environmental instructions
• Children should be supervised to ensure that they do not play with the appliance.
- If the supply cord is damaged, it must be replaced by the manufacturer or its agent or similarly qualified person in order to avoid hazard.
- Motorized cleaning head for water suction cleaning.
- WARNING: For the purposes of recharging the battery, only use the detachable supply unit ZD-024M220100EU provided with this appliance.
1.2 Compliance with the WEEE Directive and disposal of the waste product
This product complies with EU WEEE Directive (2012/19/EU). This product bears a classification symbol for waste electrical and electronic equipment (WEEE).
This symbol indicates that this product shall not be disposed with other household wastes at the end of its service life. Used device must be returned to official collection point for recycling of electrical and electronic devices. To find these collection systems please contact to your local authorities or retailer where the product was purchased. Each household performs important role in recovering and recycling of old appliance. Appropriate disposal of used appliance helps prevent potential negative consequences for the environment and human health.
1.3 Packaging information
Package of the product is made of recy clable materials in accordance with our National Legislation. Do not dispose of the packaging materials together with the domestic or other wastes. Take them to the packaging material collection points designated by the local authorities.
1 Important safety and environmental instructions
1.4 Waste batteries
This symbol on rechargeable batteries/ batteries or on the packaging indicates that the rechargeable battery/battery may not be disposed of with regular house hold rubbish. For certain rechargeable batteries/batteries, this symbol may be sup plemented by a chemical symbol. Symbols for mercury (Hg) or lead (Pb) are provided if the rechargeable batteries/batteries contain more than 0,0005 % mercury or more than 0,004 % lead.
Rechargeable batteries/batteries, including those which do not contain heavy metal, may not be disposed of with household waste. Always dispose of used batteries in accordance with local environmental regulations. Make enquiries about the applicable disposal regulations where you live.
1.5 Actions to be taken for energy saving
- To avoid redundant energy consumption while using the device, set the speed levels according to the floor you are sweeping.
- Under normal conditions, low speeds are used to clean the hard floors, curtains and sofas, and high speeds are used to clean the carpets.
1.6 Compliance with RoHS Directive
The product you have purchased complies with EU RoHS Directive (2011/65/EU). It does not contain harmful and prohibited materials specified in the Directive.
2 Overview
text_image
Exploded diagram of a vacuum cleaner with numbered parts for identification2 Overview
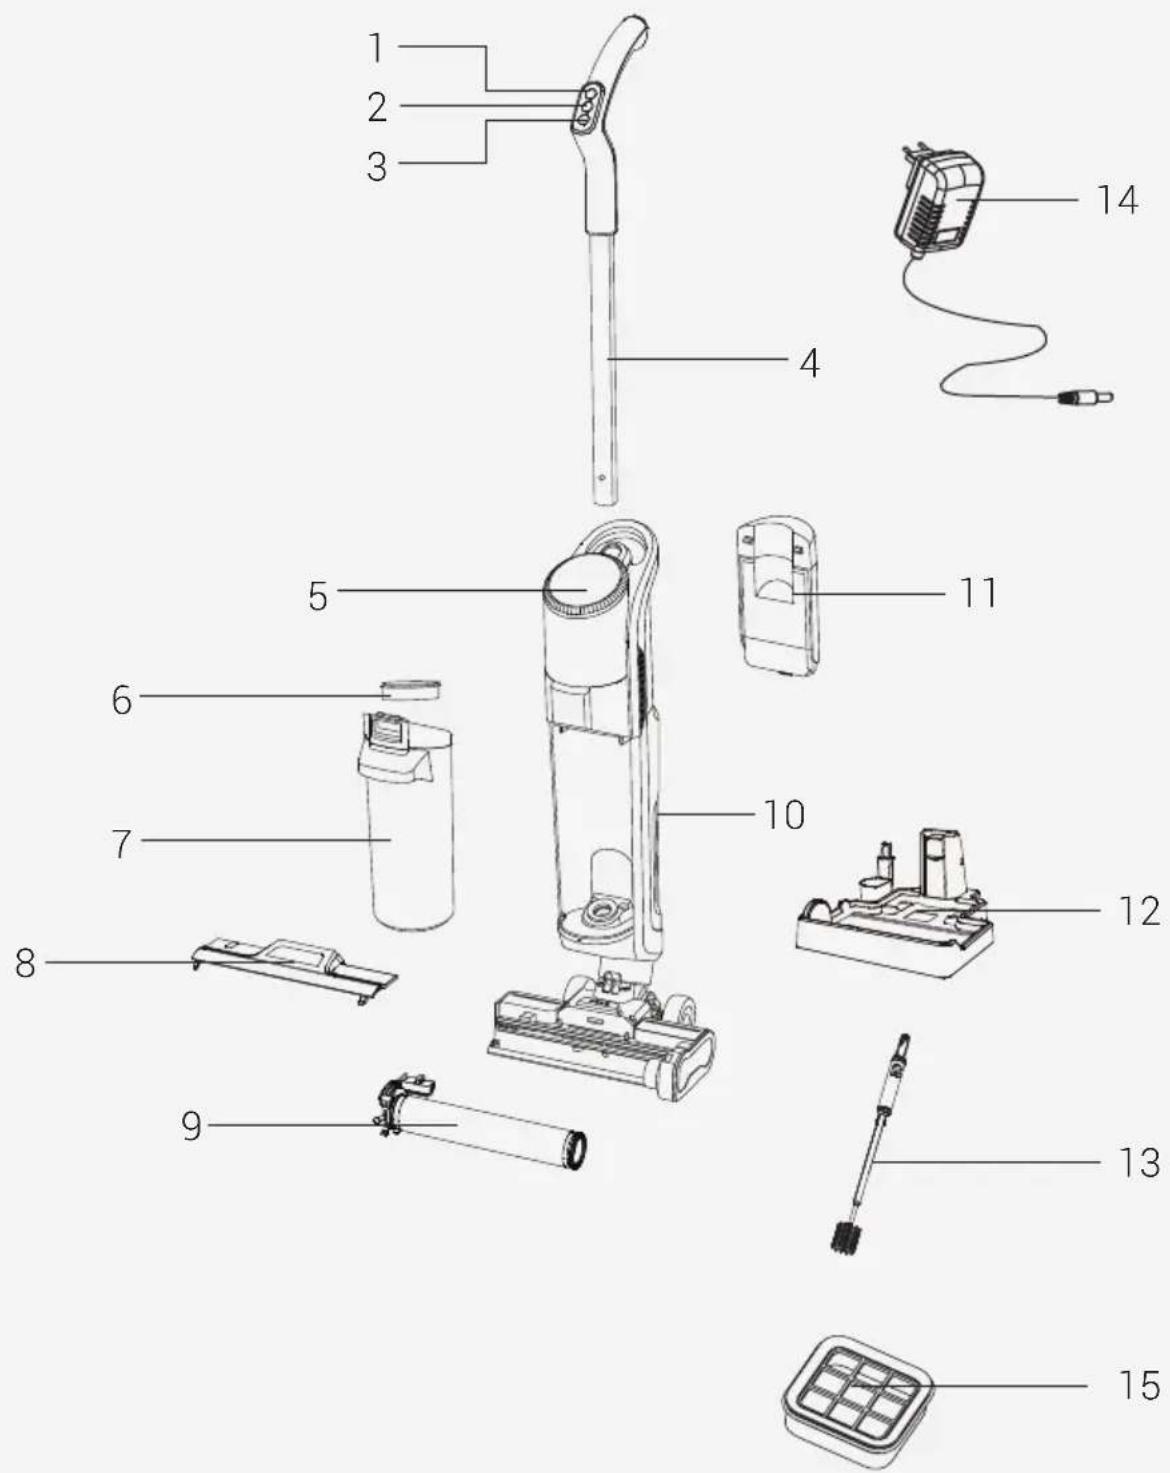
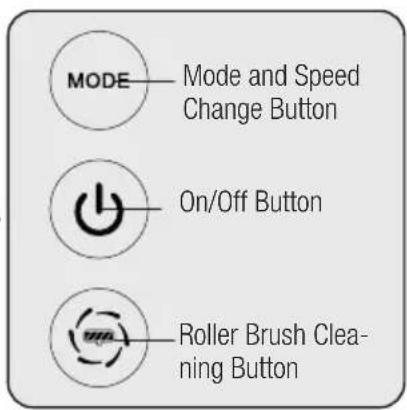
2.1 Controls and components
- Roller brush; water level and engine speed adjustment button
- Handle on-off button
- Roller brush cleaning button
- Handle
- Information display
- Dirty water tank HEPA 10 filter
- Dirty water tank
- Floor cleaning roller brush cover
- Floor cleaning roller brush cover (x2)
- Rear casing on - off switch
- Clean water tank
- Charge and park stand
- Dirty water tank cleaning brush
- Charge adaptor
- Spare HEPA 10 filter
2.2 Technical data
Nominal input power : 250 W
Input :
100-240V \~ 50/60 Hz 0.8A
Waterproof : IPX 4
Output :
Charging time : 4-5 hours
Working time under
maximum power : 16 minutes
Working time under
minimum power : 25 minutes
2.3 Product Specifications
This device has three functions: Vacuuming;
Mop and Self-cleaning.
Clean Water Tank Capacity:740 ml
Dirty Water Tank Capacity: 500 ml
External Power Supply Parameter
Manufacturing
Company : E-TEK Electronics
Manufactory Co., LTD
Model Identifier :
ZD024M220100EU
Output Current : 1.0 A
Output Power : 22.0W
Average active
efficiency : 88.25%
Efficiency at
low load (10%) : 84.57%
22.0 Vdc 1.0A
No load power
consumption : 0.08W
- WARNING! Only use water below 25^ . Do not use boiling water.
Values supplied with the instrument or accompanying documentation are laboratory readings per relevant standards. These values may differ depending on operation and ambient conditions.
2 Overview
2.3.1 Floor Surface Cleaning
The product is equipped with a clean water tank, dirty water tank, floor cleaning roller brush, motors and other functional modules. Water is pumped into the floor-cleaning roller brush, and the floor-cleaning motor makes it spin at high speed to clean surfaces. After cleaning the floor, the dirty water is sucked by the suction motor and drawn back into the dirty water tank. During the floor cleaning process, the level of spraying water on the cleaning roller brush can be adjusted or cancelled.
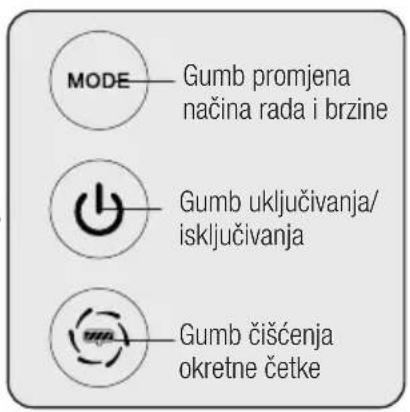
2.4 Product Introduction
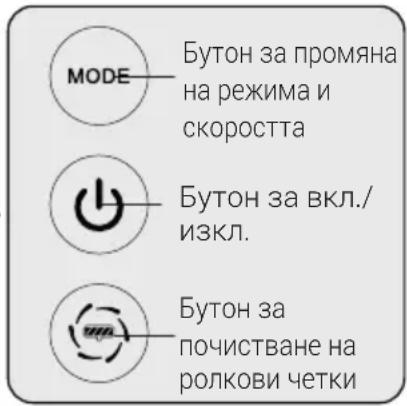
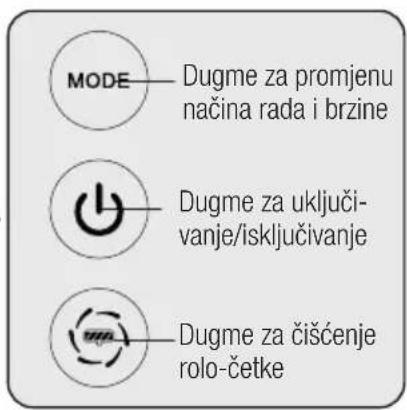
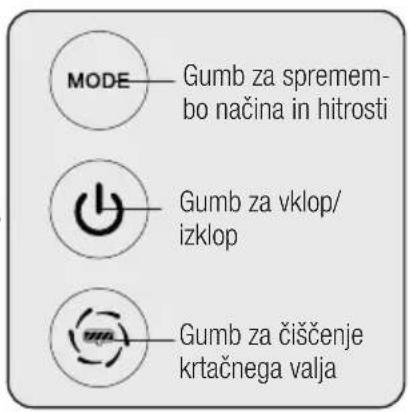
- "MODE" Roller Brush Water Level and Motor Speed Adjustment Button: When the Floor Cleaning Machine is turned on with the on/off button, the Floor cleaning roller brush water level and motor suction speed work in the Minimum Position. This appears on the information display.
- When the MODE button is pressed again while the product is operating in minimum mode, The floor cleaning roller brush level and the motor suction level rise to the Maximum position. This appears on the information display. When MODE key is pressed again in Maximum position; The roller water spray level on the information screen disappears. The Water spray is cancelled. When you cancel the water spray function of the roller brush, It is used to extract liquid from the wet floor, sweep the damp floor by mopping and sweep the carpet floors.
- "◀" Handle On/Off Button: (2) When you press the handle on/off button, the product starts to operate at minimum engine speed and water spraying.
- While the product is running (2), if you press the handle on-off button again, the product turns off by operating at high speed for about 3 seconds.
- "→" Floor Cleaning Roller cleaning button: as soon as the cleaning process is completed and you park the product on the charging stand and start charging, the floor cleaning roller icon starts to flash on the display. (Before pressing the floor cleaning button on the handle (3), empty the dirty water tank and check that the clean water tank is full.) Press the floor cleaning roller button and start the roller cleaning process. After the cleaning is completed, the product will stop by itself, the red light will illuminate the display, and the icon will come on, reminding you to empty the dirty water tank and fill it. This red icon will turn off when you empty the dirty water tank and fill the clean water tank.
3 Installation
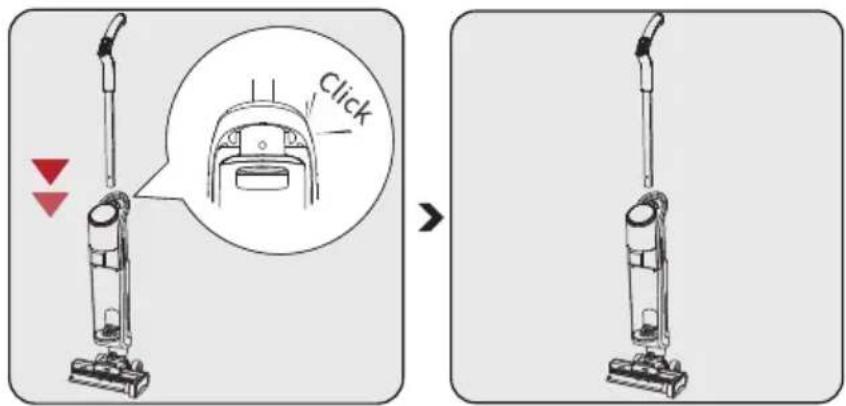
3.1 Handle mounting
text_image
Diagram showing a vacuum cleaner with a click instruction and directional arrow, illustrating the process to press or adjust.Place the handle vertically on the body.
The assembly will be completed after a "click" is heard.

text_image
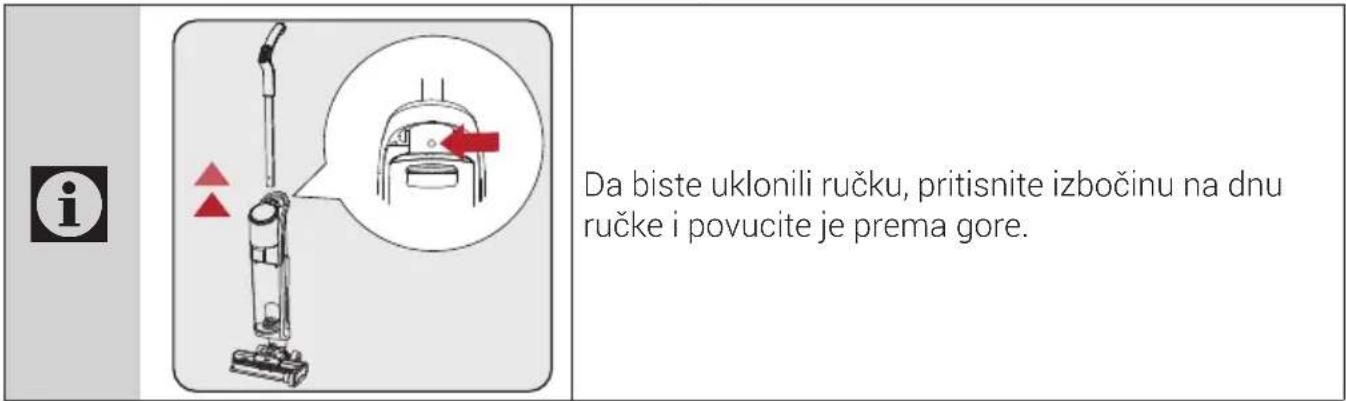
Diagram showing a vacuum cleaner with red arrows indicating left-hand side and right-hand side, highlighting the component's direction.Press the tab under the handle to remove the handle and pull it upwards.
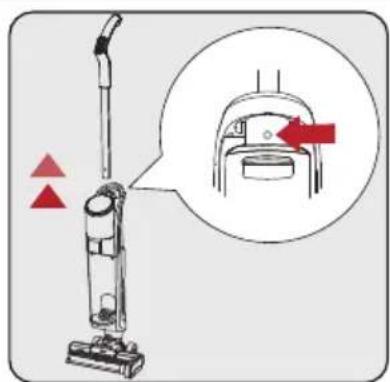
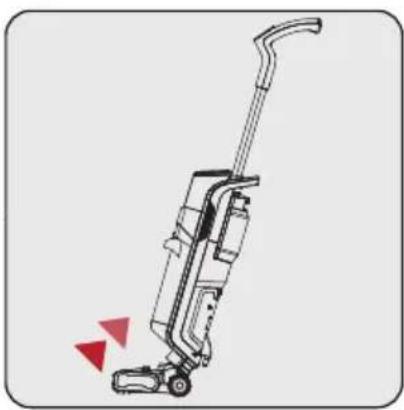
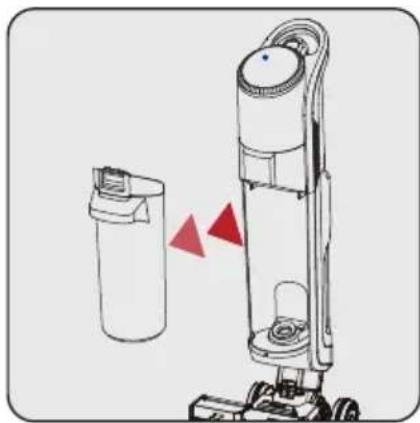
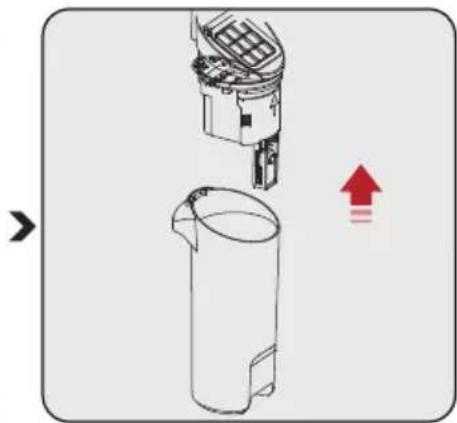
3.2 Clean water tank mounting
natural_image
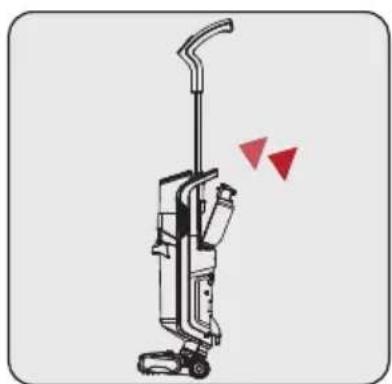
Illustration of a vacuum cleaner with red triangular warning symbols indicating stress or hazard (no text or labels)Place the clean water tank on the back of the body. Assembly will be completed after a "click" is heard.
12 / EN
3-in-1 Cordless Vacuum Cleaner / User Manual
3 Installation
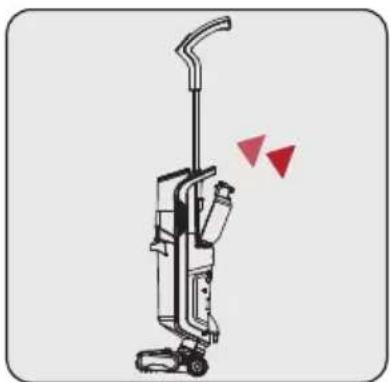
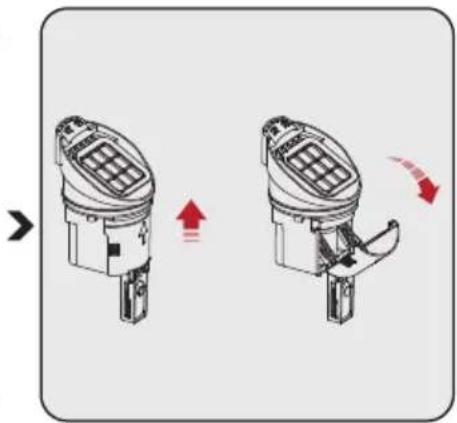
3.3 Roller brush cover mounting
natural_image
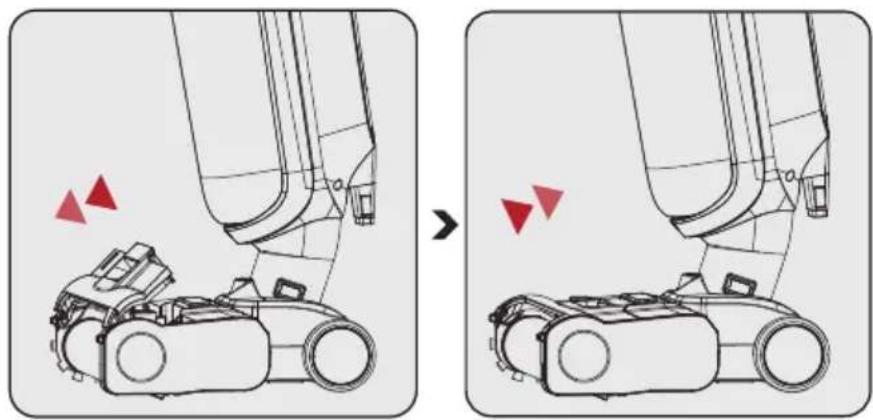
Diagram showing a robotic arm before and after assembly, with red triangular indicators indicating motion or movement (no text or symbols present)Removal:
Press the unlock button on the top cover of the floor brush with your finger and pull up to remove the top cover of the floor brush.
Installation:
Fit the top cover tabs into the grooves in front of the roller brush and press the cover firmly. Installation is complete when a "click" is heard.
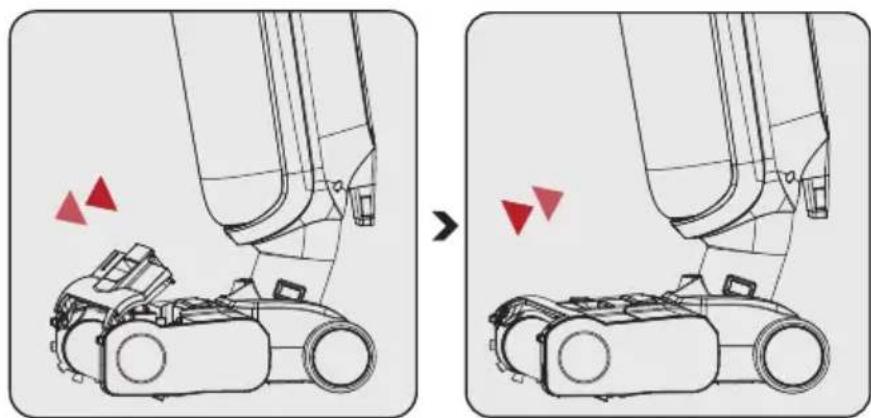
3.4 Roller brush cover removal and mounting

text_image
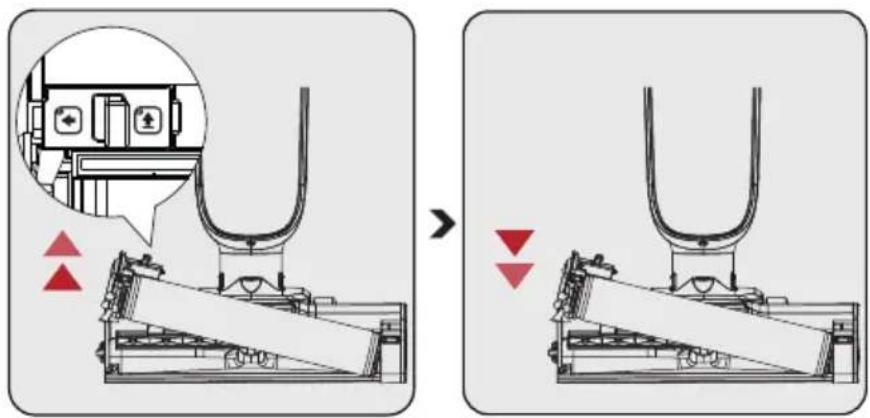
Technical diagram showing a mechanical assembly before and after modification, with red arrows indicating downward motion.Removal:
Unlock the roller brush by pressing the left button and pulling the roller brush upwards.
Installation:
Place the roller brush on the right wheel axle and press the roller brush down. The roller brush unlock button is equipped with a push button for positioning, and assembly is complete when a "click" is heard.

When using the brush on the carpet, turning off the water spray function is recommended.
4 Operation
4.1 How to Operate

If water is left on the floor after cleaning, it is recommended to use the dry mode to clean the water.

WARNING! Use only with recommended low foaming detergent. Simply add a few drops (10 ml) of the recommended floor cleaner to the clean water tank. If unexpected foaming occurs, the amount of detergent should be reduced. The foam formed may reduce the performance of your device.
natural_image
Line drawing of a hand pouring liquid from a water bottle onto a wall (no text or symbols)
natural_image
Line drawing of a vacuum cleaner with red directional arrows indicating motion (no text or symbols)
text_image
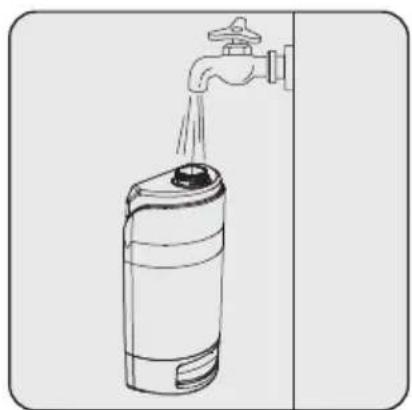
MODE Mode and Speed Change Button On/Off Button Roller Brush Cleaning ButtonClean water tank filling; Open the clean water tank to add water.

natural_image
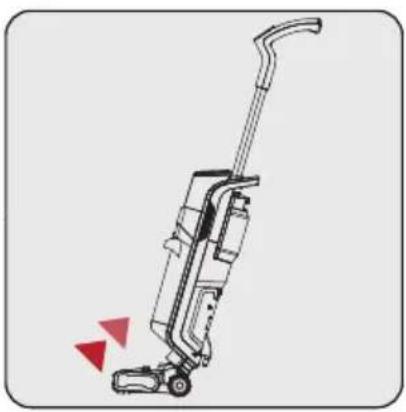
Diagram of a vacuum cleaner next to an optical target with concentric circles and red arrows indicating direction (no text or symbols)Power On: Tilt the body of the device towards yourself. Press the on / off button to operate. The product will commence working with the engine and water spray in the minimum position.

WARNING! Please press this button to turn off the device in unexpected situations, such as automatic power on.
Mode Switch: Adjust the water spray level according to actual cleaning needs.
4 Operation

WARNING! The Product will not operate when the on / off switch on the rear body is not turned on. Ensure this switch is on when your product is not operated from the handle.

WARNING! Do not tilt the device entirely while water is in the dirty tank during use. Otherwise, water may leak from the brush section.

Please ensure the clean water tank is full and the dirty container is empty so the roller brush can clean itself.
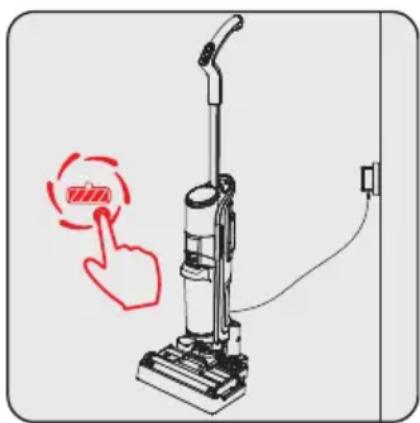
4.2 Roller brush cleaning
natural_image
Illustration of a vacuum cleaner with a red hand icon pointing to the button (no text or symbols present)As soon as the cleaning process is completed and the product is parked on the charging stand, and charging starts, the floor cleaning roller icon starts to flash on the display.
(Before pressing the floor cleaning button on the handle (3), check that the dirty water tank is empty and the clean water tank is full.)
Press the floor cleaning roller button on the handle and start the roller cleaning process. After the cleaning, the product will stop by itself, the red light will flash on the screen, and the icon will be activated, reminding that the dirty water tank should be emptied and the clean water tank should be filled.
This red icon will turn off when you empty the dirty water tank and fill the clean water tank.

When the roller brush cleaning process is finished, removing the floor cleaning roller and drying it in a ventilated place is recommended. Drying the roller brush prevents the formation of odour on the brush.
4 Operation
4.3 Roller cleaning mode operation method:
- After the floor cleaning, please turn off the device and park it in the charging stand.
- The roll cleaning icon starts to flash on the product information display.
- Press the roller cleaning button on the handle (3) for a second or two to start the roller cleaning program.
- When the roller cleaning process is finished, the red water discharge icon will appear on the information display.
- Empty the dirty water tank and clean the filter coming out of the tank.
- After emptying the dirty water tank and filling the clean water tank, the red icon on the screen will turn off.
- The blue charging information icon on the information screen will continue to light.

If you want to repeat the roller cleaning process, repeat steps 4.3 in the manual. Before repeating these steps, ensure the dirty water tank is empty and the clean water tank is full.

If the product is taken from the charging stand during the roll cleaning step, or if the charging stand adapter is unplugged or the power is cut off, the roll cleaning step will end within 15-20 seconds.

When plugged back in the following days, if the product is in the storage station, the self-cleaning light will flash, and the process can begin with the steps above.
4.4 Cleaning the dirty water tank
Step 1:
Press the dirty water tank latch to remove the dirty water tank.
Step 2:
Remove the dirty water tank by pulling up the hepa filter cassette and the dirty water tank float.
Empty and clean the dirty water tank after each use. If not using it long, dry the dirty water tank to prevent foul odour.
Step 3:
Open the cover on the dirty water tank float. Large dust and dirt particles in the dirty water tank accumulate here. Clean it and place it in the dirty water tank.
4 Operation
4.5 Information display
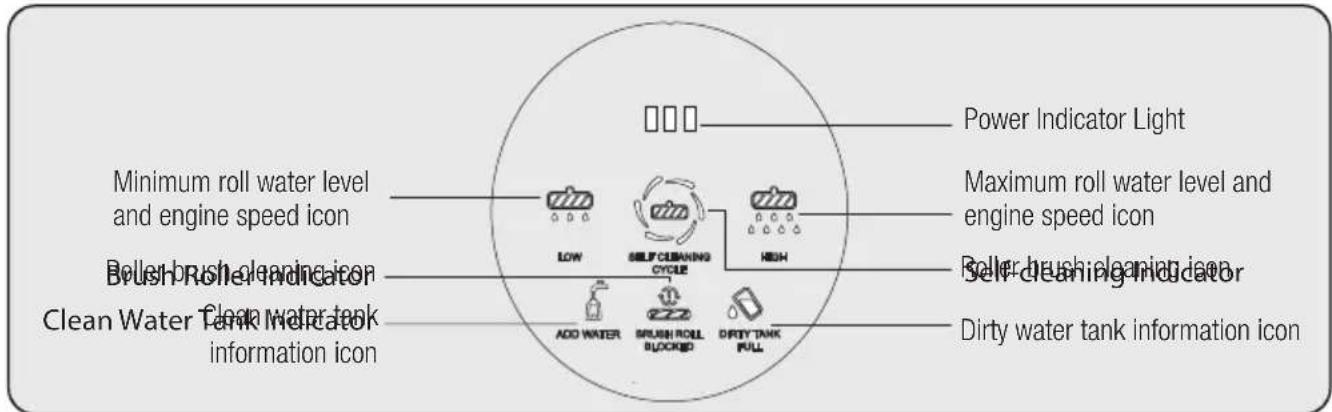
text_image
Power Indicator Light Minimum roll water level and engine speed icon Maximum roll water level and engine speed icon Brush brush cleaning icon Clean Water Tank water tank information icon Add water brush rolling blocked DRGY TANK FULL Self-cleaning indicator Roller brush cleaning icon Dirty water tank information iconWater level and engine speed indicator light :
The roller water level and engine speed indicator icon light up in white.
Roller brush error notification light:
It flashes three times and turns red continuously when hair, rope or any object prevents it from spinning around the Roller Brush. It turns off when the cause that prevents the roller brush from rotating is removed.
Charge level information icon:
Lights up blue when the charging adapter is plugged in.
Roller brush cleaning light:
After the floor cleaning process is completed, it lights up white when the product is parked on the charging stand.
Dirty water tank indicator light:
When the dirt tank is full, the red alarm light flashes three times and then turns on steadily.
Clean Water Tank Indication Light:
When the dirty water tankreaches its maximum level,it flashes 3 times and thenturns on red steadily. Thelight turns off when the dirtywater tank is emptied.
5 Cleaning and maintenance
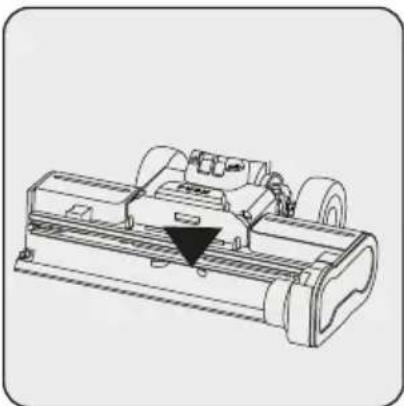
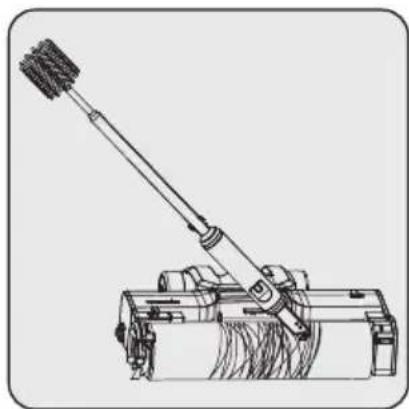
5.1 Cleaning of the brush
natural_image
Technical line drawing of a mechanical device with no visible text or symbols
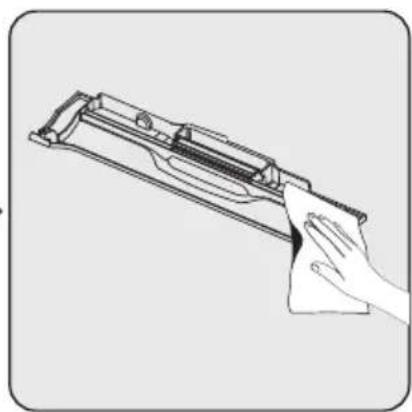
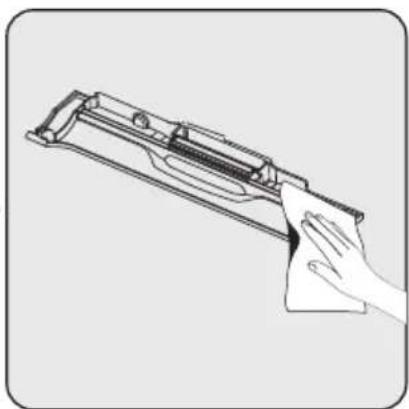
WARNING! When cleaning the shown area of the brush, please use a cleaning brush and avoid cleaning it with your hands. It can hurt fingers.

WARNING! After removing the roller brush, use the multi-purpose cleaning brush to clean the suction path opening. Avoid cleaning with bare hands; you may hurt your hand and fingers.
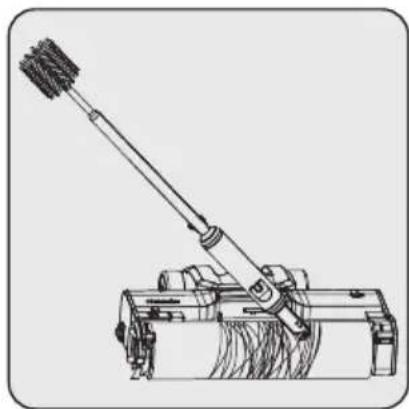
natural_image
Technical line drawing of a manual push tool mounted on a wheeled base (no text or symbols)
natural_image
Line drawing of a hand cleaning a firearm (no text or symbols)Deep cleaning of the roller brush cylinder is recommended every four or five uses. Use the multi-purpose cleaning brush to remove hair and other objects tangled in the brush roll. After cleaning and washing the brush roll, allow it to dry in a well-ventilated area for 24-48 hours. Uncomfortable odours may occur in roller brushes that are not dried.
Please rinse the brush roll cover when needed
5 Cleaning and maintenance
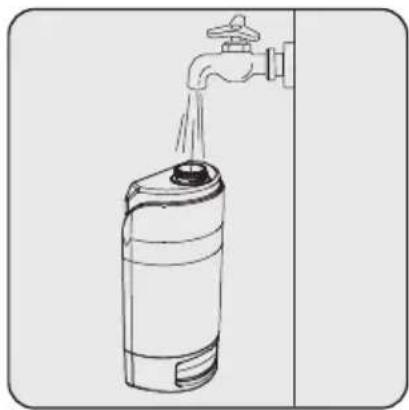
5.2 Cleaning the Filter

natural_image
Illustration of a faucet dispensing water into a square tank (no text or symbols)Wash and dry the HEPA filter to prevent air infiltration.
5.3 Cleaning the charging stand
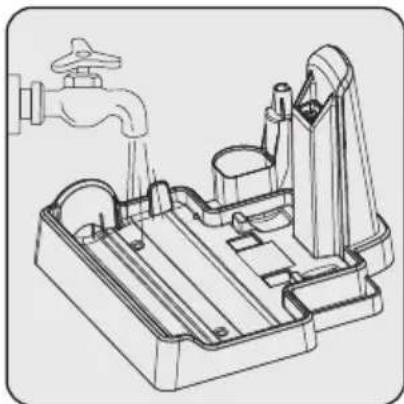
natural_image
Technical line drawing of a mechanical device with a faucet and internal components (no text or symbols)Please clean the bottom surface of the charging stand with clean water and dry it if it will not be used for a long time after the roller brush cleaning process. If the wet bottom surface and the roller brush are not dried, this may cause bad odour formation.
5 Cleaning and maintenance
5.4 Filtration Replacement Guide
natural_image
Illustration of a vacuum cleaner with two red triangular indicators indicating motion or change (no text or symbols present)Press the dirty water tank latch to remove the dirty water tank. Remove the Dirty Water tank by pulling it towards yourself.

natural_image
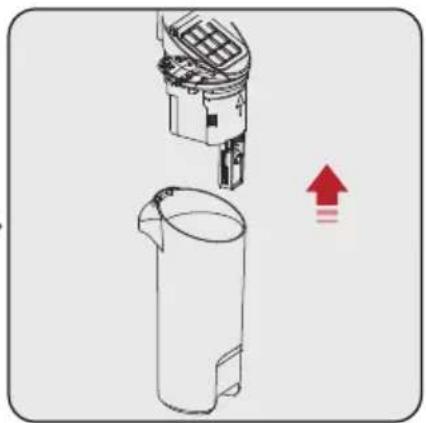
Diagram showing a mechanical device interacting with a cylindrical container, with an upward arrow indicating motion (no text or symbols present)Remove the Dirty Water tank HEPA Filter cassette and the Dirty Water Container float by pulling upwards. Empty and clean the Dirty Water tank. If not using it long, dry the dirty water tank to prevent foul odour.
natural_image
Diagram showing two mechanical components with directional arrows indicating motion (no text or symbols)Pull out the HEPA Filter. Wash and dry.
Open the Cover on the Dirty Water Tank Float. Large dust and dirt particles in the Dirty Water tank accumulate here. Clean it and place it in the dirty water tank.

For a better user experience, replacing the filter every 2-3 months (based on daily usage frequency) is recommended.

Thoroughly clean and dry the filters, washing head and cover after each use. Make sure the parts are installed correctly. A spare dry filter is supplied with your device for easy replacement.
6 Problems and remedies
| PROBLEM POSSIBLE CAUSE SOLUTION | ||
| Appliance inoperative | The power cable is not fully plugged in. | Plug the cable firmly |
| Roller Brush Cylinder does not rotate. | Restart after cleaning the brush roll | |
| Full Dirty Water Tank | Clean Roller Brush Restart. | |
| Weakened suction | The brush roll is entangled with hair and other objects | Empty and clean the dirty water tank and restart |
| Abnormal noise during operation | Objects tangled in the Roller Brush caused noise and blocked brush. | Clean the roller brush with the multi-purpose brush and restart. |

CAUTION: If the product cannot operate normally as per the above steps, please contact our after-sales service department for assistance.

Keep the product's battery fully charged when not in use for a long time.
Cher/Chère client(e),
text_image
Exploded diagram of a vacuum cleaner with numbered parts for identification2 Aperçu Général
charge (10%) : 84,57%
text_image
Diagram showing a vacuum cleaner with red arrows indicating movement, accompanied by an inset diagram illustrating the process.natural_image
Illustration of a vacuum cleaner with red triangular warning symbols (no text or labels)text_image
Technical diagram showing a mechanical assembly before and after installation, with red arrows indicating process steps.Pour le retirer :
natural_image
Diagram showing a robotic arm before and after change, with red triangular markers indicating motion or movement (no text or symbols present)Pour le retirer :
natural_image
Line drawing of a spray can pouring liquid into a water tap (no text or symbols)
natural_image
Line drawing of a vacuum cleaner with red directional arrows indicating motion (no text or symbols)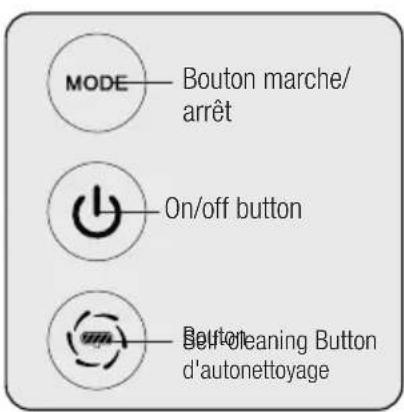
text_image
MODE Bouton marche/ arrêt On/off button Button cleaning Button d'autonettoyageRemplissage d'eau :
natural_image
Diagram of a vacuum cleaner next to an optical target with red triangular arrows indicating direction (no text or symbols)
natural_image
Illustration of a vacuum cleaner with a red hand icon pointing to the button (no text or symbols present)
natural_image
Diagram showing three cylindrical containers with red triangular indicators pointing to different components (no text or symbols present)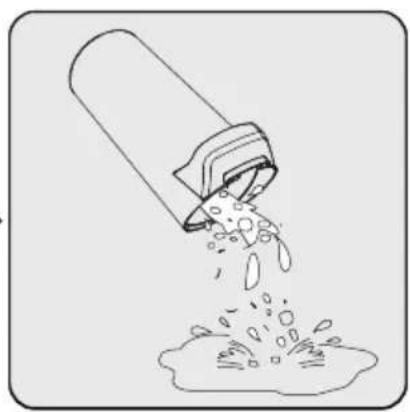
natural_image
Illustration of a bucket pouring liquid into a container (no text or symbols)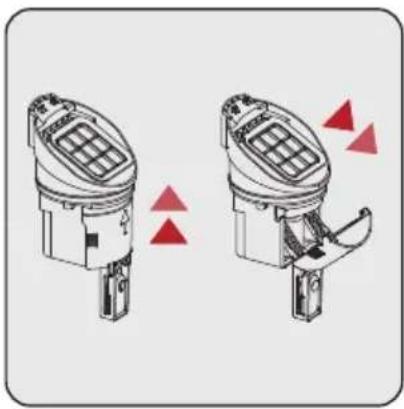
natural_image
Diagram of two identical mechanical components with red triangular indicators indicating movement or assembly (no text or symbols)Étape 1 :
natural_image
Technical line drawing of a mechanical device with no visible text or symbols
natural_image
Technical line drawing of a mechanical device with lever and base (no text or symbols)
natural_image
Line drawing of a hand cleaning a firearm with a cloth (no text or symbols)natural_image
Illustration of a faucet dispensing water into a square tank (no text or symbols)
natural_image
Technical line drawing of a mechanical device with a faucet and internal components (no text or symbols)natural_image
Illustration of a vacuum cleaner with two red triangular warning signs (no text or symbols)natural_image
Diagram showing a mechanical device interacting with a cylindrical container, with an upward arrow indicating motion (no text or symbols present)natural_image
Diagram showing two mechanical components with directional arrows indicating motion (no text or symbols)text_image
Exploded diagram of a vacuum cleaner with numbered parts for identification2 Panoramica
Uscita: 22,0 V 1,0 A
Manufactory Co., LTD
carico (10%) : 84,57%
Consumo di
text_image
Diagram showing a vacuum cleaner with red arrows indicating left-hand side and right-hand side, highlighting the component's direction.natural_image
Illustration of a vacuum cleaner with red triangular indicators indicating motion or pressure (no text or symbols)text_image
Technical diagram showing a mechanical assembly before and after modification, with red arrows indicating downward motion.Rimozione:
natural_image
Technical line drawing of a mechanical device with red triangular markers indicating specific components (no text or symbols present)
natural_image
Technical line drawing of a robotic arm with red triangular markers indicating motion or positioning (no text or symbols present)Rimozione:
natural_image
Line drawing of a spray can pouring liquid into a water tap (no text or symbols)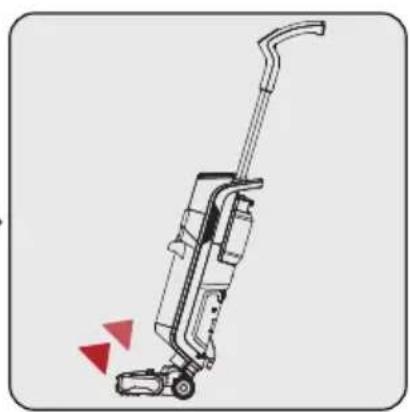
natural_image
Line drawing of a vacuum cleaner with red directional arrows indicating motion (no text or symbols)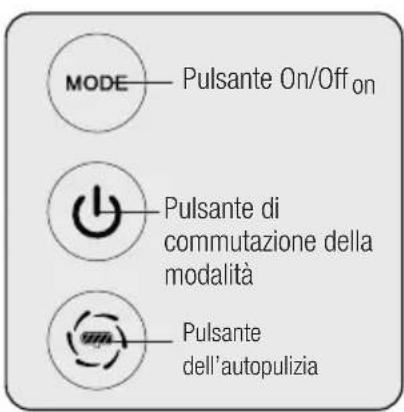
natural_image
Diagram of a vacuum cleaner next to an optical target with red triangular arrows indicating direction (no text or symbols)
text_image
Diagram showing a vacuum cleaner with a red hand icon pointing to its button, indicating action or operation.
natural_image
Diagram showing three cylindrical containers with internal components and red triangular indicators, no text or symbols present.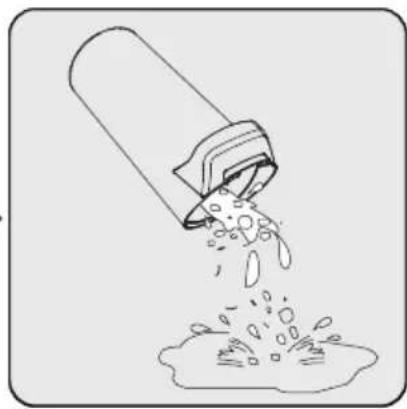
natural_image
Illustration of a pipe pouring liquid into a container with bubbles (no text or symbols)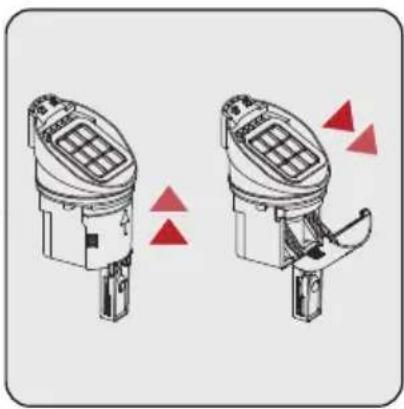
natural_image
Diagram of two identical mechanical components with red triangular indicators indicating movement or assembly (no text or symbols present)Passaggio 1:
natural_image
Technical line drawing of a mechanical device with no visible text or symbols
natural_image
Technical line drawing of a mechanical device with lever and base (no text or symbols)

natural_image
Line drawing of a hand cleaning a firearm (no text or symbols)natural_image
Illustration of a faucet pouring liquid into a square tank (no text or symbols)
natural_image
Technical line drawing of a mechanical device with a faucet and housing (no text or symbols)text_image
Exploded diagram of a vacuum cleaner with numbered parts for identification2 Omówienie
Producent: E-TEK Electronics Manufactory Co., LTD
natural_image
Illustration of a vacuum cleaner with red triangular warning symbols (no text or labels)text_image
Technical diagram showing a mechanical assembly before and after modification, with red arrows indicating downward motion.Demontaż:
natural_image
Technical line drawing of a robotic arm with red triangular markers indicating specific components (no text or symbols present)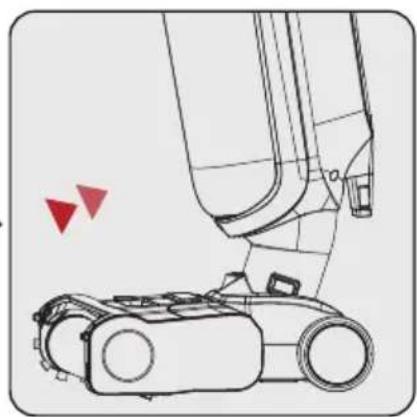
natural_image
Technical line drawing of a robotic arm with red triangular markers indicating motion or positioning (no text or symbols present)Demontaż:
natural_image
Line drawing of a spray can pouring liquid into a water tap (no text or symbols)
natural_image
Line drawing of a vacuum cleaner with red directional arrows indicating motion (no text or symbols)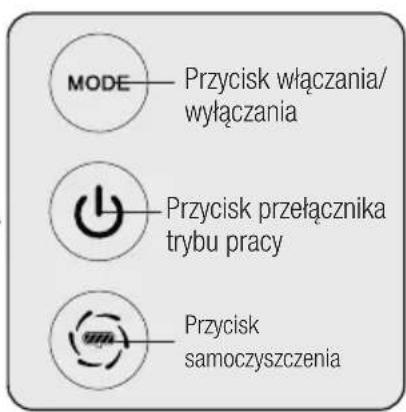
natural_image
Diagram of a vacuum cleaner next to an optical target with red triangular arrows indicating direction (no text or symbols)
text_image
Diagram showing a vacuum cleaner with a red hand icon pointing to its button, indicating action or operation.
natural_image
Diagram showing three cylindrical containers with red triangular indicators pointing to different components (no text or symbols present)
natural_image
Illustration of a pipe pouring liquid into a container with bubbles (no text or symbols)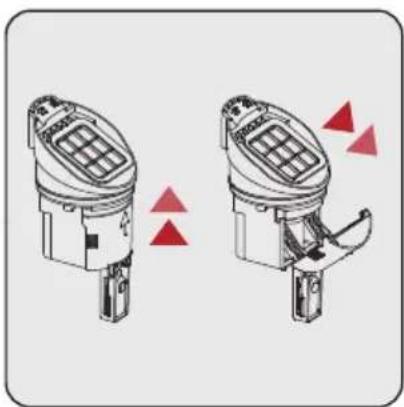
natural_image
Two identical diagrams of a device with grid and mechanical components, showing red triangular indicators (no text or symbols)Krok 1:
natural_image
Technical line drawing of a mechanical device with no visible text or symbols
natural_image
Technical line drawing of a mechanical device with lever and base (no text or symbols)

natural_image
Line drawing of a hand cleaning a firearm with a cloth (no text or symbols)natural_image
Illustration of a faucet pouring liquid into a square tank (no text or symbols)
natural_image
Technical line drawing of a mechanical device with a faucet and housing (no text or symbols)text_image
Exploded diagram of a vacuum cleaner with numbered parts for identificationProducător: E-TEK Electronics Manufactory Co., LTD
text_image
Diagram showing a vacuum cleaner with a click instruction and directional arrow, illustrating the process from before to after change.natural_image
Illustration of a vacuum cleaner with red triangular warning symbols (no text or labels)text_image
Diagram illustrating a mechanical assembly process with labeled components and directional arrows indicating movement or change.Îndepărtarea:
natural_image
Diagram showing a robotic device before and after change, with red triangular markers indicating motion or component changes (no text or symbols present)Îndepărtarea:
natural_image
Illustration of a hand pouring liquid into a spray bottle (no text or symbols)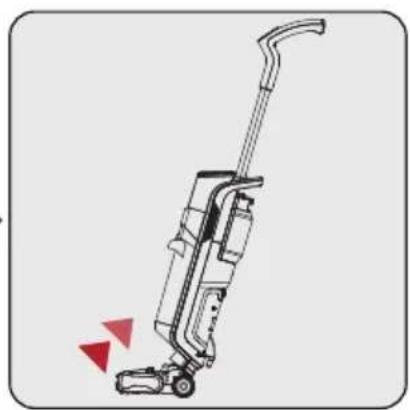
natural_image
Line drawing of a vacuum cleaner with red directional arrows indicating motion (no text or symbols)
text_image
MODE Buton On/Off on Button Off/Off before Mod Before Clearing Buttonnatural_image
Diagram of a handheld device with an arrow pointing to a target, showing concentric circles and an arrow symbol (no text or labels present)
text_image
Diagram showing a vacuum cleaner with a red hand icon pointing to its button, indicating action or control.
natural_image
Diagram showing three cylindrical containers with internal components and red triangular indicators (no text or symbols)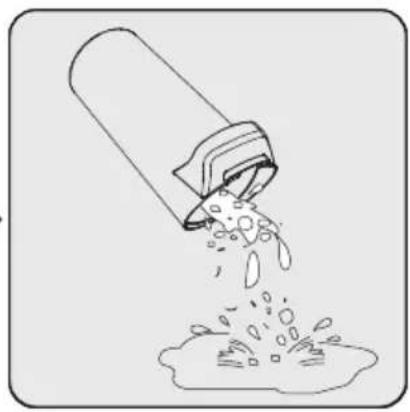
natural_image
Illustration of a pipe pouring liquid into a container (no text or symbols)
natural_image
Two identical mechanical device diagrams showing internal components with red triangular indicators, no text or symbols present.Etapa 1:
natural_image
Technical line drawing of a mechanical device with no visible text or symbols
natural_image
Technical line drawing of a mechanical device with lever and base components (no text or symbols)
natural_image
Line drawing of a hand cleaning a firearm with a cloth (no text or symbols)natural_image
Illustration of a faucet pouring liquid into a square tank (no text or symbols)
natural_image
Technical line drawing of a mechanical device with a faucet and housing (no text or symbols)text_image
Exploded diagram of a vacuum cleaner with numbered parts for identification2 Pregled
2.1 Kontrole i komponente
- Dugme za mod podešavanja količine vode
- Dugme za uključivanje-isključivanje
- Dugme za aktiviranje samočišćenja
- Ručka
- LED ekran + Samočisteći na dodir
- Cedilo prljavog rezervoara
- Prljavi rezervoar
- Poklopac valjka četke
- Valjak četke
- Komponenta četke za pod
- Rezervoar za svežu vodu
2.2 Tehnički podaci
Nominalna ulazna snaga : 250 W
Ulazna jačina: 100-240 V\~ 50/60 Hz 0,8 A
Vodootporan: IPX 4
Izlaz:22,0 V 1,0 A
Period punjenja: 4-5 sati
Period rada maksimalnom snagom: 16 min
Period rada srednjom snagom: 25 min
2.3 Karakteristike proizvoda
Ovaj uređaj sadrži tri funkcije: Usisavanje; Čišćenje i samočišćenje.
Manufactory Co., LTD
Identifikator modela:
ZD024M220100EU
Ulazni napon: 100-240 V AC
text_image
Diagram showing a vacuum cleaner with a click instruction and directional arrow, illustrating the process from left to right.Umetnite ručku u telo vertikalno.
Sastavljanje će završiti nakon što se čuje „klik“.
text_image
Da biste uklonili ručku, pritisnite izbočinu na dnu ručke i povucite je prema gore.3.2 Instalacija rezervoara za čistu vodu
natural_image
Illustration of a vacuum cleaner with red triangular warning symbols indicating mechanical stress or hazard (no text or labels)text_image
Diagram illustrating a mechanical assembly process with labeled components and directional arrows indicating movement or change.Uklanjanje:
Otključajte valjak četke pritiskom na dugme levo i izvlačenjem valjka četke prema gore.
Instalacija:
Postavite valjak četke na osovinu desnog točka i pritisnite četku valjka prema dole. Dugme za otključavanje valjka četke opremljeno je kopčom za pozicionisanje, a montaža je završena kada se čuje "klik".

Kada koristite četku na podu tepiha, preporučuje se da isključite funkciju prskanja vode.
3 Instalacija
3.4 Instalacija poklopca valjka četke
natural_image
Diagram showing a robotic device before and after assembly, with red triangular indicators indicating motion or change (no text or symbols present)Uklanjanje:
Pritisnite dugme za otpuštanje na gornjem poklopcu četke za pod prstom i povucite prema gore da biste uklonili gornji poklopac četke za pod.
Instalacija:
Poravnajte kopču na dnu gornjeg poklopca četke za zemlju sa utorom za karticu, čvrsto pritisnite poklopac i dovršite montažu kada se čuje „klik“.
4 Rad
4.1 Kako se radi

Ako nakon čišćenja ostane voda na podu, preporučuje se korišćenje suvog moda čišćenja vode.
natural_image
Line drawing of a water spray bottle with a faucet, showing liquid flow from the outlet (no text or symbols)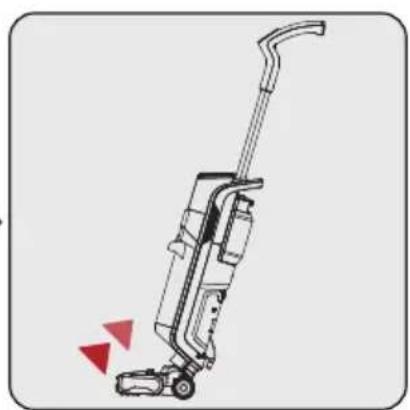
natural_image
Line drawing of a vacuum cleaner with red directional arrows indicating motion (no text or symbols)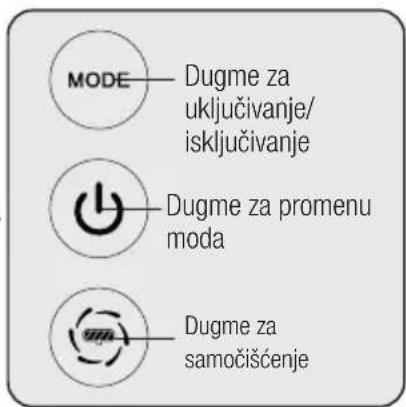
text_image
MODE Dugme za uključivanje/isključivanje Dugme za promenu moda Dugme za samočišćenjePonovo punjenje vode: Otvorite rezervoar sveže vode da dodate vodu.
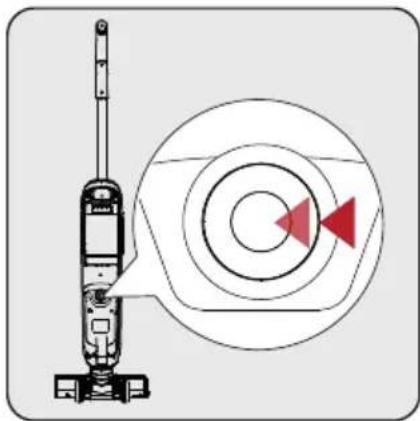
Uključeno:
Nagnite telo aparata i pritisnite dugme za uključivanje/isključivanje da biste uključili funkciju usisavanja, a funkcija raspršivanja vode niskog nivoa automatski će početi u isto vreme.
Prekidač moda:
Podesite nivo prskanja vode u skladu sa stvarnim zahtevima za čišćenje.
natural_image
Diagram of a vacuum cleaner next to an optical target with red triangular arrows indicating direction (no text or symbols)
UPOZORENJE: Ako se dogodi neka neočekivana situacija poput automatskog uključivanja, pritisnite ovo dugme da isključite uređaj.
4 Rad
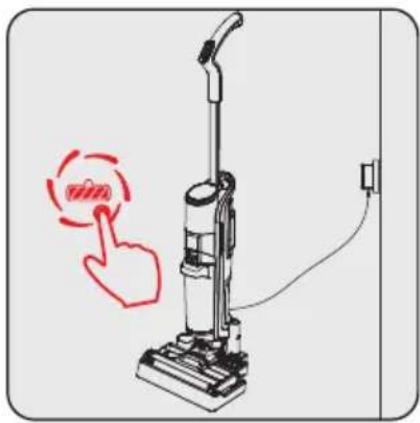
4.2 Samoočišćenje
natural_image
Illustration of a vacuum cleaner with a red hand pointing to the button, next to a wall-mounted power outlet (no text or symbols)
natural_image
Diagram showing three cylindrical containers with internal components and red triangular indicators, no text or symbols present.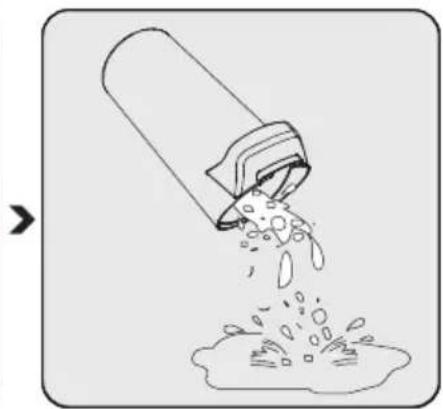
natural_image
Illustration of a container pouring liquid into a granular substance (no text or symbols)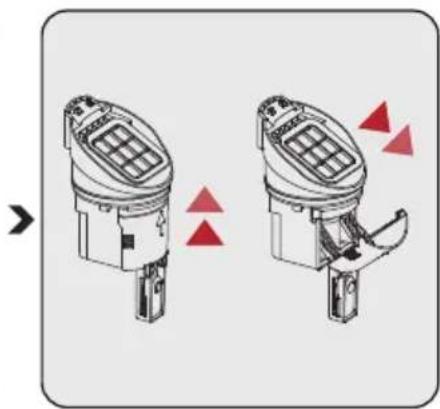
natural_image
Diagram of two identical mechanical components with red triangular indicators indicating movement or change (no text or symbols present)Korak 1:
Pritisnite da izvadite rezervoar za prljavštinu.
Korak 2:
Izvadite poklopac rezervoara za prljavštinu.
Izlijte mokri otpad i isperite rezervoar.
Korak 3:
Povucite da otvorite poklopac koji se nalazi na poklopcu i izlijte suvi otpad.
4 Rad
natural_image
Technical line drawing of a mechanical device with no visible text or symbols
UPOZORENJE: Prilikom čišćenja prikazanog područja četke, koristite četku za čišćenje i izbegavajte da je čistite rukama. Može da povredi prst.
natural_image
Technical line drawing of a mechanical device with lever and base (no text or symbols)

natural_image
Line drawing of a hand cleaning a firearm with a cloth (no text or symbols)Preporučuje se dubinsko čišćenje valjka četke nakon upotrebe svakih četiri do pet puta. Kako biste izbegli omotavanje dlaka oko valjka četke, koristite višenamensku četku za čišćenje. Preporučljivo je staviti valjak četke na provetreno mesto da se osuši.
Po potrebi isperite poklopac valjka četke

natural_image
Illustration of a faucet pouring liquid into a square tank (no text or symbols)
natural_image
Technical line drawing of a mechanical device with a faucet and housing (no text or symbols)Očistite površinu stanice za skladištenje čistom vodom nakon svakog samočišćenja.
text_image
Exploded diagram of a vacuum cleaner with numbered parts for identification2.1 Органи за управление и компоненти
Manufactory Co., LTD
text_image
Diagram showing a vacuum cleaner with a click instruction and directional arrow, illustrating the process from before to after change.text_image
Diagram showing a vacuum cleaner with red arrows indicating left-hand side and right-hand side, highlighting the component's direction.natural_image
Illustration of a vacuum cleaner with red triangular warning symbols (no text or labels)natural_image
Diagram showing a robotic device before and after change, with red triangular markers indicating motion or movement (no text or symbols present)Премахване:
text_image
Diagram illustrating a mechanical assembly process with labeled components and directional arrows indicating movement or change.Премахване:
natural_image
Illustration of a hand pouring liquid from a water tap into a spray bottle (no text or symbols)

natural_image
Line drawing of a vacuum cleaner with red directional arrows indicating motion (no text or symbols)
natural_image
Diagram of a vacuum cleaner next to an arrow target with concentric circles (no text or symbols)
text_image
Diagram showing a vacuum cleaner with a red hand icon pointing to its left button, indicating action or control.natural_image
Diagram showing three cylindrical containers with internal components and red triangular indicators (no text or symbols)
natural_image
Illustration of a pipe pouring liquid into a container (no text or symbols)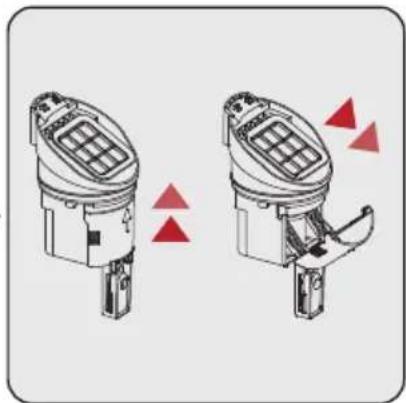
natural_image
Diagram of two identical mechanical components with red triangular indicators indicating alignment or adjustment (no text or symbols present)Стъпка 1:
natural_image
Technical line drawing of a mechanical device with no visible text or symbols
natural_image
Technical line drawing of a mechanical device with lever and base (no text or symbols)
natural_image
Line drawing of a hand cleaning a firearm with a cloth (no text or symbols)natural_image
Illustration of a faucet dispensing water into a square tank (no text or symbols)natural_image
Technical line drawing of a mechanical device with faucet and housing (no text or symbols)natural_image
Illustration of a vacuum cleaner with two red triangular indicators indicating motion or change (no text or symbols present)natural_image
Diagram showing a mechanical device interacting with a cylindrical container, with a red upward arrow indicating motion (no text or symbols present)natural_image
Diagram showing two mechanical components with directional arrows indicating motion (no text or symbols)text_image
Exploded diagram of a vacuum cleaner with numbered parts for identificationManufactory Co., LTD
Identifikator modela :
ZD024M220100EU
text_image
Diagram showing a vacuum cleaner with a click instruction and directional arrow, illustrating the process from before to after change.Postavite ručku okomito na kućište.
natural_image
Illustration of a vacuum cleaner with red triangular warning symbols (no text or labels)natural_image
Diagram showing a robotic device before and after assembly, with red triangular indicators indicating motion or change (no text or symbols present)Uklanjanje:
Pritisnite dugme za otključavanje na gornjem poklopcu četke za podove prstom i povucite prema gore da biste uklonili gornji poklopac četke za podove.
Instalacija:
Postavite jezičke gornjeg poklopca u žljebove ispred rolo-četke i čvrsto pritisnite poklopac. Instalacija je završena kada se čuje „klik“.
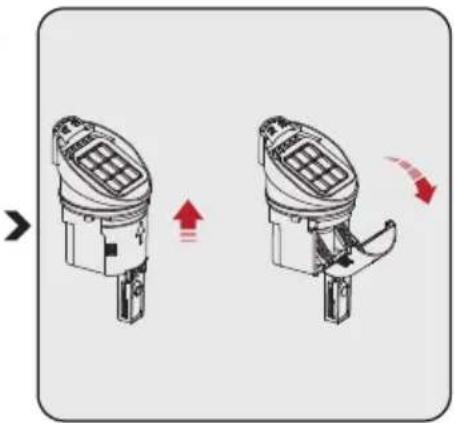
3.4 Uklanjanje i instalacija poklopca rolo-četke
text_image
Technical diagram showing a mechanical assembly before and after modification, with red arrows indicating downward motion.Uklanjanje:
natural_image
Line drawing of a hand pouring liquid from a water tap into a spray bottle (no text or symbols)

natural_image
Line drawing of a vacuum cleaner with red directional arrows indicating motion (no text or symbols)
natural_image
Diagram of a vacuum cleaner next to an arrow target with concentric circles (no text or symbols)UPOZORENJE! Pritisnite ovo dugme da isključite uređaj u neočekivanim situacijama, kao što je automatsko uključivanje.
natural_image
Illustration of a vacuum cleaner with a red hand icon pointing to its button (no text or symbols present)4 Rukovanje
Čim se proces čišćenja završi i proizvod se postavi na postolju za punjenje, a punjenje počne, ikona rolo-četke za čišćenje podova počinje da treperi na ekranu.
(Prije nego što pritisnete dugme za čišćenje poda na ručki (3), provjerite je li rezervoar za prl-javu vodu prazan, a rezervoar za čistu vodu pun.)
natural_image
Technical line drawing of a mechanical device with no visible text or symbols
natural_image
Technical line drawing of a mechanical lever system (no text or symbols)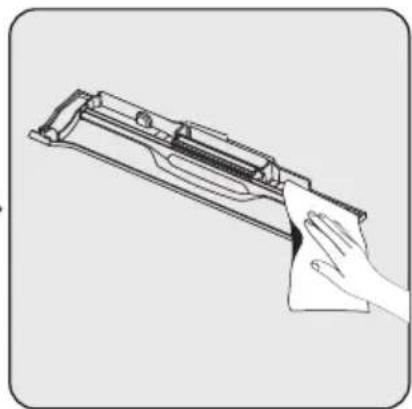
natural_image
Line drawing of a hand cleaning a firearm (no text or symbols)Dubinsko čišćenje cilindra rolo-četke preporučuje se svakih četiri ili pet upotreba. Koristite višenamjensku četku za čišćenje za uklanjanje dlačica i ostalih predmeta zapetljanih u rolo-četku. Nakon čišćenja i pranja rolo-četke ostavite da se osuši u dobro provjetrenom prostoru 24-48 sati. Neugodni mirisi mogu se pojaviti u četkama koje se ne osuše.
Po potrebi isperite poklopac rolo-četke
natural_image
Illustration of a faucet dispensing water into a square tank (no text or symbols)natural_image
Technical line drawing of a mechanical device with faucet and internal components (no text or symbols)Očistite donju površinu postolja za punjenje čistom vodom i osušite ga ako se neće koristiti duže vrijeme nakon procesa čišćenja rolo-četkom. Ako se mokra donja površina i rolo-četka ne osuše, to može uzrokovati stvaranje neugodnog mirisa.
natural_image
Illustration of a vacuum cleaner with two red triangular indicators indicating airflow or pressure (no text or symbols present)natural_image
Diagram showing a mechanical device interacting with a cylindrical container, with an upward arrow indicating motion (no text or symbols present)Uklonite kasetu HEPA filtera rezervoara za prljavu vodu i plovak rezervoara za prljavu vodu povlačenjem prema gore. Ispraznite i očistite rezervoar za prljavu vodu. Ako uređaj ne koristite duži vremenski period, osušite rezervoar za prljavu vodu kako biste spriječili neprijatan miris.
natural_image
Diagram showing two mechanical components with directional arrows indicating motion (no text or symbols)Izvucite HEPA filter. Operite i osušite.
Otvorite poklopac na plovku rezervoara za prljavu vodu. Ovdje se nakupljaju velike čestice prašine i prljavštine u spremniku za prljavu vodu. Očistite ga i stavite u rezervoar za prljavu vodu.

Za bolje korisničko iskustvo, preporučuje se zamjena filtera svaka 2-3 mjeseca (na osnovu dnevne učestalosti korištenja).

text_image
Exploded diagram of a vacuum cleaner with numbered parts for identification2 Pregled
Manufactory Co., LTD
Identifikator modela :
ZD024M220100EU
Ulazna snaga : 100-240Vac
Ulazna frekvencija : 50/60Hz
text_image
Diagram showing a vacuum cleaner with a click instruction and directional arrow, illustrating the process from before to after change.Postavite ručku okomito na kućište.
natural_image
Illustration of a vacuum cleaner with red triangular warning symbols (no text or labels)natural_image
Diagram showing a robotic device before and after assembly, with red triangular indicators indicating motion or change (no text or symbols present)Uklanjanje:
Prstom pritisnite gumb otključavanja na gornjem poklopcu okrugle četke i povucite gore za uklanjanje gornjeg poklopca četke za pod.
Postavljanje:
Postavite jezičce gornjeg poklopca u žljebove na prednjem di-jelu okrugle četke i snažno pritisnite poklopac. Postavljanje je gotovo kada čujete zvuk „klik“.
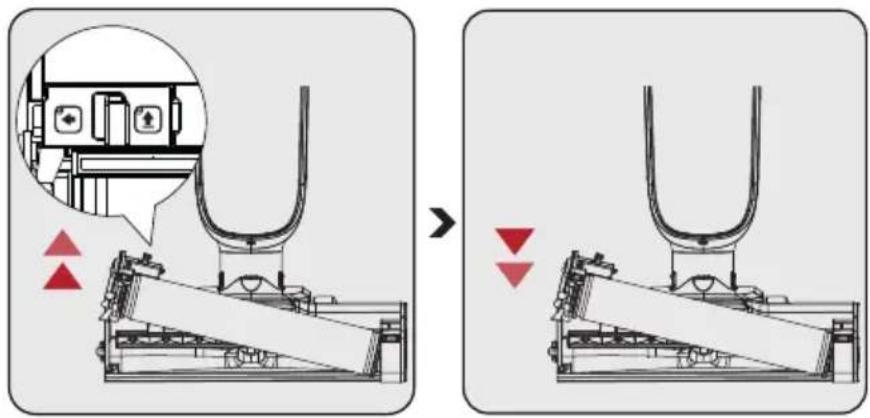
3.4 Uklanjanje i postavljanje poklopca okretna četka
text_image
Technical diagram showing a mechanical assembly before and after modification, with red arrows indicating downward motion.Uklanjanje:
natural_image
Line drawing of a hand pouring liquid into a water dispenser bottle (no text or symbols)

natural_image
Line drawing of a vacuum cleaner with red directional arrows indicating motion (no text or symbols)
natural_image
Diagram of a vacuum cleaner next to an arrow target with concentric circles (no text or symbols)
text_image
Diagram showing a vacuum cleaner with a red hand icon pointing to its left button, indicating action or control.Čim se postupak čišćenja dovrši, a proizvod se nalazi na postolju punjača, započinje punjenje, na zaslonu počinje treperiti ikona okretne četke za čišćenje poda.
(Prije pritiskanja gumba za čišćenje poda na ručki (3), provjerite je li spremnik za prljavu vodu prazan, a spremnik za čistu vodu pun).
natural_image
Diagram showing three cylindrical containers with internal components and red triangular indicators, no text or symbols present.
natural_image
Illustration of a pipe pouring liquid into a container with bubbles (no text or symbols)
natural_image
Diagram of two identical mechanical components with red triangular indicators indicating movement or assembly (no text or symbols)1. korak:
Pritisnite jezičac spremnik za prljavu vodu i uklonite spremnik za prljavu vodu.
2. korak:
Uklonite spremnik za prljavu vodu povlačeći kazetu hepa filtra prema gore i plovak spremnika za prljavu vodu.
natural_image
Technical line drawing of a mechanical device with no visible text or symbols
natural_image
Technical line drawing of a mechanical lever system with no visible text or symbols
natural_image
Line drawing of a hand cleaning a firearm (no text or symbols)Temeljito čišćenje cilindra okretne četke preporučuje se obavit nakon svake četvrte ili pete upotrebe. Višenamjensku četku za čišćenje koristite za uklanjanje kose/dlaka i drugih predmeta koji su se zapleli u okretnu četku. Nakon čišćenja i pranja okretne četke, pustite je neka se osuši u dobro prozračenom prostoru 24-48 sati. Neugodni mirisi mogu nastati ako se okretna četka ne osuši.
natural_image
Illustration of a faucet dispensing water into a square tank (no text or symbols)Operite i osušite HEPA filtar i tako spriječite infiltraciju zraka.
natural_image
Technical line drawing of a mechanical device with a faucet and internal components (no text or symbols)Očistite donju površinu postolja za punjenje čistom vodom i osušite ga ako ga nećete koristiti duže vrijeme nakon postupka čišćenja okrugle četke. Ako se mokra donja površina i okrugla četka ne osuše, to može izazvati stvaranje neugodnog mirisa.
natural_image
Illustration of a vacuum cleaner with two red triangular indicators indicating motion or change (no text or symbols present)Pritisnite jezičac spremnik za prljavu vodu i uklonite spremnik za prljavu vodu. Uklonite spremnik za prljavu vodu tako da ga povučete prema sebi.
natural_image
Diagram showing a mechanical device interacting with a cylindrical container, with an upward arrow indicating motion (no text or symbols present)Uklonite kazetu HEPA filtra spremnika za prljavu vodu i plovak spremnika za prljavu vodu povlačenjem prema gore. Ispraznite i očistite spremnik za prljavu vodu. Ako ga ne koristite dugo, osušite spremnik za prljavu vodu i spriječite neugodan miris.

natural_image
Diagram showing two mechanical components with directional arrows indicating motion (no text or symbols)Izvucite HEPA filtar. Operite ga i osušite.
Otvorite poklopac na plovku spremnika za prljavu vodu. Ovdje se nakupljaju velike čestice prašine i prljavštine u spremniku za prljavu vodu. Očistite ga i postavite ga u spremnik za prljavu vodu.

text_image
Exploded diagram of a vacuum cleaner with numbered parts for identification2 Преглед
2.1 Контроли и компоненти
Излез: 22 V DC 1,0 A
text_image
Diagram showing a vacuum cleaner with a click instruction and directional arrow, illustrating the process from before to after change.natural_image
Illustration of a vacuum cleaner with red triangular warning symbols (no text or labels)natural_image
Diagram showing a robotic device before and after assembly, with red triangular indicators indicating motion or change (no text or symbols present)Отстранување:
text_image
Technical diagram showing a mechanical assembly before and after modification, with red arrows indicating downward motion.Отстранување:
natural_image
Illustration of a hand pouring liquid from a water tap into a spray bottle (no text or symbols)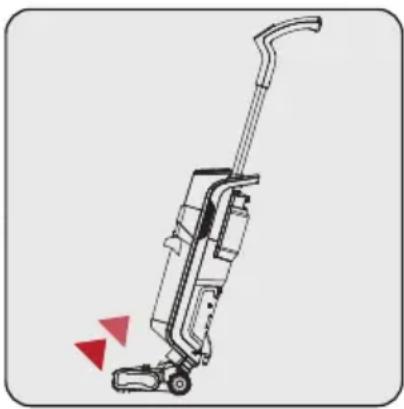
natural_image
Line drawing of a vacuum cleaner with red directional arrows indicating motion (no text or symbols)
natural_image
Diagram of a vacuum cleaner next to an arrow target with concentric circles (no text or symbols)
ПРЕДУПРЕДУВАЊЕ! Be
text_image
Diagram showing a vacuum cleaner with a red hand icon pointing to its button, indicating action or control.natural_image
Diagram showing three cylindrical containers with internal components and red triangular indicators, no text or symbols present.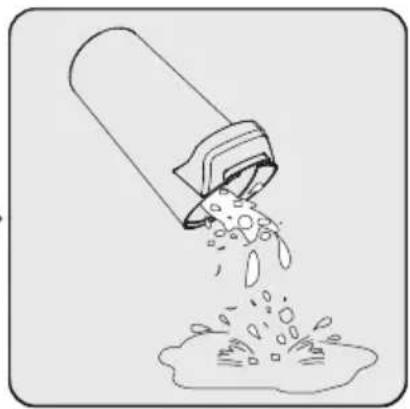
natural_image
Illustration of a pipe pouring liquid into a container with bubbles (no text or symbols)
natural_image
Two identical mechanical device diagrams showing internal components with red triangular indicators (no text or symbols)Чекор 1:
natural_image
Technical line drawing of a mechanical device with no visible text or symbols
natural_image
Technical line drawing of a mechanical lever system (no text or symbols)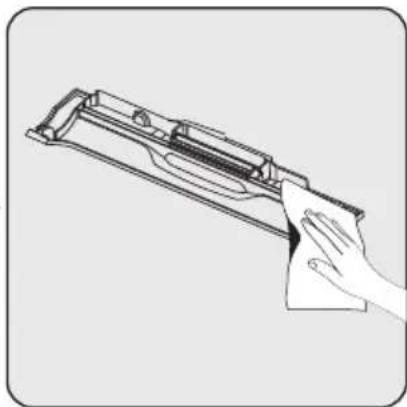
natural_image
Line drawing of a hand cleaning a firearm component (no text or symbols)natural_image
Illustration of a faucet dispensing water into a square tank (no text or symbols)natural_image
Technical line drawing of a mechanical device with a faucet and internal components (no text or symbols)natural_image
Illustration of a vacuum cleaner with two red triangular indicators indicating motion or change (no text or symbols present)natural_image
Diagram showing a mechanical device interacting with a cylindrical container, with an upward arrow indicating motion (no text or symbols present)natural_image
Diagram showing two mechanical components with directional arrows indicating motion (no text or symbols)text_image
Exploded diagram of a vacuum cleaner with numbered parts for identification2 Pregled
2.1 Upravljalni gumbi in sestavni deli
Manufactory Co., LTD
Identifikacijska oznaka modela:
ZD024M220100EU
Vhodna napetost: 100–240 V AC
Vhodna frekvenca: 50/60 Hz
Vhodni tok: 0,8A
Izhodna napetost: 22,0 V DC
Izhodni tok: 1,0 A
Izhodna moč: 22,0W
Povprečna aktivna
učinkovitost : 88,25%
Učinkovitost pri
nizki obremenitvi (10 %) : 84,57%
Poraba energije v stanju
brez obremenitve : 0,08W
20 POZORILO! Uporabljajte samo vodo s temperaturo pod 25°. Ne uporabite vrele vode.
text_image
Diagram showing a vacuum cleaner with a click instruction and directional arrow, illustrating the process from before to after change.text_image
Diagram showing a vacuum cleaner with red arrows indicating left-hand side and right-hand side, highlighting the component's direction.natural_image
Illustration of a vacuum cleaner with red triangular warning symbols (no text or labels)natural_image
Diagram showing a robotic device before and after assembly, with red triangular indicators indicating motion or change (no text or symbols present)Odstranitev:
text_image
Technical diagram showing a mechanical assembly before and after installation, with red arrows indicating process steps.Odstranitev:
Sprostite krtačni valj tako, da pritisnete levi gumb in povlečete krtačni valj navzgor.
Namestitev:
natural_image
Line drawing of a hand pouring liquid into a water dispenser bottle (no text or symbols)
natural_image
Line drawing of a vacuum cleaner with red directional arrows indicating motion (no text or symbols)
natural_image
Diagram of a handheld device with an arrow pointing to a target, showing concentric circles and an arrow symbol (no text or labels present)Vklop:
natural_image
Illustration of a vacuum cleaner with a red hand icon pointing to its left button (no text or symbols present)natural_image
Diagram showing three cylindrical containers with internal components and red triangular indicators, no text or symbols present.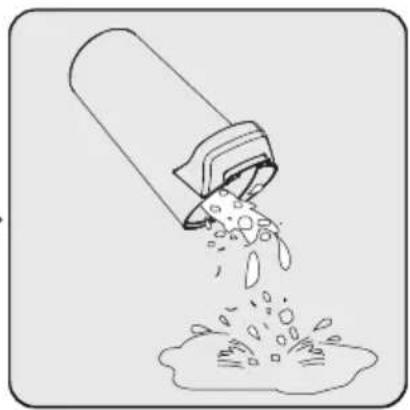
natural_image
Illustration of a pipe pouring liquid into a container (no text or symbols)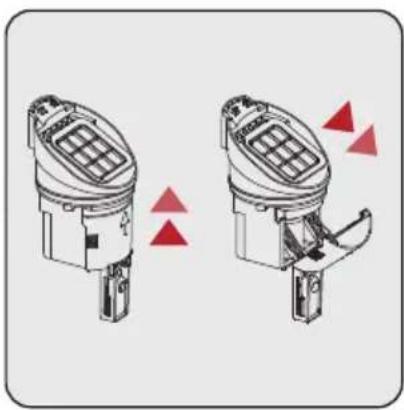
natural_image
Diagram of two identical mechanical components with red triangular indicators indicating movement or force (no text or symbols)1. korak:
Pritisnite zapah posode za umazano vodo, da odstranite posodo za umazano vodo.
2. korak:
Odstranite posodo za umazano vodo tako, da povlečete navzgor kaseto filtra HEPA in plovec posode za umazano vodo.
natural_image
Technical line drawing of a mechanical device with no visible text or symbols
natural_image
Technical line drawing of a mechanical device with lever and base (no text or symbols)
natural_image
Line drawing of a hand cleaning a firearm (no text or symbols)natural_image
Illustration of a faucet dispensing water into a square tank (no text or symbols)Operite in posušite filter HEPA, da preprečite infiltracijo zraka.
natural_image
Technical line drawing of a mechanical device with a faucet and internal components (no text or symbols)natural_image
Illustration of a vacuum cleaner with two red triangular indicators indicating motion or change (no text or symbols present)Pritisnite zapah posode za umazano vodo, da odstranite posodo za umazano vodo. Odstranite posodo za umazano vodo tako, da jo povlečete proti sebi.
natural_image
Diagram showing a robotic arm interacting with a cylindrical device, with a red upward arrow indicating motion (no text or symbols present)Odstranite kaseto filtra HEPA posode za umazano vodo in plovec posode za umazano vodo tako, da povlečete navzgor. Izpraznite in očistite posodo za umazano vodo. V primeru daljše neuporabe posušite posodo za umazano vodo, da preprečite neprijeten vonj.

natural_image
Diagram showing two mechanical components with directional arrows indicating motion (no text or symbols)Izvlecite filter HEPA. Operite in posušite.
Odprite pokrov na plovcu posode za umazano vodo. Tu se nabirajo veliki delci prahu in umazanije v posodi za umazano vodo. Očistite ga in ga namestite v posodo za umazano vodo.

text_image
Exploded diagram of a vacuum cleaner with numbered parts for identificationManufactory Co., LTD
Identifikuesi i modelit:
ZD024M220100EU
text_image
Diagram showing a vacuum cleaner with a click instruction and directional arrow, illustrating the process from before to after change.text_image
Diagram showing a vacuum cleaner with red arrows indicating left-hand side and right-hand side, highlighting the component's direction.natural_image
Illustration of a vacuum cleaner with red triangular warning symbols (no text or labels)natural_image
Diagram showing a robotic arm before and after assembly, with red triangular indicators indicating motion or movement (no text or symbols present)Heqja:
text_image
Technical diagram showing a mechanical assembly before and after modification, with red arrows indicating downward motion.Heqja:
natural_image
Line drawing of a hand pouring liquid into a water bottle (no text or symbols)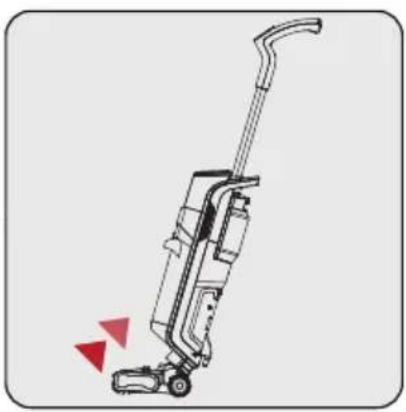
natural_image
Line drawing of a vacuum cleaner with red directional arrows indicating motion (no text or symbols)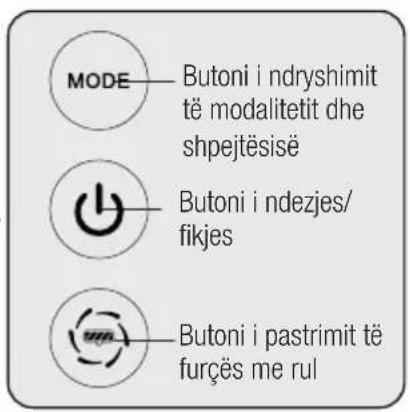
natural_image
Diagram of a vacuum cleaner next to an arrow target with concentric circles (no text or symbols)
natural_image
Illustration of a vacuum cleaner with a red hand icon pointing to its button, next to a power outlet (no text or symbols)4 Përdorimi
natural_image
Technical line drawing of a mechanical device with no visible text or symbols
natural_image
Technical line drawing of a mechanical lever system mounted on a base (no text or symbols)
