
EE610 - Motion detector HAGER - Free user manual and instructions
Find the device manual for free EE610 HAGER in PDF.
| Brand | Hager |
| Model | EE610 |
| Product type | Motion detector with LED lamp |
| Dimensions (L x W x H) | 179 x 145 x 201 mm |
| Light source | Integrated non-replaceable LED |
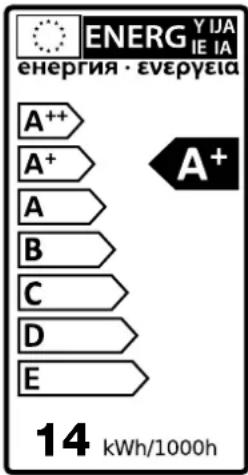
| Luminous flux | 1100 lumens |
| Color temperature | 4000 K (neutral white) |
| Power supply | 230-240 V~, 50/60 Hz |
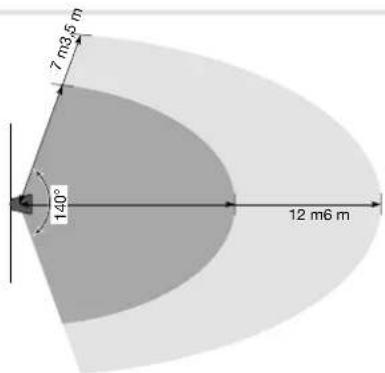
| Detection angle | 140° |
| Detection range | 6 m (default), up to 12 m with remote control |
| Time delay setting | 5 seconds to 15 minutes |
| Twilight threshold setting | 5 to 1000 lux |
| Protection rating | IP55 |
| Operating temperature | -25°C to +50°C |
| Storage temperature | -30°C to +70°C |
| Maximum installation altitude | 2000 m |
| Insulation class | II |
| Recommended protection | Fuse 10A gG/gl or circuit breaker 16A curve C/B |
| Cable cross-section | 1.5...2.5 mm² |
| Accessories supplied | Plugs and screws for fixing |
| Special functions | Test mode, optional remote control (EE806/52900) |
| Maintenance | Clean with a soft dry cloth. The light source is not replaceable; replace the entire unit at the end of its life. |
| Safety | Installation by a qualified electrician, de-energized. Heat sink hot during operation. |
| General information | CE compliant, usable in Europe and Switzerland. Dispose of in accordance with WEEE regulations. |
Frequently Asked Questions - EE610 HAGER
User questions about EE610 HAGER
0 question about this device. Answer the ones you know or ask your own.
Ask a new question about this device
Download the instructions for your Motion detector in PDF format for free! Find your manual EE610 - HAGER and take your electronic device back in hand. On this page are published all the documents necessary for the use of your device. EE610 by HAGER.
USER MANUAL EE610 HAGER
natural_image
Line drawing of a handheld electric shaver device with no text or symbols6LE000756E

Sommaire
and working principles 6
Dimensions.... 6
Installation / Dismantling.... 7
Settings......8
Technical characteristics.... 10

Índice
Installation/Demontage 12
Einstellungen 13
Démontage

Réglages
Puissance env.15 W (75 W incandescent)
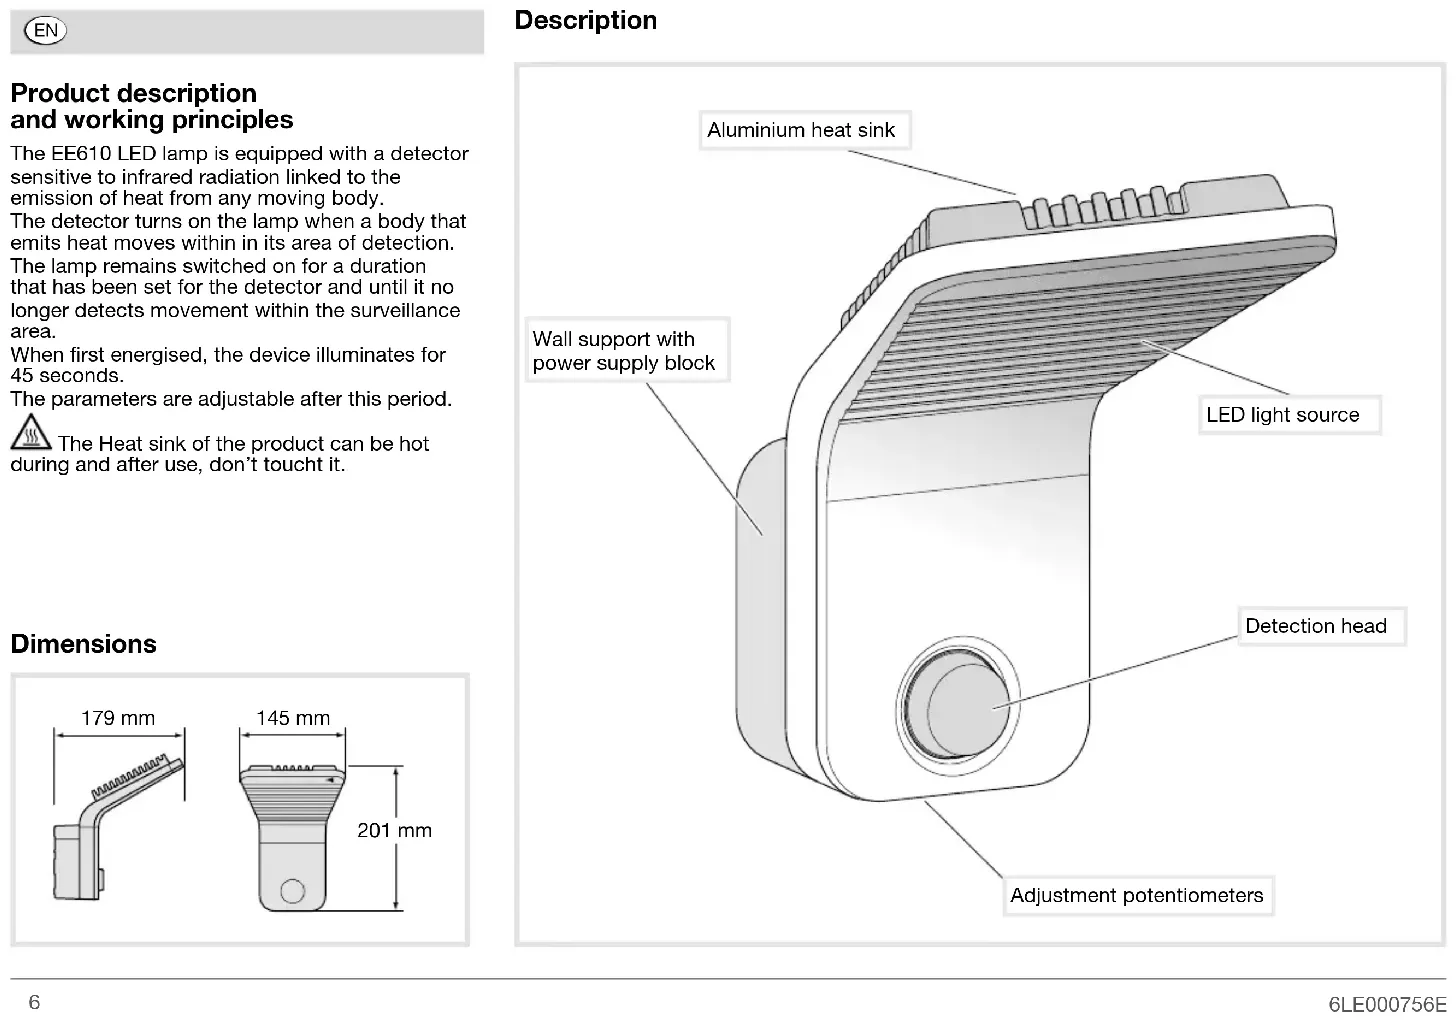
Product description and working principles
The EE610 LED lamp is equipped with a detector sensitive to infrared radiation linked to the emission of heat from any moving body.
The detector turns on the lamp when a body that emits heat moves within in its area of detection.
The lamp remains switched on for a duration that has been set for the detector and until it no longer detects movement within the surveillance area.
When first energised, the device illuminates for 45 seconds.
The parameters are adjustable after this period.

The Heat sink of the product can be hot and after use, don't touch it.
Dimensions


This device is to be installed only by a professional electrician according to local applicable installation standards. Be sure to perform all manipulations with the device switched off.
Installation
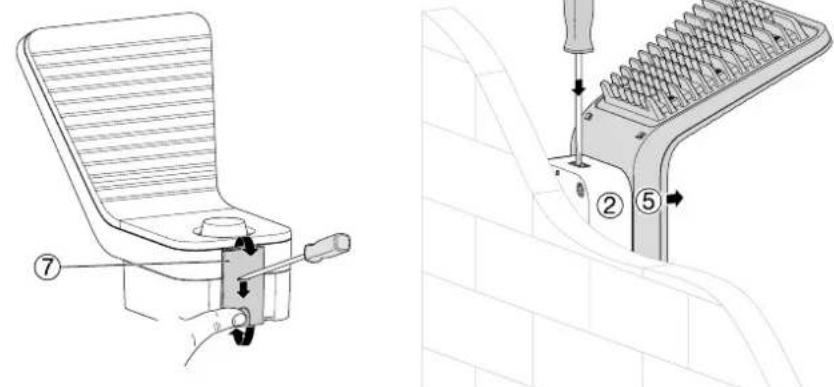
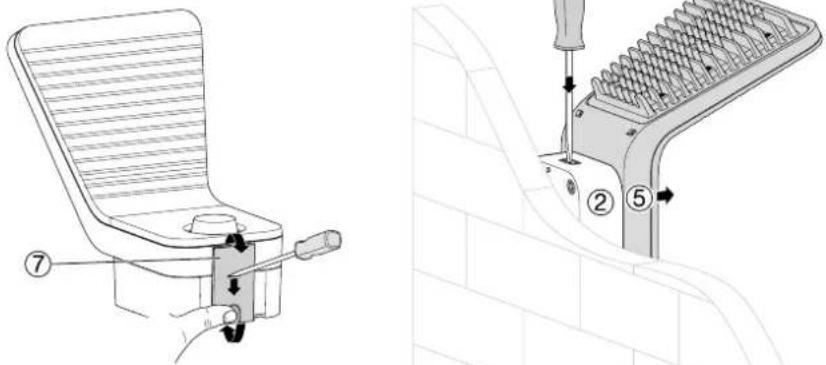
- Insert the cable into the cable grommet ① in order to facilitate access to the cables during assembly.
- Screw the wall plate ② to the wall using the 2 screws and wall plugs provided ③.
- Connect the wires as shown in the diagram ④. The earth terminal is used for earth wire parking only.
- Clip the body of the lamp ⑤ onto the wall plate ② (a «click» confirms that the casing is closed).
- Tighten the theft prevention screw ⑥ located under the LED lamp.
- Carry out the adjustments (see pages 8 and 9).
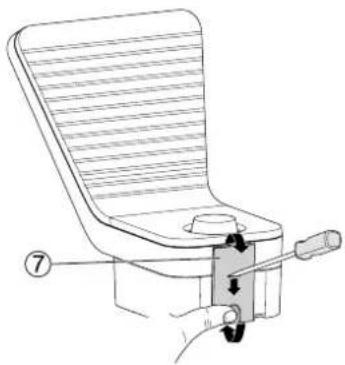
- Put in place the cover ⑦.
Dismantling
- Place a flat screwdriver in the notch of the cover ⑦ and push it towards the wall (\~ 2 mm).
- Press the rear of the cover, rotate it and remove.
- Loosen the theft prevention screw ⑥ located under the LED lamp.
- Using a flat screwdriver, press in the upper notch of the product.
- Remove the body of the lamp ⑤ from the wall plate ②.
Installation

Dismantling
natural_image
Line drawing of a mechanical device with a handle and lever, no text or symbols present
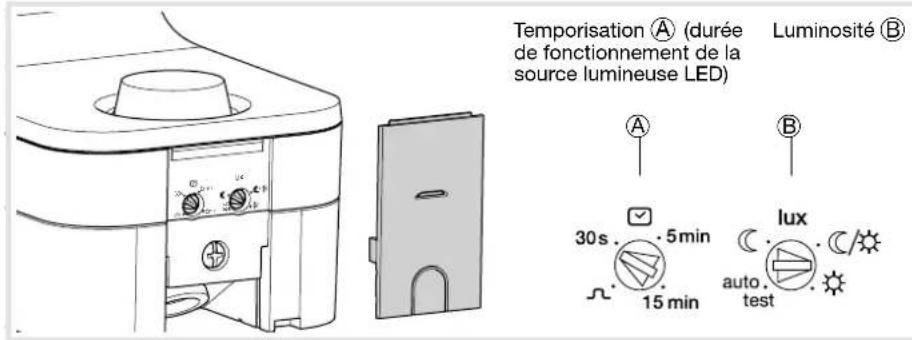
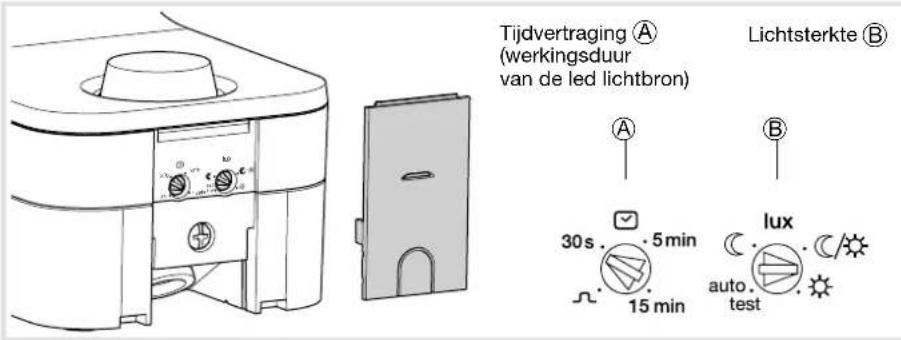
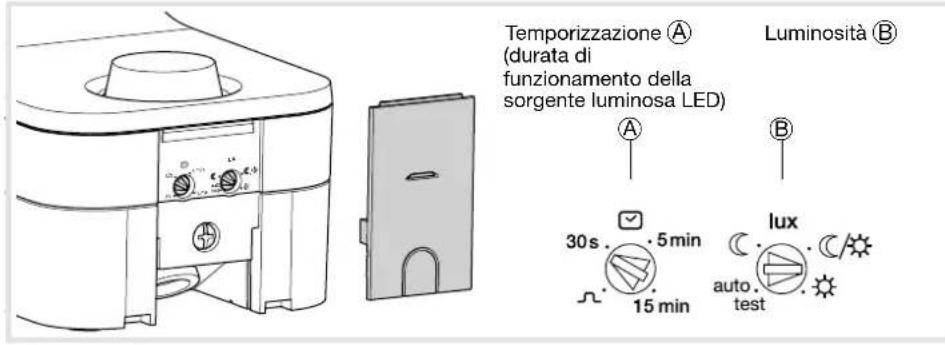
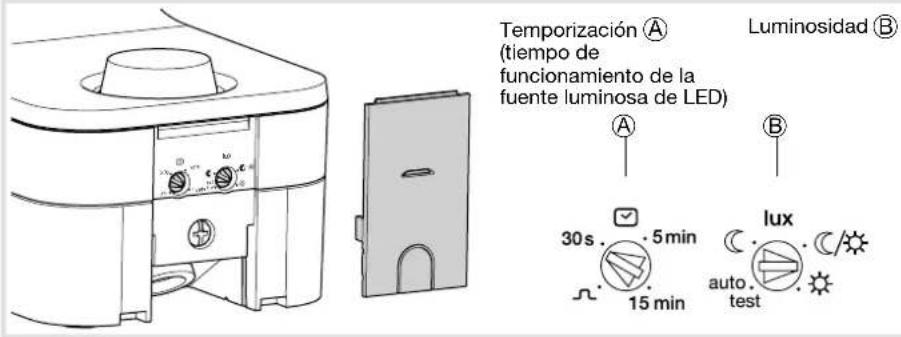
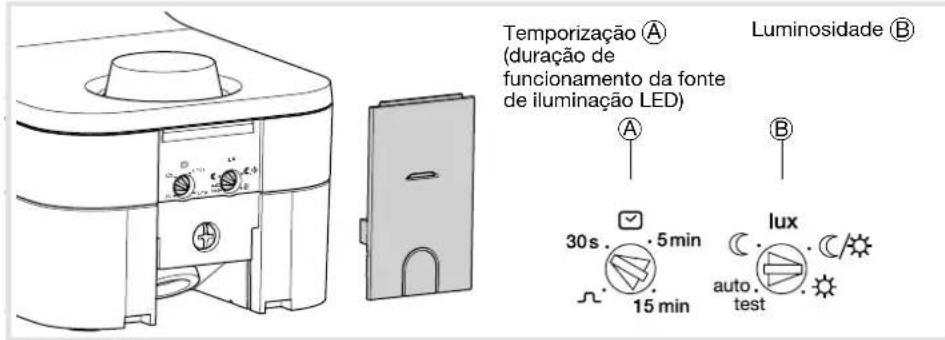
Settings
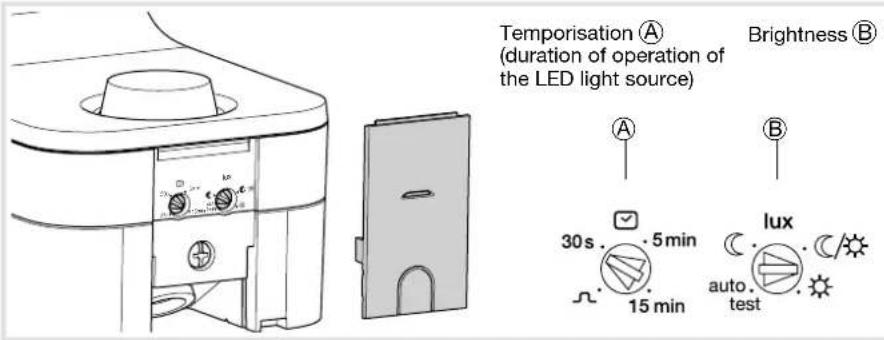
Testing and validating the detection zone
Put the potentiometer Ⓑ on "test" mode. The "test" mode is available for 3 min. Every movement detected switches on the light for 1s. After 3 min without detection of movement, the product returns to normal operation.
"Normal" operation (on/off)
The lamp is lit when the brightness level set by potentiometer is judged insufficient and a movement is detected. After detection, the light stays on for the length of time predefined by the potentiometer . The fixed timing is reset after each detection. Please note: when the potentiometer is on "auto test", the settings are predefined (see table below).
Detection zone
Optimal installation height is 2 m.
The detection zone shall remain free of obstacle.

| Action Settings Potentiometer | ||
| Use Auto settings (factory) or set by the remote control to switch the light automatically for a given time. | Auto SettingsPut the lux potentiometer on “auto test”.The settings are predefined: Lux = , (operating at night only) time = 3 min, sensitivity = min.Remote control settings(manual settings inhibited). | 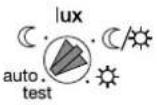 |
| Automatically switch on the light for a defined time. | Installer settings |  |
| Briefly turn on the light. | Impulse Auto settings are usable with time = 5 s. (cannot be changed). | 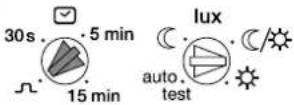 |
| Test and validate the detection zone. | Test modeMove the potentiometer to “auto test”. On this position, the remote control can be used. After 3 min without detection of movement, the product returns to normal operation. |  |
Using the remote control (option: ref. EE806/52900)
The detector receives instructions from the remote control when the lux potentiometer® is on the "auto test" position.
If the potentiometer is put on another value, the local setting resumes.
The LED of the detector lights up to confirm the signal with the remote control.
It flashes quickly for 2 s when an instruction is received and 5 s for a reset.
When an instruction is not authorised, the LED lights up for 1 s.
The available settings are:
- fixed time,
- level of luminosity,
- sensitivity (detection area).
-on/off, - holidays,
- auto,
- reset (return to factory settings),
- test.
| Potentiometer position | Values in lux |
| ≤ 5 | |
| ≈ 50/60 | |
| >1000 |
Technical characteristics
Power around 15 W (75 W luminous energy)
Colour of the light 4 000 Kelvin
Luminous flux 1 100 lumen
Power supply 230V\~ +10/-15% 50/60Hz
240V\~ +/-6% 50/60Hz
Max. altitude 2000m
Compulsory protection 10 A gG/gl fuse or
16A circuit-breaker curve C or curve B
Insulation class II
Recommended cable U1000R02V3G1.5
Connection without screws (Sanvis) terminals 1.5 ... 2.5 mm
Protection class IP55
Operating temperature -25 ... +50 °C
Storage temperature -30 ... +70 °C
Detection angle 140°
Forward detection distance 6 m (by default)
12 m maximum (with remote control)
Twilight threshold setting 5 ... 1000 lux
Operating duration setting 5 s ... 15 min
Accessories Mounting screws and wall plugs
Glow wire test 750°C
This light's light source cannot be replaced; the light must be replaced when the light source reaches the end of its usable life.
What to do if...
The lamp does not switch on
- In day/night mode, the twilight setting is set to night only mode.
- Readjust.
- Incorrect adjustment of the detection zone.
- Readjust.
The lamp does not switch off
- Continuous movement in the detection zone. - Inspect the detection zone, you may need to readjust the zone.
The lamp continually switches on and off
• Animals are moving in the detection zone.
- Adjust the sensitivity.

Correct Disposal of This product (Waste Electrical & Electronic Equipment)
(Applicable in the European Union and other European countries with separate collection systems).
This marking shown on the product or its literature indicates that it should not be disposed with other household waste at the end of its working life. To prevent possible harm to the environment or human health from uncontrolled waste disposal,
please separate this from other types of waste and recycle it responsibly to promote the sustainable reuse of material resources.
Household users should contact either the retailer where they purchased this product, or their local government office, for details of where and how they can take this item for environmentally safe recycling.
Business users should contact their supplier and check the terms and conditions of the purchase contract. This product should not be mixed with other commercial waste for disposal.
Usable in all Europe (€) and in Switzerland

Demontage

Demontage

natural_image
Line drawing of a mechanical device with a handle and lever, no text or symbols present
Instellingen
natural_image
Line drawing of a mechanical device with a handle and lever, no text or symbols present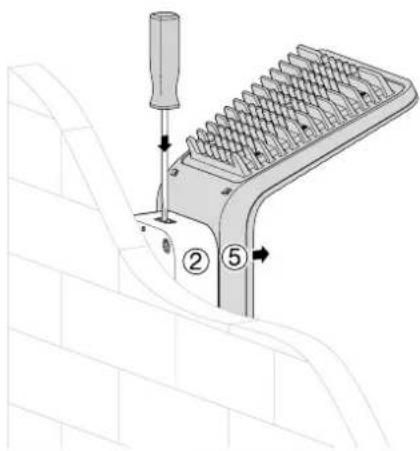
Regolazione
Desmontaje
Ajustes

Regulações
Αποσυναρμολόγηση

Ρυθμίσεις


- Sommaire
- Índice
- Product description and working principles
- Installation
- Dismantling
- Testing and validating the detection zone
- "Normal" operation (on/off)
- Using the remote control (option: ref. EE806/52900)
- Technical characteristics
- What to do if...
- The lamp does not switch on
- The lamp does not switch off
- The lamp continually switches on and off
Brand : HAGER
Model : EE610
Category : Motion detector