
EE600 - Motion detector HAGER - Free user manual and instructions
Find the device manual for free EE600 HAGER in PDF.
| Product Type | Motion detector with LED floodlight |
| Brand | Hager |
| Model | EE600 |
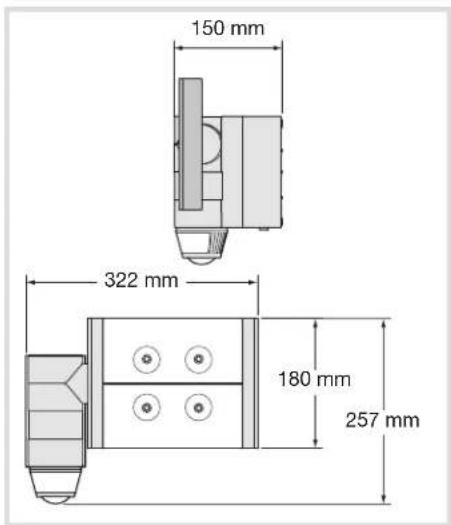
| Dimensions (L x H x D) | 322 x 150 x 257 mm |
| Power supply | 230 V~ +10/-15% 50/60Hz / 240 V~ +/-6% 50/60Hz |
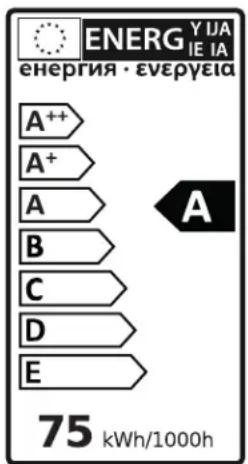
| Power | 60 W (equivalent 300 W incandescent) |
| Luminous flux | 3400 lumens |
| Color temperature | 5700 K |
| Detection angle | 220°/360° |
| Front detection range | 12 m |
| Twilight threshold adjustment | 5 ... 1000 lux |
| Operating time adjustment | 5 seconds to 15 minutes |
| Protection rating | IP55 |
| Insulation class | II |
| Operating temperature | -20°C to +45°C |
| Storage temperature | -20°C to +60°C |
| Main functions | Infrared detection, automatic switching, adjustable timer, brightness adjustment, adjustable sensitivity, optional remote control |
| Maintenance and cleaning | Clean with a soft, dry cloth. Do not use abrasive products or solvents. |
| Safety | Installation by a qualified electrician. Mandatory protection: 10A gG/gl fuse or 16A curve C or B circuit breaker. |
| Spare parts and repairability | Non-replaceable light source; at end of life, the entire luminaire must be replaced. |
| General information | CE compliant, usable throughout Europe. Optimal installation height: 2.5 m. |
Frequently Asked Questions - EE600 HAGER
User questions about EE600 HAGER
0 question about this device. Answer the ones you know or ask your own.
Ask a new question about this device
Download the instructions for your Motion detector in PDF format for free! Find your manual EE600 - HAGER and take your electronic device back in hand. On this page are published all the documents necessary for the use of your device. EE600 by HAGER.
USER MANUAL EE600 HAGER
natural_image
Exterior view of a modern office building (no signage)
Sommaire
Présentation.... 1
Installation 2
Technical characteristics.... 10

Inhoudsopgave
Beschrijving 16
Installatie 17
Instellingen 18
Réglages

natural_image
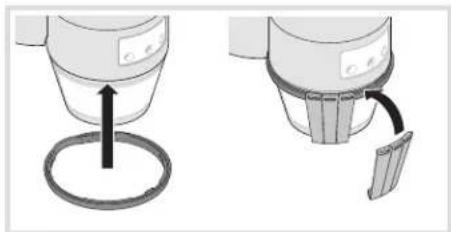
Two-step diagram showing a device with a circular base and an arrow indicating rotation or change (no text or symbols)Zone de détection
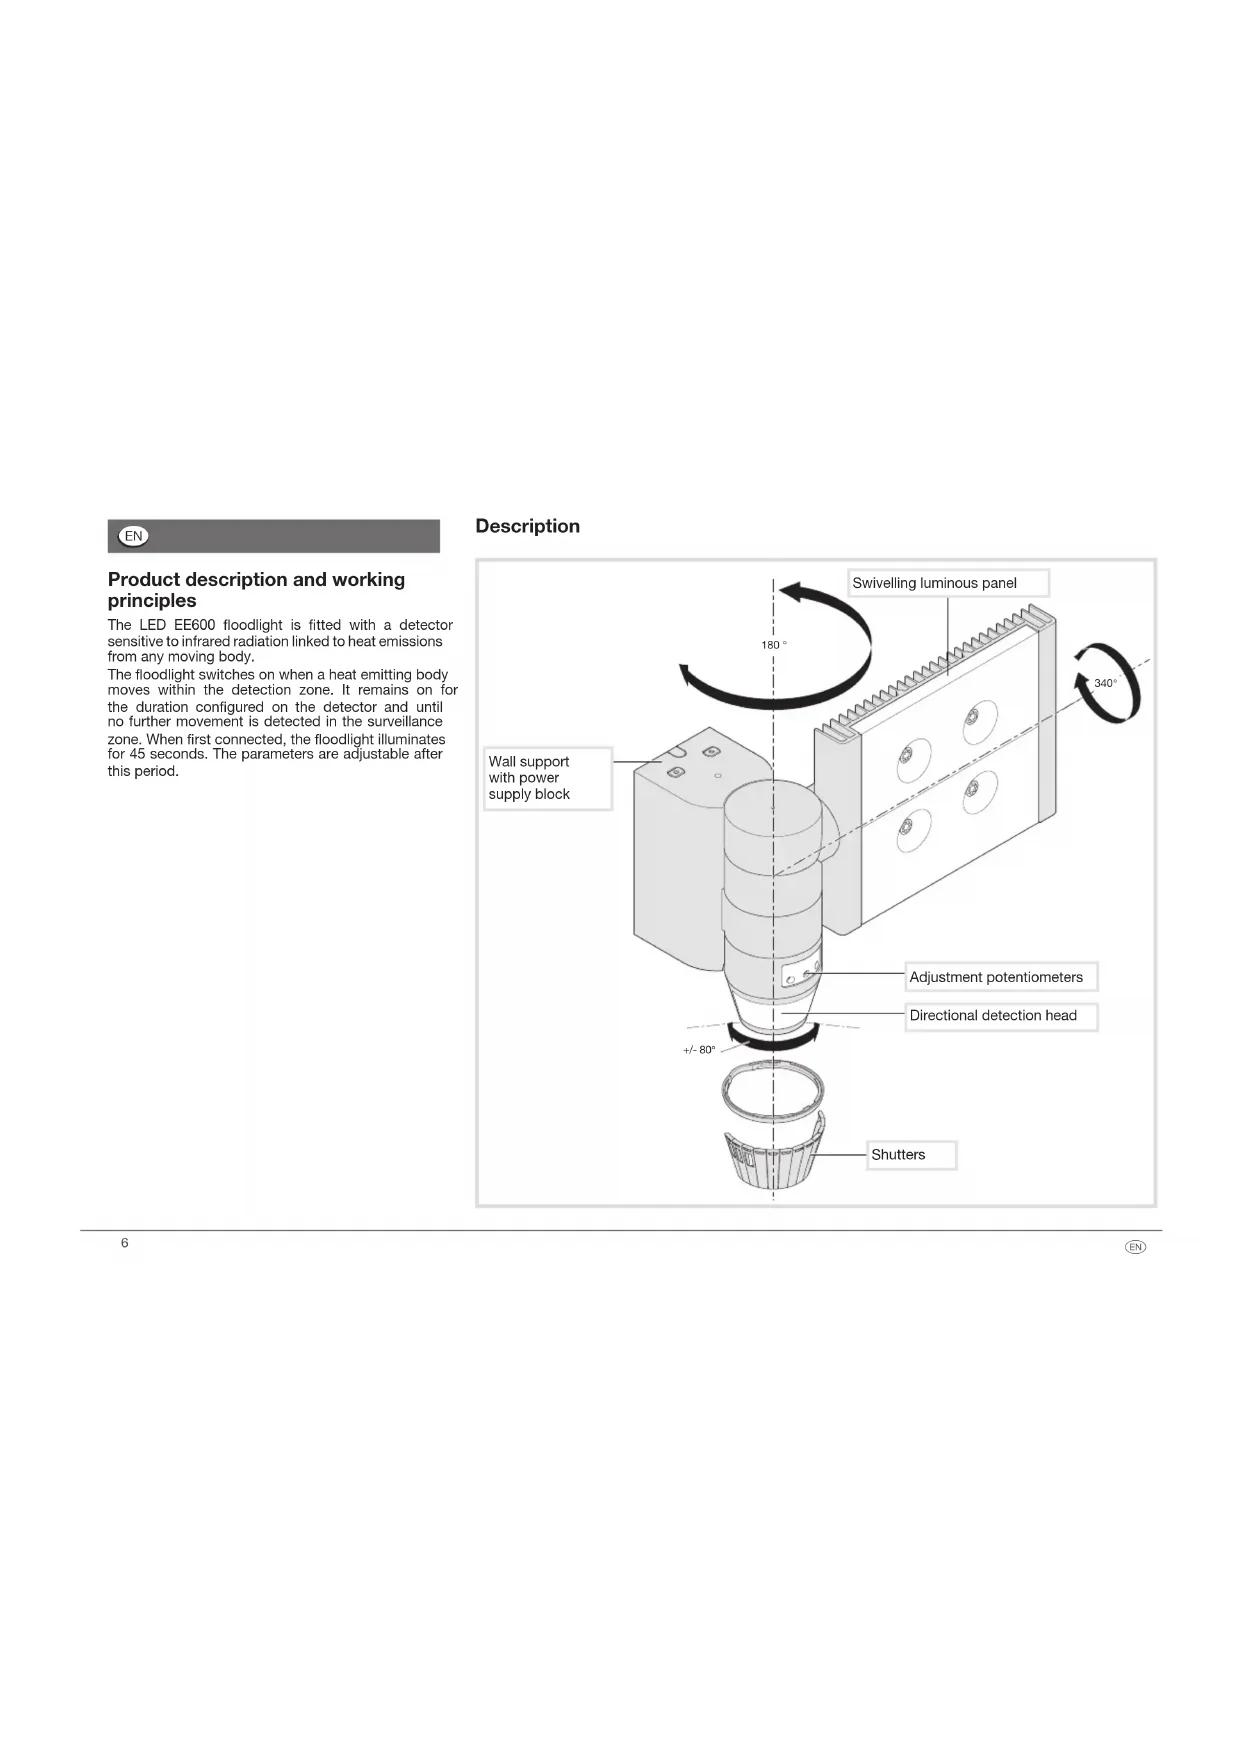
Product description and working principles
The LED EE600 floodlight is fitted with a detector sensitive to infrared radiation linked to heat emissions from any moving body.
The floodlight switches on when a heat emitting body moves within the detection zone. It remains on for the duration configured on the detector and until no further movement is detected in the surveillance zone. When first connected, the floodlight illuminates for 45 seconds. The parameters are adjustable after this period.
Description

Installation
1- Screw the block to the wall
2- Connect the wires as shown in the diagram
3- Clip the projector onto the block (a click confirms the connection)
4- Screw the floodlight onto the block (screws located behind the detector head).
Dimensions

This device is to be installed only by a professional electrician fitter according to local applicable installation standards.

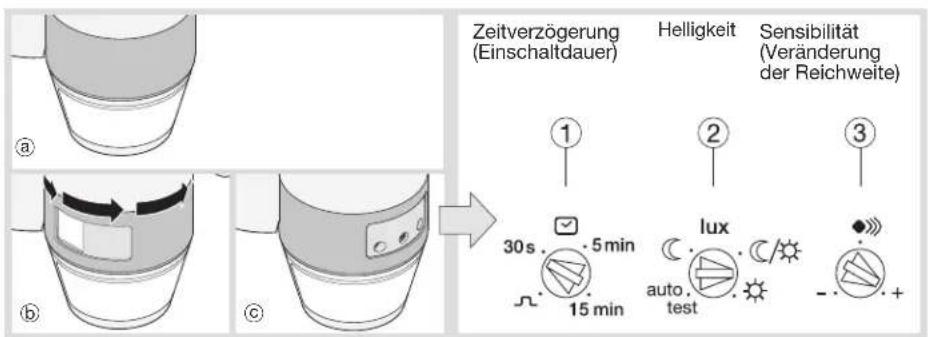
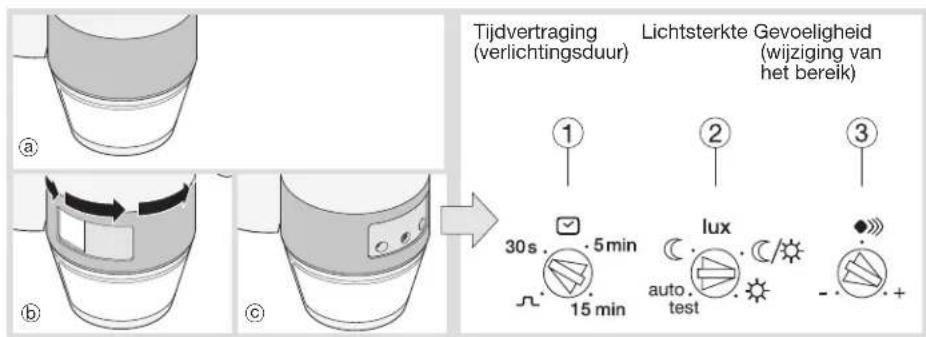
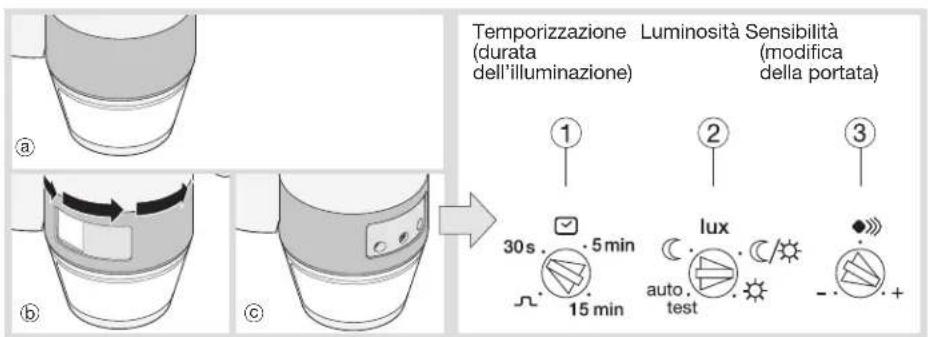
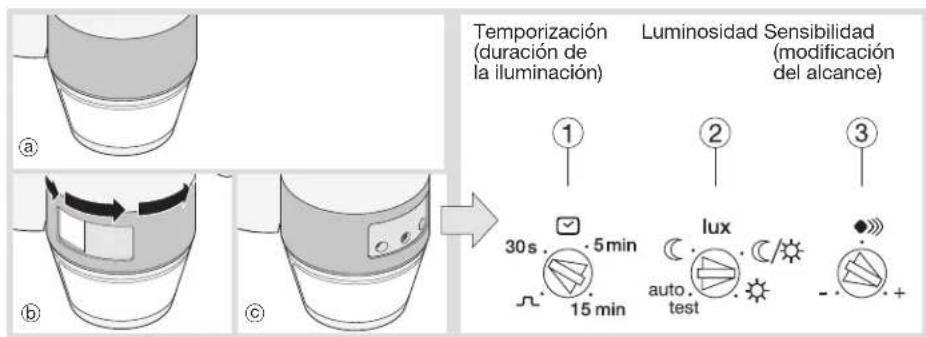
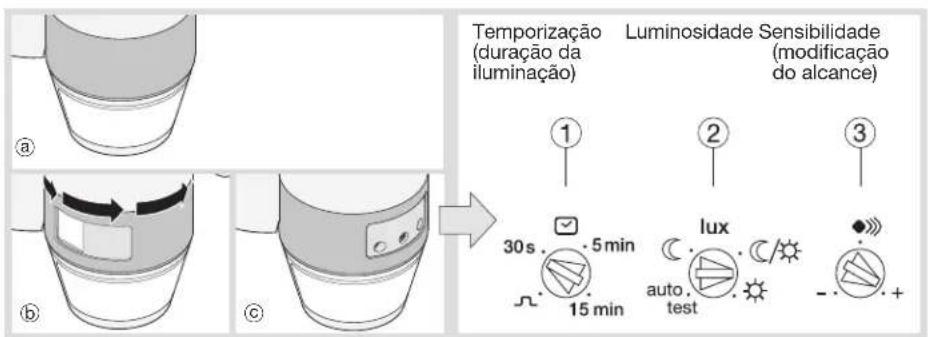
Adjustments

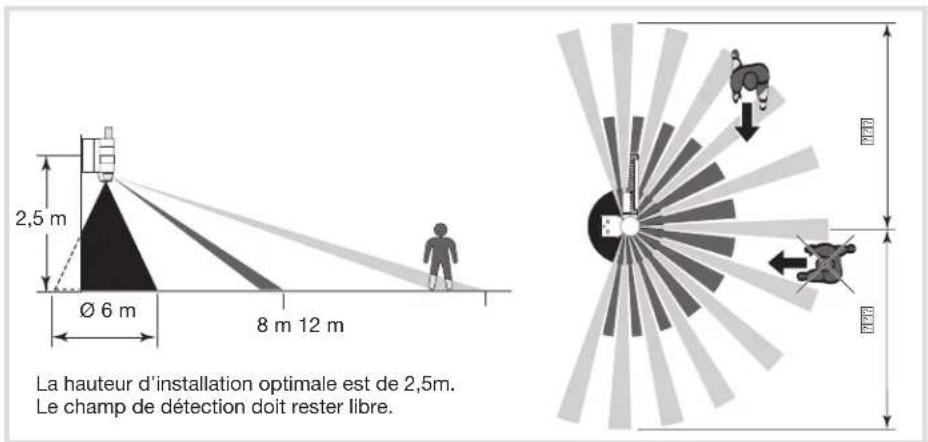
Detection zones
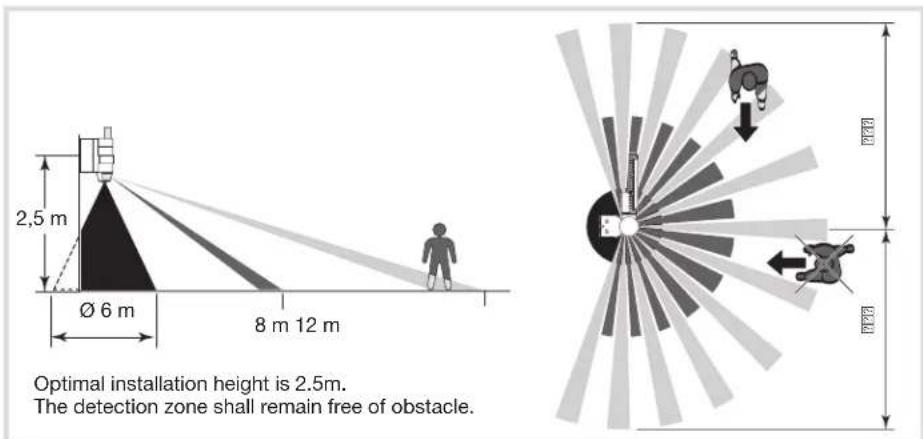
Testing and validating the detection zone
Put the potentiometer ② on Test mode and if necessary, use the shutters to define the detection zone.
natural_image
Two-step diagram showing a coffee maker's lid and its usage mechanism (no text or symbols)The Test mode is available for 3 min. Every movement detected switches on the light for 1s. After 3 min without detection of movement, the product returns to normal operation.
"Normal" operation (on/off)
The light panel switches on when the luminosity level defined by potentiometer ② is judged to be insufficient and when a movement is detected. After detection, the light stays on for the length of time predefined by the potentiometer ①. The fixed timing is reset after each detection. Please note: when the potentiometer ② is on "auto test", the settings are predefined (See table below).
| Action Settings Potentiometer | ||
| Use Auto settings (factory) or set by the remote control to switch the light automatically for a given time. | Auto SettingsPut the Lux potentiometer on “auto test”.The settings are predefined : Lux = C, (operating at night only)time = 3 min,sensitivity = max.Remote control settingsRemote control settings(Manual Settings inhibited). | 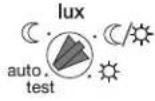 |
| Automatically switch on the light for a defined time. | Installer settings | 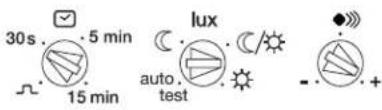 |
| Briefly turn on the light. | Impulse ΠAuto settings are usable with time = 5 s.(cannot be changed). |  |
| Test and validate the detection zone. | Test modeMove the potentiometer 2 to “auto test”. On this position, the remote control can be used. After 3 min without detection of movement, the product returns to normal operation. |  |
| Adjust the sensitivity. | Allows setting the range to avoid disturbance. |  |
Using the remote control (Option, ref. EE806/ 52900)
The detector receives instructions from the remote control when the Lux potentiometer ② is on the "auto test" position.
If the potentiometer is put on another value, the local setting resumes.
The LED of the detector lights up to confirm the signal with the remote control.
It flashes quickly for 2 s when an instruction is received and 5 s for a reset.
When an instruction is not authorised, the LED lights up for 1 s.
The available settings are :
- fixed time,
- level of luminosity,
- sensitivity,
-on/off, - holidays
- auto
- reset (return to factory settings)
- test.
| Potentiometer position | Values in lux |
| ≤ 5 | |
| / | ≈ 50/60 |
| < 1000 |
Technical specifications
| Power : around 60 W (300 W luminous energy) | |
| Colour of the light : 5700 Kelvin | |
| Luminous flux : 3400 lumen | |
| Power supply : 230 V~ +10/-15% 50/60Hz | |
| 240 V~ +/-6% 50/60Hz | |
| Compulsory protection : 10 A gG/gl fuse or 16A circuit-breaker curve C or curve B | |
| Insulation class : II | |
| Recommended cable : U1000R02V3G1.5 | |
| Connection using screw free terminals : 1 ... 1,5 mm | 2 |
| Protection class : IP55 | |
| Operating temperature : -20 ... +45 °C | |
| Storage temperature : -20 ... +60 °C | |
| Detection angle : 220/360° | |
| Forward detection distance : 12 m | |
| Twilight threshold setting : 5 ... 1000 lux | |
| Operating duration setting : 5 s ... 15 min | |
| Accessories : adjustable shutters supplied, mounting screws. | |
| Max installing altitude: 2000 m | |
The light source of this luminaire is not replaceable; when the light source reaches its end of life the whole luminaire shall be replaced.
The luminaire should be positioned so that prolonged staring into the luminaire at a distance closer than 60 cm is not expected.
What to do if...
The floodlight does not switch on :
- In day/night mode, the twilight setting is set to night only mode.
- Readjust.
- Incorrect adjustment of the detection zone. - Readjust.
The floodlight does not switch off :
- Continuous movement in the detection zone.
- Inspect the detection zone, you may need to readjust the zone or mask part of it.
The floodlight continually switches on and off :
• Animals are moving in the detection zone.
- Adjust the sensitivity.
The floodlight switches on involuntarily :
- The wind is stirring the trees and bushes in the detection zone.
- Adjust the zone.
- Cars passing on the road are being detected - Adjust the zone.
- Sudden temperature changes due to the weather (wind, rain or snow).
- Adjust the zone or mount the equipment in a different place.

Correct Disposal of This product (Waste Electrical & Electronic Equipment).
(Applicable in the European Union and other European countries with separate collection systems).
This marking shown on the product or its literature indicates that it should not be disposed with other household wasted at the end of its working life. To prevent possible harm to the environment or human health from uncontrolled waste disposal, please separate this from other types of wastes and recycle it responsibly to promote the sustainable reuse of material resources.
Household users should contact either the retailer where they purchased this product, or their local government office, for details of where and how they can take this item for environmentally safe recycling.
Business users should contact their supplier and check the terms and conditions of the purchase contract. This product should not be mixed with other commercial wastes of disposal.
Usable in all Europe C€ and in Switzerland
DE
Einstellungen
natural_image
Two-step diagram showing a device with a circular component and a curved arrow indicating motion (no text or symbols)Überwachungsbereich

Instellingen
natural_image
Two-step diagram showing a coffee maker's cup and its base, with an arrow indicating the cup's center (no text or symbols present)Detectiezone

CE en in Switzerland
IT
Regolazione
natural_image
Two-step diagram showing a device with a circular base and an arrow indicating rotation or movement (no text or symbols)Ajustes
natural_image
Two-step diagram showing a coffee maker's lid and its usage mechanism (no text or symbols)Zona de detección

Regulações
natural_image
Two-step diagram showing a device with a circular component inserted into a ring, then being inserted into a container (no text or symbols present)Ρυθμίσεις

natural_image
Two-step diagram showing a device with a circular base and an arrow indicating rotation or change (no text or symbols)
- Sommaire
- Inhoudsopgave
- Product description and working principles
- Installation
- Testing and validating the detection zone
- "Normal" operation (on/off)
- Using the remote control (Option, ref. EE806/ 52900)
- Technical specifications
- What to do if...
- The floodlight does not switch on :
- The floodlight does not switch off :
- The floodlight continually switches on and off :
- The floodlight switches on involuntarily :
Brand : HAGER
Model : EE600
Category : Motion detector