MU 8401 SWI - Mixer GUTFELS - Free user manual and instructions
Find the device manual for free MU 8401 SWI GUTFELS in PDF.

User questions about MU 8401 SWI GUTFELS
0 question about this device. Answer the ones you know or ask your own.
Ask a new question about this device
Download the instructions for your Mixer in PDF format for free! Find your manual MU 8401 SWI - GUTFELS and take your electronic device back in hand. On this page are published all the documents necessary for the use of your device. MU 8401 SWI by GUTFELS.
USER MANUAL MU 8401 SWI GUTFELS
natural_image
Exterior view of a modern kitchen blender with control panel and side blades (no visible text or symbols)11.1 Basic cleaning....17
11.2 Set up blender 18
11.3 Compose blender .... 18
12 Operating instructions....18
12.1 Adjust speed....19
12.2 Use blender 19
text_image
Diagram illustrating a cooking process with a blender and its side view showing liquid level measurement setup.Abb. 1 Abb. 2
natural_image
Two-step illustration of a blender with lid and lid, showing the process from being opened to closed using a lid (no text or symbols visible)Abb. 3 Abb. 4
natural_image
Illustration of a blender with labeled parts (a and b), showing internal components and a close-up view of the lid (no text or symbols present)Abb. 5 Abb. 6

natural_image
Illustration of a blender with liquid being poured into it, connected to a power outlet via cable (no text or symbols)Abb. 7 Abb. 8
Technische Daten; Technical information; Caractéristiques techniques Technische gegevens; Especificaciones Técnicas Especificações técnicas
| Modell | MU 8401 swi |
| Elektrischer Anschluss Volt / HzElectrical connection Voltage – frequencyRaccordement électrique (tension – fréquence)Elektrische aansluiting (Spanning – frequentie)Ligação eléctrica Volt / Hz | 220-240 V~50-60 Hz |
| Volumen; Capacity Contenance; Capaciteit- für Flüssigkeiten; for liquids;- für feste Lebensmittel; for solid foods; | 1,5 l1,2 l |
| Leistung; Power;Puissance; Vermogen | 240 W |
| EAN | 4016572024791 |
CE-Kennzeichnung
At the time of its introduction on the market the product fulfills the requirements, which were specified in the directive for the standardization of the laws of the Member States concerning the electromagnetic compatibility (2014/30/EU) of electrical equipment within certain voltage limits (2014/35/EU). This product is identified by the CE marking and delivered with a declaration of conformity for inspection by the market monitoring authority.
Marquage CE
9 General safety instructions
- Avoid injuries and damage by transporting the appliance in the packaging.
• Install and connect the appliance only as directed in this manual. - The plug must be accessible after installation. In an emergency, immediately disconnect the device.

WARNING
When connecting or removing the plug and the power cable do not touch it with wet hands.

WARNING
After removing the packaging, check all equipment parts and accessories were delivered. If in doubt, do not use it and contact a qualified technician. The packaging materials (plastic bags, polystyrene, metal clips, etc.) must not be left within reach of children as they are potentially dangerous and must be disposed of in accordance with applicable regulations.

WARNING
The unit must be outside the reach of pets, children or people who can not use it. Do not let the unit be unattended when it is connected to a power source.
• Take the necessary precautions to prevent children from playing with the unit
- The unit can only be used by children over eight years and by people whose physical, mental or emotional capacity is limited or impaired or lack the experience or knowledge when they are supervised, after they receive instructions on the safe use of the device and they understand the dangers.
• Children should not play with the appliance.
- Cleaning and maintenance that must be performed by the user, may not be performed by children, unless they are supervised.
- The unit can only be used by children
over eight years and by people whose physical, mental or emotional capacity is limited or impaired or lack the experience or knowledge when they are supervised, after they receive instructions on the safe use of the device and they understand the dangers. Children should not play with the unit. The cleaning and maintenance should not be performed by children unless they are older than 8 years and are supervised.
10 Usage
The unit is exclusively designed for mixing. The blender is intended solely for private use and not for commercial use. Use the blender just as described in this manual. Any other use is considered improper and can result in property damage or even personal injury.
The manufacturer or dealer will not accept liability for damage caused by improper or incorrect use.
11 Initial start-up
Check blender and delivery
If you open the package carelessly with a sharp knife or other pointed object, the blender can be easily damaged. Be very careful when opening.
The blender is protected from damage during transport by the packaging.
- Take the blender from the packaging.
- Check that the blender or the installation parts have damage.
- If this is the case, do not use the blender. Contact our specified service centre.
- Check whether the delivery is complete.
11.1 Basic cleaning
Remove the packaging materials, and protective films.
Clean all the parts of the blenderd before the first use as described in "Cleaning".
EN
11.2 Set up blender

WARNING
- If you place the blender improperly, it can cause damage.
- Place the blender on a flat, dry and non-slip work surface. The work area should be easy to clean, since you can not always prevent splatter.
Don't place the blender on or near the edge of the working surface.
Never place the blender on or near hot surfaces (eg. hobs, heating pipes, etc.). Note that the surface coatings of furnitures sometimes contain chemical additives which affect and soften the suction cups of the blender. In this way, residues can arise on the furniture surfaces. Therefore, place a non-slip surface under the blender.
The drive unit 5 is equipped with suction cups which provide a secure grip for the blender.
Set the blender up that it is easily accessible and near a power outlet.
11.3 Compose blender
Improper handling of the blender or individual instruments can cause serious injury.
Turn the blender off when you assemble or disassemble the blender.
The blender has two safety devices. It can only be used with a properly attached mixing bowl and properly attached safety covers.
See Fig. 1 and 2
- Screw the blade base securely to the blender jug.
- Place the blender jug on the drive unit.
- Ensure that the seal ring (5) is correctly positioned in the blade base.
- Place the blade base on the drive unit and turn in clockwise direction to lock.
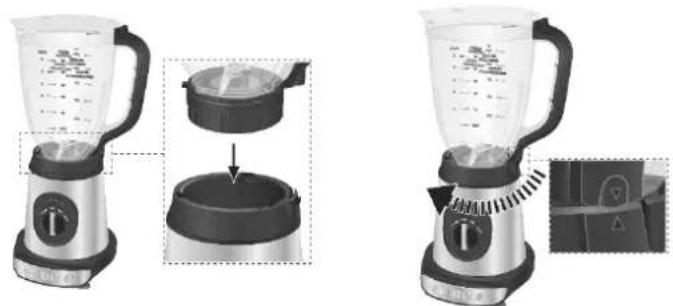
The blender jug (4) has a triangular mark on the lower end. The drive unit (8) also has a triangular mark (see Fig. 3 and 4).
- Place the blender jug onto the drive unit so that the triangles on blender
jug and drive unit are aligned.
- Turn the blender jug in clockwise direction, holding the drive unit firmly. The blender jug must engage tangibly and audibly.
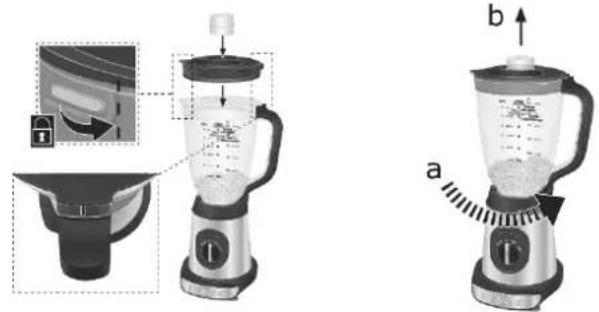
- Place the safety lid (2) onto the blender jug in such a way that the long protrusion is positioned to the right of the handle as seen from the handle.
- Turn the safety lid in clockwise direction as far as it will go. The long protrusion is now in the handle (Fig. 5).
- Place the lid insert into the filler opening so that the two lugs of the lid insert fit into the recesses in the filler opening, then fix the lid insert by turning in clockwise direction as far as it will go.
- Push the battery into the battery holder (Fig. 8).
- Connect the charger cable to the charger socket, and then the charger to a mains plug socket.
- The blender is ready for operation.
12 Operating instructions

WARNING
- Improper handling of the blender or individual instruments can cause serious injury. Do not touch the knife with bare hands, the blades are very sharp.
- Do not remove the safety cap until the blades have completely stopped.
- Do not change the location of the blender while the blender is running.
Make sure that hands, hair, clothing, jewelry or another object during the mixing process, and as long as the mixing container is located on the drive unit, are not getting in the jug. Always make sure that the speed controller is at level "0" (off) before connecting the blender to a socket.

WARNING
When processing hot mixing goods, it can cause scalding.
Do not put hot or boiling mixing goods (such as soups) in the jug.

WARNING
Improper handling of the blender can lead to damage of the blender.
- Take note of the level marks. Fill the mixing bowl at least to the lowermost mark (250 ml) and do not exceed the "MAX" (1500 ml) mark.
- Do not operate the blender without mixing goods.
- Observe the maximum operating time of 60 seconds.
- A too long operating time can lead to overheating of the engine. Allow the blender to cool on room temperature before using it again.
- Before turning on the blender, make sure no cutlery or the like is in the mixing bowl.
- Do not place over-sized pieces in the blender jug.
- Make sure when you use frozen fruit that you always use the fruit in small pieces.
- Do not mix nuts in shell or seeds.
- Always remove any existing stems or stalks from mixing goods before you start the mixing process.
- Do not place meat in the blender.
- Never open the safety cover during the mixing process.
- Clean the mixing bowl after each use as described in "Cleaning".
12.1 Adjust speed
The speed control is used to select between two speed levels "1" and "2" a pulse level "P" as well as to turn off the blender, level "0".
- Start the mixing process at the lowest speed "1".
- Later set the speed on the higher level.
- You turn off the blender, if you set the speed control to the "0" level.
- If you set the speed control to the pulse level "P", you are using the pulse function. Refer to the section "Pulse function".
12.2 Use blender
To facilitate the handling of the blender, the blender container 3 is provided with level markings. The numbers indicated there refer to the respective level in milliliters. The lowest mark has no level indication.
It corresponds to a level of 250 ml.
- Operate the blender with at least 250 ml of liquid.
- Do not fill more liquid in the blender as the 1500 ml mark "MAX".
- Always cut solid ingredients before adding it in the bowl in small pieces so you prevent jamming of the knives. If you want to process solid and liquid ingredients to the blender at the same time, first enter the liquid ingredients into the mixing bowl and mix the ingredients.
Then enter the solid, finely chopped ingredients, and continue the mixing process. In order to obtain the structure of the food, it is best to do the mixing process in a few seconds.
- Assemble the blender jug onto the drive unit as described in "Compose blender".
- Remove the safety cover by turning it counter-clockwise, until you can take it off.
- Fill the desired ingredients into the blender jug.
- Close the jug with the security cover.
- Make sure that the speed control is set to "0".
- Connect the blender to a properly installed socket.
- To start the mixing process, turn the speed control slowly up, until the desired speed is reached.
- To stop mixing for a while, turn the speed control to level "0".
- Wait for a complete stop of the blades before you take the safety lid off.
Ingrediens refill
During the current mixing process, you can add other ingredients.
- Turn the lid insert counter-clockwise until it stops and take it out.
- Fill ingredients through the filler or add small amounts of liquid.
- Use the lid insert to refill other ingredients.
Use the cover as a measuring cup. It is suitable for measuring 30 ml, 40 ml and 50 ml of liquid.
EN
- Close the safety cover 2 with the lid insert.
- Turn the lid insert clockwise until it clicks.
Using pulse function
The blender has a pulse function. It means short operation at full power. By using the pulse function is the maximum speed is immediately available.
Use the pulse function if you want to mix for a short time but intense. For example, for foaming a liquid, or for crushing ice (see "Crush ice cubes").
In order to enable this feature,
- Turn the speed control 6 to the pulse level "P" and hold it in this position for as long as you want to mix. Use this function only sporadically and never exceed the maximum operating time.
- Stop the mixing process by releasing the speed control.
Crush ice cubes
- Fill ice cubes into the blender jug 3. Do not crush more than 10 to 12 ice cubes per mixing process. Make sure that the ice is not greater than 2.5 cm edge length. With a small amount of ice cubes, you get the best results.
- Close the mixing bowl with the safety cover 2 and the lid insert 1 (see section "Compose blender").
- Set the speed control 6 to level "0".
- Connect the blender to a properly installed socket.
- Turn the speed control several times for a short time to the pulse level "P" and let it go again.
- To end the crushing operation, set the speed control to level "0".
- Unplug the blender from the socket.
13 Cleaning

WARNING
Improper handling of the blender can be causing an electric shock. Water penetrated in the housing can cause a short circuit.
Turn the blender off, and remove the power plug from the socket before cleaning the blender. Make sure that no water gets into the housing of the drive unit.
Never immerse the blender in water.
Improper handling of the blender can lead to damage. Do not place the blender or individual parts in the dishwasher.
Do not use abrasive cleaners or scouring agents, sharp or metallic cleaning objects such as knives and the like. These can damage the surface.
Clean drive unit
- Allow to cool the blender entirely.
- Wipe the drive unit 7 with a dry, possibly slightly damp cloth.
- Rub the drive unit then dry. Use a soft cloth for this.
Clean mixing bowl
The blades are very sharp. A touch of the knife during cleaning can cause injury.
Use care and caution when cleaning and drying the blender container and the knife.
Do not touch the knife with bare hands.
- Place the jug on the drive unit as described in "Compose blender".
- Pour some lukewarm water with detergent into the mixing bowl.
- Cover the mixing bowl with the safety cover 2 and the lid insert 1 (see "Use blender").
Set the speed control 8 to level "0".
14 Disposal of old units
This product is marked according to the European Waste Framework Directive 2012/19/EU. The Directive regulates the proper disposal of the product. The
environmentally friendly disposal will prevent possible negative health consequences caused by incorrect disposal. The symbol on the product or its packaging indicates that this product may not be disposed with normal household waste. The user must return the product to/at a collection point for the recycling of electrical and electronic equipment.
The disposal must comply with the current local regulations. Safety instructions
All safety instructions in this manual are labeled with a warning symbol. They show potential hazards at an early stage. It is essential to read this information and follow it up.
The following symbols and warnings are indicated in these instructions, on the blender or on the packaging.
Explanation of safety instructions:
15 Battery level
| Battery charge state bars | Colour | Mode | Battery level in % Note |
| 1 bar flashing | blue Charging | Battery charge level < 25 | |
| 1 bar flashing | Battery charge level 25 < 50 | ||
| 1 bar steady light | |||
| 2 bars steady light | Battery charge level 50 < 75 | ||
| 1 bar flashing | |||
| 3 bars steady light | Battery charge level 75 < 100 | ||
| 1 bar flashing | |||
| Battery is fully charged | |||
| 4 bars steady light | In operation | Battery charge level 75 < 100n | |
| 3 bars steady light | Battery charge level 50 < 75n | ||
| 2 bars steady light | Battery charge level 25 < 50 | ||
| 1 bar steady light | Red | Battery charge level < 25 | |
| 1 bar flashing | Defective | Battery charging | |
| 4 bars flashing | Battery is defective | ||
| No bars are lit | Not in operation | Battery is empty or the appliance is switched off. |
Battery charging
The charge of the battery pack is at a low level. Charge the battery completely before using the appliance for the first time.
- Charge the appliance in a safe place, well away from moisture and heat sources.
- Always charge the battery completely before storing.
- Check that the battery (12) is inserted completely into the battery connection (14).
- Insert the adapter plug into the battery connection (14) in the base of the appliance and the mains plug into the main plug socket.
The LEDs flash for 10 seconds before they display the current battery charge status (see Table 1).
EN
16 Troubleshooting
| Error | Possible reason | Solution |
| The blender is not functioning | The jug is not sitting correctly on the drive unit. | Set the speed control to level "0" and unplug the power cord from the socket.Put the jug on the drive unit, as described in "Compose blender". |
| The security cover does not sit correctly on the mixing bowl. | Set the speed control to level "0" and unplug the power cord from the socket.Place the safety lid on the blender jug, as described in "Compose blender ". | |
| The power cord is not properly connected in the socket. | Connect the power cord correctly to a socket. | |
| The socket has no electricity. | Check the socket by connecting another device. | |
| Missing/not fully inserted battery | Inserting the battery into the battery connection | |
| Appliance overheated (4 red flashing lights) | Turn the speed controller to "OFF", remove the battery and allow it to cool down before using the appliance again. | |
| Appliance malfunction / damaged battery | Turn the speed controller to "OFF" and remove the battery. Contact a qualified person to have the appliance inspected. | |
| The blades do not rotate. | Empty battery (1 red flashing light) | Turn the speed controller to "OFF", connect the charger cable to the charger socket, and then the charger to a mains plug socket. Put the appliance into operation again as soon as the battery is fully charged. |
| Motor overloaded (4 red flashing lights) | Turn the speed controller to "OFF", remove the battery and allow the appliance to cool down. | |
| Battery cannot be charged | Mains plug is not correctly plugged into the plug socket. | Connect the mains plug to a plug socket in the prescribed manner. |
| Damaged battery / damaged charger cable | Disconnect the charger from the mains plug socket, then the adapter plug from the charger socket, remove the battery and contact a qualified person to have the appliance inspected. |
When in doubt, consult a qualified expert.
GGV HANDELGES. MBH & CO. KG
August-Thyssen-Str.8
D-41564 KAARST
DUITSLAND
MU8401swi_E1-0_Mulit_06_L06