PR 500 Li 48 - Saw ALPINA - Free user manual and instructions
Find the device manual for free PR 500 Li 48 ALPINA in PDF.

| Product type | Cordless chain saw |
| Brand | ALPINA |
| Model | PR 500 Li 48 |
| Power source | Lithium-ion battery |
| Chain brake | Inertia-activated, emergency stop in case of kickback |
| Lubrication | Automatic, oil tank |
| Front hand guard | Yes, activates the chain brake |
| Front handle | Ergonomic, with guard |
| Rear handle | Ergonomic, with controls |
| Intended use | Pruning and limbing of trees |
| User type | Trained operator (tree trimmer) |
| Starting | Safety button + throttle lever |
| Stopping | Release the throttle or press the safety button |
| Chain | Sharpenable, replaceable |
| Chain tension | Tool-free adjustment (via tensioning screw) |
| Maintenance | Regular cleaning, sharpening, oil drain |
| Spare parts | Guide bar, chain, battery, charger |
| Included accessories | Guide bar cover, assembly wrench |
| Warranty | Coverage of material and manufacturing defects (according to conditions) |
Frequently Asked Questions - PR 500 Li 48 ALPINA
User questions about PR 500 Li 48 ALPINA
0 question about this device. Answer the ones you know or ask your own.
Ask a new question about this device
Download the instructions for your Saw in PDF format for free! Find your manual PR 500 Li 48 - ALPINA and take your electronic device back in hand. On this page are published all the documents necessary for the use of your device. PR 500 Li 48 by ALPINA.
USER MANUAL PR 500 Li 48 ALPINA
natural_image
Line drawing of a chain-linking tool (no text or symbols)


IT Motosega a catena per potatura alimentata a batteria
MANUALE DI ISTRUZIONI
ATTENZIONE: prima di usare la macchina, leggere attentamente il presente libretto.
BG Моторен верижен трион за резитба, захранван с акумулатор УПЪТВАНЕ ЗА УПОТРЕБА
ВНИМАНИЕ: преди да използвате машината прочетете внимателно настоящата книжка.
BS Lančana motorna pila na bateriju za potkresivanje grana
UPUTSTVO ZA UPOTREBU
PAŽNJA: prije nego što koristite ovu mašlnu, pažljivo pročltajte prlručnik s uputama.
CS Akumulátorová řetězová odvětvovací motorová pila
NÁVOD K POUŽITÍ
UPOZORNĚNÍ: před použitím stroje si pozorně přečtěte tento návod k použití.
DA Batteridrevet kædesav til beskæring BRUGSANVISNING
ADVARSEL: læs instruktionsbogen omhyggeligt igennem, før du tager denne maskine i brug.
DE Batteriebetriebene Kettensäge für die Baumpflege GEBRAUCHSANWEISUNG
ACHTUNG: Vor Inbetriebnahme des Geräts die Gebrauchsanleitung aufmerksam lesen.
EL Αλυσοπρίονο φορητό με μπαταρία
ΟΔΗΓΙΕΣ ΧΡΗΣΠΣ
ΠΡΟΣΟΧΗ: πριν χρησιμοποιησετε το μηχανημα, διαβαστε προσεκτικα το παρον εγχειριδιο.
EN Battery powered chainsaw for tree service OPERATOR'S MANUAL
WARNING: read thoroughly the instruction booklet before using the machine.
ES Motosierra de cadena para poda alimentada a batería MANUAL DE INSTRUCCIONES
ATENCIÓN: antes de utilizar la máquina, leer atentamente el presente manual.
ET Akutoitel mootorsaag puude hooldamiseks
KASUTUSJUHEND
TÄHELEPANU: enne masina kasutamist lugeda tähelepanelikult antud kasutusjuhendit.
FI Akkukäyttöinen puunhoitotöissä käytettävä moottorisaha KÄYTTÖOHJEET
VAROITUS: lue käyttöopas huolellisesti ennen koneen käyttöä.
FR Scie à chaîne pour élagage alimentée par batterie
MANUEL D'UTILISATION
ATTENTION: lire attentivement le manuel avant d'utiliser cette machine.
HR Motorna lančana pila za obrezivanje, s baterijskim napajanjem PRIRUČNIK ZA UPORABU
POZOR: prije uporabe stroja, pažljivo pročitajte ovaj priručnik.
HU Akkumulátoros motoros láncfűrész metszéshez HASZNÁLATI UTASÍTÁS
FIGYELEM! a gép használata előtt olvassa el figyelmesen a jelen kézikönyvet.
ITALIANO - Istruzioni Originali IT
БЪЛГАРСКИ - Инструкция за експлоатация ...... BG
BOSANSKI - Prijevod originalnih uputa BS
ČESKY - Překlad původního návodu k používání ...... CS
DANSK - Oversættelse af den originale brugsanvisning DA
DEUTSCH - Übersetzung der Originalbetriebsanleitung ...... DE
ΕΛΛΗΝΙΚΑ - Μεταφραση των πρωτοτυπων οδηγιων EL
ENGLISH - Translation of the original instruction ...... EN
ESPAÑOL - Traducción del Manual Original
EESTI - Algupärase kasutusjuhendi tõlge ET
SUOMI - Alkuperäisten ohjeiden käännös FI
FRANÇAIS - Traduction de la notice originale .... FR
HRVATSKI - Prijevod originalnih uputa .... HR
MAGYAR - Eredeti használati utasítás fordítása ...... HU
LIETUVIŠKAI - Originalių instrukcijų vertimas ....LT
LATVIEŠU - Instrukciju tulkojums no origināl valodas ...... LV
МАКЕДОНСКИ - Превод на оригиналните упатства ...... MK
NEDERLANDS - Vertaling van de oorspronkelijke gebruiksaanwijzing ....NL
NORSK - Oversettelse av den originale bruksanvisningen ...... NO
POLSKI - Tłumaczenie instrukcji oryginalnej PL
PORTUGUÊS - Tradução do manual original PT
ROMÂN - Traducerea manualului fabricantului ...... RO
РУССКИЙ - Перевод оригинальных инструкций ...... RU
SLOVENSKY - Preklad pôvodného návodu na použitie ...... SK
SLOVENŠČINA - Prevod izvirnih navodil SL
SRPSKI - Prevod originalnih uputstva .... SR
SVENSKA - Översättning av bruksanvisning i original SV
TÜRKÇE - Orijinal Talimatların Tercümesi TR
text_image
1 A B C D I J G K E H F L M 7 4 9 10 1 Type: LWA CE Art.N. -s/n 3 5 6 8 2 dB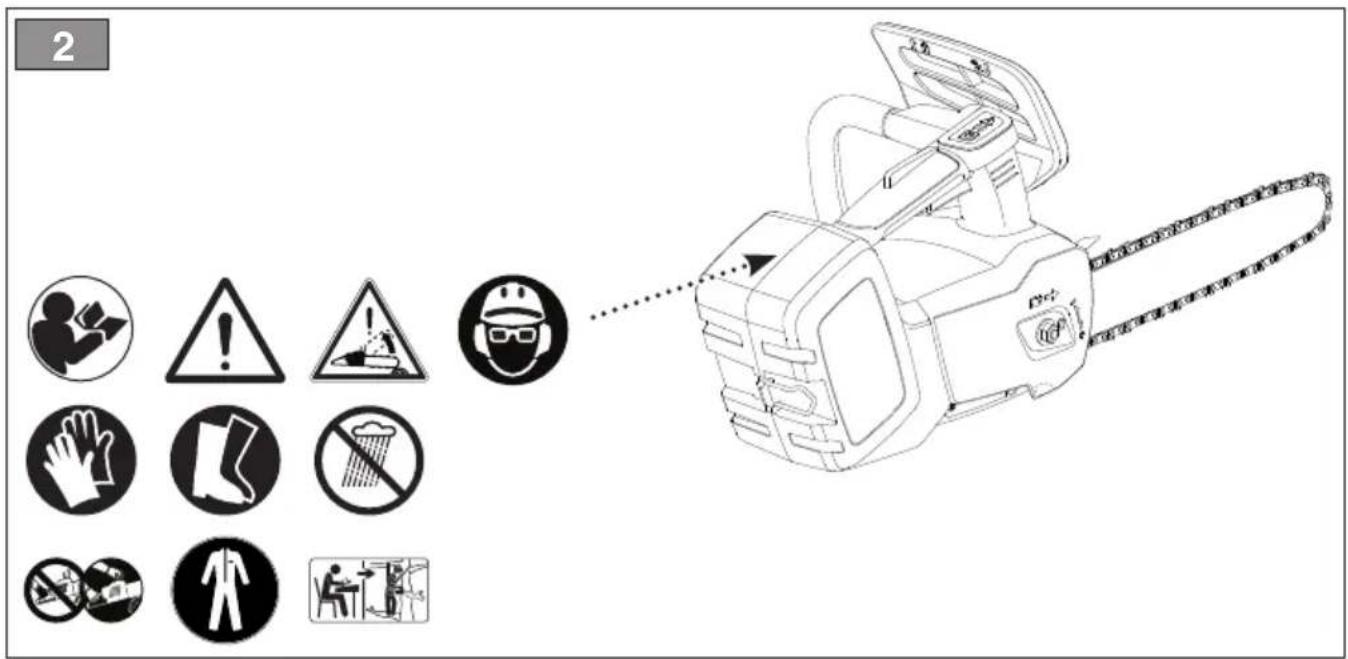
text_image
2 1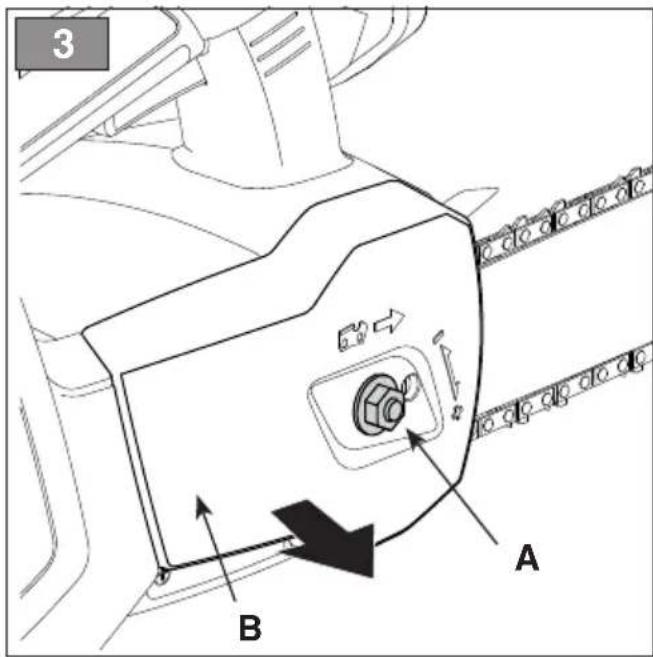
text_image
3 A B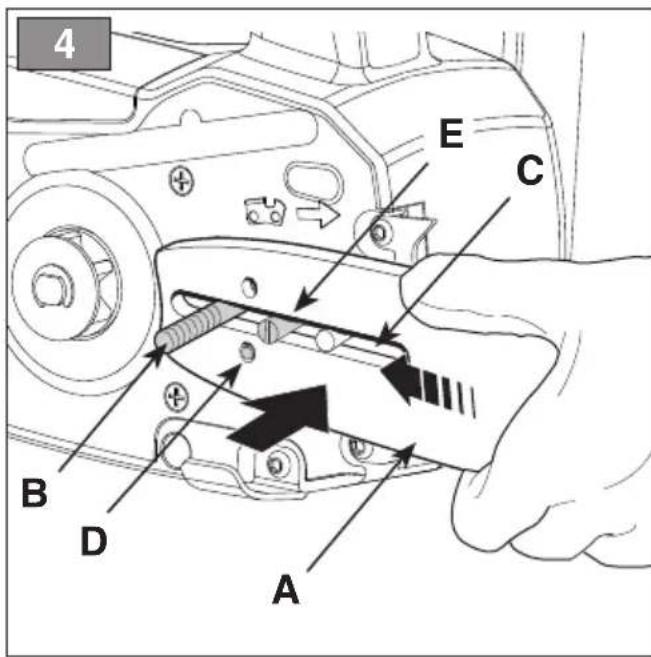
text_image
4 E C B D A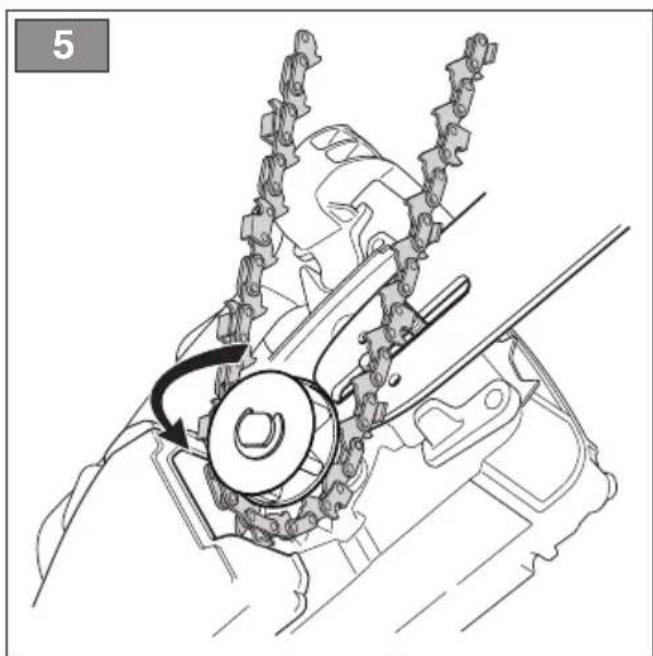
natural_image
Mechanical assembly diagram showing a chain link mechanism with no visible text or symbols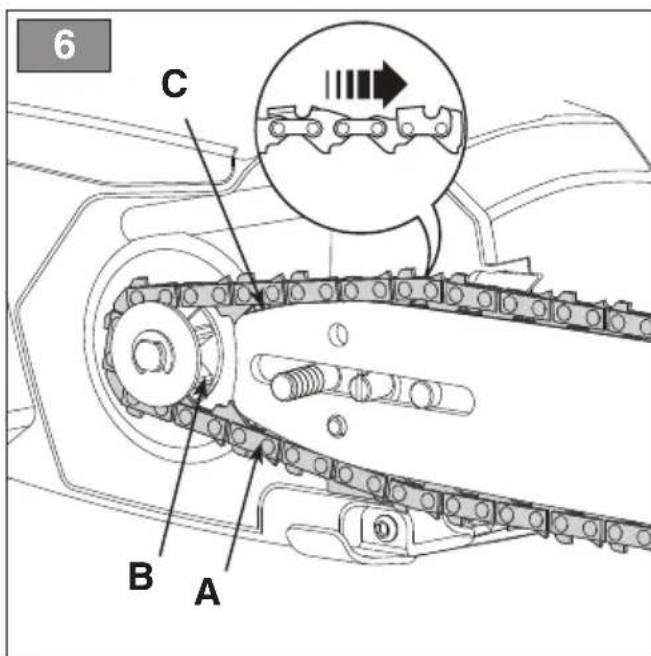
text_image
6 C B A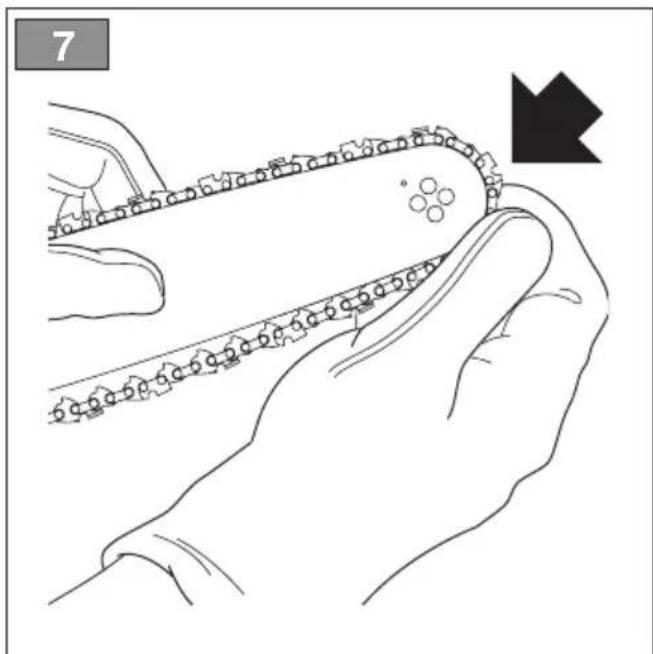
natural_image
Line drawing of a hand holding a chain with chains extending outward, no text or symbols present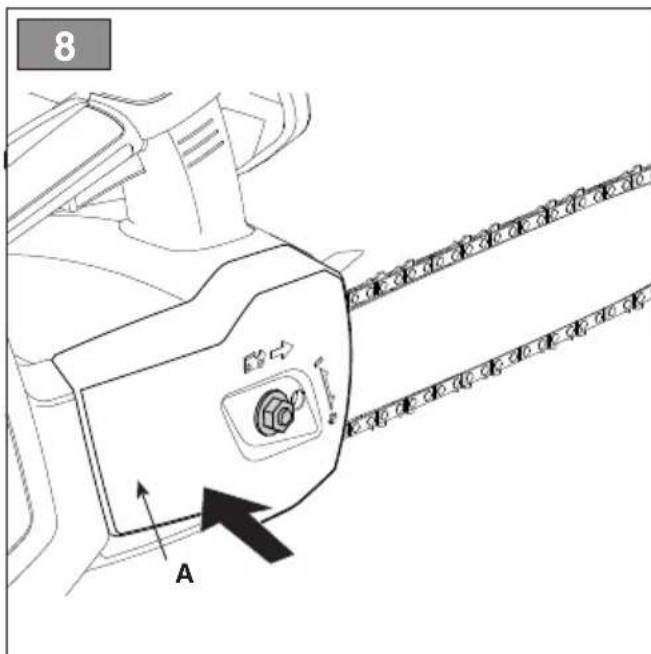
text_image
8 A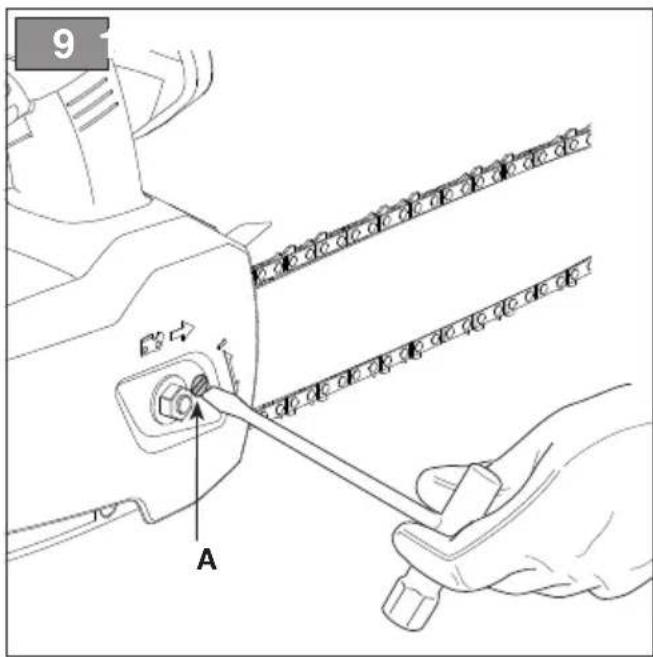
text_image
9 A
natural_image
Illustration of hands using a tool to adjust or install a mechanical component, with no visible text or symbols.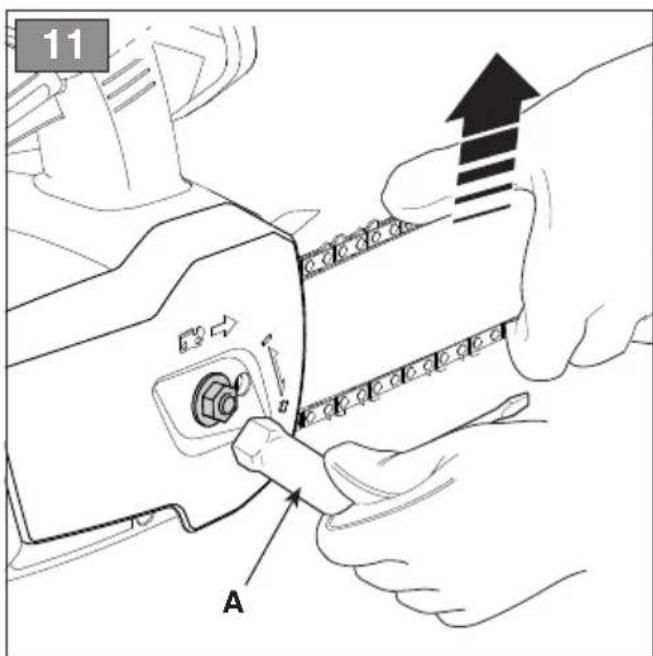
text_image
11 A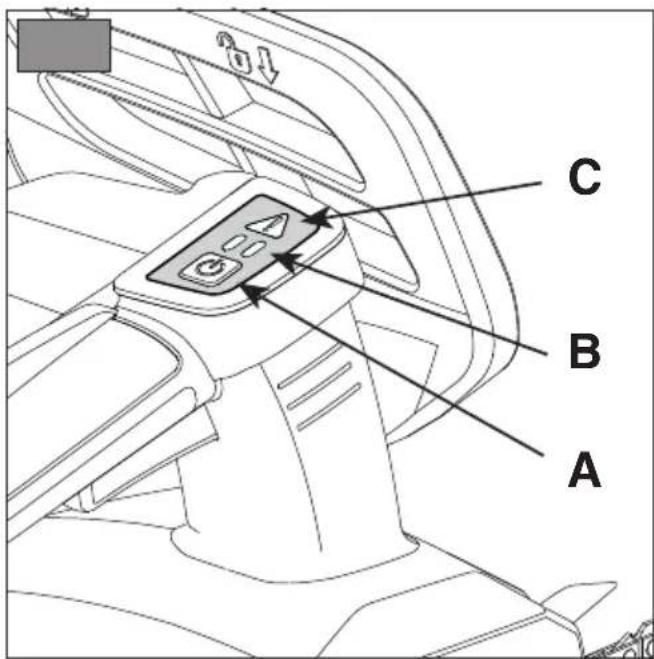
text_image
A B C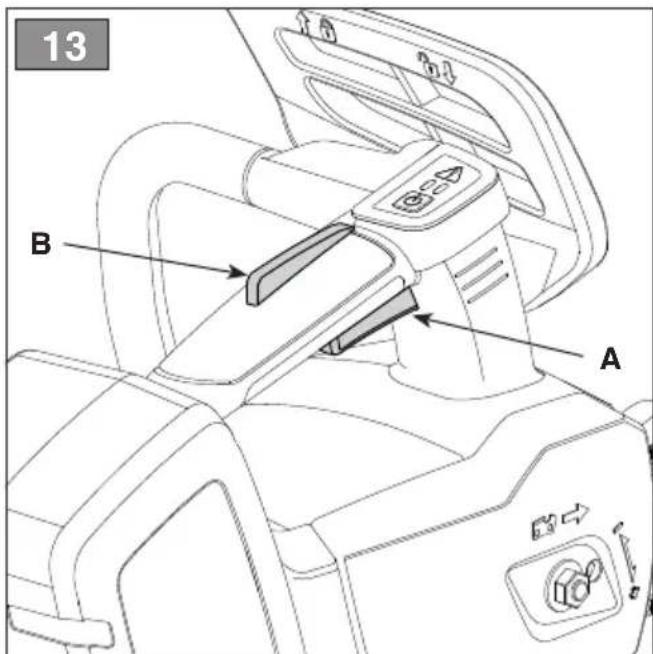
text_image
13 B A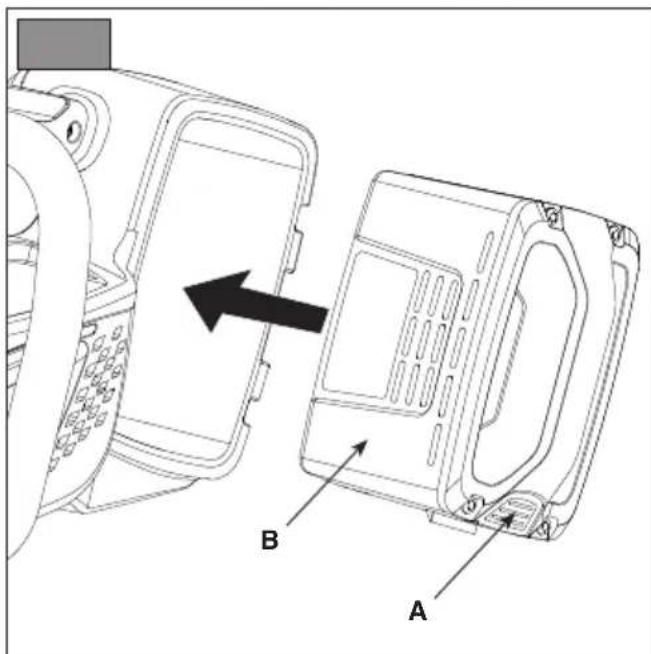
text_image
Technical diagram showing a device's internal structure with labeled components A and B, including an arrow indicating direction.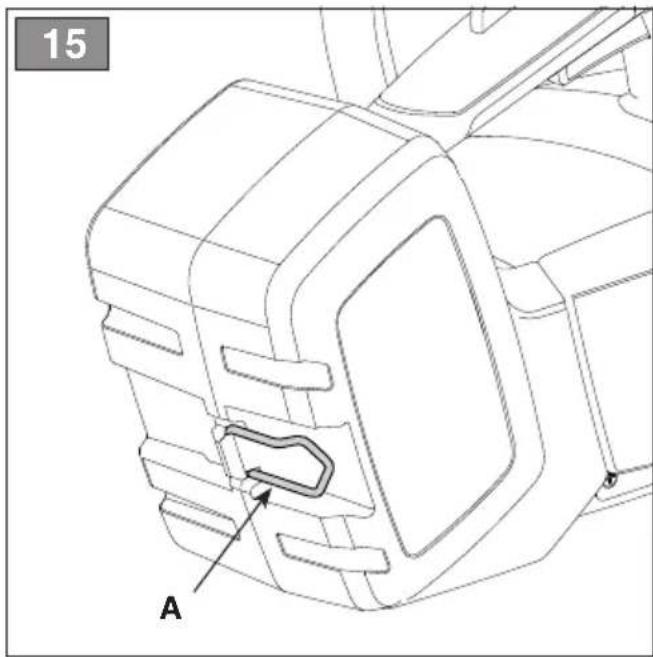
natural_image
Technical line drawing of a mechanical component with labeled section A (no text or symbols beyond label)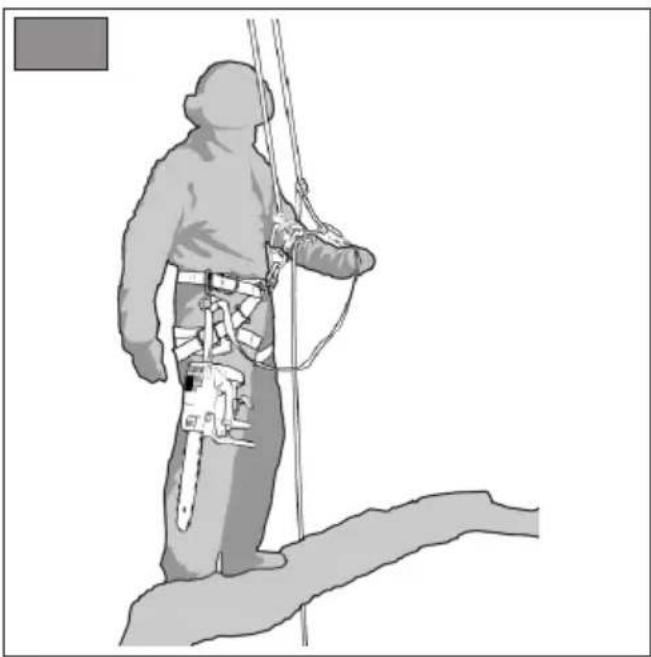
natural_image
Illustration of a climber in full gear climbing a rope, no text or symbols present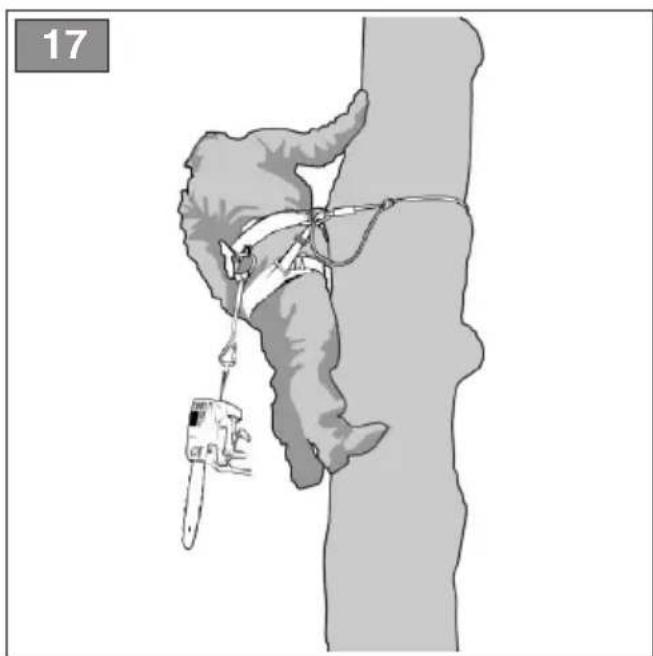
natural_image
Illustration of a person climbing a rope with a tool, no text or symbols present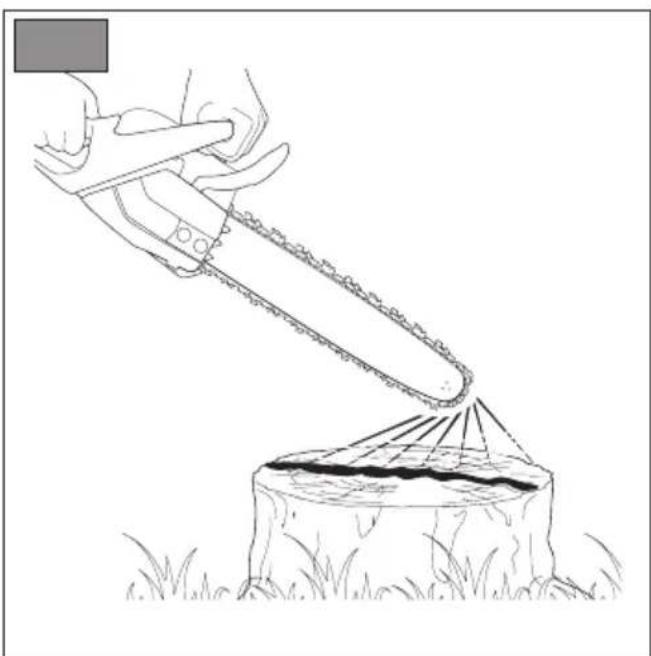
natural_image
Line drawing of a person using a chainsaw to lift a tree stump (no text or symbols)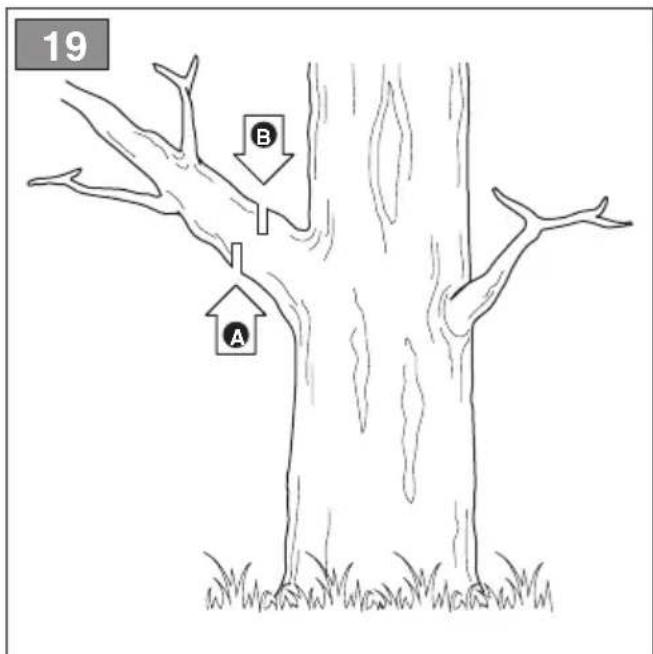
text_image
19 B A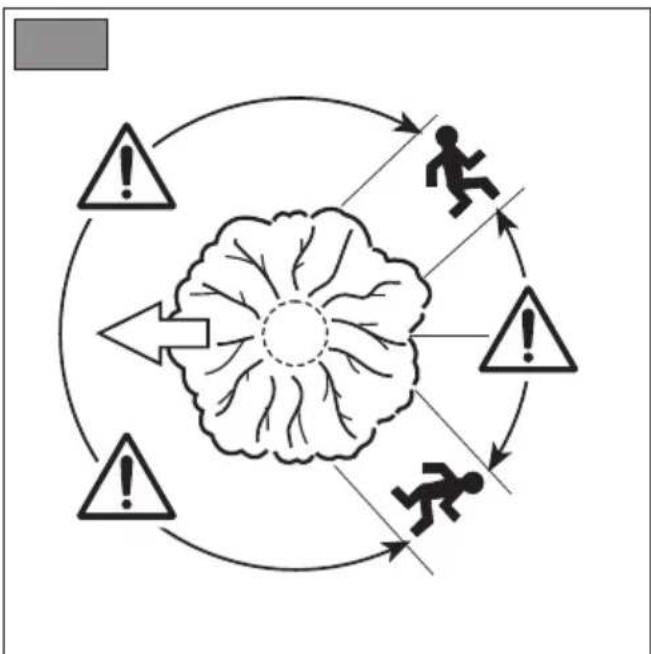
flowchart
graph TD
    A["Warning"] --> B["Human"]
    B --> C["Accident"]
    C --> D["Brain"]
    D --> E["Injury"]
    E --> A
    style A fill:#f9f,stroke:#333
    style B fill:#ccf,stroke:#333
    style C fill:#cfc,stroke:#333
    style D fill:#fcc,stroke:#333
text_image
21 A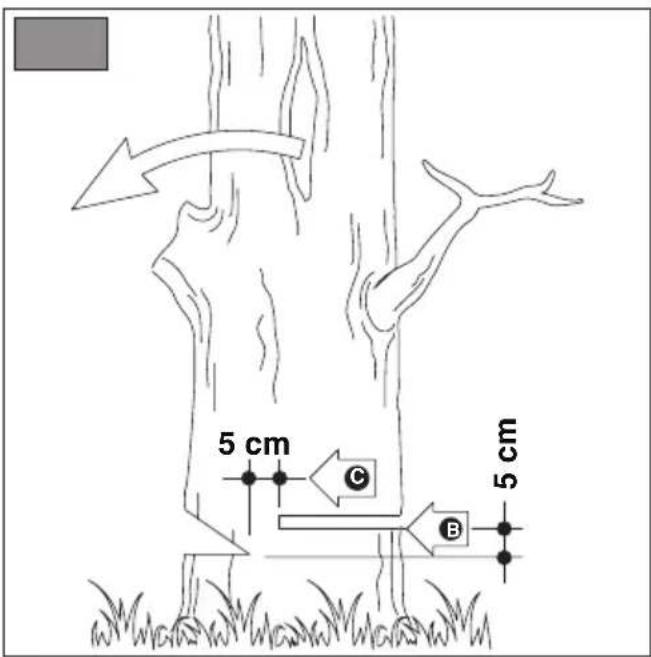
text_image
5 cm C B 5 cm
natural_image
Illustration of a tree with a hammer and sickle, showing a falling branch and a falling tree (no text or symbols)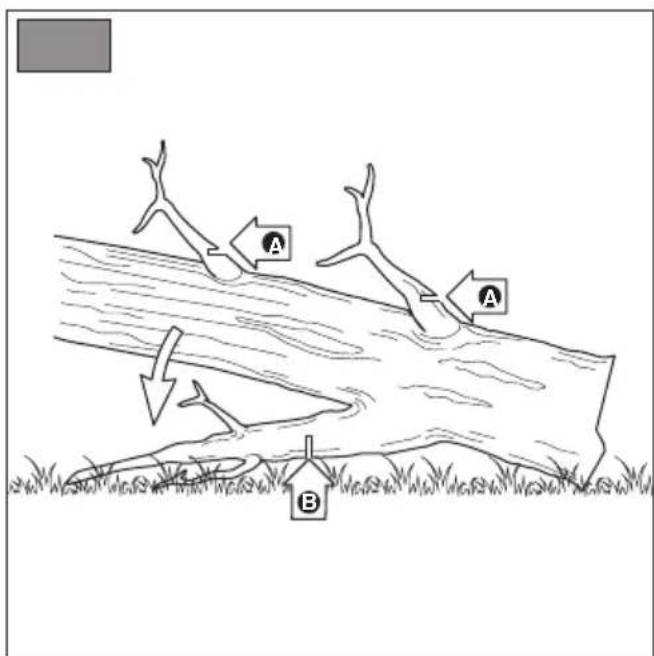
text_image
A A B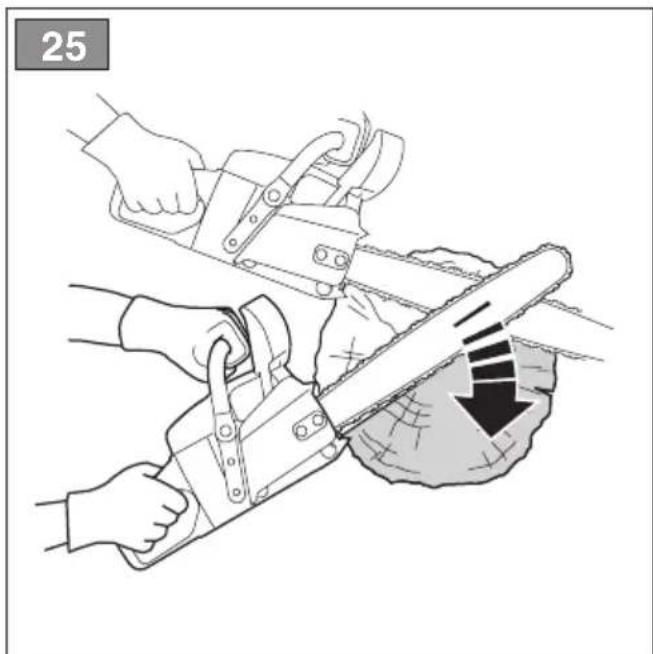
natural_image
Illustration of hands using a chain-linking tool to cut a piece of material (no text or symbols present)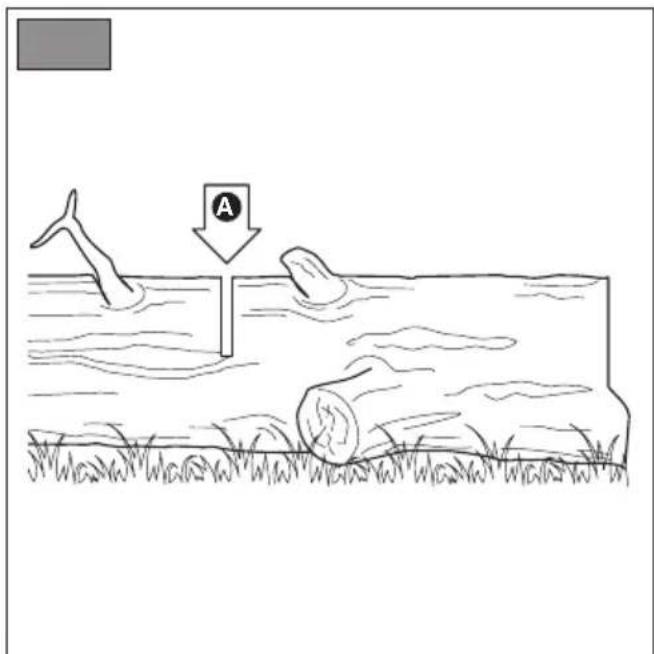
text_image
Diagram illustrating a water cycle with a dolphin, a rock, and a downward arrow labeled 'A', likely depicting a biological or geological process.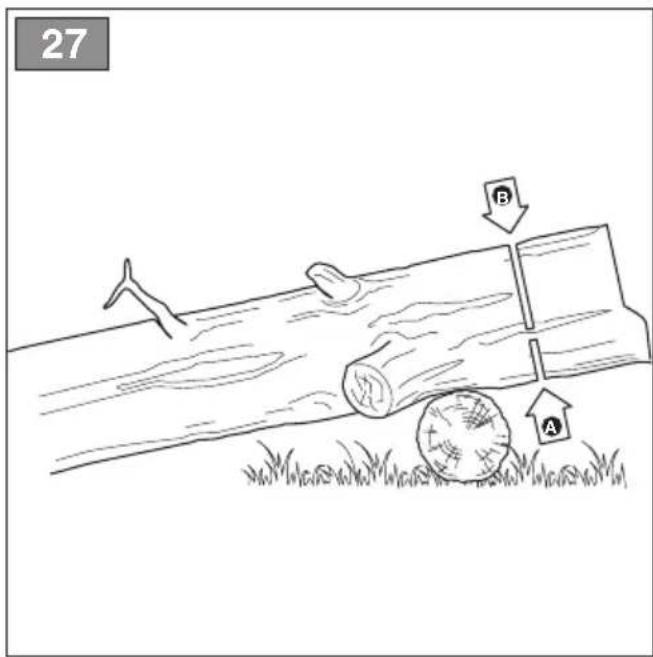
text_image
27 B A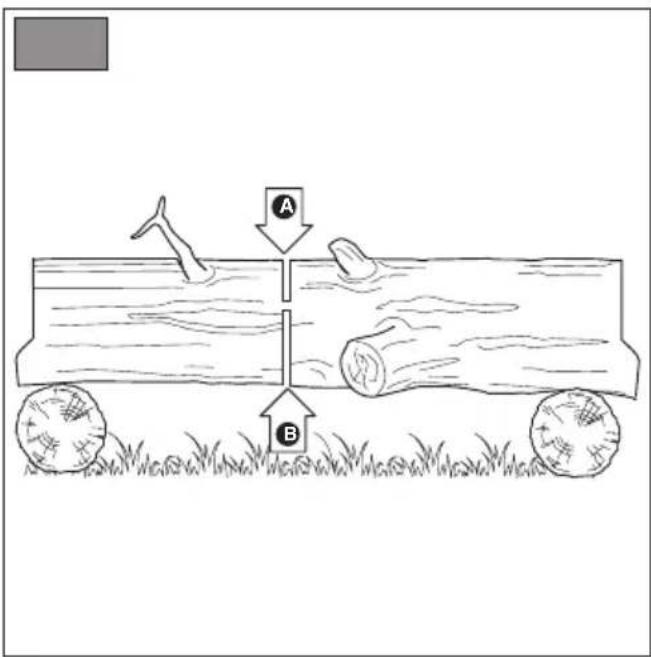
text_image
A B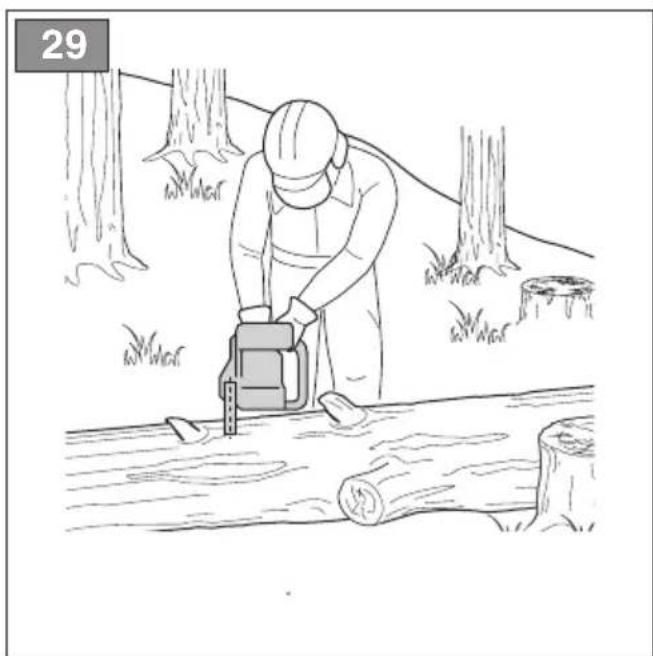
natural_image
Line drawing of a person using a power knife to cut wood in a forest setting (no text or symbols)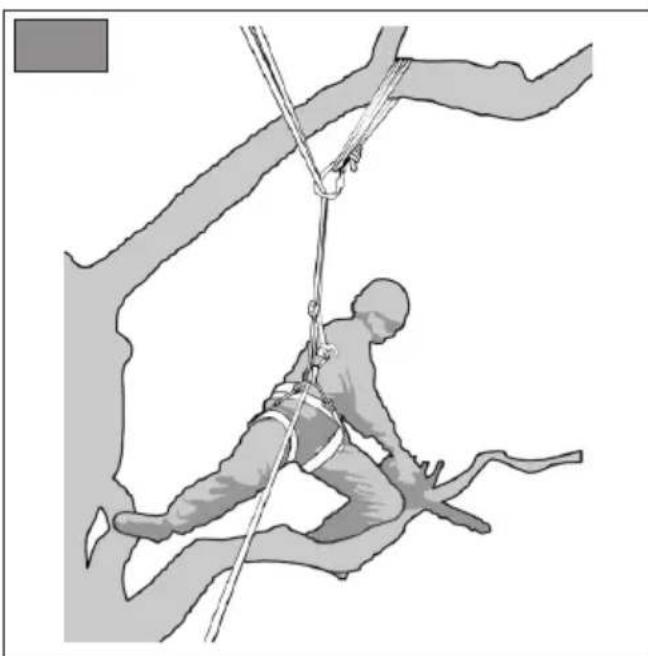
natural_image
Illustration of a person climbing a rope with ropes, no text or symbols present
natural_image
Illustration of a person climbing ropes with harnesses, no text or symbols present
natural_image
Illustration of a soldier climbing a tree with a sword, no text or symbols present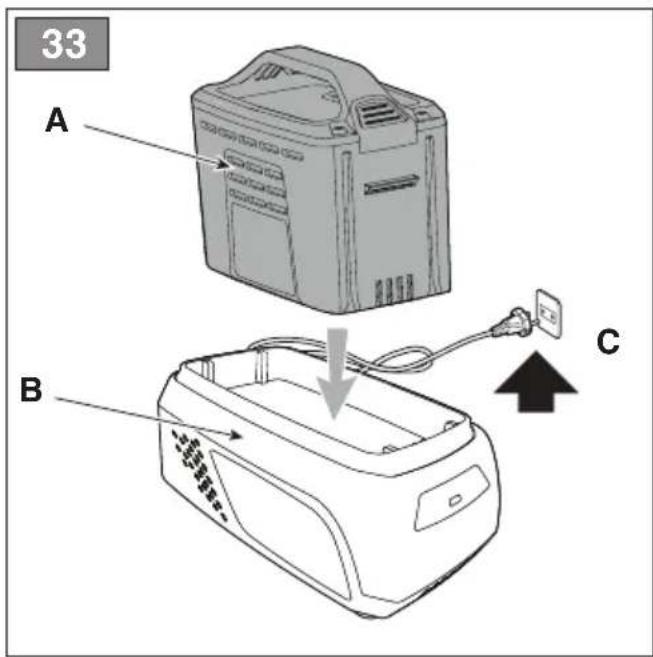
text_image
33 A B C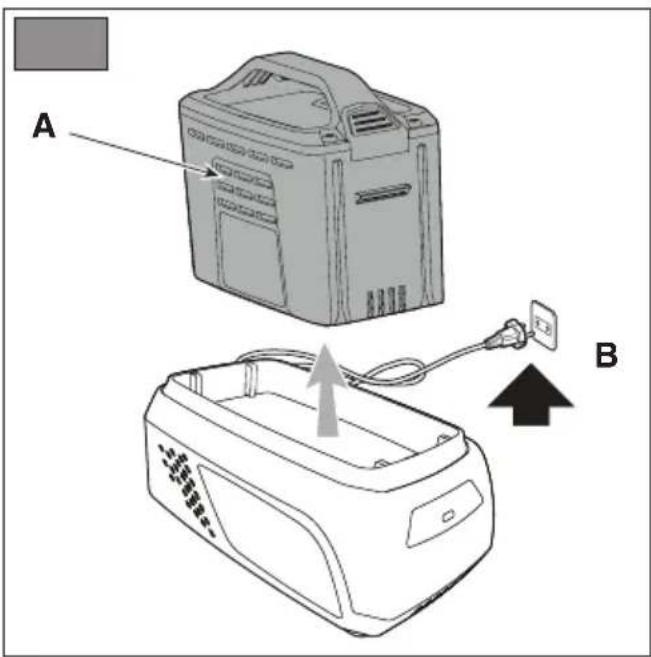
text_image
A B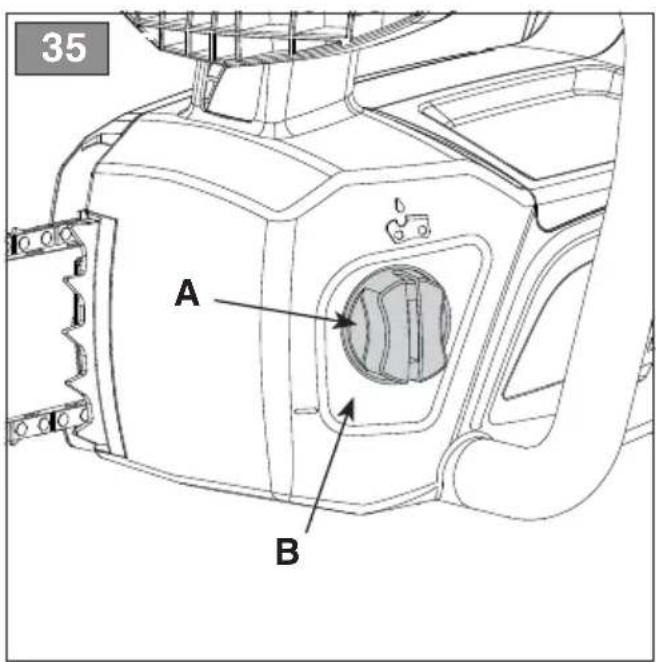
text_image
35 A B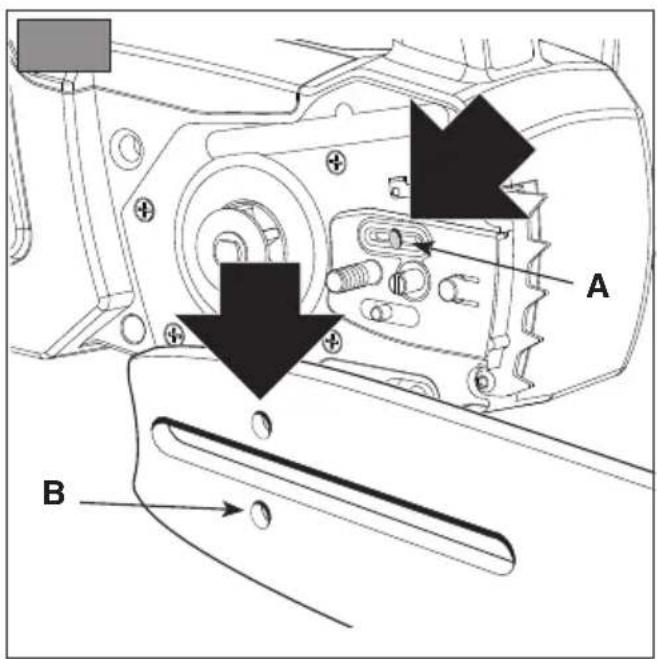
text_image
Technical diagram of a mechanical assembly with labeled parts A and B, showing directional arrows indicating movement or force.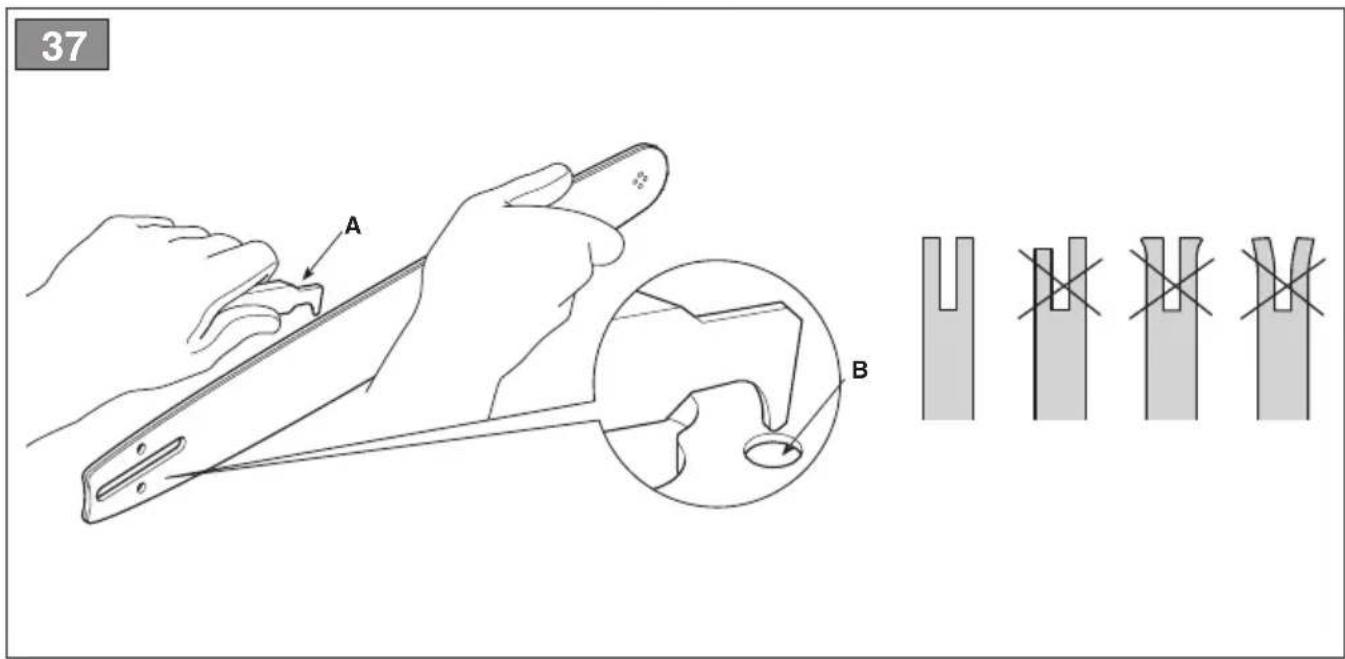
text_image
37 A B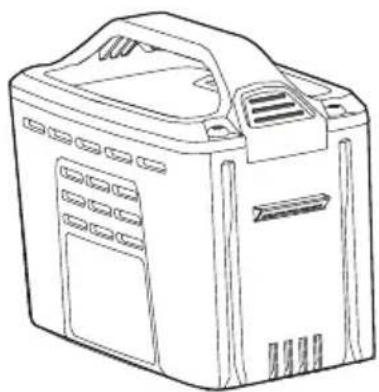
natural_image
Line drawing of a portable electronic device with ventilation slots and front panel (no text or symbols)39
natural_image
Line drawing of a portable electronic device with no visible text or symbols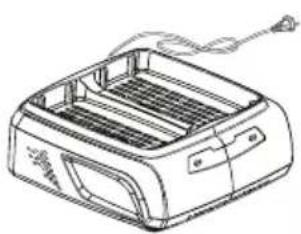
natural_image
Line drawing of a portable electric heater with ventilation slots and a cord (no text or symbols)[1] LT - TECHNINIAI DUOMENYS
[2] MAKSIMALI maitinimo jtampa ir dažnis
[3] NOMINALI maitinimo jtàmpa ir dažnis
[21] TABEL PENTRU O ASOCIERE CORECTA BARA-LANT (Cap. 15.3)
[22] PAS
[23] BARÃ
[24] LANT
[25] Inchi'/mm
[26] Lungime: Inchi / cm
[27] Lătimea canelurii: Inchi / mm
[28] Cod
6. USO DELLA MACCHINA
6.5 PRACOVNÍ ČINNOST
7.5 KÆDESTOPPER-STIFT
7.6 SM∅REHULLER I MASKINEN OG I SVÆRDET
- GENERAL ASPECTS ...... 1
- SAFETY REGULATIONS....2
- GETTING TO KNOW THE MACHINE......5
3.1 Description of the machine and planned use....5
3.2 Safety signs 6
3.3 Identification label 6
3.4 Main components 7
- ASSEMBLY....7
4.1 Assembly components....7
4.2 Assembly of the guide bar and toothed chain 7
- CONTROLS....8
5.2 Throttle trigger lever 8
5.3 ilnterlock lever 8
5.4 Chain brake....8
- USING THE MACHINE....9
6.1 Preliminary procedures 9
6.2 Safety checks....9
6.3 Preparing to use the chainsaw on the tree....10
6.4 Start-up....10
6.5 Working....10
6.6 Forestry work 11
6.7 For pruning high up using a rope and a belt harness 12
6.8 Advice for operation 13
6.9 Stop 13
6.10 After use....13
- ROUTINE MAINTENANCE 13
7.1 General information.... 13
7.2 Battery 14
7.3 Topping up the chain oil tank.... 14
7.4 Cleaning....15
7.5 Chain catcher....15
7.6 Machine and bar lubrication holes ..... 15
7.7 Nuts and bolts....15
- OCCASIONAL MAINTENANCE....15
8.1 Chain brake metal band 15
8.2 Chain drive sprocket 15
8.3 Maintenance of the toothed chain ..... 15
8.4 Guide bar maintenance.... 16
- STORING 16
9.1 Storing the machine 16
9.2 Storing the battery.... 16
-
HANDLING AND TRANSPORTATION ..... 16
-
ASSISTANCE AND REPAIRS......16
12.WARRANTY COVERAGE 17
13.MAINTENANCE TABLE.... 17 - TROUBLESHOOTING.....17
- ATTACHMENTS ON REQUEST.... 19
15.1 Battery 19
15.2 Battery charger 19
15.3 Bars and chains 19
1. GENERAL ASPECTS
1.1 HOW TO READ THE MANUAL
Some paragraphs in the manual contain important information regarding safety and operation and are emphasized in this manner:
NOTE or IMPORTANT These give details or further information on what has been previously indicated and aim to prevent damage to the machine or cause other damage.
The symbol highlights danger. Failure to observe the warning can lead to the risk of injury to oneself and others and/or damage.
The paragraphs inside a grey dotted frame refer to optional features not available on all the models referred to in this booklet. Check if the feature is available on your model.
Whenever reference is made to a position on the machine "front", "back", "left" or "right" hand side, this refers to the operator's working position.
1.2 REFERENCES
1.2.1 Figures
The figures in these instructions for use are numbered 1, 2, 3, etc.
The components indicated in the figures are identified with letters A, B, C, and so on.
Reference to component C in figure 2 is indicated with the wording: "See fig. 2.C" or simply "(Fig. 2.C)".
The figures are given as a guide only. The actual pieces can differ from those illustrated in this document.
1.2.2 Titles
The manual is divided into chapters and paragraphs. The title of paragraph "2.1 Training" is a sub-title of "2. Safety regulations". References to titles or paragraphs are marked with the abbreviation chap. or par. and the relevant number. Example: "chap. 2" or "par. 2.1".
2. SAFETY REGULATIONS
2.1 GENERAL POWER TOOL SAFETY WARNINGS
WARNING Read all safety warnings and all instructions. Failure to follow the warnings and instructions may result in electric shock, fire and/or serious injury.
Save all warnings and instructions for future reference.
The term “power tool” in the warnings refers to your battery-operated (cordless) power tool.
1) Work area safety
a) Keep work area clean and well lit.
Dirty or cluttered areas invite accidents.
b) Do not operate power tools in explosive atmospheres, such as in the presence of flammable liquids, gases or dust. Power tools create sparks which may ignite the dust or fumes.
c) Keep children and bystanders at a safe distance while operating a power tool. Distractions can cause you to lose control.
2) Electrical safety
a) Avoid body contact with earthed or grounded surfaces, such as pipes, radiators, cookers and refridgerators.
There is an increased risk of electric shock if your body is earthed or grounded.
b) Do not expose power tools to rain or wet conditions. Water entering a power tool will increase the risk of electric shock.
3) Personal safety
a) Stay alert, watch what you are doing and use common sense when operating a power tool. Do not use a power tool while you are tired or under the influence of drugs, alcohol or medication. A moment of negligence while operating power tools may result in serious personal injury.
b) Use personal protective equipment. Always wear eye protection. Protective equipment such as dust mask, non-skid safety shoes, hard hat, or hearing protection used for appropriate conditions will reduce personal injuries.
c) Prevent unintentional starting. Ensure the tool is switched OFF before fitting the battery, picking up or carrying the power tool. Carrying power tools with your
finger on the switch or fitting the battery with the tool switched ON invites accidents.
d) Remove any adjusting key or wrench before turning the power tool on. A wrench or a key left attached to a rotating part of the power tool may result in personal injury.
e) Do not lose your balance. Keep proper footing and balance at all times. This enables better control of the power tool in unexpected situations.
f) Dress properly. Do not wear loose clothing or jewellery. Keep your hair, clothing and gloves away from moving parts. Loose clothes, jewellery or long hair can be caught in moving parts.
g) If any devices are to be connected to dust extractor and collection units, check they are connected and used appropriately. The use of these devices may reduce dust related risks.
4) Power tool use and care
a) Do not force the power tool. Use the correct power tool for your application. The correct power tool will do the job better and safer at the rate for which it was designed.
b) Do not use the power tool if the switch does not turn it on and off. Any power tool that cannot be controlled with the switch is dangerous and must be repaired.
c) Remove the accumulator from its housing before making any adjustments, changing attachments or storing power tools. Such preventive safety measures reduce the risk of starting the power tool accidentally.
d) Store idle power tools out of the reach of children and do not allow persons unfamiliar with the power tool or these instructions to operate the power tool. Power tools are dangerous in the hands of untrained users.
e) Maintain power tools with care. Check for misalignment or obstruction of moving parts, breakage of parts and any other condition that may affect the power tool's operation. If damaged, have the power tool repaired before use. Many accidents are caused by poorly maintained power tools.
f) Keep cutting tools sharp and clean.
Properly maintained cutting tools with sharp cutting edges are less likely to become jammed and are easier to control.
g) Use the power tool and its accessories according to the instructions provided, taking into account the working conditions and the type of work to
be performed. Using a power tool for operations different to those specified may cause hazardous situations.
5) Use and precautions to take during use of battery-operated power tools
a) Recharge only with the charger specified by the manufacturer. A charger that is suitable for one type of battery pack may create a risk of fire when used with
another type of battery pack.
b) Use power tools only with specifically designated battery packs. Use of other battery packs may create a risk of injury or fire.
c) When battery pack is not in use, keep it away from other metal objects, like paper clips, coins, keys, nails, screws or other small metal objects, that can make a connection from one terminal to another. Shorting the battery terminals together may cause burns or a fire.
d) Under abusive conditions, liquid may leak from the battery: avoid all contact. If contact accidentally occurs, flush with water immediately. If the liquid comes into contact with the eyes, seek medical assistance immediately. Liquids leaking from the battery terminals may cause irritation or burns.
6) Service
a) Have your power tool serviced by a qualified repair person using only original replacement parts. This will ensure that the safety of the power tool is maintained.
2.2 SPECIFIC SAFETY RULES FOR CHAINSAWS AND ELECTRIC CHAINSAWS.
- Keep all body parts at a distance from the toothed chain when the chainsaw is running. Before starting the chainsaw, check that the toothed chain is not in contact with anything.
Lack of concentration when using the chainsaw can cause clothes or body parts to get caught up in the toothed chain. - The right hand must always hold the rear grip and the left hand the front grip.
You should never turn your hands when holding the chainsaw, as this increases the risk of accidents on yourself. - Hold the power tool by insulated gripping surfaces only, because the
toothed chain may come in contact with hidden wiring. Toothed chain contacting a "live" wire may make exposed metal parts of the power tool "live" and could give the operator an electric shock.
- Always wear safety goggles and ear protection. Other protective equipment for the head, hands and feet is also recommended. The wearing of protective clothing will reduce accidents caused by hurled workpieces and accidental contact with the toothed chain.
- Keep proper footing and balance at all times, and only use the chainsaw on fixed, secure and flat surfaces. Slippery or unstable surfaces such as ladders, can cause loss of balance or control of the chainsaw.
- When cutting a branch that is under tension, be alert for spring back. When the tension of the wood fibres is released, the branch can spring back and injure the operator and/or kick the chainsaw out of control.
- Use extreme caution when cutting small size brush and saplings.
The slender material may catch in the chainsaw and be whipped towards you and/or pull you off balance.
- Carry the chainsaw by the front grip when it is switched off and keep it away from your body. When storing or transporting a chainsaw always use the guide bar cover. Correct handling of the chainsaw will reduce the probability of unintended contact with the moving chain.
- Follow the instructions concerning lubrication, chain tension and replacement parts. Chains with incorrect tension and lubrication can break and increase the risk of kickback.
- Keep handles dry, clean and free from oil and grease. Greasy and oily handles are slippery and can cause loss of control.
- Use the chainsaw to cut wood only. Do not use the chainsaw for purposes for which it is not intended. For example: do not use an chainsaw for cutting plastic, masonry or other non-wood materials. Using the chainsaw for operations other than those intended could result in a hazardous situation.
- Prolonged exposure to vibrations can cause injuries and neurovascular disorders (also called "Raynaud's syndrome" or "white finger"), especially to people suffering from circulation disorders. The symptoms can appear in the hands, wrists and fingers and are shown through loss of sensitivity, torpor, itching, pain and discolouring of or structural changes to the skin. These effects can be worsened by low ambient
temperatures and/or by gripping the hand grips excessively tightly. If the symptoms occur, the length of time the machine is used must be reduced and a doctor consulted.
- It is recommended that those operating chainsaws for trimming and performing height work aided by a rope and belt harness:
-
should never work alone;
– should be assisted by an operator on the ground who has received training on appropriate emergency procedures;
– should have received training on secure climbing and work positions for this type of job;
– are supplied with belt harnesses, ropes, flat belts with end loops, clasp clips and other recommended additional safety equipment or any other system that prevents the operator and chainsaw from falling. -
Perform cleaning and maintenance before storing the machine after use.
- Improper maintenance, use of non-compliant spare parts or modification of the safety devices can cause damage to the device and cause serious injury to the user.
2.3 CAUSES OF KICKBACK AND OPERATOR PROTECTION
Kickback can occur when the nose or tip of the guide bar touches an object, or when the wood closes in and pinches the chain in the cut.
Contact of the tip can, in certain cases, cause a sudden fast reverse action, pushing the guide bar upwards and backwards towards the operator.
Pinching of the chain along the top of the guide bar can rapidly push the chain back towards the operator.
Both the above reactions may cause loss of control of the saw, which could result in serious injury for operators. Do not rely exclusively on the chainsaw built-in safety devices
Chainsaw users should take additional precautions to eliminate accident or injury risks during cutting operations. Kickback is the result of poor use of the tool and/or incorrect operating procedures or conditions and can be avoided by taking the specific precautions provided below:
- Hold the saw firmly with both hands, with the thumbs and fingers around the chainsaw grips, and position your body and arms so that you can resist the force of a kickback. Kickback can be controlled by the operator if all appropriate precautions have been taken. Do not allow the chainsaw to start.
- Do not fully extend the arms and do not saw above shoulder height. This helps avoid undesired contact with the ends and allows for more control over the chainsaw in unexpected situations.
- Only use the guide bar and chains recommended by the manufacturer.
Unsuitable guides and chains can cause the chain to break and/or kickbacks.
- Follow the manufacturer's instructions regarding sharpening and maintenance of the chainsaw. A decrease in the level of depth can cause an increase in kickbacks.
- Techniques for using the electric chainsaw (battery-operated)
Always observe the safety regulations and use the most suitable cutting techniques according to the work to be performed, following the instructions and examples in the user instructions.
- Safe carrying of the electric chainsaw (battery-operated)
Whenever the machine is to be handled or transported you must:
– turn off the motor, wait for the chain to stop and unplug the machine from the mains;
- apply the protection bar cover;
– only hold the machine using the handles and position the bar in the opposite direction to that used during operation;
When using a vehicle to transport the machine, position it so that it can cause no danger to persons and fasten it firmly in place.
- Recommendations for first-time users
Before felling or delimbing for the first time, make sure:
– to have been specifically trained to use this type of equipment;
– to have carefully read the safety regulations and user instructions contained in this manual;
– you practise first on logs on the ground or attached to trestles, in order to get familiar with the machine and the most suitable cutting techniques.
- Handling and correct use of battery-operated power tools
a) Make sure that the machine is switched off before inserting the battery. Inserting a battery in an electric device which is switched on can cause accidents.
b) Charge battery packs only with the chargers recommended by the manufacturer. Battery chargers are generally specific for each battery type; use with other types can cause fire risks.
c) Use only batteries specifically designed for your power tool. The use of other batteries may cause injuries and fire risks.
d) Keep all unused batteries at a distance from paper clips, coins, keys, nails, screws or other small metal objects as contact with the same can cause short circuits. Short circuits between battery contacts can lead to explosion or fires.
e) Batteries in poor condition can cause liquids to leak. Avoid contact with the liquid. In the case of accidental contact flush with water. If the liquid comes into contact with the eyes, also seek medical advice. Liquid leaking from the battery may cause skin irritation or burns.
f) Check that the accumulator is in good condition and there are no signs of damage. Do not use the device with a damaged or worn accumulator.
2.4 PROTECTING THE ENVIRONMENT
Safeguarding the environment must be a relevant and priority aspect of machine use, of benefit to the community and the environment we live in.
- Avoid being a disturbance to the neighbourhood. Use this machine at reasonable times of the day only (not early morning or late evening when the noise could cause disturbance).
- A certain amount of chain lubricating oil is released into the environment when the machine is running, so only use biodegradable oils made specifically for this use. Use of a mineral oil or motor oil causes serious damage to the environment.
- Comply with local regulations for the disposal of packaging, deteriorated parts or any elements with a strong environmental impact; this waste must not be disposed of as normal waste, it must be separated and taken to specified waste disposal centres where the material will be recycled.
- Comply with local regulations for the disposal of waste materials
- When the machine is withdrawn from service, do not dispose of it in the environment, but take it to a waste disposal facility in accordance with the local regulations in force.
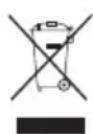
Do not throw electrical equipment away with domestic waste. According to the European Directive 2012/19/EU on electrical and electronic equipment waste and its implementation in compliance with national standards, old electrical equipment must be collected separately, for eco-compatible recycling. If electrical equipment is disposed of in landfills or in the ground,
hazardous substances can leak into the groundwater and contaminate the food chain, damaging your health and well-being. For further information on the disposal of this product, contact your dealer or a domestic waste collection service.
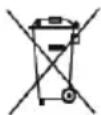
Li-ion
At the end of their working life, dispose of batteries paying due attention to the environment. Batteries contain material classified as hazardous for you and the environment. They must be removed and disposed of separately at a facility that accepts lithium-ion batteries.

Separate waste collection of the products and packaging used allows the materials to be recycled and reused. Reuse of recycled materials help to prevent environmental pollution and reduces the demand for raw materials.
3. GETTING TO KNOW THE MACHINE
3.1 DESCRIPTION OF THE MACHINE AND PLANNED USE
This machine is a forestry tool and precisely a battery powered chainsaw designed for trimming and pruning work performed directly on the tree.
The machine is essentially composed of a battery powered motor and a guide bar that takes the power from the battery to the motor which drives the cutting chain.
The operator is able to operate the machine with two hands, using the front and rear hand grips, and can use the main controls, always remaining at a safe distance from the cutting means.
3.1.1 Intended use
This special type of chainsaw has been designed specifically for the trimming of trees and must only be used by a trained operator following carefully planned and secure work instructions. This chainsaw is only destined to the trimming of trees when the above-mentioned conditions are complied with. It is generally conceived for use with two hands, just like a standard chainsaw. Some national regulations can restrict use of the machine.
This machine was designed and manufactured for:
– trimming and cutting of tall tree tops;
– cutting hedges, trunks or wooden beams, the diameter of which depends on the length of the guide bar;
-cutting wood only
– use by one operator only;
– use by qualified operators who have received specific training on tree maintenance.
3.1.2 Improper use
Any other usage not in keeping with the above-mentioned ones may be hazardous and harm persons and/or damage things. Examples of improper use may include, but are not limited to:
- trimming hedges;
– carving operations;
– sectioning pallets, crates and various packing materials;
– sectioning furniture or other materials with nails, screws or other metal components;
– butchering meat;
– using the machine to cut materials other than wood (plastic materials, building materials);
– using the machine to lift, move or split objects;
– using the machine while fastened to fixed supports;
– using cutting means other than those found in the "Technical Data" table. Serious injury and wound hazard.
– using of the machine by more than one person.
IMPORTANT Improper use of the machine will invalidate the warranty, relieve the Manufacturer from all liability, and the user will consequently be liable for all and any damage or injury to himself or others.
3.1.3 User types
This machine is intended for use only by operators trained in tree maintenance.
3.2 SAFETY SIGNS
The machine has various symbols on it (fig. 2). They are used to remind the operator of the behaviour to follow to use it with the necessary attention and caution.
Meaning of symbols:


Warning! Read the instructions before operating the machine.
Warning! The failure to use this machine correctly can be hazardous for oneself and others.

Danger! Wear ear protectors, safety goggles and a protective helmet.

Wear gloves and non-skid safety boots!

Danger! Do not leave the machine in the rain or in damp conditions.

Beware of kickback! Kickback is the rapid and uncontrollable backward motion of the chainsaw in the direction of the operator. Always work in complete safety. Use chains with safety links that limit kickback.
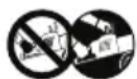
Warning! Never hold the machine with one hand! Hold the machine firmly with both hands to control the machine and reduce the risk of kickback.
Danger! Wear protective clothing.

This chainsaw is only suitable for use by operators who have received training on tree maintenance (see instruction manual).
IMPORTANT Any damaged or illegible decals must be replaced. Order replacement decals from an authorised service centre.
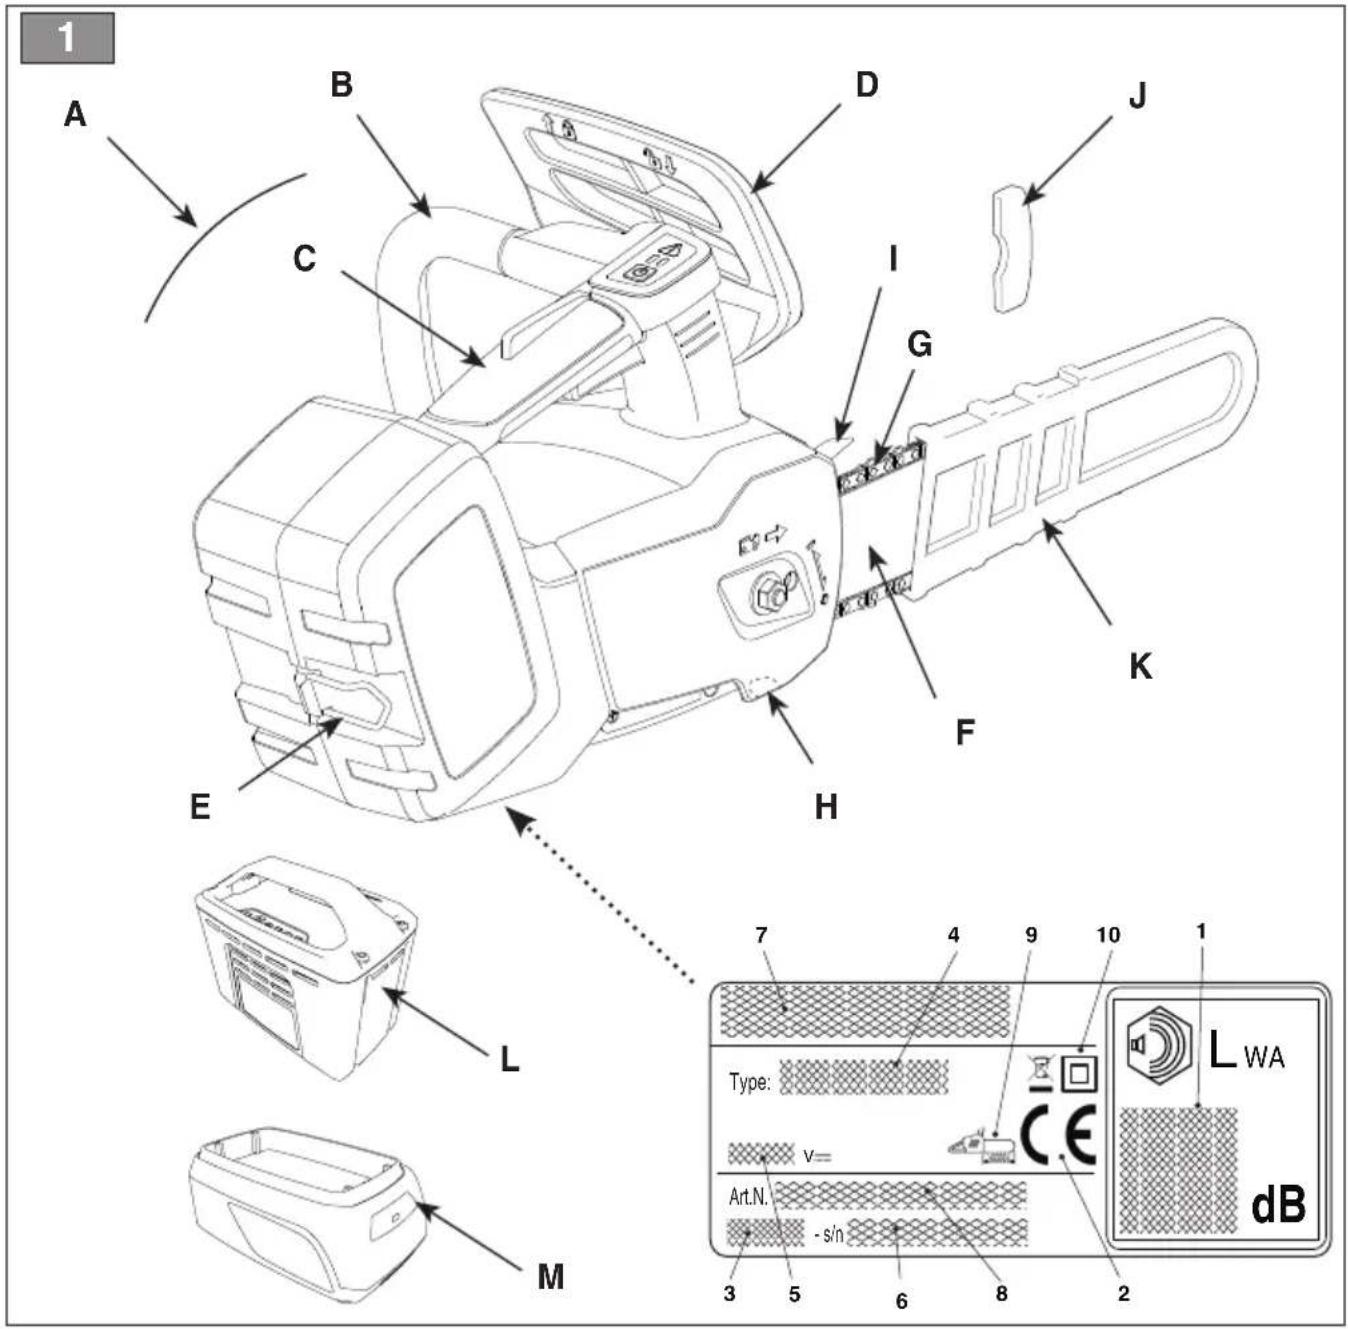
3.3 IDENTIFICATION LABEL
The identification label holds the following data (fig. 1):
- Sound power level
- CE conformity marking
- Month/Year of manufacture
- Type of machine
- Voltage and Frequency of power supply
- Serial number
- Name and address of Manufacturer
- Article code
- Length of the guide bar
- Dual insulation
Write the identification data of the machine in the specific space on the label on the back of the cover page.
IMPORTANT Quote the information on the product identification label whenever you contact an authorised service centre.
IMPORTANT The example of the Declaration of Conformity is provided on the last pages of the manual.
3.4 MAIN COMPONENTS
The machine is composed of a series of main components that have the following functions (fig.1):
A. Motor: supplies the drive power to the cutting means.
B. Front hand grip: support hand grip located on the front of the chainsaw. This should be grasped using the left hand.
C. Rear hand grip: support hand grip located on the rear of the chainsaw. This should be grasped using the right hand. This hand grip is fitted with the main throttle controls.
D. Front hand guard: protection device seated between the front hand grip and the toothed chain, to protect the hand against injuries should it slip off the hand grip. This guard is used as a device to trigger the chain brake.
E. Fastening point: coupling device used to fasten the chainsaw to a rope or belt, and then hook it onto the operator's harness using clasp clips.
F. Guide bar: supports and guides the toothed chain.
G. Toothed chain: cutting element, consisting of drive links fitted with small blades called "teeth" and side connections held in place by rivets.
H. Chain restraint pin: safety device that prevents uncontrolled movements of the toothed chain should it break or slacken.
I. Spiked bumper: device installed opposite the guide bar assembly point acting as a pivot when it comes into contact with a tree or trunk.
J. Spiked bumper guard: spiked bumper cover to be fitted during handling, transportation or storage of the machine. This guard must be removed when using the machine.
K. Bar cover guard: chainsaw cover on the guide bar to be fitted during handling, transportation or storage of the machine.
L. Battery: device that supplies electric current to the tool; its specifications and regulations for use are described in a specific manual.
M. Battery charger (accessory available upon request, par. 15.2): device used to recharge the battery.
4. ASSEMBLY
The safety regulations to follow are described in chap. 2. Strictly comply with these instructions to avoid serious risks or dangers.
For storage and transport purposes, some components of the machine may not be installed in the factory and have to be assembled after unpacking. Follow the instructions below.
⚠️ Unpacking and completing the assembly should be done on a flat and stable surface, with enough space for machine handling and its packaging, always making use of suitable equipment. Do not use the machine until all the instructions provided in the “ASSEMBLY” section have been carried out.
4.1 ASSEMBLY COMPONENTS
The packaging holds the components needed for assembly as listed in the table below:
| Guide bar fitted with bar cover |
| Toothed chain |
| Key |
| Documentation |
4.1.1 Unpacking
- Carefully open the packaging, paying attention not to lose components.
- Consult the documentation in the box, including these instructions.
- Remove all the unassembled parts from the box.
- Remove the machine from the box.
- Dispose of the box and packaging in compliance with local regulations.
4.2 ASSEMBLY OF THE GUIDE BAR AND TOOTHED CHAIN
Always wear heavy duty gloves when handling the bar and chain. Mount the bar and chain very carefully so as not to impair the safety and efficiency of the machine. If in doubt, contact your dealer.
⚠ Perform all operations after removing the battery.
⚠️ Before assembling the bar, check that the chain brake is not engaged (par. 5.4).
- Using the supplied wrench, unscrew the nut (Fig. 3.A) and remove the chain guard (Fig. 3.B), to access the drive pinion and bar seat.
- Mount the bar (Fig. 4.A) by inserting the stud bolt (Fig. 4.B) in the groove (Fig. 4.C) and push it towards the back of the machine body.
- Check that chain tension adjuster pin (Fig. 4.D) is fitted properly in the hole on the bar; if it isn't, turn the chain tension adjuster screw (Fig. 6.E) using a screwdriver until the pin is completely inserted.
- Tilt the machine to make it easier to wind the chain around the drive sprocket (Fig. 5).
- Mount the chain (Fig. 6.A) around the drive sprocket (Fig. 6.B) and along the bar guide (Fig. 6.C) being careful to follow the sliding direction.
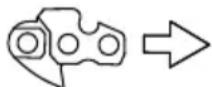
Direction in which the chain runs
-
If the tip of the bar is equipped with a nose sprocket, make sure the drive links are correctly inserted in the sprocket rims (Fig. 7).
-
Refit the guard (Fig. 8.A), without fully tightening the nut.
-
Turn the chain tension adjuster screw (Fig. 9.A) to achieve the desired tension (Fig. 10).
-
Raise the bar and tighten the guard nuts securely using the wrench supplied (Fig. 9.A).
4.2.1 Checking the chain tension
Check the chain tension.
The tension is correct when the drive links do not slip out of the chain guides if you hold the chain in the middle of the bar (Fig. 10).
5. CONTROLS
5.1 SAFETY BUTTON (ACTIVATION / DEACTIVATION DEVICE)

Press this button (Fig. 12.A) to activate and deactivate the machine's electrical circuit. The relevant LED lights up (Fig. 12.B).

• One LED on: the machine's electrical circuit is activated. The machine is ready for use.
- Both LEDs on: the machine is in action.
- Lights off: the electrical circuit is completely deactivated (OFF).
IMPORTANT Do not keep your finger on the button when moving the machine to avoid accidentally enabling the machine.

The “Attention” icon (Fig. 12.C) lights up in case of mechanical failure of the machine (see the Troubleshooting table, par. 14).
5.2 THROTTLE TRIGGER LEVER
It allows the activation of the chain.
The activation of the throttle trigger lever (Fig. 13.A), can only be used if the throttle safety lever is pressed simultaneously (Fig. 13.B).
The cutting means stops automatically when the throttle safety lever is released.
5.3 IINTERLOCK LEVER
The throttle lock lever (Fig. 13.B) allows the throttle trigger lever to be used (Fig. 13.A).
5.4 CHAIN BRAKE
This is a safety braking system that blocks the chain movement when kickback occurs during cutting. Kickbacks occur following an irregular contact of the tip of the bar, with a rapid upward movement of the bar that causes the hand to strike the front guard (Fig. 1.D) It must be manually released to disengage the chain brake.

Chain brake engaged. This is achieved when the front hand guard is pushed all the way forward.

Chain brake disengaged. This is achieved when the front hand guard is pulled all the way back, towards the machine body, until it clicks into position.
Do not use the machine if the chain brake does not function correctly and have it inspected by your dealer.
6. USING THE MACHINE
The safety regulations to follow are described in chap. 2. Strictly comply with these instructions to avoid serious risks or dangers.
IMPORTANT For instructions regarding the motor and the battery (if supplied), read the relevant manuals.
6.1 PRELIMINARY PROCEDURES
Before starting to work, it is necessary to carry out several checks and operations to ensure you can work efficiently and in maximum safety.
6.1.1 Checking the battery
Purchase the battery with the capacity that most suits your operational requirements and fully charge it according to the instructions in the battery booklet. The list of approved batteries for this machine is found in the "Technical Data" table.
- Before each use: - check the battery charge status according to the instructions in the battery booklet.
6.1.2 Filling with chain lubrication oil
Fill with chain lubrication oil before using the machine. For oil filling methods and precautions (see paragraph 7.3).
6.1.3 Checking the chain tension
⚠ Perform all operations with the motor off.
Always wear heavy duty work gloves.
Check the chain tension. The tension is correct when the drive links do not slip out of the chain guides if you hold the chain in the middle of the bar (Fig. 10).
To adjust the chain tension:
- loosen the cover nut, using the supplied wrench;
- turn the chain tension adjuster screw (Fig. 9.A) to achieve the desired tension;
- raise the bar and tighten the guard nut securely using the wrench supplied (Fig. 11.A).
⚠️ Never work with the chain loose, as it can be hazardous if the chain slips out of the bar guides.
IMPORTANT During the first period of use (or after replacing the chain) it must be checked more frequently due to settling of the chain.
6.2 SAFETY CHECKS
Run the following safety checks and check that the results correspond to those outlined on the tables.
⚠️ Always carry out the safety checks before use.
⚠️ Always carry out a daily inspection of the machine before use, after a fall or other impact to detect any damage or significant defects.
6.2.1 General safety check
| Object Result | |
| Grip and guards Clean, | dry, without traces of oil and grease, and fixed correctly and firmly to the machine. |
| Screws on the machine and blade | Correctly tightened (not loose) |
| Cooling air ducts Not clogged | |
| Guide rod Properly installed | |
| Chain Sharp, not damaged | or worn, mounted and tensioned correctly. |
| Guards Intact, undamaged. | |
| Battery | No damage to the casing, no liquid leakage |
| Machine | No signs of damage or wear |
| Throttle trigger lever, safety lever | The levers must move freely and not be forced. |
| Test driving No abnormal | vibrations.No abnormal sound |
6.2.2 Machine operating test
| Action Result | |
| Fit the battery inside its housing (par. 7.2.3).Press the safety button. | The blue light must come on (electrical circuit activated) and the chain must not move.⚠ Do not use the machine if the chain moves; in this case, contact your dealer. |
| Activate the throttle trigger lever. (without pressing the throttle lock lever) | The throttle trigger lever remains blocked. |
| Press the throttle lock button and throttle trigger lever. | The levers must move freely and not be forced. The chain moves. |
| Release the throttle trigger lever or press the safety button. | The lever automatically and rapidly returns to the idle position. The chain should stop. |
| CHECKING THE CHAIN BRAKE7. Start the machine (par. 6.4 )8. Grasp the hand grips firmly with both hands.9. Use the throttle lever to keep the chain moving, push the front hand guard forwards using the back of your left hand (par. 5.4 ) | 3. The chain must stop moving immediately. When the chain has stopped, release the throttle trigger lever and disengage the chain brake (par. 5.4). |
⚠️ If any of the results fail to match the instructions provided in the tables, do not use the machine! Contact a service centre to have it checked and repaired if necessary.
6.3 PREPARING TO USE THE CHAINSAW ON THE TREE
The chainsaw must be equipped with a flat strap with end slots suitable for attaching it to the operator's belt harness.
- Fasten the flat strap with end loops to the fastening point (Fig. 14.A) on the rear of the chainsaw.
- Provide suitable clasp clips to allow both indirect (via the flat strap with end slots) and direct (on the chainsaw fastening point) fastening of the chainsaw to the operator's belt harness.
- Make sure that the electrical circuit is switched off (Lights off) (Fig. 12.B).
- Make sure the chain brake is engaged (par. 5.4).
- Pass the machine to the operator situated on the tree.
⚠️ Check that the chainsaw is connected securely when passed to the operator in the tree and check that it is fastened to the belt harness before releasing it from the equipment used to lift it.
- Fasten the chainsaw to the fastening point on the operator's harness (Fig. 16). The fastening points can be central points (front or rear) or side points: - where possible, connect the chainsaw to the rear central point (Fig. 15.A) to prevent it from interfering with the climbing ropes and ensure that the weight is supported by the operator's back (Fig. 17).
NOTE The possibility of fastening the chainsaw directly to the belt harness reduces the risk of damaging the equipment whilst moving around the tree.
The chainsaw must always be switched off when it is directly fastened to the belt harness.
IMPORTANT When moving the chainsaw from one fastening point to another, make sure the machine is fastened to a new position before unfastening from the previous fastening point.
6.4 START-UP
- Remove the bar cover guard (fig. 1.K) and the spiked bumper guard (fig. 1.J) (if fitted).
- Make sure the bar and the chain are not touching the ground or any other object.
- Fit the battery inside its housing correctly (par. 7.2.3).
- Press the safety button (blue light) (fig. 12.A).
- Press the throttle lock lever (fig. 13.B) and throttle trigger lever. (fig. 13.A).
6.5 WORKING
Before felling or delimbing for the first time, make sure:
– to have been specifically trained to use this type of equipment;
– to have carefully read the safety regulations and user instructions contained in this manual;
– you practise first on logs on the ground or attached to trestles, in order to get familiar with the machine and the most suitable cutting techniques.
To use the machine proceed as follows:
• Always disengage the chain brake, pulling the lever towards you before using the throttle.
- The machine must always be firmly held in both hands, with the left hand on the front hand grip and the right hand on the rear hand grip, even if the operator is left-handed.

Stop the machine immediately e chain stops during sawing.
NOTE During use, the battery is protected against total drainage with a protective device that switches off the machine and stops it from working.
6.5.1
Checks to be conducted whilst working
6.5.1.a Checking the chain tension
The chain tends to stretch gradually as you work, so you need to check its tension frequently (par. 6.1.3).
6.5.1.b Checking the oil delivery
IMPORTANT Never use the machine without lubrication!

Make sure the bar and the chain are face when you check the oil delivery.
Start the motor (par. 6.4) and check if the chain oil is spread as shown in (fig. 18).
6.6
FORESTRY WORK
6.6.1 Delimbing a tree

Make sure there is nothing or nobody the area where the branches will fall.

For pruning high up using a rope a belt harness, carefully follow instructions under par. 6.7.
-
Stand opposite the branch you want to cut.
-
Start cutting lower branches followed by the higher ones.
- Make first cut from the bottom towards the top (Fig. 19.A). Complete delimbing by cutting from top to bottom, as shown in (Fig. 19.B).
6.6.2 Felling a tree
IMPORTANT Where two or more persons are working together on felling and bucking operations, such operations must be performed in separate areas at a distance from each other of at least 2.5 times the height of the tree being felled. Do not fell trees if this involves risks of injuring people, coming into contact with a power line or causing any form of damage. If the tree should come into contact with a main power line, report the incident immediately to the network provider.
Before commencing the felling operations:
– it is necessary to evaluate the natural inclination of the tree, the part where the branches are larger and the wind direction, to assess how the tree will actually fall;
– remove any dirt, stones, pieces of bark, nails, metal staples and wire;
– clear the area around the tree and find a stable place to stand;
- plan obstacle-free escape routes at a 45^ angle back and away from the direction of the fall (Fig. 20) which allow the operator to escape to a safe zone, about 2.5 times the height of the tree being felled;
- Stand uphill of the land onto which the tree will probably roll or fall over after felling.
• Performing a face notch
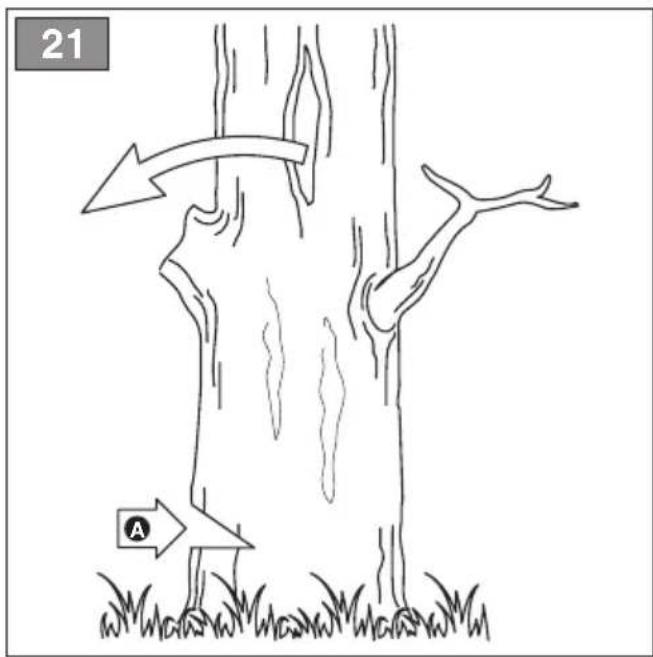
- Stand to the right of the tree, behind the chainsaw.
- Saw a horizontal face notch to 1/3 of the diameter of the tree, perpendicular to the direction in which it will fall (Fig. 21.A).
- Felling back cut
-
Perform the felling back cut at least 5 cm higher than the horizontal face notch (Fig. 22.B).
-
Perform the felling back cut leaving sufficient wood to act as a "hinge" (Fig. 22.C). The hinge wood will prevent the tree from twisting and falling in the wrong direction. Do not cut through the hinge.
-
Reduce the thickness of this hinge without pulling out the bar, until the tree falls.
-
If there is any risk of the tree not falling in the desired direction, or that it might lose its balance moving backwards and bending the toothed chain, stop cutting
before completing the felling back cut and use some wooden, plastic or aluminium wedges (Fig. 23.D) to open the cut. Force the tree to fall along the desired line by hitting the wedges with a sledge hammer.
- When the tree starts to fall, it is necessary to withdraw the machine from the cut, switch it off (par. 6.9), lie it on the ground and take the foreseen exit route. Beware of falling branches and pay attention where you put your feet.
6.6.3 Limbing tree branches
Limbing means removing the branches from a felled tree.
⚠️ Be careful of where the branches are lying on the ground, the risk of them being under tension, the direction the branch may go during cutting and the risk of the tree being unstable after the branch has been cut.
When limbing, it is necessary to leave the lower, larger branches to support the trunk on the ground. Remove the small branches with a single cut (Fig. 24.A).
It is recommended to cut the tensioned branches working from the bottom upwards to prevent the chainsaw from bending (Fig. 24.B).
6.6.4 Bucking the trunk
Bucking means sawing a tree trunk into logs.
It is essential to make sure your feet are positioned firmly on the ground, and your weight is distributed equally on both feet. If possible, it is recommended to raise and support the trunk using branches, logs or blocks of wood.
It is easier to saw a log using the spiked bumper (Fig. 1.I):
- plant the spiked bumper into the log and use it as a pivot. Cut with an arched motion to make the bar penetrate the wood (Fig. 25);
- repeat several times if necessary, changing the point where you plant the spiked bumper.
- Trunk lying on the ground
When the entire trunk is lying on the ground, it is bucked from the top down (overbucking) (Fig. 26.A).
– Cut up to half the diameter, roll the log over and finish sawing on the other side.
- Trunk resting on one end only
When the trunk is resting on one end only:
– saw through 1/3 of the diameter from the bottom up (underbucking) (Fig. 27.A);
– then perform the final cut, overbucking to reach the first cut (Fig. 27.B).
- Trunk resting on both ends
When the trunk is resting on both ends:
– saw through 1/3 of the diameter from the top down (overbucking) (Fig. 28.A);
– then perform the final cut, underbucking the lower 2/3 to reach the first cut (Fig.. 28.B).
- Sloping trunk
Always stand uphill when bucking a sloping trunk (Fig. 29).
During the operation, to maintain control when the cut is almost complete, reduce the bucking pressure without removing removing your hands from the machine hand grips. Take all necessary precautions to prevent the machine from coming into contact with the ground.
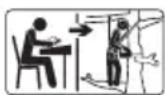
6.7 FOR PRUNING HIGH UP USING A ROPE AND A BELT HARNESS
IMPORTANT This chapter describes the work procedures implemented to reduce the risk of injuries when using chainsaws for trimming and performing height work aided by a rope and belt harness. This is not intended to replace formal training on the subject. The guidelines provided in this appendix are only examples of best practice. National laws and regulations must always be observed.
6.7.1 Using the chainsaw with two hands
Using the chainsaw with two hands allows you to: - maintain a firmer grip on the chainsaw in the event of a kickback; - maintain a level of control over the chainsaw that decreases the probability of it coming into contact with the ropes and the operator's body; - adopt a safe work position to avoid any loss of control that could lead to contact with the chainsaw (unintentional movement while the chainsaw is running).
In order to be able to grip the chainsaw with both hands, as a general rule, the operator must always try to maintain a safe position when using the chainsaw:
– at a hip level when cutting horizontally or
– at a solar plexus level when cutting vertically.
- When the operator is working close to vertical trunks, with reduced lateral force on the working position, stable support is sufficient to maintain a safe working position.
- When the operator moves away from the trunk, the lateral forces increase and it is necessary to eliminate or offset them using one of the following methods:
– add an additional fastening point for the main rope to stabilise it;
– use a flat strap with end slots adjustable from the harness fastened to an additional fastening point (Fig. 30);
- Use of a temporary foot stirrup, created by a ring belt, can make it easier to achieve a stable working position. Fig. 31).
6.7.2 Using the chainsaw with one hand
Do not work with one hand if you are in an unstable working position or when using a chainsaw instead of a handsaw to cut small sized branches.
The chainsaw must be used with one hand only when:
- the operator is not able to reach a working position that allows him to use both hands,
- the operator needs to use one hand to support himself in the working position,
- the cutting involves extension of the operator's upper limb beyond his own body line (Fig. 32).
The operator must never:
• perform cutting operations with the kickback area corresponding with the point of the chainsaw bar;
- "hold and cut" sections;
- attempt to catch falling sections.
6.9) when moving between work areas.
⚠️ Stop the machine immediately if the chain stops during sawing.
If the chainsaw should get stuck during pruning high up (using a rope and a belt harness), the operator must:
- stop the machine immediately;
- fasten it securely to the part of the branch between the trunk and the cut section or to a rope not attached to the tool;
-
pull the chainsaw out from the cut, lifting the branch where necessary;
-
if necessary, use a handsaw or second chainsaw to free the trapped chainsaw, cutting at a minimum distance of 30 cm from the trapped chainsaw. Cutting operations to free the chainsaw must always be performed towards the end of the branch, (i.e. between the trapped chainsaw and the end of the branch and not between the trunk and the trapped chainsaw). This will prevent the chainsaw from being dragged by the part of the branch that is cut away, which would complicate the situation even further.
6.9 STOP
To stop the machine:
- Release the throttle trigger lever (Fig. 13.A).
- Press the safety button and turn off the electrical circuit (light off) (Fig. 12.A).
After releasing the throttle control it takes a few seconds for the toothed chain to stop.
Always stop the machine:
– when moving between work areas.
Do not keep your finger on the safety button when moving the machine to avoid accidentally enabling the machine.
6.10 AFTER USE
- Remove the battery from its housing and recharge it (par. 7.2.2).
- Mount the bar cover.
- Allow the motor to cool before storing in an enclosed space.
- Loosen the bar fastening nut to reduce chain tension.
- Carefully remove any dust and debris and remove all traces of sawdust or oil deposits from the chain (par. 7.4).
- Check there are no loose or damaged components. If necessary, replace the damaged components and tighten any screws and loose bolts.
IMPORTANT Always remove the battery (par. 7.2.2) and fit the blade guard whenever the machine is unused or left unattended.
7. ROUTINE MAINTENANCE
7.1 GENERAL INFORMATION
The safety regulations to follow are described in chap. 2. Strictly
comply with these instructions to avoid serious risks or dangers.
⚠️ Before conducting any inspections, cleaning or maintenance/adjustment interventions on the machine:
- Stop the machine;
- Wait until the chain is stationary;
- Remove the battery from its housing;
- Apply the bar cover, except when working directly on the chain or bar itself.
- Wait until the motor is sufficiently cold;
- Read the relevant instructions;
-
Use suitable clothing, protective gloves and goggles;
-
The frequency and types of maintenance are summarised in the "Maintenance Table". This table will help you maintain your machine's safety and performance. It summarises the main interventions to be made and the frequency applicable to each of them. Carry out the relevant task as soon as it is scheduled to be performed.
- The use of non-genuine and/or incorrectly assembled spare parts and attachments could adversely affect machine operation and safety. The manufacturer shall decline all liability in the event of injuries or damages caused by such parts.
• Genuine spare parts are supplied by authorised assistance workshops and dealers.
IMPORTANT Any maintenance and adjustment operations not described in this manual must be carried out by your dealer or Authorised Service Centre.
7.2 BATTERY
7.2.1 Battery power reserve
Battery autonomy is mainly influenced by:
a. environmental factors, that cause higher energy requirements:
– cutting trees and branches that are too thick;
b. operator behaviour that should be avoided:
– switching the machine on and off frequently whilst working;
- adopting a cutting technique that is unsuitable for the work to be performed (par. 6.6, par. 6.7);
To optimise battery power reserve it is always recommended to:
- cut wood when dry;
- use the most appropriate technique for the work to be performed
If the need arises to use the machine for sessions which exceed the capability of a standard battery, it is possible to:
• purchase a second standard battery to immediately replace the discharged battery, without compromising the continuity of operations;
7.2.2 Battery removal and recharging
- Press the button placed on the battery 14.A) and remove it (Fig. 14.B);
- Fit the battery (Fig. 33.A) in the battery charger housing (Fig. 33.B);
- Connect the battery charger to a mains power socket (Fig. 33.C) with the voltage indicated on the rating plate.
- Fully charge the battery according to the instructions in the battery/battery charger booklet.
NOTE The battery is equipped with a guard that inhibits recharging if the environmental temperature is not between 0 and +45 °C.
NOTE The battery can be recharged at any time, even partially, with no risk of damaging it.
7.2.3 Refitting the battery on the machine
When recharging is completed:
- Remove the battery (Fig. 34.A) from the housing in the battery charger (do not keep charging when recharging is completed);
- Disconnect the battery charger from the electrical outlet (Fig. 34.B);
- Fit the battery (Fig. 14.B) in its housing pressing down until you hear it click firmly into position which ensures the electrical contact;
7.3 TOPPING UP THE CHAIN OIL TANK
NOTE The following symbol is found near the chain oil tank cap (fig. 35.A):
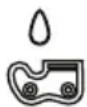
Chain oil tank
IMPORTANT Only use chainsaw oil or adhesive oil for chainsaws. Do not use oil containing impurities so as not to block the oil filter and to prevent irreparable damage to the oil pump.
It is essential that you use good quality oil to lubricate the cutting parts effectively. Used or poor quality oil does not
guarantee good lubrication and reduces the working life of the chain and bar.
IMPORTANT Never run the chain without sufficient oil, this could damage the saw and compromise safety.
Check the amount of oil in the chainsaw by checking the oil level indicator (Fig. 35.B).
If the oil level is low, top up as follows:
- Unscrew and remove the cap (Fig. 35.A) from the oil tank.
- Pour oil in the tank and monitor the level on the indicator (Fig. 35.B).
- Make sure no impurities penetrate the oil tank when filling.
- Screw on the oil cap and tighten it.
7.4 CLEANING
7.4.1 Cleaning the machine and the motor
After every work session, clean the machine thoroughly to remove all dust and debris.
- To reduce fire hazards, keep the machine and, in particular, the motor free of leaves, branches or excessive grease.
- Always clean the machine after use with a damp cloth dipped in neutral detergent.
- Remove all traces of humidity using a soft damp cloth. Humidity can generate risks of electric shocks.
- Do not use aggressive detergents or solvents to clean the plastic parts or hand grips.
- Do not spray water onto the motor and electrical components and prevent them from getting wet.
- To avoid overheating and damage to the motor or the battery, always keep the cooling air vents clean and free of debris.
7.4.2 Cleaning the chain
Remove any traces of sawdust or oil deposits from the chain every time it is used.
If there is excessive dirt or resin build-up, disassemble the chain and place it in a container with a specific cleanser for a few hours. Then rinse it with clean water and treat it with a suitable anticorrosive spray, before reassembling on the machine.
7.5 CHAIN CATCHER
Check the chain stop pin conditions before each use (Fig. 1.H) and repair in the event of damages.
7.6 MACHINE AND BAR LUBRICATION HOLES
Before daily use, remove the guard (par. 4.2), disassemble the bar and check that machine lubrication holes (Fig. 36.A) and guide bar (Fig. 36.B) are not clogged.
7.7 NUTS AND BOLTS
- Keep all nuts, bolts and screws tight to be sure the equipment is in safe working condition.
- Check regularly that the handles are fixed firmly.
8. OCCASIONAL MAINTENANCE
Have your dealer check the condition of the metal band around the clutch housing once a month. The band must be replaced if deteriorated or deformed.
8.2 CHAIN DRIVE SPROCKET
Regularly check the condition of the sprocket with your local dealer and replace it when wear exceeds the accepted limits.
Do not mount a new chain with a worn sprocket or vice-versa.
8.3 MAINTENANCE OF THE TOOTHED CHAIN
To ensure that the chainsaw works safely and efficiently, it is essential that the cutting means are well-sharpened.
⚠️ Always wear heavy duty gloves when handling the bar and chain.
Chain sharpening is necessary when:
– The sawdust looks like dust.
– Cutting becomes more difficult.
- The cut is not straight.
– Vibrations increase.
⚠️ Kickback may occur if the chain is not sufficiently sharpened
IMPORTANT It is recommended to have an Authorised centre sharpen the chain using the right tools to ensure minimum removal of material and even sharpness on all the cutting edges.
8.3.1 Replacing the toothed chain
Replace the chain whenever:
– the length of the cutting edges reduces to 5 mm or less;
– there is too much play between the links and the rivets.
– the cutting speed is too slow and the repeated sharpening does not improve the cutting speed. The chain is worn.
IMPORTANT After replacing the chain, its tension level must be checked more frequently due to settling of the chain.
8.4 GUIDE BAR MAINTENANCE
NOTE Any work on the guide bar requires specific experience and special tools in order to achieve top workmanship standards; for safety purposes, we recommend you contact your dealer to ensure work is done correctly.
To avoid asymmetrical wear on the bar, make sure it is turned over periodically.
To keep the bar in perfect working order, proceed as follows:
- grease the bearings on the nose sprocket (if present) with the syringe (not included).
- clean the bar groove with the scraper (not included) (Fig. 37.A);
- clean the lubrication holes (Fig. 37.B);
- with a flat file, remove burr from the edges and level off the guides.
8.4.1 Replacing the bar
Replace the bar whenever:
– the groove is not as deep as the height of the drive links (which must never touch the bottom);
– the inside of the guide is worn enough to make the chain lean to one side.
9. STORING
9.1 STORING THE MACHINE
When the machine is to be stored away:
- Remove the battery from its housing and recharge it;
- Mount the bar cover.
- Wait until the motor is sufficiently cold;
- Clean (par. 7.4).
- Check there are no loose or damaged components. If necessary, replace the
damaged components and tighten any screws and loose bolts or contact the authorised service centre.
-
Store the machine:
-
in a dry place
– protected from inclement weather
– in a place where children cannot get to it
– making sure that keys or tools used for maintenance are removed.
9.2 STORING THE BATTERY
The battery must be kept in a cool, shaded place without humidity.
NOTE If unused for any length of time, recharge the battery every two months to prolong its working life.
10. HANDLING AND TRANSPORTATION
Whenever the machine is to be handled, raised, transported or tilted you must:
- Stop the machine;
- Wait until the chain is stationary;
- Remove the battery from its housing and recharge it;
- Mount the bar cover;
- Wait until the motor is sufficiently cold;
- Wear heavy work gloves;
- Only hold the machine using the hand grips and position the bar in the opposite direction to that used during operation;
When transporting the machine on a vehicle, always: - fasten the machine securely with cables or chains;
- position it so that it does not cause a hazard to anyone
11. ASSISTANCE AND REPAIRS
This manual provides all the necessary information to run the machine and for correct basic maintenance operations which can be performed by the user. Any regulations and maintenance operations not described herein must be carried out by your Dealer or Authorised Service Centre, which have the necessary knowledge and equipment to ensure that the work is carried out correctly, maintaining the correct degree of safety and the original operating conditions of the machine. Any operations performed in unauthorised centres or by unqualified persons will totally invalidate the Warranty and all obligations and responsibilities of the Manufacturer.
- Only authorised service centres can carry out guaranteed repairs and maintenance.
- The authorised service centres only use genuine spare parts. Genuine spare parts and accessories have been designed specifically for machines.
- Non-genuine spare parts and accessories are not approved. Use of non-genuine spare parts and accessories cause the warranty to be invalidated.
- It is advisable to send your machine once a year to an authorised service centre for servicing, assistance and safety device inspection.
12. WARRANTY COVERAGE
The warranty covers all material and manufacturing defects. The user must follow all the instructions provided in the accompanying documentation.
The warranty does not cover damages caused by:
- Failure to become familiar with the documentation accompanying the machine.
- Carelessness.
- Incorrect or prohibited use or assembly.
- Use of non-genuine spare parts.
- Use of accessories not supplied or approved by the manufacturer.
The warranty does not cover:
- Normal wear and tear of consumables, such as cutting means, safety bolts.
• Normal wear and tear.
The purchaser is protected by his or her own national legislation. The purchaser's rights under the national laws or his or her own country are not in any way restricted by this warranty.
13. MAINTENANCE TABLE
| Intervention Frequency Paragraph | |||
| First time | And then after every | ||
| MACHINE | |||
| Check all fasteners | - Before each use 7.7 | ||
| Safety checks/check controls | - Before each use 6.2 | ||
| Check the chain catcher | - Before each use 7.5 | ||
| General cleaning and inspection | - After each use 7.4 | ||
| Cleaning the chain | - After each use 7.4.2 | ||
| Check the machine and bar lubrication holes | - Before each use 7.6 | ||
| Check the chain brake metal band | - Once a month 8.1 * | ||
| Check the chain drive sprocket | - Once a month 8.2 * | ||
| Chain maintenance | - | - | 8.3 * |
| Bar maintenance | - | - | 8.4 |
| Topping up the chain oil level | - Before each use 7.3 | ||
* Interventions which must be carried out by your dealer or an authorised service centre
14. TROUBLESHOOTING
If problems persist after having performed the above operations, contact your dealer.
| PROBLEM | PROBABLE CAUSE | SOLUTION |
| 1. When the safety button is pressed, the blue light does not light up | Battery is not inserted or is inserted incorrectly | Make sure that the battery is inserted correctly (par. 7.2.3) |
| 2. When the safety button is pressed, the blue light does not switch on and the "Attention" icon lights up | Low battery Check the battery | status and recharge if necessary (par. 7.2.2). |
| 3. By activating the safety button when the throttle lever and throttle lock lever are pressed, the motor does not start and the "Attention" icon lights up | Incorrect starting procedure Follow the instructions (see chapter 6.4) | |
| 4. The motor shuts down whilst working | Battery is not inserted correctly Make sure that the battery is inserted correctly (par. 7.2.3) | |
| Machine damaged Do not use the machineRemove the battery and Contact a Service Centre. | ||
| 5. The motor stops whilst working and the safety button flashes | Low battery Check the battery | status and recharge if necessary (par. 7.2.2). |
| 6. With the throttle lock button and throttle trigger lever on, the chain does not turn | Excessive chain tensioning Retension the chain (par. 6.1.3). | |
| Bar and chain problems Check that the chain runs freely and the bar guides are not deformed (par. 8.3, 8,4). | ||
| Machine damaged. Do not use the machine.Immediately turn off the machine, remove the battery and Contact an Authorised Service Centre. | ||
| 7. The chain heats and emits smoke on the end part of the bar. | Excessive chain tensioning Retension the chain (par. 6.1.3). | |
| Lubricant oil tank empty. Fill the lubricant oil tank (par. 7.3). | ||
| 8. The motor runs irregularly and lacks power when revved | Bar and chain problems Check that the chain runs freely and the bar guides are not deformed. | |
| 9. No oil is released | Poor quality oil When the motor is cold, empty the tank, clean it and the pipes with liquid detergent and change the oil. | |
| Lubrication holes are clogged Clean them (chap. 7.6) | ||
| 10. The machine has struck a foreign body. | Damaged or loose parts. Stop the machine (chap. 6.9).Inspect for damage.Check for and tighten any loose parts.Have all checks, repair work and replacements carried out by an Authorised Centre only. | |
| 11. Excessive noise and/ or vibration is experienced whilst working | Loose or damaged parts Turn o the machine, remove the battery and: - inspect for damage; - check for and tighten any loose parts; - have any damaged parts replaced or repaired with parts having equivalent speci cations. | |
| 12. The machine gives o smoke whilst working | Machine damaged Do not use the machine. Immediately turn o the machine, remove the battery and Contact an Authorised Service Centre. | |
| 13. Battery power reserve is low | Severe working conditions requiring greater current absorption | |
| Battery is insu cient for operating requirements | ||
| Decrease in battery capacity Purchase a new battery | ||
| 14. The battery charger is not recharging the battery | Battery is not correctly inserted in the battery charger | |
| Unsuitable environmental conditions | ||
| Dirty contacts Clean the contacts | ||
| The battery charger is not energised | ||
| Faulty battery charger Replace with an original spare part | ||
15. ATTACHMENTS ON REQUEST
15.1 BATTERY
Di erent capacity batteries are available to suit speci c operating requirements (Fig. 38). The list of approved batteries for this machine is found in the "Technical Data" table.
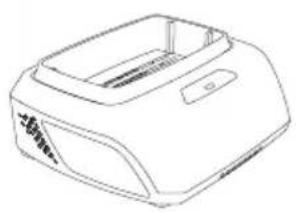
15.2 BATTERY CHARGER
Device used to recharge the battery (Fig. 39).
15.3 BARS AND CHAINS
The "Correct bar and chain combination table" contains a list of all possible combinations between bar and chain. The same table also provides the speci cation data for all chains and bars approved for use on each machine. ⚠️ Only use the replacement bars and chains listed in the table. The use of unapproved combinations may be
hazardous and cause serious injuries to operators and damage the machine.
In consideration that the selection, application and use of the bar and chain are actions made solely by the user, at
his own discretion, the latter assumes responsibility for damages of any kind arising from such actions. When in doubt or if lacking knowledge of the specifics of each bar or chain, contact your dealer or an authorised garden centre.
ÍNDICE
1.1 KUIDAS KASUTUSJUHENDIT LUGEDA
8.1 KETIPIDURI METALLRIBA
10. MANUTENTION ET TRANSPORT
D. Lgs. 262/2002, ANNEX V (Italy)
EN • The content and images in this User Manual were produced expressly for ST. S.p.A. and are protected by copyright – any unauthorised reproduction or modification to the document, either partially or in full, is prohibited.
text_image
Scanned text of a formal letter or document with multiple paragraphs and footnotes, likely from a formal letter or document.Type: