
C 1648 Li - Saw ALPINA - Free user manual and instructions
Find the device manual for free C 1648 Li ALPINA in PDF.


| Product type | Cordless circular saw |
| Brand | Alpina |
| Model | C 1648 Li |
| Power source | 18 V lithium-ion battery |
| Blade diameter | 165 mm (estimated) |
| Maximum cutting depth | 55 mm at 90° (estimated) |
| No-load speed | 4500 rpm (estimated) |
| Weight | 3.5 kg (with battery) |
| Dimensions (L x W x H) | 350 x 200 x 250 mm (estimated) |
| Sound level | 90 dB(A) (estimated) |
| Battery capacity | 2.0 Ah (estimated) |
| Charging time | 1 hour (estimated) |
| Main functions | Cutting wood, derived materials, plastics |
| Maintenance and cleaning | Clean after use, check blade tightness, lubricate moving parts |
| Safety | Electric blade brake, spindle lock, anti-restart protection |
| Spare parts | Blade, battery, charger, parallel guide |
| Repairability | Repairability score 7/10 (estimated) |
| Warranty | 2 years (estimated) |
Frequently Asked Questions - C 1648 Li ALPINA
User questions about C 1648 Li ALPINA
0 question about this device. Answer the ones you know or ask your own.
Ask a new question about this device
Download the instructions for your Saw in PDF format for free! Find your manual C 1648 Li - ALPINA and take your electronic device back in hand. On this page are published all the documents necessary for the use of your device. C 1648 Li by ALPINA.
USER MANUAL C 1648 Li ALPINA
- manual code nm. 171501308/0
- Homologation name CS 48 Li
- Date 09/2014
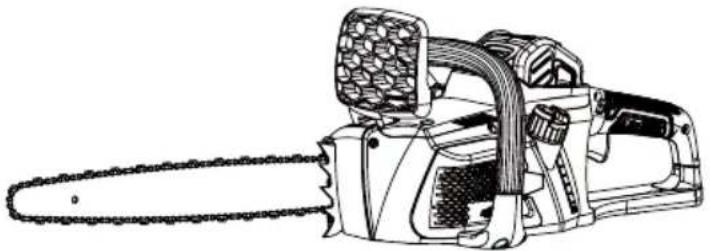
IT Sega a catena con alimentazione a batteria - MANUALE DI ISTRUZIONI
BG Верижна резачка захранвана с батерия - УПЪТВАНЕ ЗА УПОТРЕБА
BS Lančana pila na bateriju - UPUTSTVO ZA UPOTREBU
CS Řetězová pila napájená z akumulátoru - NÁVOD K POUŽITÍ
DA Batteridrevet kædesav - BRUGSANVISNING
DE Batteriebetriebene Kettensäge - GEBRAUCHSANWEISUNG
EL Αλυσοπρίονο με τροφοδοσία μπαταρίας - ΟΔΗΓΙΕΣ ΧΡΗΣΠΣ
EN Battery powered chainsaw - OPERATOR'S MANUAL
ES Sierra de cadena con alimentación por batería - MANUAL DE INSTRUCCIONES
ET Akutoitega kettsaag - KASUTUSJUHEND
FI Akkukäyttöinen moottorisaha - KÄYTTÖOHJEET
FR Scie à chaîne sans fil - MANUEL D'UTILISATION
HR Lančana pila s baterijskim napajanjem - PRIRUČLNIK ZA UPORABU
HU Akkumulátoros láncfűrész - HASZNÁLATI UTASÍTÁS
LT Baterija maitinamas grandininis pjūklas - INSTRUKCIJŲ VADOVAS
LV Kēdes zāgis ar barošanu no akumulatora - OPERATORA ROKASGRĀMAT
MK Моторна пила на батерии - УПАТСТВА ЗА УПОТРЕБА
NL Kettingzaag met accuvoeding - GEBRUIKERSHANDLEIDING
NO Batteridreven kjedesag - INSTRUKSJONSBOK
PL Piła łańcuchowa akumulatorowa - INSTRUKCJE OBSŁUGI
PT Serra de corrente com alimentação a bateria - MANUAL DE INSTRUÇÕES
RO Ferăstrău cu lant cu alimentare pe baterie - MANUAL DE INSTRUCTIUNI
RU Цепная пила с батарейным питанием - РУКОВОДСТВО С ИНСТРУКЦИЯМИ
SK Ret'azová píla napájaná z akumulátora - NÁVOD NA POUŽITIE
SL Akumulatorska verižna žaga - PRIROČNIK ZA UPORABO
SR Lančana testera na bateriju - PRIRUČNIK SA UPUTSTVIMA
SV Batteridriven kedjesåg - BRUKSANVISNING
TR Batarya beslemeli zincirli testere - KULLANIM KILAVUZU



GGP ITALY SPA
Via del Lavoro, 6
I-31033 Castelfranco Veneto (TV) ITALY

ENGLISH - Translation of the original instruction .... EN








OPBEVARING AF PRODUKTET
Li-ion battery. This product has been marked with a symbol relating to separate collection for all battery packs and battery pack. It will then be recycled or dismantled in order to reduce the impact on the environmnt. Battery packs can be hazardous for the environment and for human health.
FEHLERBEHEBUNG
Your product has been engineered and manufactured to high standard for dependability, ease of operation, and operator safety. When properly cared for, it will give you years of rugged, trouble-free performance.
For use with 43.2V 4Ah (146 Wh) battery only.
GENERAL SAFETY WARNINGS
WARNING
Read all safety warnings and all instructions. Failure to follow the warnings and instructions may result in electric shock, fire and/or serious injury.
INTENDED USE
This chainsaw is designed for cutting branches, trunks, logs and beams of a diameter determined by the cutting length of the guide bar. It is only designed to cut wood. It is only to be used in an outdoor, domestic application by adults.
User type: This machine is intended for use by consumers, i.e. non-professional operators. The machine is intended for "DIY" use only.
Do not use the chainsaw for any purpose not listed above.
This chainsaw is not to be used for professional tree services. It is not to be used by children or by persons not wearing adequate personal protective equipment and clothing.
RESIDUAL RISKS:
Even with the intended use of the appliance, there is other risk which cannot be prevented. According to the type and construction of the appliance, the following potential hazards might happen:
■ Contact with exposed saw teeth of the saw chain (cutting hazards).
■ Access to the rotating saw chain (cutting hazards).
■ Unforeseen, abrupt movement of the guide bar (cutting hazards).
■ Flung out of parts from the saw chain (Cutting / injection hazards).
■ Flung out of parts of the work piece.
■ Inhalation of work piece particles.
■ Skin contact with the fuel oil.
■ Loss of hearing, if no ear protection is used during work.
Save all warnings and instructions for future reference.
The term "power tool" in the warnings refers to your mains operated (corded) power tool or batteryoperated (cordless) power tool.
WORK AREA SAFETY
- Keep work area clean and well lit. Cluttered or dark areas invite accidents.
■ Do not operate power tools in explosive atmospheres, such as in the presence of flammable liquids, gases or dust. Power tools create sparks which may ignite the
dust or fumes.
- Keep children and bystanders away while operating a power tool. Distractions can cause you to lose control.
ELECTRICAL SAFETY
■ Avoid body contact with earthed or grounded surfaces, such as pipes, radiators, ranges and refrigerators. There is an increased risk of electric shock if your body is earthed or grounded.
■ Do not expose power tools to rain or wet conditions. Water entering a power tool will increase the risk of electric shock.
PERSONAL SAFETY
- Stay alert, watch what you are doing and use common sense when operating a power tool. Do not use a power tool while you are tired or under the influence of drugs, alcohol or medication. A lapse of attention while operating power tools may result in serious personal injury. - Use personal protective equipment. Always wear eye protection. Protective equipment such as dust mask, non-skid safety shoes, hard hat or hearing protection used appropriately will reduce personal injuries.
■ Prevent unintentional starting. Ensure the switch is in the off position before connecting to power source and/or battery pack and when picking up or carrying the tool. Carrying power tools with your finger on the switch or energizing power tools that have the switch on invites accidents.
■ Remove any adjusting key or wrench before turning the power tool on. A wrench or a key left attached to a rotating part of the power tool may result in personal injury.
- Do not over-reach. Keep proper footing and balance at all times. This enables better control of the power tool in unexpected situations.
■ Dress properly. Do not wear loose clothing or jewellery. Keep your hair, clothing and gloves away from moving parts. Loose clothes, jewellery or long hair can be caught in moving parts.
■ If devices are provided for the connection of dust extraction and collection facilities, ensure these are connected and properly used. Use of dust collection can reduce dust-related hazards.
POWER TOOL USE AND CARE
- Do not force the power tool. Use the power tool for the application. The correct power tool will do the job better and safer at the rate for which it was designed.
■ Do not use the power tool if the switch does not turn it on and off. Any power tool that cannot be controlled with the switch is dangerous and must be repaired.
■ Disconnect the battery pack from the power tool before making any adjustments, changing accessories, or storing power tools. Such preventive safety measures reduce the risk of starting the power tool accidentally.
■ Store idle power tools out of the reach of children and
do not allow persons unfamiliar with the power tool or these instructions to operate the power tool. Power tools are dangerous in the hands of untrained users.
- Maintain power tools. Check for misalignment or binding of moving parts, breakage of parts and any other condition that may affect the power tool's operation. If damaged, have the power tool repaired before use. Many accidents are caused by poorly maintained power tools.
- Keep cutting tools sharp and clean. Properly maintained cutting tools with sharp cutting edges are less likely to bind and are easier to control.
■ Use the power tool, accessories and tool bits etc. in accordance with these instructions, taking into account the working conditions and the work to be performed. Use of the power tool for operations different from those intended could result in a hazardous situation.
BATTERY TOOL USE AND CARE
■ Ensure the switch is in the off position before inserting battery pack. Inserting the battery pack into power tools that have the switch on invites accidents.
■ Recharge only with the charger specified by the manufacturer. A charger that is suitable for one type of battery pack may create a risk of fire when used with another battery pack.
■ Use power tools only with specifically designated battery packs. Use of any other battery packs may create a risk of injury and fire.
■ When battery pack is not in use, keep it away from other metal objects like paper clips, coins, keys, nails, screws, or other small metal objects that can make a connection from one terminal to another. Shorting the battery terminals together may cause burns or fire.
■ Under abusive conditions, liquid may be ejected from the battery; avoid contact. If contact accidentally occurs, flush with plenty of soap and water. If liquid contacts eyes, immediately seek medical help. Liquid ejected from the battery may cause irritation or burns.
SERVICE
■ Have your power tool serviced by a qualified repair person using only identical replacement parts.
This will ensure that the safety of the power tool is maintained. Servicing requires extreme care and knowledge and should be performed only by a qualified service technician. For service we suggest you return the product to your neatest AUTHORISED SERVICE CENTRE for repair. When servicing, use only identical replacement parts.
SPECIFIC SAFETY WARNINGS
- Hold the power tool by insulated gripping surfaces only, because the saw chain many contact hidden wiring. Saw chains contacting a “live” wire may make exposed metal parts of the power tool “live” and could give the operator an electric shock.
- Keep all parts of the body away from the saw chain when the chain saw is operating. Before you start the chain saw, make sure the saw chain is not in contact with anything. A moment of inattention while operating chain saws may cause entanglement of your clothing or body with the saw chain.
■ Always hold the chain saw with your right hand at
the rear handle and your left hand at the front handle. Holding the chain saw with a reversed hand configuration increases the risk of personal injury and should never be done.
■ Wear safety glasses and hearing protection. Further protective equipment for head, hands, legs and feet is recommended. Adequate protective clothing will reduce personal injury from flying debris or accidental contact with the saw chain.
- Do not operate chain saw while up in a tree. Operation of a chain saw while up in a tree may result in personal injury.
■ Always keep proper footing and operate the chain saw only when standing on fixed, secure and level surface. Slippery or unstable surfaces such as ladders may cause loss of balance or control of the chain saw.
■ When cutting a limb that is under tension, be alert of spring back. When the tension in the wood fibres is released, the spring loaded limb may strike the operator and/or throw the chain saw out of control.
■ Use extreme caution when cutting brush and saplings. The slender material may catch the saw chain and be whipped toward you or pull you off balance.
- Carry the chain saw by the front handle with the chain saw switched off and away from your body. When transporting or storing the chain saw, always fit the guide bar cover. Proper handling of the chain saw will reduce the likelihood of accidental contact with the moving saw chain.
■ Follow instructions for lubricating, chain tensioning and changing accessories. Improperly tensioned or lubricated chain may either break or increase the chance for kickback.
- Keep handles dry, clean, and free from oil and grease. Greasy, oily handles are slippery, causing loss of control.
- Cut wood only. Do not use chain saw for purposes not intended. For example: do not use chain saw for cutting plastic, masonry or non-wood building materials. Use of the chain saw for operations other than intended could result in a hazardous situation.
CAUSES AND OPERATOR PREVENTION OF KICKBACK:
Kickback may occur when the nose or tip of the guide bar touches an object, or when the wood closes in and pinches the saw chain in the cut.
Tip contact in some cases may cause a sudden reverse reaction, kicking the guide bar up and back towards the operator. Pinching the saw chain along the top of the guide bar may push the guide bar rapidly back towards the operator.
Either of these reactions may cause you to lose control of the saw which could result in serious personal injury. Do not rely exclusively upon the safety devices built into your saw.
As a chain saw user, you should take several steps to keep your cutting jobs free from accident or injury. Kickback is the result of tool misuse and/or incorrect operating procedures or conditions and can be avoided by taking proper precautions as given below::
■ Maintain a firm grip, with thumbs and fingers encircling the chain saw handles, with both hands on the saw and your body and arm positioned to allow you to resist
kickback forces.
■ Kickback forces can be controlled by the operator, if proper precautions are taken. Do not let go of the chain saw. Do not overreach and do not cut above shoulder height. This helps prevent unintended tip contact and enables better control of the chain saw in unexpected situations.
■ Only use replacement bars and chains specified by the manufacturer. Incorrect replacement bars and chains may cause chain breakage and/or kickback.
- Follow the manufacturer's sharpening and maintenance instructions for the saw chain. Decreasing the depth gauge height can lead to increased kickback.
ADDITIONAL WARNINGS
- It has been reported that vibrations from hand-held tools may contribute to a condition called Raynaud's Syndrome in certain individuals. Symptoms may include tingling, numbness and blanching of the fingers, usually apparent upon exposure to cold. Hereditary factors, exposure to cold and dampness, diet, smoking and work practices are all thought to contribute to the development of these symptoms. It is presently unknown what, if any, vibrations or extent of exposure may contribute to the condition. There are measures that can be taken by the operator to possibly reduce the effects of vibration:
- Keep your body warm in cold weather. When operating the unit wear gloves to keep the hands and wrists warm. It is reported that cold weather is a major factor contributing to Raynaud's Syndrome.
- After each period of operation, exercise to increase blood circulation.
- Take frequent work breaks. Limit the amount of exposure per day. If you experience any of the symptoms of this condition, immediately discontinue use and see your physician about these symptoms.
■ The recommended cutting capacity of this chain saw is 153mm (6 in.) and smaller to prolong the life of the tool and allow for safest operation. Cutting logs with a diameter larger than this will cause excess wear on your tool. Logs with a maximum diameter of 229mm (9in.) can be cut, but should only be done so rarely and with caution.
■ The integral spiked bumper is designed to assist cutting. When forced against the log while cutting it provides a more stable pivot point.
■ Any chainsaw is potentially lethal if used inappropriately. It is strongly suggested that you seek professional training in the safety and use of this tool.
SAVE THESE INSTRUCTIONS. REFER TO THEM FREQUENTLY AND USE THEM TO INSTRUCT OTHERS WHO MAY USE THIS UNIT. IF YOU LOAN SOMEONE THIS UNIT, LOAN THEM THESE INSTRUCTIONS.
SYMBLES
Some of the following symbols may be used on this tool. Please study them and learn their meaning. Proper interpretation of these symbols will allow you to operate the tool better and safer.
SYMBOL DESIGNATION/EXPLANATION
| V Voltage | |
| W Watt | Power |
 | Direct current - Type or characteristic of current |
 | Precautions that involve your safety |
 | Read the operation manual and follow all warnings and safety instructions. |
 | Wear eye and hearing protection when operating this product. |
 | Do not expose to rain or damp conditions. |
 | Hold with both hands |
 | Be aware of kicking back. |
The following signal words and meanings are intended to explain the levels of risk associated with this product.
| SYMBOL SINGAL MEANING | ||
 | DANGER: | Indicates an imminently hazardous situation, which, if not avoided, will result in death or serious injury. |
 | WARNING: | Indicates a potentially hazardous situation, which, if not avoided, could result in death or serious injury. |
 | CAUTION: | Indicates a potentially hazardous situation, which, if not avoided, may result in minor or moderate injury. |
| CAUTION: | Without Safety Alert Symbol) Indicates a situation that may result in property damage. | |
SPECIFICATIONS
| Rated voltage | 43.2 V DC |
| No Load Speed | 11.2 m/s |
| Guide bar length | 400 mm |
| Chain stop | < 0.12s |
| Chain oil tank capacity | 180 ml |
| Weight | 3.9 kg |
| Sound pressure level | 87dB(A) |
| – Measurement uncertainty | 3.0dB(A) |
| Measured sound power level | 98.9dB(A) |
| – Measurement uncertainty | 3 dB(A) |
| Guaranteed sound power level | 103dB(A) |
| Vibration level 2.6 m/s2 | |
| – Measurement uncertainty | 1.5m/s |
REMARKS:
■ The declared vibration value has been measured with a standard test method and may be used to compare one tool with another.
■ The declared vibration value may be used in a preliminary assessment of exposure.
The example of the conformity declaration is found in the penultimate page of the manual.
WARNING
The actual vibration values during use of the tool can be different from the above stated and depend on the use of the tool; and the need to identify safety measures to protect the operator are based on an estimation of exposure in the actual conditions of use (taking account all parts of the operating cycle such as the times when the tool is switched off and when it is running idle in addition to the trigger time).
CHAIN & BAR INFORMATION
| C 1648 Li / SC 48 AE | ||
| Manufacture | Chain Guide bar | |
| Oregon | 91PX056X (C 1648 Li) | 160 SDE A041 (C 1648 Li) |
| 91PX052X (SC 48 AE) | 140 SDE A041(SC 48 AE) | |
| Oregon's chain must be fitted with Oregon's bar. | ||
DESCRIPTION
- Guide bar cover
- Front handle guard / chain brake
- Front handle
- Safety lock-off button
- Switch trigger
- Oil tank cover
- Oil level gauge
- Spike bumpers
- Saw chain
- Guide bar
- Nuts
- Rear handle
- Chain tensioner adjustment knob
- Sprocket cover
- Sprocket cover tighten knob
- Bolt for saw chain tension
- Sprocket
- Bar guide
- Oil outlet
- Bar groove
- Chain drive links
- Cutter
- Felling direction
- Danger zone
- Escape route
- Direction of fall
- Notch
-
Felling back cut
-
Hinge
- Limb cut
- Keep work off ground leave support limbs until log is cut
- Log supported along the entire length
- Cut from top (over buck) avoid cutting earth
- Log supported one end
- Under buck
- Over buck
- Log supported both ends
- Bucking a log
- Stand on uphill side when cutting because log may roll
- Battery pack
- Battery latch button
- Charger
- Charger cable
- On/off switch
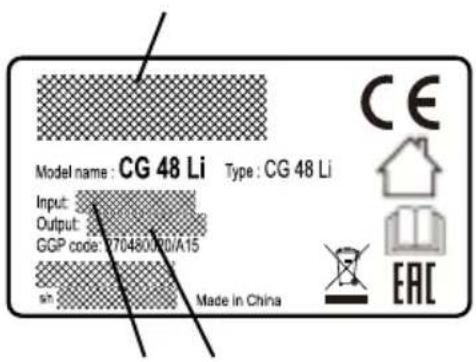
- EC Conformity marking
- Name and address of the manufacturer
- Manufacturer's model of reference
- Guaranteed sound power level
- Year of manufacture
- Serial number
- Article Code
- Manufactuer
- Charger voltage and current
- Power supply frequency and voltage
ASSEMBLY
This chain saw does not require assembly, but user should know how to assemble the guide bar and saw chain. Check the chain tensioning and add oil as described later in this manual before each operation.
ASSEMBLING THE GUIDE BAR AND SAW CHAIN
See figure 2 - 7
Make sure remove the battery pack from the unit. Wear protective gloves.
■ Unscrew the sprocket cover tighten knob (item 15) and remove the sprocket cover.
■ The saw chain should face in the direction of chain rotation. If they face backwards, turn the loop over.
■ Place the chain drive links into the bar groove. Position the chain so there is a loop at the back of the bar.
■ Hold the chain in position on the bar and place the loop around the sprocket and make sure it is correctly mounted. Make sure the bar hole fits well with bolt (item 16) for saw chain tension.
- Replace the sprocket cover, turn the chain tension adjust knob (item 13) clockwise until the saw chain is properly tensioned. The guide bar must then be pushed upwards, check chain tension again, do not tension the chain too tight.
■ After the chain is well-tensioned, tighten the knob (item 15) again.
Note: The saw chain is properly tensioned if, in the middle of the guide bar, it can be lifted 3mm to 4mm from the edge of the guide bar. Start the saw again with a new saw chain, allowing it to run-in for 2\~3 minutes.
WARNING
After the run-in time, check the chain tension and retighten the chain if necessary.
OPERATION
For complete charging instructions, refer to the Operator's Manuals for your battery pack and charger models. Use the charger which complies with EN 60335-2-29 for charging
NOTE: To avoid serious personal injury, always remove the battery pack and keep hands clear of the lock-out button when carrying or transporting the tool
BEFORE EACH USE CHECKING THE CHAIN TENSION WARNING
See Figure 2.
WARNING
Remove the battery pack from the chain saw before checking the chain tension or making adjustments to the chain. Wear protective gloves while touching the chain, bar or areas around the chain.
■ Pull the chain in the middle of the lower side of the bar away from the bar. The gap between the cutter in the chain and the bar should be between 3mm - 4mm.
■ If you need to adjust the chain tension, please refer to the section "ADJUSTING THE CHAIN TENSION" later in this manual.
TO INSTALL BATTERY PACK
See Figure 2.
- Place the battery pack in the chain saw. Align raised ribs on battery pack with grooves in the chain saw's battery port.
■ Make sure the latch on bottom of the battery pack snaps in place and that battery pack is fully seated and secure in the chain saw before beginning operation.
TO REMOVE BATTERY PACK
See Figure 2.
■ Release the trigger to stop the chain saw.
■ Press and hold the battery latch button at the bottom of the battery pack.
■ Remove battery pack from the chain saw.
CHECKING THE CHAIN LUBRICANT
See Figure 1.
- Check the amount of oil in the chain saw by looking at the oil level gauge (item 7). If the oil level is low, follow the steps shown in section "ADDING CHAIN & BAR LUBRICANT" of this manual..
WARNING
Check the chain tension before each use of the saw.
WARNING
Never operate the chain saw without sufficient chain lubrication as this might damage the saw and is a threat to safety. Check the chain lubricant level before each use!
In order to prevent kickback, please follow these safety instructions:
■ Never cut with the tip of the guide bar! Be careful when continuing from previous cuts.
■ Always start cutting only when the chain saw is already running.
■ Make sure that the saw chain is always properly sharpened.
■ Never cut through more than one branch at a time! When lopping off branches, be careful not to touch any other branches. When cross-cutting, pay attention to trunks standing very close to each other. If possible, use a sawing trestle.
HOLDING THE CHAIN SAW (Fig. 8)
Always hold the chain saw with your right hand at the rear handle and your left hand at the front handle. Grip both handles with the thumbs and fingers encircling the handles. Ensure that your left hand is holding the front handle so that your thumb is underneath.
STARTING OPERATION
■ Before starting for operation, you should install the battery pack in the machine.
■ Press the on/off switch (item 44), this makes the switch trigger operational. starting for operation, you should install the battery pack in the machine.
■ Start the machine: Press the Safety lock-off button (item 4), and then pressure the switch trigger (item 5).
STOPPING OPERATION
■ Release the power switch trigger (item 5) to stop the chain saw.
- Check the operating condition of the chain brake prior to each use.
■ Engage the chain brake by rotating your left hand around the front handle, allowing the back of your hand to push the chain brake lever/hand guard toward the bar while the chain is rotating rapidly. Be sure to maintain both hands on the saw handles at all times.
■ Reset the chain brake back into the RUN position by grasping the top of the chain brake lever/hand guard and pulling toward the front handle.
WARNING
If the chain brake do not stop the chain immediately, or if the chain brake will not stay in the run position without assistance, take the saw to an authorized service center for repair prior to use.
USING THE CHAIN SAW
Always be sure of your footing and hold the chain saw firmly with both hands while the motor is running.
BASIC FELLING, LIMBING, AND CROSS-CUTTING
TECHNIQUES
See figure 9
FELLING A TREE
When bucking and felling operations are being performed by two or more persons at the same time, the felling operation should be separated from the bucking operation by a distance of at least twice the height of the tree being felled. Trees should not be felled in a manner that would endanger any person, strike any utility line or cause any property damage. If the tree does make contact with any utility line, the utility company should be notified immediately.
The chain saw operator should keep on the uphill side of the terrain as the tree is likely to roll or slide downhill after it is felled. An escape path should be planned and cleared as necessary before cuts are started. The escape path should extend back and diagonally to the rear of the expected line of fall. Before felling is started, consider the natural lean of the tree, the location of larger branches and the wind direction to judge which way the tree will fall. Remove dirt, stones, loose bark, nails, and staples from the tree.
NOTCHING UNDERCUT (A NOTCH CUT IN A TREE TO
DIRECT THE FALL) See Figure 10
Make the notch 1/3 in diameter of the tree, perpendicular to the direction of falls. Make the lower horizontal notching cut first, this will help to avoid pinching of either the saw chain or the guide bar when the second notch is being made.
FELLING BACK CUT (THE FINAL CUT IN A TREE FELLING OPERATION, MADE ON THE OPPOSITE SIDE OF THE TREE FROM THE NOTCHING UNDERCUT)
See Figure 10
Make the felling back cut at least 50mm higher than the horizontal notching cut. Keep the felling back cut parallel to the horizontal notching cut. Make the felling back cut so as to leave enough wood to act as a hinge. The hinge wood keeps the tree from twisting and falling in the wrong direction. Do not cut through the hinge. As the felling cut gets close to the hinge, the tree should begin to fall. If there is any chance that the tree may not fall in the desired direction or it may rock back and bind the saw chain, stop cutting before the felling back cut is complete and use wedges of wood, plastic or aluminium to open the cut and drop the tree along the desired line of fall. When the tree begins to fall, remove the chain saw from the cut, stop the motor, put the chain saw down, and then use the retreat path as planned. Be alert of overhead limbs falling and watch your footing.
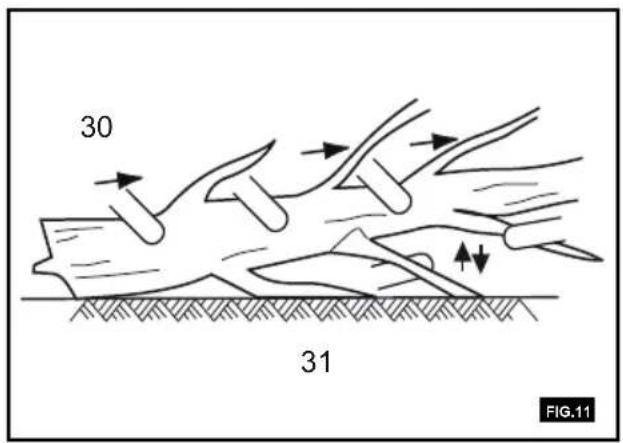
LIMBING A TREE See Figure 11
Limbing is removing the branches from a fallen tree. When limbing, leave the larger lower limbs to support the log off the ground. Remove the small limbs in one cut. Branches under tension should be cut from the bottom up, to avoid binding the chain saw.
BUCKING A LOG
See figure 12 - 15
Bucking is cutting a log into lengths. It is important to make sure your footing is fi rm and your weight is evenly distributed on both feet. When possible, the log should be raised and supported by the use of limbs, logs or chocks. Follow the simple direction for easy cutting:
-
When the log is supported along the entire length, it is cut from the top (over buck).
-
When the log is supported on one end, cut 1/3 of the diameter from the underside (under buck). Then make the finished cut by over bucking to meet the first cut.
- When the log is supported on both ends, cut 1/3 of that diameter from the top (over buck). Then make the fi nished cut by under bucking the lower 2/3 to meet the fi rst cut.
- When bucking on a slope, always stand on the uphill side of the log. When cutting through, to maintain complete control, release the cutting pressure near the end of the cut without relaxing your grip on the chain saw handles.
Do not let the chain contact the ground. After completing the cut, wait for the saw chain to stop before you move the chain saw. Always stop the motor before moving from tree to tree.
WARNING
Always remove the battery pack from the machine before checking the chain tension or making adjustments to the chain. Wear protective gloves while touching the chain, bar or areas around the chain.
ADJUSTING THE CHAIN TENSION See figure 2
■ Un-tighten the sprocket cover tighten knob (item 15) slightly by turning it counterclockwise.
■ To increase the chain tension, turn the chain tensioner adjustment knob (item 13) clockwise and check the chain tension frequently. To reduce the chain tension, turn the chain tensioner adjustment knob (item 13) counterclockwise and check the chain tension frequently.
■ The chain tension is correct when the gap between the cutter in the chain and the bar is between 3mm-4mm. Pull the chain in the middle of the lower side of the bar downwards (away from the bar) and measure the distance between the bar and the chain cutters.
■ Tighten the sprocket cover tighten knob (item 15) by turning it clockwise.
REPLACING THE BAR AND CHAIN
See Figure 2, 3, 5, 7
- Put the saw down on a flat and even surface to make adjustments to the chain.
■ Make sure that you have the correct replacement bar and chain as advised earlier in the specification section of this manual.
■ Unscrew the sprocket cover tighten knob (item 15) by turning it counterclockwise until the sprocket cover (item 14) comes loose.
■ Remove the sprocket cover. Remove the bar and saw chain from unit.
■ To replace the bar with the new one, unscrew the nut of the safety tip, mount the safety tip on to the new bar and tighten the nut. - Put the new chain in the correct direction as shown in figure 7 onto the bar and make sure that the drive links are aligned in the bar groove (figure 5).
■ Attach the bar to the chain saw and loop the chain around the drive sprocket as shown in figure 3.
■ Replace the sprocket cover (item 14), tighten sprocket cover and tighten knob (item 15).
■ Unscrew and remove the cap (item 6) from the oil tank.
■ Pour the oil into the oil tank and monitor the oil level gauge (item 7). Ensure that no dirt enters the oil tank while filling the oil in.
■ Put the oil cap back on and tighten it up.
■ One full oil tank will enable you to use the saw for 20-40 min.
TRANSPORTING THE CHAIN SAW
Before transporting the chain saw, always remove the battery pack from the chain saw and slide the chain cover over the bar and chain. If several cuts are to be performed with the chain saw, the saw must be switch off between cuts.
GUIDE BAR COVER see figure 1
The chain cover must be clipped onto the chain and bar as soon as the sawing work has been completed and whenever the machine has to be transported.
When the chain penetrates into wood with difficulty, it needs sharpening as follows:
■ Put the chain under tension.
■ Fasten the bar in a vice so that the chain can slide.
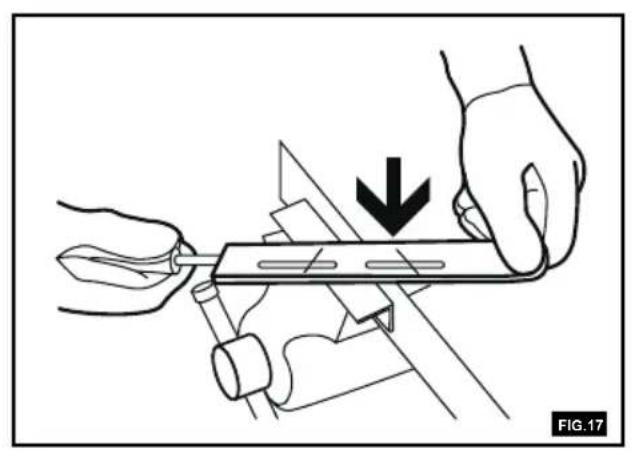
■ Fasten the file to the file holder and place it on cutter at 35° angle.
■ File with forward strokes only until all the worn out parts of the cutting edge are taken away.
■ Count the number of strokes given to the cutter as a reference and file away with the same number of strokes on all other cutters.
■ If the depth gauge protrudes from the template after sharpening a few times, reset its level. Use a flat file. Finally, round off the depth gauge.
NOTE: It is recommended to have the deep or important sharpening carried out by a service agent who is equipped with electric sharpener.
GUIDE BAR MAINTENANCE
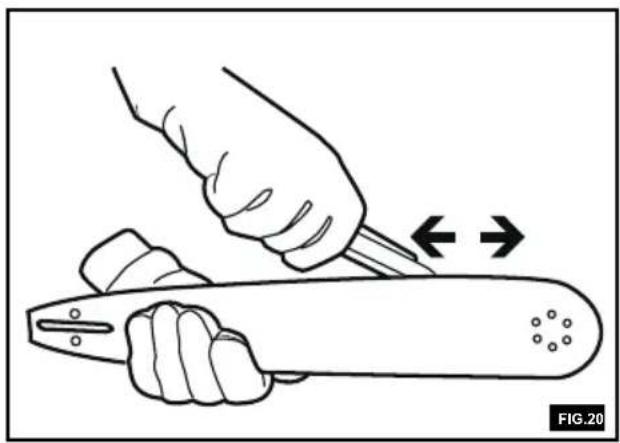
■ When you have finished working, clean out the groove and the oil passages with a scraping hook.
■ Periodically trim the sides of rails using a flat file. If not done in the long run, the feather edges might break away and damage the bar.
■ If one rail is higher than the other one, it is necessary to make it even with a flat file then smooth it with a file or fine grain abrasive paper.
WARNING
When servicing, use only identical replacement parts. Use of any other parts may create a hazard or cause product damage.
WARNING
To avoid serious personal injury, always remove the battery pack from the tool when cleaning or performing any maintenance.
GENERAL MAINTENANCE
Before each use, inspect the entire product for damaged, missing, or loose parts such as screws, nuts, bolts, caps, etc. Tighten securely all fasteners and caps and do not operate this product until all missing or damaged parts are replaced. Please call Customer Service for assistance.
Avoid using solvents when cleaning plastic parts. Most plastics are susceptible to damage from various types of commercial solvents and may be damaged by their use. Use clean cloths to remove dirt, dust, oil, grease, etc.
WARNING
Do not at any time let brake liquids, gasoline, petroleumbased products, penetrating oils, etc., come in contact with plastic parts. Chemicals can damage, weaken or destroy plastic which may result in serious personal injury.
Only the parts shown on the parts list are intended to be repaired or replaced by the customer. All other parts should be replaced at an authorised service centre.
STORAGE
STORING THE PRODUCT
■ Remove the battery pack from the unit before storing.
■ Clean all foreign material from the unit.
■ Store it in a place that is inaccessible to children.
- Keep away from corrosive agents such as garden chemicals and de-icing salts.
■ Store and charge your batteries in a cool area. Temperatures above or below normal room temperature will shorten battery pack life.
■ Never store batteries in a discharged condition. Store battery packs in a 30%-50% charged condition.
■ Store the battery pack where the temperature is below 27 FIC and away from moisture.
■ All batteries gradually lose their charge. The higher the temperature, the quicker they lose their charge. If you store your unit for long periods of time without using it, charge the pack as normal every six months of storage. This practice will prolong battery pack life.
ENVIRONMENTAL PROTECTION
1) Environmental protection should be a priority of considerable importance when using the machine, for the benefit of both social coexistence and the environment in which we live. Try not to cause any disturbance to the surrounding area.
2) Scrupulously comply with local regulations for the disposal of packaging, deteriorated parts or any elements with a strong environmental impact; this waste must not be disposed of as normal waste, it must be separated and taken to specified waste disposal centres where the material will be recycled.
3) Scrupulously comply with local regulations for the disposal of waste materials after mowing.
DISPOSAL

Do not dispose of electrical equipment with household waste material. In observance of European Directive 2012/19/EC on waste electrical and electronic equipment and its implementation in accordance with national regulations, electric equipment that has reached the end of its life must be collected separately and recycled in an ecologically compatible way. If electrical equipment is disposed of in dumps or in landfills, hazardous substances can leak into the groundwater
and get into the food chain, damaging your health and well-being. For further information on the disposal of this product, contact a domestic waste collection authority or your dealer.
The battery contains material which is hazardous to you and the environment. It must be removed and disposed of separately at a facility that accepts lithium-ion batteries.
Li-ion battery. This product has been marked with a symbol relating to separate collection for all battery packs and battery pack. It will then be recycled or dismantled in order to reduce the impact on the environmnt. Battery packs can be hazardous for the environment and for human health.
TROUBLESHOOTING
| PROBLEM POSSIBLE | CAUSE | REMEDY |
| Bar end chain running hot and smoking | Check chain tension for overtightened conditions Bar lube reservoir empty | Tension chain. Refer to Chain Tension earlier in this manual.Check bar lube reservoir. |
| Motor runs, but chain is not rotating. | Chain tension too tight. Check guide bar and chain assembly.Check guide bar and chain for damage. | Retention chain. Refer to Chain Tension earlier in this manual.Refer to Replacing the Bar and Chain earlier in this manual.Inspect guide bar and chain. |
Un-tighten the sprocket cover tighten knob (item 15) slightly by turning it counterclockwise.
■ Keerake kergelt lahti ketiratta kaane kinnitusnupp (pos 14) vastupäeva keerates.
TUOTTEEN TEKNISET TIEDOTU
PUIDEN KAADON, OKSIEN KARSINNA N J A POIKKISYYHYN SAHAAMISEN PERUSTEKNIKAT
(kuva 9)
Puun kaato
CARACTÉRISTIQUES DU PRODUIT
SIGURNOST RADNOG PROSTORA
SIKKERHET PÅ ARBEIDSOMRÅDE
TA VARE PÅ DISSE FORSKRIFTENE. LES DEM REGELMESSIG OG FORKLAR DEM TIL ENHVER P E R S O N S O M K A N K O M M E T I L Å BR U K E D E T T E V E R K T ∅ Y E T. H V I S D U L Å N E R B O R T D E T T E V E R K T ∅ Y E T, MÅ D U O G SÅ LÅ N E B O R T BRU K S A N V I S N I N G E N.
SYMBOLERE
saw. Always stop the motor before moving from tree to tree.
ADVARSEL
Fjern alltid batteripakken fra sagen før det foretas kontroll av kjedestrammingen eller andre justeringer på sagen. Bruk alltid beskyttende hansker när du berører kjeden, sverdet eller områder rundt kjeden.
JUSTERING AV KJEDESTRAMMINGEN Se Figur 2.
VEDLIKEHOLD AV SVERDET
GENERELT VEDLIKEHOLD
Før hver gangs bruk, inspiser hele sagen for skader,
BEZPIECZEŃSTWO W MIEJSCU PRACY
Only the parts shown on the parts list are intended to be repaired or replaced by the customer. All other parts should be replaced at an authorised service centre.
SKLADIŠTENJE
SKLADIŠTENJE PROIZVODA
■ Izvadite bateriju iz uređaja pre nego što ga odložite.
■ Uklonite eventulane ostatke materijala sa uređaja.
■ Uređaj držite dalje od domašaja dece.
■ Nemojte ga odlagati u blizini korozivnih supstanci kao što su hemijski proizvodi za baštu ili so za sneg.
■ Baterije skladištite i punite na hladnom mestu. Temperature niže ili više od normalne temperature prostora smanjuju trajanje baterije.
■ Prazne baterije nemojte nikada da skladištite. Baterija koju skladištite mora da budu 30%-50% puna.
■ Bateriju skladištite na temperaturi ispod 27°C u prostoru bez vlage.
■ Sve baterije tokom vremena gube svoje punjenje. Što je temperatura veća to baterije više gubi punjenje. U slučaju dužeg nekorišćenja uređaja, baterije punite na svakih šest meseci. Ovaj postupak produžava životni vek baterije.
ZAŠTITA ŽIVOTNE SREDINE
1) Zaštita životne sredine mora predstavljati bitan i prvenštveni vid upotrebe mašine, u korist civilnog življenja kao i zaštite životne sredine. Ne uznemiravajte susede.
2) Strogo se pridržavajte lokalnih propisa o uklanjanju am-balaže, ulja, benzina, filtera, istrošenih delova ili svih drugih elemenata štetnih za životnu sredinu; ti otpaci se ne smeju bacati u smeće, nego ih treba razdvojiti i predati odgovara-jućim centrima za skupljanje, koji će se pobrinuti za recikli-ranje materijala.
3) Strogo se pridržavajte lokalnih propisa o zbrinjavanju ot-padnog materijala nakon košenja.
4) U trenutku kada mašinu više ne koristite, nemojte je na¬pustiti u okolini, već se obratite centru za skupljanje otpada, u skladu s važećim lokalnim propisima.
ODLAGANJE

Ne bacajte električne aparate u kućno smeće. Na osnovu Evropske Direktive 2012/19/EC o električnom i elektronskom otpadu i njenom sprovođenju u skladu sa državnim pravilima, istrošeni električni apa-rati se moraju odvojeno sakupljati tako da bi mogli ponovo da se iskoriste na ekološko prihvatljiv način. Ako budete bacili električne aparate na depo-niju ili na zemljište, štetne supstance mogu dospeti u podzemne vode i tako ući u lanac ishrane i ugroziti vaše zdravlje. Za
detaljne informacije o likvida-ciji ovog proizvoda, obratite se nadležnom zavodu za odlaganje otpada iz domaćinstva ili vašem prodavcu.
Baterije sadrže materijale opasne za čoveka i za životnu sredinu. Baterija se mora izvaditi i odvojeno odložiti u odgovarajućem centru u kome se tretiraju litijum-jonske baterije.
BYTA UT SVÄRDET OCH KEDJAN (FIG. 2, 3, 5, 7)



- OPBEVARING AF PRODUKTET
- GENERAL SAFETY WARNINGS
- WARNING
- INTENDED USE
- RESIDUAL RISKS
- SAVE ALL WARNINGS AND INSTRUCTIONS FOR FUTURE REFERENCE
- WORK AREA SAFETY
- ELECTRICAL SAFETY
- PERSONAL SAFETY
- POWER TOOL USE AND CARE
- BATTERY TOOL USE AND CARE
- SERVICE
- SPECIFIC SAFETY WARNINGS
- CAUSES AND OPERATOR PREVENTION OF KICKBACK
- ADDITIONAL WARNINGS
- SYMBLES
- REMARKS
- DESCRIPTION
- ASSEMBLY
- ASSEMBLING THE GUIDE BAR AND SAW CHAIN
- OPERATION
- BEFORE EACH USE CHECKING THE CHAIN TENSION WARNING
- TO INSTALL BATTERY PACK
- TO REMOVE BATTERY PACK
- CHECKING THE CHAIN LUBRICANT
- HOLDING THE CHAIN SAW (FIG. 8)
- STARTING OPERATION
- STOPPING OPERATION
- USING THE CHAIN SAW
- BASIC FELLING, LIMBING, AND CROSS-CUTTING
- TECHNIQUES
- FELLING A TREE
- NOTCHING UNDERCUT (A NOTCH CUT IN A TREE TO
- FELLING BACK CUT (THE FINAL CUT IN A TREE FELLING OPERATION, MADE ON THE OPPOSITE SIDE OF THE TREE FROM THE NOTCHING UNDERCUT)
- LIMBING A TREE SEE FIGURE 11
- BUCKING A LOG
- ADJUSTING THE CHAIN TENSION SEE FIGURE 2
- REPLACING THE BAR AND CHAIN
- TRANSPORTING THE CHAIN SAW
- GUIDE BAR COVER SEE FIGURE 1
- GUIDE BAR MAINTENANCE
- GENERAL MAINTENANCE
- STORAGE
- STORING THE PRODUCT
- ENVIRONMENTAL PROTECTION
- DISPOSAL
- PUIDEN KAADON, OKSIEN KARSINNA N J A POIKKISYYHYN SAHAAMISEN PERUSTEKNIKAT
- PUUN KAATO
- SIGURNOST RADNOG PROSTORA
- SIKKERHET PÅ ARBEIDSOMRÅDE
- SYMBOLERE
- ADVARSEL
- JUSTERING AV KJEDESTRAMMINGEN SE FIGUR 2
- VEDLIKEHOLD AV SVERDET
- GENERELT VEDLIKEHOLD
- BEZPIECZEŃSTWO W MIEJSCU PRACY
- SKLADIŠTENJE
- SKLADIŠTENJE PROIZVODA
- ZAŠTITA ŽIVOTNE SREDINE
- ODLAGANJE
- BYTA UT SVÄRDET OCH KEDJAN (FIG. 2, 3, 5, 7)
Brand : ALPINA
Model : C 1648 Li
Category : Saw