
TIE20301 - Coffee maker BOSCH - Free user manual and instructions
Find the device manual for free TIE20301 BOSCH in PDF.

| Product Type | Automatic Coffee Machine |
| Brand | Bosch |
| Model | TIE20301 |
| Dimensions (H x W x D) | 38.3 x 25.1 x 43.3 cm |
| Weight | Approximately 8-9 kg |
| Power Supply | 220-240 V ~, 50/60 Hz, 1300 W |
| Maximum Pump Pressure | 15 bar |
| Water Tank Capacity | 1.3 L |
| Bean Container Capacity | Approx. 250 g |
| Grinder Type | Ceramic / Steel |
| Power Cord Length | 100 cm |
| Beverage Functions | Espresso, Coffee, Cappuccino, Latte Macchiato, Milk Froth, Double Cup |
| Customizable Settings | Coffee Intensity, Beverage Volume, Froth Duration, Grind Level |
| Cup Warmer | Yes (optional, depending on equipment) |
| Maintenance Programs | Calc'nClean (automatic descaling and cleaning) |
| Cleaning | Removable brewing unit, removable milk frother, drip tray, coffee grounds container |
| Water Filter | Compatible (optional accessory) |
| Safety | Automatic shut-off, safety lock, frost protection |
| Spare Parts Available | Cleaning/descaling tablets, water filter, maintenance kit, milk frother |
| After-Sales Service | Available with product number (E-Nr) and manufacturing number (FD) |
Frequently Asked Questions - TIE20301 BOSCH
User questions about TIE20301 BOSCH
0 question about this device. Answer the ones you know or ask your own.
Ask a new question about this device
Download the instructions for your Coffee maker in PDF format for free! Find your manual TIE20301 - BOSCH and take your electronic device back in hand. On this page are published all the documents necessary for the use of your device. TIE20301 by BOSCH.
USER MANUAL TIE20301 BOSCH
m = 311
17

19
m = 311
21
m = 311
23
24
25
Further information and explanations are available online:

Table of contents
1 Safety 37
1.1 General information 37
1.2 Intended use 37
1.3 Restriction on user group 37
1.4 Safety information.. 37
2 Environmental protection and saving energy. 41
2.1 Disposing of packaging 41
2.2 Tips for saving energy.. 41
3 Installation and connection.... 41
3.1 Scope of delivery 41
3.2 Installing and connecting the appliance 41
4 Familiarising yourself with your appliance. 42
4.1 Appliance 42
4.2 Control panel 42
4.3 Display 43
5 Accessories 43
6 Before using for the first time .. 44
6.1 Preparing and cleaning the appliance 44
6.2 Performing initial start-up 44
6.3 General information 44
6.4 Water filter 45
7 Basic operation 46
7.1 Switching the appliance on or off 46
7.2 Dispensing beverages 46
7.3 Dispensing a coffee drink made from fresh beans 46
7.4 Dispensing drinks with milk .... 46
7.5 Dispensing a coffee drink with milk 47
7.6 Frothing up milk 47
7.7 Drink settings 47
8Grinder 48
8.1 Adjusting the grinding level.... 48
9 Cup heater1 49
9.1 Activating and deactivating the cup heater1 49
10 Basic settings 49
10.1 Changing the basic settings 49
10.2 Overview of basic settings 50
11 Cleaning and servicing. 50
11.1 Dishwasher-safe components 51
11.2 Cleaning agent 51
11.3 Cleaning the appliance 52
11.4 Cleaning the drip tray and coffee dregs container 52
11.5 Cleaning the milk frother.... 52
11.6 Cleaning the brewing unit .... 53
11.7 Cleaning brewing unit 53
11.8 Service programmes.. 54
12 Troubleshooting 56
13 Transportation, storage and disposal 61
13.1 Activating frost protection 61
13.2 Disposing of old appliance ... 61
en
14 Customer Service. 61
14.1 Product number (E-Nr.) and production number (FD) 62
15 Technical specifications... 62

1 Safety
Observe the following safety instructions.
1.1 General information
- Read this instruction manual carefully.
- Keep the instruction manual and the product information safe for future reference or for the next owner.
- Do not connect the appliance if it has been damaged in transit.
1.2 Intended use
Only use this appliance:
for preparing hot drinks.
- in private households and in enclosed spaces in a domestic environment.
up to an altitude of max. 2000 m above sea level.
1.3 Restriction on user group
This appliance may be used by children aged 8 or over and by people who have reduced physical, sensory or mental abilities or inadequate experience and/or knowledge, provided that they are supervised or have been instructed on how to use the appliance safely and have understood the resulting dangers.
Do not let children play with the appliance.
Children must not perform cleaning or user maintenance unless they are at least 8 years old and are being supervised.
Keep children under the age of 8 years away from the appliance and power cable.
1.4 Safety information
WARNING - Risk of suffocation!
Children may put packaging material over their heads or wrap themselves up in it and suffocate.
- Keep packaging material away from children.
- Do not let children play with packaging material.
en Safety
Children may breathe in or swallow small parts, causing them to suffocate.
- Keep small parts away from children.
- Do not let children play with small parts.
WARNING - Risk of electric shock!
Incorrect installation is dangerous.
- Connect and operate the appliance only in accordance with the specifications on the rating plate.
- Connect the appliance to a power supply with alternating current only via a properly installed socket with earthing.
- The protective conductor system of the domestic electrical installation must be properly installed.
If the appliance or the power cord is damaged, this is dangerous.
- Never operate a damaged appliance.
- Never operate an appliance with a cracked or fractured surface.
- Never pull on the power cord to unplug the appliance. Always unplug the appliance at the mains.
- If the appliance or the power cord is damaged, immediately unplug the power cord or switch off the fuse in the fuse box.
- Call customer services. Page 61
Incorrect repairs are dangerous.
- Repairs to the appliance should only be carried out by trained specialist staff.
- Only use genuine spare parts when repairing the appliance.
If the power cord of this appliance is damaged, it must be replaced by the manufacturer, the manufacturer's Customer Service or a similarly qualified person in order to prevent any risk.
An ingress of moisture can cause an electric shock.
- Never immerse the appliance or the power cord in water.
- Liquids must not be spilled on the appliance plug connection.
- Only use the appliance in enclosed spaces.
- Never expose the appliance to intense heat or humidity.
- Do not use steam- or high-pressure cleaners to clean the appliance.
WARNING - Risk of fire!
The appliance will become hot.
- Ventilate the appliance adequately.
- Never operate the appliance in a cabinet.
It is dangerous to use an extended power cord and non-approved adapters.
- Do not use extension cables or multiple socket strips.
- Only use adapters and power cords approved by the manufacturer.
If the power cord is too short and a longer one is not available, please contact an electrician to have the domestic installation adapted.
WARNING - Risk of burns!
Some parts of the appliance become very hot.
- Never touch hot appliance parts.
After use, allow hot appliance parts to cool down before touching.
WARNING - Risk of scalding!
Freshly prepared drinks are very hot.
- Leave drinks to cool down if necessary.
- Do not let escaping liquids or steam come into contact with your skin.
WARNING - Risk of injury!
Improper use of the appliance may endanger the user.
- To avoid injuries, only use the appliance for its intended purpose.
Trapped fingers when closing the appliance door. - Be careful of your fingers when closing the appliance door.
The grinder rotates. - Never reach into the grinder.
en Safety
WARNING - Danger: Magnetism!
The appliance contains permanent magnets. These may affect electronic implants, e.g. pacemakers or insulin pumps.
- People with electronic implants must stand at least 10cm away from the appliance.
- This minimum distance of 10cm must also be observed for the water tank when removed.
WARNING - Risk of harm to health!
Soiling on the appliance may be harmful to health.
To ensure hygiene, follow the cleaning instructions for the appliance.
2 Environmental protection and saving energy
2.1 Disposing of packaging
The packaging materials are environmentally compatible and can be recycled.
- Sort the individual components by type and dispose of them separately.
2.2 Tips for saving energy
If you follow these instructions, your appliance will use less power.
Set the interval for automatic switchoff to the smallest value.
- If the appliance is not being used, it will switch itself off earlier.
"Basic settings", Page 49
Do not interrupt the dispensing process prematurely.
- The amount of water or milk that is heated is used optimally.
Descale the appliance regularly.
Limescale deposits increase the appliance's energy consumption.
3 Installation and connection
3.1 Scope of delivery
After unpacking all parts, check for any damage in transit and completeness of the delivery.
Note: Different accessories are enclosed depending on the appliance model. This accessory is shown in a frame with a dashed line.
Fig. 1
| A | Fully automatic coffee machine |
| B | Milk frother |
| C | User manual |
| D | Cleaning tablet1 |
| E | Descaling tablet1 |
| F | Water filter1 |
1 Depending on the appliance specifications
3.2 Installing and connecting the appliance
ATTENTION!
Risk of damage to the appliance. If the appliance is not started up correctly, it may be damaged.
- Use the appliance in frost-free rooms only.
-
If the appliance has been transported or stored below 0^ , wait 3 hours at room temperature before starting it up.
After plugging in, always wait approx. 5 seconds. -
Place the appliance on a level, water-resistant surface that is capable of bearing its weight.
- Using the mains plug, connect the appliance to an earthed socket that has been correctly installed.
4 Familiarising yourself with your appliance
4.1 Appliance
You can find an overview of the parts of your appliance here.
Note: Individual details and colours may differ, depending on the appliance model.
Fig. 2
1 Water tank
2 Cover for water tank
3 Cup heater
4 Display
5 Rotary selector for grinder setting
6 On/off button
1 Depending on the appliance specifications
4.2 Control panel
You can use the control panel to configure all functions of your appliance and to obtain information about the operating status.
| (1) | Switch the appliance on or off. |
| Espresso | Dispense espresso. |
| Coffee | Dispense coffee Display navigation <" back without saving |
| 1 Depending on the appliance spe-cifications | |
| 7 | Aroma lid |
| 8 | Bean container |
| 9 | Control panel |
| 10 | Milk frother holder |
| 11 | Brewing unit |
| 12 | Rating plate |
| 13 | Milk frother |
| 14 | Outlet system |
| 15 | Brewing chamber door |
| 16 | Drip tray |
| 17 | Drip pan |
| 18 | Filling state indicator, mechanical |
| 19 | Drip grate |
| 20 | Coffee dregs container |
1 Depending on the appliance specifications
| Cappuccino | Dispense cap-puccino Display navigation ↓ down |
| Latte Macchiato | Dispense lattemacchiato Display navigation"ok" confirm andsave |
| Milk | Froth milk. |
| ∅ | Strength → "Adjusting the coffeestrength", Page 47 |
| 1Depending on the appliance specifications | |
| calc'n Clean | Start service pro- gramme. → Page 54 |
| 1 Depending on the appliance spe- cifications | |
| Simultaneously dis- pense 2 cups of es- presso or caffe crema. → Page 48 | |
| Switch the cup heater¹ on or off. | |
| 1 Depending on the appliance spe- cifications |
Display
| Lights up and display shows message | Fill the water tank Water tank missing Change the water filter |
| ■ is lit ■ is flashing | Empty trays Close the brewing chamber door |
| LEDs are lit | ready for use dispensing underway waiting for operation, e.g. with Calc'nClean not available |
4.3 Display
The display shows the selected drinks, settings and setting options, as well as messages about the appliance's operating status.
The display shows additional information and action steps. The information is hidden after a short period or by
pressing a button. The action steps are hidden when they have been completed.
Note: If no display language is available in your national language, select a display language that is available, e.g. English.
5 Accessories
Use original accessories. These have been made especially for your appliance.
| Accessories Retail Customer service |
| Cleaning tablets TCZ8001A 00312096 |
| Descaling tablets TCZ8002A 00312093 |
| Water filter TCZ7003 17000705 |
| Microfibre cloth - 00460770 |
| Care set TCZ8004A 00312107 |
6 Before using for the first time
Prepare the appliance for use.
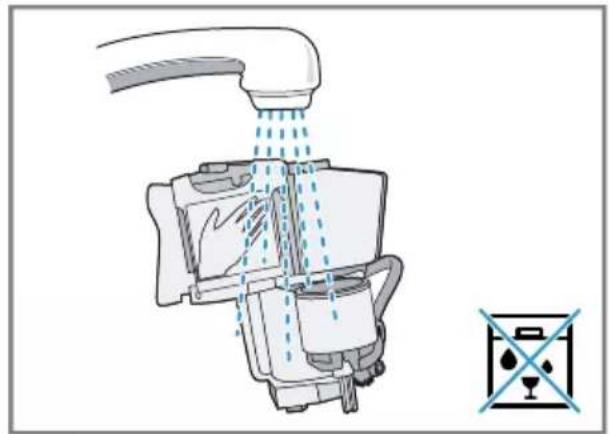
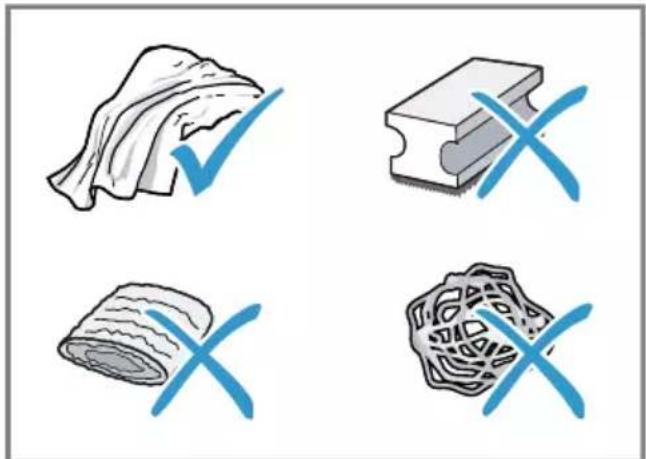
6.1 Preparing and cleaning the appliance
Remove the protective foils and clean the appliance and individual parts. Follow the illustrated instructions at the beginning of this manual.
ATTENTION!
Unsuitable beans can block up the grinder.
- Only use pure, roasted bean mixes that are suitable for use in fully automatic coffee or espresso machines.
- Do not use glazed coffee beans.
- Do not use caramelised coffee beans.
- Do not use coffee beans that have been treated with additives containing sugar.
- Do not add ground coffee.
Fig. 3 - 10
Note: Fill the water tank each day with fresh, cold, non-carbonated water.
Tip: To keep the coffee beans at their best, store them in a sealed container in a cool place.
You can keep the coffee beans in the bean container for several days without them losing their aroma.
6.2 Performing initial start-up
After connecting the appliance to the power supply, configure the settings for the language selection. The language selection step only appears when the machine is switched on for the first time.
- Press to switch on the appliance.
- The display will show the language that is preset.
- Press button Cappuccino peatedly until the display shows the required language.
- To confirm that you want to use these settings, press "ok" button Latte Macchiato.
The appliance is rinsed. When the display shows "Choose beverage", the appliance is ready for use.
Tip: You can change the language at any time.
"Basic settings", Page 49
6.3 General information
Please bear this information in mind so that you can get the best out of your appliance.
Notes
The appliance has been programmed at the factory with standard settings for optimum operation.
The grinder has been factory-set for optimum operation. If coffee is only dispensed drop by drop or is too thin and with too little crema, you can adjust the grinding level when the grinder is running. "Adjusting the grinding level", Page 48
During operation water droplets may form at the ventilation slits.
If you do not perform any actions on the appliance for a certain period, it will switch off automatically. You can change the duration in the basic settings.
- For technical reasons steam can escape from the appliance.
If you press a button, a signal tone sounds. You can deactivate the signal tone in the basic settings.
Tip: Check and set the water hardness before using your appliance.
Note
The first beverage will not yet have its full aroma if:
- You are using the appliance for the first time.
You have run a service programme. - You have not used the appliance for a long time.
Do not drink the beverage.
Tip: You will get a stable, fine-pored crema after you have started up your appliance and dispensed a few cups.
6.4 Water filter
You can use a water filter to minimise limescale deposits and reduce impurities in the water.
Inserting or replacing a water filter
If you have to change the inserted water filter, lights up on the display.
ATTENTION!
Possible damage to the appliance due to limescale build-up.
- Change the water filter in good time.
- Change the water filter after 2 months at the latest.
Observe the display messages.
Requirement: The appliance is switched on.
- Press and hold buttons and calc'n Clean simultaneously for at least 3 seconds.
- Press button Grpncino display shows "W. hardness".
- Confirm with "ok" button Latte Macchiato.
- Press button "Carpuncino display shows "Water filter".
- Confirm with "ok" button Latte Macchiato.
The display shows "Filter act."
- Immerse the water filter in a glass of water with the opening facing up and press the sides together lightly until no more air bubbles rise to the surface.
$$ \rightarrow \text {F i g .} \boxed {7} $$
-
Set the water hardness on the aroma ring of the water filter.
-
Press the water filter firmly into the empty water tank.
$$ \rightarrow F i g. \quad 8 $$
You can find out the water hardness from your local water supplier.
- Fill the water tank with water up to the max mark.
- Insert water tank into the appliance.
- Place a container with a capacity of at least 1.0 l under the outlet.
en Basic operation
- Press the "ok" button Latte Macchiato to save the setting and start rinsing.
Water will now flow through the filter.
12. Press "<" button Coffee to exit the menu.
13. Empty the container.
The appliance is ready to use.
Removing the water filter
You can also operate your appliance without a water filter.
- Remove the water filter.
- Set the water hardness.
"Basic settings", Page 49
Tips
- You should also change your water filter for reasons of hygiene.
- With a water filter you need to descale your appliance less frequently.
If you use a water filter, your coffee will be more flavoursome. - The water filter can be purchased from retailers or customer service.
"Accessories", Page 43
7 Basic operation
7.1 Switching the appliance on or off
Press
When the appliance is switched on or off, it will rinse itself automatically. When switched off, the appliance will emit steam into the drip tray for cleaning. The appliance will not rinse itself if the appliance is still warm when switched on or if no beverage was dispensed before it was switched off.
7.2 Dispensing beverages
Find out how to prepare a drink of your choice.
WARNING
Risk of scalding!
Freshly prepared drinks are very hot.
- Leave drinks to cool down if necessary.
- Do not let escaping liquids or steam come into contact with your skin.
7.3 Dispensing a coffee drink made from fresh beans
- Place a cup under the outlet system.
- To set the coffee strength, press the button repeatedly.
- Press button Espanso Coffee
The coffee is brewed and then dispensed into the cup.
Tip: To stop the current dispensing step early, press the Esecco Coffee button.
7.4 Dispensing drinks with milk
You can make coffee drinks with milk or froth up milk.
WARNING
Risk of burns!
The milk frother gets very hot.
- Let the milk frother cool down before you touch it.
ATTENTION!
Milk residues can dry on surfaces and are difficult to remove.
Clean the milk frother after each use.
Tips
- You can also use plant-based alternatives to milk, e.g. soya milk.
The quality of the milk froth depends on the type of milk or plant-based alternative used.
7.5 Dispensing a coffee drink with milk
You can choose between cappuccino and latte macchiato.
- Fill a large cup or a large glass with approx. 100ml milk for cappuccino or approx. 150ml milk for latte macchiato.
- Place the cup or glass under the outlet system.
- Slide the outlet system and milk frother right down.
- To set the coffee strength, press the button repeatedly.
- Press button Cappuccino Latte Macchiato.
The milk is first frothed up in the cup or glass. The coffee is then brewed and dispensed into the cup or the glass.
Tip: To stop the current dispensing step early, press the Cappuccino Latte Macchiato button.
7.6 Frothing up milk
- Fill a large cup or a large glass with approx. 100ml milk.
- Place the cup or glass under the outlet system.
- Slide the outlet system and milk frother right down.
- Press the Milk button.
The milk is frothed up.
Note: To stop the dispensing process early, press the Milk button.
7.7 Drink settings
Prepare a drink according to your taste.
Adjusting the coffee strength
Before making a drink, you can adjust the coffee strength.
To adjust the coffee strength, press the button repeatedly.
| * | Very mild |
| ** | Mild |
| *** | Normal |
| **** | Strong |
| ***** | Very strong |
| ***** | aromalntense1 |
| 1 | Depending on the model |
Note: The coffee strength selected is then active for all drinks made with coffee.
Adjusting the filling level
You can adjust the filling level of your drinks.
- Place a cup under the outlet system.
- Press and hold button Espresso or Coffee for 3 seconds.
Dispensing takes place, with the button selected flashing.
The display shows the progress. Fig. 11
- Once the required filling level is reached, press the button selected to stop.
Notes
The new filling level is only apparent when the next drink is dispensed.
- You can set the filling level between 25-60 ml for espresso or 80-200 ml for coffee.
enGrinder
- The appliance always brews a minimum quantity of approx. 25ml for espresso and approx. 80ml for coffee.
Tip: You can change the settings at any time.
"Basic settings", Page 49
Adjusting the frothing time
You can adjust the frothing time of your drinks.
- Fill a large cup or a large glass with approx. 100 ml milk for cappuccino or approx. 150 ml milk for latte macchiato.
- Place the cup or glass under the outlet system.
- Slide the outlet system and milk frother right down.
- Press and hold button Cappuccino, Latte Macchiato or Milo 3 seconds.
The milk is frothed up, and the button selected flashes.
The display shows the progress. Fig. 11 - Once the required frothing time is reached, press the button selected to stop.
Notes
- You can set a limited time depending on the drink.
- Setting the frothing time has no impact on the filling level.
Tip: You can change the settings at any time.
"Basic settings", Page 49
Dispensing two cups at once
Depending on your beverage, you can make 2 cups at the same time.
- Press the button.
The display shows "Double cup on" for 5 seconds.
- Place two cups on the left and right under the outlet system.
- Press button Espresso or Coffee
The LED in the button pulses.
- The drink is prepared in 2 steps. The beans are ground in 2 grinding operations.
- The drink is brewed and then runs into the cup.
4. Wait until the process is complete.
5. To switch off the double cup function, press the button.
Notes
You can set the double cup function for expressly. Coffee
If you have set the double cup function, you cannot dispense other drinks.
If you do not press any other button within 90 seconds, the appliance automatically switches to the "Double cup off" setting.
8Grinder
Your appliance has an adjustable grinder, which you can use to customise the grinding level of your coffee beans.
8.1 Adjusting the grinding level
Set the desired grinding level while the coffee beans are being ground.
WARNING
Risk of injury!
The grinder rotates.
- Never reach into the grinder.
ATTENTION!
Risk of damage to the grinder. The grinder may be damaged if the grinding level is not set properly.
- Only set the grinding level when the grinder is running.
- Select the grinding level using the rotary selector step by step.
Grinding level Setting
Fine grinding level for lightly roasted beans
Turn rotary selector anticlockwise.

Coarse grinding level for dark-roasted beans
Turn rotary selector clockwise.

The grinding level setting only takes effect after the second cup.
Tip: If the coffee is only dispensed drop by drop, set a coarser grinding level.
If the coffee is too thin with too little crema, set a finer grinding level.
9 Cup heater
You can use the cup heater to preheat your cups.
9.1 Activating and deactivat ing the cup heater
WARNING Risk of burns!
The cup heater can become very hot.
- Never touch the cup heater1 while hot.
- Allow the hot cup heater1 to cool down before touching it.
Tip: Place the cups with their base on the cup heater to warm them to optimum effect1.
To activate or deactivate the cup heater, press the button.
10 Basic settings
You can configure the basic settings for your appliance to meet your needs and call up additional functions.
10.1 Changing the basic settings
- Press and hold buttons and calc'n Clean simultaneously for at least 3 seconds.
- Press button reappuccino peatedly until the display shows the required setting.
- Confirm with "ok" button Latte Macchiato.
- Press the button to appuccino change the setting.
- Confirm with "ok" button Latte Macchiato.
- The display shows "Settings saved".
en Cleaning and servicing
- Press "<" button to exit the menu.
Note: If you do not press any other button within 90 seconds, the appliance switches to the select beverage setting without saving.
Tip: You can change the settings at any time.
"Basic settings", Page 49
10.2 Overview of basic settings
You can find an overview of the basic settings here.
| Setting Selection Description | ||
| Language See selection on the appliance | Set menu language. Changes are immediately displayed. | |
| Factory reset Select the required language. | Restore settings to the factory settings. Note: The appliance rinses and deletes all individual settings. | |
| W. hardness ▪ "W. hardness" 1, 2, 3, 4 Water filter H2O-Softener | Set the appliance to the local water hardness. Tip: Ask your local water supplier about the water hardness. Note: If a water softening system is installed in your house, select "H2O-Softener". | |
| Auto Stand-by See selection on the appliance | Set how long the appliance should wait after preparing the last beverage before automatically switching itself off. | |
| Sound ▪ Sound on ▪ Sound off | Switch the tones on or off. | |
11 Cleaning and servicing
To keep your appliance working efficiently for a long time, it is important to clean and maintain it carefully.
11.1 Dishwasher-safe components
Here you can find an overview of the components you can clean in the dishwasher.
ATTENTION!
Some components are sensitive to heat and may be damaged if they are cleaned in a dishwasher.
-
Follow the operating instructions of the dishwasher.
-
Only clean dishwasher-safe components in the dishwasher.
Only use programmes that do not heat the components above 60^
Suitable:
Drip plate
Drip grate
- Coffee dregs container
Mechanical fill level indicator
Milk frother
Not suitable:
Water tank
Water tank lid
Aroma lid
Brewing unit
Drip tray
11.2 Cleaning agent
Only use suitable cleaning agents.
ATTENTION!
Unsuitable cleaning products may damage the surfaces of the appliance.
- Do not use harsh or abrasive detergents.
- Do not use cleaning agents containing alcohol or spirits.
- Do not use hard scouring pads or cleaning sponges.
Unsuitable cleaning and descaling agents may damage the appliance.
- Do not use pure citric acid, vinegar or any vinegar-based agents to descale the appliance.
- Do not use descending agent with phosphoric acid.
Only use cleaning tablets and descaling tablets that have been specially developed for the appliance. "Accessories", Page 43
Tips
- Wash new sponge cloths thoroughly to remove any salt adhering to them. Salt can cause rust film to develop on stainless steel surfaces.
Always remove any residues of limescale, coffee, milk and cleaning/descaling solutions immediately to prevent corrosion.
11.3 Cleaning the appliance

WARNING
Risk of electric shock!
An ingress of moisture can cause an electric shock.
- Never immerse the appliance or the power cord in water.
- Liquids must not be spilled on the appliance plug connection.
- Do not use steam- or high-pressure cleaners to clean the appliance.

WARNING
Risk of burns!
Some parts of the appliance become very hot.
-
Never touch hot appliance parts.
After use, allow hot appliance parts to cool down before touching. -
Disconnect the appliance from the mains power supply.
- Clean the housing, the high-gloss surfaces and the control panel with a microfibre cloth.
- Clean the outlet system with a soft, damp cloth after beverages have been dispensed.
- Rinse the water tank with fresh, clean water.
- If the appliance has not been used for a long time, e.g. after a holiday, clean the entire appliance, including moving parts such as the brewing unit or water tank.
Note: The appliance will rinse itself automatically if you switch it on when it is cold or switch it off after it has dispensed coffee. The system is therefore self-cleaning.
11.4 Cleaning the drip tray and coffee dregs container
Clean and empty the drip tray and coffee dregs container every day to prevent deposits. Follow the illustrated instructions at the beginning of this manual.
Fig. 12 - 16
11.5 Cleaning the milk frother
Clean the milk frother after each use to remove residues and ensure its proper function.
WARNING
Risk of burns!
The milk frother gets very hot.
-
Let the milk frother cool down before you touch it.
-
Fill a glass half-full with water and place under the outlet system.
- Push the milk frother right down.
- Press the Milk button.
Milk system is cleaned.
- Push the milk frother right up and allow it to cool down.
- Remove the milk frother and clean it thoroughly.
- Attach the milk frother again.
Note: To stop the process early, press the Milk button.
Tip: You can clean the milk frother in the dishwasher. After rinsing, remove the detergent residues thoroughly from the milk frother.
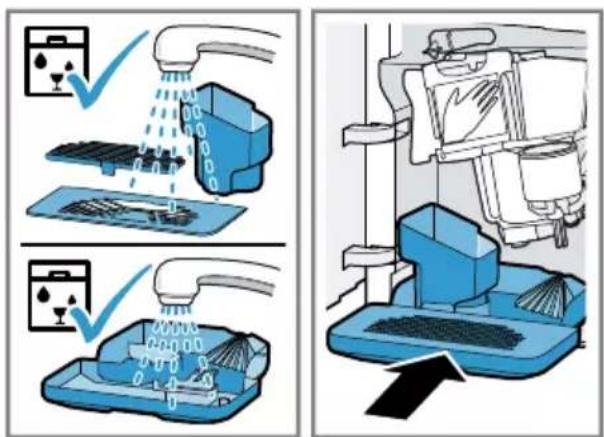
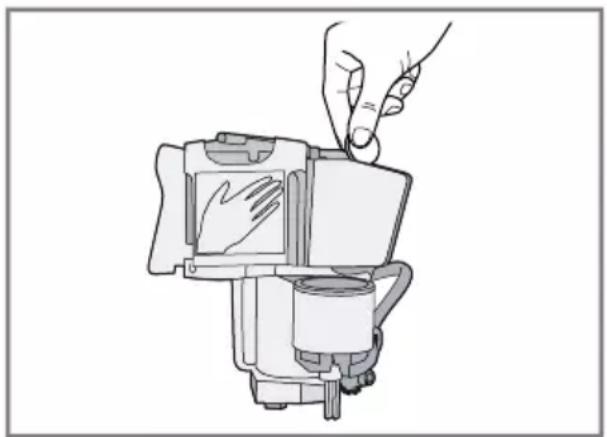
11.6 Cleaning the brewing unit
In addition to automatic rinsing, also remove and clean the brewing unit regularly. Follow the illustrated instructions at the beginning of the manual.
WARNING
Risk of burns!
Some parts of the appliance become very hot.
- Never touch hot appliance parts.
After use, allow hot appliance parts to cool down before touching.
ATTENTION!
The brewing unit may be damaged by improper cleaning.
Do not use washing-up liquid.
- Do not use cleaning agents containing vinegar or acids.
- Do not clean in the dishwasher.
Fig. 17 - 26
Note: The door can only be closed if the brewing unit and drip tray are inserted correctly.
11.7 Cleaning brewing unit
In addition to the automatic rinsing process, regularly remove and clean the brewing unit.
WARNING
Risk of burns!
Some parts of the appliance become very hot.
- Never touch hot appliance parts.
After use, allow hot appliance parts to cool down before touching.
ATTENTION!
The brewing unit may be damaged by improper cleaning.
- Do not use washing-up liquid.
- Do not use cleaning agents containing vinegar or acids.
- Do not clean in the dishwasher.
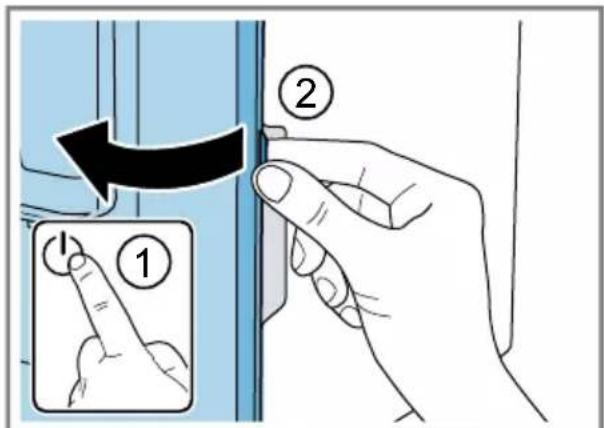
1.Use to switch the appliance off.
-
Open the brewing chamber door.
Fig. 17 -
Remove the drip tray with the coffee dregs container.
Fig. 18
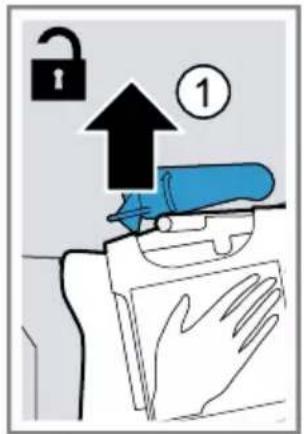
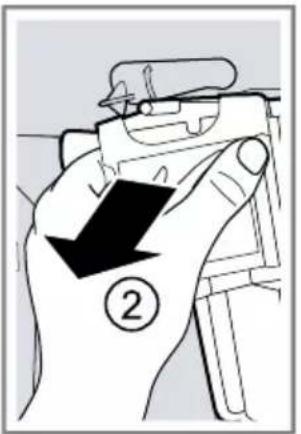
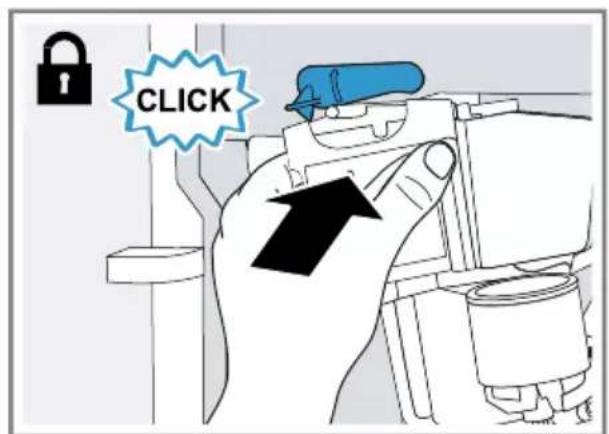
- Push the red lever upwards.
Hold the brewing unit by the handle and carefully pull forwards and out.
Fig. 19
- Clean the brewing unit thoroughly under warm running water.
Fig. 20
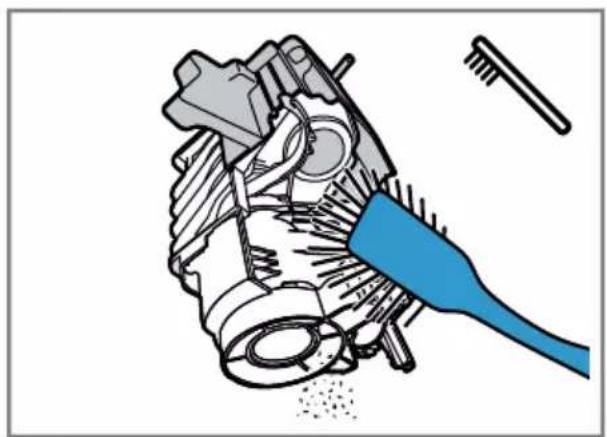
- Remove all coffee residues.
Fig. 21
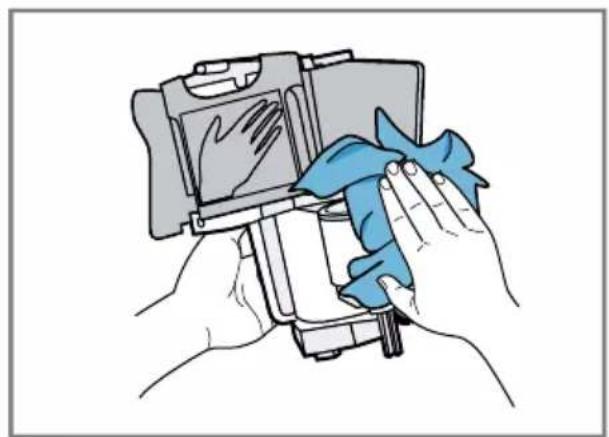
- Dry the brewing unit thoroughly.
Fig. 22
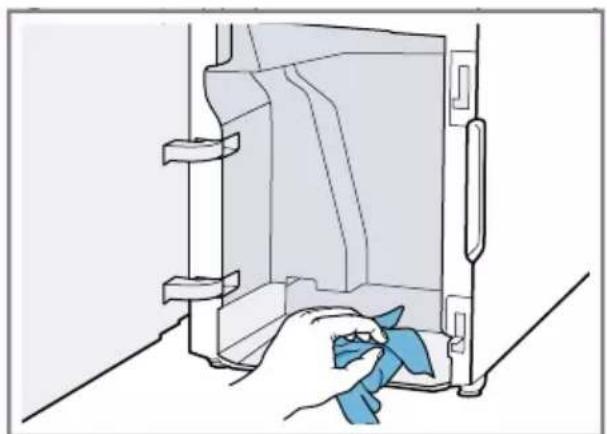
-
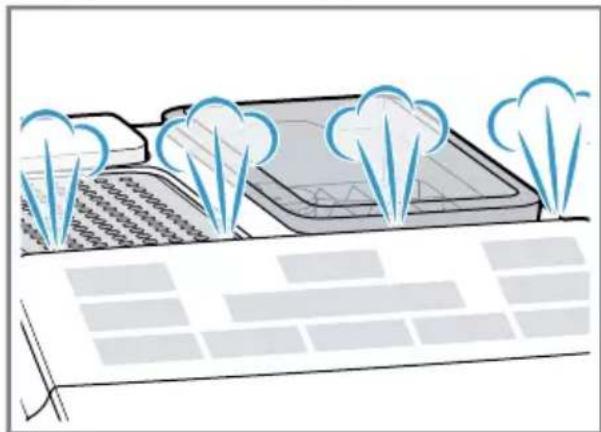
Clean the appliance interior with a damp cloth and remove any coffee residues.
-
Leave the brewing unit and the appliance interior to dry.
Fig. 23 -
Hold the brewing unit by the handle.
-
Push the red lever upwards.
- Position the brewing unit under the lever and slide it back as far as it will go.
Fig. 24
The lever will click into place.
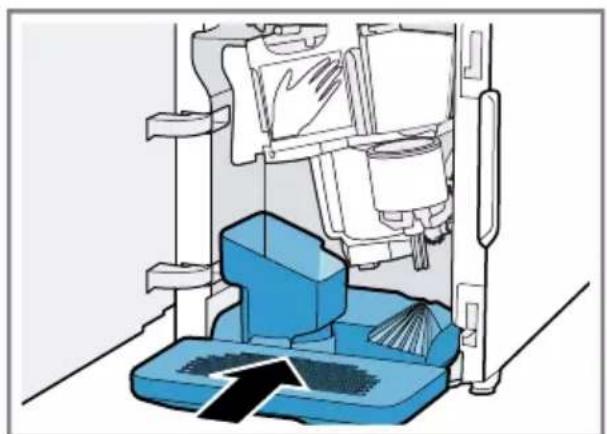
- Insert the drip tray with the coffee dregs container.
Fig. 25
en Cleaning and servicing
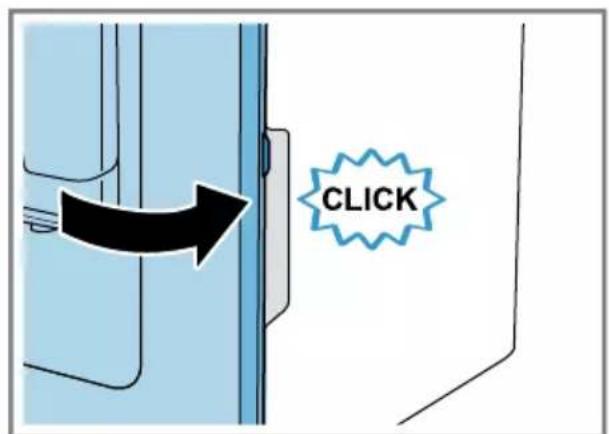
10.Close the brewingchamber door. Fig. 26
Note: The door can only be closed if the brewing unit and drip tray are inserted correctly.
11.8 Service programmes
The calc'n Clean button lights up and the display shows "Calc'nClean required!" depending on the water hardness and use of your appliance. Use the programme to descale and clean your appliance.
ATTENTION!
Improper cleaning and descaling or a delay in doing so may damage the appliance.
Perform Calc'nClean according to the instructions immediately.
- Only put cleaning tablets in the duct of the brewing unit.
- Do not put descending tablets or other products in the duct of the brewing unit.
Notes
If you do not descale and clean the appliance in good time, the appliance is locked and the display shows "Device locked".
- To unlock the appliance, run the service programme.
Tip: Before you start the service programme, remove, clean and re-insert the brewing unit. Clean the milk frother.
Start Calc'nClean
The process takes approx. 40 minutes.
- Press and hold the calc'n Clean button for at least 5 seconds.
symbol lights up. -
Open the door.
-
Remove and empty the drip tray and coffee dregs container.
- Remove and clean the brewing unit.
- Put a cleaning tablet into the duct of the brewing unit and re-insert the brewing unit.
- Insert the drip tray and coffee dregs container again and close the door.
symbol lights up. - If there is a water filter, remove it.
- Fill the empty water tank with lukewarm water up to the 0.5 l mark and dissolve one Siemens descal-ing tablet in it.
- Re-insert the water tank and place a container with approx. 1 l capacity under the outlet system.
-
When calc'n Clean flashes, press the calc'n Clean button.
-
The programme starts, cleans and descares the appliance.
calpunisessan
The process takes approximately 20 minutes minutes.
symbol lights up. - Empty the container and open the door.
- Empty the drip tray and re-insert.
13.Close the door and place the container under the outlet system again.
symbol lights up.
14.Clean the water tank.
If you have removed the water filter, re-insert the water filter.
-
Fill the water tank with fresh, cold, non-carbonated water up to the max mark.
16.When calc'n Clean flashes, press the calc'n Clean button. -
The programme starts, cleans and rinses the appliance.
calc'n Clean pulses.
symbol lights up.
17.Remove and empty the drip tray and coffee dregs container.
18. Clean the drip tray and the coffee dregs container and re-insert them in the appliance.
The programme has ended and the appliance is ready for operation again.
Resetting a service programme
If the service programme is interrupted, e.g. by a power cut, calc'n Clean and will light up.
- Clean the water tank.
If you have removed the water filter, re-insert the water filter. - Fill the water tank with fresh, cold, non-carbonated water up to the max mark.
-
Press the calc'n Clean button.
-
The service programme starts and rinses the appliance. The process takes approximately 2 minutes.
- Empty the drip tray, clean it and re-insert.
- Close the door.
The programme has ended and the appliance is ready for operation again.
12 Troubleshooting
You can rectify minor faults on your appliance yourself. Read the troubleshooting information before contacting after-sales service. This will avoid unnecessary costs.

WARNING
Risk of electric shock!
Incorrect repairs are dangerous.
- Repairs to the appliance should only be carried out by trained specialist staff.
- Only use genuine spare parts when repairing the appliance.
- If the power cord of this appliance is damaged, it must be replaced by the manufacturer, the manufacturer's Customer Service or a similarly qualified person in order to prevent any risk.
Fault Cause and troubleshooting
| Appliance no longer responds. | Appliance has a fault. 1. Pull out the mains plug and wait 60 seconds. 2. Re-insert the mains plug. |
| Appliance only dis-penses water, not cof-fee. | Empty bean container is not detected by the appli- ance. ► Pour in coffee beans. |
| Beans are too oily and are not falling into the grinder. ► Gently tap the bean container. ► Change the coffee variety. ► Do not use oily beans. ► Clean the empty bean container with a damp cloth. | |
| Brewing unit is not inserted properly. ► Slide the brewing unit right back. | |
| Coffee or milk froth quality varies widely. | Build-up of limescale in the appliance. ► Descale the appliance. |
| Coffee is not dis-pensed or has slowed to a trickle. | Grinding level is set too fine. ► Set a coarser grinding level. → "Adjusting the grinding level", Page 48 |
| Set quantity is not reached. | Heavy build-up of limescale in the appliance. ► Descale the appliance. |
| Air is in the water filter. 1. Immerse the water filter in water with the opening facing upwards until no more air bubbles escape. 2. Reinsert the filter. | |
| Appliance is soiled. | |
| Fault Cause and troubleshooting | |
| Coffee is not dis-pensed or has slowed to a trickle. | Clean the brewing unit.→ "Cleaning brewing unit", Page 53 |
| Set quantity is not reached. | Descale and clean the appliance. |
| Residues of limescale remover are blocking the water tank.1. Remove the water tank.2. Clean the water tank thoroughly. | |
| Coffee strength is set too high.Reduce the coffee strength. | |
| Milk or milk-based drinks are too hot. | There is too little milk in the glass or cup.1. Use more milk. |
| Milk froth is too thin, and there is a loud suction noise. | 2. Change the frothing time. |
| Milk or milk-based drinks are too cold. | There is too much milk in the glass or cup.1. Use less milk.2. Change the frothing time. |
| Milk in the glass or cup is too cold.Use lukewarm milk. | |
| Coffee has no crema. Type of coffee is not optimal. | Use a coffee variety with a higher proportion of Robusta beans.Use beans with a darker roast. |
| Beans are no longer fresh.Use fresh beans. | |
| Grinding level is not appropriate for coffee beans.Adjust the grinder to a finer setting.→ "Adjusting the grinding level", Page 48 | |
| Coffee is too acidic. Grinding level is set too coarse. | Adjust the grinder to a finer setting.→ "Adjusting the grinding level", Page 48 |
| Type of coffee is not optimal.Use a coffee variety with a higher proportion of Robusta beans.Use beans with a darker roast. | |
| Coffee is too bitter. Grinding level is set too fine. | Set a coarser grinding level.→ "Adjusting the grinding level", Page 48 |
| Type of coffee is not optimal. | |
| Coffee is too bitter. ▶ Change the coffee variety. | |
| Coffee tastes burnt. Grinding level is set too fine. ▶ Set a coarser grinding level. → "Adjusting the grinding level", Page 48 | |
| Type of coffee is not optimal. ▶ Change the coffee variety. | |
| Milk froth quality var-ies widely. | Milk froth quality depends on the type of milk or plant-based alternative used. ▶ Optimise the result through the selection of the milk or vegetable-based drink type. |
| Appliance is not dis-pensing milk froth. | Heavy build-up of limescale in the appliance. ▶ Descale the appliance. |
| Milk frother is soiled. ▶ Clean the milk frother in the dishwasher. | |
| Milk frother is not inserted in the milk. 1. Use more milk. 2. Check whether the milk frother is inserted in the milk. 3. Slide the outlet system down completely. | |
| Appliance is not dis-pensing drinks. | Air is in the water filter. 1. Immerse the water filter in water with the opening facing upwards until no more air bubbles escape. 2. Reinsert the filter. ▶ Firmly press the water filter straight down into the tank connection. |
| Residues of limescale remover are blocking the water tank. 1. Remove the water tank. 2. Clean the water tank thoroughly. | |
| There is dripping wa-ter on the inner floor of the appliance. | Drip tray was removed too soon. ▶ Wait a few seconds after the last drink was dispensed before removing the drip tray. |
| Brewing unit cannot be removed. | Locking device cannot be released, brewing unit is jammed. ▶ Switch the appliance off and back on after 3 minutes. |
| Grinder won't start. Appliance is too hot. ▶ Disconnect the appliance from the mains. 1. Wait 1 hour so the appliance can cool down. 2. Wait 1 hour so the appliance can cool down. | |
| Display shows "Fill water tank" despite the water tank being full. | Water tank is wrongly inserted. • Insert the water tank correctly. |
| Carbonated water is in the water tank. • Fill the water tank with fresh tap water. | |
| Float is stuck in the water tank. 1. Remove the water tank. 2. Clean the water tank thoroughly. | |
| New water filter was not rinsed as per instructions. 1. Rinse the water filter according to the instructions. 2. Place the water filter into operation. | |
| Air is in the water filter. 1. Immerse the water filter in water with the opening facing upwards until no more air bubbles escape. 2. Reinsert the filter. | |
| Water filter is old. • Insert a new water filter. | |
| Limescale deposits in the water tank are blocking the system. 1. Clean the water tank thoroughly. 2. Start the Calc'nClean service programme. | |
| Display shows "Clean brewing unit". | Brewing unit is soiled. • Clean the brewing unit. → "Cleaning brewing unit", Page 53 |
| Mechanism of brewing unit is stiff. • Clean the brewing unit. → "Cleaning brewing unit", Page 53 | |
| Display shows "Incorrect voltage". | There are problems with the power supply. • Only operate the appliance at 220 - 240 V. |
| Display shows "Calc'nClean required!" very frequently. | Decalcified water still contains small amounts of lime. 1. Insert a new water filter. 2. Set the corresponding water hardness. |
| Incorrect or too little descaling agent used. • When descaling, only use suitable tablets. | |
| Appliance cannot be operated. Change displays. | Appliance is in demo mode. 1. To deactivate demo mode, press and hold the Ⓞ button for at least 5 seconds. 2. Remove the water tank. 3. Fill the water tank with fresh water. 4. Re-insert the water tank. |
| Display shows "Close door" despite the fact that the door is closed. | Door is not properly closed. Press the door firmly shut. |
| Appliance is too hot. 1. Disconnect the appliance from the mains. 2. Wait 1 hour so the appliance can cool down. | |
| Display shows "Empty trays" despite the fact that the drip tray is empty. | Appliance is switched off and does not detect emptying. 1. Switch the appliance on, and remove the drip tray. 2. Re-insert the drip tray. |
| Display shows "Fill water tank" and LEDs flashing. | Water tank is missing or wrongly inserted. Insert the water tank correctly. |
| Pipe system in the appliance is dry. Fill the water tank with fresh, cold, non-carbonated water. | |
| Air is in the water filter. 1. Immerse the water filter in water with the opening facing upwards until no more air bubbles escape. 2. Reinsert the filter. | |
| Display shows "Device too cold". | Ambient temperature is too cold. Operate the appliance at temperatures over 5 °C. |
| Display shows "Restart appliance". LEDs flashing. | Brewing unit is heavily soiled or cannot be removed. Restart the appliance. Clean the brewing unit. → "Cleaning brewing unit", Page 53 |
| Display shows "Restart appliance". No LED is lit. | Appliance has a fault. Restart the appliance. |
| Display shows "Clean/ fill water tank"; calc'n Clean and light up. | Descaling process has been interrupted. Proceed as described in section → "Resetting a service programme", Page 55. |
13 Transportation, storage and disposal
13.1 Activating frost protection
Protect your appliance from frost during transport and storage.
ATTENTION!
Residues of liquid in the appliance may damage it during transport or storage.
- Empty the pipe system before transport or storage.
Requirements
The appliance is ready to use.
The water tank has been filled.
- Place a large container under the outlet system and push the milk frother down.
- Press and hold the Milk button for at least 5 seconds.
The LED in the button flashes, and the appliance heats up. - When steam escapes from the milk frother, remove the water tank.
- Allow the appliance to cool down and wait until the display shows "Water tank empty".
- Use do switch the appliance off.
- Empty the water tank and the drip tray and thoroughly clean the appliance.
- Disconnect the appliance from the mains power supply.
You can now transport or store the appliance.
Note: The brewing unit is now secured and you cannot remove it.
13.2 Disposing of old appliance
Valuable raw materials can be reused by recycling.
- Unplug the appliance from the mains.
- Cut through the power cord.
- Dispose of the appliance in an environmentally friendly manner. Information about current disposal methods are available from your specialist dealer or local authority.
This appliance is labelled in accordance with European Directive 2012/19/EU concerning used electrical and electronic appliances (waste electrical and electronic equipment - WEEE). The guideline determines the framework for the return and recycling of used appliances as applicable throughout the EU.
14 Customer Service
Function-relevant genuine spare parts according to the corresponding Ecodesign Order can be obtained from Customer Service for a period of at least 7 years from the date on which your appliance was placed on the market within the European Economic Area.
Note: Under the terms of the manufacturer's warranty the use of Customer Service is free of charge.
en Technical specifications
Detailed information on the warranty period and terms of warranty in your country is available from our after-sales service, your retailer or on our website.
If you contact Customer Service, you will require the product number (E-Nr.) and the production number (FD) of your appliance.
The contact details for Customer Service can be found in the enclosed Customer Service directory or on our website.
14.1 Product number (E-Nr.) and production number (FD)
You can find the product number (ENr.) and the production number (FD) on the appliance's rating plate.
Make a note of your appliance's details and the Customer Service telephone number to find them again quickly.
15 Technical specifications
| Voltage 220- | 240 V ~ |
| Frequency 50 / 60 Hz | |
| Connection rating 1300 W | |
| Maximum static pump pressure | 15 bar |
| Maximum capacity of water tank (without filter) | 1,3 l |
| Maximum capacity of bean container | ≈250 g |
| Length of the power cable | 100 cm |
| Appliance height 38,3 cm | |
| Appliance width 25,1 cm |
| Appliance depth 43,3 cm |
| Weight, empty ≈8-9 kg |
| Type of grinder Ceramic/steel |
WAARSCHUWING - Kans op verstikking!
WAARSCHUWING - Kans op brand!
- İnceceğe®,®,®,®,®,®,®,®,®,®,®,®,®,®,®,®,®,®,®,®,®,®,®,®,®,®,®,®,®,®,®,®,®,®,®,®,®,®,®,®,®,®,®,®,®,®,®,®,®,®,®,®,®,®,®,®,®,®,®,®,®,®,®,®,®,®,®,®,®,®,®,®,®,®,®,®,®,®,®,®,®,®,®,®,®,®,®,®,®,®,®,®,®,®,®,®,®,®,®,®,®.
- Üçehelçınluyüz, ilgili olarak sinirli bir sureyayarlayabilirsiniz.
Köpürtmesüresi ayari, dolum miktarini etkilemez.
I P E D U N P E K I D E H N E - O n a c h o c t b y d u y s b y!
IeTn MOryt 3aBepHyTbCBy B yNaKOBOUHbIM MaTePnaI nII NaDeTb erO ce6e Ha rOIOBy I 3aDOxHyTbCra.
He npdnyckaite detey K ynaKOBOHOMy MaTePnany.
He no3BOJnTe DeTm nrgatb C ynaKOBOHbIM MaTePnALOM.
I P E D U N P E X K I E H N E - O n a c h o c t b B O3 r o p a n h!
Прибор награваетс.
Obecneyte doctatoHyIO BENTnlaun npnbopa.
▶ Kateropnueckn 3anpeuetaKcnpyaataun npnbopa B shkafoy.
I P E D U N P E X K I E H N E - O n a c h o c t b o w n a p u b a n h y!
CbeKeepnroToBJeHHbIe HAnNTKn OueHb rOpAYe.
Ecnn notpebyetc, daTe ocTbITb HapNTkam.
H36eeraTe KOHTaKTa BbIeJIHOUxxCra KNDKOCTe N npoB C KOJKei.
I P E D U N P E X J D E H N E - O n a c h o c t b T p a B M n p o B a H N A!
IOnHOCTbIO aBTOMaTnueckaKo-ΦeMaùnHa

KanyuHaTOp

HnctpyKunno 3Kcnnyatau

Ynctraa Ta6neTka

Ta6netka dny ydaJeHnHaKnnn

ΦnIbTpДЯВOДbl
1 B 3aBnMoCTN OT KOMJIeKtauH
3.2 YcTaHOBKa I NOdKJIHOUeHne npH6opa
BHIMAHHE!
Onachoctb noBpeKdEHHn np6opa. Pn HnPaBnHOM BBOe B 3KcNpyaTuHO BO3MOxHb NOpeKdEHH np6opa.
PekomeHdaa: IpeepTe, KaKaHaayatb noIb3OBaTbcn npN6Opom, npOBepe Te n yctaHOBNTe JKeCTKOCTb BObl.
3ametka
IepBbHnTOK eue He oNaJaet NOHbIM apOMaTOM,ecNI:
BblncnoJb3yeTe npnbop B nepBbI pa3;
Bbl BbINOHNHIN CepBnCHyO npoPamMy;
BblIInTeHbHOe BpeMa He HcNoJIb3OBa- nn np6op.
He neiTe 3TOT HAnITOK.
PekomeHdaa: Cta6nIbHO MeIkonopnCTa KOHCnCTeHcna NeHb I DoCTnraetc nocLe BBOda np6opa B 3KcIpyaTuHO nprirotOBHeHH HeCKoJIbKNx qaWeK.
6.4 ΦильТр ДЯ ВОДы
ФильтдяВODыСнжаeТОбра3OBaHneHaKINu,a TaKxe B 3HaunTeJbHOn MepeOчиаet BODYOT3arPra3HeHn.
YcTaHOBKa HJIH 3aMeHa ΦHbTpαДЯ BOdBi
EcnHyxKHO 3aMeHnTb yCTaHOBHeHHbI HnIbTp DnRA BOdBi, Ha DnCnJIee 3arOpaeTcH
BHIMAHHE!
Bo3MOxHNO NOBpeJKeHne np6opabpe- 3yIbTaTe 06pa3OBaHnHaKnPi.
CboeBpeMeHHo 3aMeHnTe fNbTp IJIABOdbI.
3aMeHnTe ΦnIbTp IJI BODbl CaMOe nO3dHee Ype3 2 Mec..
YuHTbIbAaTe COO6UeHnHa DnCnnee.
Tpe6oBaHne: Pn6op BkIIOueH.
- KhoNk N CepaTe HaKaTbIMN OJHOBpeMeHHO B TeueHHe MHHyM 3 cekyHd.
- HaximaiTe KhoNky Cappuccino Ka Ha DnCnnee He NoBHTcra "W. hardness".
- Повпердente нажатиem "ok" Кногку Latte Macchiato.
- HaximaiTe KhoNky Cappuccino Ka Ha DnCnnee He NoBNTcay "Water filter".
- Повпердente нажатиem "ok" Конки Latte Macchiato.
Ha niscnnee oTo6paKaetcra "Filter act." - Norpuy3nTe fNlBtp DnRA BOJb OTBepCTHe M BBePbX B CTAkAH BOJb IN CJIeRka CxHMaIte 6OKOBbIe NOBepXHOCTn FInbTp a, NOKa He NepeCTaHyT BbIXOHTb Ny3bIpbKn BO3dYxa.
→Pc.7
ru CtaHdapThoe ynpabJeHne
-
C nOMOuHnactpoeHOro KOBua ΦnIbTp a dnn BODbl HacTpoNTe JxecT-KoCTb BObl.
-
BCTaBbTe, npOuHo npKab, HnIbTp DnA BoDbl B nycToH pe3epByap DnA BoDbl.
→Pnc. 8
BbMOKeTe y3HaTb JHeCTKOCTb BODbI B MeCTHO BODOCHA6kaIOUeN OprAHn3a- cHn.
- 3aene Te Body B pe3epByap dIy BoDbI DO OTMeTkn «max»
- BCTaBbTe pe3epByap IJIЯ BOdbl B npn-6op.
- NocTaBbTe NOd INcneHcep EMKoCTb 06beMOM He MeHee 1 I.
- To6bI coXpaHnTb yCTaHOBky n 3anyCTnTb npOcecc npOMbIBKN, HaxMMTe "ok" KhoNkY Latte Macchiato.
Boda teueT uee3 fnilbtp.
- HaxMMTe "<" KHONky Coffee, yTO6bI BblTNn3 MeHIO.
- OnopokHHte emKoCTb.
Pn6op roTOB K pa6ote.
H3BleueHne fNJIbTpapI BODbl
Baw np6op moKet pa6oTaTb n 6e3 nnbTpa dna BODbl.
1.ИЗВЕКИТЕФИЛБТРДЯВОДыI.
2. HactpoIte JkeCTKocTb BOIbl. "Ba3OBbIe yCTaHOBKn", CtpaHnua 226
PekomeHdaCnH
■ФильтprДЯВODы Heo6xOДнmo3aMeHЯТь TaKKe NO TnRHeHnueckm COO6paJXeHnM.
PnHcNoB3OBaHHnΦnBtpa DnBBoTpe6yETcpeXeOuNtA Tb np6OpOT HaKnn.
HcnoIb30BaHneΦnIbTpapdNBAyUyUaETBkycKoΦeHbIXHaNITKOB.
■ФильтprДЯВОдыMOЖНОпрнобpeCTNBMara3HHaxИнчepe3 cepBnchHyocny6y.
"Akeccyyapbl", CtpaHnua 219
7 CtaHdapTHoe ynpabIeHne
7.1 Bключehne nIbИьключeHne npn6opa
HaMMTe 0
Pn BkIIOUeHn N BbIKIOUeHn BblONHReTcABTOMaTneCKaNpOMbIBKa np6opa.Pn BblKIOUeHn np6op BblNyckaetnapBnoDoH C cJeIbO ouNCTKn.Ecnnp6Op npn BkIOUeHn eue HarpET nPi nepeD BblIOUeHHe HAnITOK He roTOBnLC, pOMbIBKa np6opa He BblONHReTc.
Ecnn notpe6yetc, daTe oCTbITb HAnNTkAm.
H36eraTe KOHTaKTa BbIeJIIOUxCJHKIOCTe I napOB C KOKei.
7.3ПригOTOBJIeHne KoФeHOrO HAnNTka n3 CBexnx KoФeHnBix 3epeH
- NocTaBbTe yawky noD nncpeHcep.
- HaximaiTe KhoNky 0ДЯ NaCTpoiKn KpeNoCTn KoΦe.
- HaxMMte KhoNky Espritso nn Cofee
Kofoe3aBapnBaetcH 3aTeM HAnnBaetcB YAshky.
PekomeHaa: TTo6bl npexKeBpeMeHHO 3aKOHHTb TeKyuNn 3tan npiroTOBneHHra, HaxMMte KhoNky Essso nn Coffee
7.4 ПпгOTOBЛЕнne HaNTKOB C MOJOKOM
BbIMoKeTe npHroTOBHTb KoFeHNbIe HAnNTKn C MOJOKOM NIN BCNEHHTb MoJOKO.

PPEyIeHne
Onachoctb oXora!
KanyuHaTop cnIbHo HArpeBaetc.
OCTaTKM OJOKa MOryT 3acoxHyTb, INx 6y- Det Tpydno ydaHtB.
OuHaaTe KaanyHaTOp nocJe KaJdo-TO HcNoIb3OBaHn.
PekomeHdaqun
BbIMoKTe BMeCTO MOJOKa TaKHe HcIIOJIb3OBaTb HAnITKN I3 paCTHTeJIbHOrO cbIPb,HaNPImep,IN3 CON.
KaueCTBO MOLOOHON HeHbI 3aBNCHT OT BnDa HcNoJIb3yEmOro MoJOKa HnHaNITKa n3 pAcTnteJIbHOrCbIpB.
BbIMoKeTe BbIbpaTb KaanyuHNo nn NaTte MaKNaTo.
- Haneite B 60nbuyu yaushky nnn 60nbwo CTaKaH npn6n. 100 mN moNOKa dna KanyuHNO nnn npn6n. 150 mN MOnOKa dna NaTte MaKnato.
- NocTaBbTe YaShky HnN CtaKaH NOd INC- neHcep.
- Onyctte dincneHcep n KanyuHaTOp do ynopa Bn3.
- HaximaiTe KhoNky ①ДЯ HabcTpoKn KpeNoCTn KoΦe.
- HaxMMTe KhoNky Cappuccino NnLatte Macchiato.
Chaaya BCnEHNBaeTcMOnOKOBaWKe HnCTaKaHe.3aTeM 3aBapNBaETcKoFe Hpa3NnBaETcB YaWKy HnCTaKaH.
PekomeHdaun: UTo6I npEeKDeBpeMeHHO 3aKoHHTb TeKyuyn 3tan npiroTOBLeHn, HAKMITE KONky Cappuccino nnLatte Macchiato.
7.6 BcpeHbAHne MoJoka
- Haneite B 60nbyu yawky nnn 60nbwoi ctaKaH np6n. 100 mI mooka.
- NocTaBbTe yawky nnn ctaKaH noD nncneHcep.
- Onyctnte dincneHcep n kanyuHaTOp do ynopa BHN3.
- HaxMMTe KhoNky Milk.
MoJOKO BCNEHNBaETcR.
3aMeTka: UTo6bI npeJxDeBpeMeHHO 3a-KOHHTb PnroTOBJIeHHe HAnrTKa, HaKMTe KhoNkY Milk.
7.7 HactpoynДЯHaNTKOB
PnroToBbTe HAnrTOK NO BaWemy Bkycy.
Hac troponka kpenoctn kofoe
IpeTeM, KaK npnroTOBHTb HAnITOK, MOxHO yCTaHOBNTb KpeNoCTb Kofoe.
HaKIMaTe KHOKNy 0, YTO6bI N3MeHHTb KpeNoCTb KOfe.
BbIMoKeTe H3MeHnTb KOJIuYeCTBO npIroTaBnBaEMOrHaNTka.
ru CtaHdapThoe ynpabJeHne
-
NocTaBbTe yawky noD nucnHecep.
-
YdepnBaIte HaKaToi KHOIpKy
Espresso nn CooeHne 3 ce- KyHd.
IeT npiroTOBneHne HAnNTka, BbI6paHnHa KHOJa Mmraet.
Ha nucnnee oTo6paKaetc npoecc. P_nc 11
- Korda hyxHoe KOJnueCTBO HAnNTka DoCTnHyTO, KOCHTecb KHONK, YTO6bl PpeKpaTb IpOceCC.
PpimmeuHn
Hoboe 3aHaHHoe KOJIueCTBO HAnNTka peaIIN3yeTc, TOnbKO HaunHa CO CneDyIOUeO pInrTOBLeHn HAHTKa.
BbIMoKeTe HAcTpOHTb KOINueCTBO dIa 3cnpecco 25-60 mI nI IN dJI KOFe 80-200 mI.
Pn6opKaJbpa33aBapnBaetMmHMaIbHoeKoJIueCTBO-ДЯЗcpecco np6n.25mNdJa KoFe np6n.80 mI.
PekomeHa: BbIMoKeTe N3MeHHTb yCTaHOBKn BJIIO6oe Bpemr.
"Ba30BbIe yCTaHOBKn", CtpaHnua 226
BbIMoKeTe N3MeHnTb DInIteJIbHOCTb BCneHNBaHnHaNtKOB.
- HaneTe B 6oIbSyUO yawky nnn 6oIbwoi ctaKaH npn6n. 100 mI MoIoka dIyKanyuHNO nnn npn6n. 150 mI MOIoka dJI NaTte MaKnato.
- NocTaBbTe YaWKy HnCtakAn NOI dnc- neHcep.
- Onyctnte dincpeHcep n KaanyuHaTOp do ynpa Bn3.
- YdepnBaIte HaKaToN KHOnKy Cappuccino, Latt Macchiato Milk TeueHne 3 ceKyHd.
MoIOKo BCnEHNBaeTcR, BbI6paHna KHOIIKa MHaet.
Ha nucnnee oTo6paKaetc npoecc. P_sc 11
- Korda HyxHnaДЛNTeIbHOCTb BCNEHnBa-HnA DOCTnHyTa, KOCHNTecb KHOKN, YTO-6bl npeKpaTntb npocecc.
PpHmeeaHH
BbIMoKeTe yCTaHOBnTb ORpaHnueHne JInTeJIbHOCTN B 3aBNCmOcTH OHTKa.
YCTaHOBKa JINTEJIbHOCTN BCNEHNBAHNA HE BNIReT Ha KOJIYeCTBO HAnITKa.
Pekomehdaun: Bbl MoKeTe N3MeHHTb yCTaHOBKn BJIIO6oe BpeMra.
"Ba3OBbIe yCTaHOBKn", CtpaHnua 226
BbMoKeTe yCTaHOBnTb FyHKuHIO npIroTOBHeHHAByx qaWeK Cpa3y TOnbKO DnEspano nnCoffee
EcnBbl yctaHOBNH FyHKnIO nproTOBHeHnAByx qaWeK cpa3y,Bbl He MoJKeTe rOBoNTb dpyrne HAnrTkN.
EcnBbTeueHne 90 ckyHn He haxmaeTe HN OndHy KhoNky, np6Op aBtOMaTnueckn BO3BpaUaetcK yCTaHOBKe "Double cup off".
8 KoΦemolka
Ipi6op o6OpydoBaH peRynpyeMoN KoFeMOnKo, KOtopa N03BOLReT INDINByaJIbHO yCTaHaBnBaTb CTeNeHb NOMOJa KoFeiNbIX 3epeH.
8.1 YcTaHOBka CTeNeHn NOMO- na
B npouecce nomola kofoeHbIX 3epen yctaHOBnTe HxKHyO cTepeHb NOMOA.

PPEyIpeKdEHN
Onachoctb TpaBMnopobHn!
KoΦemolka Bpaaeta.
He npKacaiTecb K BHyTpEHNM aCTaM KOfemOJKN.
BHIMAHHE!
Onachoctb noBpeKdEHHa KOeMOn
Pn HnpaBnIbHOy yCTaHOBKe CTeENH NOMOJa BO3MOxHNOBpeKdEHNe KOfEMoJKN.
YcTaHaBnBaIte CTeHb NOMoJa TOnb-KO np pa60TaUoSei KoFemONKe.
CTeneHb nomola yctaHaBnBaetcTc TyeHnHaTo NOBOpOTbIM nepeKIOuataTelem.
CTeneHb nomo- YcTaHOBka Ia
MeIkn NOMOJdJIa 3epeH CBETIOJno O6KapKn
IobepHnTe nepeKluoyaTeIb npOTNB yacOBoN CTpeKN.
CTeneHb nomo- YcTaHOBka Ia

KpynhnI NOMONДЯ 3epeH Tem-HoJO6XapKn
IobepHnte nepeKIOUaTeIb no uacOBoi cTpeIke.

HactpoKa CTeneHn nomola DeiCTByeT TOIbKO Nocne BTOPOUaWKN.
PekomeHaun: EcNI KoFe BbIXOHT NnB OTdJIbHbIMN KaIJIaMn, YCTaHOBtE 6oJee KpyNHbI NOMJ.
EcnKoFe cHsKOM XnDkN n CnHsKOM MaIOn HKn, yCTaHOBHTe 6OJIe MeJKN IOMOI.
9Подогревать чашек
UaMn MoXHo NDoOrpeTb, Nolb3yrcb NDoOrpeBaTeIeM yAWeK.
9.1 BkIIOUeHne n BbIKIOUeHne noIOrpeBa yaWeK
I P E D U N P E X J D E H N E Onachoctb ojkora!
IodorpeBaTeB yawek' cnIbHo HArpeBa-etc.
HnB Koem cnyae He npKacaiTecsb K ropaemy noDorpeBaTeIHO qaWeK
- Ipeed KOHTaKTOM C ropyHm NODOrpeBaTeIeM YaWeK' DaIte EMy OCTbITb.
PekomeHdaun:IOnTImaJIbHOrO nOOrpeBa yCTaHaBnBaIe YaShKn DHom Ha NODOrpeBaTeIb1.
ru Ba3OBbIe yCTaHOBKn
ДяВКЛIOUeHЯИВыIKIIOUeHЯ NOO- rpeBa yaWeK'HaKMnte KHOKNy
10 Ba3Obble yCTaHOBKN
BbMoKeTe 3aTaTb 6a30BbIe yCTaHOBKn np6opBa B COOTBeTCTBn C BaUHMn NO- Tpe6HOCTaMn N Bbl3BaTb DOONHHTeJIbHbIe _YHK n.
Hn OAnH n3 CBeToaNoOoB He rOpNT.
HnkaunHa dncnnee "Clean/ fill water tank", calc'n Clean n
Ppoecc ydaJIeHnHaKnn6bl npepBaH.
BbInonHnTe DeiCTBnA, ONncAHhIe B pa3deJe
"C6poc cepBnchOn nporpaMMbl", CtpaHnua 231.
13 TpaHcnpTnpoBka, xpaHeHne n yTuJIIn3aCnA
13.1 AkTnBaun 3auntbI OT 3a-Mep3aHn
Ipn TpaHcnpOpOBKe I xpaHeHH npEdoXpaHnte BaW np6Op OT Bo3DeiCTBn Hn3Knx TempepaTyp.
BHIMAHHE!
OCTKJ KNDKOCTN B pnp6ope MOryt npnBecTN K NOBpeKDeHNO pnp6opa npTpaHCnOpTnPOBKe IIN XpaHeHN.
Ipeed TpaHcnpTnOBoKo Hnn Nome- ⅢeHHeM Ha XpaHeHne OopOxHnTe CnCTeMy IODaUH KNDKOCTN.
Tpe6oBaHHa
Pnp6op roTob K pa6ote.
Pe3epByap HanoJIHeH.
- NocTaBbTe NOd dncnEhcep eMKoCTb 6OJbIoro pa3Mepa n onyCTHte KaanyuHaTOp BHN3.
- YdepknBaIte HaKaToi KHOnKy Milk MHNMyM 5 cekyHd.
CBeToIIOI KHOII MmraET n npIbop pa3OrpeBaetc. - Korda n3 kanyuHaTopa NaHcET BbIXO-DnTb nap, CHMNTe pe3epByap dJa BO-Dbl.
- Подождnte, noka Bынолнтся пpoцecc npponapивани И на дспjee оToopa- 3ntc "Water tank empty".
- BbIKHouHTe np6Op c nOoIbHO
- OnopoknHb pe3epByap IJI BODI IN NOdOH, TuaTeIbHO OUnCTHe npnbOp.
- OToCoeDInHInTe np6Op ot 3JIeKTpocetn. Tepeb Bbl MoKeTe TpaHCnOpTnpoBaTb np6Op Hn NoCTaBHTb erO Ha XpaHeHne.
3aMeTka: 3aBapOchbI 6nok Tepeb 3a-6nOKupoBaH n He BblHMaeTcra.
13.2 YtHn3aunc Staporo 6bI-TOBOro np6opa
YTNIN3aUNB COOTBECTBNN C 3KOLONHueCKMHN HopMaMN OecneuHBaeT BO3MOXHOCTb BTOPNUHO NcNOJb3OBAHN ueHHbIXCbIPbeBbIX MaTePnaIOB.
- BbHbTe n3 po3eTKn BNkky cTeBOrO Ka-6eJr.
- O6peKbTe ceTeBoi Ka6eIb np6opa.
- Ytunn3npynte npnbop B COOTBeTCTBnC 3KOJOrnueckmH HopMaMn.
CBeDeHnO BO3MOKhbIX CnOCobax yTN- Ⅲaun MOxHO NOnyHTb B CneuaJIH- 3IPOBaHHOM TOPROBOM PpeDpNtTu, a TaKKe B paOHbIX IIN rOpOdCKNX opraHax ynpaBHeHn.
Даанньй пибор Имeel OT-MeTKу O COOTBeTCTBn EВpo-NeiCKm HOpMaM 2012/19/EU yTnIn3aunn 3JIeKtpnueCKnx n3JIeKTPoHHbIX npH6pOBo (waste electrical and electronic equipment - WEEE).
Дааньie HopMbI onpeJelIHT DeIcTByIOUne Ha TeppINrOpNn EBpocOu3a npaBnla BO3BpaTa n yTnIn3aunn CTapbIX pNi6bOpOB.
14 CepBnchna cnyk6a
BaJHbIe IJIyHKUHOHPOBAHnI np6Opa OpHnHaJIbHbIe 3aNuaCTn, COOTBETCTByIO- Une DInpeKTHBe EC no 3KOJOrHueCKOMy npoeKTHoBaHnIO 3JeKTPoNtpe6JIHOuSe IpoDyKUnn, Bbl MoKeTe 3aKa3aTb B HaWei CepBnCHOn cLyX6e, KaK MmHmym, B TeueHne 7 letc MOMeHTa npOdaKn BaWero np6Opa B npedeJax Ebponeckoro 3KO-Homueckoro npocTpaHCTBa.
3aMeTka: Pn BbINOHHeHH rapaHTNHBIX yCIOBn Ipon3BOHNTeJI pa6OTbl BbINOJIHrIOTc cepBnCHOn cnyKbo 6ecnlaTHO.
Iopno6HyIO HOpMaunO rapaHTnHOM cpoKe I yCIOBnX rapaHTn B BaWei CTpaHe BbIMoKTe 3aIpocntb B HaWei cepBnCHOn CnyKBe, y BaWeero npOdaUca NNHaTn Ha Haem caTe.
IpnO6paueHnBcePbncHyIO cnyK6byykaJHTe Homep n3deJIyra (E-Nr.) 3aBoDcKOHomep (FD) np6opa.
Ampc n Tepeoh cepBnCHoCnyKbIMOxHo HauTN B npnilaraemom nepeueHecepBnChbIX CnyK6 nn Ha HaWeM Be6caHTe.
ДяdoctynaK KOHTaKTam CnyK6 KIneHTCKORO cepBnca,Bbl TaKKe MoKTe NcNoJIb3OBaTb daHHbI QR KoJ.
https://www.bosch-home.ru

HmnpTeP/OpraHn3aun, npHmHaOua npTeH3n no KaueCTbY/TOO «BSH Home Appliances (BCX Xoym AnnaaHcəc)»
Pecny6nka Ka3axctan, r. AnMaTbI, yI.
XaJxN MykaHa, 22/5, 7 3aK
e-mail: ala-infokz@bshg.com
Cpok cnjxkb yctpoiCTBa-7 neT.
Ha TeppnTopnn Pecny6nkn Ka3axctan, npn 6hapxkeHn HncnpaBHOCTN, 3BOHnTe B cepBnchbl KOHTaKT-ueHtp 5454
(TOJIbKOДЯMOBnIbHbIXTeJIeΦOHOB).