Classic 3 6 kW - Sauna Weka - Free user manual and instructions
Find the device manual for free Classic 3 6 kW Weka in PDF.

| Product type | Electric sauna stove |
| Brand | Weka |
| Model | Classic 3 6 kW |
| Power | 3.6 kW |
| Supply voltage | 230 V~ |
| Max. cabin volume | 6 m³ |
| Dimensions (W × D × H) | 280 × 370/460 × 460 mm |
| Weight (approx.) | Approx. 12 kg |
| Housing material | Steel |
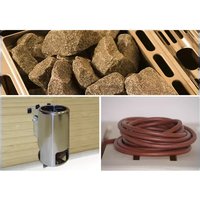
| Stone type | Natural sauna stones, max. 12 kg |
| Main functions | Resistance heating, water infusion (steam) |
| Thermal protection | Integrated safety cut-out |
| Installation | Wall mounting, requires external control unit |
| Electrical connection | By qualified electrician, silicone cable rated for 140 °C |
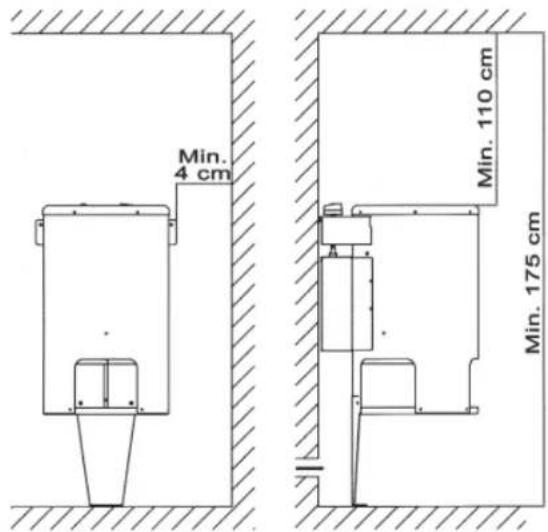
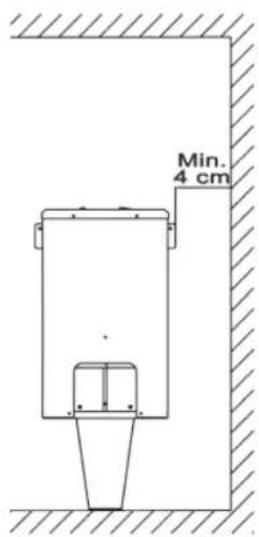
| Safety distances | Min. 4 cm lateral, 110 cm to ceiling, 30 cm from floor |
| Maintenance and cleaning | Clean with clean water without abrasive products |
| Stone replacement | Every 2 years, remove stones that are too small |
| Safety | Do not operate without stones, do not dry laundry |
| Max. water projection | 15 g/m³ of cabin volume |
| Spare parts and repairability | Parts list provided in manual, repair by professional |
| Conformity | CE, according to VDE 0100 |
Frequently Asked Questions - Classic 3 6 kW Weka
User questions about Classic 3 6 kW Weka
0 question about this device. Answer the ones you know or ask your own.
Ask a new question about this device
Download the instructions for your Sauna in PDF format for free! Find your manual Classic 3 6 kW - Weka and take your electronic device back in hand. On this page are published all the documents necessary for the use of your device. Classic 3 6 kW by Weka.
USER MANUAL Classic 3 6 kW Weka
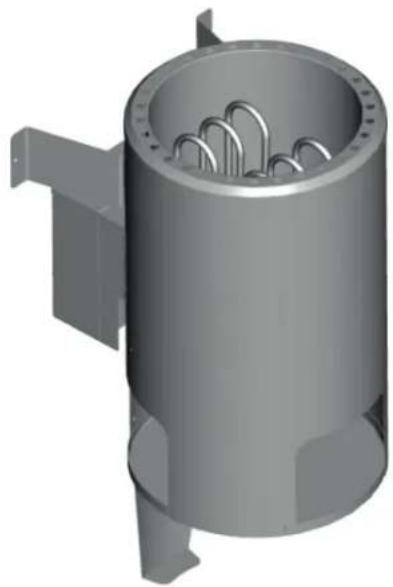
natural_image
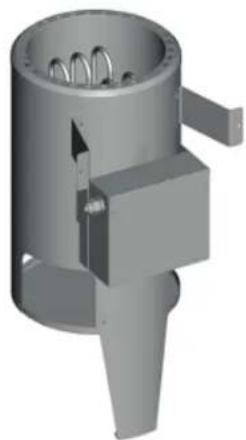
3D rendering of a cylindrical industrial vessel with internal cavities and mounting bracket (no text or symbols)GB Table of contents Page
• Table of contents 2
- General 6
- Important safety instructions 6
• Installation instructions 6
• Installing the sauna oven 7
- Instructions for the electrician 7
- Test the insulation resistance/Ohm values 7
- Connection diagram 7
• Stove rating/cabin size/connection table 8
- Position the sauna stones on the stone grid 8
- Troubleshooting 8
- Spare parts drawing and spare parts lists 24
• EC declaration of conformity 25
natural_image
3D rendering of a cylindrical industrial component with internal cavities and mounting brackets (no text or symbols visible)Abb. 2
Allgemeines
natural_image
3D mechanical component diagram showing internal structure with no visible text or symbols


text_image
Min. 4 cm Min. 110 cm Min. 175 cmtext_image
Diagram illustrating heat transfer or heat exchange in a device, showing input/output flow with directional arrows and crosshairs.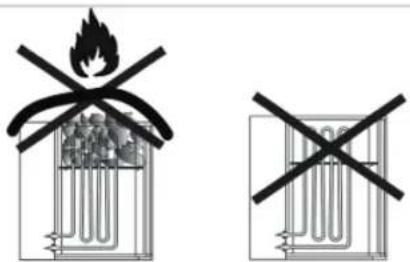
text_image
Diagram showing two crossed-out electrical circuit symbols with explosion and resistance symbolsnatural_image
3D rendering of a cylindrical industrial component with internal cavities and mounting brackets (no text or symbols visible)Fig. 2
General:
Dear Customer,
Please read these operating instructions carefully before you connect and use the sauna stove for the first time to prevent causing any damage.
Important safety instructions
- The installation and electrical connection of the sauna equipment and other electrical equipment may only be carried out by a licensed electrician. (except P & P)
- Refer to the safety actions required by VDE 0100 § 49 DA/6 and VDE 0100 Part 703/11.82 §4. Even if you comply with the required safety actions it is not possible to rule out the possibility of all accident risks.
- Follow the safety instructions to the letter to ensure that you can operate your equipment safely.
- The sauna stove must be operated with a suitable external control unit.
- Only one sauna stove with the appropriate heating capacity may be installed in the sauna cabin.(See table)
| Connection rating [kW] | cabine size [m3] |
| 3,6 up to approx. 6 m | ^3 |
• The unit is not designed for use in public saunas.
- Caution – danger of burns. The case on the sauna stove and the stones get very hot.
- If it is not installed correctly the unit may cause a fire. Read the complete assembly instructions with due care. Pay particular attention to the dimensions and instructions.
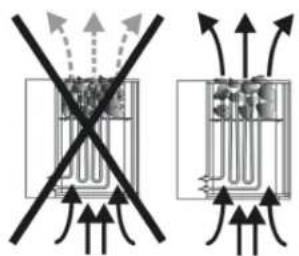
- Only use sauna stones approved for use in saunas. Insert sauna stones loosely; if the stones are inserted too tightly there is a danger of overheating.
- Do not operate the stove without sauna stones.
- Keep children away from the sauna stove. They may suffer burns.
- Seek medical advice about the sauna temperature and how long people with medical problems, infants, children, pensioners and handicapped people may stay in the sauna.
- Do not allow the sauna stove to be used by people who are under the influence of medication, alcohol or drugs.
- Pour small amounts of liquid on to the stones; if you pour too much liquid on to them you may suffer scalds. The quantity of liquid on the stones should not exceed 15g / m^3 of cabin volume.
- Do not use the sauna to dry items, clothing or laundry. They may catch fire.
- Do not place any items on the stove. They may catch fire.
- Do not place any items, apart from the sauna controller's temperature sensor, in the convection current of the stove.
• Metal surfaces may rust in a damp, saltwater climate. - The stove may generate cracking noises while it is heating up and while it is operating (metal heating elements and stones expanding)
- Sauna equipment and sauna cabins may only be made of suitable, low resin and untreated materials (for example Norway spruce, poplar or linden).
- The maximum temperature for the wall and ceiling of the sauna cabin is +140°C.
• Over time the cabin walls will become darker near the sauna stove than in the rest of the cabin; this is normal. Complaints about this will not be accepted.
• The minimum height of the sauna cabin must be 1.75m (interior height) - Ventilation openings must be provided in every sauna cabin. The ventilation opening must be on the wall directly below the sauna stove approx. 5-10 cm above floor level. The waste air must be discharged through an opening diagonally opposite the stove in the rear wall between the top and bottom benches. The ventilation openings must not be sealed. The cabin light and its installation must have a splash-proof design and be suitable for an ambient temperature of 140^ . Therefore only an approved sauna light with max. 40W may be installed with the sauna stove.
Installation instructions
Important.
Do not use any floor coverings under the stove if they are made of inflammable material such as wood, plastic, etc. Ceramic tiles are ideal for use in a sauna.
The area under the stove may suffer discoloration, even on non-flammable flooring or joint material.
No compensation will be paid for discoloration or damage to flooring or the sauna walls.
The distance between the rear of the stove and the cabin wall depends on the design (wall mounting).
The stove must be connected to the electricity supply before it is mounted on the wall holder.
The sauna stove is designed for cabin sizes up to 6m ^3 .
Installing the sauna oven
- Mount 4 wall brackets in accordance with Fig. 3.
- Place the sauna stove in front of the air inlet opening. (distance from floor 30cm) Use the supplied wood screws to secure the wall bracket for the sauna stove to the cabin wall. Insert the stone grid and place the sauna stones on top (see the description in „Loading the sauna grid with sauna stones“, section „Cleaning and care“).
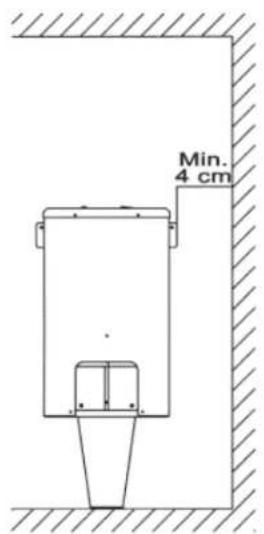
- When mounting the sauna stove on the wall, make sure that there is a vertical distance of at least 110cm between the top edge of the sauna stove and the sauna ceiling and a horizontal distance of at least 4cm between the stove and the cabin wall. The distance between the rear of the stove and the cabin wall depends on the design (wall mounting).
- The distance from the stove's safety grille or bench and other combustible materials to the stove must be at least 4 cm. The safety grille height must be the same as the height of the stove at the front.
natural_image
3D rendering of a mechanical component with internal cavities and a protruding shaft (no text or symbols visible)Fig. 3
text_image
Min. 4 cm Min. 110 cm Min. 175 cmDimensions of the sauna stove:
Length: 280 mm
Depth: 370/460 mm
Height: 460 mm
Note:
The control equipment may be destroyed even if it is incorrectly connected only once. The warranty will be voided if the electrical connection is not correct.
Instructions for the electrician
DIN VDE 0100 and Accident Prevention Regulation BGV A2 must be observed for connecting the stove and all electrical systems. An external all-pole disconnecting device with full isolation according to overvoltage category III must be installed.
Important:
Mains connection leads must be flexible cables with polychlorophene sheaths. No connection leads are supplied with the stove. All the cables installed inside the cabin must be capable of withstanding temperatures of at least 140 °C. Heat-resistant silicon cables must be used. The minimum cross-section of the connection cable and the minimum size of the sauna cabin are shown in the table (page 5 Table 1). A connection diagram is affixed to the inside of the duct cover. Please note that for safety reasons live cables are not allowed to be routed visibly along the internal walls of the cabin. In prefabricated sauna cabins the wall element with the air supply opening generally has empty cable conduits or a duct for routing the cable. If your cabin does not have any cable routing preparations, we recommend that you install a connection socket (not supplied) to the outside of the cabin. Drill a hole in the cabin wall near the cable infeed from the stove and the connection socket. Thread the cable through the hole to the external connection socket. All cables must be protected from damage. This can be achieved using installation ducting/piping or using wooden covers.
Connection diagram
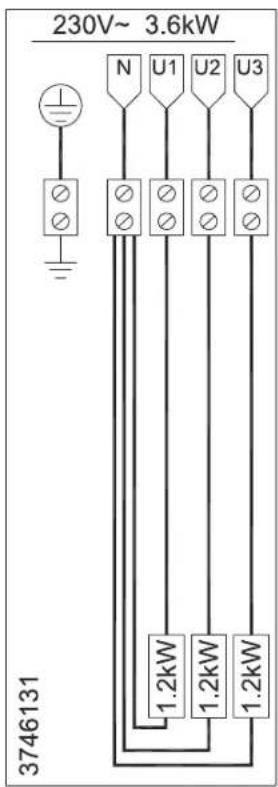
text_image
230V~ 3.6kW N U1 U2 U3 3746131 1.2kW 1.2kW 1.2kWTest the insulation resistance
The resistance values between the various conductor terminals and the case (protective earth) can be measured using an insulation resistance measuring unit. The total insulation resistance between the conductor terminals and case (protective earth) must definitely be greater than 1 MOhm.
Ohm values of the stoves
| Oven type | Connection rating in kW | Connection rating in kW | Minimum cross-sections mm2 (copper cable)3,6 kW oven connect to 230 V AC 1N | ||
| Mains cable from mains to control unit | Oven connection cable from control unit to oven (silicon) | Fuse in A | |||
| 3,6 kW Saunaofen externe Steuerung | 3,6 ca.6 3x2,5 | 3 x 1,5 16 | |||
Position the sauna stones on the stone grid
Sauna stones are a natural product. We recommend that you clean the stones with clean water before placing them on the stove. Do not use stones unless they are designed for use in a sauna. Use a maximum of 12 kg of stones. Important. Position the stones loosely and remove any stones that are too small. If the stones are packed too tightly they will affect the air circulation and will result in the sauna stove and cabin walls overheating and a fire risk. Do not use the stove without stones.
Only use stones that are marked as sauna stones in shops. Warranty claims will not be accepted if stones other than those designed for use in saunas are used or for claims resulting from filling of the stone chambers incorrectly. Turn the stones at least once per year, remove any stones that are too small and remove all stone dust and stone splinters. We recommend that you replace the stones every two years.
Important.
If you cover the stove and fill the stone container incorrectly the unit may cause a fire. Do not use the stove without sauna stones.
text_image
Diagram illustrating heat transfer or airflow around a device with crossed-out regions and directional arrows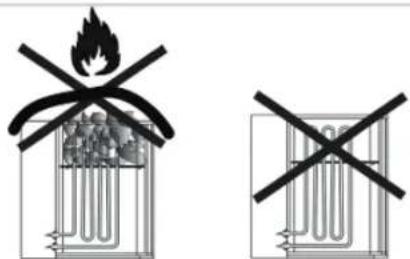
text_image
Two diagrams showing fire extinguishing and heat exchanger symbols with crossed-out black prohibition signsCleaning and care
Switch off the stove and allow it to cool before you clean it. Do not use scouring cleaning products to clean the stove.
Liquids
The sauna stove is suitable for sauna liquids.
Please read the following carefully:
- Only use water that meets the quality requirements for domestic water.
• Water that contains high levels of lime or iron will leave residue on the stones and metal in the water tank. - To prevent scalds caused by rising steam whilst pouring liquid over the stones, liquids should always be poured from the side using a ladle.
- Dripping water may cause permanent marks on the cabin floor.
- Pour small amounts of liquid on to the stones; if you pour too much liquid on to them you may suffer scalds.
- Use as much liquid as you are comfortable with, but do not exceed a volume of 15g / m^3 of cabin volume.
-
The liquid should be poured straight on to the stones in the stove and must be spread evenly over all the stones.
-
If you use liquid concentrates (for example essential oils), follow the instructions for use provided by the manufacturer.
• Using excessive concentrations of these products may result in explosions. - Do not use mixtures of alcoholic drinks or other additives not recommended for use in saunas as they pose a risk of fire, explosion and may be harmful.
- The warranty will be voided if you fail to follow these instructions.
Important. Liquids may cause marks on metal surfaces and sauna stones. Sauna liquids with citrus fragrance may cause rust patches as a result of their acid content.
In this case you should only use products in the diluted form specified by the manufacturer.
Troubleshooting
The stove will not heat up
- Have you activated all the necessary switches?
- Has the fuse in the domestic installation tripped?
• Have you set the temperature controller correctly?
• Have you pre-set the time switch? - Defective sauna control unit (sensor breaker, see operating manual for the control unit).
- RCCB trips – see the section entitled "Testing the insulation resistance"
The stove causes "cracking noises"
- The case parts and heating elements expand when the stove is heating up or operating. The heating elements may move the sauna stones and cause noises. Cracking noises are normal and are not grounds for complaint.
• Sauna stones split and cause an odor
- Use only sauna stones recommended by the manufacturer.
• Sauna stones are too old; replace them.
The cabin does not get hot enough
• The sauna stove is too small
- Excessive temperature loss from the sauna cabin, for example due to poor or lack of sealing.
- Incorrect display on the sauna thermometer. Mount the thermometer higher and at a distance of approx. 3 cm from the sauna wall.
- Have a defective heating element (heating element does not glow) checked and measured by an electrician.
natural_image
3D rendering of a cylindrical industrial component with internal cavities and mounting brackets (no text or symbols visible)Fig. 2
Généralités
Chère Cliente, Cher Client,
natural_image
3D rendering of a mechanical component with internal cavities and a protruding shaft (no text or symbols visible)Fig. 3

text_image
Min. 4 cm Min. 110 cm Min. 175 cmtext_image
Diagram illustrating heat transfer or heat exchange in a device, showing no heat input and heat transfer through a chamber with arrows indicating direction.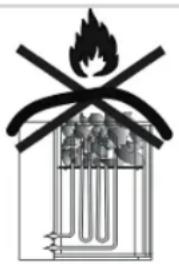
natural_image
Cross-sectional diagram of a mechanical device with no visible text or symbols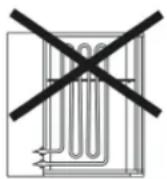
natural_image
3D rendered mechanical component with internal channels and mounting bracket (no text or symbols)natural_image
3D rendered mechanical component with cylindrical body and protruding ports (no text or symbols)Fig. 3
text_image
Min. 4 cm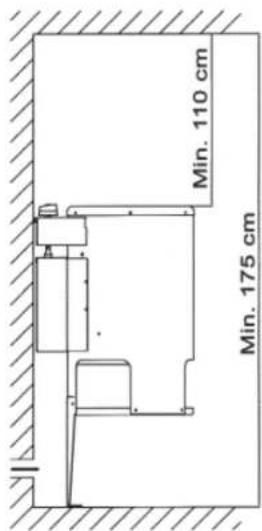
text_image
Min. 110 cm Min. 175 cmtext_image
Diagram illustrating heat transfer or heat exchange in a device, showing no heat input and heat transfer with directional arrows.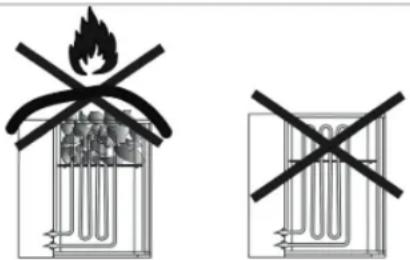
text_image
Diagram showing two crossed-out electrical circuit symbols with no accompanying text or labelsPulizia e cura
natural_image
3D rendering of a cylindrical industrial component with internal cavities and mounting brackets (no text or symbols)Fig. 2
natural_image
3D rendered mechanical component with internal cavities and a protruding shaft (no text or symbols visible)Fig. 3
text_image
Min. 4 cm
text_image
Min. 110 cm Min. 175 cmtext_image
Diagram illustrating a crossed-out electrical circuit with labeled components and directional arrows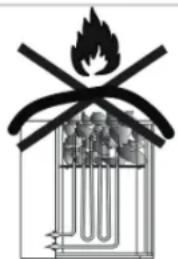
natural_image
Cross-sectional diagram of a mechanical device with no visible text or symbols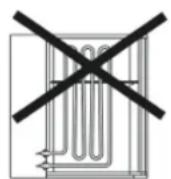
Limpieza y cuidados
natural_image
3D rendering of a cylindrical industrial component with internal cavities and mounting brackets (no text or symbols)Fig. 2
Algemeen:
natural_image
3D rendering of a mechanical component with internal cavities and a protruding shaft (no text or symbols visible)Fig. 3

text_image
Min. 4 cm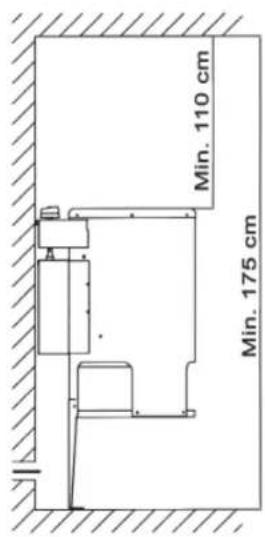
text_image
Min. 110 cm Min. 175 cmtext_image
Diagram illustrating heat transfer or heat exchange in a device, showing crossed-out and uncoiled components with directional arrows.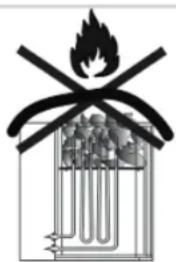
natural_image
Cross-sectional diagram of an internal combustion engine cylinder with flame and smoke (no text or labels)
natural_image
3D rendering of a cylindrical industrial component with internal cavities and mounting brackets (no text or symbols visible)Obr. 2
Všeobecne:
natural_image
3D rendered mechanical component with internal cavities and a protruding shaft (no text or symbols visible)Obr. 3

text_image
Min. 4 cm Min. 110 cm Min. 175 cmtext_image
Diagram illustrating fluid flow through a filtration or separation system with directional arrows and labeled components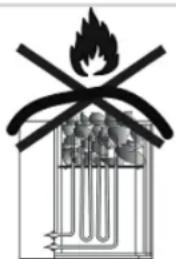
text_image
Diagram of an electrical circuit with a flame symbol crossed out, indicating no protection or resistance.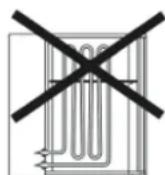
Čištění a péce
text_image
Technical diagram of a mechanical device with numbered components for identification| Position | Art.Nr. | Bezeichnung | Description | Menge |
| 1 | 865000998 Abdeckung | Top cover | 1 | |
| 2 | 865000999 Steingitter | Stone grid | 1 | |
| 3 | 865001008 | Heizspirale 1.2kW | Heating spiral 1.2kW | 3 |
| 4 ohne | Innenmantel | Inside shell | 1 | |
| 5 | ohne | Außenmantel | Outside shell | 1 |
| 6 | Wandhalter | Wall holder | 2 | |
| zu 6 | 8655063361 | Spaxschraube 5X35mm | Chipboard screw 5X35mm | 2 |
| 7 | ohne | Klemmkasten | Control box external controller | 1 |
| 8 | 868002113 Kabelbaum 3.6kW Terminal block | 3.6kW | 1 | |
| 9 ohne | Fuß | Holder | 1 | |
| zu 9 | 865033162 | Schraube M5X12mm | Raised cheeks head screw M5X12mm | 2 |
Noise: measured L_WA = dB (A); guaranteed L d B
P = KW; L/∅ = cm
2004/26/EC
Emission No.:
Standard references: EN 60335-1, EN 60335-2-53, EN 55014-1, EN 55014-2, EN 61000-3-2, EN 61000-3-3, EN 62321
Subject to change without notice
Archive-File/Record:
Documents registrar:
Wiesenweg 22, D-94405 Landau/Isar
D Nur für EU-Länder
Never place any electric tools in your household refuse.
To comply with European Directive 2012/96/EU concerning old electric and electronic equipment and its implementation in national laws, old electric tools have to be separated from other waste and disposed of in an environment-friendly fashion, e.g. by taking to a recycling depot.
Recycling alternative to the demand to return electrical devices:
As an alternative to returning the electrical device, the owner is obliged to cooperate in ensuring that the device is properly recycled if ownership is relinquished. This can also be done by handing over the used device to a returns center, which will dispose of it in accordance with national commercial and industrial waste management legislation. This does not apply to the accessories and auxiliary equipment without any electrical components which are included with the used device.
(OHNWULVFK JHUHHGVFKDS KRRUW QLHW ELM KHW KXLVYXLO WKXLV
9ROJHQV GH (XURSHVH ULFKWOLMQ (8 RS DIJHGDQNWH HOHNWULVFKH HQ HOHNWURQLVFKH WRHVWHOOHQ HQ RP]HW JHUHHGVFKDSSHQ DIJRQGHUOLMN WH ZRUGHQ YHU]DPHOG HQ PLOLHXYULHQGHOLMN WH ZRUGHQ JHUHF\FOHHUG
5HF\FODJHDOWHUQDWLHI L S Y KHW WRHVWHO WHUXJ WH VWXUHQ
'H HLJHQDDU YDQ KHW HOHNWULVFKH WRHVWHO LV DOWHUQDWLHI YHUSOLFKW L S Y KHW WRHVWHO WHUXJ WH VWXUHQ HLJHQGRP RQWGRHW +HW DIJHGDQNWH WRHVWHO NDQ KLHUYRRU RRN ELM HHQ YHU]DPHOSODDWV ZRUGHQ DIJHJHYHQ GLH YR JDNH UHF\FODJH HQ DIYDOYHUZHUNLQJ JRUJW +LHURQGHU YDOOHQ QLHW ELM GH DIJHGDQNWH WRHVWHOOHQ JHYRHJGH DFFHV FRPSRQHQWHQ
-HQ SUR ]HPČ (8
(OHNWULFNp QiG DGt D SGt VWURMH QHRGKD]XMWH GR GRPRYQtKR RGSDGX
3RGOH HYURSVNp VPCUQLFH (8 R Y\VORXäLOêFK HOHNWULFNêFK D HOHNWURQLFNêFK SĞtVWURMtFK D SĞL SURVD]RYiQ QiĞDGt VEtUiQR VDPRVWDWQČ D PXVt EêW GRSUDYHQR GR RGSRYtGDMtFt HNRORJLFNpKR UHF\NODpQtKR JiYRGX
\$OWHUQDWLYD UHF\NODFH
9ODVWQtN HOHNWULFNpKR S tVWURMH MH SRYLQHQ DOWHUQDWLYQ QDPtVWR JS WQpKR RGHVOiQt ]D tJHQt VSROXS VRELW S YODVWQLFWYt 6WDU S tVWURM O]H Y WDNRYpS S tSDG RGHY]GDW WDnP YH VE UQ NWHUi SURYHGH RGVWUDQ Qt YH VP\V S HGSLV\ VH QHY]WDKXMt QD GtO\ S tVOX HQVWYt D SRPRFQp SURVW HGN\ EH] HOHNWULFN FK VRXpiVVt S LGDQp NH VWDU P S
'HU 1DFKGUXFN RGHU VRQVWLJH 9HUYLHOILOWLJXQJ YRQ 'RNXPHQWDWLRQ XQG %HJOHLWSDSLHUHQ GHU 3URG: =XVWLPPXQJ GHU ,6& *PE+ ]XOIVVLJ
7KH UHSULQWLQJ RU UHSURGXFWLRQ E\DQ\RWKHU PHDQV LQ ZKROH RU LQ SDUW RI GRFXPHQWDWLRQ DQG H[SUHVV FRQVHQW RI,6& *PE+
/D UpLPSUHVVLRQ RX XQH DXWUH UHSURGXFWLRQ GH OD GRFXPHQWDWLRQ HW GHV GRFXPHQWV G¶DFFRPSDJQ TX¶DYHF O¶DJUpPHQW H[SUqV GH O¶HQWUHSULVH ,& *PE+
/D ULVWDPSD R O[XOWHULRUH ULSURGX]LRQH DQFKH SDU]LDOH GHOOD GRFXPHQWD]LRQH R GHL GRFXPHQW O[HVSOLFLWD DXWRUL]D]LRQH GD SDUWH GHOOD ,6& *PE+
/D UHLSUHVLYq R FXDOTXLHU RWUD UHSURGXFFLyQ GH GRFXPHQWRV H LQIRUPDFLyQ DGMXQWD D SURGXFWRV DXWRUL]DFLyQ H[SUHVD GH ,6& *PE+
1DGUXN RI DQGHUH UHSURGXFWLH YDQ GRFXPHQWDWLH HQ JHOHLGHSDSLHU HQYDQ GH SURGXFWHQ JHKHHC WRHVWHPPLQJ YDQ ,6& *PE+
'RWLVN QHER MLQp URJPQRåRYiQt GRNXPHQWDFH D SUHYRGQtFK GRNXPHQWH YêURENÂ HDNp SRX]H YêEDWNÂ
7HFKQLVFKH bQGHUXQJHQ YRUEHKDOWHQ
7HFKQLFDO FKDQJHV VXEMHFW WR FKDQJH
6RXV UpVHUYH GH PRGLILFDWLRQV
&RQ ULVHUYD GL DSSRUWDUH PRGLILFKH WHFQLFKH
6DOYR PRGLILFDFLRQHV WpFQLFDV
7HFKQLVFKH ZLM)LJLQJHQ YRRUEHKRXGHQ
7HFKQLFNp JPČQ\ Y\KUD]HQ\
⑭ Bei Fragen zur Gewährleistung bzw. bei Gewährleistungsansprüchen wenden sie sich bitte mit ihrem Kaufnachweis an ihren Händler.
GB If you have any questions about warranties or wish to claim on a warranty, please contact your dealer with your proof of purchase.
F Pour toute question sur la garantie ou pour tout droit à garantie, veuillez vous adresser à votre marchand muni de votre preuve d'achat.
① In caso di domande relative alla garanzia ovvero di rivendicazione di diritti di garanzia rivolgetevi con la prova di acquisto al vostro rivenditore.
Para cualquier pregunta relacionada con la garantía o los derechos de garantía, acuda con el comprobante de compra a su distribuidor.
NL Gelieve u bij vragen over de garantie resp. bij garantieclaims met uw aankoopbewijs te wenden tot uw handelaar.