Kompakt 3 6 kW INST - Sauna Weka - Free user manual and instructions
Find the device manual for free Kompakt 3 6 kW INST Weka in PDF.

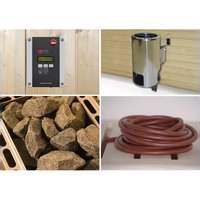
| Product type | Electric sauna heater |
| Brand | Weka |
| Model | Kompakt 3 6 kW INST |
| Power | 3.6 kW |
| Dimensions (L × D × H) | 280 × 370/460 × 460 mm |
| Weight | Approximately 12 kg |
| Power supply | 230 V~, single-phase |
| Minimum cable cross-section | 3 x 1.5 mm² (silicone) |
| Fuse protection | 16 A |
| Suitable cabin volume | Up to 6 m³ |
| Maximum stone capacity | 12 kg |
| Minimum ceiling height | 1.75 m |
| Vertical distance to ceiling | Minimum 110 cm |
| Lateral distance to walls | Minimum 4 cm |
| Distance to protective grille | Minimum 4 cm |
| Control type | Internal control with timer and thermostat |
| Main functions | Time and temperature preselection, water projection |
| Heating element material | Metal heating sticks |
| Safety | Insulation resistance > 1 MOhm, overheat protection, shutdown in case of fault |
| Maintenance and cleaning | Clean with clear water, no abrasive cleaner; replace stones every 2 years |
| Spare parts and repairability | Spare parts available, CE declaration of conformity |
| General information | French manual included, household use only |
Frequently Asked Questions - Kompakt 3 6 kW INST Weka
User questions about Kompakt 3 6 kW INST Weka
0 question about this device. Answer the ones you know or ask your own.
Ask a new question about this device
Download the instructions for your Sauna in PDF format for free! Find your manual Kompakt 3 6 kW INST - Weka and take your electronic device back in hand. On this page are published all the documents necessary for the use of your device. Kompakt 3 6 kW INST by Weka.
USER MANUAL Kompakt 3 6 kW INST Weka
natural_image
3D rendering of a cylindrical industrial vessel with internal components and mounting brackets (no text or symbols visible)GB Table of contents
• Table of contents 2
- General 6
- Important safety instructions 6
• Installation instructions 6
• Installing the sauna oven 7
• Instructions for the electrician 7
- Test the insulation resistance/Ohm values 7
- Connection diagram 7
- Stove rating/cabin size/connection table 8
- Position the sauna stones on the stone grid 8
- Troubleshooting 8
- Spare parts drawing and spare parts lists 24
• EC declaration of conformity 25
NL Inhoudsopgave
natural_image
3D mechanical component with cylindrical housing and mounting bracket, labeled Abb. 4 (no text or symbols on the object itself)

Hinweis:
text_image
Diagram illustrating heat transfer or heat exchange in a device, showing input/output flows and internal structure with directional arrows.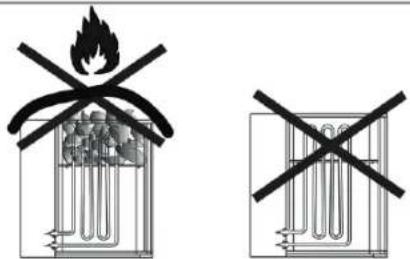
text_image
Diagram showing two types of fire extinguishing symbols: one with a flame and crossbones, the other with a crossed-out tube.text_image
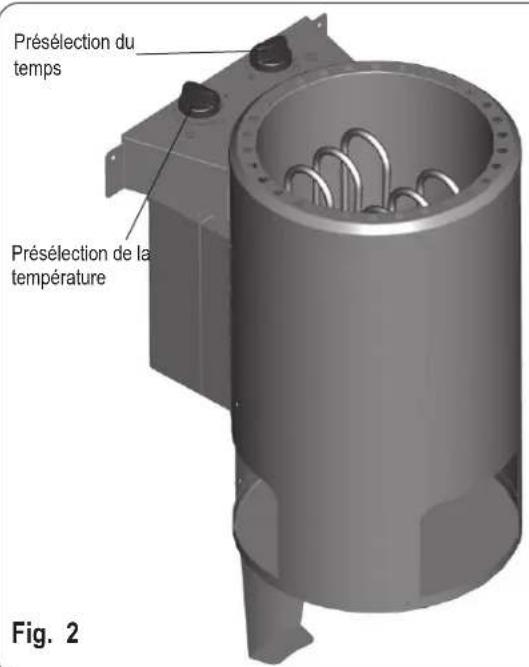
Time preselection Temperature preselection Fig. 2General:
Dear Customer,
Please read these operating instructions carefully before you connect and use the sauna stove for the first time to prevent causing any damage.
Important safety instructions
- The installation and electrical connection of the sauna equipment and other electrical equipment may only be carried out by a licensed electrician. (except P & P)
- Refer to the safety actions required by VDE 0100 § 49 DA/6 and VDE 0100 Part 703/11.82 §4. Even if you comply with the required safety actions it is not possible to rule out the possibility of all accident risks.
- Follow the safety instructions to the letter to ensure that you can operate your equipment safely.
- Only one sauna stove with the appropriate heating capacity may be installed in the sauna cabin.(See table)
| Connection rating [kW] | cabine size [m3] |
| 3,6 up to approx. 6 m | ^3 |
• The unit is not designed for use in public saunas.
- Caution – danger of burns. The case on the sauna stove and the stones get very hot.
- If it is not installed correctly the unit may cause a fire. Read the complete assembly instructions with due care. Pay particular attention to the dimensions and instructions.
- Only use sauna stones approved for use in saunas. Insert sauna stones loosely; if the stones are inserted too tightly there is a danger of overheating.
- Do not operate the stove without sauna stones.
- Keep children away from the sauna stove. They may suffer burns.
- Seek medical advice about the sauna temperature and how long people with medical problems, infants, children, pensioners and handicapped people may stay in the sauna.
- Do not allow the sauna stove to be used by people who are under the influence of medication, alcohol or drugs.
6
- Pour small amounts of liquid on to the stones; if you pour too much liquid on to them you may suffer scalds. The quantity of liquid on the stones should not exceed 15g / m^3 of cabin volume.
- Do not use the sauna to dry items, clothing or laundry. They may catch fire.
- Do not place any items on the stove. They may catch fire.
- Do not place any items, apart from the sauna controller's temperature sensor, in the convection current of the stove.
• Metal surfaces may rust in a damp, saltwater climate.
- The stove may generate cracking noises while it is heating up and while it is operating (metal heating elements and stones expanding)
- Sauna equipment and sauna cabins may only be made of suitable, low resin and untreated materials (for example Norway spruce, poplar or linden).
- The maximum temperature for the wall and ceiling of the sauna cabin is +140°C.
• Over time the cabin walls will become darker near the sauna stove than in the rest of the cabin; this is normal. Complaints about this will not be accepted.
• The minimum height of the sauna cabin must be 1.75m (interior height)
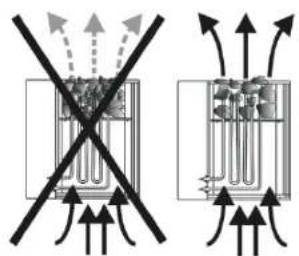
- Ventilation openings must be provided in every sauna cabin. The ventilation opening must be on the wall directly below the sauna stove approx. 5-10 cm above floor level. The waste air must be discharged through an opening diagonally opposite the stove in the rear wall between the top and bottom benches. The ventilation openings must not be sealed. The cabin light and its installation must have a splash-proof design and be suitable for an ambient temperature of 140^ . Therefore only an approved sauna light with max. 40W may be installed with the sauna stove.
Installation instructions
Important.
Do not use any floor coverings under the stove if they are made of inflammable material such as wood, plastic, etc. Ceramic tiles are ideal for use in a sauna.
The area under the stove may suffer discoloration, even on non-flammable flooring or joint material.
No compensation will be paid for discoloration or damage to flooring or the sauna walls.
The distance between the rear of the stove and the cabin wall depends on the design (wall mounting).
The stove must be connected to the electricity supply before it is mounted on the wall holder.
The sauna stove is designed for cabin sizes up to 6m³.
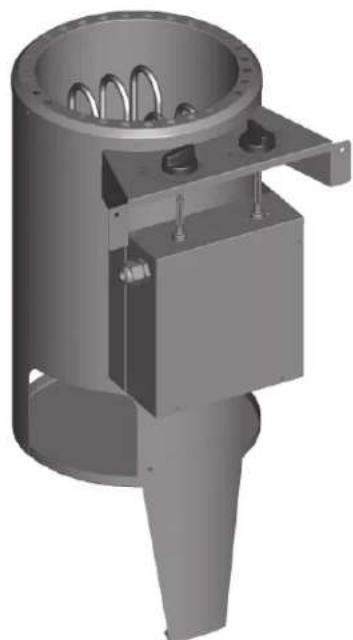
Installing the sauna oven
- Mount 4 wall brackets in accordance with Fig. 3.
- Place the sauna stove in front of the air inlet opening. Use the supplied wood screws to secure the wall bracket for the sauna stove to the cabin wall. Insert the stone grid and place the sauna stones on top (see the description in „Loading the sauna grid with sauna stones“, section „Cleaning and care“).
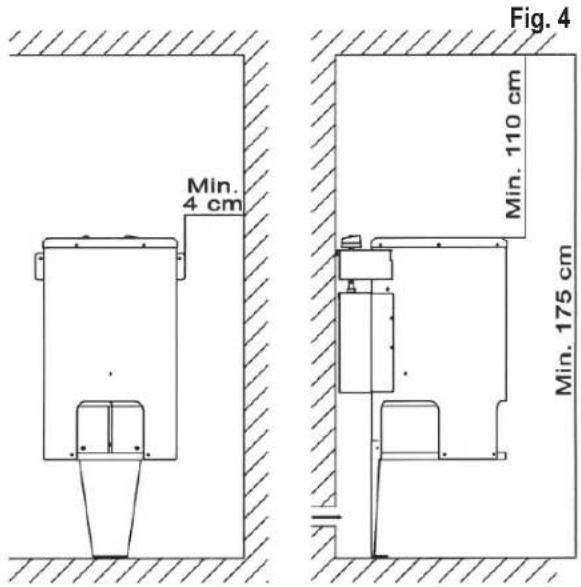
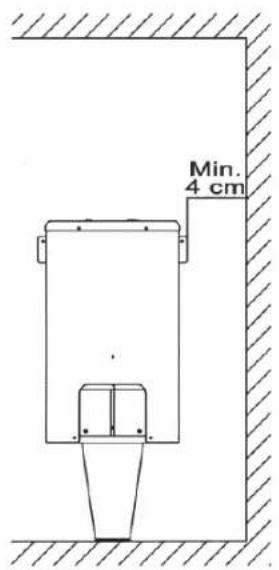
- When mounting the sauna stove on the wall, make sure that there is a vertical distance of at least 110cm between the top edge of the sauna stove and the sauna ceiling and a horizontal distance of at least 4cm between the stove and the cabin wall. The distance between the bottom edge of the stove and the floor depends on the equipment's design (adjustable foot). Similarly, the distance between the rear of the stove and the cabin wall depends on the design (wall bracket).
- The distance from the stove's safety grille or bench and other combustible materials to the stove must be at least 4 cm. The safety grille height must be the same as the height of the stove at the front.
natural_image
3D rendering of a mechanical device with internal components and mounting brackets (no text or symbols visible)Fig. 4
Note:
The control equipment may be destroyed even if it is incorrectly connected only once. The warranty will be voided if the electrical connection is not correct.
Instructions for the electrician
DIN VDE 0100 and Accident Prevention Regulation BGV A2 must be observed for connecting the stove and all electrical systems. An external all-pole disconnecting device with full isolation according to overvoltage category III must be installed.
Important:
Mains connection leads must be flexible cables with polychlorophene sheaths. No connection leads are supplied with the stove. All the cables installed inside the cabin must be capable of withstanding temperatures of at least 140 °C. Heat-resistant silicon cables must be used. The minimum cross-section of the connection cable and the minimum size of the sauna cabin are shown in the table (page 5 Table 1). A connection diagram is affixed to the inside of the duct cover. Please note that for safety reasons live cables are not allowed to be routed visibly along the internal walls of the cabin. In prefabricated sauna cabins the wall element with the air supply opening generally has empty cable conduits or a duct for routing the cable. If your cabin does not have any cable routing preparations, we recommend that you install a connection socket (not supplied) to the outside of the cabin. Drill a hole in the cabin wall near the cable infeed from the stove and the connection socket. Thread the cable through the hole to the external connection socket. All cables must be protected from damage. This can be achieved using installation ducting/piping or using wooden covers.
text_image
Fig. 4 Min. 4 cm Min. 110 cm Min. 175 cmFig. 5
Dimensions of the sauna stove:
Length: 280 mm
Depth: 370/460 mm
Height: 460 mm
Connection diagram
3.6 kW sauna stove with internal controller
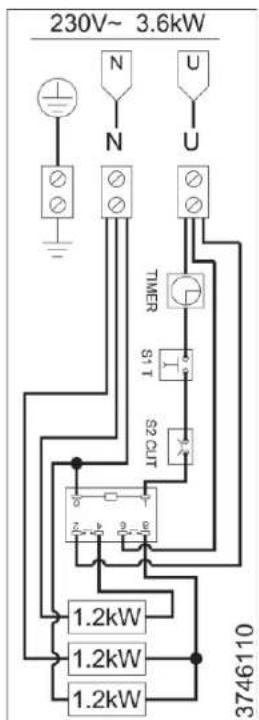
text_image
230V~ 3.6kW N U N U TIMER S1-T S2-CLIT 1.2kW 1.2kW 1.2kW 3746110Test the insulation resistance
The resistance values between the various conductor terminals and the case (protective earth) can be measured using an insulation resistance measuring unit. The total insulation resistance between the conductor terminals and case (protective earth) must definitely be greater than 1 MOhm.
| Oven type | Connection rating in kW | Suitable for booth size in m^3 | Minimum cross-sections mm^2 (copper cable) 3,6kW oven connect to 230 V 1N | |
| Mains cable from mains to control unit | Fuse in A | |||
| 3.6 kW sauna stove Internal controller | 3,6 approx 6 | Silicon 3 x 1,5 m | 2 | 16 |
Position the sauna stones on the stone grid
Sauna stones are a natural product. We recommend that you clean the stones with clean water before placing them on the stove. Do not use stones unless they are designed for use in a sauna. Use a maximum of 12 kg of stones. Important. Position the stones loosely and remove any stones that are too small. If the stones are packed too tightly they will affect the air circulation and will result in the sauna stove and cabin walls overheating and a fire risk. Do not use the stove without stones.
Only use stones that are marked as sauna stones in shops. Warranty claims will not be accepted if stones other than those designed for use in saunas are used or for claims resulting from filling of the stone chambers incorrectly. Turn the stones at least once per year, remove any stones that are too small and remove all stone dust and stone splinters. We recommend that you replace the stones every two years.
Important.
If you cover the stove and fill the stone container incorrectly the unit may cause a fire. Do not use the stove without sauna stones.
text_image
Diagram illustrating heat transfer or heat exchange in a device, showing cross-sections with arrows and directional arrows indicating movement.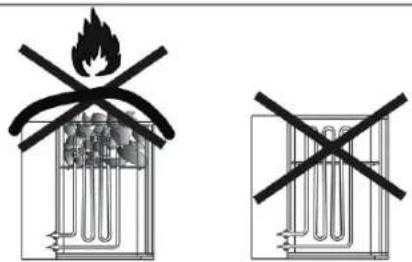
text_image
Diagram showing fire extinguishing with a flame symbol and crossed-out electrical circuit lines, indicating no fire extinguishing.Cleaning and care
Switch off the stove and allow it to cool before you clean it. Do not use scouring cleaning products to clean the stove.
Liquids
The sauna stove is suitable for sauna liquids.
Please read the following carefully:
- Only use water that meets the quality requirements for domestic water.
• Water that contains high levels of lime or iron will leave residue on the stones and metal in the water tank.
• To prevent scalds caused by rising steam whilst pouring liquid over the stones, liquids should always be poured from the side using a ladle. - Dripping water may cause permanent marks on the cabin floor.
- Pour small amounts of liquid on to the stones; if you pour too much liquid on to them you may suffer scalds.
- Use as much liquid as you are comfortable with, but do not exceed a volume of 15g / m^3 of cabin volume.
• The liquid should be poured straight on to the stones in the stove and must
be spread evenly over all the stones.
- If you use liquid concentrates (for example essential oils), follow the instructions for use provided by the manufacturer.
• Using excessive concentrations of these products may result in explosions. - Do not use mixtures of alcoholic drinks or other additives not recommended for use in saunas as they pose a risk of fire, explosion and may be harmful.
- The warranty will be voided if you fail to follow these instructions.
Important. Liquids may cause marks on metal surfaces and sauna stones. Sauna liquids with citrus fragrance may cause rust patches as a result of their acid content.
In this case you should only use products in the diluted form specified by the manufacturer.
Troubleshooting
The stove will not heat up
- Have you activated all the necessary switches?
- Has the fuse in the domestic installation tripped?
- Have you set the temperature controller correctly?
- Have you pre-set the time switch?
- RCCB trips – see the section entitled "Testing the insulation resistance"
The stove causes "cracking noises"
- The case parts and heating elements expand when the stove is heating up or operating. The heating elements may move the sauna stones and cause noises. Cracking noises are normal and are not grounds for complaint.
• Sauna stones split and cause an odor
- Use only sauna stones recommended by the manufacturer.
• Sauna stones are too old; replace them.
The cabin does not get hot enough
• The sauna stove is too small
- Excessive temperature loss from the sauna cabin, for example due to poor or lack of sealing.
- Incorrect display on the sauna thermometer. Mount the thermometer higher and at a distance of approx. 3 cm from the sauna wall.
- Have a defective heating element (heating element does not glow) checked and measured by an electrician.
natural_image
3D mechanical component diagram labeled Fig. 4, showing a cylindrical housing with internal components and mounting brackets (no text or symbols on the object itself)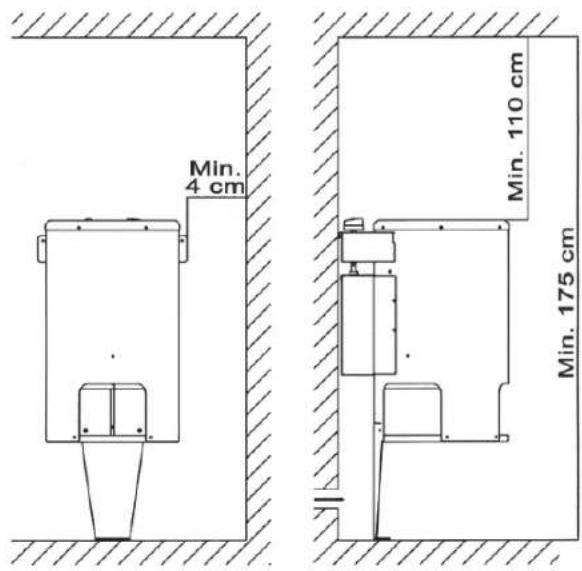
text_image
Min. 4 cm Min. 110 cm Min. 175 cmFig. 5
text_image
Diagram illustrating heat transfer or airflow around a device with crossed-out and uncoiled components, showing directional arrows and text annotations.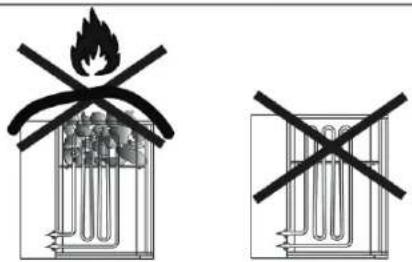
text_image
Diagram showing two types of fire extinguishing symbols: one with a flame and crossbones, the other with a crossed-out tube.natural_image
3D rendering of a mechanical component with internal spring and mounting bracket (no text or symbols)Fig. 4
Avvertenza:
text_image
Diagram illustrating heat transfer or heat exchange in a device, showing heat flow direction with arrows and crosshairs.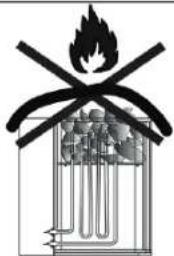
natural_image
Cross-sectional diagram of a mechanical device with no visible text or symbols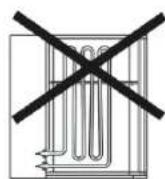
Pulizia e cura
natural_image
3D mechanical component diagram labeled Fig. 4, showing a cylindrical housing with internal components and mounting brackets (no text or symbols on the object itself)Advertencia:
text_image
Diagram illustrating heat transfer or heat exchange in a U-tube with directional arrows and cross symbols indicating flow or movement.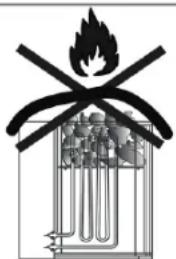
natural_image
Cross-sectional diagram of an internal combustion engine cylinder with flame symbol (no text or labels)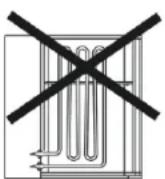
Limpieza y cuidados
natural_image
3D rendering of a mechanical device with internal components and mounting brackets (no text or symbols visible)Fig. 4

text_image
Min. 4 cm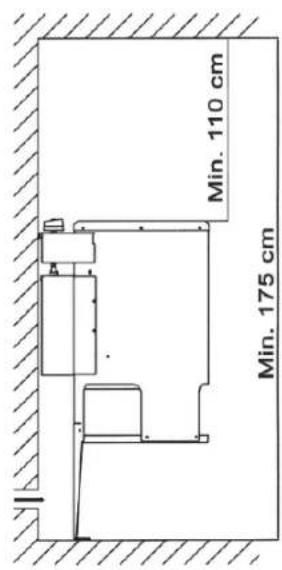
text_image
Min. 110 cm Min. 175 cmFig. 5
text_image
Diagram illustrating heat transfer or heat exchange in a device, showing cross-sectional and side views with arrows indicating movement.
text_image
Diagram showing fire extinguishing with a flame symbol and crossed-out U-shaped tube, indicating no fire extinguishing or no heat exchanger.natural_image
3D rendering of a mechanical component with cylindrical body and internal spring-like structure (no text or symbols)Obr. 4
text_image
Min. 4 cm
text_image
Min. 110 cm Min. 175 cmObr. 5
text_image
Diagram illustrating heat transfer or heat exchange in a device, showing heat flow direction with arrows and cross symbols.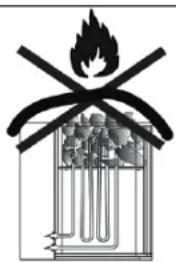
natural_image
Cross-sectional diagram of a combustion engine cylinder with flame and smoke (no text or labels)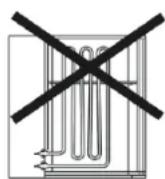
Čištění a péce
text_image
Exploded view diagram of a mechanical device with numbered parts for identification| Position Art. | Nr. Bezeichnung Description Menge | |||
| 1 ohne Abdeckung Top cover 1 | ||||
| 2 0865000999 Steingitter Stone grid 1 | ||||
| 3 0865001013 Heizspirale 1.2kW Heating spiral 1.2kW 3 | ||||
| 4 ohne Innenmantel | Inside shell | 1 | ||
| 5 | ohne | Außenmantel | Outside shell | 1 |
| 6 0865001009 Drehknopf | Knob | 2 | ||
| 7 ohne Bedienpaneel | Control panel | 1 | ||
| zu 7 | 0865063361 | Holzschraube 4,8X32mm | wood screw 4,8X32mm | 2 |
| 8 ohne Verlängerung | Connecting link for sensor | 1 | ||
| 9 ohne Verlängerung | Connecting link for timer | 1 | ||
| 10 | ohne | Klemmkasten | Control box external controller | 1 |
| 11 | 0865001010 Temperatursensor Temperature sensor | 1 | ||
| 12 | 0867003807 Zeitschaltuhr Timer | 1 | ||
| 13 | 0865000970 | Relais-6polig | Relay-6pole | 1 |
| 14 | 0865001011 | Temperatursicherung | Temperature safety | 1 |
| 15 | 0865001059 | Kabelbaum 3.6kW | Terminal block 3.6kW | 1 |
| 16 | ohne Fuss | Base | 1 | |
| zu 16 | 0865033162 | Schraube M5X12mm | Raised cheeks head screw M5X12mm | 2 |
Subject to change without notice
Archive-File/Record:
Documents registrar:
Wiesenweg 22, D-94405 Landau/Isar
D Nur für EU-Länder
Never place any electric tools in your household refuse.
To comply with European Directive 2012/96/EU concerning old electric and electronic equipment and its implementation in national laws, old electric tools have to be separated from other waste and disposed of in an environment-friendly fashion, e.g. by taking to a recycling depot.
Recycling alternative to the demand to return electrical devices:
As an alternative to returning the electrical device, the owner is obliged to cooperate in ensuring that the device is properly recycled if ownership is relinquished. This can also be done by handing over the used device to a returns center, which will dispose of it in accordance with national commercial and industrial waste management legislation. This does not apply to the accessories and auxiliary equipment without any electrical components which are included with the used device.
The reprinting or reproduction by any other means, in whole or in part, of documentation and papers accompanying products is permitted only with the express consent of ISC GmbH.
GB Technical changes subject to change