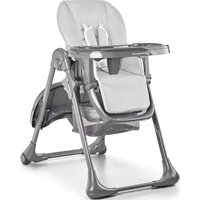
Livy - High chair Kinderkraft - Free user manual and instructions
Find the device manual for free Livy Kinderkraft in PDF.

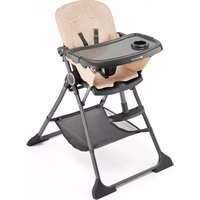
| Product Type | Convertible high chair with recliner and junior seat |
| Brand | Kinderkraft |
| Model | Livy |
| Recommended Age | From birth to 36 months (recliner up to 9 kg, high chair up to 15 kg, seat up to 110 kg) |
| Maximum Supported Weight | Recliner: 9 kg; Feeding chair: 15 kg; Adult seat: 110 kg |
| Main Materials | Plastic, metal, fabric (cover), silicone (mat) |
| Functions | Low and high recliner (reclining), feeding chair with tray, adult seat |
| Safety Harness | 5-point safety harness integrated into the arch, adjustable |
| Footrest | Height adjustable (for high chair) |
| Tray | Removable, with non-slip silicone mat |
| Seat Adjustments | 4 height levels for the seat; 3 depth positions (for chair) |
| Care and Cleaning | Cover and cushion hand washable; frame and belts with damp cloth; silicone mat dishwasher safe or hot water |
| Safety | Never leave the child unattended; use the harness; do not place on a raised surface; keep away from heat sources |
| Spare Parts and Repairability | Use only manufacturer-approved parts; 24-month warranty (extendable to 120 months) |
Frequently Asked Questions - Livy Kinderkraft
User questions about Livy Kinderkraft
0 question about this device. Answer the ones you know or ask your own.
Ask a new question about this device
Download the instructions for your High chair in PDF format for free! Find your manual Livy - Kinderkraft and take your electronic device back in hand. On this page are published all the documents necessary for the use of your device. Livy by Kinderkraft.
USER MANUAL Livy Kinderkraft
Available only in selected countries Details on kinderkraft.com
text_image
kinderkraft.com /kinderkraft.official You Tube kinderkraft
@kinderkraftofficial
(AR) كرسي.عالي
(CZ) STOLIČKA NA KRMENÍ 2v1
DE) KINDERSTUHL 2in1
(EN) HIGH CHAIR 2in1
(ES) TRONA PARA COMER 2en1
(FR) CHAISE HAUTE POUR BÉBÉ 2en1
(HU) ETETÓSZÉK 2az1-ben
(IT) SEGGIOLINO DA TAVOLO 2in1
الاستخدام دليل
NÁVOD K OBSLUZE
BEDIENUNGSANLEITUNG
USER MANUAL
MANUAL DE USO
GUIDE D'UTILISATION
HASZNÁLATI ÚTMUTATÓ
ISTRUZIONI PER UTENTE
(NL) VOEDINGSTOEL 2in1
(PL) KRZESEŁKO DO KARMIENIA 2w1
(PT) CADEIRA DE ALIMENTAÇÃO 2em1
(RO) SCAUN PENTRU ALĂPTAT 2în1
(RU) СТУЛ ДЛЯ КОРМЛЕНИЯ 2в1
(SK) STOLIČKA NA KŘMENIE 2v1
(SV) BARNSTOL 2i1
GEBRUIKSAANWIJZING
INSTRUKCJA OBSŁUGI
MANUAL DE INSTRUÇÕES
INSTRUCTIUNI DE UTILIZARE
natural_image
Pure diagram of a curved pipe or tube with two ends, no text or symbols present
natural_image
Simple line drawing of a curved, oval-shaped object with a small rectangular feature inside (no text or symbols)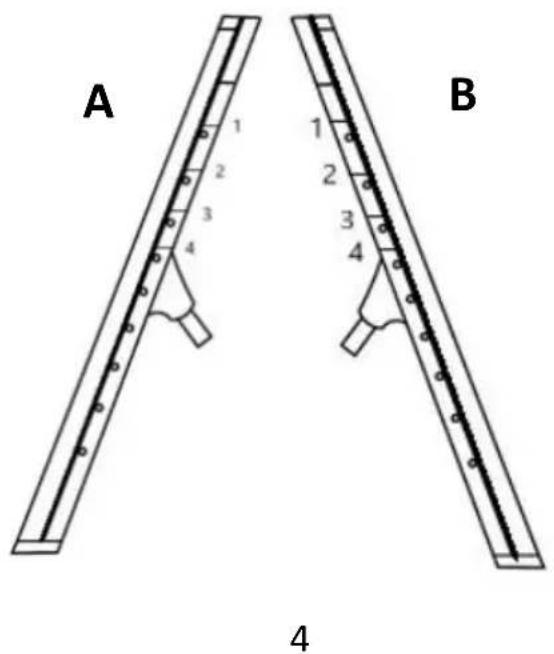
text_image
A 1 2 3 4 B 1 2 3 4 4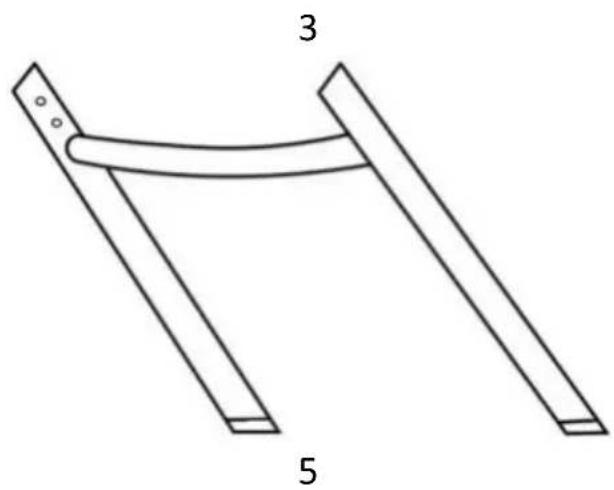
natural_image
Simple line drawing of a two-legged support structure with labeled parts 3 and 5 (no text or symbols on the diagram itself)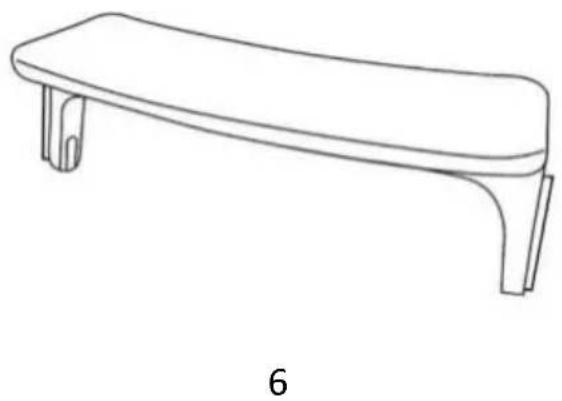
natural_image
Line drawing of a simple bench or bench with two legs and a curved handle, labeled '6' at the bottom (no text or symbols on the diagram itself)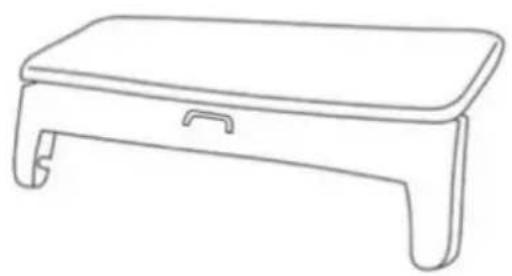
natural_image
Line drawing of a simple rectangular table with a flat top and side legs (no text or symbols)7
natural_image
Line drawing of a mechanical component with curved arms and central shaft (no text or symbols)8
natural_image
Line drawing of a mechanical component with curved and flat surfaces (no text or symbols)9
natural_image
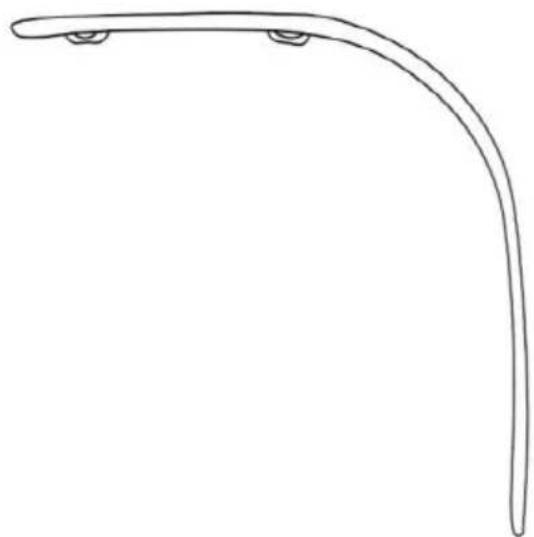
Line drawing of a curved metal bracket or panel with two side slots and mounting holes (no text or symbols)10
natural_image
Simple line drawing of a rounded rectangular object with a circular hole and two small circular symbols on the side (no text or labels)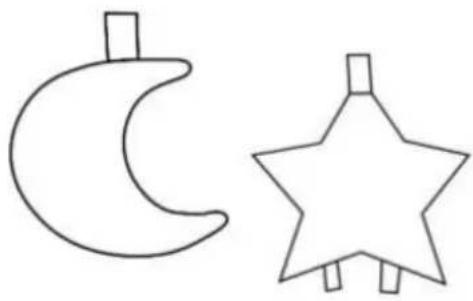
natural_image
Simple line drawings of a crescent moon and a star shape (no text or symbols)11
natural_image
Simple line drawing of a curved, elongated object with two small circular features at the top (no text or symbols)12
natural_image
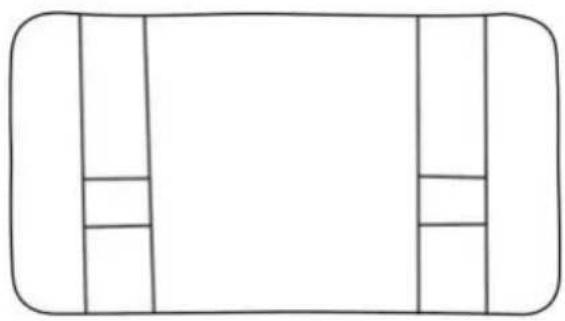
Simple line drawing of a rectangular frame with vertical and horizontal sections (no text or symbols)13
text_image
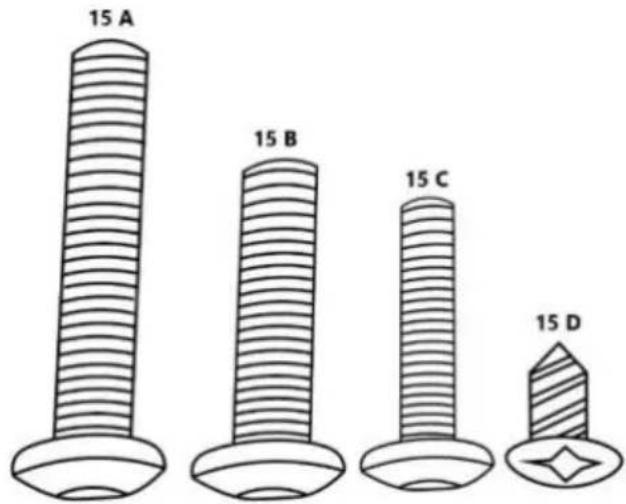
15 A 15 B 15 C 15 D14
natural_image
Simple line drawing of a black tool with a handle, no text or symbols present16
15
natural_image
Line drawing of a medical or laboratory device with a curved tube and attached rod (no text or symbols)A1
natural_image
Line drawing of a tool with a magnified inset showing a screw detail (no text or symbols)A II
text_image
CLICK! CLICK!B
natural_image
Diagram showing a cable being inserted into two separate cable bundles, with no text or symbols present.C
natural_image
Simple line drawing of a mechanical support structure with a vertical rod and two horizontal rods, one marked with an arrow (no text or symbols)D
natural_image
Line drawing of two vertical poles with textured surfaces, no text or symbols presentE

natural_image
Line drawing of a folding chair with a magnified inset showing the seat detail (no text or symbols)F
text_image
CLICK!G
natural_image
Simple line drawing of a crescent moon and star-shaped objects with an upward arrow, no text or symbols present.H
natural_image
Line drawing of a baby boom chair with decorative elements and a black arrow indicating rotation (no text or symbols)|
natural_image
Diagram showing a person touching a curved surface with an upward arrow indicating motion (no text or symbols present)J

natural_image
Line drawing of a folding chair with a circled detail on the side panel (no text or symbols)K

natural_image
Line drawing of a simple folding chair with adjustable legs and seat (no text or symbols)LI
natural_image
Simple line drawing of a car's side profile with a circular object and two dots, no text or symbols present.LII
natural_image
Line drawing of a hand holding a device with arrows indicating movement or force (no text or symbols)MI
text_image
Click!M II
text_image
1 2N
text_image
1 2 3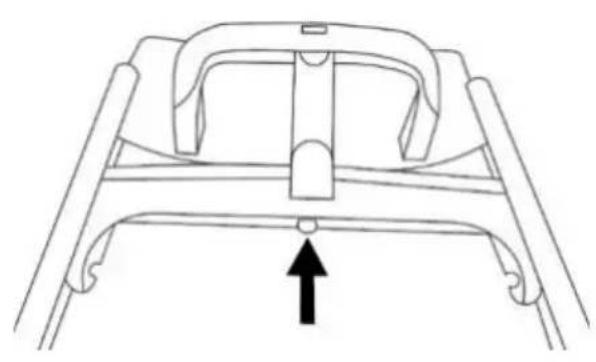
natural_image
Line drawing of a mechanical component with a central handle and an upward arrow indicator (no text or symbols)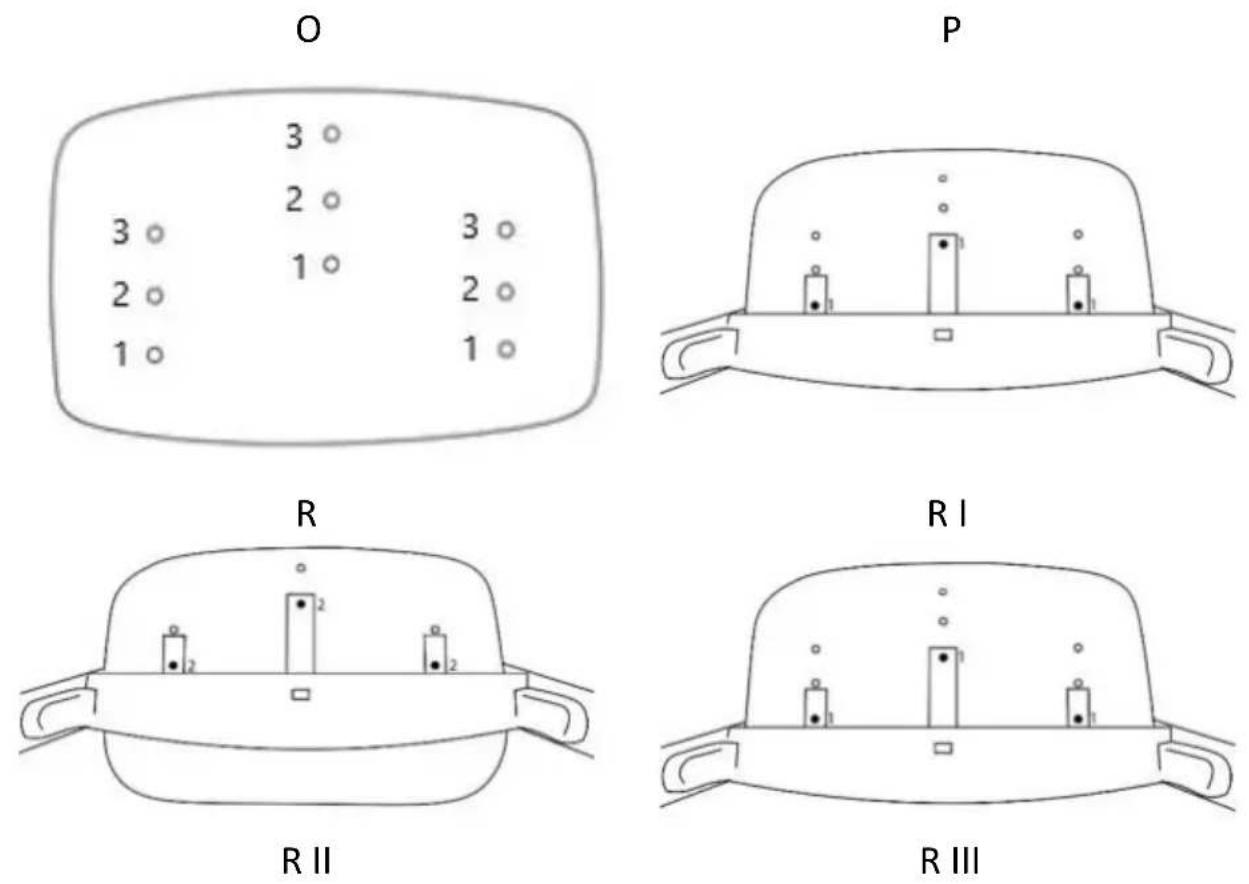
عميلنا المحترم!
text_image
Safety warning signs for children and adults in workplace safety, including pictograms, weight limits, and safety symbols.قائمة المكونات
text_image
Safety warning signs for children and adults, including pictograms, no-dressure symbols, and weight limits.Seznám dílů
text_image
Safety warning signs for children and adults in a workplace, including pictograms, safety symbols, and weight limits.Liste der Teile
Thank you for choosing a product by Kinderkraft. Our designs are child-oriented – safety and quality always comes first, stay comfortable knowing that you have made the best choice.
IMPORTANT! READ CAREFULLY
AND KEEP FOR FUTURE
REFERENCE
SAFETY INSTRUCTIONS AND PRECAUTIONS
WARNING!
RECLINED CRADLE
- Never leave the child unattended.
- Do not use the reclined cradle once your child can sit unaided.
- This reclined cradle is not intended for prolonged periods of sleeping.
- It is dangerous to use this reclined cradle on an elevated surface, e.g. a table.
- Always use the restraint system.
- Never use the toy bar to carry the reclined cradle.
- Product is intended for children from birth to 9 kg.
- This reclined cradle does not replace a cot or a bed. Should your child need to sleep, then it should be placed in a suitable cot or bed.
- Do not use the reclined cradle if any components are broken or missing.
- Do not use accessories or replacement parts other than those approved by the manufacturer.
- Keep children away when assembling and disassembling the product to avoid injury.
- Do not move or lift the product while the child is inside.
- Keep the product away from open fire and other heat sources such as electric heaters, gas heaters, etc.
HIGH CHAIR
- Never leave the child unattended.
- Always use the restraint system.
- Falling hazard: Prevent your child from climbing on the product.
- Do not use the product unless all components are correctly fitted and adjusted
- Be aware of the risk of open fires and other sources of strong heat in the vicinity of the product.
- Be aware of the risk of tilting when your child can push its feet against a table or any other structure.
- Do not use the product until the child can sit up unaided.
-
Don't use the product if any part is broken, torn or missing.
-
High chair is intended for children able to sit up unaided and up to 3 years or a maximum weight of 15 kg.
- Always check the security and the stability of product before use.
- Make sure that any harness is correctly fitted.
- Do not move or lift the product while the child is inside.
- Accessories or replacement parts other than those approved by the manufacturer must not be used.
SILICONE MAT
For your child's safety and health
• Always use this product with adult supervision.
- Before each use, inspect the product. Throw away at the first sign of damage or weakness.
- Always check food temperature before feeding.
- Recommended age: 6m+.
• Maximum food temperature on the mat – 40 °C
- Before first use, clean the product.
- Do not clean the mat with sharp objects or caustic agents which could damage it.
- Do not scald the mat with boiling water.
- Thoroughly clean the mat after each use. Keep out of reach of children and animals when completely dry.
- Certain foods are naturally able to stain the surfaces they come into contact with.
- Exposing the silicone mat to prolonged UV radiation can affect its overall appearance.
- Do not use the mat to heat food in conventional or microwave ovens.
- The mat is not a toy.
SEATING FOR CHILDREN
- DO NOT place this product near a window as it can be used as a step by the child and cause the child to fall out of the window.
- Be aware of the risk of open fires and other sources of strong heat in the vicinity of the product.
- DO NOT place this product near a window where cords from blinds or curtains could strangle a child.
- Recommended age: 24m+.
- All assembly fittings should always be tightened properly.
- Do not to use the seating if any part is broken, torn or missing.
- Use only spare parts approved by the manufacturer.
- The restraint system shall be removed/hidden/covered when the product is used as a seating.
text_image
Safety warning signs for children and adults, including pictograms, weight limits, and safety requirementsList of components
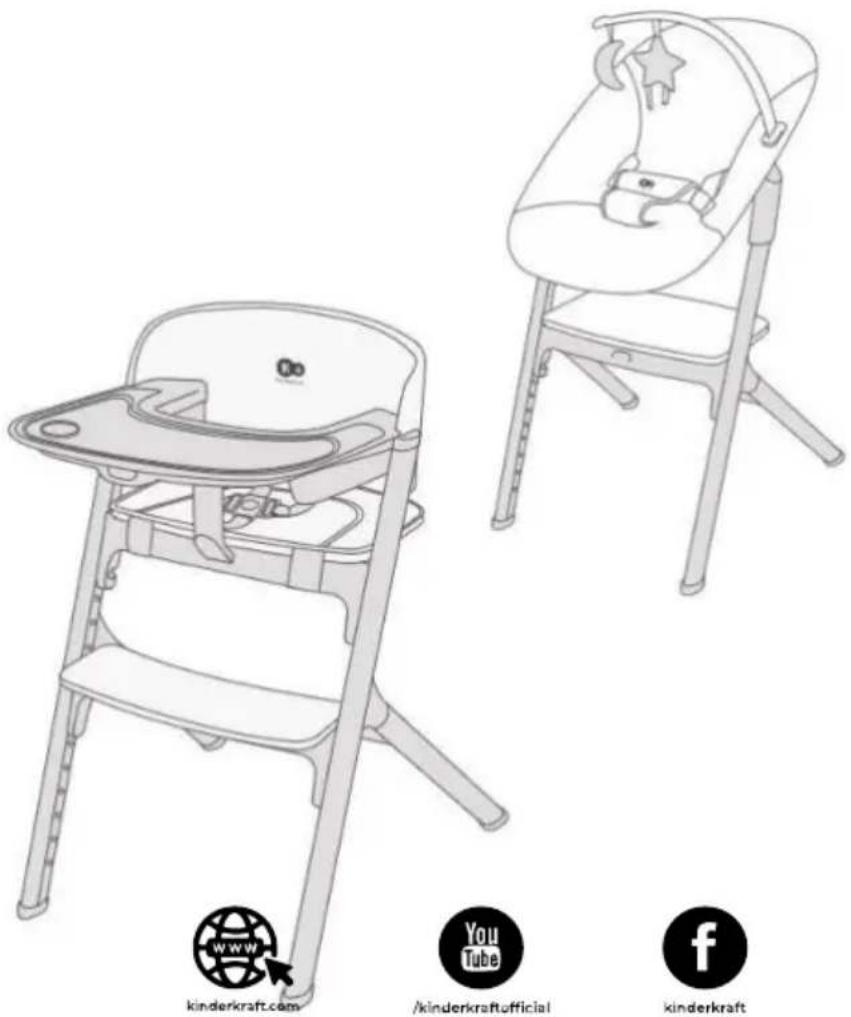
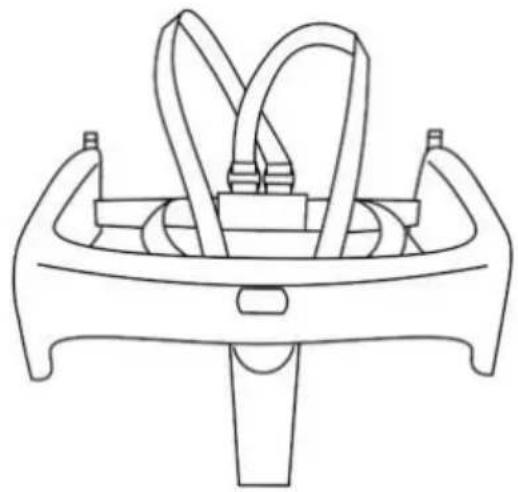
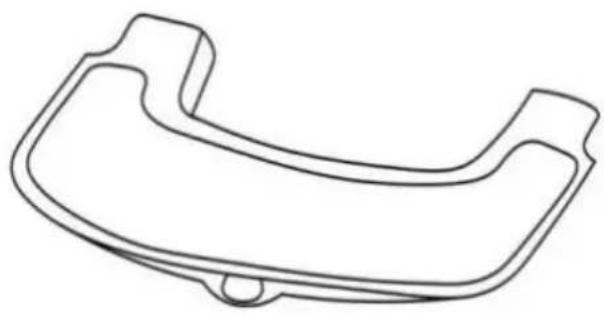
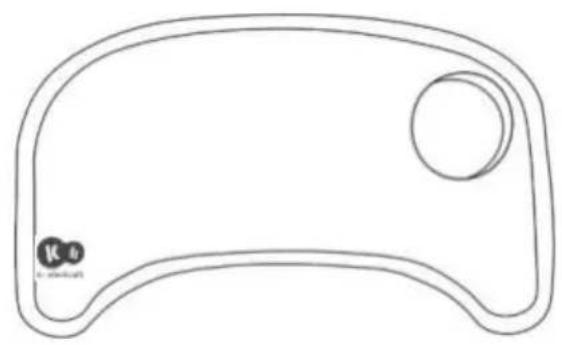
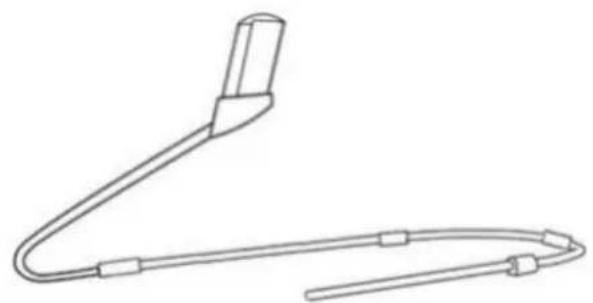
| 1. | Bouncer legs (A and B)* | 11. | Silicone mat |
| 2. | Bouncer base* | 12. | Toys (star, moon)* |
| 3. | Bouncer body* | 13. | Bow* |
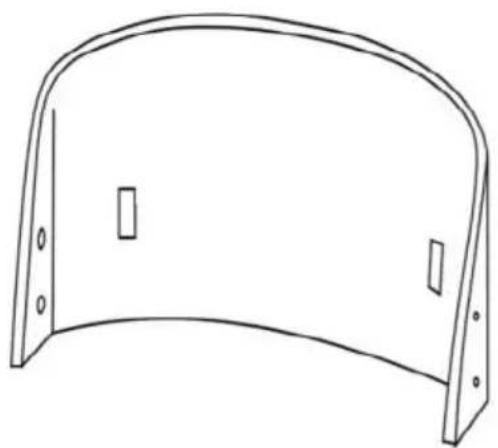
| 4. | Front legs (A and B) | 14. | Seat cushion |
| 5. | Back legs | 15A | Bolts (M6x34 ) x 4 |
| 6. | Footrest | 15B | Bolts (M6x22 ) x 4 |
| 7. | Seating | 15C | Bolts (M5x20 ) x 4 |
| 8. | Bow with safety straps | 15D | Screw* (∅4x7mm) x 2 |
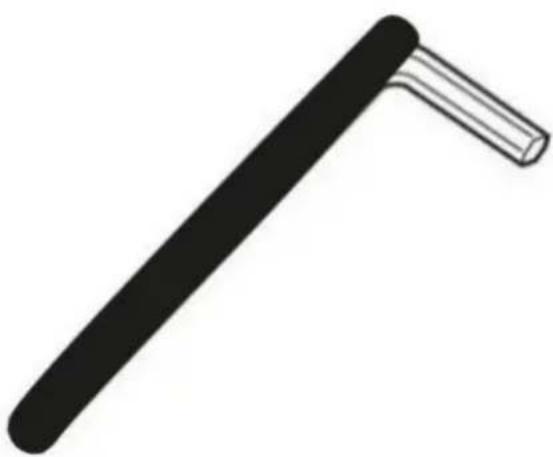
| 9. | Tray | 16. | Allen key |
| 10. | Backrest |
* Elements available in the set of chair and bouncer.
1. Bouncer\*:
You will need a Phillips screwdriver (not supplied) to assemble the product. The second tool you will need (if you are assembling a high bouncer) is the Allen key that is included in the set (found under the seat of the chair).
The bouncer has two installation options: a low bouncer and a high bouncer.
1.A. Assembling the low bouncer\*:
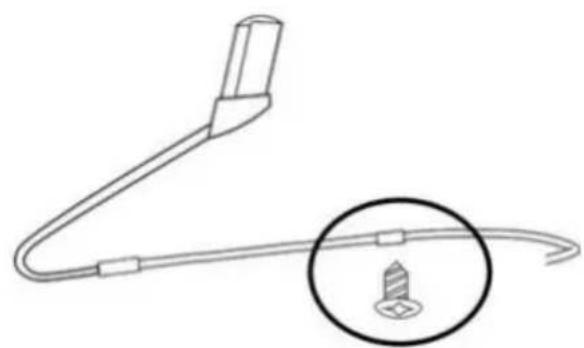
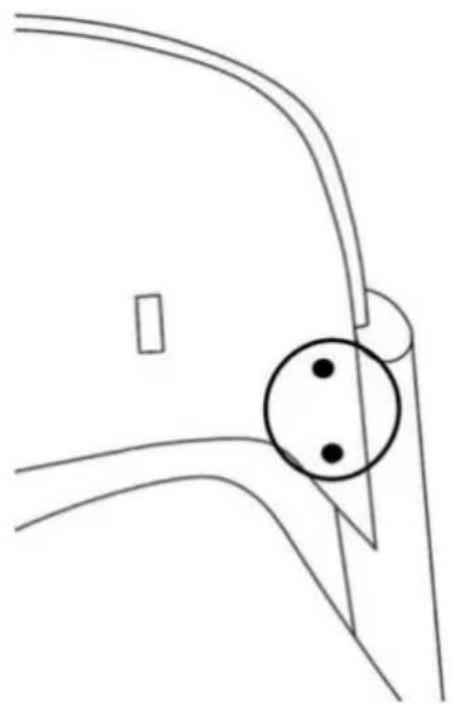
Slide the leg of the bouncer (1) into the base of the bouncer (2), the notched side of the “adapter” should be on the inside of the structure (fig. A I). Note the notch at the end of the base tube. It should engage with the teeth covered by the foot on the leg of the bouncer. In the next step you will need a screwdriver. Connect the leg and the base of the bouncer with screw 15 D (the screw should go underneath through the foot, the base and the leg of the bouncer (fig. A II). Then repeat with the other leg. Make sure that the legs do not slide out of the base, nor can they be twisted. Place the resultant structure on a level, flat surface. Place
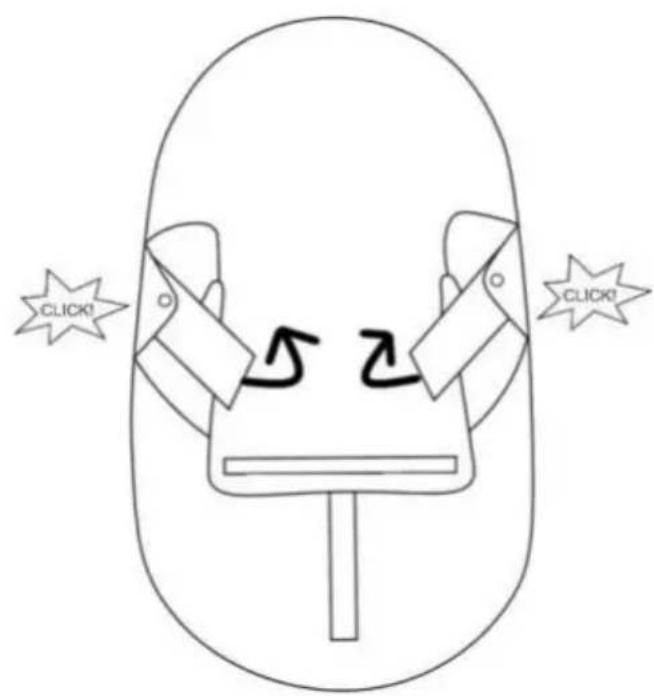
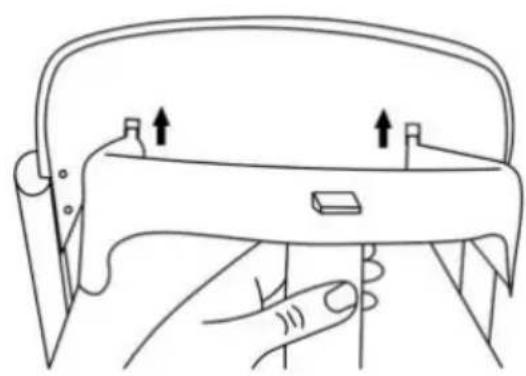
the body of the bouncer on a clean, level surface so that the adapters are at the top. Unfold the adapters – pull them towards the outside of the bouncer (fig. B). The correct locking of the adapters is indicated by the click of the latches on the frame of the bouncer. Then slide the adapters of the bouncer onto the legs, correct installation is characterised by a click (fig. C).
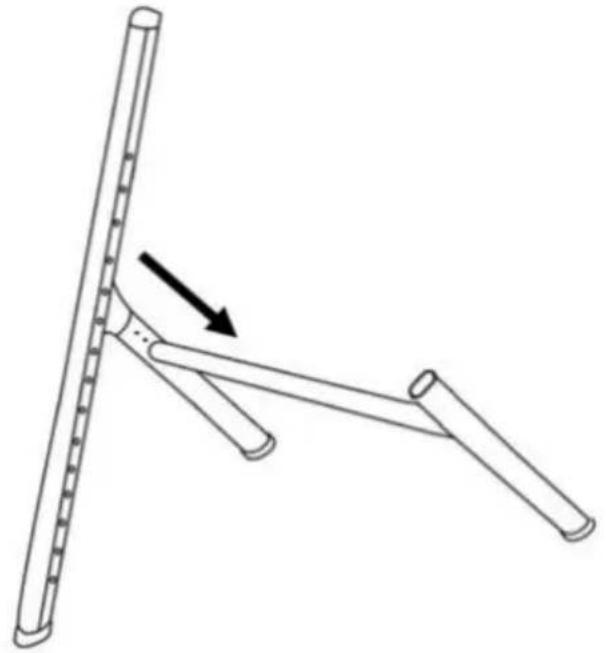
1.B. Assembling the high bouncer\*:
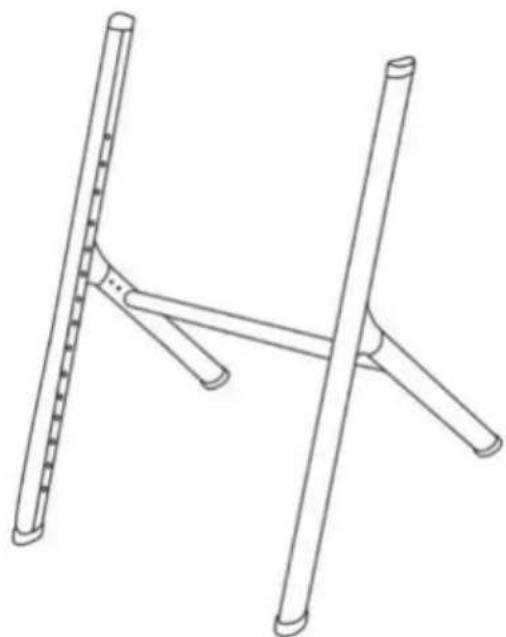
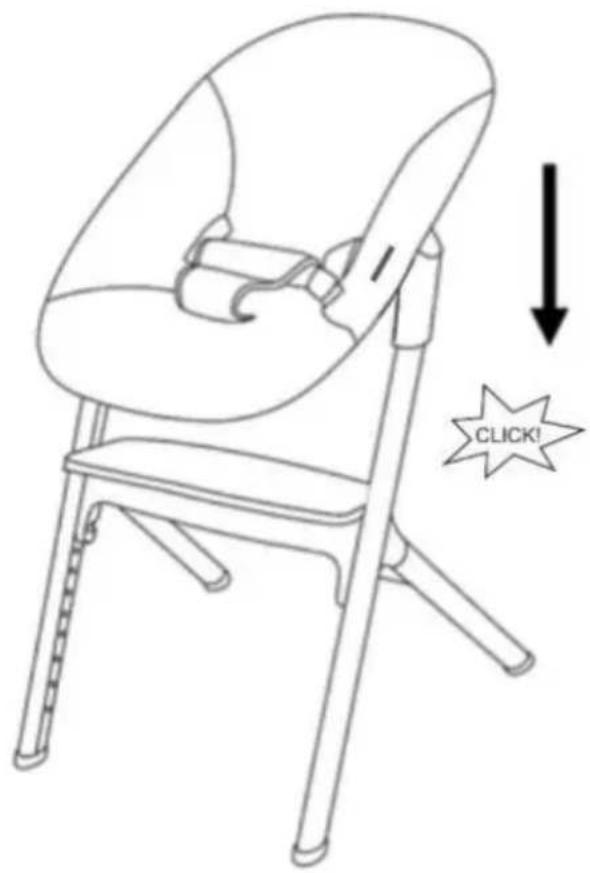
Place one of the front legs (4) on a flat surface so that its smooth part is visible. Slide the leg (4) into the back legs (5) (fig. D) and screw them together with two bolts 15 B using an Allen key (16). Repeat with the other front leg and bring the structure upright (fig. E). Make sure that the screws are properly tightened and the structure is stable. Slide the footrest (6) between the legs of the chair (the metal pieces on the sides of the footrest should slide into the grooves on the legs) and set at the bottom of the legs at the level of your choice (fig. F). Connect the footrest to the legs using two bolts 15 A. Place the body of the bouncer on a clean, level surface so that the adapters are at the top. Unfold the adapters – pull them towards the outside of the bouncer (fig. B). The correct locking of the adapters is indicated by the click of the latches on the frame of the bouncer. Place the bouncer onto the structure formed (fig. G), correct installation is characterised by a click.
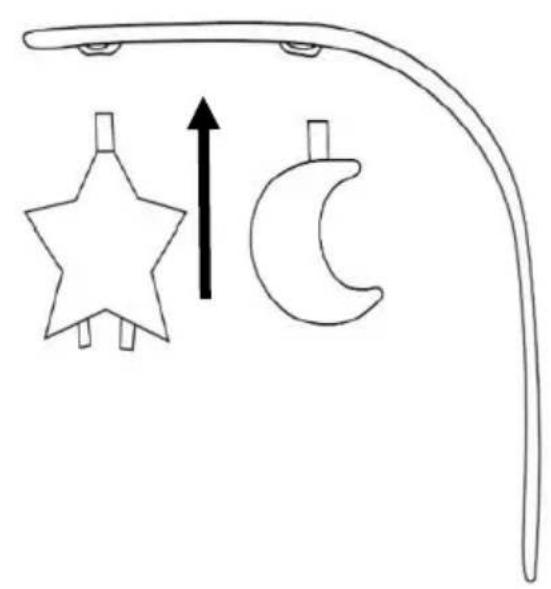
1.C. Assembly of the toy bow\*:
Hook the toys (12) attached to the bouncer into the eyelets on the bow (13) (fig. H). Slide the bow with the toys into the hole in the frame of the bouncer (fig. I).
1.D. Dismantling the bouncer\*:
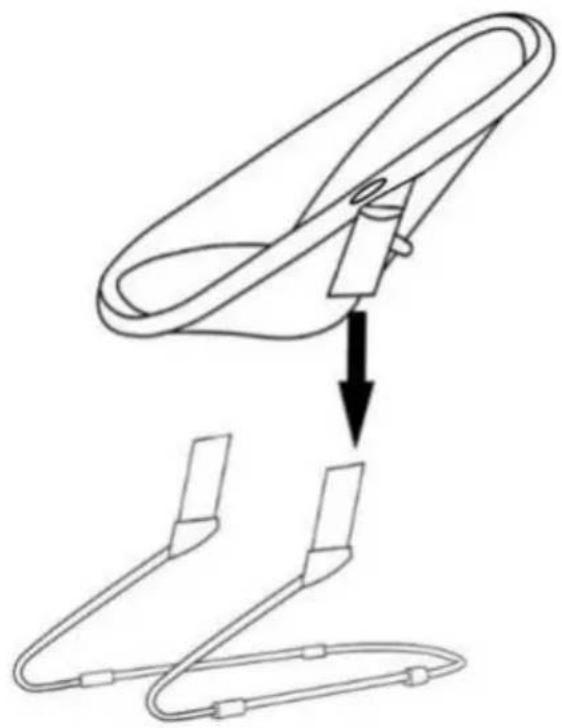
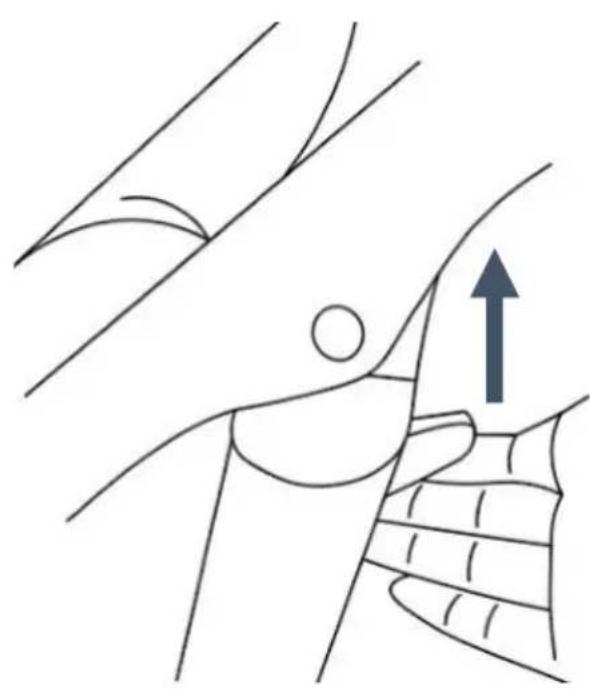
There are two levers on the back of the adapters. Press them simultaneously (fig. J) and lift the bouncer. To fold the bouncer seat flat, unlock the latches on the inside of the adapter.. Undo the legs of the bouncer. ATTENTION! Do not make any changes to the product with the child inside!
2. Feeding chair:
See section 1.B “Assembling the high chair” for fitting the chair legs. After fitting the footrest instead of the bouncer, slide the seat (7) between the legs of the chair (fig. K). Set the seat at level 1 (the highest level) and join it to the legs with two bolts 15 A. Then insert the backrest of the chair into the notches in the upper part of the legs (fig. L I). Screw the backrest to the legs with four bolts 15C (fig. L II). Place the supplied cushion (14) on the seat. Fasten the cushion straps with Velcro under the seat. First insert the bow with straps (8) into the two holes on the backrest (fig. M I) and then into the hole on the seat (make sure the parts are securely connected) (fig. M II). Position the tray (9) so that its ends are in the grooves in the bow with straps (fig. N 1), then push the tray down (make sure the tray and bow are connected correctly) (fig. N 2). Place the silicone mat (11) on the tray. The chair can be placed at the table without using the tray (fig. R). Attention! Be aware of the possibility of your child's feet bumping off the edge of the table.
2.A. Height adjustment of the footrest:
Adjust the height of the footrest to your child's height. Set the footrest (6) at the desired height and connect it to the chair legs (4) with two bolts 15 A so that the child's legs support themselves freely.
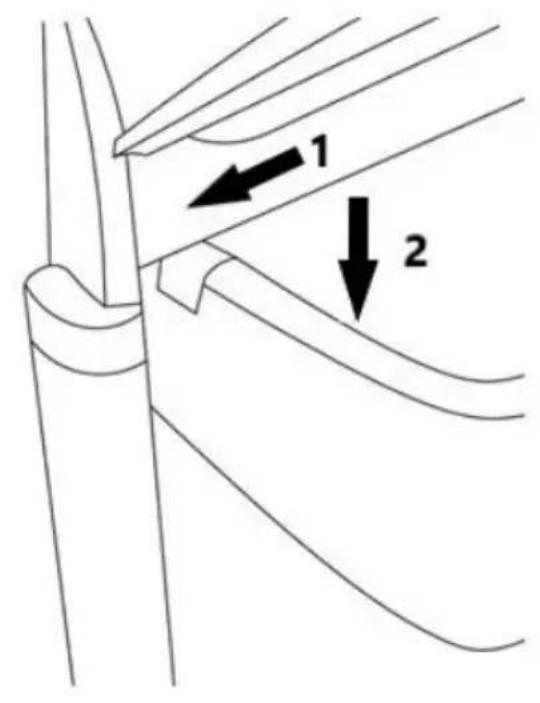
2.B. Removal of the tray and bow with straps:
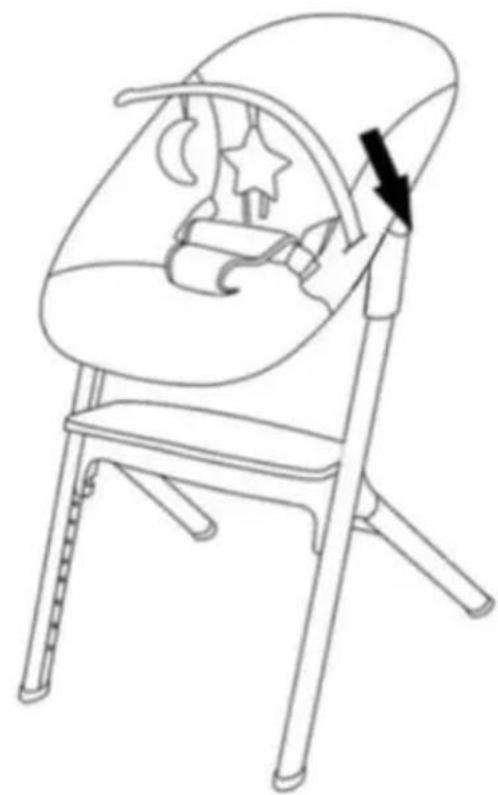
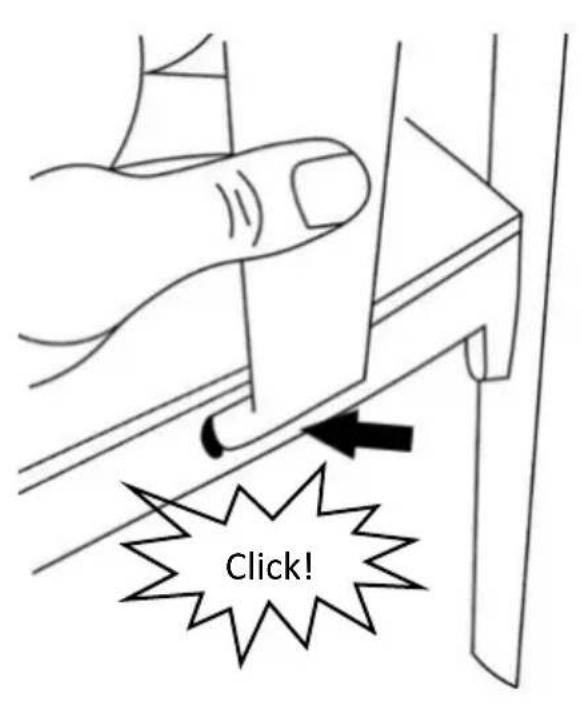
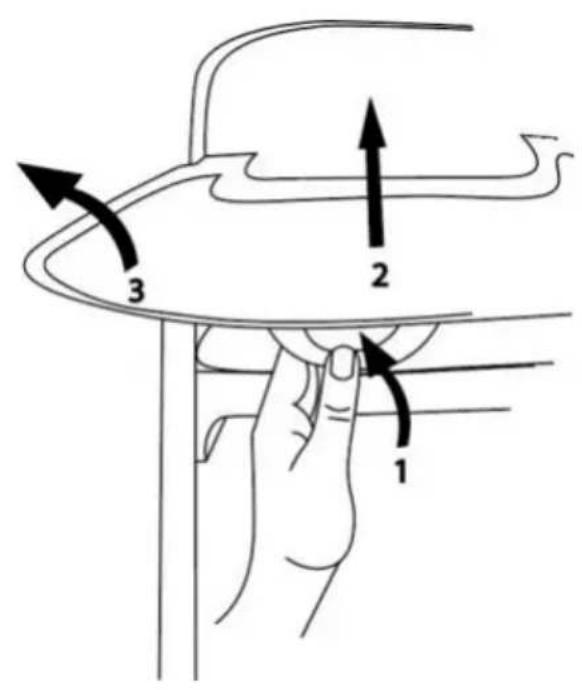
There is a button under the tray (fig. O). Press it and pull the tray up and towards yourself. To remove the bow with straps, press the button under the seat and pull the bow upwards, disconnecting it from the seat and the backrest (fig. P.
3. Chair up to max. 110 kg:
See section 1.B “Assembling the high chair” for fitting the chair legs. The footrest can be fitted or omitted if the target user is comfortable resting their feet on the ground. Slide the seat (7) in between the legs of the chair (fig. K). Set the seat at the desired level and join it to the legs with two bolts 15 A. Then insert the backrest of the chair into the notches in the upper part of the legs (fig. L I). Screw the backrest to the legs with four bolts 15C (fig. L II).
3.A Seat height and depth adjustment:
The seat as a chair can be mounted on one of the four levels marked on the legs. Adjust the seat to the desired position and connect it to the legs using two bolts 15 A.
In addition, the seat as a chair has a 3-stage depth adjustment (fig. R). Remove the bolts connecting the upper seat plate to its frame (fig. R I, R II, R III). Adjust the seat depth to your needs and reconnect the two pieces by tightening with three bolts. Position 1 – most retracted. Position 3 – most extended. Attention! For the feeding chair, the upper seat plate must be placed in position 1 – the most retracted position.
Remember that the Allen key (16) can be stored in the holder under the seat.
4. Strap adjustment:
On the bouncer and feeding chair the straps are adjusted by sliding the plastic buckles along the straps. The straps should always be adjusted to securely hold the child.
5. Cleaning:
Sheathing of the bouncer: Undo the Velcro under the seat of the bouncer, then undo the zipper. Disconnect the press studs connecting the sheathing to the frame. Slide the sheeting off the frame. Wash manually.
Toys: wash manually with mild detergent.
Frame of the bouncer and chair: clean with a damp cloth and mild detergent.
Chair straps: clean with a damp cloth. Do not detach the straps from the bow yourself.
Cushion: wash manually.
Silicone mat: wash in warm water with a mild detergent. It is possible to clean the mat in the dishwasher with standard cleaning agents.
Warranty
-
All Kinderkraft products are covered by a 24-month warranty. The warranty period starts from the date the product is handed over to the Buyer.
-
The warranty is only valid in the member states of the European Union, excluding overseas territories (as currently defined, including in particular: Azores, Madeira, Canary Islands, French Overseas Departments, Åland Islands, Athos, Ceuta, Melilla, Helgoland, Büsingen am Hochrhein, Campione d'Italia and Livigno) and the territory of the United Kingdom of Great
Britain and Northern Ireland excluding the British Overseas Territories (e.g. Bermuda, Cayman Islands, Falkland Islands).
-
The manufacturer's warranty does not apply to countries not listed above. The conditions of the additional warranty may be determined by the Seller.
-
In some countries, it is possible to extend the warranty to a limited period of 120 months (10 years). The complete terms and conditions and the warranty extension registration form are available at WWW.KINDERKRAFT.COM
-
The warranty is valid only in the territory indicated in paragraph 2.
-
Claims must be made by completing the form available at WWW.RMA.KINDERKRAFT.COM
-
The warranty does not cover:
A. Cosmetic damage, including but not limited to: scratches, dents and cracks in plastic, unless the failure is due to a material or manufacturing defect;
B. Damage resulting from misuse or poor maintenance - including but not limited to: mechanical damage to products caused by misuse or poor maintenance;
- Refer to the instructions for use and installation of the product contained in the user manual;
C. Damage caused by improper assembly, installation or disassembly of products and/or accessories;
- Refer to the instructions for use and installation of the product contained in the user manual;
D. Damage caused by corrosion, mould or rust, resulting from improper maintenance, care and storage;
E. Damage caused by normal wear and tear or otherwise resulting from the normal passage of time;
- This includes: tears or punctures in inner tubes; tyre damage; tyre tread damage; fading of fabrics resulting from mechanical use (e.g. on joints and covering of moving parts);
F. Damage or erosion caused by sun, perspiration, detergents, storage conditions or frequent washing, etc;
G. Damage caused by accident, abuse, misuse, fire, contact with liquid, earthquake or other external causes;
H. Products that have been modified to change functionality without 4Kraft's written consent;
I. Products from which the serial number or lot number has been removed or tampered with in any way;
J. Damage caused by the use of third party components or products - including but not limited to: cup holders, umbrellas, reflectors, bells;
K. Damage caused by transport or by ground handling service providers.
-
The warranty period for accessories included with the product is 6 months from the date of sale, excluding the faults described above.
-
These warranty conditions are complementary to the Customer's statutory rights with respect to 4KRAFT sp. z o.o. The warranty does not exclude, limit or suspend the Customer's rights under warranty for defects in goods sold.
-
The full text of the Terms and Conditions of the Warranty is available on the website WWW.KINDERKRAFT.COM
All rights to this data are entirely reserved to 4Kraft Sp. z o.o. Any unauthorized use or misuse, including usufruct, copying, duplication and sharing, wholly or partially, without consent of 4Kraft Sp. z o.o. may result in legal consequences.
ES
¡Estimado Cliente!
text_image
Safety warning signs for children and adults with pictograms, including weight limits and safety requirementstext_image
Safety warning signs for children and adults in a vehicle safety system, including pictograms, weight limits, and safety requirements.text_image
Safety warning signs for occupational and safety measures, including pictograms, no-drawn figures, and maximum weight limits.Alkatrészlista
text_image
Safety warning signs for children and adults, including pictograms, no-drawn figures, and weight limitstext_image
Safety warning signs for children and adults, including pictograms, weight limits, and safety symbolsOnderdelenlijst
| 1. | Poten van de wipstoel (A en B)* | 11. | Siliconen mat |
| 2. | Basis van de wipstoel* | 12. | Speeltjes (sterretje, maan)* |
| 3. | Romp van de wipstoel* | 13. | Beugel* |
| 4. | Voorpoten (A en B) | 14. | Zitkussen |
| 5. | Achterpoten | 15A | Bouten (M6x34) x 4 |
| 6. | Voetsteun | 15B | Bouten (M6x22) x 4 |
| 7. | Zitting | 15C | Bouten (M5x20) x 4 |
| 8. | Beugel met veiligheidsgordel | 15D | Schroef* (∅4x7mm) x 2 |
| 9. | Blad | 16. | Inbussleutel |
| 10. | Leuning |
text_image
Safety warning signs for children and adults, including pictograms, weight limits, and safety requirementsLista części
text_image
Safety warning signs for driving a passenger seat, including seatbelt, no-pulling, weight limit, and safety symbols
text_image
<36m MAX 15kg >36m MAX 110kgLista de peças
| 1. | Pernas da cadeira (A i B)* | 11. | Cobertura de silicone |
| 2. | Base da cadeira* | 12. | Brinquedos (estrela, lua)* |
| 3. | Corpo da cadeira * | 13. | Arco* |
| 4. | Pernas dianteiras(A i B) | 14. | Almofada do assento |
| 5. | Pernas traseiras | 15A | Parafusos (M6x34) x 4 |
| 6. | Base dos pés | 15B | Parafusos (M6x22) x 4 |
| 7. | Assento | 15C | Parafusos (M5x20) x 4 |
| 8. | Cinto com fecho de segurança | 15D | Parafusos * (∅4x7mm) x 2 |
| 9. | Bandeja | 16. | Chave |
| 10. | Suporte |
SCAUN PENTRU ALĂPTAT
text_image
Safety warning signs for children and adults in workplace safety, including pictograms, no-dressor signs, and weight limits.Lista de piese
text_image
Safety warning signs for children and adults, including pictograms, weight limits, and safety requirementsСписок деталей
text_image
Safety warning signs for children and adults in workplace safety, including pictograms, weight limits, and safety requirements.Zoznam dielov
text_image
Safety warning signs for children and adults, including pictograms, weight limits, and safety symbols(EN) In the interests of our Clients - we are at your disposal! If you have a problem with the product you received, contact us in the most convenient way for you!