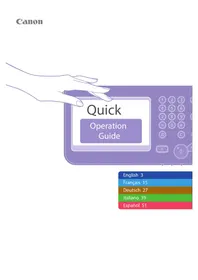
MAXIFY GX3040 - Printer CANON - Free user manual and instructions
Find the device manual for free MAXIFY GX3040 CANON in PDF.

User questions about MAXIFY GX3040 CANON
0 question about this device. Answer the ones you know or ask your own.
Ask a new question about this device
Download the instructions for your Printer in PDF format for free! Find your manual MAXIFY GX3040 - CANON and take your electronic device back in hand. On this page are published all the documents necessary for the use of your device. MAXIFY GX3040 by CANON.
USER MANUAL MAXIFY GX3040 CANON
Read Safety and Important Information (addendum) first.
Lea primero Informacion de seguidade e informacion importante (apendice).
Connecting to a Computer, Smartphone or Tablet.. page 7
Setting Up the Printer
1.Box Contents
- Ink Bottles
Power Cord - Setup CD-ROM
Safety and Important Information - Getting Started (this manual)
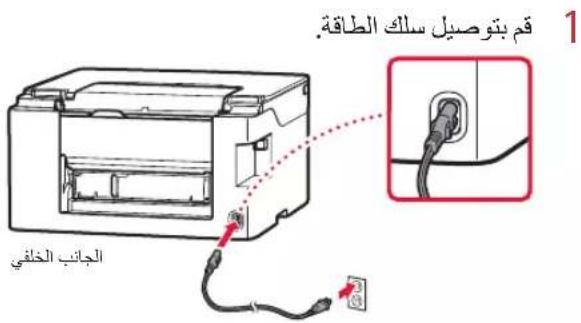
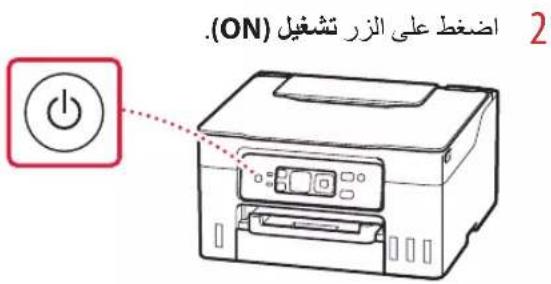
2. Turning on the Printer
1 Connect the power cord.
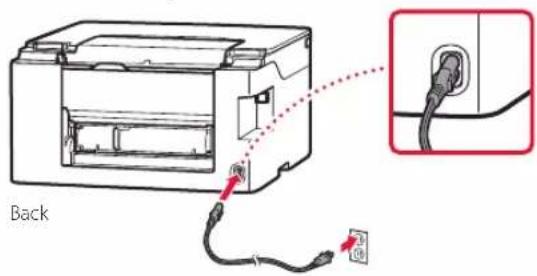
2 Press the ON button.

Setting Up the Printer
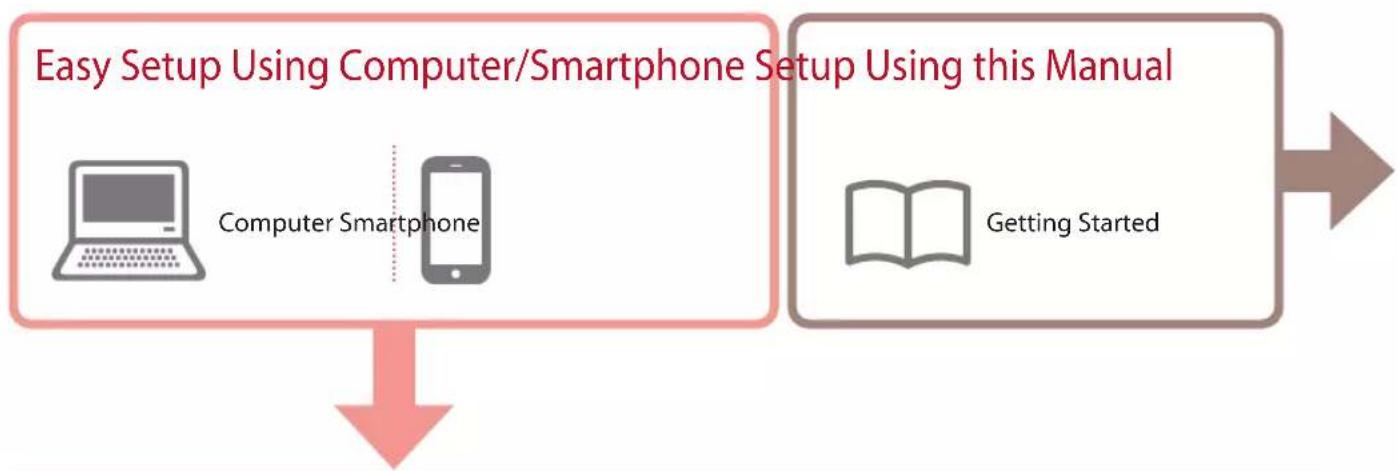
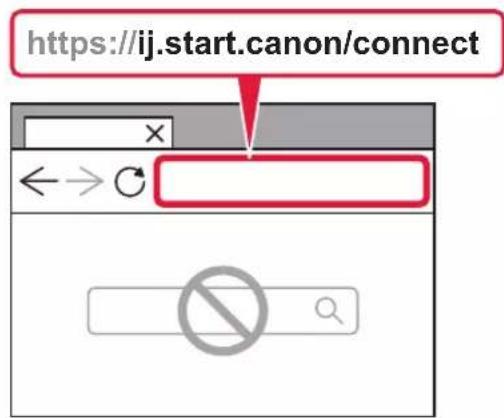
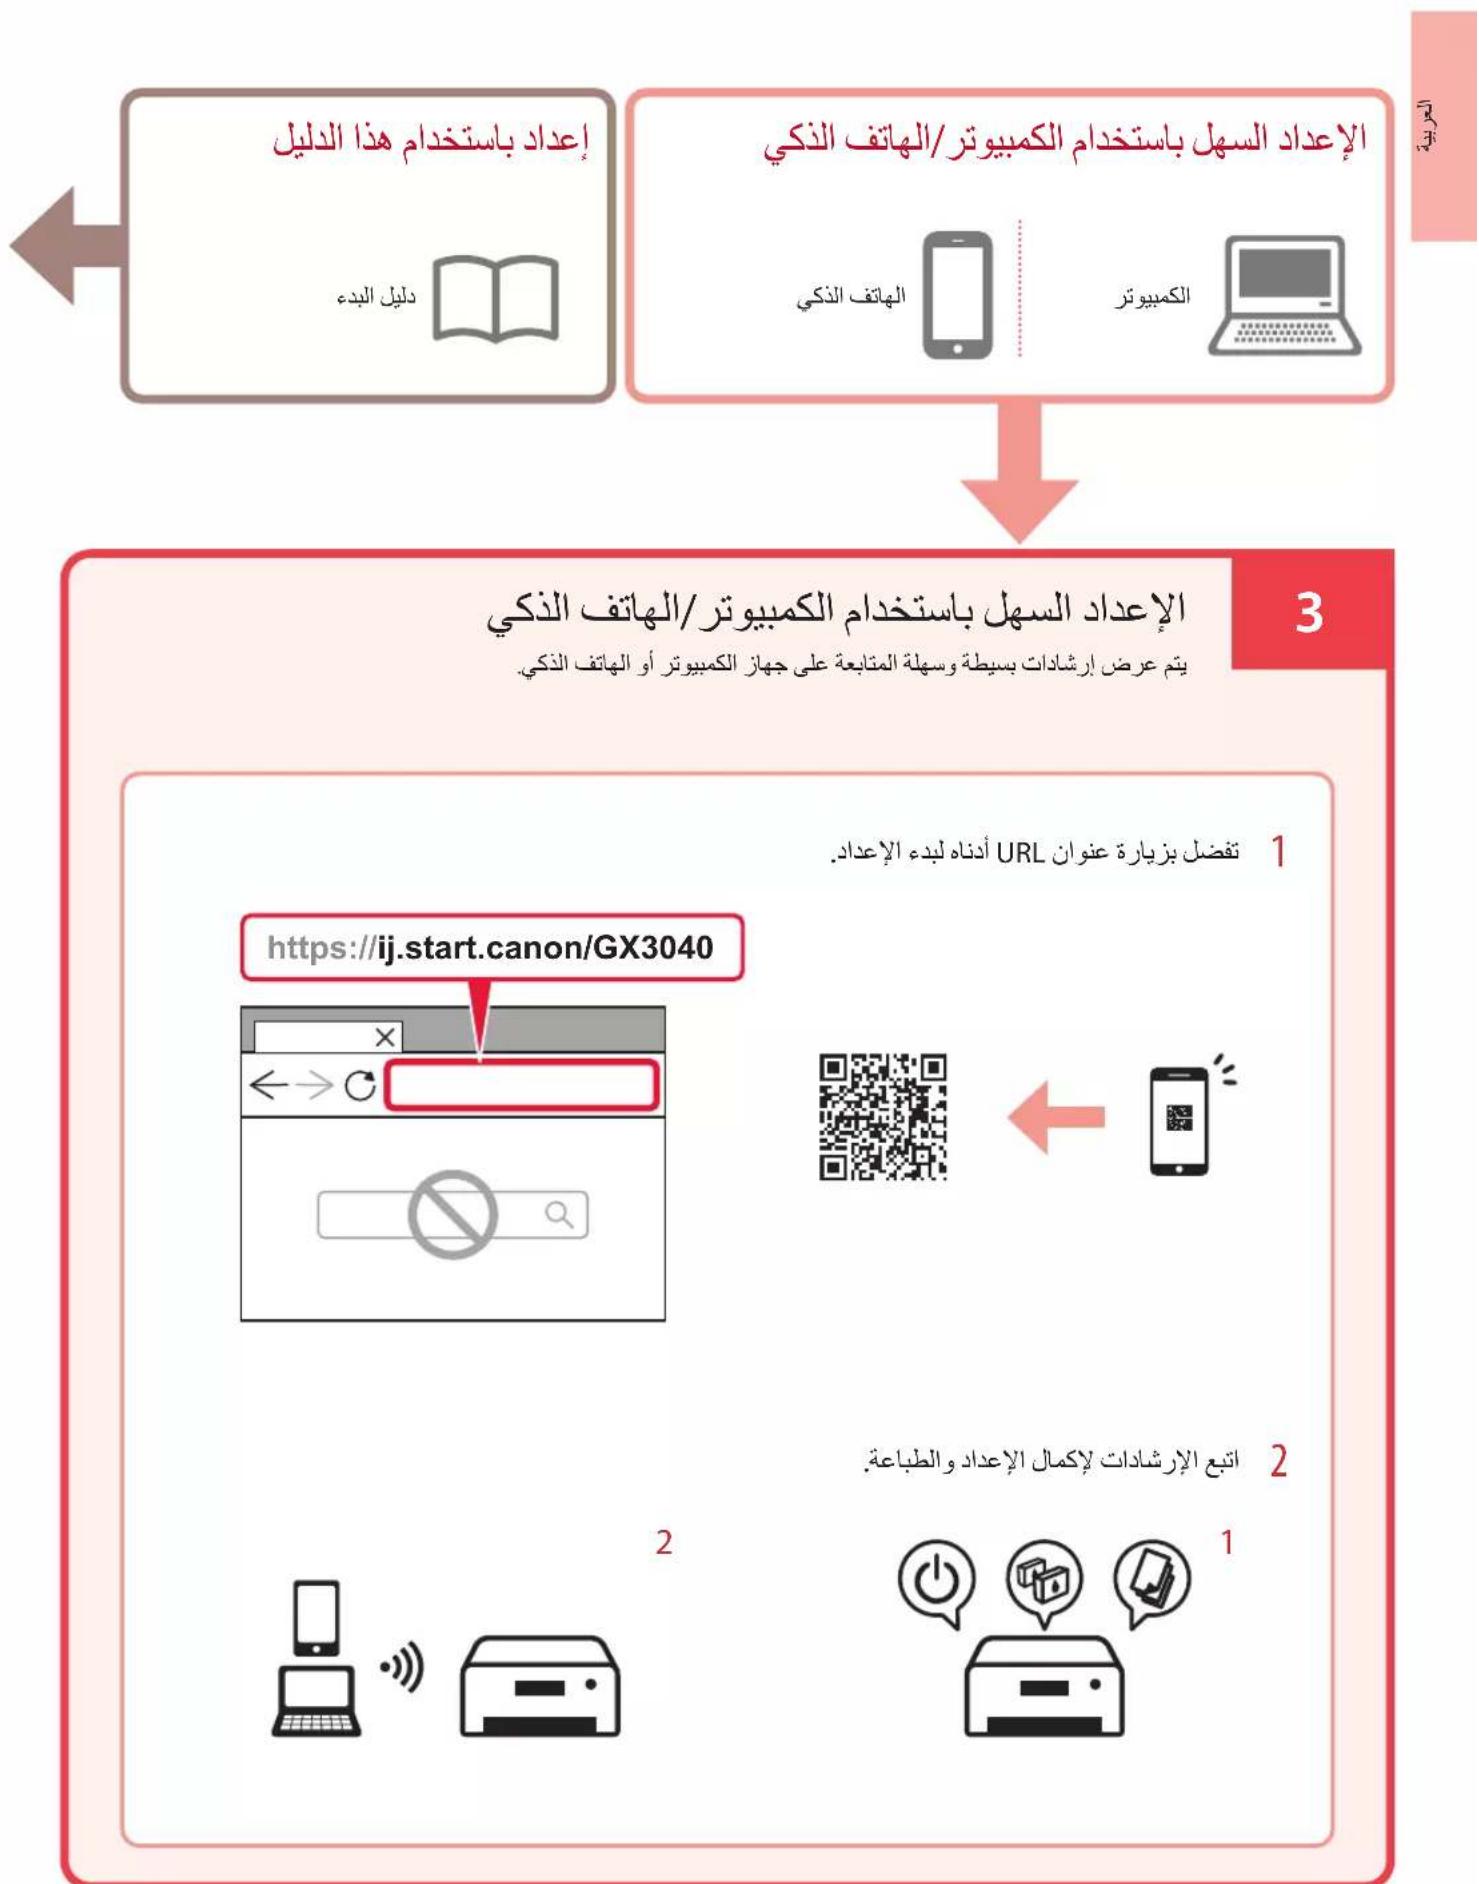
3 Easy Setup Using Computer/Smartphone Simple, easy-to-follow instructions are displayed on your computer or smartphone.
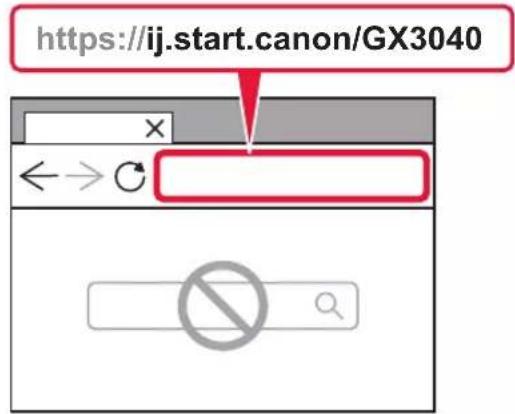
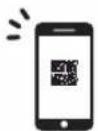
1 Visit the URL below to start setup.


2 Follow the instructions to complete setup and print.
1

2


4. Making Initial Settings
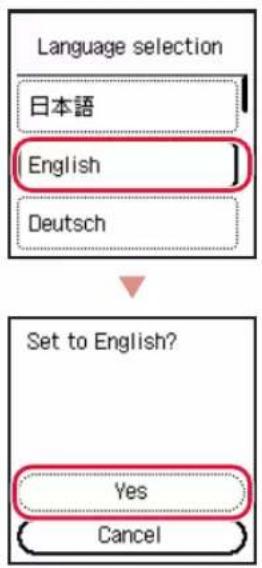
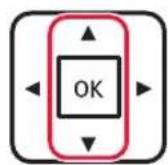
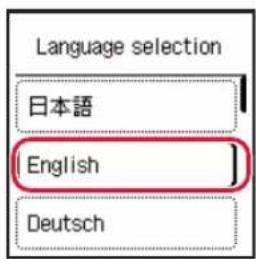
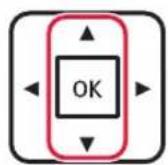
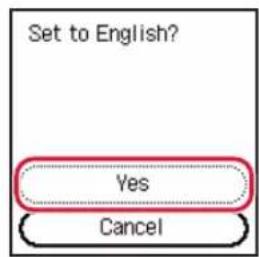
1 Use the and buttons to select a language, and then press the OK button.
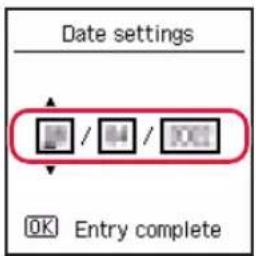
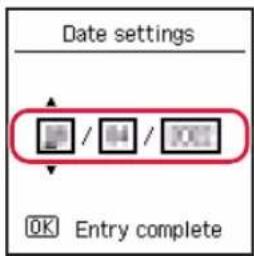
2 Set the date, and then press the OK button.
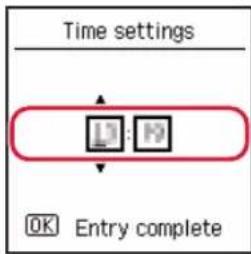
3 Set the time, and then press the OK button.

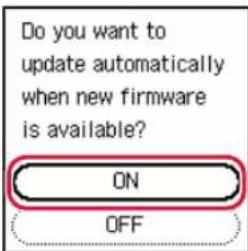
4 Select ON, and then press the OK button.

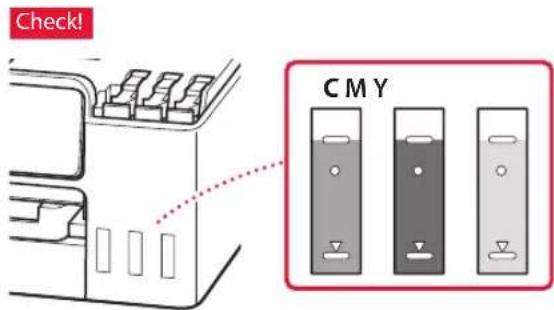
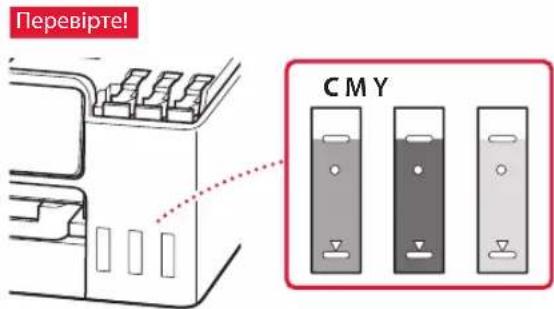
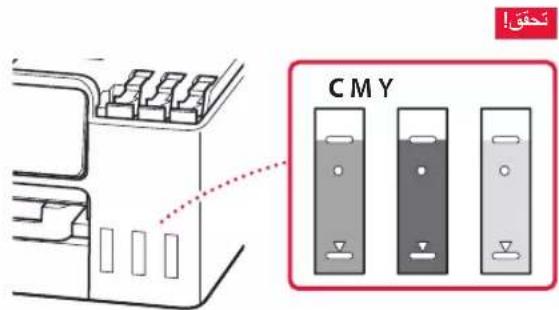
5. Pouring Ink
Important
This product requires careful handling of ink. Ink may splatter when the ink tanks are filled with ink. If ink gets on your clothes or belongings, it may not come off.
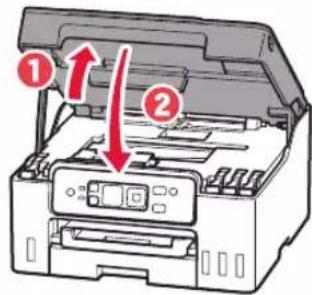
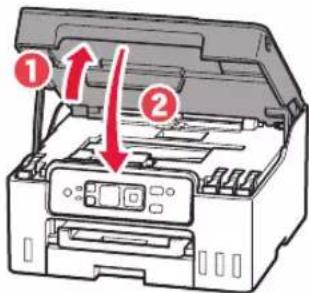
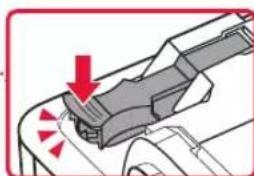
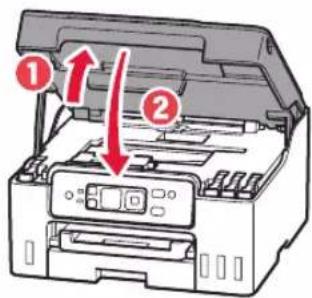
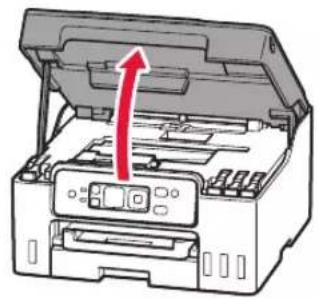
1 Open the scanning unit / cover.

2 Open the tank cap on the left of the printer.
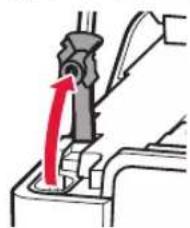
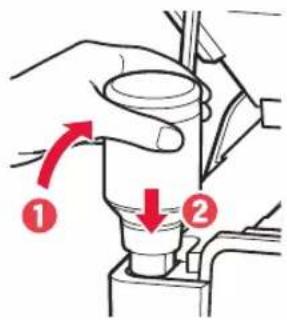
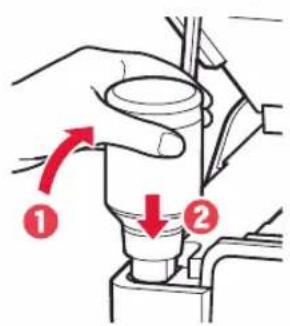
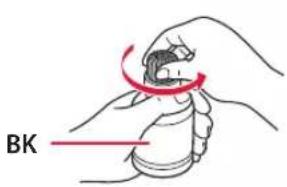
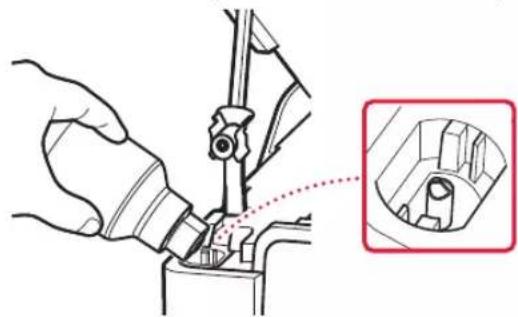
3 Hold the ink bottle upright and gently twist the bottle cap to remove.

4 Align the nozzle of the ink bottle with the inlet.
Setting Up the Printer
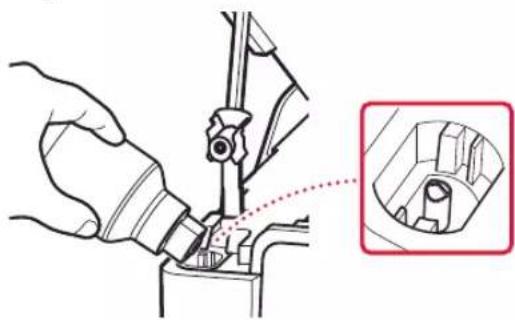
5 Slowly stand the ink bottle upside down and push down to pour the ink.
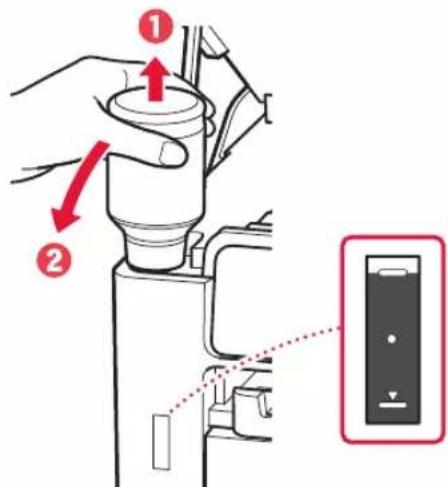
If the ink does not pour, gently remove the ink bottle and try again.

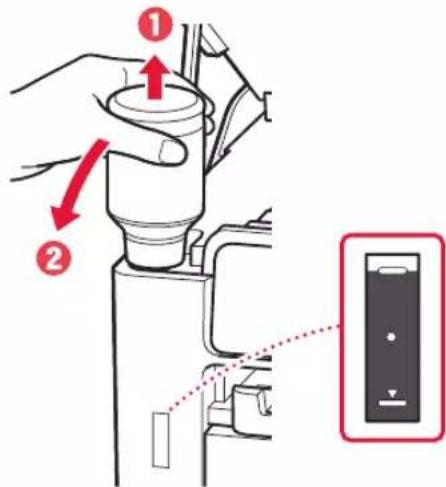
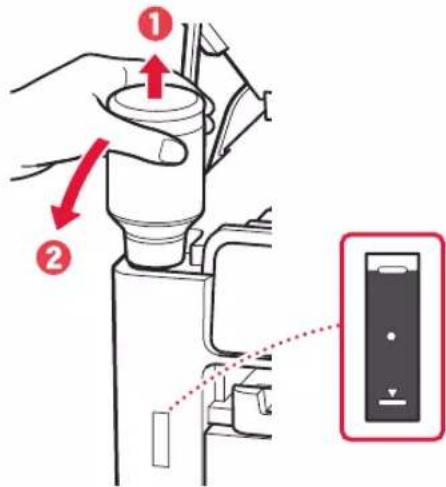
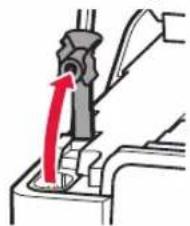
Gently remove the ink bottle from the inlet.
- Be careful not to spill the ink.
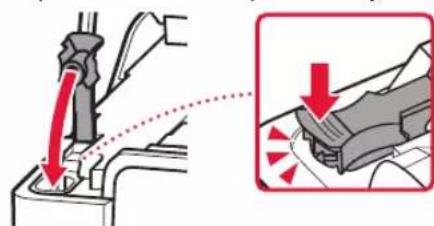
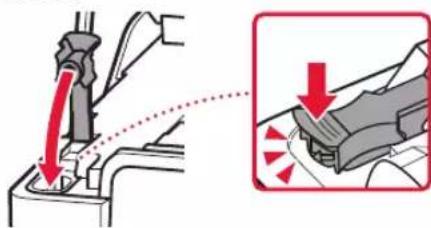
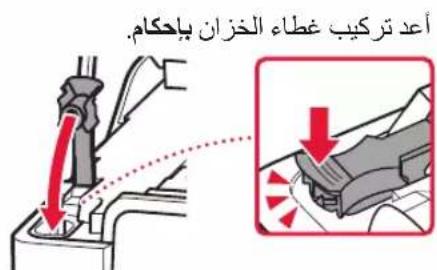
7 Replace the tank cap securely.
8 Repeat steps 2 through 7 to pour all ink into the corresponding ink tanks on the right.
9 Close the scanning unit / cover.
- If you lift the scanning unit / cover slightly and release it, it will close by itself.
6. Loading Paper
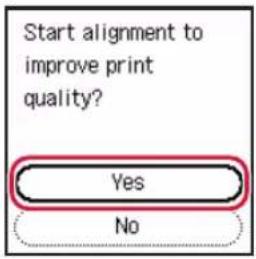
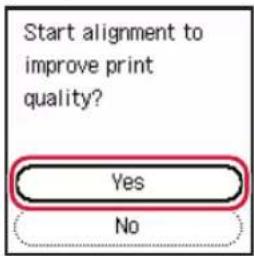
1 Select Yes, and then press the OK button.
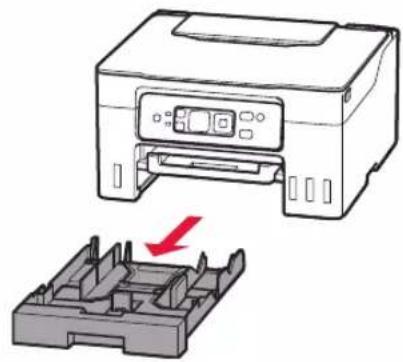
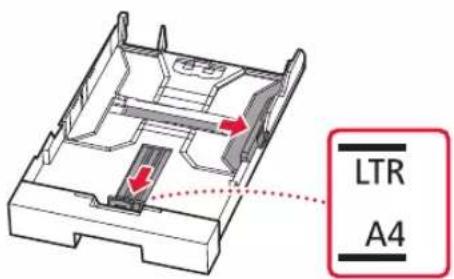
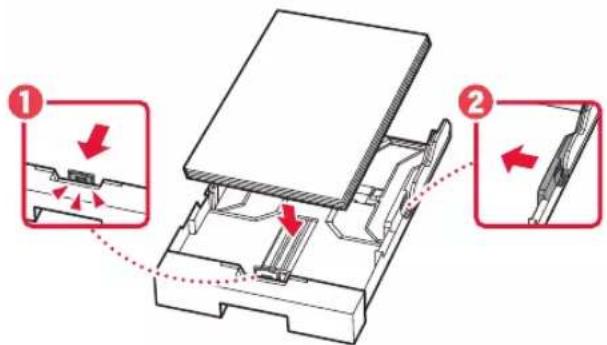
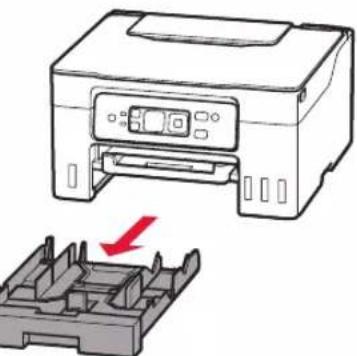
2 Remove the cassette from the printer.

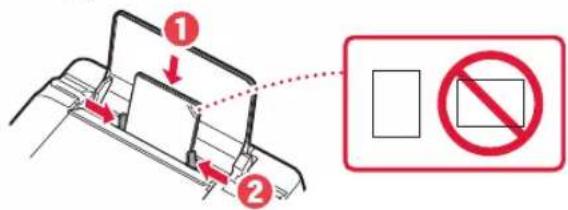
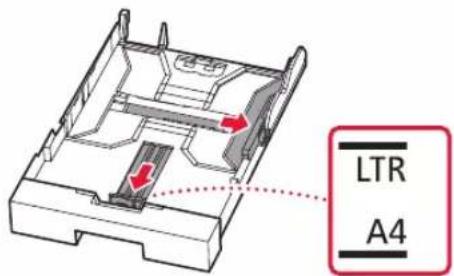
3 Slide apart the paper guides.
- Slide the right paper guide to the right edge. Align the front paper guide with the Letter or A4 mark.
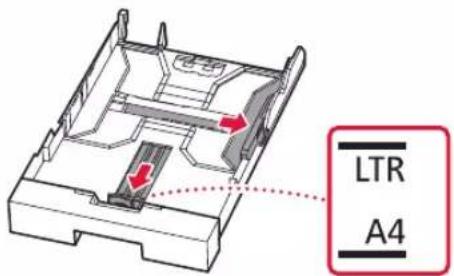
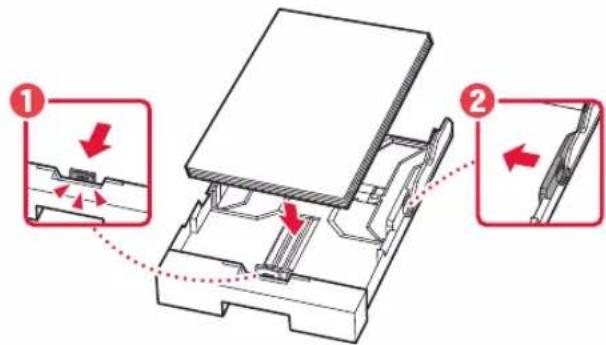
4 Load Letter or A4 sized plain paper.
- Place the paper against the front paper guide, and align the right paper guide to the width of the paper.
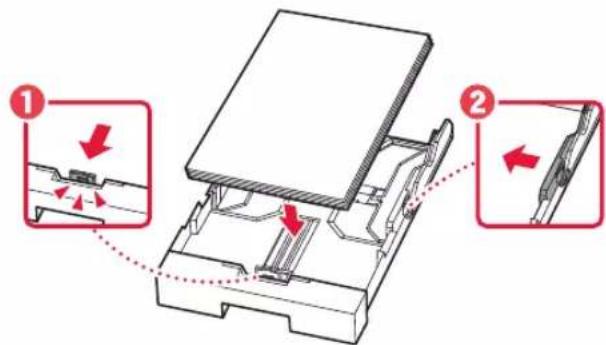
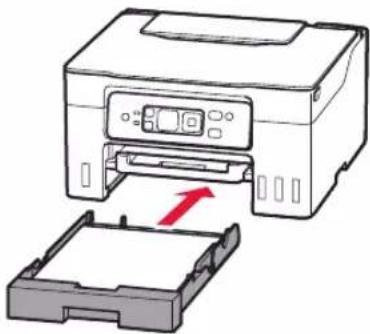
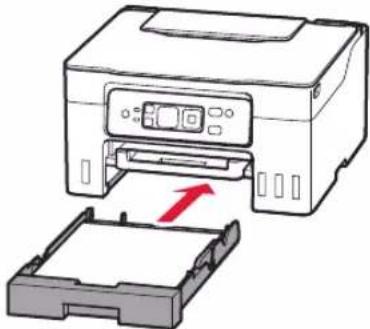
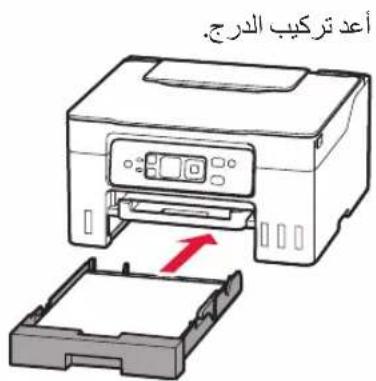
5 Replace the cassette.
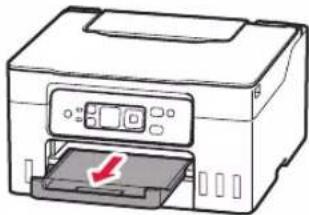
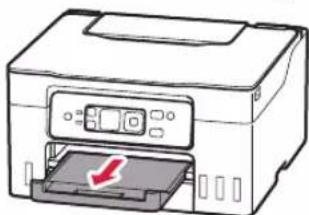
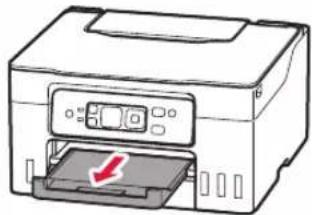
6 Pull out the paper output tray.
Calibrating printer for optimal print quality. Do not remove the paper. About minutes
Setting Up the Printer
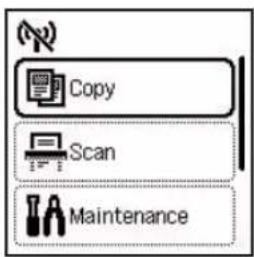
7 Check that the following screen appears.
Select the connection method that best matches how you will use the printer.
To use the printer without connecting to any other devices
Setup is now complete.
To use the printer connecting to a computer or smartphone
Proceed to the next page.
7. Connecting to a Computer or Smartphone

If you are using multiple computers/smartphones, perform these steps on each device.
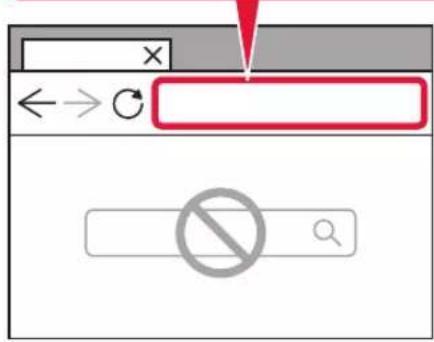
1 Access the Canon website directly. No need to search.

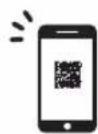


2 Enter your printer's model name and click Go.
3 Follow the on-screen instructions.

Using the Setup CD-ROM
- Double click EasySetup.exe on the screen that appears.
- If the printer selection screen appears, select GX3040. If the installation screen appears, click Next.
- Follow the on-screen instructions. If nothing appears, start Explorer and then run EasySetup.exe in the CD-ROM.
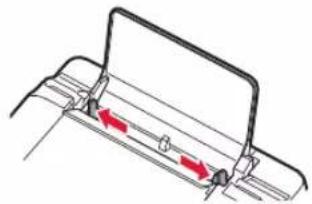
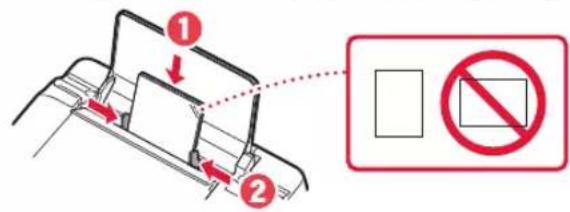
Loading Paper
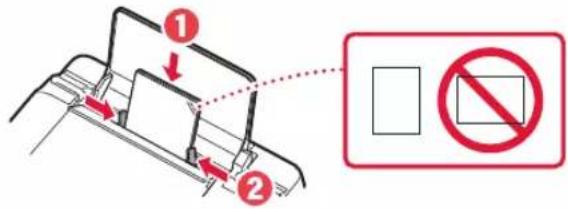
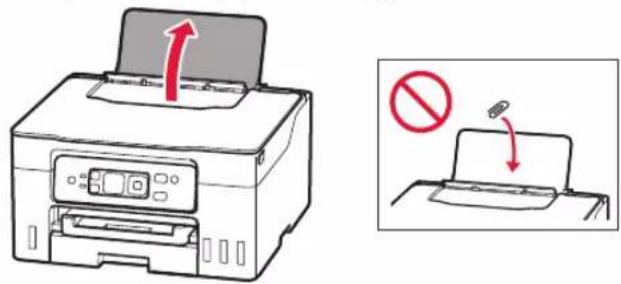
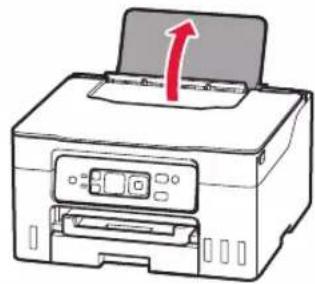
1 Open the paper support.

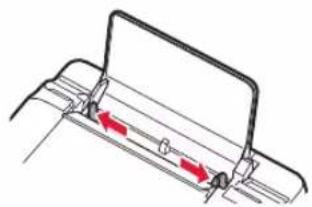
2 Slide the right-hand side paper guide to the far right.
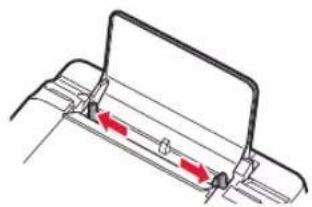
3 Load several sheets of paper with the print side facing up and slide the side paper guide against the edge of the paper stack.
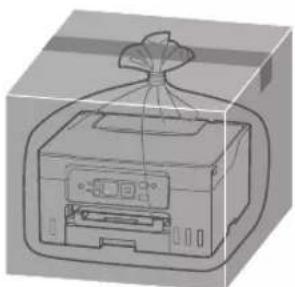
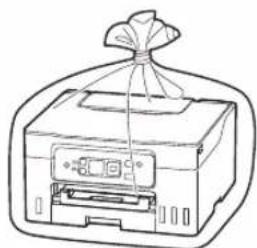
Transporting Your Printer
When relocating the printer, check the following. Refer to the Online Manual for details.
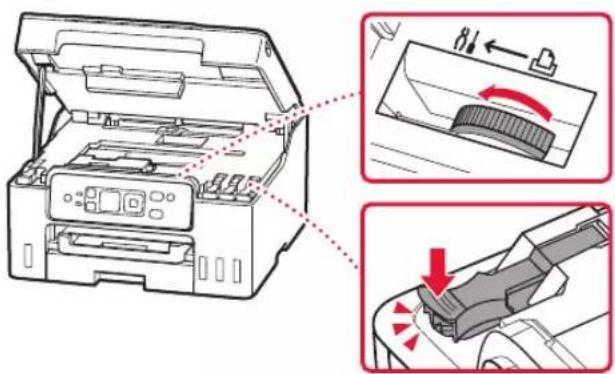
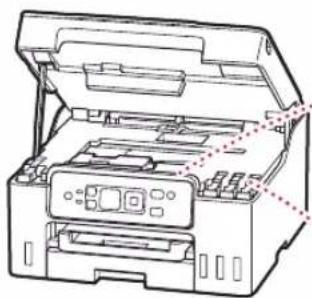
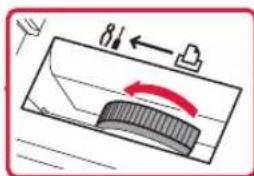
- Check that the position of the ink valve lever is closed.
- Check if the tank caps are completely closed.

If the print head holder is in the center of the printer, check that the cover is closed.
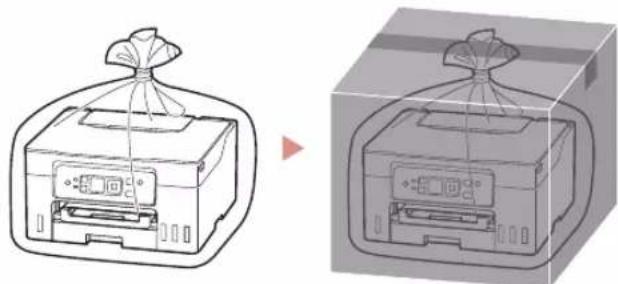
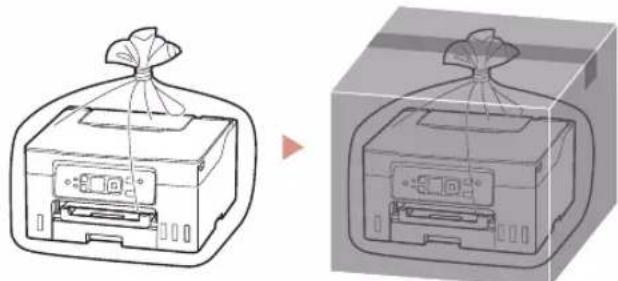
Pack the printer in a plastic bag in case ink leaks.
- Pack the printer in a sturdy box so that it is placed with its bottom facing down, using sufficient protective material to ensure safe transport.
- Do not tilt the printer. Ink may leak.
- Please handle with care and ensure the box remains flat and NOT turned upside down or on its side, as the printer may be damaged and ink in the printer may leak.
- When a shipping agent is handling transport of the printer, have its box marked "THIS SIDE UP" to keep the printer with its bottom facing down. Mark also with "FRAGILE" or "HANDLE WITH CARE".
Calibrating printer for optimal print quality. Do not remove the paper. About minutes
Calibrating printer for optimal print quality. Do not remove the paper. About minutes
Configurando a impressora
7 Verifique se a tela a seguir aparece.

Calibrating printer for optimal print quality. Do not remove the paper. About minutes
HacrtpoiKa npntepa
7 y6eIntecb,TO OTo6paKaTcnaKa3aHHbHnHex 3KpaH.
Bb6epntMeToDIOKJIIOUeHn, KOTOpB Iyue Bcero COOTBeTCTByET 3aDaayam NcNoJb3OBAHH npHTepa.
IopaoKNCNoB3OBAHn npHTepa6e3 noKnIOueHn Kdpyum yCTpoiCTBaM
Tenepb HactpoiKa 3aBepseHa.
IopAOK NcNoB3OBAHnI npHTepa, noKJIoueHHoro K KombTopepy nIu cMapTfoHy
PepeynteKcneyoueCtpaHnue.
KuO OOpHnIO He HAnBaTbC, 06epexHo np6epiB fnaKOH i3 OOpHnIOM i NOBtOPIb Cnpo6y.
6 O6epexHo npi6epitb fnaKoH i3 yOpHnIOM BiBxIDHO OTBOPY.
BydbTe oBepexHi, uo6 He po3nTuOpHnNo.
7 Hadiinho BCTaHOBITb KOBnaOc KOpHnIbHnci Ha Micue.
8 Iobtopitb kpoKn 2-7, uo6 haHnTn Bci yOpHnna y BiIOBIDHI YOpHNbHnCi, po3TaOBoHi npabopyu.
9 3akpuTeMoDyNb cKaHyBaHHa / KpNkU.
KkuToTPOxPiHnI BiDnyCTHTMOyNb CkaHyBaHH/KpNShKy,BOH3aKpnIOBcCaM.
6.3aBaHTaxeHHn panepy
1 Bu6epiTb TaK (Yes), a NOTIM HATnCHiTb KHOInKy OK.
2 BnIMtB kaceTy 3 npHTepa.
3 PocyHbTe HapmHKn dna nanepy.
Iocyhte npabn HnpanmHK dna nanepy do npaboro kpa. BupibHne nepedHn HnpanmHK dna nanepy 3a no3haKo1 Letter a6o A4.
4 3aBaHTaXTe 3BnuaHn napiP fOpMaTy Letter a6o A4.
Pozmiitb nanip BnpiTyI do nepeHbOHa npaMHka dIy nanepy BnpiBHeIe npaBnHa npaMHk dIy nanepy 3a unpuHOIO nanepy.
5 BcTaBTe Kacety Ha Micu.
6 BuTgHITb IOTOK BvBeHnHa nanepy.
Calibrating printer for optimal print quality. Do not remove the paper. About minutes
HactpoIOBaHH npHTepa
7 MaO o6OB'ra3KOBO 3'ABNTnC HabeHn HnKHe ekpaH.
Bn6epiTb HainontmamlbHhiu cnocio nikluoyehra 3anekHO BID TOTO,AK BNKOpNCOTOBaTaTMeTbca npHTep.
BukopncTaHH npntepa 6e3 niknueHH do iHux npucTpoB
HactpoKoBaHHaBepseHo.
Uo6 BnKOpNCTOBaTn npHTep i3 NiKJIoueHMM KOMn'IOTePOM a60 cMapTfoHOM
IpeenDITb DO HacTynHoiCTopiHNK.
7.ПдклоченяdoKOMN'ЮТepa a6o cMaprФоHA

Akuo BnKOpNCToBcyTbca KJIbKa KOMNIOTePib a6o CMaprTOHIB, BnKOHaHTe 1 KpOKn Ha KOxHOMy npCTpoi.
1 IpeeiDitb npraMo Ha caaT Canon. Notpe6n B nowyky Hemae.


2 BBeiItb Ha3By moJIeI CBOrO npHTepa NkaunHtB IpeuTn.
3 DToPmMyTeCnHCTpyKci, kI 3'ABnTmMyTbcn Ha ekpaHi.

BukopncTaHHKOMnKaT-DnCKa 3 nporpaMOb BCTaHOBneHHA
1.Дичи Кlaцпь EasySetup.exe Ha ekpaHI, lo 3'BAITbca.
2. Aki 3'ABNTbcA ekpaH Bn60py npHTepa, Bn6epiB GX3040. Aki 3'ABNTbcA ekpaH yCTaHOBHeHHK nauHITb Dani (Next).
3.ДotpmyTeca iHCTpyKuji,як 3'ЯВnatMyTbCHa ekpaHi.
YKIO HiOro He 3'ABITbC, 3aNyCTiB IpoBIDHnK (Explorer), a notim BIDKpnIte faIn EasySetup.exe Ha KOMNaKT-DnCKy.
3aBaHTaJKeHHa napey
1 BiikpuTe niDnpuy dny panepy.
2 Iocyhte npabn HapmHK dny nanepy do npaBoro Kpaio.
3 3aBaHTaXTe KInbKa apKyuIb nanepy cTOpHOIO dIyDpyKy DOrOpN I nepeMICITb 6iHn HAnpMaMHNK dIy nanepy Do KpaIO CTOnKn nanepy.
TpaHcnpTyBaHHn npHtepa
IiucnepemieHH npHTepa doTpmytecHabeedeHX Hxue iHctpykui. 06 oTpMaTHdoKnaHii BiOMocTi, nB. DOKyMeHT OHnaHOBn noci6HNK.
- PepekoHaTecb, 10 BaxiIeCb yOpHnIbHoro KlaNaHa nepe6yBaB 3akpntomy nOJoxHeHi.
- IpepebiTe, H KOBnauKu OOpHnIbHnUb NOBHiCTIO 3aKpNUTo.
KtPmauDpykyooi ronOBnnepe6yBaBcHTpi npHTepa,nepekoHaTecra,io KpnuKy 3aKpntO.
PomictiB npnHep y nonietuheOBn naKeT, ockibKn OOpHnlo MoKe BntiKaTu.
IomictiB npInTep y TBepny Kopo6ky HxHbOu qactnHO npInTepa DOHN3y N BnKOpNCTaTe DoCTaTHIO KINbKiCTb 3axnCHOro MaTepiany, u6 rapaHTyBaTu 6e3neue He TpaHCnOPTyBaHHa.
He haxnayte npntep. YopHnIO MOKe BNTeKTH.
IIOBOBbTEc3 KOpO6KOIO OBepeXHO Ta nepeKoHaITec8, 0o BOHa 36epirae oopmy HEPepehpyTa Doropn dHom a6o Ha 6iK, OCKINbKN PpHTeP MoKe 6yTu NOnKoJKeHo, a YoPHNIO B HbOMy MOKe BNTeKTn.
HannuithhaKopo6ui3 npnHTepom《UIM5OKOM IOTOPI》,0o6niuaTpaHcnopTyBaHHeekCneiHTOP 3aBxnn TpImaB npnHTep HxNBoO CTPOHOIO DOHN3y. TaKoX HanuithkKPNXKE)a6oIIOBOIDNTUCb OBEPEXHO
gall
1 1
3
g( x) = x - ax^2 + + c
1
中
2
slaalaaaaljai
Jalalill aed cuiy jie 1e llll
laaiiaa aii jaiyabie iis lai gaa
a
JaljIgai jiaai aai s aai Jaa
y
g 10000000000000000000000000000000000000000000
15" 10x100000000000000000000000000000000000000000000000000000000000000000
.

s
https://ij.start.canon/connect


2
3
EasySetup.exe (Explorer)
aalalalalalalalalalalalalalalalalalalal
s yj jyj JuyyJyj
j111e1ylae ciais
Ss
Aaalaaal
ailll llll jol joi
7
求
A4 Letter 23
4
5
6
z
Calibrating printer for optimal print quality. Do not remove the paper. About minutes
6
.(OK) 1

2
3 4
7 2 1 2
8
1 1
9
J 1
a a a a a a a a a a a a a a
6
7
5
A

jll jai jai jai jai jai jai jai jai jai jai jai jai jai jai jai jai jai jai jai jai jai jai jai jai jai jai jai jai jai jai jai jai jai jai jai jai jai jai jai jai jai jai jai jai jai jai jai jai jai jai jali jali jali jali jali jali jali jali jali jali jali jali jali jali
1
2
3
Aii j 3

4
1 (OK)
.(OK) 2
.(OK) 3
.(OK) 4
aal 2
.1
j
aillil
alil cio gaoall jlo 1o lo
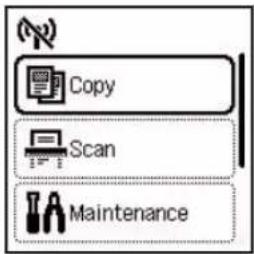
()

Access Online Manual