Viper CAR275 - Vacuum Cleaner NILFISK - Free user manual and instructions
Find the device manual for free Viper CAR275 NILFISK in PDF.
| Product type | Vacuum cleaner |
| Brand | Nilfisk |
| Model | Viper CAR275 |
| Use | Car and interior cleaning |
| Power supply | Mains 220-240 V, 50-60 Hz |
| Power | 1200 W |
| Tank capacity | 15 L |
| Filter type | Washable cartridge filter |
| Noise level | 70 dB(A) |
| Weight | 6.5 kg |
| Dimensions (L x W x H) | 40 x 35 x 50 cm |
| Cable length | 8 m |
| Hose length | 2.5 m |
| Included accessories | Seat nozzle, flat crevice tool, round brush |
| Maintenance | Regular cleaning of filter and tank |
| Safety | Thermal protection, automatic shut-off in case of overheating |
| Standards | CE, RoHS |
| Spare parts | Available from Nilfisk or authorized dealers |
| Repairability | Repairability index: 7.5/10 |
| Manual languages | French, English, German and 20 other languages |
Frequently Asked Questions - Viper CAR275 NILFISK
User questions about Viper CAR275 NILFISK
0 question about this device. Answer the ones you know or ask your own.
Ask a new question about this device
Download the instructions for your Vacuum Cleaner in PDF format for free! Find your manual Viper CAR275 - NILFISK and take your electronic device back in hand. On this page are published all the documents necessary for the use of your device. Viper CAR275 by NILFISK.
USER MANUAL Viper CAR275 NILFISK
(CAR275 OWNER'S MANUAL)
natural_image
Line drawing of a vacuum cleaner with attached hose and pump (no text or symbols)Manufacturer / Výrobce / Hersteller / Fabrikant / Fabricante / Κατασκευαστής / Gyártó / Proizvođač / Fabbricante / Gamintojas / Ražotājs / Produsent / Fabrikant / Fabricante / Producent / Producător / производитель / Tillverkaren / Výrobca / Proizvajalec/ Üretici firma:
Nilfisk A/S, Kornmarksvej 1
DK-2605 Broendby, DENMARK
Product / Produkt / Producto, Toode, Produit, Tuote/ Produkt / Ppoïov / Termék / Proizvod / Prodotto / Produktas / Produkts / Artikel / Produtos / Produs / Izdelek / Ürün
CAR275
Description / Popis / Beschreibung / Beskrivelse / Descripción / Kirjeldus / La description / Kuvaus / Описание / Пεριγραφή / Leirás / Opis / Descrizione / Aprašymas / Apraksts / Beschrijving / Descrição / Descriere / Beskrivning / Popis / Açıklama
FC - Spray Extraction Machine
220-240V 50/60Hz, IP44

We, Nilfisk hereby declare under our sole responsibility, that the above mentioned product(s) is/are in conformity with the following directives and standards.

Authorized signatory:
Lars Gjødsbøl, Executive Vice President Global Products & Services
Sep 25, 2018

text_image
Jans GoudeseeUK Declaration of Conformity
We,
Nilfisk Ltd
Nilfisk House, Bowerbank Way Gilwilly Industrial Estate
Penrith Cumbria
CA11 9BQ UK
Hereby declare under our sole responsibility that the
Product: FC - Spray Extraction Machine
Description: 220-240V 50-60 Hz, IP44
Type: CAR275
Is in compliance with the following standards:
EN 60335-1:2012+A11:2014+A13:2017
EN 60335-2-68:2012
EN 55014-1:2017+A11:2020
EN 55014-2:2015
EN 61000-3-2:2014
EN 61000-3-3:2013
EN 63000:2018
Following the provisions of:
Supply of Machinery (Safety) Regulations 2008/1597
Electromagnetic Compatibility Regulations 2016/1091
The Restriction of the Use of Certain Hazardous Substances in Electrical and Electronic Equipment
Regulations 2012/3032
Penrith, 25-1-2021

Stewart Dennett
GM/MD
ENGLISH. Operation Guidelines.... 3-6. 7-10
SLO"/NS°Y Pokyny pre obsluhu 3-6.59-62
text_image
Technical diagram of a mechanical device with numbered components for identification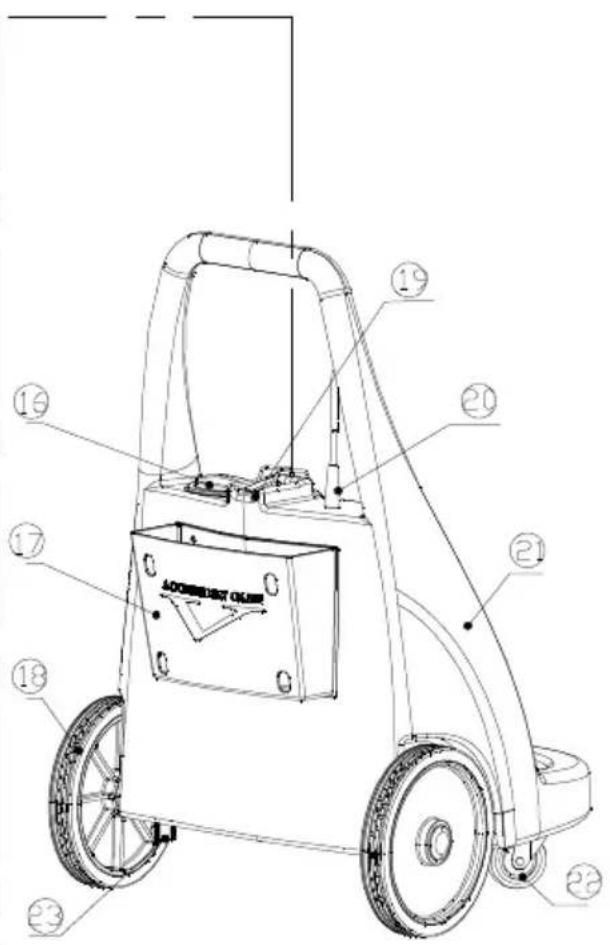
text_image
Technical diagram of a mechanical device with numbered components and labeled partsF1
text_image
F2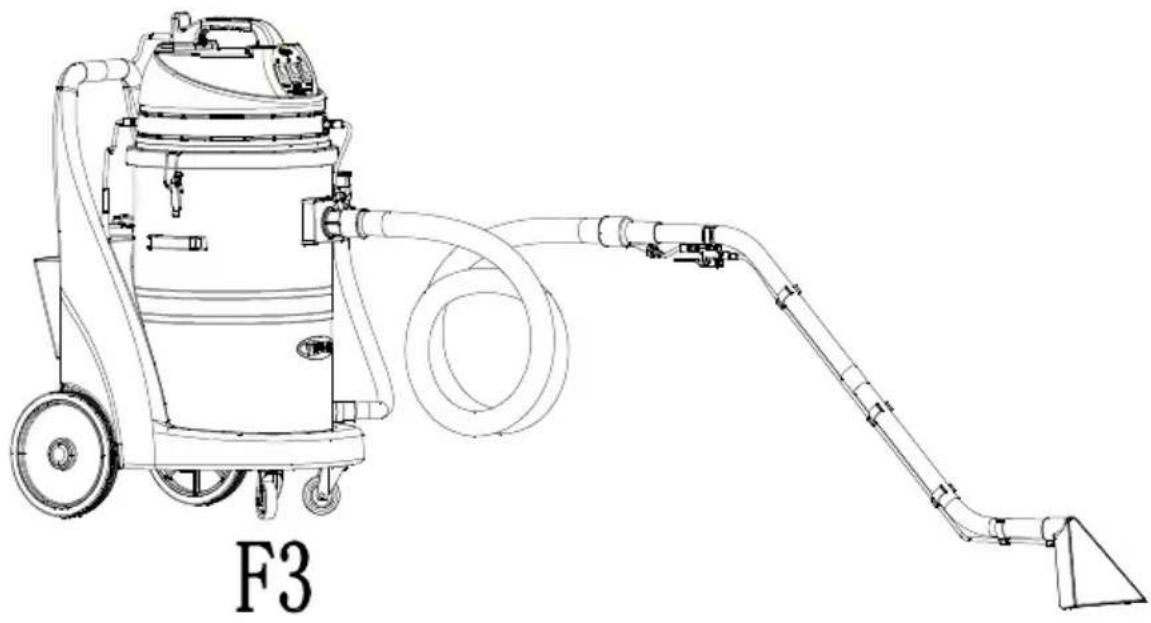
natural_image
Line drawing of a vacuum cleaner with attached hose and pipe, labeled F3 (no text or symbols on the device itself)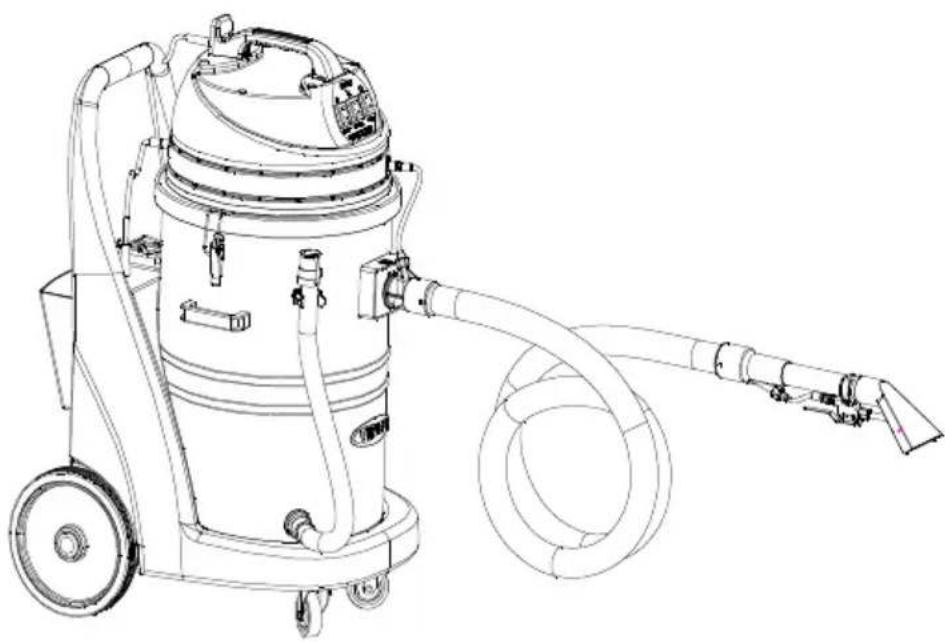
natural_image
Line drawing of a vacuum cleaner with attached hose and wheels (no text or symbols)F4
text_image
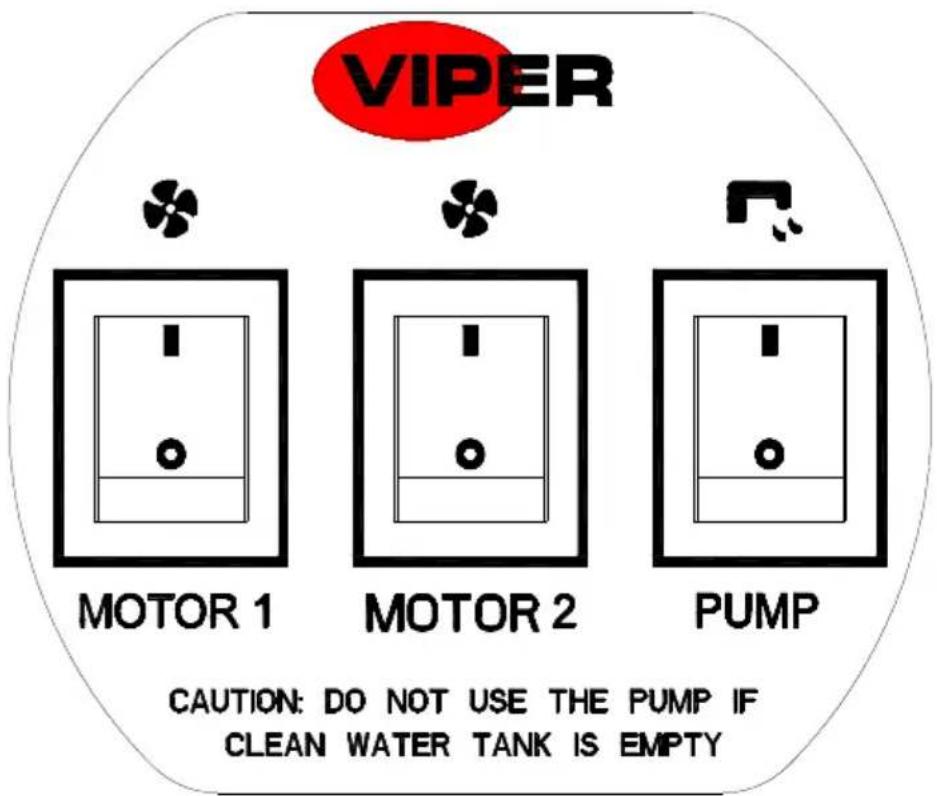
VIPER MOTOR 1 MOTOR 2 PUMP CAUTION: DO NOT USE THE PUMP IF CLEAN WATER TANK IS EMPTYKTO
flowchart
graph TD
    A["220V~2A0V T0/COHz"] --> B["MΩ/RM"]
    B --> C["Yellow/GREEN"]
    C --> D["MΩ/MΩ"]
    D --> E["Yellow/W/PRbBN"]
    E --> F["MΩ/MΩ"]
    F --> G["Yellow/W/PRbBN"]
    G --> H["MΩ/MΩ"]
    H --> I["Yellow/W/PRbBN"]
    I --> J["MΩ/MΩ"]
    J --> K["Yellow/W/PRbBN"]
    K --> L["MΩ/MΩ"]
    L --> M["Yellow/W/PRbBN"]
    M --> N["MΩ/MΩ"]
    N --> O["Yellow/W/PRbBN"]
    O --> P["MΩ/MΩ"]
    P --> Q["Yellow/W/PRbBN"]
    Q --> R["MΩ/MΩ"]
    R --> S["Yellow/W/PRbBN"]
    S --> T["MΩ/MΩ"]
    T --> U["Yellow/W/PRbBN"]
    U --> V["MΩ/MΩ"]
    V --> W["Yellow/W/PRbBN"]
    W --> X["MΩ/MΩ"]
    X --> Y["Yellow/W/PRbBN"]
    Y --> Z["MΩ/MΩ"]
    Z --> AA["Yellow/W/PRbBN"]
    AA --> AB["MΩ/MΩ"]
    AB --> AC["Yellow/W/PRbBN"]
    AC --> AD["MΩ/MΩ"]
    AD --> AE["Yellow/W/PRbBN"]
    AE --> AF["MΩ/MΩ"]
    AF --> AG["Yellow/W/PRbBN"]
    AG --> AH["MΩ/MΩ"]
    AH --> AI["Yellow/W/PRbBN"]
    AI --> AJ["MΩ/MΩ"]
    AJ --> AK["Yellow/W/PRbBN"]
    AK --> AL["MΩ/MΩ"]
    AL --> AM["Yellow/W/PRbBN"]
    AM --> AN["MΩ/MΩ"]
    AN --> AO["Yellow/W/PRbBN"]
    AO --> AP["MΩ/MΩ"]
    AP --> AQ["Yellow/W/PRbBN"]
    AQ --> AR["MΩ/MΩ"]
    AR --> AS["Yellow/W/PRbBN"]
    AS --> AT["MΩ/MΩ"]
    AT --> AU["Yellow/W/PRbBN"]
    AU --> AV["MΩ/MΩ"]
    AV --> AW["Yellow/W/PRbBN"]
    AW --> AX["MΩ/MΩ"]
    AX --> AY["Yellow/W/PRbBN"]
    AY --> AZ["MΩ/MΩ"]
    AZ --> BA["Yellow/W/PRbBN"]
    BA --> BB["MΩ/MΩ"]
    BB --> BC["Yellow/W/PRbBN"]
    BC --> BD["MΩ/MΩ"]
    BD --> BE["Yellow/W/PRbBN"]
    BE --> BF["MΩ/MΩ"]
    BF --> BG["Yellow/W/PRbBN"]
    BG --> BH["MΩ/MΩ"]
    BH --> BI["Yellow/W/PRbBN"]
    BI --> BJ["MΩ/MΩ"]
ΙΘΚΦύλώςΚπύΘ:
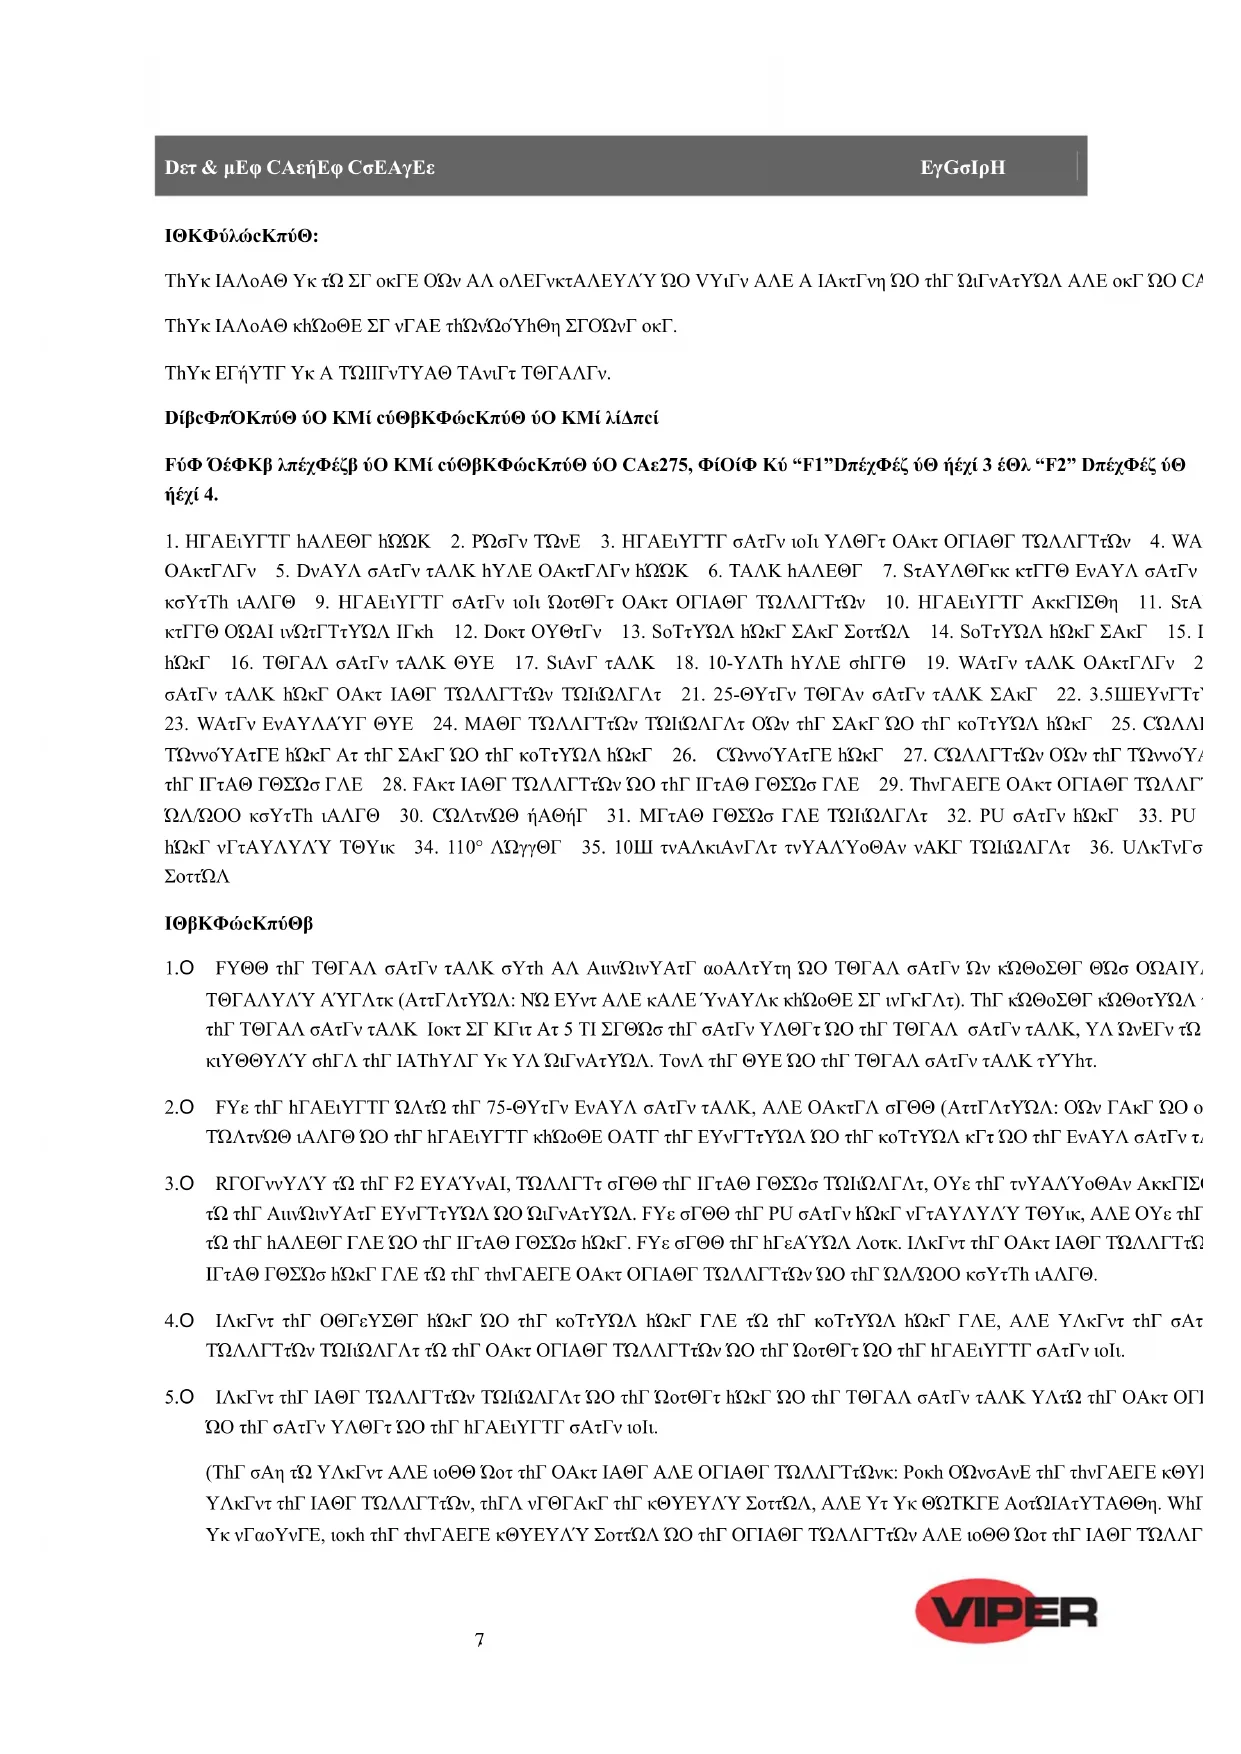
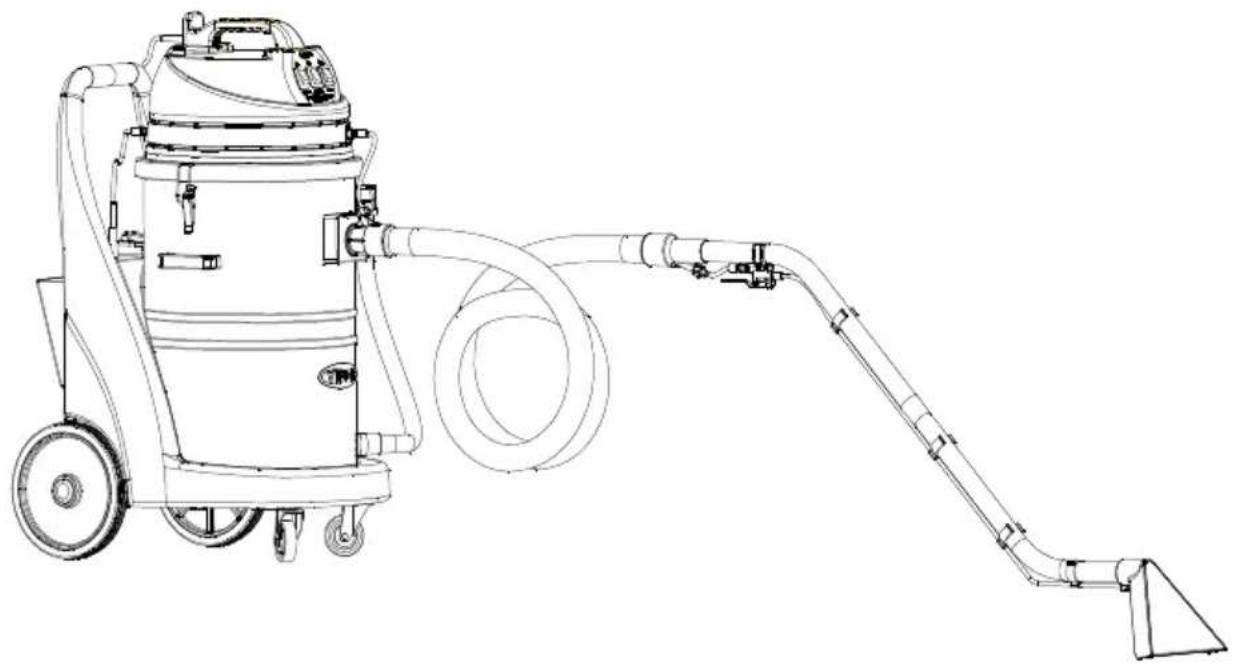
CAε275'πΘ yεΟιβι Δί ΌέΦzέθέΦι ΜέψψιΘλέ, ρέγΟέ 3'Κίψπ "F1" Σίζέγέ Δί ρέγΟέ 4'Κίψπ "F2" Σίζέγέ bέψιΘ.
Viper Cleaning Equipment Co. Ltd.
Viper Industrial Estate
Liangbian, Liaobu,
Dongguan, Guangdong
CHINA
Tel: +86-769 83283988
Fax: +86-769-8328 0104
İthalatçı Bilgisi
Nilfisk-Advance Profesyonel
(XCC)OÄAX-ÄY3VOOOOOOOOOOOOOOOOOOOOOOOOOOOOOOOOOOOOOOOOOOOOOOOOOOOOOO
(XCC)OÃÃ-VIÊBROOOOOOOOOOOOOOOOOOOOOOOOOOOOOOOOOOOOOOOOOOOOOOOOOOOOOOO
0000000000000000000000000000000000000000000000000000000000000000000