
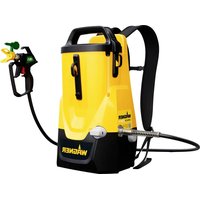
2361742 - Paint spray WAGNER - Free user manual and instructions
Find the device manual for free 2361742 WAGNER in PDF.
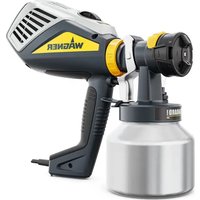
| Product type | Removable facade for Corner&Reach paint sprayer |
| Brand | Wagner |
| Model | 2361742 |
| Nozzle extension length | 22 cm |
| Jet deflection angle | 25° |
| Cup capacity | 600 ml |
| Compatibility | Wagner base units with Click & Paint system |
| Applicable materials | Very fluid water-soluble and solvent-based paints |
| Estimated weight | 0.5 kg |
| Approximate dimensions | 30 cm x 10 cm x 10 cm |
| Power supply | None (manual accessory for electric unit) |
| Paint flow adjustment | Adjustment wheel (Fig.1, pos.10) |
| Spray direction adjustment | Rotation of air hose with rotation aid |
| Viscosity measurement | Measuring cup, flow time in seconds |
| Safety | Do not use if paint rises in the ventilation hose; do not lay the gun on its side |
| Maintenance and cleaning | Clean with solvent or water depending on paint; do not use sharp metal objects |
| Spare parts | Needle, nozzle seal, paint/air hose, union nut, air cap, cup seal, dip tube, cup, depressurization hose, valve cap, membrane, measuring cup |
| Warranty | 2 years |
| Environmental protection | Device and accessories to be recycled at collection point |
Frequently Asked Questions - 2361742 WAGNER
User questions about 2361742 WAGNER
0 question about this device. Answer the ones you know or ask your own.
Ask a new question about this device
Download the instructions for your Paint spray in PDF format for free! Find your manual 2361742 - WAGNER and take your electronic device back in hand. On this page are published all the documents necessary for the use of your device. 2361742 by WAGNER.
USER MANUAL 2361742 WAGNER
natural_image
Line drawing of a traditional gun firing weapon system with lever and base (no text or symbols)WOOD&METAL EXTRA CORNER&REACH
SPRÜHAUFSATZ SPRAY ATTACHMENT FAÇADE AMOVIBLE SPUITOPZET


Read the operating instructions carefully before using the tool and observe the safety instructions. Keep the operating instructions in a safe place. The safety instructions for the basic unit apply to this Corner&Reach spray attachment.
General instructions
The Corner&Reach spray attachment was developed for applying water-soluble and low-viscosity materials containing solvents.
The spray jet is deflected by 25^ at the end of the 22 cm nozzle extension. This allows problem-free coating of narrow spaces or points that are difficult to reach.
CAUTION!

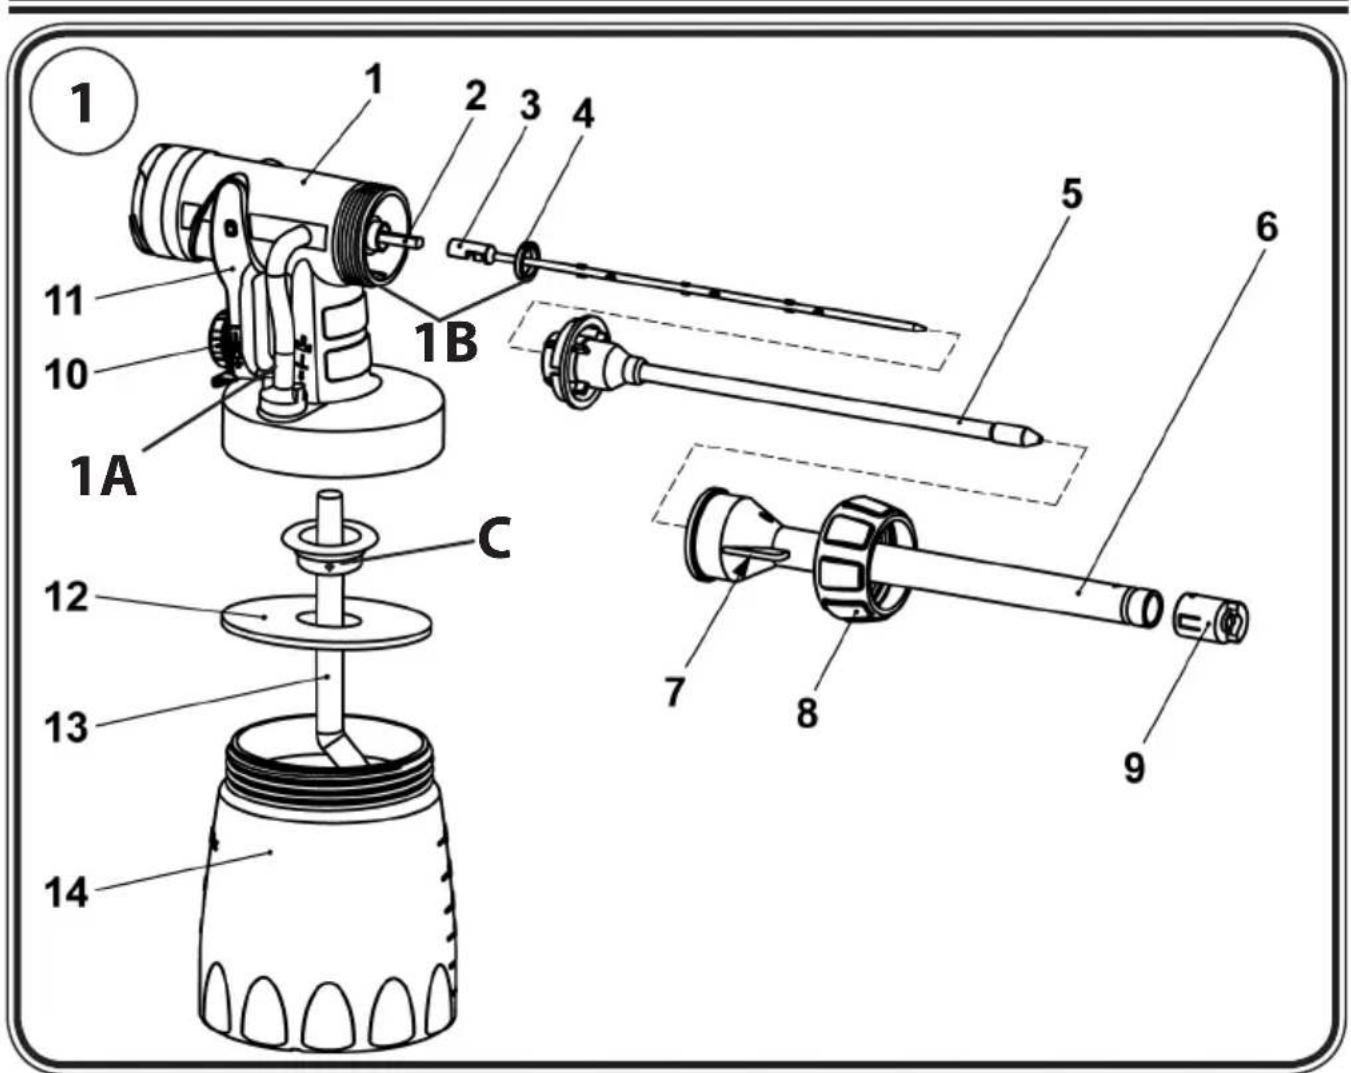
- The units may only be used with a functional valve. If paints rises in the ventilating hose (Fig. 1 A, item 15) do not operate the unit further! Dismantle and clean the ventilating hose, valve and diaphragm and replace the diaphragm if necessary.
- Do not place the spray gun on the side.
- Do not combine components from different spray attachments. The parts could be damaged.
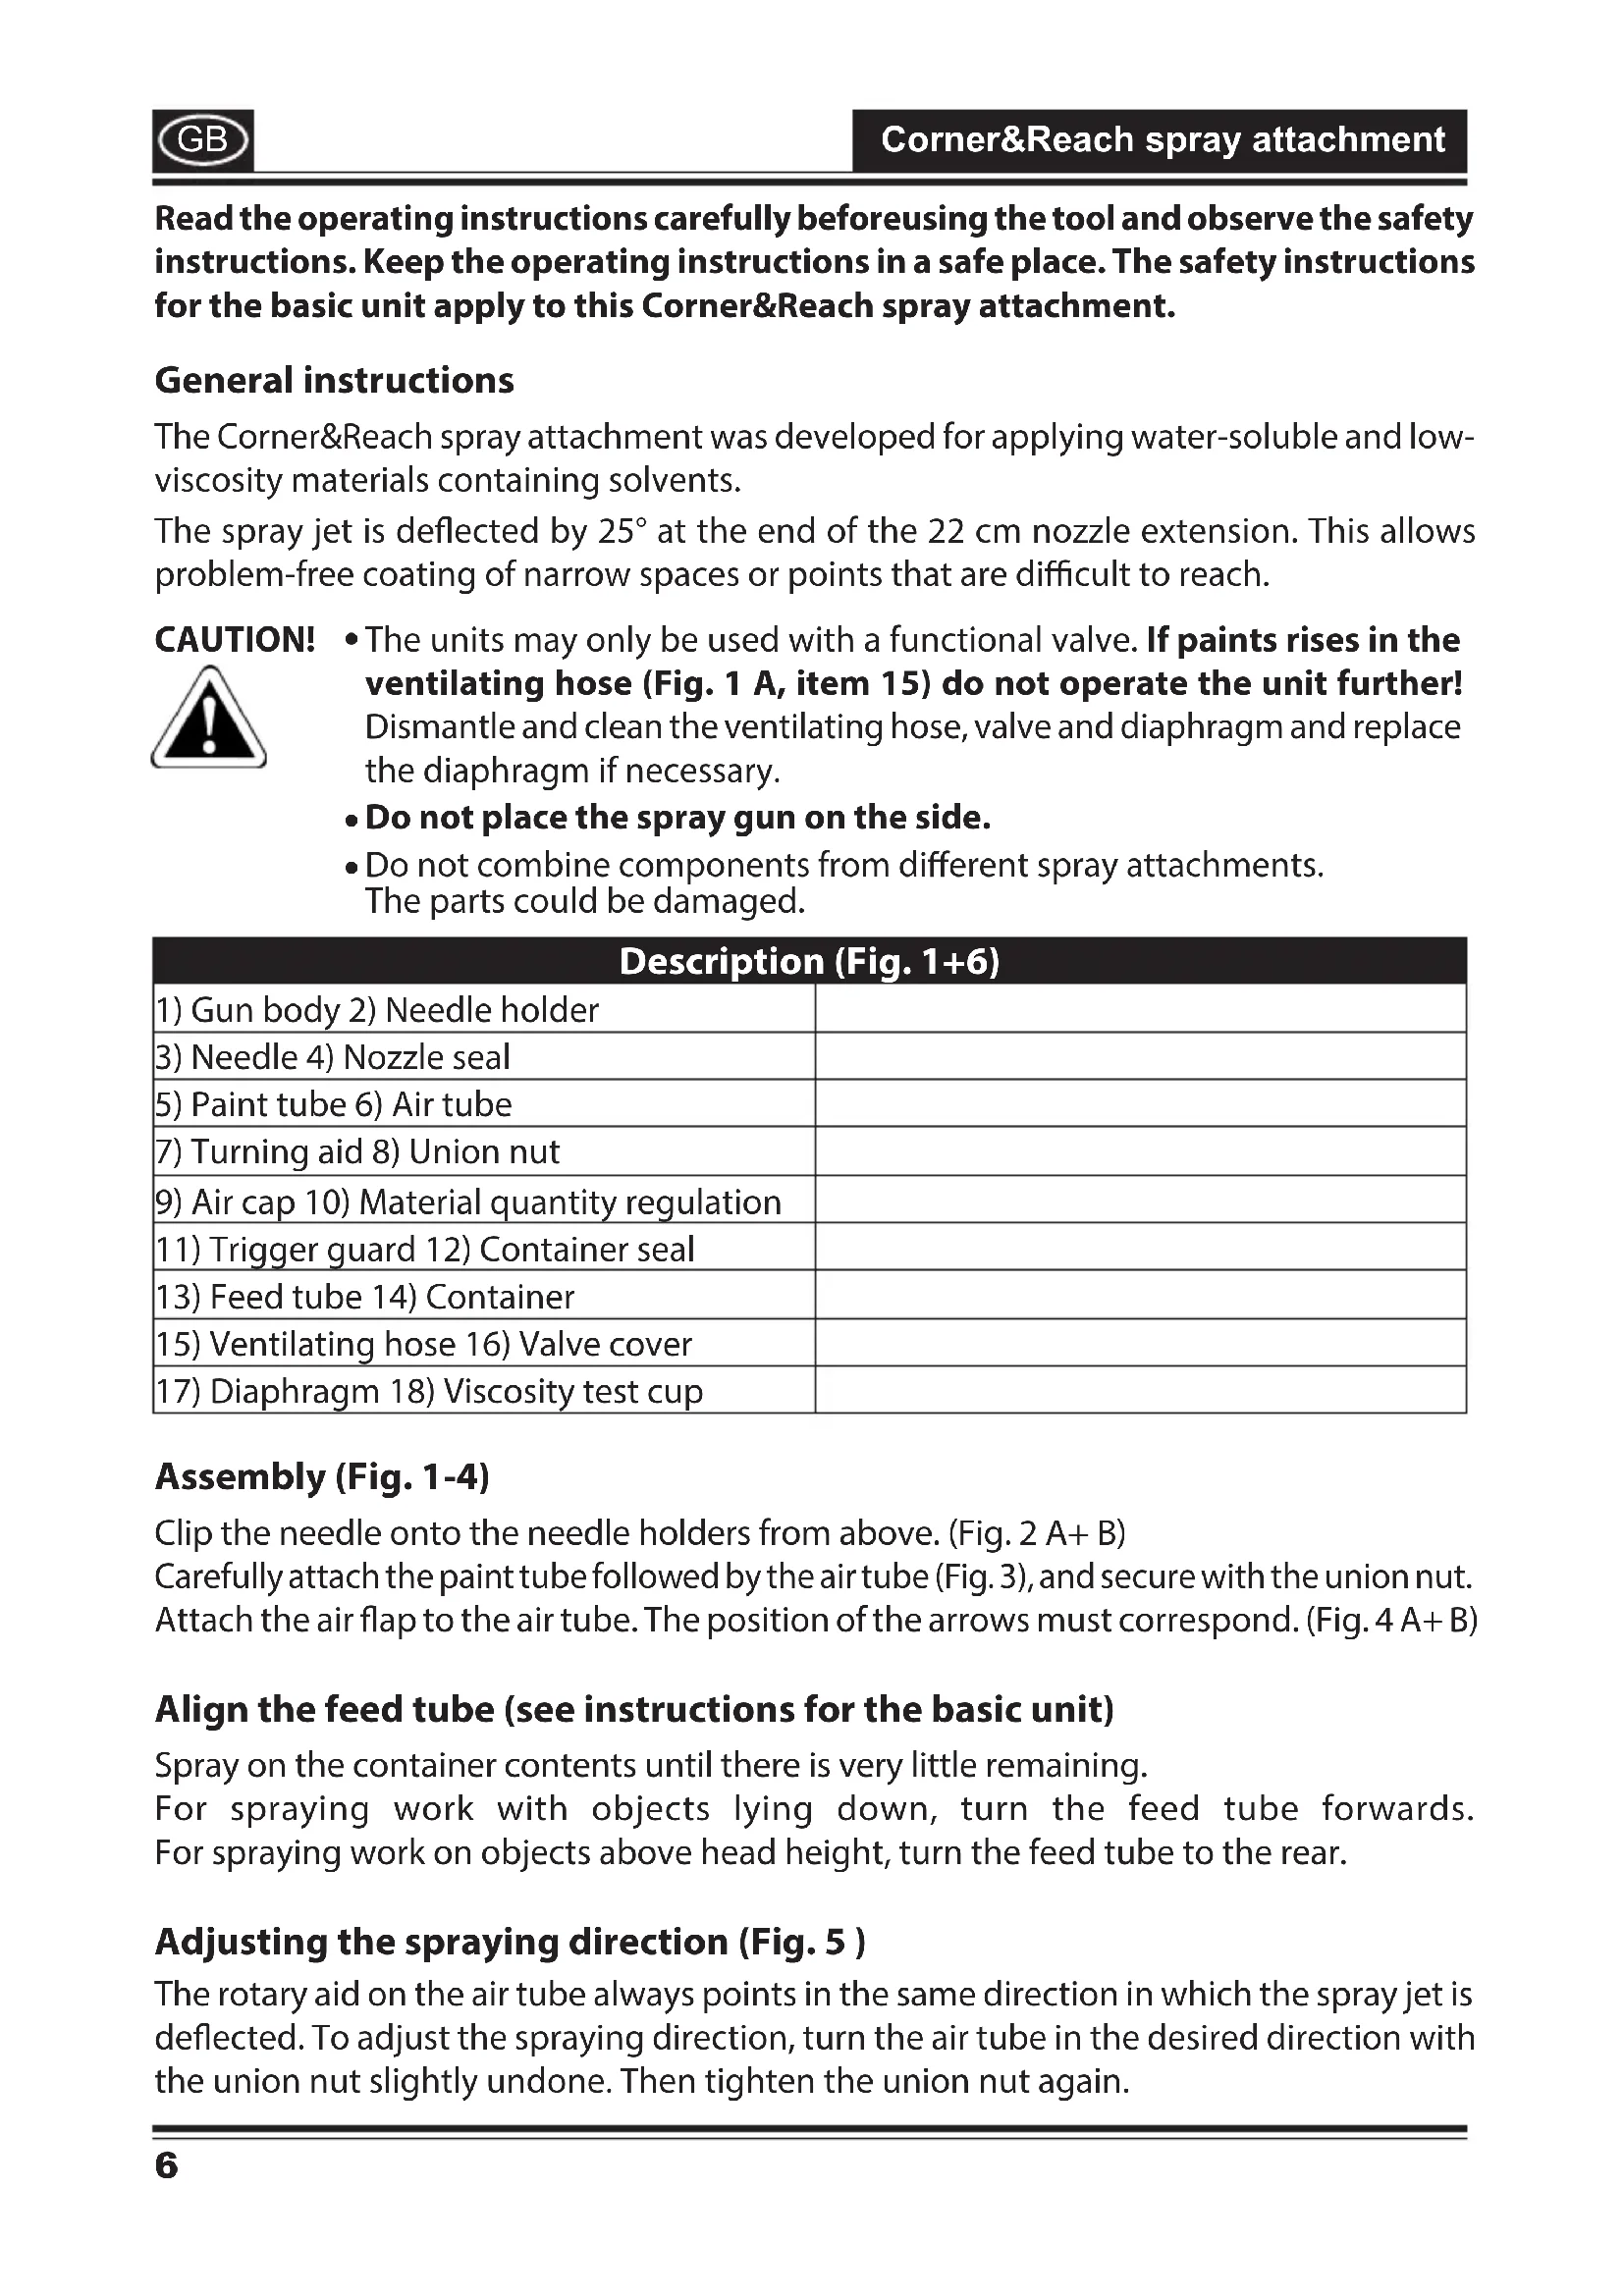
| Description (Fig. 1+6) | |
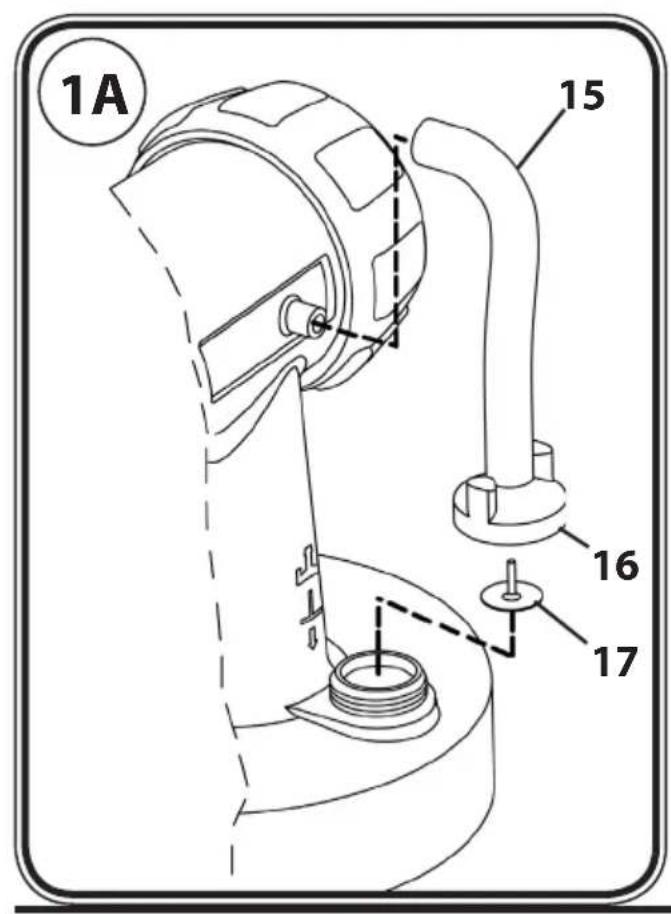
| 1) Gun body 2) Needle holder | |
| 3) Needle 4) Nozzle seal | |
| 5) Paint tube 6) Air tube | |
| 7) Turning aid 8) Union nut | |
| 9) Air cap 10) Material quantity regulation | |
| 11) Trigger guard 12) Container seal | |
| 13) Feed tube 14) Container | |
| 15) Ventilating hose 16) Valve cover | |
| 17) Diaphragm 18) Viscosity test cup | |
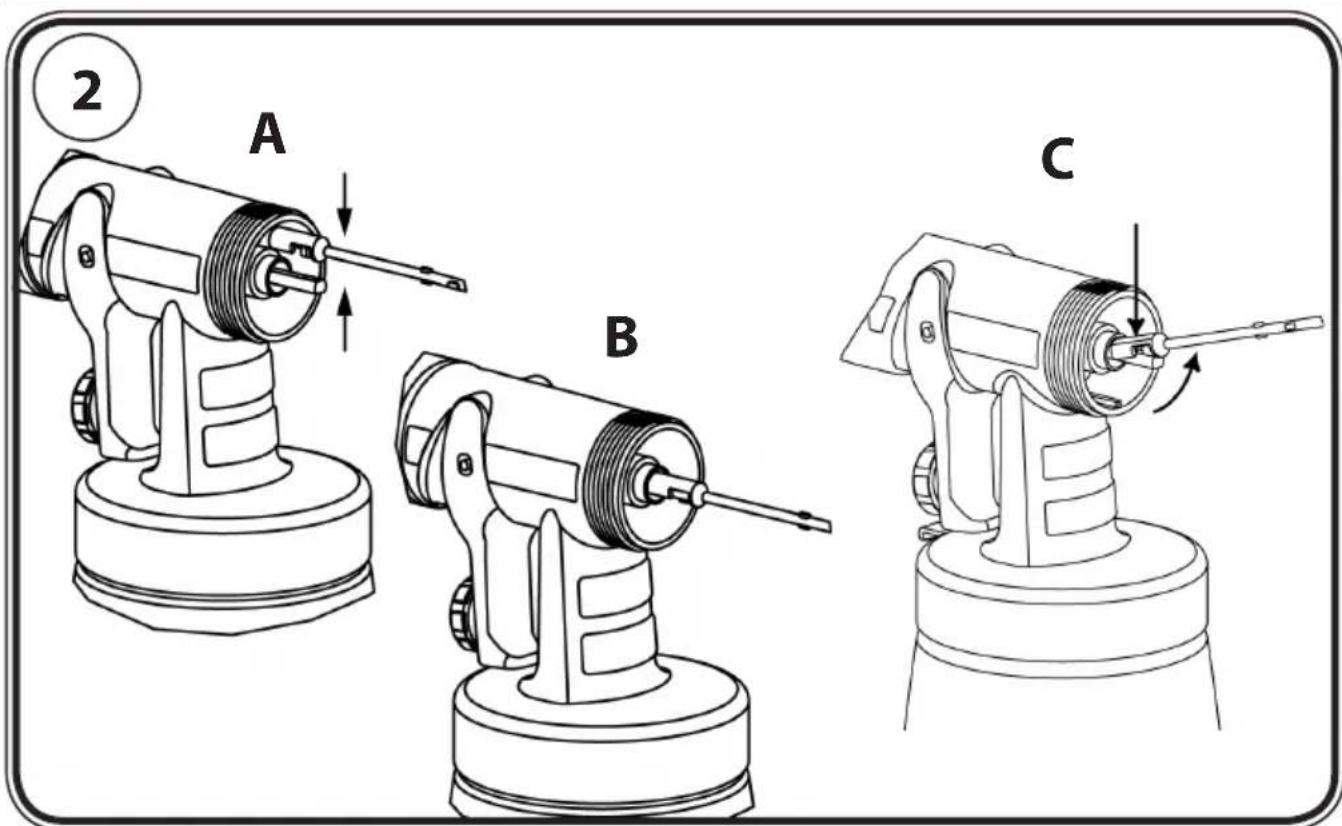
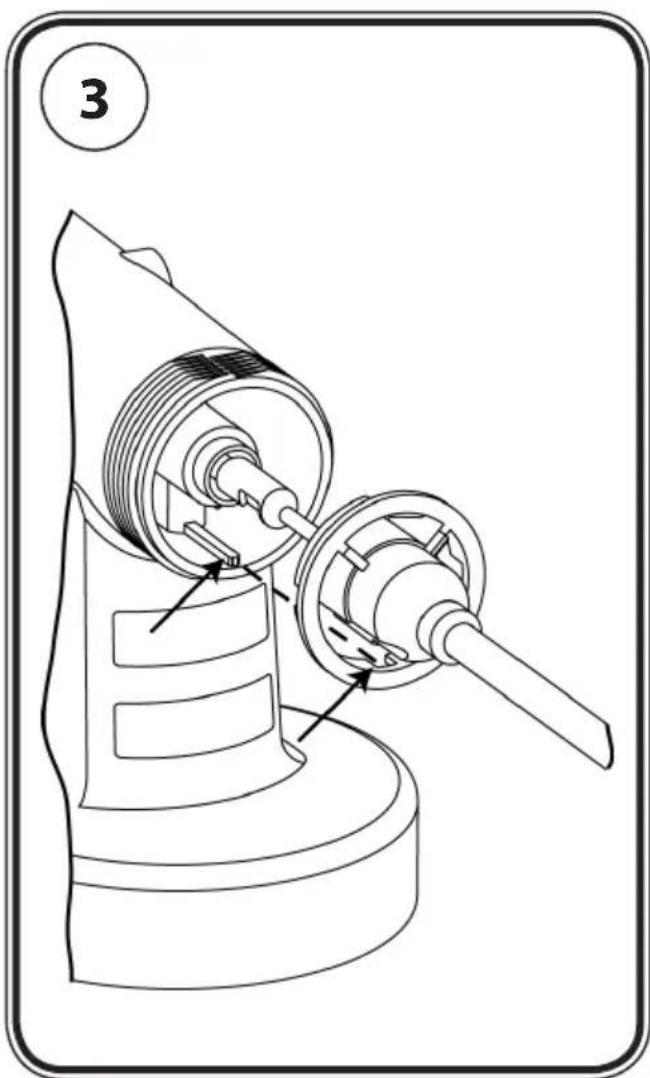
Assembly (Fig. 1-4)
Clip the needle onto the needle holders from above. (Fig. 2 A+ B)
Carefully attach the paint tube followed by the air tube (Fig. 3), and secure with the union nut. Attach the air flap to the air tube. The position of the arrows must correspond. (Fig. 4 A+ B)
Align the feed tube (see instructions for the basic unit)
Spray on the container contents until there is very little remaining.
For spraying work with objects lying down, turn the feed tube forwards. For spraying work on objects above head height, turn the feed tube to the rear.
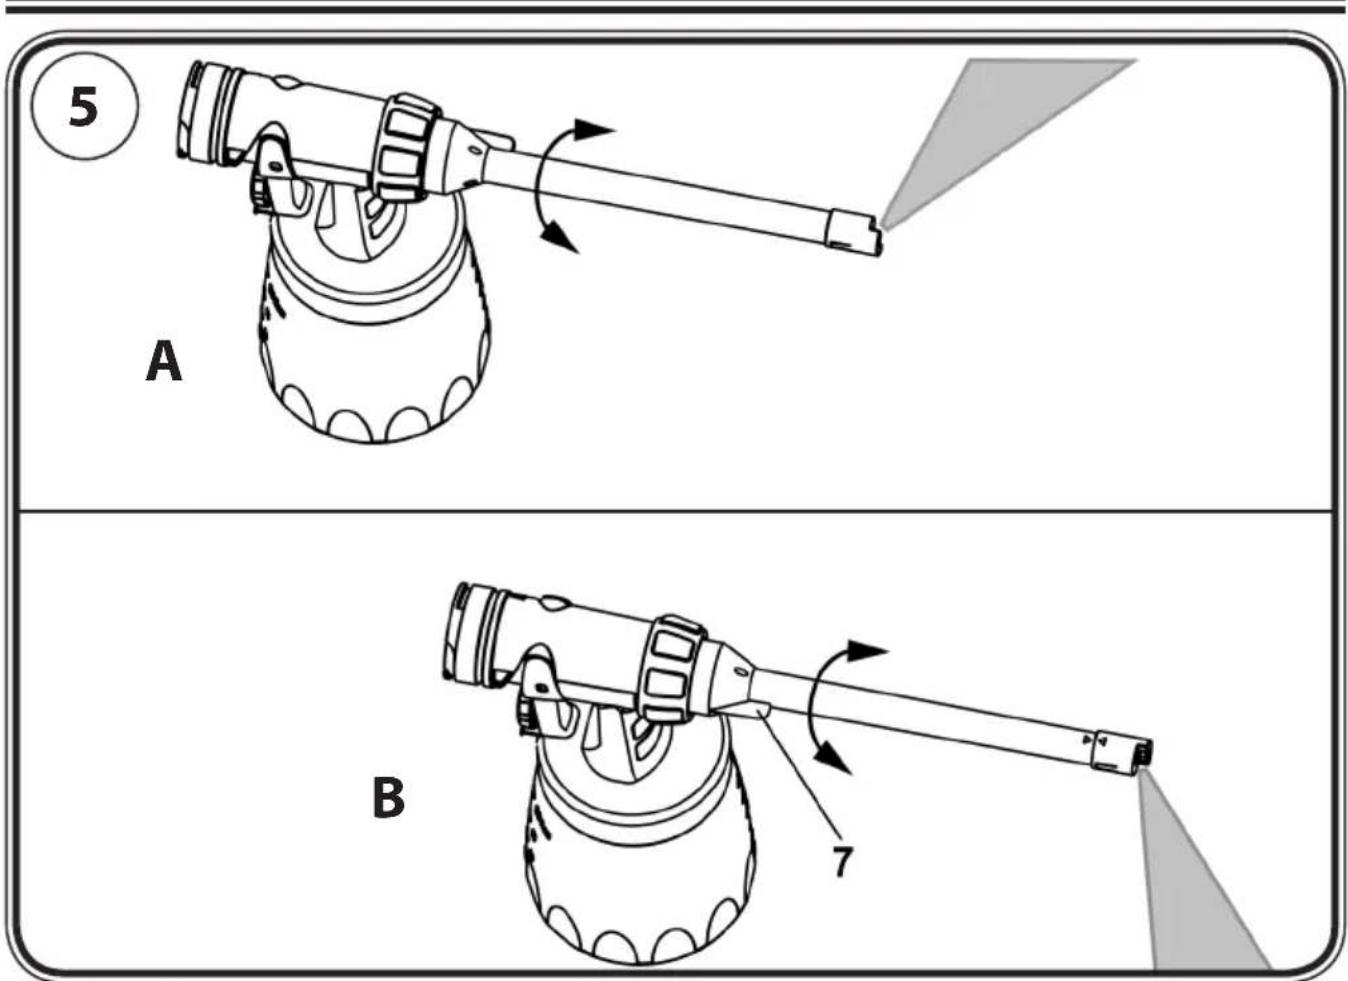
Adjusting the spraying direction (Fig. 5)
The rotary aid on the air tube always points in the same direction in which the spray jet is deflected. To adjust the spraying direction, turn the air tube in the desired direction with the union nut slightly undone. Then tighten the union nut again.
Preparing the Coating Material
The paints usually need to be diluted for use with the spray gun. You can find information on spray consistency for dilution on the material container or in the respective manufacturer's data sheet (e.g. available on the Internet).
Otherwise, use the data in the viscosity table below as guide values (viscosity = consistency of the coating material).
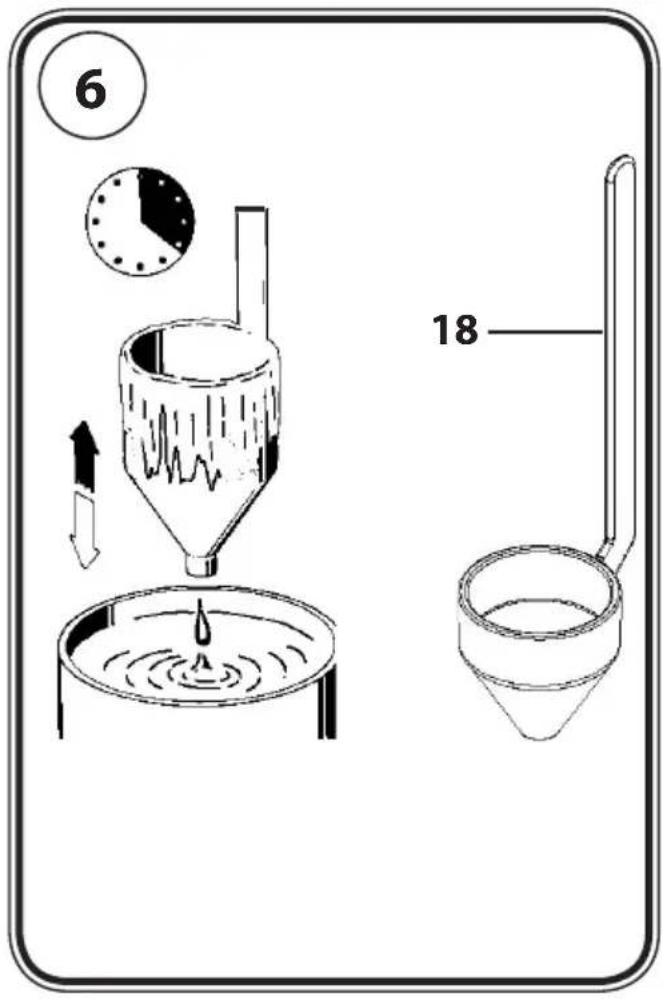
Measuring the Viscosity (Fig. 6)
- Stir the coating material thoroughly before measuring.
- Dip the viscosity test cup (18) completely into the coating material.
- Hold the test cup up and measure the time in seconds until the liquid empties out.
| Viscosity Table | |||
| Sprayed material Runout Time in Seconds | |||
| Wood&Metal, Wall Universal | |||
| 280 W 300 W 350 W | 630 W | ||
| Thinner-soluble primers | 25-30 30-40 | 30 - 45 | 40-60 |
| Thinner-soluble varnishes | 15-30 20-45 | 20 - 45 | 30-60 |
| Water-soluble primers | 25-30 30-40 | 30 - 45 | 40-60 |
| Water-soluble varnishes | 20-25 20-35 | 20 - 40 | 30-55 |
| Wood preservatives, strippers, oils | undiluted | ||
| Disinfectants, plant protectants | undiluted | ||
| Automobile spray paint | 20-25 20-35 | 20 - 40 | 30-55 |
Adjusting the material quantity
The extension nozzle allows you to spray into very narrow spaces. To prevent paint runs on the object, first adjust the paint quantity by spraying onto a piece of card or paper from the same spraying distance.
First turn the adjustment knob (Fig. 1, pos. 10) fully to the left (-) and then slowly increase the material quantity to the desired amount by turning it to the right (+). Cover areas that are not to be sprayed.
Tips for painting points to which access is difficult
Cover all surfaces not to be sprayed. On furniture and objects with cavities, narrow spaces and other points to which access is difficult, always work from the inside outwards. When doing so, first paint the points to which access is difficult and the inner. Less visible surfaces, then gradually work out towards the outer surfaces.
Tips for radiator painting
Allow the radiator to cool down before painting.
Pre-treat the radiator in accordance with the paint manufacturer's instructions. Start painting in the spaces. First paint one side of the spaces. Move the gun in even upward and downward strokes. Paint the other side after allowing the paint to dry for a short
time. This prevents the air tube coming into contact with wet paint. From time to time, remove any paint particles from the air cap and nozzle using a damp cloth. Finally, paint the outer surfaces from a greater distance and using more material. The Standard spray attachment can of course also be used for this.
Interruption of Work

When processing 2-component varnishes, clean the device immediately.
Shutting down and cleaning
- Pull out the mains plug. Vent the container in case of longer breaks and after the work has been terminated. This can be done by briefly turning open and then closing the container or by pulling the trigger guard and letting the paint into the original paint container.
- Disassemble the gun.
- Unscrew the container. Empty the rest of the coating material back into the can.
- Pre-clean the container and feed tube using a brush. Clean the ventilating bore (Fig.1C).
- Fill the container with solvent or water. Screw on the container.
Do not use flammable materials for cleaning purposes. - Reassemble the gun.
- Plug in the mains plug, switch on the unit and spray solvent or water into a container or onto a cloth.
- Repeat the above procedure until clear solvent or water comes out of the nozzle.
- Switch off the unit and pull out the mains plug.
CAUTION! Never clean seals, diaphragm and nozzle or air holes of the spray gun with metal objects. The ventilation hose and diaphragm are only solvent-resistant to a limited extent. Do not immerse in solvent, only wipe.
- Pull the ventilating hose (Fig.1A, pos. 15) at the top from the gun body. Screw off the valve cover (16). Remove the diaphragm (17). Clean all the parts carefully.
- Unscrew the union nut, then carefully pull off the air cap, air tube and paint tube. Unclip the needle from the needle holder (Fig.2, C). Depending on the paint type, use solvent or water and a brush to clean all parts of the extension.
- Wipe the outside of the spray gun and container with a cloth impregnated with solvent or water.
Assembly
The unit may only be operated with an integer diaphragm (Fig.1A, 17).
- Place the diaphragm (Fig.1A, 17) with the pin facing upwards on the bottom section of the valve. Also see the marking on the gun body.
-
Place on the valve cover (Fig.1A, 16) and screw it closed.
-
Place the ventilating hose (Fig.1A, 15) on the valve cover and on the nipple at the gun body.
- Push the nozzle seal (Fig. 1B, 4) over the needle (2); the groove (slot) should point towards you.
- Insert all the parts of the extension into each other and keep in the packaging (Fig. 1, pos. 3, 5, 6, 9).
- Place the container seal from below on the ascending tube and slide it over the collar, while turning the container seal slightly.
- Insert the ascending tube with container seal in the gun body.
| Spare Parts List (Fig. 1+6) | ||
| Pos. Designation Order No. | ||
| 3 Needle, front section 0417 919 | ||
| 4 Nozzle seal 0417 706 | ||
| 5/6 Paint/air pipeAustralia (AUS) version order no. in brackets | 0417 920AUS (0417 926) | |
| 8 Union nut 2362 873 | ||
| 9 Air cap 0417 363 | ||
| 12 Container seal 2323 039 | ||
| 13 Feed tube 2362 876 | ||
| 14 Container 600 ml with cover 0414 906 | ||
| 15,16,17 | Ventilating hose, Valve cover, Diaphragm | 2304 027 |
| 18 Viscosity test cup | 0209 058 | |
The CLICK&PAINT SYSTEM with additional spray attachments and accessories offers the right tool for each work.
Further information about the WAGNER range of products for renovating is available under www.wagner-group.com
Environmental protection

The appliance and accessories should be recycled in an environmentally friendly way. Do not dispose of the appliance with household waste. Support environmental protection by taking the appliance to a local collection point or obtain information from a specialist retailer.
Important Note regarding Product Liability!
Due to an EC ordinance in effect since 01.01.1990, the manufacturer is liable for his product only if all parts originate from or were approved by the manufacturer and the devices are assembled and operated correctly. The use of other accessories and spare parts can partially or completely invalidate the liability.
2 years guarantee
The guarantee runs for two years, counting from the date of sale (sales slip). It covers and is restricted to free-of-charge rectification of faults which are demonstrably attributable to the use of faulty materials in manufacture, or assembly errors; or free-of-charge replacement of the defective parts. The guarantee does not cover incorrect use or commissioning or fitting or repair work which is not stated in our operating instructions. Wearing parts are also excluded from the guarantee. The guarantee excludes commercial use. We expressly reserve the right to fulfil the guarantee. The guarantee expires if the tool is opened up by persons other than WAGNER service personnel. Transport damage, maintenance work and loss and damage due to faulty maintenance work are not covered by the guarantee. Under any guarantee claim, there must be proof of purchase of the tool through submission of the original receipt. Wherever legally possible, we exclude all liability for injury, damage or consequential loss, especially if the tool has been used for a purpose other than that stated in the operating instructions, commissioned or repaired other than in accordance with our operating instructions or if repairs are performed by someone who is unqualified. We reserve the right to perform any repairs in excess of those stated in our operating instructions. In case of guarantee or repair, please refer to your point of sale.
- WOOD&METAL EXTRA CORNER&REACH
- General instructions
- CAUTION!
- Assembly (Fig. 1-4)
- Align the feed tube (see instructions for the basic unit)
- Adjusting the spraying direction (Fig. 5)
- Preparing the Coating Material
- Measuring the Viscosity (Fig. 6)
- Adjusting the material quantity
- Tips for painting points to which access is difficult
- Tips for radiator painting
- Interruption of Work
- Shutting down and cleaning
- Assembly
- Environmental protection
- Important Note regarding Product Liability!
- years guarantee
Brand : WAGNER
Model : 2361742
Category : Paint spray