
MG501N10 - Food Processor MOULINEX - Free user manual and instructions
Find the device manual for free MG501N10 MOULINEX in PDF.
| Product type | Multi-cooker food processor |
| Brand | Moulinex |
| Model | MG501N10 |
| Power supply | 220-240 V ~ 50/60 Hz |
| Power | 1500 W |
| Bowl capacity | 2.5 L |
| Weight | 5 kg |
| Dimensions (L x W x H) | 40 x 30 x 25 cm |
| Automatic programs | 8 programs (Quiche & Cakes, Pizza, Pasta & Rice, Gourmet Sandwich, Meats, Fish & Vegetables, Frozen Foods, Plancha) |
| Manual mode | Yes, with thermostat setting (1 to 10) and time |
| Grill function | Yes, upper heating plate |
| 180° opening | Yes, support handle |
| Bowl and upper plate | Removable, dishwasher safe |
| Drip tray | Yes, removable |
| Cord storage | Yes, under the appliance |
| Safety | Automatic stop at end of program, keep warm for 1 hour |
| Maintenance | Never immerse the appliance; use a damp sponge for the exterior |
| Spare parts | Available from Moulinex after-sales service |
| Repairability | Repairs exclusively by an authorized service center |
Frequently Asked Questions - MG501N10 MOULINEX
User questions about MG501N10 MOULINEX
0 question about this device. Answer the ones you know or ask your own.
Ask a new question about this device
Download the instructions for your Food Processor in PDF format for free! Find your manual MG501N10 - MOULINEX and take your electronic device back in hand. On this page are published all the documents necessary for the use of your device. MG501N10 by MOULINEX.
USER MANUAL MG501N10 MOULINEX
natural_image
Exterior view of a black Moutimer vacuum cleaner (no visible text or symbols on the device body)Please read the "Use & Safety instructions" booklet carefully before first use.

A. UTILISATION D'UN PROGRAMME AUTOMATIQUE
FR
natural_image
Hand inserting a plug into an electrical outlet, showing a black arrow indicating direction (no text or symbols)
natural_image
Illustration of a cooking pot with a stopwatch and thermometer above it, no text or symbols present.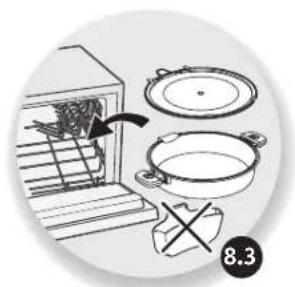
natural_image
Illustration of cooking process steps showing a stove with a pan and a pot, no text or symbols present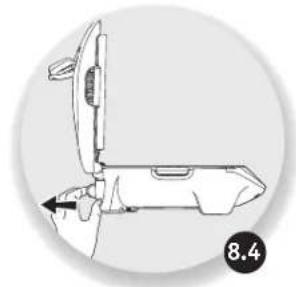
natural_image
Technical line drawing of a mechanical device with no visible text or symbols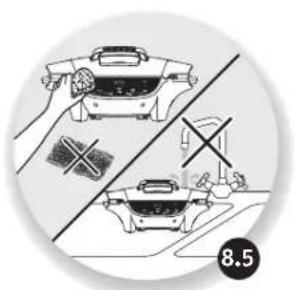
natural_image
Illustration of two kitchen utensils with crossed handles and a scale, no text or symbols present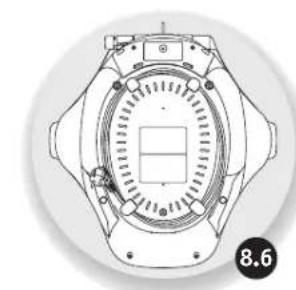
natural_image
Technical line drawing of a mechanical component with no visible text or symbols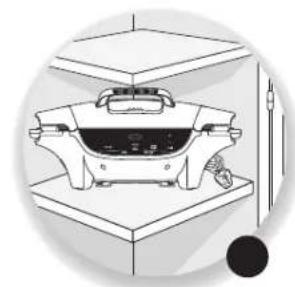
natural_image
Illustration of a vintage kitchen appliance on a stand, no text or symbols present
natural_image
Illustration of hands using a tool to adjust or install a product, with no visible text or symbolsENTRETIEN ET NETTOYAGE
• Description 21
- Change of position 24
- Product overview 26
- Preparation 26
• Installation and connection 26
• Overview of the programmes 28
• A. Using an automatic programme 30
• B. Using the manual programme 32
• C. Changing the cooking time 34
• D. Changing the thermostat during cooking 34
• E. End of a programme (automatic or manual) 34
• F. Extending a cooking cycle (automatic or manual) 34
- Maintenance and cleaning 36
- Cooking guide 37
- Troubleshooting guide 38
EN
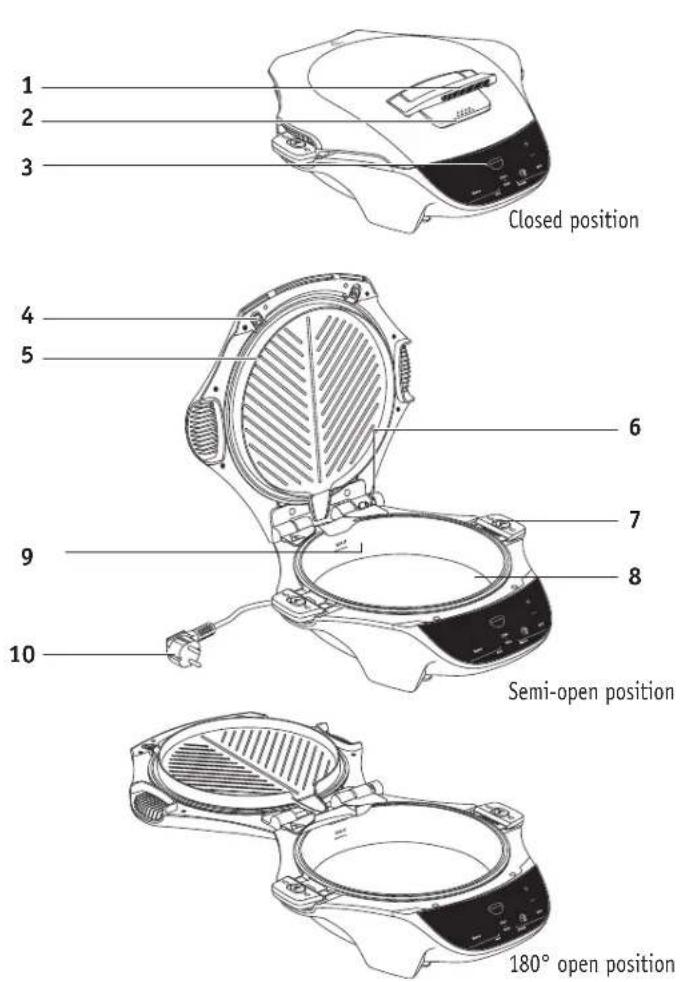
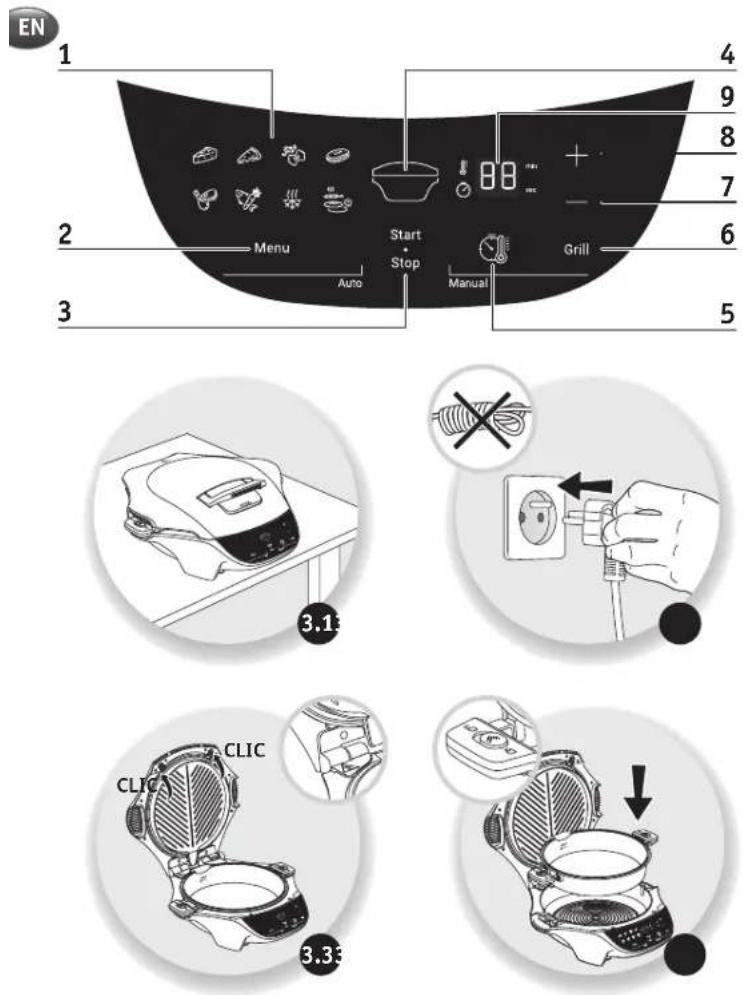
DESCRIPTION
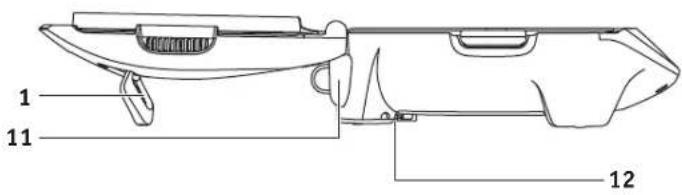
1 Handle/Holder 180° open position
2 Handle unlock button on side of handle
3 Control panel
4 Top plate clips
5 Top plate
6 180° opening hinge button
7 Pot handle clips
8 Pot
9 Maximum volume level indicator
10 Power cord
11 Juice jug
12 Cord storage
EN
EN
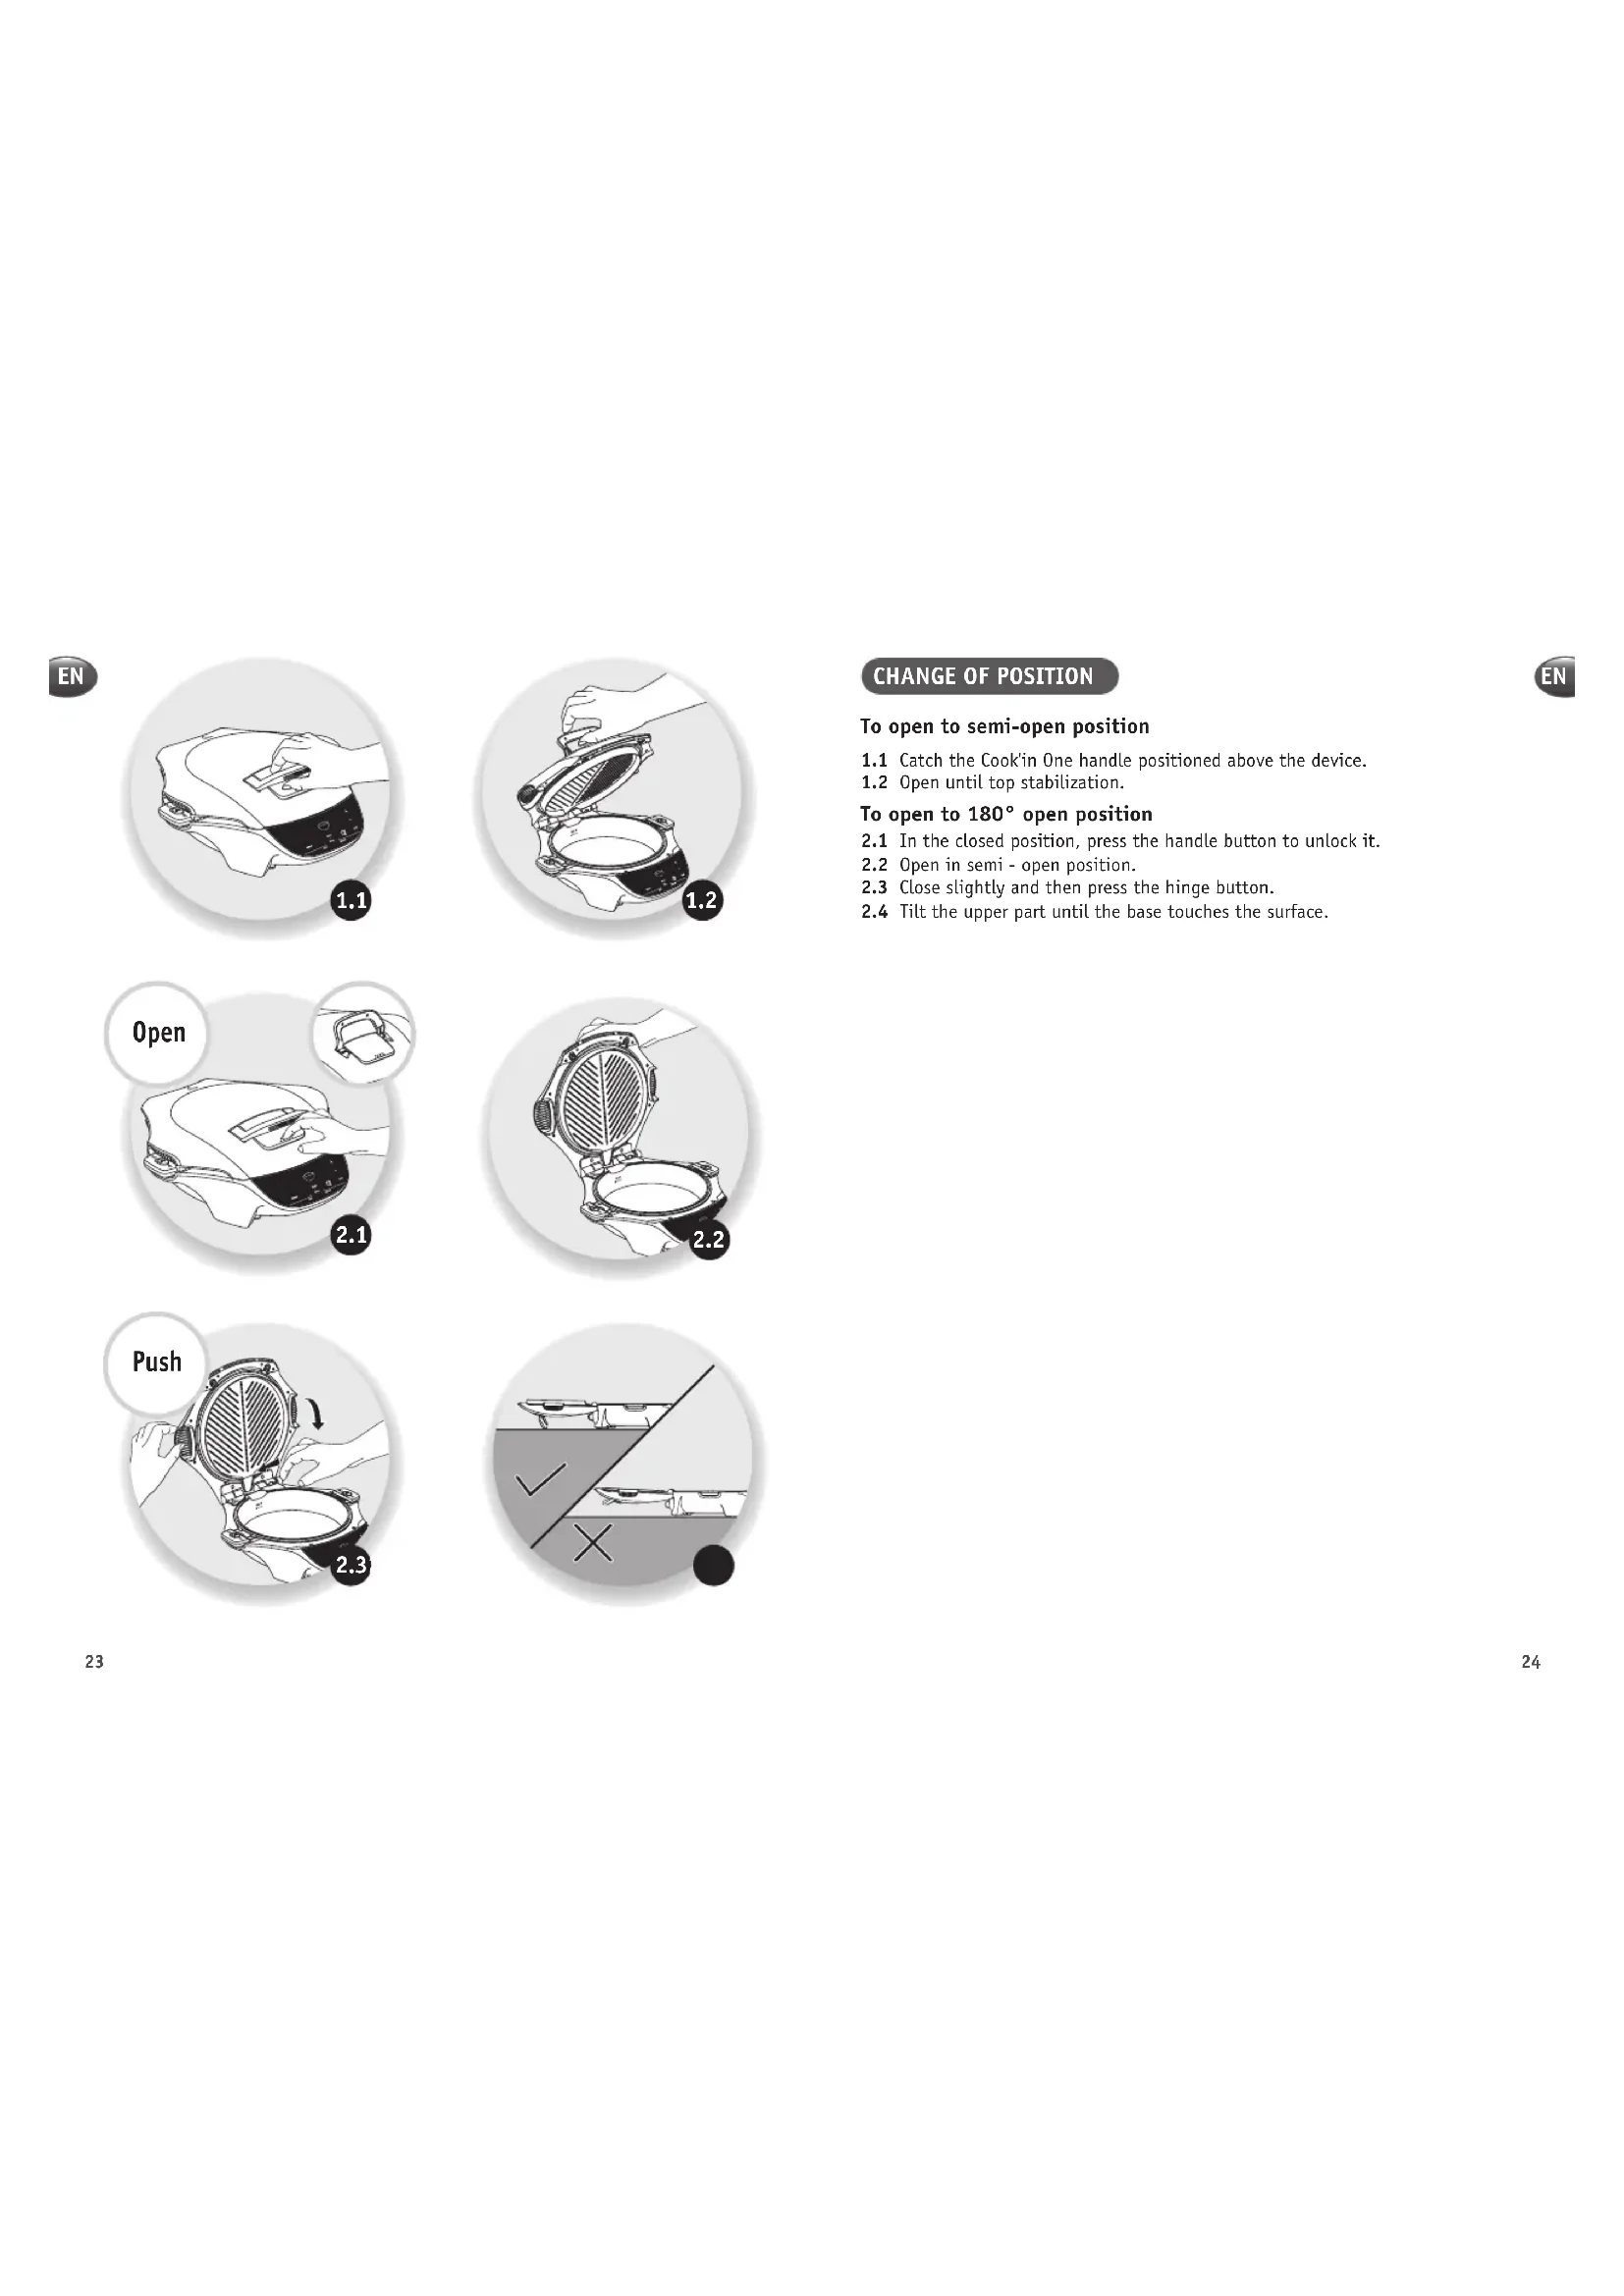
CHANGE OF POSITION
EN
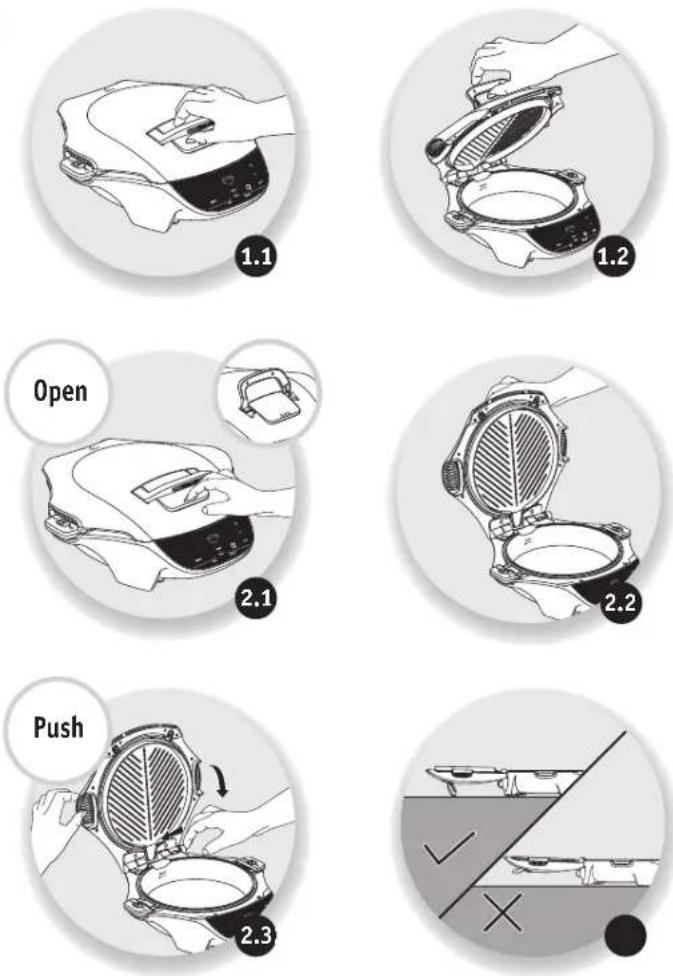
To open to semi-open position
1.1 Catch the Cook'in One handle positioned above the device.
1.2 Open until top stabilization.
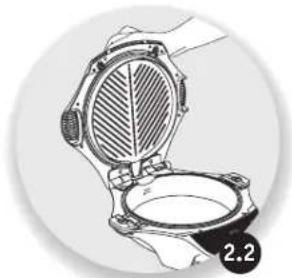
To open to 180^ open position
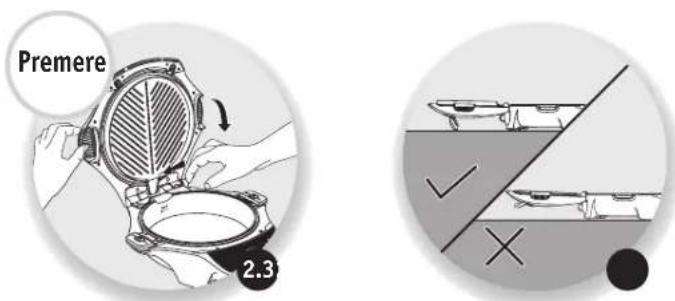
2.1 In the closed position, press the handle button to unlock it.
2.2 Open in semi - open position.
2.3 Close slightly and then press the hinge button.
2.4 Tilt the upper part until the base touches the surface.
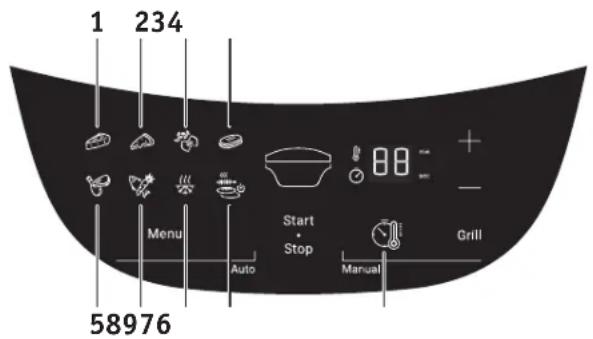
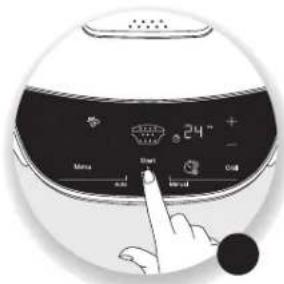
PRODUCT OVERVIEW
1 Menu screen (depending on model)
2 Menu button
3 Start/Stop button
4 Heat zone indicator
5 Manual mode button
6 Grill button (see page 32)
7 Minus (-) button
8 Plus (+) button
9 Control panel
PREPARATION
- Remove all packaging, stickers and other accessories from both the interior and exterior of the appliance.
- Prior to first use, thoroughly clean the top plate and the pot with hot water and washing-up liquid; carefully rinse and dry.
- Clip the pot and the top plate into the product.
Note: Use a damp sponge to clean the cooking plates and a soft, damp cloth for the body of the appliance.
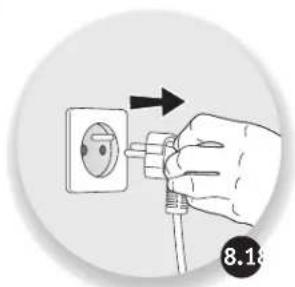
INSTALLATION AND CONNECTION
The appliance start-up applies to all programmes
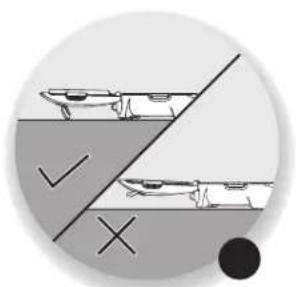
3.1. Place your Cook'in one on a flat, stable, heat resistant work surface away from water.
3.2. Plug in your appliance
3.3. Check that the pot and the top plate are installed in the product.
Caution: Do not heat without food, except for preheat.
Note: Choose the position best suited to your cooking
When using the appliance for the first time, a slight odour and/or smoke may be emitted during the first minutes of use
EN
OVERVIEW OF THE PROGRAMMES
EN
8 Automatic programme
1 Quiche & cakes programme
2 Pizza programme
3 Pasta & rice programme
4 Gourmet sandwich programme
5 Meat programme
6 Fish & vegetable programme
7 Frozen programme
8 Plancha programme
Cooking tip: There is a programme suited to each recipe style Depending on the programme selected, a default cooking time is indicated. There are several recipes per programme. It may therefore be necessary to adjust the cooking time based on the recipe selected (see the list of recommended times per recipe).
Caution: To ensure best results, it is essential to follow the recipe and to adhere to the exact quantities.
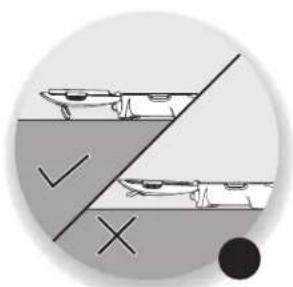
Liquid's cooking must always be done in open mode in order to avoid a large release of steam at the opening and a possible flow of liquid on the work surface.
1 manual mode (9)
Use the correct setting for the selected programme.
EN


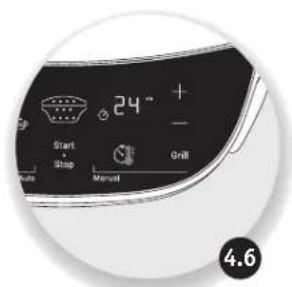
A. USING AN AUTOMATIC PROGRAMME
EN
Once the installation and connections are complete.
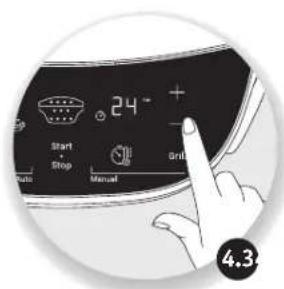
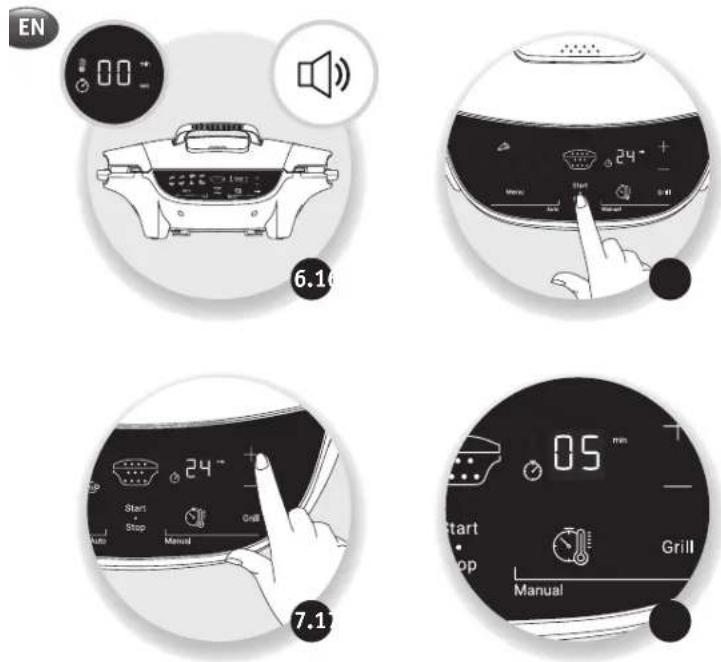
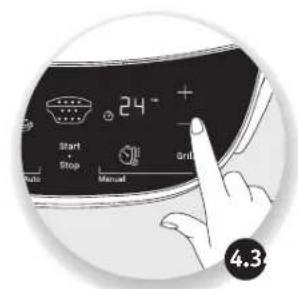
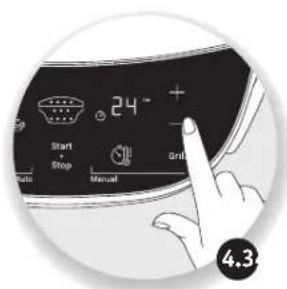
4.1. Scroll through the cooking programs using the Menu button.
4.2. The selected pictogram flashes.
4.3. If required, press the + and - buttons to change the time.
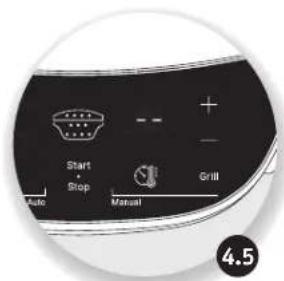
4.4. Place the Cook'in one in the correct position and then press Start/Stop.
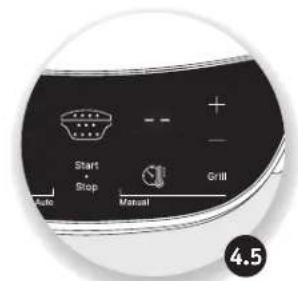
4.5. The preheating starts. The display will then show a succession of horizontal bars during preheating.
Caution: There is no preheating for the pizza and quiche & cakes programmes. Cooking starts as soon as the START/STOP button is pressed.
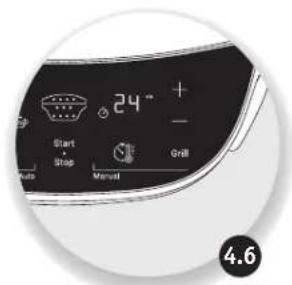
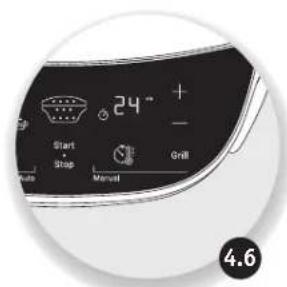
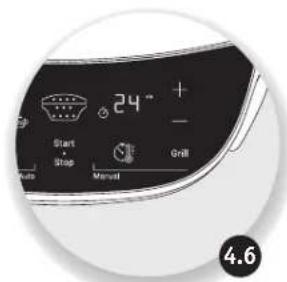
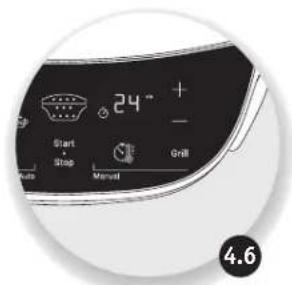
4.6. Once preheating is completed, the Cook'in one beeps, cooking starts automatically and the display shows the cooking time you selected in step 4.3. The cooking time counts down in minutes and then in seconds for the last minute.
Note: The preheating time is set by default. You cannot change the preheating time. To force the end of preheating and start cooking immediately, press the START/STOP button twice.
For the quiche & cakes, pizza, meat, fish & vegetable and frozen programmes, the Cook'in one switches to "keep warm" mode for one hour by default.
EN
EN
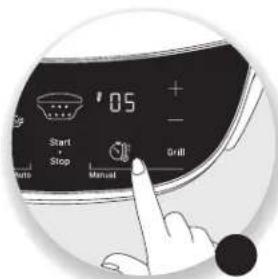


B. USING THE MANUAL PROGRAMME
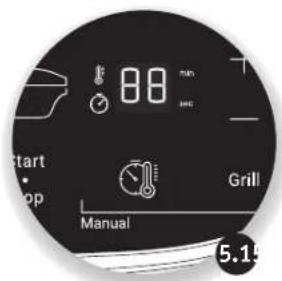
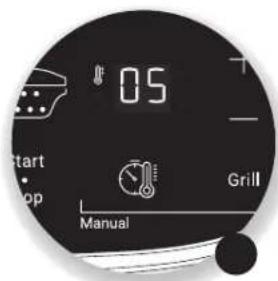
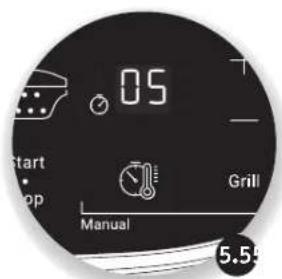
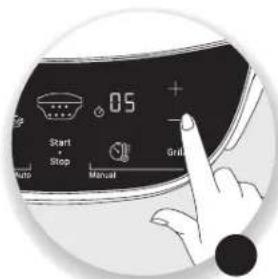
5.1. Press the manual mode button.
5.2. A default thermostat flashes.
5.3. Press the +/- keys to change the thermostat (min. 01, max. 10).
5.4. Press the manual mode button to confirm.
5.5. A predefined cooking time flashes.
5.6. Press the + and - buttons to change the time, if required.
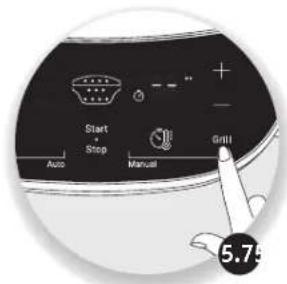
5.7. The pot of the appliance will always heat up by default.
If you want to use the top plate, press the Grill button. A row of red LEDs will light up on the Cook'in One central heat indicator. Press the START/STOP button to confirm and start preheating.
5.8. At the end of preheating, the Cook'in one beeps and cooking starts automatically. The display shows the cooking time you selected in step 5.6.
Note: Choose the setting best suited to your cooking.
The Cook'in one goes into "keep warm" mode for one hour by default.
C. CHANGING THE COOKING TIME
EN
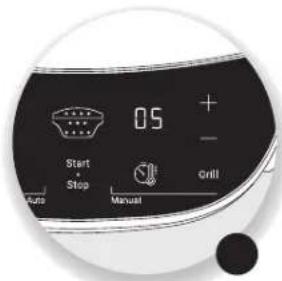
- Once cooking has started, press the +/- buttons to change the cooking time.
Note: The cooking time cannot be changed during preheating.
D. CHANGING THE THERMOSTAT DURING COOKING
Note: The cooking thermostat cannot be changed during the preheating phase. For the manual programme, once cooking has started. Press the manual programme button and then the +/- buttons to change the thermostat.
D. END OF A PROGRAMME (AUTOMATIC OR MANUAL)
6.1 The time reaches 00 and the product sounds an alert to signal the end of cooking.
6.2 Press START/STOP once to stop the sound alert; the display flashes 00.
Caution: The plates stay hot at the end of the cooking process. If you leave the food in the appliance, it will continue to cook.
F. EXTENDING A COOKING CYCLE (AUTOMATIC OR MANUAL)
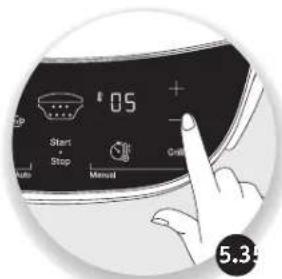
7.1 At the end of the programme if the dish is undercooked when starting the warm-up mode, additional cooking time can be added by pressing the + button.
7.2 The time display stops flashing and the minute-by-minute countdown starts. Cooking continues.
Note: A long press on the Start/Stop button will return you to the original setting.
EN
natural_image
Hand inserting a plug into an electrical outlet, showing a black arrow indicating direction (no text or symbols)
natural_image
Illustration of a cooking pot with a stopwatch and thermometer above it, no text or symbols present.
natural_image
Illustration of cooking process steps: oven with pan, pot, and stand (no text or symbols)
natural_image
Technical line drawing of a mechanical device with an open lid and internal components, no text or symbols present.
natural_image
Technical line drawing of a mechanical component with no visible text or symbols
natural_image
Illustration of a kitchen appliance on a counter with a tool nearby (no text or symbols)
natural_image
Illustration of hands using a tool to cut a shoe with checkmark and cross symbols (no text or symbols present)MAINTENANCE AND CLEANING
8.1 Unplug the appliance.
8.2 Allow the Cook'in One to cool completely for at least two hours.
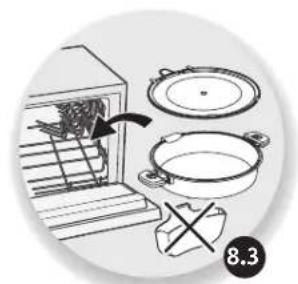
8.3 The top plate and the cooking pot are dishwasher-safe.
8.4 After use, empty the juice jug and rinse with water or washing-up liquid.
8.5 The appliance and its power cord must never be put in the dishwasher, nor under water or in any other liquid. If you do not wish to put the top plate and the pot in the dishwasher, use hot water and washing-up liquid to wash them, then rinse thoroughly to remove all residues.
Dry them thoroughly. Do not use any metal scouring pads, steel wool or abrasive cleaning products to clean the top plate and pot. Only use nylon or non-metallic cleaning pads.
Never immerse the appliance wholly or partly in water or in any other liquid.
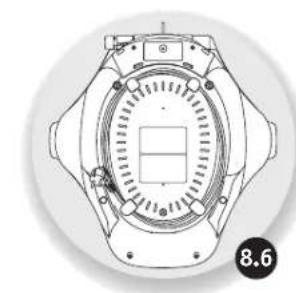
8.6 We recommend winding the cord under the appliance.
8.7 Always ensure that the appliance is clean and dry prior to storage. Clean the outside of the appliance regularly.
8.8 The appliance must not be carried by the top part or the holder (1) or by the power cord.
Caution: All repairs must be carried out by an authorised service centre.
EN
COOKING GUIDE
| Programmes Recipes Quantity | Cooking time | Recommended position | Preheating | "Keep warm" mode | |
| 1. Quiche & cakes | Quiche 1 50 min |  | No Yes | ||
| 2. Pizza Pizza | 1 25min |  | No Yes | ||
| 3. Pasta& rice | Pasta | 250g |  | ||
| 4. Sandwich | Gourmet sandwich | 2 10-15 min |  | Yes No | |
| 5. Meat | Minced beef | 4 |  | ||
| 6. Fish & vegetables | 8 Asian stir-fried vegetables | 200-400g |  | Yes | Yes |
| 7. Frozen | Minced beef | 2-4 |  | Yes | Yes |
| 8. Plancha | Chicken kebab | 2-4 |  |
COOKING GUIDE TROUBLESHOOTING GUIDE
EN
| Problem Solution | |
| E1 or H1 or E2 | Appliance failure: Unplug the appliance and contact your customer service or authorised repair centre. |
| E3 | Check that the pot is properly installed.Unplug the appliance and wait a few minutes.Then plug in your appliance again and turn it on.If the problem persists, contact your customer service or a repair centre. |
| The displayed time flashes. | If the displayed time is correct, press START/STOP to confirm. |
| The displayed thermostat flashes | If the displayed thermostat is correct, press START/STOP to confirm. |
| The illuminated programme flashes | If the displayed programme is correct, press START/STOP to confirm. |
| The time has reached 00, but the level of cooking is insufficient | At the end of cooking, after turning off the beep sound by pressing START/STOP once, close the appliance again and add some time using the - and + buttons, then confirm by pressing START/STOP. |
| Once a cooking programme has been started, it is not possible to change the cooking time | Once the programme has started, wait for the preheating time to finish before changing the time using the - and + buttons. |
| Key malfunction | Unplug the appliance and wait a few minutes.Then plug in your appliance again and turn it on.If the problem persists, contact your customer service or a repair centre. |
| The cooking result is not as expected. | Follow the Moulinex recipes available on the app. |
| Liquid flow on the worktop and/or on the contour of the Cook'in one. | Cooking of liquids must always be carried out in open mode in order to prevent a large amount of steam from being released on opening and liquid potentially flowing onto the worktop. |
| The product is not stable in the 180° open position. | Check that the handle is in the support position, 180° open (see page 23) and that it touches the worktop. |
| There is a gap between the top plate and the pot when the product is closed. | Check that the top plate and the pot are correctly installed. |
INHALTSVERZEICHNIS
DE


A. VERWENDEN EINES AUTOMATISCHEN PROGRAMMS
DE
natural_image
Hand inserting a plug into an electrical outlet, showing a black arrow indicating direction (no text or symbols)
natural_image
Illustration of a cooking pot with a stopwatch and thermometer symbols (no text or labels)
natural_image
Illustration of cooking process steps including oven, pan, and stand (no text or symbols)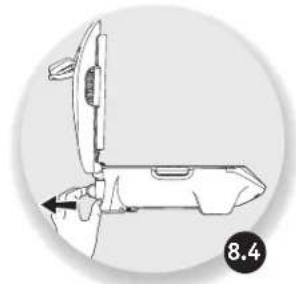
natural_image
Technical line drawing of a mechanical device with an arrow indicating direction (no text or symbols)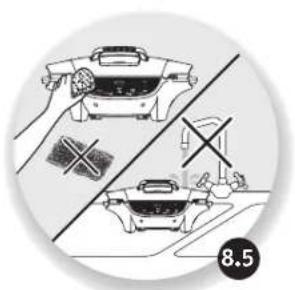
natural_image
Illustration of two kitchen utensils with crossed handles and a cross symbol, no text or labels present
natural_image
Technical line drawing of a mechanical component with no visible text or symbols
natural_image
Diagram of a kitchen appliance with a mounted fan and base, no visible text or symbols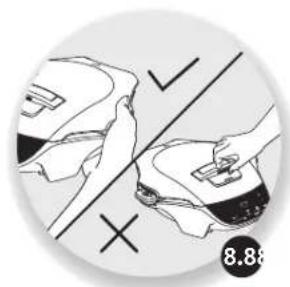
natural_image
Illustration of hands using a tool to adjust or install a product, with no visible text or symbolsnatural_image
Illustration of a hand holding a small electronic device with a control panel, enclosed in a circular frame (no text or symbols)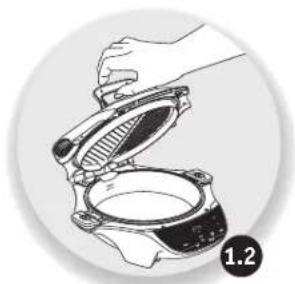
natural_image
Illustration of hands installing or adjusting a mechanical component (no text or symbols visible)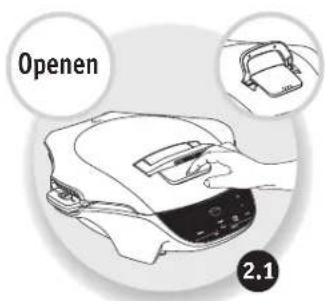
natural_image
Illustration of a hand holding a mechanical component with a meshed circular opening (no text or symbols)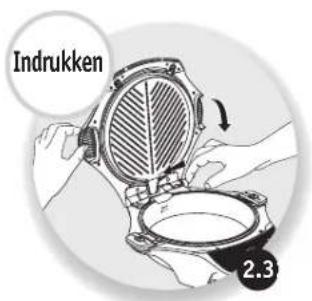
natural_image
Simple diagram showing two ships on a boat deck divided by a diagonal line, with check and cross symbols (no text or labels)

A. EEN AUTOMATISCH PROGRAMMA GEBRUIKEN
NL
B. HET HANDMATIGE PROGRAMMA GEBRUIKEN
natural_image
Hand inserting a plug into an electrical outlet, showing a black arrow indicating direction (no text or symbols)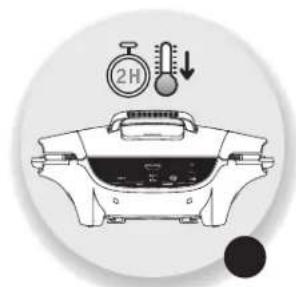
natural_image
Illustration of a cooking pot with a stopwatch and thermometer above it, no text or symbols present.
natural_image
Illustration of cooking process steps including oven, pan, and pot (no text or symbols)
natural_image
Technical line drawing of a mechanical device with an arrow indicating direction (no text or symbols)
natural_image
Illustration of a cooking process with two identical cookware and a crossed-out tool, no text or symbols present.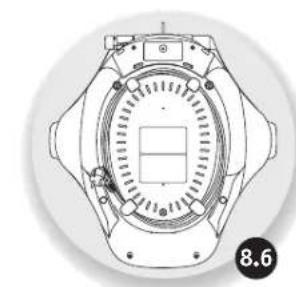
natural_image
Technical line drawing of a mechanical component with no visible text or symbols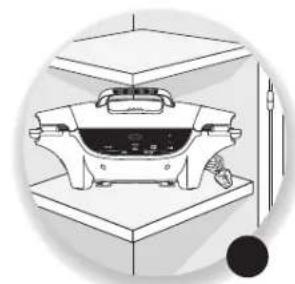
natural_image
Illustration of a kitchen appliance on a counter with a tool nearby (no text or symbols)
natural_image
Illustration of hands using a tool to cut a shoe with checkmark and cross symbols (no text or symbols present)NL
ONDERHOUD EN REINIGING
natural_image
Line drawing of a hand holding a small object over a food item, with no visible text or symbols.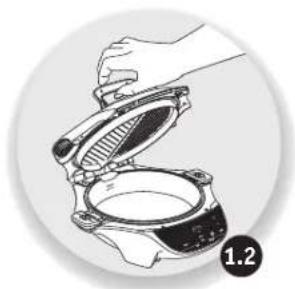
natural_image
Illustration of hands installing or adjusting a mechanical component (no text or symbols visible)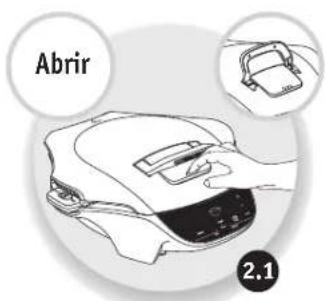

natural_image
Illustration of a hand holding a mechanical component with a meshed lid and a circular inset showing a circular opening (no text or symbols)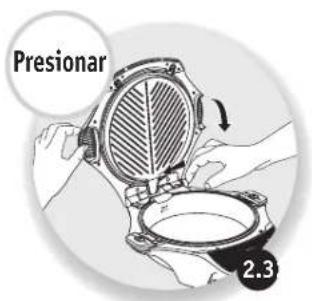
natural_image
Simple diagram showing two figures on a divided surface with check and cross marks, no text or symbols present.CAMBIO DE POSICIÓN
ES

A. USAR UN PROGRAMA AUTOMÁTICO
ES
B. USAR EL PROGRAMA MANUAL
natural_image
Hand inserting a plug into an electrical outlet, showing a black arrow indicating direction (no text or symbols)
natural_image
Illustration of a cooking pot with a stopwatch and thermometer symbols (no text or labels)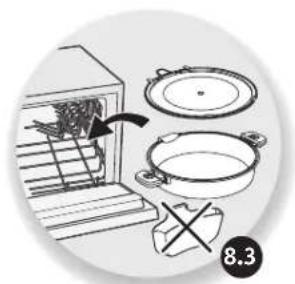
natural_image
Illustration of cooking process steps including oven, pan, and stand (no text or symbols)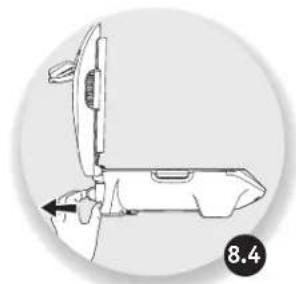
natural_image
Technical line drawing of a mechanical component with no visible text or symbols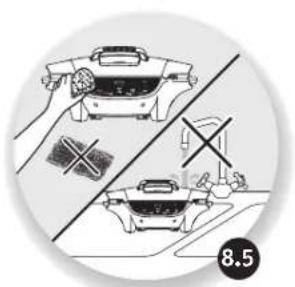
natural_image
Illustration of a cooking process with hands holding a hot pot and a crossed-out kitchen pan (no text or symbols)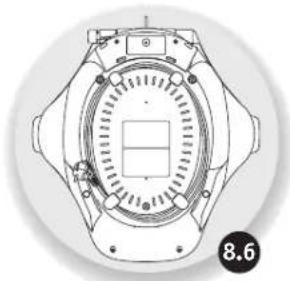
natural_image
Technical line drawing of a mechanical component with no visible text or symbols
natural_image
Illustration of a kitchen appliance on a counter with a tool nearby (no text or symbols)
natural_image
Illustration of hands using a tool to cut a shoe with checkmark and cross symbols (no text or symbols present)MANTENIMIENTO Y LIMPIEZA
natural_image
Two-step diagram showing hands installing a device on a device, labeled 1.1 and 1.2 (no text or symbols on the devices themselves)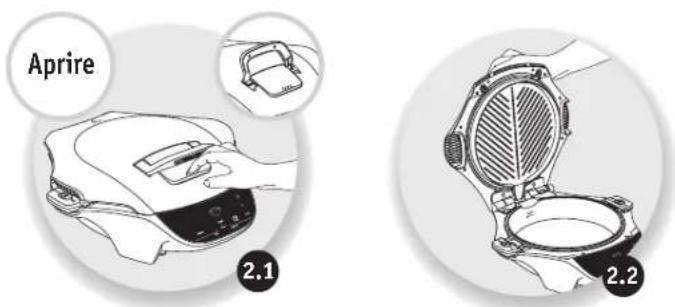
CAMBIO DI POSIZIONE
IT

A. USO DI UN PROGRAMMA AUTOMATICO
IT
B. USO DEL PROGRAMMA MANUALE
natural_image
Hand inserting a plug into an electrical outlet, showing a black arrow indicating direction (no text or symbols)
natural_image
Illustration of a cooking pot with a stopwatch and thermometer symbols (no text or labels)
natural_image
Illustration of a kitchen appliance on a counter with a tool nearby (no text or symbols)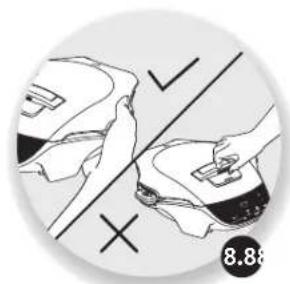
natural_image
Illustration of hands using a tool to cut a shoe with checkmark and cross symbols (no text or symbols present)IT
natural_image
Illustration of cooking process steps: oven with pan, pot, and stand (no text or symbols)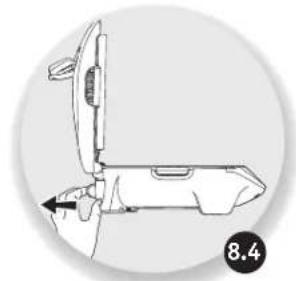
natural_image
Technical line drawing of a mechanical device with an arrow indicating direction (no text or symbols)natural_image
Illustration of a cooking pan and a kitchen with crossed tools, no text or symbols present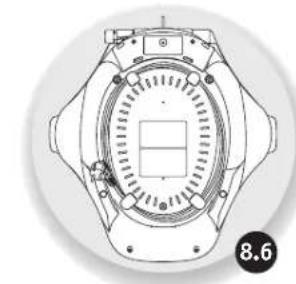
natural_image
Technical line drawing of a mechanical component with no visible text or symbolsIT
GUIDA ALLA COTTURA


- UTILISATION D'UN PROGRAMME AUTOMATIQUE
- ENTRETIEN ET NETTOYAGE
- EN
- DESCRIPTION
- CHANGE OF POSITION
- To open to semi-open position
- To open to 180° open position
- PRODUCT OVERVIEW
- PREPARATION
- INSTALLATION AND CONNECTION
- OVERVIEW OF THE PROGRAMMES
- Automatic programme
- manual mode (9)
- USING AN AUTOMATIC PROGRAMME
- USING THE MANUAL PROGRAMME
- CHANGING THE COOKING TIME
- CHANGING THE THERMOSTAT DURING COOKING
- END OF A PROGRAMME (AUTOMATIC OR MANUAL)
- EXTENDING A COOKING CYCLE (AUTOMATIC OR MANUAL)
- MAINTENANCE AND CLEANING
- COOKING GUIDE
- COOKING GUIDE TROUBLESHOOTING GUIDE
- INHALTSVERZEICHNIS
- VERWENDEN EINES AUTOMATISCHEN PROGRAMMS
- EEN AUTOMATISCH PROGRAMMA GEBRUIKEN
- HET HANDMATIGE PROGRAMMA GEBRUIKEN
- ONDERHOUD EN REINIGING
- CAMBIO DE POSICIÓN
- USAR UN PROGRAMA AUTOMÁTICO
- USAR EL PROGRAMA MANUAL
- MANTENIMIENTO Y LIMPIEZA
- CAMBIO DI POSIZIONE
- USO DI UN PROGRAMMA AUTOMATICO
- USO DEL PROGRAMMA MANUALE
Brand : MOULINEX
Model : MG501N10
Category : Food Processor