S6 - Broom hoogo - Free user manual and instructions
Find the device manual for free S6 hoogo in PDF.
| Brand | hoogo |
| Model | S6 |
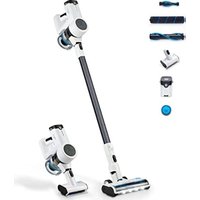
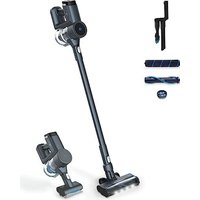
| Type | 2-in-1 Cordless Stick Vacuum |
| Reference | SC602 |
| Power supply input voltage | 100-240 V~, 50/60 Hz, 0.4 A max |
| Power supply output voltage | 30 V, 500 mA |
| Power supply protection class | II |
| Battery type | Lithium-ion |
| Battery voltage | 25.9 V |
| Battery capacity | 2200 mAh |
| Charging time (80%) | Approximately 4 hours |
| Charging time (100%) | Approximately 5 hours |
| Power modes | Eco, Standard, Power, Auto |
| Maximum runtime (two batteries, Eco mode) | 90 minutes |
| Runtime per battery in Eco mode | Approximately 45 minutes |
| Runtime per battery in Standard mode | Approximately 25 minutes |
| Runtime per battery in Power mode | Approximately 10 minutes |
| Dust container capacity | Approximately 500 ml |
| Floor brush included | Yes |
| Electric upholstery/dust mite brush | Yes |
| Combined upholstery and furniture nozzle | Yes |
| Crevice tool | Yes |
| Flexible suction hose | Yes |
| Wall mount included | Yes |
| Dust sensors | Yes |
| Motor protection filter | Washable and replaceable |
| Brush roller | Cleanable and replaceable |
| Removable battery | Yes |
Frequently Asked Questions - S6 hoogo
User questions about S6 hoogo
0 question about this device. Answer the ones you know or ask your own.
Ask a new question about this device
Download the instructions for your Broom in PDF format for free! Find your manual S6 - hoogo and take your electronic device back in hand. On this page are published all the documents necessary for the use of your device. S6 by hoogo.
USER MANUAL S6 hoogo
natural_image
Blank white image with faint horizontal lines, no text or symbols presentRitikat or Vortak Tengas te
14
text_image
CLEVER SEIN UND EIN ZUSÄTZLICHES JAHR GARANTIE ABSTAUBEN. hooGo ... and shine! hoogo S6| Languages | |
| English | 23 |
| Chinese | 81 |
| European | 75 |
| Italian | 95 |
| International Services | |
| SLEY | |
| Austria | Silva Schweiz je neubels |
| Belgium | davon |
| Canada | Kaufortische |
| Denmark | SOP, Coupier |
| Finland | Golf, Kock |
| France | Inédien |
| Germany | Infolgliche Bete |
| India | Jahili |
| Israel | Jahili |
| Italy | Istituto |
| Japan | Tokyo |
| Korea | Tokyo |
| Mexico | Tokyo |
| Russia | Tokyo |
| China | Tokyo |
| CLM-CH |
| The Colours: The company is a member of the company and is not an individual. This company is a member of the company and is not an individual. |
| B |
| The Company's name, name, and location of the Company is the company's name, name, and location of the Company's name. |
| H |
| In the case, the company's name, name, and location of the Company is the company's name, name, and location of the Company's name. |
| I |
| In the case, the company's name, name, and location of the Company is the company's name, name, and location of the Company's name. |
| II |
| De owner's name, name, name, and location of the Company is the company's name, name, and location of the Company's name. |
Intrusion Horsal Hoogo 24
1
Product Review
text_image
Technical diagram of a mechanical assembly with numbered components and labeled partsF. F- hawu baling haoqiu St
legends
2.1.1.3.4.5.6.7.8.9.10.11.12.13.14.15.16.17.18.19.20.21.22.23.24.25.26.27.28.29.30.31.32.33.34.35.36.37.38.39.40.41.42.43.44.45.46.47.48.49.50.51.52.53.54.55.56.57.58.59.60.61.62.63.64.65.66.67.68.69.70.71.72.73.74.75.76.77.78.79.80.81.82.83.84.85.86.87.88.89.90.91.92.93.94.95.96.97.98.99.100
[Non-Text]
[Non-Text]
[Non-Text]
[Non-Text]
Bato 10-2013
all approximating 10.0 mm x 1000 cm
To Mr. M. and Mrs. Kevin the for 2010 to 2014, the
In contrast, the following figures are
-
-
-
-
-
-
-
-
-
-
-
-
-
-
-
-
-
-
-
-
-
-
-
-
-
-
-
-
-
-
-
-
-
-
-
-
-
-
-
-
-
-
-
-
-
-
-
-
-
-
-
-
-
-
-
-
-
-
-
-
-
-
-
-
-
-
-
-
-
-
-
-
-
-
-
-
-
-
-
-
-
-
-
-
-
-
-
-
-
-
-
-
-
-
-
-
-
- 99.
-
-
-
-
-
-
-
-
-
-
-
-
-
-
-
-
-
-
-
-
-
-
-
-
-
-
-
-
-
-
-
-
-
-
-
-
-
-
-
-
-
-
-
-
-
-
-
-
-
-
-
-
-
-
-
-
-
-
-
-
-
-
-
-
-
-
-
-
-
-
-
-
-
-
-
-
-
-
-
-
-
-
-
-
-
-
-
-
-
-
-
-
-
-
-
-
[Unreadable Text]
to date, we need to be
In addition, the average value of the
- 所有
obtisla and folia. Tamaer worke and aom reclav
In this case, the Department of California
(2) 1.0.1. (3) 1.0.2. (4) 1.0.3. (5) 1.0.4. (6) 1.0.5. (7) 1.0.6. (8) 1.0.7. (9) 1.0.8. (10) 1.0.9. (11) 1.0.10.
(2014)1984-057(1)
correspondent information which is available
The following table is in English:
The source image is illegible due to extreme noise and distortion. No text can be extracted.
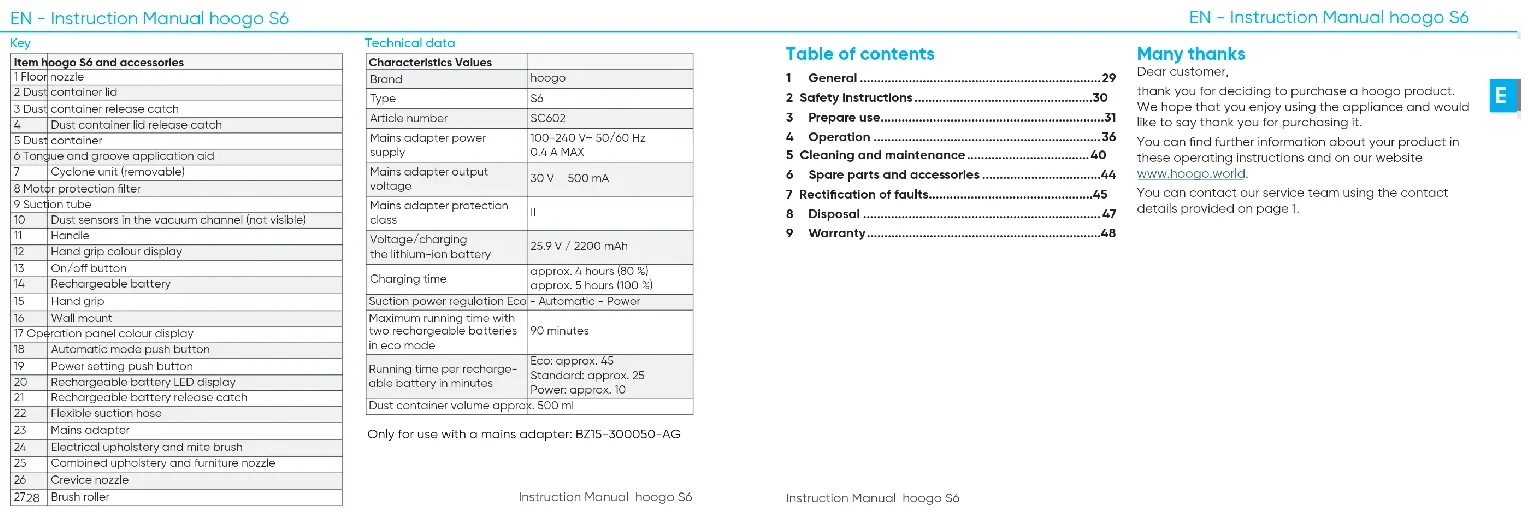
| Item Hoogo S6 and accessories | |
| 1 | Foot nozzle |
| 2 | Dust container lid |
| 3 | Dust container release catch |
| 4 | Dust container lid release catch |
| 5 | Dust container |
| 6 | Tongue and groove application aid |
| 7 | Cyclons unit (removable) |
| 8 | Motor protection filter |
| 9 | Suction tube |
| 10 | Dust sensors in the vacuum channel (not visible) |
| 11 | Handle |
| 12 | Hand grip colour display |
| 13 | On/off button |
| 14 | Rechargeable battery |
| 15 | Hand grip |
| 16 | Wall mount |
| 17 | Operation panel colour display |
| 18 | Automatic mode push button |
| 19 | Power setting push button |
| 20 | Rechargeable battery LED display |
| 21 | Rechargeable battery release pinch |
| 22 | Flexible suction hose |
| 23 | Maine adapter |
| 24 | Electrical upholstery and mite brush |
| 25 | Combined upholstery and furniture nozzle |
| 26 | Crevise nozzle |
| 27a | Brush roller |
Technical data
| Characteristics Values | |
| Brand | Hoogo |
| Type | 56 |
| Article number | 50,602 |
| Mains adapter power supply | 100-240 V~ 50/60 Hz0.4 A MAX |
| Mains adapter output voltage | 30 V ~ 500 mA |
| Mains adapter protection class | II |
| Voltage/charging the lithium-ion battery | 25.9 V / 2200 mAh |
| Charging time | approx. 4 hours (50 %) approx. 5 hours (100 %) |
| Suction power regulation Eco - Automatic - Power | |
| Maximum running time with two rechargeable batteries in eco mode | 90 minutes |
| Running time per recharge-cole battery in minutes | Eco: approx. 45Standard: approx. 25Power: approx. 10 |
| Dust container volume approx. 500 ml | |
Only for use with a mains adapter: BZ15-300050-AG
Instruction Manual: hooge 56
Table of contents
1 General 29
2 Safety Instructions 30
3 Prepare use....31
4 Operation 36
5 Cleaning and maintenance....40
6 Spare parts and accessories....44
7 Rectification of faults....45
8 Disposal 47
9 Warranty....48
Many thanks
Dear customer,
thank you for deciding to purchase a hoogo product. We hope that you enjoy using the appliance and would like to say thank you for purchasing it.
You can find further information about your product in these operating instructions and on our website www.hoogo.world.
You can contact our service team using the contact details provided on page 1.
Instruction Manual: noogo 56
1 General
These instructions for use contain important information for your safety as well as on the use of the appliance.
- Read the instructions for use in full and attentively prior to initial use. Failure to observe the instructions for use may result in injury to persons or damages to property as well as loss of warranty.
- Store these instructions for use at an easily accessible location in the vicinity of the appliance.
• Always provide third parties these instructions for use together with the appliance.
1.1 Target group
- This appliance and its accessories may only be operated by children above 8 years of age and persons with reduced physical, sensory or mental abilities as well as also in-general in case of lacking experience and/or knowledge if they are previously instructed by experienced adults regarding potential danger and safe use or are supervised during use.
- All use and work on and with the appliance as well as playing within its proximity is prohibited for children under 8 years of age.
1.2 Intended use
The 2-in-1 battery-operated vacuum cleaner hoogo S6 is exclusively intended for dust removal in domestic surroundings. The 2-in-1 battery-operated vacuum cleaner hoogo S6 (in the following also referred to as the appliance) may only be used with the Mytek accessories belonging to it.
Use the appliance exclusively in the household for vacuum cleaning even, dry, normally soiled hard floors, short pile carpets or sets which withstand the burdens of the rotating brush without damages. Dependent on the brush attachment selected, the appliance can also be used to vacuum furniture. All further use is deemed as not intended and is prohibited. The appliance is not suitable for the removal of dangerous dust or liquid.
The appliance and its accessories do not have any moisture protection. Only use it in dry indoor rooms.
1.3 Predictable misuse
All different use or use above and beyond the intended use is deemed as unintended use.
The manufacturer is not liable for damages resulting from this. In case of alterations or incorrect assembly, installation, commissioning, operation, servicing or repairs, the manufacturer assumes no liability.
Exclusively original parts from the manufacturer are permissible as spare parts and accessories. Spare parts and accessories not delivered by the manufacturer are not tested for operation and may influence operational safety. The manufacturer assumes no liability for damages arising from the use of non-permissible spare parts and accessories.
Reasonably predictable misuse includes in particular: • Operation without a collecting vessel
• Operation with an incorrectly positioned collecting vessel
• Outdoor use and/or use in the rain
- Operation with Incorrect operation: Vacuuming people, animals (in particular fur/hair, fingers and other parts of the body)
• Operation with a floor nozzle above head height
• Operation without a brush roller
• Operation with an open lid
• Operation without a filter
2 Safety instructions
2.1 Basic safety measures
If you abuse the following basic safety measures, this may result in severe injury to persons or damages to property!
The product:
- Use exclusively in accordance with the intended purpose
- Never commission despite recognisable damages
- Never make technical alterations
- Never operate when incompletely assembled
- Never operate without the required covers
The safety measures are the prerequisite for safe, disturbance-free operation and for the achievement of the specified product properties.
2.2 Structuring warning information
Safety information protects against injury to persons or damages to property. The measures described for risk avoidance must be adhered to.

WARNING
Marks an exceptionally high danger situation. If this information is not observed, severe, irreversible or lethal injuries may be incurred.

ATTENTION
Marks a danger situation. If this information is not observed, minor or moderate injuries may be incurred.
INFORMATION
Marks risk of accidental loss, destruction or deterioration. If this information is not observed, loss, destruction or deterioration may be incurred.
2.3 General safety instructions

WARNING
Danger of explosion, bursting!
Appliance and rechargeable battery are heat-sensitive.
▶ Neither subject the appliance and rechargeable battery to fire nor to temperatures exceeding 45 °C.

WARNING
Danger of suffocation, choking!
It is possible that packaging material and small parts can be inhaled, swallowed or misused for playing with.
▶ Secure packaging and small parts against use,
3 Prepare use
Follow the instructions listed to prepare the appliance for use.
- Check the network adopter cable for possible damages prior to use.
- Never use a network adapter with a damaged plug or cable.
- Only connect the network adapter to sockets which use the electrical voltage defined on the network adapter.
• In case of incorrect treatment of rechargeable batteries, risk of injury exists. - Only use the charger provided to charge the rechargeable battery pack.
3.1 Unpacking
The packaging protects the vacuum cleaner against transport damages. Keep the packaging for transport purposes.
Disposal information is provided at the end of the instructions.
Follow the action steps listed to unpack the appliance.
1. Unpack the appliance and its accessory components.
2. Check the completeness and intactness of the unpacked contents.
→ In case of transport damages or missing parts, turn to your dealer without delay.
3.2 Become acquainted with the displays
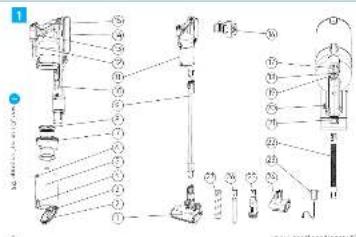
The appliance has a colour display in the operation panel (Fig. 1, p. 2, no. 17), an LED rechargeable battery display (Fig. 1, no. 20) and a lit hand grip (Fig. 1, no. 12). The elements serve as a display when the appliance is switched on. The LEDs in the operation panel and the hand grip can be lit in various colours:
- Blue: The appliance vacuums in standard mode.
- Red: The appliance vacuums in power mode.
- Green: The appliance vacuums in eco mode.
- White: The appliance vacuums in automatic mode.
Cleaning display
The colour display in the operation panel (Fig. 1, no. 17) flashes red if the filter is clogged or the air path is blocked. This function is only available in power mode (3.3.1 Assembling the wall mount" on page 33).
LED rechargeable battery display
The rechargeable battery display LEDs (Fig. 1, no. 20) are lit according to the appliance's charge status:
• 1 LED: Rechargeable battery charged approx. 30%
- 2 LEDs: Rechargeable battery charged 30-64%
• 3 LEDs: Rechargeable battery charged 64-99%
- If the appliance is fully charged, all three LEDs are constantly lit
3.3 Assembly
3.3.1 Assembling the wall mount
-
Hold the wall mount (Fig. 1, no. 16) on the wall and mark two holes at the attachment points.
-
Drill two holes (∅ approx. 8 mm) at the locations marked and insert the two dowels provided into the drill holes.
-
Attach the wall mount using the two screws provided.
3.3.2 Assembling the handle
You must assemble the handle before you assemble the floor nozzles.
- Insert the handle (Fig. 1, no. 11) into the upper end of the suction tube (Fig. 1, no. 9) until the adopter engages audibly and noticeably.
3.3.3 Assembling the nozzles

ATTENTION
Danger of Injuryl
Unintended activation of the appliance may result in injury.
▶ Switch the appliance off before assembling the nozzles.
▶ Secure the appliance against unintended activation before assembling the nozzles.
INFORMATION
Property damages!
Incorrect use of the nozzles may result in damaging your flooring.
Before vacuuming, inform yourself regarding the requirements of your flooring. Observe the recommendations made by the flooring manufacturers.
Assembling the floor nozzle
- Insert the floor nozzle (Fig. 1, no. 1) onto the lower end of the suction tube (Fig. 1, no. 9) until it engages audibly and noticeably.
Assembling further nozzles
You can extend the functional scope of your appliance by exchanging the floor nozzle.
In addition to the floor nozzle, further nozzles, brushes and a flexible suction hose are included in the scope of delivery of your appliance:
- Crevice nozzle (Fig. 1, no. 26): Use the crevice nozzle to vacuum dust out of locations which are difficult to access.
- Combined upholstery and furniture nozzle (Fig. 1, no. 25): Use the upholstery and furniture nozzle to remove dust from items with sensitive surfaces.
- Electrical upholstery and mite brush (Fig. 1, no. 24): Use the electrical upholstery and mite brush to brush out fibres and mites and to ease cleaning upholstery and furniture.
- Flexible suction hose (Fig. 1, no. 22): Use the suction hose for greater flexibility to vacuum dust out of locations which are difficult to access. The suction hose serves as an alternative to the suction tube.
Follow the action steps listed to assemble other nozzles.
- Press the lower locking mechanism on the lower end of the suction tube (Fig. 1, no. 9) to release the floor nozzle (Fig. 1, no. 1).
- Pull the floor nozzle off the suction tube.
- Insert the desired nozzle onto the end of the suction tube. The accessory nozzles can alternatively be attached to the handle.
3.3.4 Charging the rechargeable battery

WARNING
Risk of electric shock!
In case of non-intended use or damages, short-circuits and contact with dangerous voltages may occur.
▶ Test the appliance and accessories for damages, in particular the mains adopter, before all work on or with the appliance.
▶ Only operate the appliance and its accessories in a perfect state.

ATTENTION
Danger of short-circuit of the rechargeable battery!
▶ Never contact both poles simultaneously with electrically conducting items.
▶ Do not immerse the rechargeable battery in liquid.
INFORMATION
Property damages and loss of warranty!
The product is only approved for use with the mains adopter provided.
▶ Only use the mains adapter provided.
INFORMATION
Property damages!
The mains adapter and cable are prone to damages.
▶ Only unplug the mains adapter from the connector casing and never at the cable from the wall socket.
▶ Neither bend, clamp nor drive over the mains adapter cable.
INFORMATION
Risk of stumbling!
▶ Lay the mains adapter cable safely, avoiding sharp edges and bends.
The appliance is charged with electrical current. Here, the basic danger of an electric shock exists. Therefore, pay attention to the following:
- Check the appliance and mains adapter for damages before use. Never use a faulty appliance or an appliance with a faulty mains adapter.
- Only connect the mains adapter to wall sockets with electrical current equivalent to that defined on the name plate of the appliance.
Charge the rechargeable battery completely prior to initial use, it is best to charge the rechargeable battery before each use, above-all if not used for a longer period. This increases the working life of the rechargeable battery and enables long cleaning cycles.
Charging the rechargeable battery
- Insert the mains adapter plug provided (Fig. 1, no. 23) into the charging connection (on the side of the rechargeable battery) on the appliance.
- Connect the mains adapter provided to the wall socket.
The LEDs on the rechargeable battery display (Fg no. 20) start flashing. The more LEDs which flash the further the charging process has progressed.
3. Wait until all three rechargeable battery display LEDs are constantly lit.
- Then, the rechargeable battery is fully charged.
4. Unplug the mains adapter from the wall socket.
5. Unplug the mains adapter plug from the connector socket on the appliance.
4 Operation

WARNING
Risk of electric shock!
Damp and moisture in the appliance may cause contact with dangerous voltage.
▶ Neither touch the appliance nor the mains adopter with wet hands.
▶ Neither immerse the appliance nor the mains adopter in liquid.
▶ Protect the appliance and accessories against moisture.

ATTENTION
Danger of injury!
If you drop the appliance or it falls over accidentally, injuries may be incurred.
Do not drop the appliance when in use.
▶ When not in use, secure the appliance against falling over.
4.1 Vacuum cleaning

WARNING
Danger of injury!
The use of a damaged appliance may result in injury.
▶ Test the appliance prior to each use.
▶ Do not use any damaged appliances.

ATTENTION
Danger of Injury!
The installed brush roller rotates at a high speed and can cause injuries.
▶ Do not position yourself beneath the brush roller with any parts of your body.

ATTENTION
Glare!
The LEDs on the floor nozzle cannot be exchanged and illuminate the working area.
▶ Do not store directly into the LEDs.
INFORMATION
Property damages!
The brush roller can suck in items, damage them or wrap them around itself, resulting in blocking and overheating the motor.
▶ Do not vacuum in the vicinity of cables and leads.
▶ Do not vacuum any shag-pile carpets or loose threads.
INFORMATION
Property damages!
The appliance may be damaged if a filter is incorrectly inserted or blocked.
▶ Ensure that the filter is inserted correctly.
▶ Ensure that no openings are blocked.
▶ Ensure that the filter is intact and dry.
The appliance has four different modes:
- Eco mode: Use eco mode to remove slight soiling. The appliance uses less energy and the rechargeable battery operating time is increased.
- Standard mode: Use standard mode to remove normal soiling. When switched on, the appliance is automatically in standard mode.
- Power mode: Use power mode if more suction power is required. The appliance runs at top performance.
- Automatic mode: Use automatic mode if the power should be adapted automatically according to the extent of soiling.
4.1.1 Activating standard mode
-
Remove the appliance from the wall mount (Fig. 1, no. 16).
-
Ensure that the handle and desired nozzle are assembled correctly 1,3.3.2 Assembling the handle" on page 33, 3.3.3 Assembling the nozzles' on page 33).
- Press the on/off button (Fig. 1, no. 13). The LEDs on the operation panel (Fig. 1, no. 17) and the hand grip (Fig. 1, no. 12) of the appliance are lit in blue. The appliance vacuums in standard mode.
4.1.2 Activating power mode
- Switch standard mode on for the appliance (4.1.1) Activating standard mode* on page 38l.
- Press the power setting push button (Fig. 1, no. 19) once to select power mode. The LEDs on the operation panel (Fig. 1, no. 17) and the hand grip (Fig. 1, no. 12) of the appliance are lit in red.
4.1.3 Activating eco mode
- Switch standard mode on for the appliance (4,1,1) Activating standard mode* on page 38.
- Press the power setting push button (Fig. 1, no. 19) twice to select eco mode. The LEDs on the operation panel (Fig. 1, no. 17) and the hand grip (Fig. 1, no. 12) of the appliance are lit in green.
4.1.4 Activating automatic mode
- Switch standard mode on for the appliance (4.1.1 Activating standard mode* on page 38).
- Press the automatic mode push button (Fig. 1, no. 18) to select automatic mode. The LEDs on the operation panel (Fig. 1, no. 17) and the hand grip (Fig. 1, no. 12) of the appliance are lit in white.
4.2 Deactivation
- Press the on/off button (Fig. 1, no. 13). The LEDs on the appliance go off.
→ The appliance is switched off.
4.3 Keeping and storage

ATTENTION
Property damages!
The appliance may be damaged by heat.
▶ Do not place the appliance directly next to heat sources (e.g. heating or ovens).
▶ Avoid direct insolation.
4.3.1 Keeping the appliance
INFORMATION
Property damages!
Constant charging may damage the appliance
▶ Do not insert the mains adapter plug provided into the connector socket on the appliance permanently during storage.
- Ensure that the appliance is switched off (4.2 Decactivation* on page 39).
- Hang the appliance on the intended wall mount (Fig. 1, no. 16).
4.3.2 Storing the appliance
Follow the action steps listed to prepare the appliance for longer-term storage.
- Ensure that the appliance is switched off (4.2 Deactivation* on page 38).
- Empty the dust container 1,11 Target group* on page 29).
- Clean the dust container (1.1 Target group* on page 29).
4.4 Transport and disassembly
For comfortable transport, you can remove the suction tube from the handle and nozzle used.
- Ensure that the appliance is switched off (4.2 Deactivation* on page 38).
- Press the locking mechanism on the upper end of the suction tube (Fig. 1, no. 9) to release the handle (Fig. 1, no. 11).
- Pull the handle out of the suction tube.
- Press the locking mechanism on the floor nozzle (Fig. 1, no. 1) to release the floor nozzle from the lower end of the suction tube.
- Pull the nozzle used off the suction tube.
5 Cleaning and maintenance

WARNING
Risk of electric shock!
Damp and moisture in the appliance may cause contact with dangerous voltage.
▶ Neither touch the appliance nor the mains adapter with wet hands.
▶ Neither immerse the appliance nor the mains adapter in liquid.
▶ Protect the appliance and accessories against moisture.

ATTENTION
Danger of Injury!
Unintended activation of the appliance may result in injury.
▶ Switch the appliance off before cleaning and maintenance work.
- Secure the appliance against unintended activation before cleaning and maintenance work.
Instruction Manual: hoogo 56
5.1 Emptying the dust container
INFORMATION
Property damages!
The dust container can only receive a limited quantity of dirt. The appliance can be damaged by dust.
▶ Empty the dust container regularly, ideally after each use, however at the latest when vacuuming performance worsens significantly.
Please observe the appliance's clearing display in the operation panel (Fig. 1, no. 17).
Follow the action steps listed to empty the dust container.
- Ensure that the appliance is switched off (4.2 Deactivation" on page 38).
- Press the upper locking mechanism on the suction tube (Fig. 1, no. 9) to release the handle (Fig. 1, no. 11).
- Pull the handle out of the suction tube.
- Press the dust container release catch (Fig. 1, no. 3), to release the dust container (Fig. 2A "Cleaning", p. 123, 1).
-
Pull the dust container off the handle (Fig. 2A, 2).
-
Hold the dust container deep in a dustbin.
- Press the release catch on the dust container lid (Fig. 1, no. 4). The lid (Fig. 1, no. 2) opens and the dust drops into the dustoin.
- Beat the dust container empty gently.
- Use a dry cloth or a brush with soft bristles to remove dust deposits from the dust container.
- Close the lid of the dust container.
- Place the dust container on the handle. Ensure that the elevation on the appliance is inserted into the recess on the dust container (Fig. 1, no. 6). Push the dust container into the locking mechanism (Fig. 1, no. 3) until it engages audibly and noticeably.
- Check the correct positioning of the dust container.
5.2 Cleaning the dust container
INFORMATION
Loss of vacuuming performance!
The cyclone unit and motor protection filter may become blocked during use. Vacuuming performance deteriorates.
▶ Clean the dust container with the cyclone unit and motor protection filter regularly, however of the latest when vacuuming performance worsens significantly.
▶ If necessary, replace the motor protection filter in order to retain maximum vacuuming performance.
Follow the action steps listed to clean the dust container.
- Ensure that the appliance is switched off (4.2 Deactivation* on page 38).
- Empty the dust container (5.1 Emptying the dust container* on page 40).
- Leave the dust container (Fig. 1, no. 5) dismantled.
-
If required, remove the cyclone unit (Fig. 1, no. 7) from the dust container for cleaning purposes.
-
Remove the motor protection filter (Fig. 1, no. 8; Fig. 2B) from the cyclone unit.
- Beat the filter above the dustbin and rinse the filter using clear water (Fig. 2C).
- Let the filter dry completely in the fresh air or on a radiator (Fig. 2D). Let the filter dry for at least 24 hours on a radiator. Drying in the fresh air may take up to 72 hours. If necessary, use replacement filters during this period [1 General] on page 29].
- If required, use a dry cloth or a brush with soft bristles to remove dust deposits from the cyclone unit.
- Insert the cyclone unit into the dust container if you have removed the cyclone unit during step 4.
- Insert the motor protection filter into the cyclone unit.
- Place the dust container on the handle. Ensure that the elevation on the appliance is inserted into the recess on the dust container (Fig. 1, no. 6). Push the dust container into the locking mechanism (Fig. 1, no. 3) until it engages audibly and noticeably.
- Check the correct positioning of the dust container.
5.3 Cleaning the brush roller
INFORMATION
Property damages!
Soiling can influence the rotation of the brush roller. ▶ Clean the brush roller regularly.
Follow the action steps listed to clean the brush roller.
- Ensure that the appliance is switched off (4.2 Deactivation" on page 38).
- Press the lower locking mechanism on the lower end of the suction tube (Fig. 1, no. 9) to release the floor nozzle (Fig. 1, no. 1).
- Pull the floor nozzle off the suction tube,
- Release the brush locking mechanism. If the locking mechanism cannot be released, use a coin as a help (Fig. 3A "Cleaning", on page 123).
- Remove the brush roller (Fig. 3Bl)
- Free the brush roller of dirt. If the dirt cannot be removed, use tweezers or a pair of scissors.
- Insert the cleaned brush roller into the floor nozzle.
- Close the locking mechanism.
- Insert the floor nozzle onto the lower end of the suction tube.
5.4 Replacing the rechargeable battery

ATTENTION
Detrimental to health!
In case of unintended use or overageing, the rechargeable battery may lose acidic liquid.
▶ Use protective gloves for cleaning and disposal and avoid skin contact with rechargeable battery liquid.
- Rinse parts of the body with contact using water.
- In case of after-effects, consult a physician.

ATTENTION
Danger of short-circuit of the rechargeable battery!
▶ Never contact both poles simultaneously with electrically conducting items.
▶ Do not immerse the rechargeable battery in liquid.
Follow the action steps listed to replace or exchange the rechargeable battery.
-
Ensure that the appliance is switched off [_44.2 Deco-tivation^* on page 38).
-
Press the release catch (Fig. 1, no. 21) to release the rechargeable battery
- Pull the rechargeable battery out of the rechargeable battery compartment.
- Insert the replacement or a new rechargeable battery I,1 General* on page 29 ^1 into the rechargeable battery compartment until it engages audibly and noticeably.
- Check the correct positioning of the rechargeable battery.
5.5 Cleaning the dust sensors
NOTICE
Reduction of the running time!
The dust sensors become heavily soiled during use. In automatic mode, the appliance then vacuums with maximum performance, independent of the extent of soiling. The running time of the appliance is reduced.
▶ Clean the dust sensors regularly at the latest when you notice that vacuuming performance in automatic mode is not adopted to the extent of soiling.
The dust sensors are located in the vacuum channel of the handle at the height of the location marked (Fig. 1, no. 10). They serve automatic performance adaptation in automatic mode ('4.1.4 Activating automatic mode* on page 14).
Follow the action steps listed to clean the dust sensors. 1. Ensure that the appliance is switched off (*4.2 Switching off* on page 15).
- Press the upper locking mechanism on the suction tube (Fig. 1, no. 9) to release the handle (Fig. 1, no. 11).
- Pull the handle out of the suction tube (Fig. 1, no. 9).
- Use a round cleaning brush with soft bristles to remove dust deposits from the dust sensors. Guide the cleaning brush into the vacuum channel of the handle up to the dust sensors (Fig. 1, no. 10) and turn the brush.
- Remove the cleaning brush from the suction channel.
6 Spare parts and accessories
You can order spare parts and accessories for the 2-in-1 battery-operated vacuum cleaner hoogo So in the Internet under www.hoogo.world or via our service ("International Services" on page 1).
| Accessory/ Spare part Order number | |
| Motor protection filter | SC40205 |
| Battery 25.9 V | SC402065 |
| Mains adapter | SC402075 |
| Brush roller (universal) | SC402010 |
| Brush roller (for sensitive floors and hair) | SC402011 |
7 Rectification of faults

WARNING
Risk of electric shock!
Damp and moisture in the appliance may cause contact with dangerous voltage.
▶ Neither touch the appliance nor the mains adapter with wet hands.
▶ Neither immerse the appliance nor the mains adapter in liquid.
▶ Protect the appliance and accessories against moisture.

ATTENTION
Danger of Injury!
Unintended activation of the appliance may result in injury.
▶ Switch the appliance off before rectifying faults.
- Secure the appliance against unintended activation before rectifying faults.
The appliance may only be used if it is fully in order. If the appliance or part of it is faulty, it must be decommissioned and expertly repaired or disposed of. Try to rectify minor faults yourself. Observe the pertinent safety regulations in the operating instructions here. If the fault cannot be rectified, decommission the appliance and inform the manufacturer's qualified staff for fault rectification ("International Services" on page 1).
The following table shows on overview of the most important faults as well as their possible causes and rectification measures.
| Problem Possible cause Solution | ||
| An colour develops and/or dust is lost from the appliance when vacuuming. | Parts of the dust container of accessories dismantled for filter cleaning or changing accessories were not correctly re-installed or closed. | Test all parts for a firm fit and hold. |
| Problem Possible cause Solution | ||
| The appliance only cleans a little of the dirt or the red LED flashes. | The dust container is overfilled. | Emery the dust container (1,5.1 Emrying the dust container* on page 40). |
| The filter is soiled. | Clean the filter (1,5.2 Cleaning the dust container* on page 41). | |
| The nozzle used is inappropriate for the surface. | Use the fitting nozzle for your surface (1,3.3.3 Assembling the nozzle* on page 33). | |
| The dust container is not correctly inserted in the appliance. | Test the correct positioning of the dust container (1,5.1 Emrying the dust container* on page 40). | |
| The appliance cannot be switched on. | The rechargeable battery is fully empty. | Switch the appliance off and charge the rechargeable battery (1,3.3.4 Charging the rechargeable battery* on page 34). |
| Problem Possible cause Solution | ||
| The brush roller rotates slowly and/or unevenly. | the brush roller is soiled. | Clean the brush roller ‘l, s, 3 Cleaning the brush roller’ on page (42). |
| The appliance cannot be charged. The LEDs are not it. | The mains adopter is not correctly inserted. | Check whether the mains adopter plug and the mains adopter are correctly in their sockets. |
| The rechargeable battery is not correctly inserted in the appliance. | Disconnect the mains adopter and check whether the rechargeable battery is correctly placed. Reconnect the mains adopter. | |
| The appliance vacuums permanently in automatic mode with full performance. | The dust sensors are extremely soiled. | Clean the dust sensors L, S Cleaning the dust sensors’ auf Soile (43). |
8 Disposal

ATTENTION
Detrimental to health!
In case of unintended use or overaging, the rechargeable battery may lose acidic liquid.
▶ Use protective gloves for cleaning and disposal and avoid skin contact with rechargeable battery liquid.
- Rinse parts of the body with contact using water.
- In case of after-effects, consult a physician.
INFORMATION
Environmental danger!
The rechargeable battery may not be disposed of as domestic waste.
▶ Dispose of the rechargeable battery after removal at regional collection points designated for this purpose.
This appliance is marked in accordance with the requirements of Directive 2012/19/EU for Waste Electrical and Electronic Equipment - WEEE.
The Directive provides the framework for an EU-wide take-back and recovery of the old appliances.
This appliance was manufactured from recyclable or reusable materials. Its disposal must be made in accordance with the local regulations for waste management. Make the appliance unusable prior to scraping by cutting off the power supply cable. You can request further information regarding the treatment, recovery and reuse of electrical appliances from the local waste disposal company, the next recycling centre or your dealer where you purchased the appliance.
The packaging protects the appliance against transport damages. The packaging materials are selected in accordance with environmentally compatible and technical disposal criteria and therefore recyclable.
Dispose of these in an environmentally compatible manner and homogeneously in the collection systems provided.
9 Warranty
INFORMATION
If you incur problems with the hoogo S6, please call the service centre ("International Services" on page 1).
Our products are subject to stringent quality control. Should the hooga 56 nevertheless fail to function flawlessly, we regret this very much, and kindly ask you to contact the service address provided. We, Mytek GmbH, Sinninger Straße 44, D-48282 Emsdetten, will be happy to help you on the telephone via our service hotline. The following applies to the assertion of warranty claims – without your statutory rights being restricted:
1. You can only make warranty claims within a maximum period of 2 years as of the purchase date. Our warranty service is restricted to the rectification of material and manufacturing faults or the replacement of the appliance. Our warranty service is free of charge for you. The assertion of warranty claims after the warranty period has elapsed is excluded unless the warranty claims are made within a period of 2 weeks after the expiry of the warranty period.
Warranty claims must be made without delay following the discovery of the fault.
2. Please send faulty appliances with the warranty card and the receipt postage-paid to the service address. If the fault is within the scope of our warranty service, you will receive a repaired or new appliance back. A new warranty period does not begin with the repair or replacement of the appliance. The warranty period of 2 years as of the date of purchase remains valid. This also applies in the case of on-site services.
3. The warranty claims refer to equipment which is purchased and operated in Germany. Please enquire on the country-specific service hotline for information about the scope of validity of the warranty claims in another EU or EFTA country. The warranty claims do not apply to use outside the EU / EFTA.
Please remember that our warranty is null and void in the case of misuse or improper use, the failure to follow the valid safety precautions for the appliance, the use of force, or in the case of interventions that are not carried out by the service address authorised by us. We are able to rectify faults or damage to the appliance that are not for no longer covered by the warranty against reimbursement of the costs. In this case, please contact our service centre. It is only necessary to return
Warranty
Warranty
the appliance to our service address if the service hotline is unable to solve the problem.
9.1 Warranty
The respective implementation of EU Directive 2011/63 EU as national law is the valid minimum warranty standard in as far as you purchased the appliance as a consumer within the European Union. The valid minimum warranty rights in the respective country are valid for non-EU countries. Batteries and rechargeable batteries which snow faults due to normal wear and tear or incorrect handling or whose period of use has been reduced are excepted from warranty. We reserve the right to make technical and design alterations within the scope of constant product improvements. © Mytek GmbH