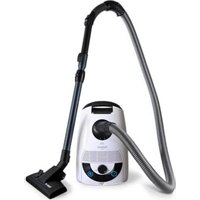
B3+ - Vacuum Cleaner hoogo - Free user manual and instructions
Find the device manual for free B3+ hoogo in PDF.


| Brand | hoogo |
| Model | B3+ |
| Appliance type | Canister vacuum cleaner |
| Power consumption | 850 W |
| Supply voltage | 220-240 V ~ 50/60 Hz |
| Protection class | II |
| Noise level | 72 dB(A) |
| Dust container capacity | 3 L |
| Weight | 3,9 kg |
| Operating range | > 11 m |
| Filter type | High performance filter HLM/14 |
| Motor filter | Washable with water |
| Exhaust filter | Dry cleaning (tapping and brushing) |
| Included nozzles | Universal floor brush, crevice nozzle, upholstery nozzle, furniture brush, parquet nozzle |
| Suction control | Continuously adjustable |
| Dust level indicator | Yes (blue) |
| Compatible dust bag | hoogo ZB101 or Swirl Y101 |
| Warranty | 2 years |
| Spare parts | Mini turbo brush ZB002, bag set ZB101, filter set DB302035 |
| Included accessories | Handle, suction tube, locking system, cable rewind |
Frequently Asked Questions - B3+ hoogo
User questions about B3+ hoogo
0 question about this device. Answer the ones you know or ask your own.
Ask a new question about this device
Download the instructions for your Vacuum Cleaner in PDF format for free! Find your manual B3+ - hoogo and take your electronic device back in hand. On this page are published all the documents necessary for the use of your device. B3+ by hoogo.
USER MANUAL B3+ hoogo
natural_image
Blank white image with faint horizontal gray lines, no text or symbols presentPart 2.001 Manual (n=6)
100
| Languages | |
| Deutsche | 25 |
| English | 25 |
| Chinese | 25 |
| German | 25 |
| Italian | 25 |
| International Services | |
| Net AT | |
| Pays in the bank of Trinidad | 2nd Canadian province 1- |
| Germany (€) | 2014 |
| France (€) | 2014 |
| Germany (€) | 2014 |
| Japan (€) | 2014 |
| Italy (€) | 2014 |
| China (€) | 2014 |
| India (€) | 2014 |
| Italy (€) | 2014 |
| China (€) | 2014 |
| China (€) | 2014 |
| China (€) | 2014 |
| China (€) | 2014 |
| China (€) | 2014 |
| China (€) | 2014 |
| China (€) | 2014 |
| China (€) | 2014 |
| China (€) | |
275
- 2016年7月4日 星期六
| Item | Age (years) and location |
| 1 | Younger, 60 years |
| 2 | Meningue, 30 years |
| 3 | Younger, 40 years |
| 4 | Younger, 50 years |
| 5 | Younger, 60 years |
| 6 | Younger, 70 years |
| 7 | Younger, 80 years |
| 8 | Younger, 90 years |
| 9 | Younger, 100 years |
| 10 | Younger, 110 years |
| 11 | Younger, 120 years |
| 12 | Younger, 130 years |
| 13 | Younger, 140 years |
| 14 | Younger, 150 years |
| 15 | Younger, 160 years |
| 16 | Younger, 170 years |
| 17 | Younger, 180 years |
| 18 | Younger, 190 years |
| 19 | Younger, 200 years |
| 20 | Younger, 210 years |
| 21 | Younger, 220 years |
| 22 | Younger, 230 years |
| 23 | Younger, 240 years |
| 24 | Younger, 250 years |
| 25 | Younger, 260 years |
| 26 | Younger, 270 years |
| 27 | Younger, 280 years |
| 28 | Younger, 290 years |
| 29 | Younger, 300 years |
| 30 | Younger, 310 years |
| 31 | Younger, 320 years |
| 32 | Younger, 330 years |
| 33 | Younger, 340 years |
| 34 | Younger, 350 years |
| 35 | Younger, 360 years |
| 36 | Younger, 370 years |
| 37 | Younger, 380 years |
| 38 | Younger, 390 years |
| 39 | Younger, 400 years |
| 40 | Younger, 410 years |
| 41 | Younger, 420 years |
| 42 | Younger, 430 years |
| 43 | Younger, 440 years |
| 44 | Younger, 450 years |
| 45 | Younger, 460 years |
| 46 | Younger, 470 years |
| 47 | Younger, 480 years |
| 48 | Younger, 490 years |
| 49 | Younger, 500 years |
| 50 | Younger, 510 years |
| 51 | Younger, 520 years |
| 52 | Younger, 530 years |
| 53 | Younger, 540 years |
| 54 | Younger, 550 years |
| 55 | Younger, 560 years |
| 56 | Younger, 570 years |
| 57 | Younger, 580 years |
| 58 | Younger, 590 years |
| 59 | Younger, 600 years |
| 60 | Younger, 610 years |
| 61 | Younger, 620 years |
| 62 | Younger, 630 years |
| 63 | Younger, 640 years |
| 64 | Younger, 650 years |
| 65 | Younger, 660 years |
| 66 | Younger, 670 years |
| 67 | Younger, 680 years |
| 68 | Younger, 690 years |
| 69 | Younger, 700 years |
| 70 | Younger, 710 years |
| 71 | Younger, 720 years |
| 72 | Younger, 730 years |
| 73 | Younger, 740 years |
| 74 | Younger, 750 years |
| 75 | Younger, 760 years |
| 76 | Younger, 770 years |
| 77 | Younger, 780 years |
| 78 | Younger, 790 years |
| 79 | Younger, 800 years |
| 80 | Younger, 810 years |
| 81 | Younger, 820 years |
| 82 | Younger, 830 years |
| 83 | Younger, 840 years |
| 84 | Younger, 850 years |
| 85 | Younger, 860 years |
| 86 | Younger, 870 years |
| 87 | Younger, 880 years |
| 88 | Younger, 890 years |
| 89 | Younger, 900 years |
| 90 | Younger, 910 years |
| 91 | Younger, 920 years |
| 92 | Younger, 930 years |
| 93 | Younger, 940 years |
| 94 | Younger, 950 years |
| 95 | Younger, 960 years |
| 96 | Younger, 970 years |
| 97 | Younger, 980 years |
| 98 | Younger, 990 years |
| 99 | Younger, 1000 years |
Corporated Hamilton, 2016
Figure 1. The following table is a table with two columns: 'Fig. 1' and 'Fig. 2'.
imreconselling height
Inhaltsverzelchnis
[Non-Text]
[Non-Text]
[Non-Text]
[Non-Text]
[Non-Text]
[Non-Text]
[Non-Text]
amecoclen
广力云智慧零售收银系统
D
[Unreadable]
Allgemeines
Sicherheitshinweise
1 Allgemeines
| Item Hooge B3+ and accessories | |
| 1 Hand grip locking | |
| 2 easy touch * sleeve (suction tube length adjustment) | |
| 3 Suction tube | |
| 4 Cable winding button | |
| 5 Secondary air regulator | |
| 6 Hand grip | |
| 7 Vacuum cleaner cover locking mechanism | |
| 8 MicroPort dust bog with DIRTLOCK' hygiene lock | |
| 9 Suction power adjustment (stepress) | |
| 10 On/off sensing device | |
| 11 Dust filing level display | |
| 12 Crevico nozzle | |
| 13 Upholstery nozzle | |
| 14 Furniture brush | |
| 15 Switchhole universal floor nozzle | |
| 16 Carpet/hord flooring toggle | |
| 17 Parquet nozzle | |
| 18 Motor filter | |
| 19 Exhaust filter |
Technical data
| Characteristics Values | |
| Brand | hcogo |
| Type | B3- |
| Article number | BB 302 |
| Mains adapter | 220-240V~50-60Hz |
| Mains adapter protection class | II |
| Power consumption 850 W | |
| Sound power level 72 dbA | |
| Filter | HEPA % high-performance filter |
| Dust container volume apocce. 31 | |
| Weight approx. 3.9 kg | |
| Operating range > 11 m | |
hoogo ZB101 and Swir® Y101 dust bags
Table of contents
1 General 23
2 Safety instructions....24
3 Prepare use....25
4 Operation 28
5 Cleaning and maintenance....31
6 Spare parts and accessories 34
7 Rectification of faults....35
8 Disposal 37
9 Warranty....37
Many thanks
Dear customer,
thank you for deciding to purchase a hoogo product.
We hope that you enjoy using the appliance and would
like to say thank you for purchasing it.
You can find further information about your product in
these operating instructions and on our website
www.noogo.world.
You can contact our service team using the contact
details provided on page 1.
^1 Registered trademark of a company of the Melitta Group
1 General
These instructions for use contain important information for your safety as well as on the use of the appliance.
- Read the instructions for use in full and attentively prior to initial use. Failure to observe the instructions for use may result in injury to persons or damages to property as well as loss of warranty.
- Store these instructions for use at an easily accessible location in the vicinity of the appliance.
• Always provide third parties these instructions for use together with the appliance.
1.1 Target group
- This appliance and its accessories may only be operated by children above 8 years of age and persons with reduced physical, sensory or mental abilities as well as also in general in case of lacking experience and/or knowledge if they are previously instructed by experienced adults regarding potential danger and safe use or are supervised during use.
- All use and work on and with the appliance as well as playing within its proximity is prohibited for children under 8 years of age.
1.2 Intended use
The canister vacuum cleaner hoogo B3+ is exclusively intended for dust removal in domestic surroundings. The canister vacuum cleaner hoogo B3+ (In the following also referred to as the appliance) may only be used with the hoogo accessories belonging to it.
Use the appliance exclusively in the household for vacuum cleaning even, dry, normally soiled hard floors, carpets or sets. Dependent on the brush attachment selected, the appliance can also be used to vacuum furniture. All further use is deemed as not intended and is prohibited. The appliance is not suitable for the removal of dangerous dust or liquid.
The appliance and its accessories do not have any moisture protection. Only use it in dry indoor rooms.
1.3 Predictable misuse
All different use or use above and beyond the intended use is deemed as unintended use.
The manufacturer is not liable for damages resulting from this. In case of alterations or incorrect assembly, installation, commissioning, operation, servicing or repairs, the manufacturer assumes no liability.
Exclusively original parts from the manufacturer are permissible as spare parts and accessories. Spare parts and accessories not delivered by the manufacturer are
not tested for operation and may influence operational safety. The manufacturer assumes no liability for damages arising from the use of non-permissible spare parts and accessories.
Reasonably predictable misuse includes in particular:
• Operation without a dust bag
• Operation with an incorrectly positioned dust bag
- Out door use and/or use in the rain
• Operation with a floor nozzle above head height
• Operation with an open Id
• Operation without a filter
• Operation with incorrect operation:
• Vocuuming people, animals, in particular fur/hair, fingers and other parts of the body
- Sucking in glowing, burning or smouldering particles (e.g. ash, coal, charcoal, cigarettes, matches)
- Sucking in explosive or highly flammable materials or toner
- Sucking in sharp items (e.g. glass splitters, nails, building rubble)
2 Safety instructions
2.1 Basic safety measures
If you abuse the following basic safety measures, this may result in severe injury to persons or damages to property!
• The product:
- Use exclusively in accordance with the intended purpose
- Never commission despite recognisable damages
- Never make technical alterations
- Never operate when incompletely assembled
- Never operate without the required covers
• The safety measures are the prerequisite for safe, disturbance-free operation and for the achievement of the specified product properties.
2.2 Structuring warning information
Safety information protects against injury to persons or damages to property. The measures described for risk avoidance must be adhered to.

WARNING
Marks an exceptionally high danger situation. If this information is not observed, severe, irreversible or lethal injuries may be incurred.

ATTENTION
Marks a danger situation. If this information is not observed, minor or moderate injuries may be incurred.
INFORMATION
Marks risk of accidental loss, destruction or deterioration. If this information is not observed, loss, destruction or deterioration may be incurred.
2.3 General safety instructions

WARNING
Danger of suffocation, choking!
It is possible that packaging material and small parts can be inhaled, swallowed or misused for playing with.
▶ Secure packaging and small parts against use.
3 Prepare use
Follow the instructions listed to prepare the appliance for use.
- Check the mains cable for possible damages prior to use.
- Never use on appliance with a damaged plug or cable.
- Only connect the mains cable to wall sockets with electrical current equivalent to that defined on the name plate of the appliance.
• In case of incorrect treatment of the appliance, risk of injury exists.
3.1 Unpacking
The packaging protects the vacuum cleaner against transport damages. Keep the packaging for transport purposes. Disposal information is provided at the end of the instructions.
Follow the action steps listed to unpack the appliance.
1. Unpack the appliance and its accessory components.
2. Check the completeness and intactness of the unpacked contents.
- In case of transport damages or missing parts, turn to your dealer without delay.
3.2 Become acquainted with the display
The appliance has dust filling level display (Fig. 1, p. 2, no. 11). The dust filling level display inspection window is filled increasingly in blue as the filling level of the dust bag increases.
Replace the dust bag at the latest when the dust filling level display is fully blue (5.1 Replacing the dust bag" on page 32).
3.3 Assembly
3.3.1 Assembling the suction tube
Before you assemble one of the nozzles, you must assemble the suction tube.
- Insert the hand grip (Fig. 1, no. 4) into the upper end of the suction tube (Fig. 1, no. 3) until the adopter engages audibly and noticeably.
3.3.2 Assembling the nozzles

ATTENTION
Danger of Injury!
Unintended activation of the appliance may result in injury.
▶ Switch the appliance off before assembling the pozzles.
▶ Secure the appliance against unintended activation before assembling the nozzles.
INFORMATION
Property damages!
Incorrect use of the nozzles may result in damaging your flooring.
Before vacuuming, inform yourself regarding the requirements of your flooring. Observe the recommendations made by the flooring manufacturers.
Assembling the floor nozzle
- Insert the floor nozzle (Fig. 1, no. 15) onto the lower end of the suction tube (Fig. 1, no. 3).
Toggle the floor nozzle
The floor nozzle (Fig. 1, no. 75) has two setting options (Fig. 1, no. 16l and can be toggled in accordance with the flooring.
• Position 1 (Fig. 1, no. 16): for carpets
- Position 2 (switch pressed down to the rear): for hard floors
Assembling further nozzles
You can extend the functional scope of your appliance by exchanging the floor nozzle (Fig. 1, no. 15). In addition to the floor nozzle, the following nozzles are included in the scope of delivery of your appliance.
- Crevice nozzle (Fig. 1, no. 12): Use the crevice nozzle to vacuum dust out of locations which are difficult to access.
- Upholstery nozzle (Fig. 1, no. 13): Use the upholstery nozzle to clean upholstered furniture, upholstery and mattresses.
• Furniture brush (Fig. 1, no. 14): Use the furniture brush to clean furniture, skirting boards and similar gently.
- Porquet nozzle (Fig. 1, no. 17): Use the parquet nozzle to clean hard floors. The nozzle must be fully flat on the surface in order to clean cracks and joints optimally. For the intake of coarse dirt, you can tilt the parquet nozzle slightly.
Follow the action steps listed to assemble other nozzles. 1. Pull the floor nozzle (Fig. 1, no. 15) off the suction tube, 2. Insert the desired nozzle onto the end of the suction tube.
The furniture brush, crevice nozzle and upholstery nozzle can alternatively be attached to the handle.
4 Operation

WARNING
Risk of electric shock!
Damp and moisture in the appliance may cause contact with dangerous voltage.
▶ Neither touch the appliance nor the mains cable with wet hands.
▶ Neither immerse the appliance nor the mains cable in liquid.
▶ Protect the appliance and accessories against moisture.

ATTENTION
Danger of injury!
If you drop the appliance or it falls over accidentally, injuries may be incurred.
▶ Do not drop the appliance when in use.
▶ When not in use, secure the appliance against falling over.
INFORMATION
Property damages!
The mains cable can be damaged
▶ Only unplug the mains cable from the connector casing and never at the cable from the wall socket.
▶ Neither bend, clamp nor drive over the mains cable.
INFORMATION
Risk of stumbling!
▶ Lay the mains cable safety, avoiding sharp edges and bends.
The appliance is operated with electrical current. Here, the basic danger of an electric shock exists. Therefore, pay attention to the following:
- Check the appliance and mains cable for damages before use. Never operate a faulty appliance.
- Only connect the appliance to wall sockets with electrical current equivalent to that defined on the name plate of the appliance.
4.1 Vacuum cleaning

WARNING
Danger of Injury!
The use of a damaged appliance may result in injury.
▶ Test the appliance prior to each use.
▶ Do not use any damaged appliances.
INFORMATION
Property damages!
The appliance can suck in items, which may result in blocking and overheating the motor.
▶ Do not vacuum in the vicinity of cables and leads.
▶ Do not vacuum any items like glass splitters, nails or construction rubble, for example.
INFORMATION
Property damages!
The appliance may be damaged if a filter is incorrectly inserted or blocked.
▶ Ensure that the filter is inserted correctly.
▶ Ensure that no openings are blocked.
▶ Ensure that the filter is intact and dry.
The appliance has stepless adjustable suction power control (Fig. 1, no. 9). Adapt the suction power to the base to be vacuumed.
• Maximum power: Use the maximum power to
vacuum hard floors and heavily soiled floor covering.
• High power: Use high power to vacuum carpets, rugs and similar.
- Low power: Use low power to vacuum upholstered furniture, upholstery and mattresses.
- Minimum power: Use minimum power to vacuum curtains, blinds or similar.
Follow the action steps listed to vacuum.
1. Pull the electricity cable out up to the yellow marking. If the red marking is visible, draw the electricity
cable back in up to the yellow marking using the cable winding button.
- Plug the plug into a socket.
- Press the on/off switch (Fig. 1, no. 10) to turn the appliance on.
- Adapt the suction power to the base to be vacuumed via the suction power regulation (Fig. 1, no. 9).
- Activate the auxiliary air regulator (Fig. 1, no. 5), if an item has been accidentally drawn or sucked in.
4.2 Switching off and retracting mains cables
-
Press the on/off switch (Fig. 1, no. 10) to turn the appliance off.
-
Unplug the plug from the wall socket,
- Hold the mains cable plug in your hand.
- Press the cable winding button (Fig. 1, no. 4).
- When drawing it in, guide the plug towards the cable winding in order to avoid the mains cable moving from side to side;
4.3 Keeping and storage

ATTENTION
Property damages!
The appliance may be damaged by heat.
▶ Do not place the appliance directly next to heat sources (e.g. heating or ovens).
▶ Avoid direct insolation.
4.3.1 Storing the appliance
- Ensure that the appliance is switched off („4.2 Switching off and retracting mains cables" on page 30).
- Insert the parking hook on the universal floor nozzle (Fig. 1, no. 15) into the parking fixture on the reverse side of the appliance.
4.3.2 Storing the appliance
- Ensure that the appliance is switched off (A.2 Switching off and retracting mains cables" on page 30).
-
Place the appliance upright so that the carrying handle is at the top and the reverse side of the appliance is accessible.
-
Insert the parking hook on the universal floor nozzle (Fig. 1, no. 15) into the storage fixture on the reverse side of the appliance.
4.4 Transport and disassembly
For comfortable transport, you can remove the suction tube from the hand grip and nozzle used.
1. Ensure that the appliance is switched off (4.2 Switching off and retracting mains cables" on page 30).
2. Press the locking mechanism (Fig. 1, no. 1) on the lower end of the suction tube (Fig. 1, no. 6) to release the hand grip (Fig. 1, no. 6).
3. Pull the hand grip out of the suction tube.
4. Pull the nozzle used off the suction tube.
5 Cleaning and maintenance

WARNING
Risk of electric shock!
Damp and moisture in the appliance may cause contact with dangerous voltage.
▶ Neither touch the appliance nor the mains adopter with wet hands.
▶ Neither immerse the appliance nor the mains adopter in liquid.
▶ Protect the appliance and accessories against moisture.

ATTENTION
Danger of injury!
Unintended activation of the appliance may result in injury.
▶ Switch the appliance off before cleaning and maintenance work.
▶ Secure appliance against unintended activation before cleaning and maintenance work.
5.1 Replacing the dust bag
INFORMATION
Property damages!
The dust bag can only hold a limited quantity of dirt. The appliance can be damaged by dust.
▶ Replace the dust bag when vacuuming performance worsens notably or at the latest when the dust filling level display is fully blue.
▶ Only replace the dust bags with type hoogo ZB101 or Swirl® Y101.
Follow the action steps listed to replace the dust bag.
- Ensure that the appliance is switched off (4.2 Switching off and retracting mains cables" on page 30).
- Press the locking mechanism on the vacuum cleaner lid (Fig. 24, p. 99).
- Open the vacuum cleaner lid.
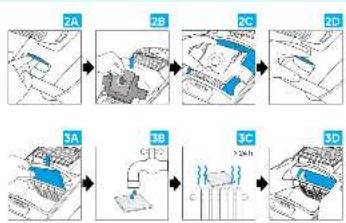
- Remove the dust bag (Fig. 2B).
-
Dispose of the dust bag as domestic waste as long as no dirt is contained in it which is forbidden as domestic waste.
-
Insert the new dust bog into the holder.
-
Check the correct positioning of the dust bad and that it protrudes nowhere (Fig. 2C).
-
Close the vacuum cleaner lid until it engages audibly and noticeably (Fig. 2D).
5.2 Cleaning the motor filter
INFORMATION
Loss of vacuuming performance
The motor filter may become blocked during use. Vacuuming performance deteriorates.
▶ Clean the motor filter regularly, however at the latest when vacuuming performance worsens.
▶ If necessary, replace the motor filter in order to retain maximum vacuuming performance.
Follow the action steps listed to clean the motor filter (Fig. 1, no. 18).
- Ensure that the appliance is switched off („4.2 Switching off and retracting mains cables" on page 30).
Cleaning and maintenance
Spare parts and accessories
- Press the locking mechanism on the vacuum cleaner
lid (Fig. 2A). - Open the vacuum cleaner lid.
- Remove the dust bag (Fig. 2B).
S. Flap the filter holder open (Fig. 3A, p. 99). - Remove the motor filter [Fig. 3A].
- Beat the filter above the dustbin and rinse the filter using clear water (Fig. 3B).
- Let the filters dry completely in the fresh air or on a radiator (Fig. 3C). Let the filter dry for at least 24 hours on a radiator. Drying in the fresh air may take up to 72 hours. It necessary, use replacement filters during this period. They can be ordered on the Internet or via our service department („6 Spare parts and accessories" on page 34).
- Insert the clean motor filter into the filter holder.
- Close the filter holder until it engages doubly and noticeably (Fig. 3D).
5.3 Cleaning the exhaust filter
INFORMATION
Property damages!
The exhaust filter can be damaged by water and
heavy soiling
▶ Clean the exhaust filter only dry by beating it and brushing it carefully.
▶ Clean the filter regularly, however at the latest when vacuuming performance worsens significantly.
Follow the action steps listed to clean the exhaust filter (Fig. 1, no. 19).
- Ensure that the appliance is switched off (4.2
Switching off and retracting mains cables" on page 301. - Press the locking mechanism on the vacuum cleaner lia (Fig. 1, no. 7).
- Open the vacuum cleaner Id.
- Press the locking mechanism on the exhaust filter cover and flap the exhaust filter cover open.
-
Remove the exhaust filter (Fig. 1, no. 19).
-
Beat the exhaust filter empty.
-
Brush the exhaust filter carefully with a soft brush (e.g. the furniture brush provided within the scope of delivery).
-
Re-insert the exhaust filter into the exhaust filter cover. If the filter is damaged or deformed, replace the filter with a new one („6 Spare parts and accessories" on page 34).
-
Close the exhaust filter cover until it engages audibly and noticeably.
5.4 Cleaning the appliance

WARNING
Risk of electric shock!
Damp and moisture in the appliance may cause contact with dangerous voltage.
▶ Neither touch the appliance nor the mains cable with wet hands.
▶ Neither immerse the appliance nor the mains cable in liquid.
▶ Protect the appliance and accessories against moisture.

ATTENTION
Property damages!
The appliance may be damaged by cleaning agents or brushes.
▶ Do not use any strong or abrasive cleaning agents for cleaning the appliance.
▶ Do not use any hard brushes for cleaning the appliance.
-
Ensure that the appliance is switched off (4.2 Switching off and retracting mains cables" on page 30).
-
Wipe the casing of the appliance clean with a slightly moist cloth.
- Rub the appliance dry with a cloth.
6 Spare parts and accessories
You can order spare parts and accessories for the canister vacuum cleaner hoogo B3+ on the Internet under www.hoogo.world or via our service ("International Services" on page 1).
| Accessory/Spare part Order number | |
| Mini turbo brush | ZB002 |
| Dust bag set | ZB101 |
| Filter sat (HEPA filter + motor filter) | 8B302035 |
7 Rectification of faults

Risk of electric shock!
Damp and moisture in the appliance may cause contact with dangerous voltage.
▶ Neither touch the appliance nor the mains cable with wet hands.
▶ Neither immerse the appliance nor the mains cable in liquid.
▶ Protect the appliance and accessories against moisture.

ATTENTION
Danger of injury!
Unintended activation of the appliance may result in injury.
▶ Switch the appliance off before rectifying faults.
▶ Secure the appliance against unintended activation before rectifying faults.
The appliance may only be used if it is fully in order, if the appliance or part of it is faulty, it must be decommissioned and expertly repaired or disposed of. Try to rectify minor faults yourself. Observe the pertinent safety regulations in the operating instructions here. If the fault cannot be rectified, decommission the appliance and inform the manufacturer's qualified staff for fault rectification (International Services* on page 1). The following table shows an overview of the most important faults as well as their possible causes and rectification measures.
| Problem Possible cause Solution | ||
| The dust filling level display is fully blue. | The dust bag is overfilled. | Replace the dust bag (1,5.1 Reclaring the dust bag" on page 32). |
| The appliance only cleans a little of the dirt. | The dust bag is overfilled. | Replace the dust bag (1,5.1 Reclaring the dust bag" on page 32). |
| The filters are soiled. | Clean the filters (1,5.2 Cleaning the motor filter" on page 32, 5.3 Cleaning the exhaust filter" on page 33). | |
| The nozzle used is inappropriate for the surface. | Use the fitting nozzle for your surface (1,3.3.2 Assembling the nozzles" on page 29). | |
| The vacuuming performance set is inappropriate for the surface. | Set the correct suction performance (1,4.1 Vacuum cleaning" on page 29). | |
| A hindrance exists. | Check whether the nozzle, suction tube, hand grip or hose is blocked and remove the hindrance. | |
| Problem Possible cause Solution | ||
| The appliance cover cannot be closed. | The dust bag is protruding and hinders the cover from closing fully. | Check the correct positioning of the dust bag. Ensure that the correct bag type has been inserted. |
| The appliance suddenly stops vacuuming. | The integrated overheating protection has been activated (possibly due to an overfilled dust filter bag). | Proceed as follows:1. Switch the appliance off.2. Unplug it.3. Rectify the cause of overheating replace the dust bag, clean the filter, remove blockages.4. Close the appliance again if applicable and put the accessories into place.5. Wait for approx. 46 minutes.6. Commission the cooled-down appli-ance. |
8 Disposal
This appliance is marked in accordance with the requirements of Directive 2012/19/EU for Waste Electrical and Electronic Equipment - WEEE.
The Directive provides the framework for an EU-wide take-back and recovery of the old appliances.
This appliance was manufactured from recyclable or reusable materials. Its disposal must be made in accordance with the local regulations for waste management. Make the appliance unusable prior to scrapping buy cutting off the power supply cable. You can request further information regarding the treatment, recovery and reuse of electrical appliances from the local waste disposal company, the next recycling centre or your dealer where you purchased the appliances.
The packaging protects the appliance against transport damages. The packaging materials are selected in accordance with environmentally compatible and technical disposal criteria and therefore recyclable. Dispose of these also in an environmentally compatible manner and homogeneously in the collection systems provided.
9 Warranty
INFORMATION
If you incur problems with the appliance, please call the service centre.
Our products are subject to stringent quality control. Should this appliance nonetheless not function faultlessly, we regret this deeply and request you to turn to the service address provided. Our service hotline is also happy to help you on the telephone. The following applies for the assertion of warranty claims – without your legal rights being restricted:
- You can only stake warranty claims within a max. period of 2 years as of the purchase date. Our warranty service is restricted to the rectification of material and manufacturing faults or replacement of the appliance. Our warranty service is free of charge to you.
- Warranty claims must be stoked respectively without delay after gaining knowledge of them.
• The assertion of warranty claims after the warranty period has elapsed is excluded unless the warranty claims are made within a period of 2 weeks after expiry of the warranty period.
- Please send faulty appliances with the warranty cord and the receipt post-paid to the service address. If the fault lies within the scope of our warranty service, you will receive a repaired or new appliance back. No new warranty period begins with the repair or replacement of the appliance. The warranty period of 2 years as of the date of purchase remains decisive. This also applies in case or on-site service.
Please observe that our warranty is null and void in case of abusive or incorrect treatment, failure to observe the void safety precautions for the appliance, use of force or intervention not carried out by the service address authorised by us. We rectify faults or damages to the appliance not for no longer covered by the warranty against reimbursement of the costs. Please contact our service centre for this. It is only necessary to return the appliance to our service address if the service hotline is unable to solve the problem.
9.1 Warranty
The respective Implementation of EU Directive 2011/83/EU as national law is the valid minimum warranty standard in as far as you purchased the appliance as a consumer within the European Union.
The valid minimum warranty rights in the respective country are valid for non-EU countries.
We reserve the right to make technical and design alterations within the scope of constant product improvements.
Mytek GmbH
Légende
^1 Registered trademark of a company of the Melitta Group
[Non-Text]
[Non-Text]
[Non-Text]
[Non-Text]
[Non-Text]
^1 Registered trademark of a company of the Melitta Group
^1 Registered trademark of a company of the Melitta Group
- Allgemeines
- Sicherheitshinweise
- Allgemeines
- Table of contents
- Many thanks
- General
- Target group
- Intended use
- Predictable misuse
- Safety instructions
- Basic safety measures
- Structuring warning information
- WARNING
- ATTENTION
- INFORMATION
- General safety instructions
- Danger of suffocation, choking!
- Prepare use
- Unpacking
- Become acquainted with the display
- Assembly
- Assembling the suction tube
- Assembling the nozzles
- Danger of Injury!
- Property damages!
- Operation
- Risk of electric shock!
- Risk of stumbling!
- Vacuum cleaning
- Switching off and retracting mains cables
- Keeping and storage
- Storing the appliance
- Storing the appliance
- Transport and disassembly
- Cleaning and maintenance
- Replacing the dust bag
- Cleaning the motor filter
- Loss of vacuuming performance
- Cleaning and maintenance
- Cleaning the exhaust filter
- Cleaning the appliance
- Spare parts and accessories
- Rectification of faults
- Disposal
- Warranty
- Warranty
Brand : hoogo
Model : B3+
Category : Vacuum Cleaner