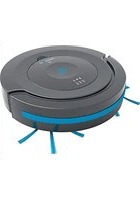
R2 - Robot vacuum hoogo - Free user manual and instructions
Find the device manual for free R2 hoogo in PDF.


| Product type | Robot vacuum cleaner |
| Brand | hoogo |
| Model | R2 (RO201/RO201SAT) |
| Power supply | Li-Ion Polymer battery 11.1 V / 2500 mAh |
| Runtime | Approximately 120 minutes |
| Charging time | Approximately 4.5 hours |
| Power adapter | Input 100-240 V~, 50/60 Hz; Output 19 V / 600 mA |
| Dustbin capacity | 275 ml |
| Weight (with battery) | Approximately 1.5 kg |
| Movement modes | Random, Spiral, Along walls |
| Drop sensors | 3 adjustable sensors (4 positions) |
| Compatible floor types | Hard floors and short-pile carpets (without side brushes) |
| Side brushes | 2 removable side brushes |
| Filter | Washable with water, drying 24 hours |
| Indicator lights | Charging (blue), low battery (red), full bin (red) |
| Safety | Automatic shut-off when lifted; overload protection |
| Warranty | EU legal warranty (Directive 2011/83/EU) |
| After-sales service | Contact details on page 2 of the manual |
| Available spare parts | Side brushes (RO201011), filter (RO201043), adapter (RO201075), battery (RO201065) |
| Repairability | Repair by an authorized specialist store or hoogo customer service only |
Frequently Asked Questions - R2 hoogo
User questions about R2 hoogo
0 question about this device. Answer the ones you know or ask your own.
Ask a new question about this device
Download the instructions for your Robot vacuum in PDF format for free! Find your manual R2 - hoogo and take your electronic device back in hand. On this page are published all the documents necessary for the use of your device. R2 by hoogo.
USER MANUAL R2 hoogo
hooGo ... and shine!
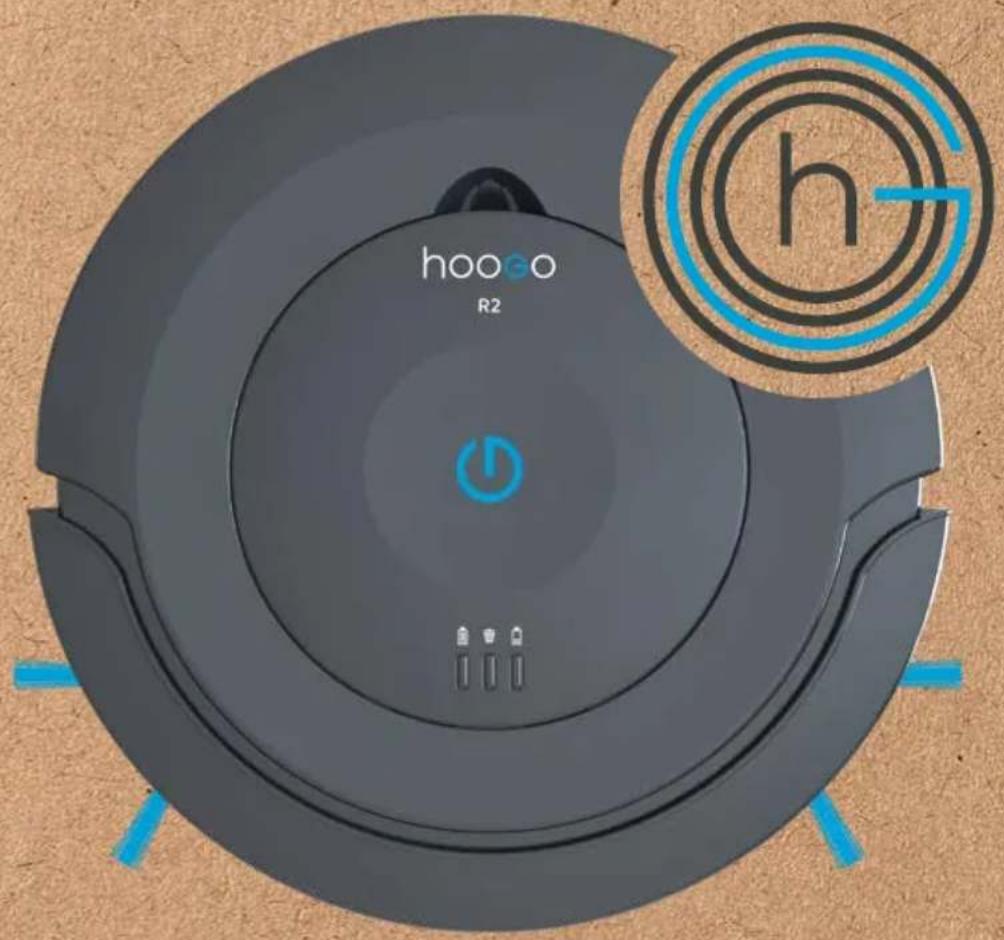
hoogo R2
DE Bedienungsanleitung | Saugroboter | 6
EN Instruction Manual | Robot Vacuum | 16
FR Mode d'emploi | Robot Aspirateur | 26
NL Bedieningshandleiding | Zuigrobot | 36
IT Istruzioni per l'uso | Robot Aspirapolvere | 46
International Services
DE
The costs for telephone calls from abroad are based on the charges of the respective foreign providers and the respective current tariffs.
FR
natural_image
Simple line drawing of a staircase with a circular object on top (no text or symbols)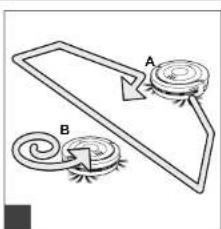
natural_image
Diagram of two circular objects labeled A and B on a mechanical or electrical component (no text or symbols present)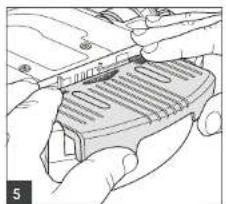
natural_image
Illustration of hands using a tool to adjust or install a component, no text or symbols visible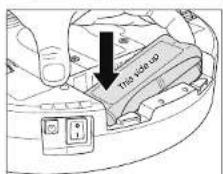
natural_image
Hand holding a small electronic component with a circular icon labeled A (no text or symbols on the device itself)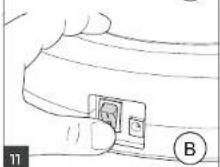
natural_image
Line drawing of a hand inserting a screw into an electrical socket (no text or symbols)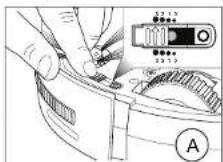
natural_image
Illustration of two mechanical components labeled A and B, showing hands operating a tool on a circular base (no text or symbols present)
natural_image
Illustration of a finger pressing down on a circular device with an arrow indicating motion (no text or symbols)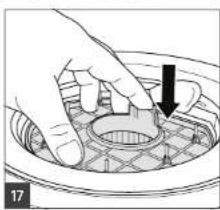
natural_image
Hand placing a circular component into a mesh chamber with a black arrow indicating direction (no text or symbols)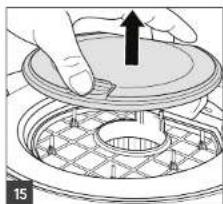
natural_image
Diagram of a hand pressing down on a circular component with a black arrow indicating upward motion (no text or symbols)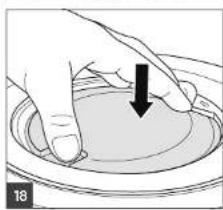
natural_image
Hand pressing down on a circular object with a black arrow indicating downward motion (no text or symbols)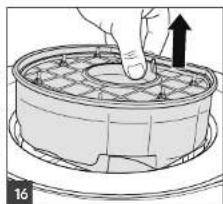
natural_image
Diagram of a hand pressing down on a circular component with an upward arrow, no text or symbols present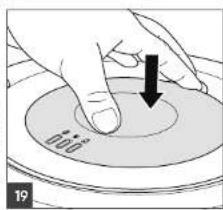
natural_image
Illustration of four electronic components: a fan-like device, a circular grid-patterned plate, a battery pack, and a connected plug (no text or symbols)Vielen Dank!
natural_image
Illustration of hands installing or adjusting a device component with a tool (no text or symbols visible)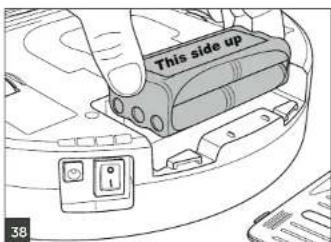
⚠️ WARNING
We are pleased that you decided to purchase a hoogo product. We hope you enjoy using your appliance and we would like to thank you for your purchase. You will find further information on your product in this operating manual and at our website www.hoogo.world. To contact our service team, refer to the contact details on page 2.
Technical data
| Type of appliance: Robot vacuum cleaner | |
| Model name, model: | hoogo R2, RO201/RO201SAT |
| Rechargeable battery: Li-Ion Polymer, 11.1 V, 2500 mAh | |
| max. operating duration: approx. 120 minutes | |
| max. charging duration: approx. 4.5 hours | |
| Mains adapter: Input: 100-240 V~, 50/60 Hz | |
| Output: DC 19 V, 600 mA | |
| Dust bin capacity: approx. 275 ml | |
| Weight(with battery pack inserted): | approx. 1.5 kg |
Environmental protection and disposal
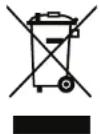
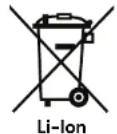
If you wish to dispose of the appliance, remove the battery pack, > "Removing the battery pack" on page 21, and dispose of the battery pack and the appliance separately.
Warranty
If you have purchased the appliance as a consumer within the European Union, the respective national legislation implemented as per EU Directive 2011/83/EU applies as the minimum warranty standard. In non-EU countries the minimum warranty requirements in the respective country apply. This does not apply to batteries or rechargeable batteries which have become faulty or have a reduced service life as a result of normal wear or improper handling.


We reserve the right to make changes to technical and design specifications in the interest of continuous product improvement. © Mytek GmbH
Safety Instructions
> About the operating manual
Read this operating manual completely before using the appliance. Keep the operating manual for reference. If you pass the appliance on to third parties, it must be accompanied with the operating manual. Failure to adhere to this operating manual can lead to serious injuries or damage to the appliance. We assume no liability for damage caused as a result of failure to adhere to this operating manual. Important information not included in this chapter is indicated as follows:

WARNING!
Warns of health hazards and identifies possible risks of injury.

CAUTION!
Indicates possible dangers to the appliance or other objects.
NOTE
Highlights tips and information.
You can also download this operating manual at any time from our website: www.hoogo.world
> Concerning certain groups of persons
These appliances can be used by children of 8 years and persons with impaired physical, sensory or mental abilities, or insufficient experience or knowledge, providing they are supervised or have been instructed in the proper use of the appliance and understand the risks involved.
Children must not perform cleaning or user maintenance tasks without supervision. Children must not play with the appliance.
- Packing material ad small parts must not be used as toys. There is risk of asphyxiation.
Children under the age of 8 years old should be kept away from the appliance, the mains adapter and the mains adapter cord whilst
they are switched on, plugged in at the socket or are cooling down.
INFORMATION ON THE POWER SUPPLY
The appliance is charged with electrical current. Thus there is always risk of electrical shock.
You must therefore observe the following:
Never touch the rechargeable battery or mains adapter with wet hands. Never immerse the appliance, the rechargeable battery or the mains adapter in water or other liquids.
Always take hold of the mains adapter when you wish to disconnect the mains adapter from the mains socket. Never pull on the mains adapter's cord.
- Ensure that the mains adapter cord is not bent, pinched, rolled over and that it does not come into contact with heat sources.
- Only use the mains adapter included in the scope of supply to charge the rechargeable battery.
■ Always check the mains adapter cord for possible damage before using the appliance. Do not use a mains adapter with a damaged cord or plug. Only ever connect the mains adapter to sockets which carry the voltage indicated on the mains adapter.
Before cleaning or performing maintenance on the appliance, ensure that the appliance is switched off and that the mains adapter is not connected.
EN EN
> Information on the battery pack
There is a risk of injury if rechargeable batteries are handled incorrectly.
■ Only use the charger included in the scope of supply to charge the battery pack.
■ Never short-circuit the battery pack, i.e. never touch both poles simultaneously, especially with electrically conductive objects.
It is necessary to replace the battery pack, contact a specialist dealer or the hoogo customer service department, > "International Services" on page 2. Never replace the battery pack yourself. Do not under any circumstances replace the battery pack with other batteries, rechargeable or otherwise.
■ Never take the battery pack apart and never expose it to high temperatures.
- Improper handling can cause liquid to leak from the battery pack. Avoid any contact with such liquid.
If you have come into contact with liquid, rinse it off with copious amounts of water and consult a doctor.
After its service life, dispose of the appliance and the battery pack in an environmentally friendly manner, as described, > "Environmental protection and disposal" on page 16.
> If the appliance is faulty
If the appliance, the mains adapter or the mains adapter cord are damaged, they will need to be replaced by the manufacturer, the manufacturer's customer service department or a similarly qualified person in order to prevent hazards.
- Hand over a faulty appliance to an authorised dealer or send it to the hoogo customer service department for repairs, > "International Services" on page 2.
■ Never use a faulty appliance, mains adapter, mains adapter cord or rechargeable battery!
> Information on proper use
This appliance must only be used for domestic use. It is not suitable for industrial or commercial use. The appliance must only be used to clean on level hard floors with normal dirt and accumulation. If the round brooms are not installed, the appliance can also be used on short pile carpet.
The following in particular is prohibited:
vacuuming:
- people, animals, plants or items of clothing on the body
→ High risk of Injury!
- hot ash, burning cigarettes, matches and highly flammable substances → Risk of fire!
- water and other liquids
→ Risk of short circuit!
- toner (for laser printers, copying machines, etc.)
→ Risk of fire and explosion!
use
- In the vicinity of explosive or highly flammable substances
→ Risk of fire and explosion!
-outdoors
→ Risk of damage due to rain and dirt!
- of non-original accessories.
This can impair appliance safety.
on long-pile carpets and on damp floors.
carrying out repairs yourself
- → Risk of injury and loss of
entitlement to free replacement!!
Preparatory work
> Getting to know the appliance
Figure 1
① Charging Indicator light
② Cleaning Indicator
③ Battery Indicator
4 Recessed grip to release dust
bin compartment cover
⑤ Mains adapter
⑥ Mains adapter cord
⑦ Mains adapter plug
⑧ Battery compartment cover
⑨ Battery pack
⑩ Battery compartment
⑪ Rubber-coated drive wheels
⑫ Slide controller to set sensitivity
of unthall sens 13 Round brooms
Mount for round brooms
35
①
⑯ Charging socket on appliance
⑰ ON/OFF switch
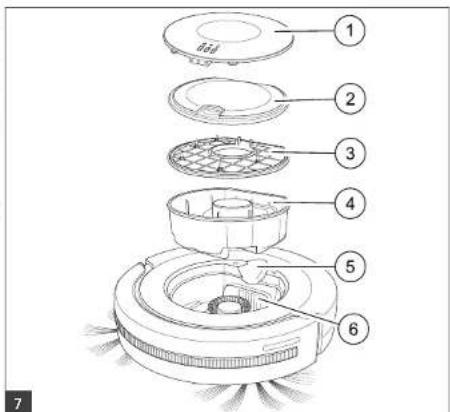
Figure 7
① Dust bin compartment cover
② Dust bin cover
③ Eiftox
4 Dust bin
Recessed grip to release dust
bin compartment cover
⑥ Dust bin compartment
> Introducing displays
Figure 1
① Charging indicator light
- Flashes blue, when the battery pack is charging - Lights up with constant blue light when the battery pack is fully charged - Flashes alternately with battery indicator during operation
② Cleaning indicator
- Lights up red when dust bin must be emptied
③ Battery indicator
- Lights up red when battery pack must be charged or appliance has no contact to floor - Flashes alternately with charging indicator light during operation
> Unpacking and preparing
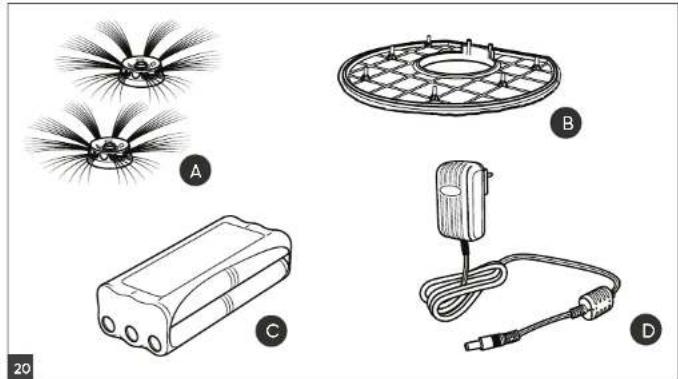
Check that the unpackaged contents are complete (Fig. 1). If you notice any transport damage or if anything is missing, contact your dealer immediately.
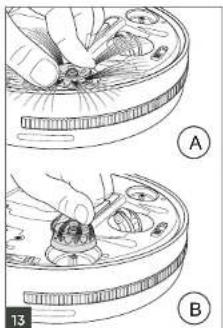
2 When using the appliance on hard floors, attach the round brooms one after the other as shown (Fig. 1 / 13).
NOTE:
If you want to remove the round brooms, grab the bristles and pull the round brooms away from the appliance (Fig. 13 / B).
> Inserting the battery pack
1 Firmly remove cover from battery compartment (Fig. 5 / OPEN).
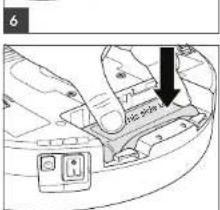
Insert the provided battery pack. Ensure that the sticker with the words "This side up" is facing up and the contacts in the battery compartment are able to engage in the apertures in the insulation of the battery pack. For this purpose, let the battery pack first slide into the battery compartment on the side with the contacts (Fig. 6) and then press the battery pack into the battery compartment on the other side (Fig. 8). The battery pack must rest evenly on the bottom of the battery compartment.
3 Reattach the cover of the battery compartment and slide it firmly into its bracket until you hear and feel it click into place.
> Charging the battery pack
WARNING!
Risk of fire or explosion! Only use the mains adapter Included in the scope of supply to charge the battery pack.
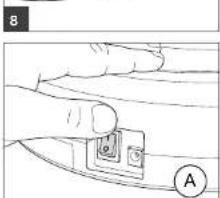
1 Ensure that the ON / OFF switch is in position 0 (Fig. 11/B).
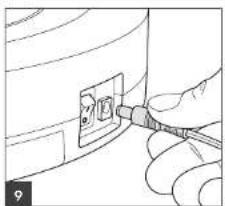
2 Connect the plug of the mains adapter cable to the charging socket on the appliance (Fig. 9).
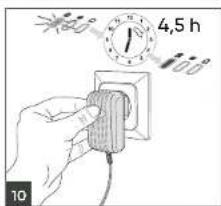
3 Connect the mains adapter to a socket (Fig. 10). The charging indicator light (Fig. 1 / 1) lights up blue to indicate the charging process.
4 After a maximum of 4.5 hours, the charging indicator light remains blue. The rechargeable battery is then charged.
5 Disconnect the mains adapter from the socket (to save electricity) and disconnect the plug of the mains adapter cable from the appliance.
NOTE:
Recharge the appliance when the battery indicator (Fig. 1 / 3) on the appliance lights up with constant red light.
> Setting the anti-fall sensors
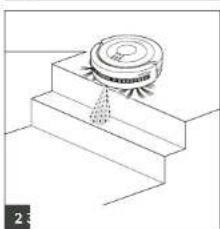
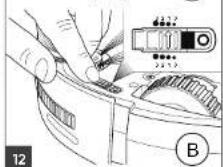
Your robot vacuum cleaner automatically detects dropoffs in front of it by means of 3 anti-fall sensors (Fig. 2). As a result, it changes its direction of travel and continues to clean in the opposite direction. Lower-level surfaces, such as stairs are detected and thus omitted from the cleaning. You can adjust the sensitivity of the anti-fall sensors as follows:
WARNING!
Test the correct settings repeatedly while you are present to avoid damage by incorrect settings.
1 Ensure that the ON / OFF switch is in position 0 (Fig. 11/B).
Adjust the position of the slide controllers to set the sensitivity of the anti-fall sensors at the bottom of the appliance (Fig. 1 / 12): - Position0 (smallest opening) for light floors and low steps - Position1 (Fig. 12 / B) for light floors and slightly higher steps - Position2 for dark floors and even higher steps - Position3 (largest opening, Fig. 12 / A) for dark floors and high steps.
NOTE:
All 3 slide controllers have to be set to the same setting. If your robot constantly travels backward on dark floors, you must select position 3 (largest opening).
> Cleaning floors
NOTE:
To clean short pile carpets, remove the round brooms first. To do so, grab the bristles and firmly pull the round brooms upwards (Fig. 13 / B). Do not use the appliance on long pile carpets.
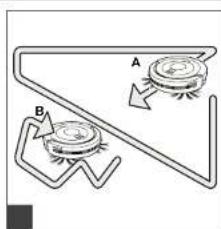
To switch on the appliance, place it on the floor and set the ON / OFF switch to position I (Fig. 11 / A). Both external LEDs flash alternately. After approx. 8 seconds the appliance will start to move in "random mode" (Fig. 3 / A). After approx. 1.5 minutes the appliance changes to "gyro mode", moving in ever increasing circles (Fig. 3 / B). As soon as the appliance encounters an obstacle in this mode, it changes to "edge mode" (Fig. 4 / A), traversing the edges of the room to be cleaned for approx. 2.5 minutes. Then the cycle starts all over again with "random mode" (Fig. 4 / B).
NOTE:
If the appliance has become stuck on an obstacle, give it a gentle push with your hand.
NOTE:
When the performance of the battery pack diminishes, the battery indicator (Fig. 1 / 3) remains red and the appliance stops soon afterwards. If this is the case, the appliance will beep every 60 seconds to make it easier to locate it. (If the battery pack is completely flat, the beep function will stop.) Then switch off the appliance and charge the battery pack > "Charging the battery pack" on page 19.
NOTE:
If you lift the appliance while it is in operation, the motors switch off automatically after approximately 1 second without floor contact. However, the appliance is not switched off (the blue LED is still lit) and starts up again as soon as it makes contact with a surface.
To switch off the appliance, set ON / OFF switch to position 0 (Fig. 11 / B).
→ The LEDs go out.
> Emptying the dust bin
1 Ensure that the ON / OFF switch is in position 0 (Fig. 11/B).
2 Reach Into the recessed grip (Fig. 7 / 5) and unlock the cover of the dust bin (Fig. 7 / 1).
3 Remove the dust bin comportment cover (Fig. 7 / 1) from the appliance (Fig. 14).
Remove (Fig. 15) the dust bin cover (Fig. 7 / 2).
5 Carefully pull dust bin with the attached filter from the appliance (Fig. 16).
6 Place dust bin with attached filter above a waste bin and then separate dust bin from filter. Tap both parts lightly and remove coarser debris with a dry cloth.
> Cleaning the dust bin and the filter
1 Remove and empty the dust bin > "Emptying the dust bin" on page 21.
2 Thoroughly rinse dust bin by hand under running cold water or lukewarm water.
3 Thoroughly rinse filter by hand under
Allow both elements to dry at room temperature for at least 24 hours.
5 Reinsert filter into dust bin in such a way that the plastic grid of the filter is visible. Firmly push filter into place (Fig. 17).
6 Reinsert dust bin with filter into the appliance > "Inserting dust bin and filter" on page 21.
> Inserting dust bin and filter
1 Reinsert dust bin with attached filter into dust bin compartment (Fig. 17).
2 Put dust bin cover firmly in place until you feel it engage (Fig. 18).
3 First, put the dust bin compartment cover in place at the front so that the 3 tabs on the cover engage in the 3 slots provided in the dust bin compartment. Now press against the dust bin compartment cover in the rear until you hear and feel it click in place (Fig. 19).
NOTE:
The appliance can only be switched on again if the cover is positioned correctly.
>Removing the battery pack
1 Operate the appliance until the battery pack is completely empty and the motor of the appliance stops.
2 Place the ON / OFF switch to position 0 (Fig. 11/B).
3 Firmly remove cover from battery compartment (Fig. 5 / OPEN).
4 Remove the battery pack.
> Troubleshooting
Before you contact our customer service department or send the appliance to the hoogo customer service department, you will find a lot of additional information in the service area of our website which will help you solve problems. www.hoogo.world/service
WARNING!
Switch off the appliance before you start troubleshooting. Never use a faulty appliance, charger or rechargeable battery.
Troubleshooting
> If the appliance does not work as it should
See if you can solve the problem yourself by following the steps in the table below. If you cannot solve the problem using this table, contact our Service Hotline (Page 2, 'International Services') and describe the problem to us.
| Problem Possible cause / solution | |
| The appliance will not start. | The battery pack is inserted incorrectly. Insert the battery pack correctly, Page 19 'Inserting the battery pack'. |
| The battery pack is completely empty. Switch off the appliance via the ON / OFF switch (position ,0") and charge the battery pack as described, Page 19, 'Charging the battery pack'. | |
| The appliance was switched on (position ,1") during the charging process. Switch off the appliance via the ON / OFF switch (position ,0") and switch it back on again (position ,1"). The appliance will then start up. | |
| The cover of the dust container compartment has been taken off while the appliance was still switched on. Switch off the appliance via the ON / OFF switch (position ,0") and switch it back on again (position ,1"). The appliance will then start up. | |
| The cover of the dust container is not correctly seated. Switch off the appliance via the ON / OFF switch (position ,0") and correctly insert the cover of the dust container compartment as described, Page 21, 'Inserting dust bin and filter'. | |
| The battery indicator Is illuminated red. | The capacity of the battery pack is too weak. Switch off the appliance via the ON / OFF switch (position ,0") and charge the battery pack as described, Page 19, 'Charging the battery pack'. |
| The appliance has no ground contact. Place the appliance on the floor. It will now directly start cleaning. | |
| The cleaning indicator is illuminated red. | The dust container is overfilled or the filter is clogged. Switch off the appliance via the ON / OFF switch (position ,0") and proceed as described under Page 21. |
| The appliance starts up, but it continuously moves backward. | The slide controller for adjusting the sensitivity of the fall sensors is set on a position for a light floor, although the appliance is being used on a dark floor. Adjust the setting of the slide controller to the sensitivity setting of the fall sensors, Page 20, 'Setting the anti-fall sensors'. |
| The appliance only cleans part of the room to be cleaned. | Depending on the size of the room to be cleaned, the appliance may - at the end of the 3 modes - not necessarily have been everywhere. Let the appliance run until it has travelled over every area of the room. |
Troubleshooting
| Problem Possible cause / solution | |
| In "random mode" the appliance does not move in straight paths, although the area is free. | One of the wheels may be being hindered from turning by dirt. Remove dirt from the wheel. If required, carefully use scissors or tweezers. |
| The round broom has stopped turning. | This round broom might be prevented from freely turning by dirt. Remove the round broom (Page 19, 'Unpacking and preparing') and free it and its receptacle of dirt. If required, carefully use scissors or tweezers. |
| The appliance is stuck against an obstacle. | Give the appliance a shove with your hand. |
| The appliance stops by Itself. | The capacity of the battery pack is too weak. Switch off the appliance via the ON / OFF switch (position ,0") and charge the battery pack as described, Page 19, 'Charging the battery pack'. |
| The appliance will not charge. | The AC adapter is not plugged in properly. Check whether the plug or the AC adapter are fitted correctly in their sockets (Page 19, 'Charging the battery pack'). |
| The operating time is becoming increasingly shorter. | The wheels may be being prevented from turning by dirt. This increases the power required. Remove dirt from the wheels. If required, carefully use scissors or tweezers. |
NOTE:
If you cannot solve the problem using this table, contact our service representative (Page 2, 'International Services') and describe the problem. Our service personnel are specially trained for such cases and can help you get to the bottom of the matter in a targeted manner, and solve the problem together with you. In this way, any inconvenience of having to send your vacuum robot to us can be avoided, and you can use it again quickly.

You will find our service hotline and other contact details on page 2, "INTERNATIONAL SERVICES"!
Troubleshooting
Ordering accessories and spare parts
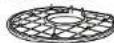
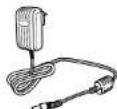
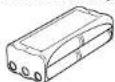
Item no. Description
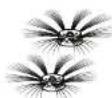
RO201011 1 round broom set
RO201043 1 filter
RO201075 1 AC adapter
RO201065 1 battery pack
Accessories and spare parts can be reordered. You can get these:
■ by phone +49 (0) 203 570 57 510
by email hoogo.service@walzer.de
or at our service partner
If the appliance is defective
WARNING:
Danger of injury! Never use or charge a defective appliance! If the appliance or the power cord of the AC adapter is damaged, it must be replaced by the manufacturer, the manufacturer's customer service organisation or a similarly qualified person, in order to avoid danger.
If the appliance has been dropped or damaged in another way and has obvious signs of damage, give it to an authorised dealer or hoogo Customer Services to be repaired. Send the defective appliance with emptied dust container to the address on Page 2, 'International Services'.
Troubleshooting
Removing the battery pack
WARNING:
Danger of Injury due to Improper handling of the battery pack!
Before removing the battery pack, ensure that the AC adapter has been removed from the socket.
Never short-circuit the battery pack, i.e. never touch both poles simultaneously, especially with metal objects.
Never take the battery pack apart, and never expose it to high temperatures.
Improper handling can lead to liquid leaking from the battery pack. Avoid any contact with the liquid.
natural_image
Illustration of hands using a tool to adjust or install a device component (no text or symbols visible)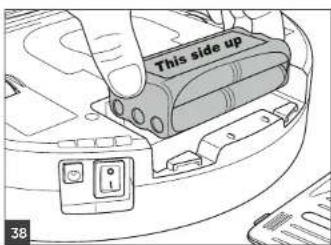
WARNING:
Danger of Injury due to improper replacement of the battery pack!
If the battery pack must be replaced, contact a specialist dealer or hoogo Customer Services.
Never replace the battery pack yourself. Do not replace the battery pack with other rechargeable batteries or batteries.
ATTENTION:
Danger of pollution! Do not dispose of the battery pack in household trash. Take the appliance and the removed battery pack to the appropriate recycling points for separate disposal.
- Run the appliance until the battery pack is completely empty and the motor stops.
- Switch off the appliance with the ON/OFF switch (position „0“).
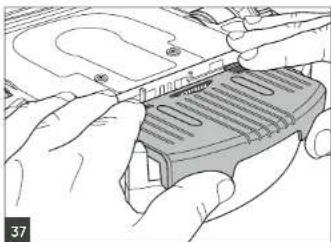
- Forcefully pull off the cover of the battery compartment (Fig. 37).
- Take out the battery pack (Fig. 38).
-
If you want to replace the worn out battery pack with a new original battery pack, Page 24, 'Ordering accessories and spare parts'.
-
To insert the new battery pack proceed as described under Page 19, 'Inserting the battery pack'.
- Dispose of the worn out battery pack separately via a municipal collection point.
> Disposing of appliance and battery pack
Do not dispose of the appliance or its battery pack via household trash! Take the appliance and the removed battery pack to the appropriate recycling points for separate disposal.
FR FR
Merci beaucoup!
③ Adaptation protocol
⑧ Compartment to add a position
www.hoogo.world/service
AVERTISSEMENT!
natural_image
Illustration of hands installing or adjusting a component on a device (no text or symbols visible)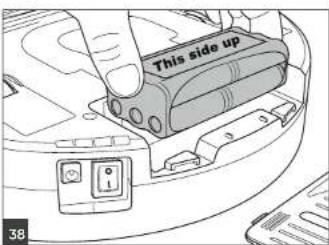
AVERTISSEMENT:
natural_image
Illustration of hands using a tool to adjust or install a device component (no text or symbols visible)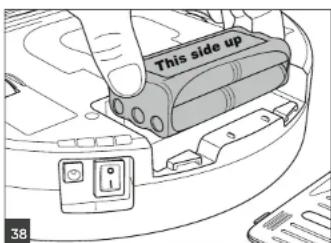
WAARSCHUWING:
natural_image
Illustration of hands using a tool to adjust or install a device component (no text or symbols visible)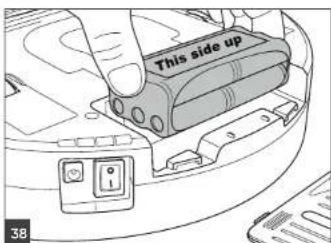
ATTENZIONE:
- hooGo ... and shine!
- hoogo R2
- International Services
- DE
- FR
- Vielen Dank!
- ⚠️ WARNING
- Environmental protection and disposal
- Warranty
- Safety Instructions
- > About the operating manual
- WARNING!
- CAUTION!
- NOTE
- > Concerning certain groups of persons
- INFORMATION ON THE POWER SUPPLY
- EN EN
- > Information on the battery pack
- > If the appliance is faulty
- > Information on proper use
- The following in particular is prohibited:
- Preparatory work
- > Getting to know the appliance
- Figure 1
- Figure 7
- > Introducing displays
- > Unpacking and preparing
- NOTE:
- > Inserting the battery pack
- > Charging the battery pack
- > Setting the anti-fall sensors
- > Cleaning floors
- > Emptying the dust bin
- > Cleaning the dust bin and the filter
- > Inserting dust bin and filter
- >Removing the battery pack
- > Troubleshooting
- Troubleshooting
- > If the appliance does not work as it should
- WARNING:
- ATTENTION:
- > Disposing of appliance and battery pack
- FR FR
- Merci beaucoup!
- AVERTISSEMENT!
- AVERTISSEMENT:
- WAARSCHUWING:
- ATTENZIONE:
Brand : hoogo
Model : R2
Category : Robot vacuum