M8 PRO - Vacuum Cleaner Proscenic - Free user manual and instructions
Find the device manual for free M8 PRO Proscenic in PDF.
User questions about M8 PRO Proscenic
0 question about this device. Answer the ones you know or ask your own.
Ask a new question about this device
Download the instructions for your Vacuum Cleaner in PDF format for free! Find your manual M8 PRO - Proscenic and take your electronic device back in hand. On this page are published all the documents necessary for the use of your device. M8 PRO by Proscenic.
USER MANUAL M8 PRO Proscenic
natural_image
Top-down line drawing of a robotic vacuum cleaner (no text or symbols on the device itself)CONTENTS
EN
Product description ....1
Installation Notes 7
Instructions for use ....8
Routine maintenance 12
Basic parameters 19
Common problem .....20
Troubleshooting 21
DE
text_image
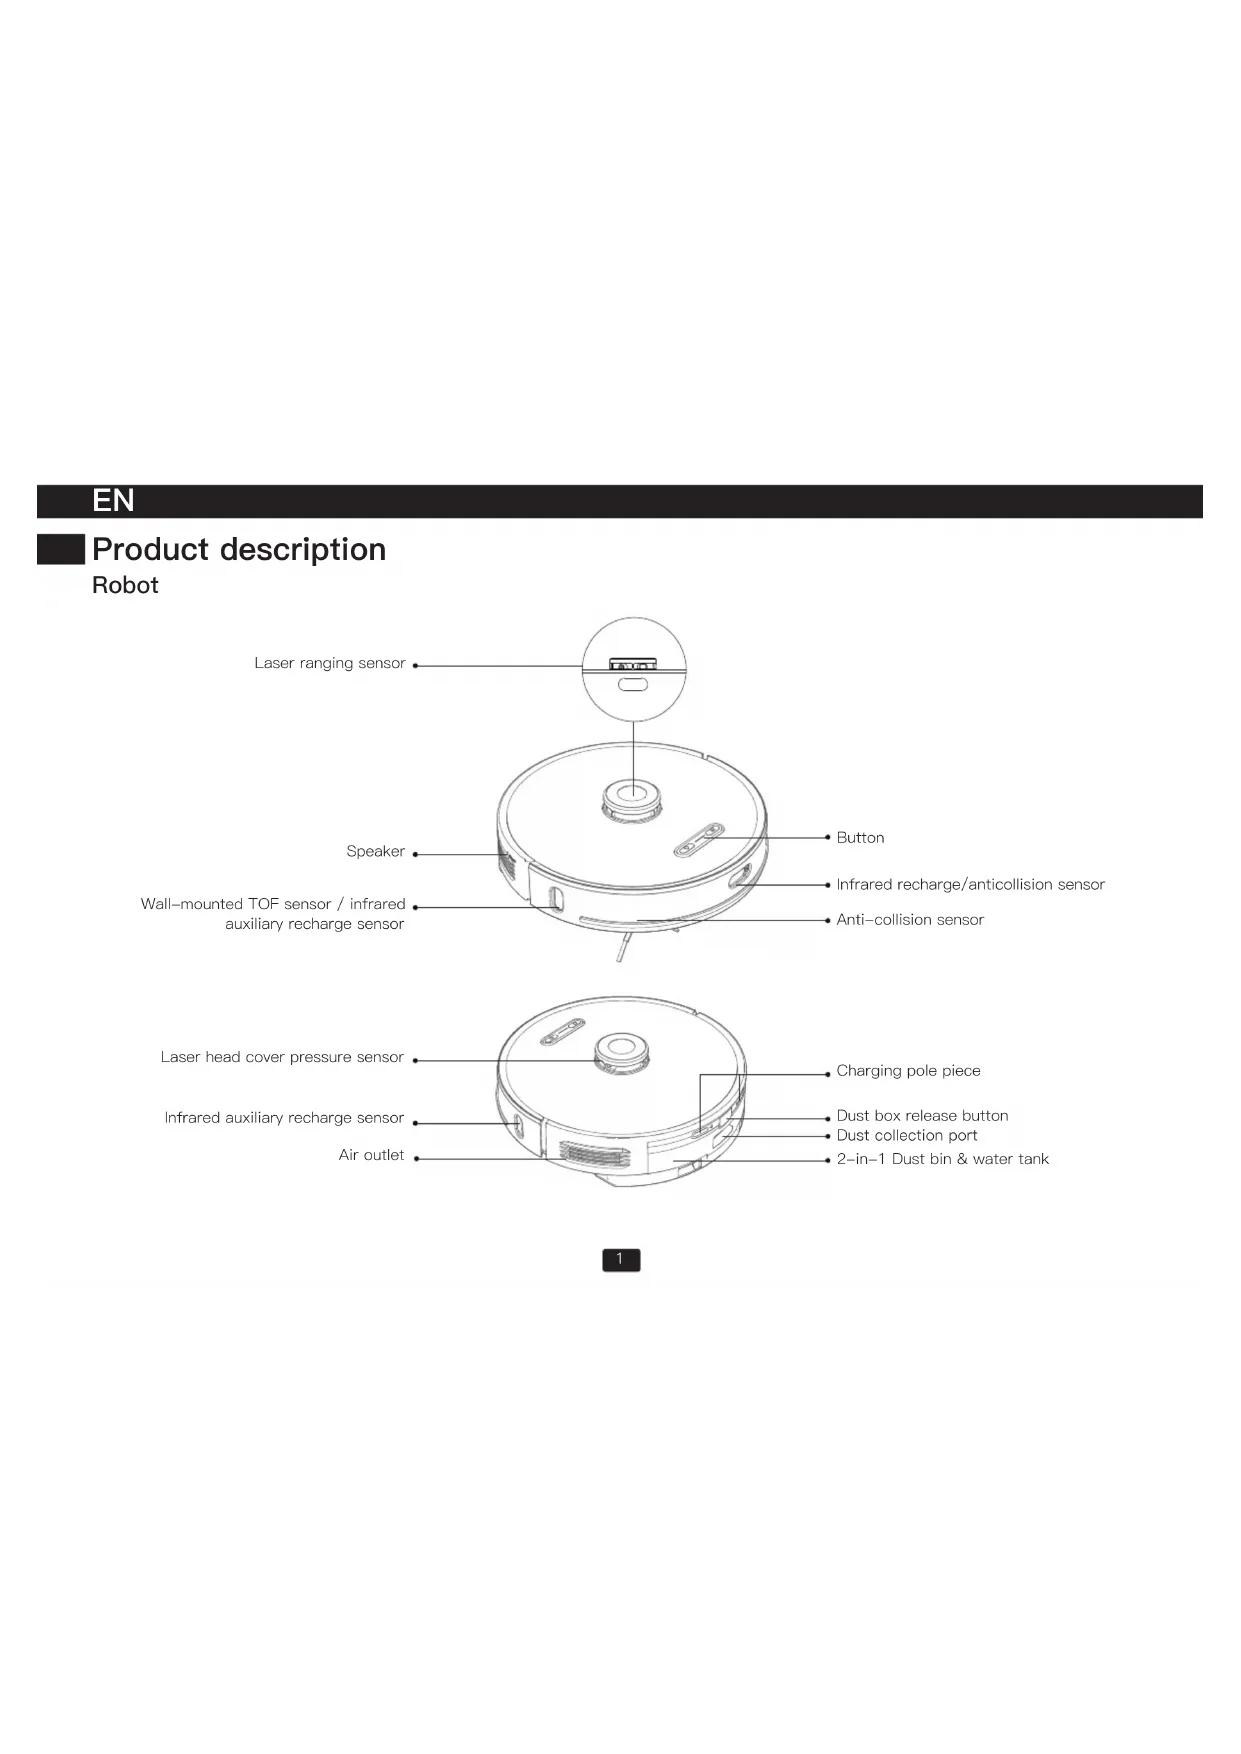
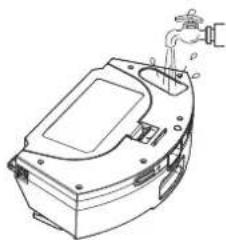
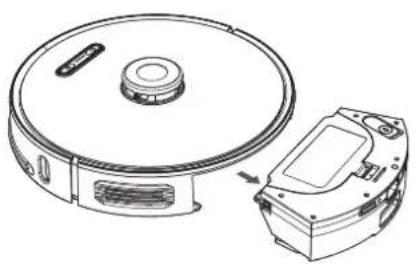
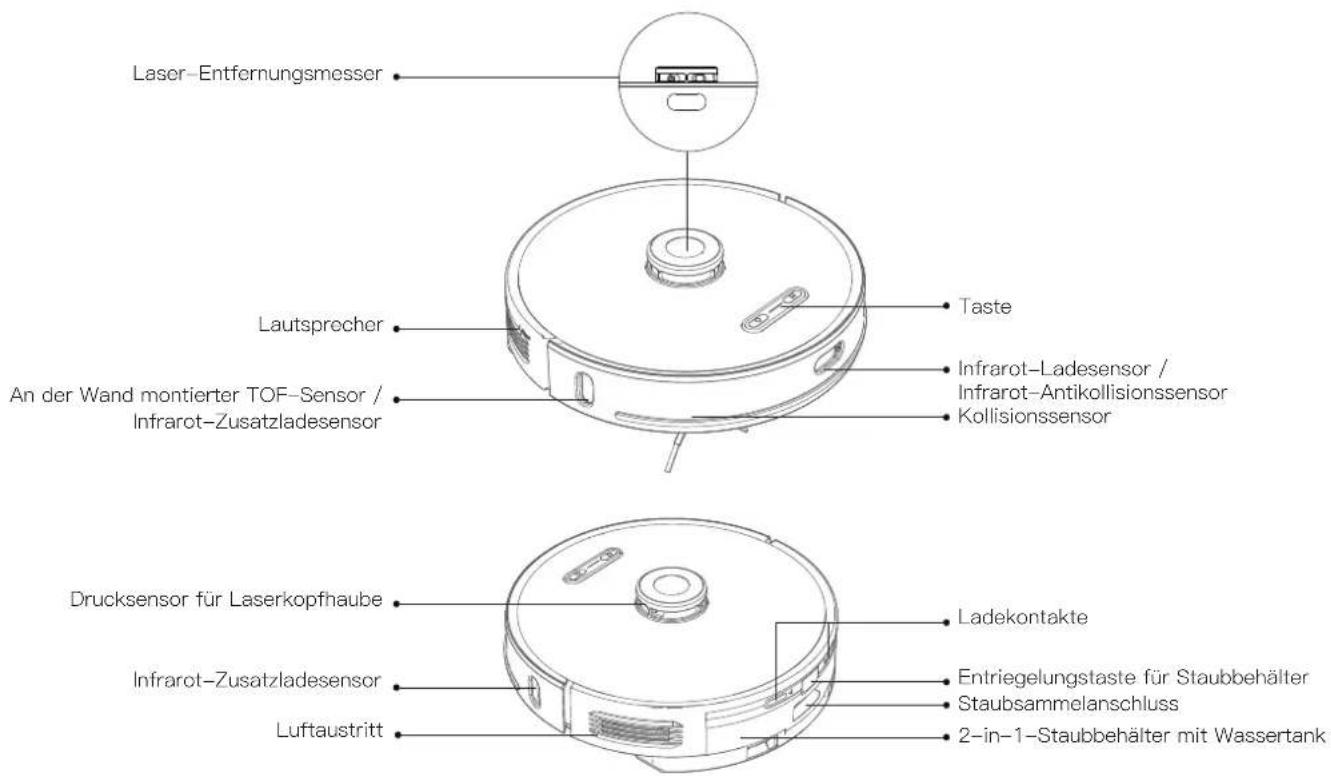
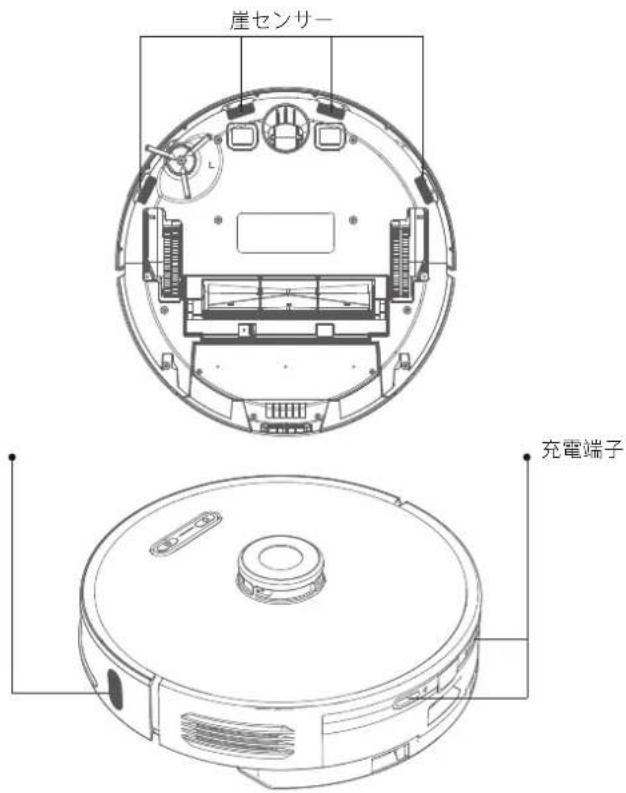
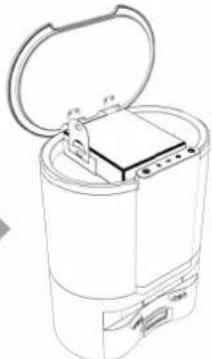
Laser ranging sensor Speaker Wall-mounted TOF sensor / infrared auxiliary recharge sensor Button Infrared recharge/anticollision sensor Anti-collision sensor Laser head cover pressure sensor Infrared auxiliary recharge sensor Air outlet Charging pole piece Dust box release button Dust collection port 2-in-1 Dust bin & water tankRobot
text_image
Croscentic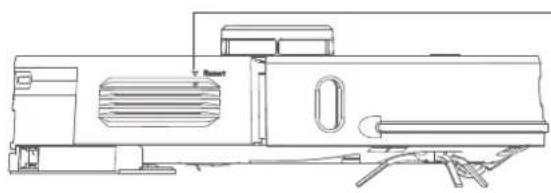
natural_image
Line drawing of a flatbed or modular device with ventilation slots and a ladder (no text or symbols)
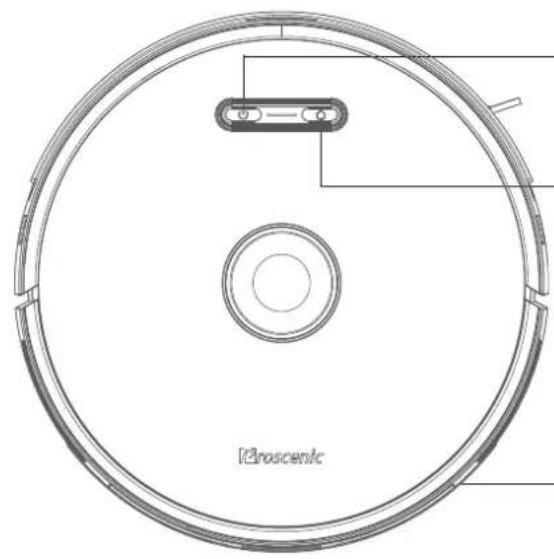
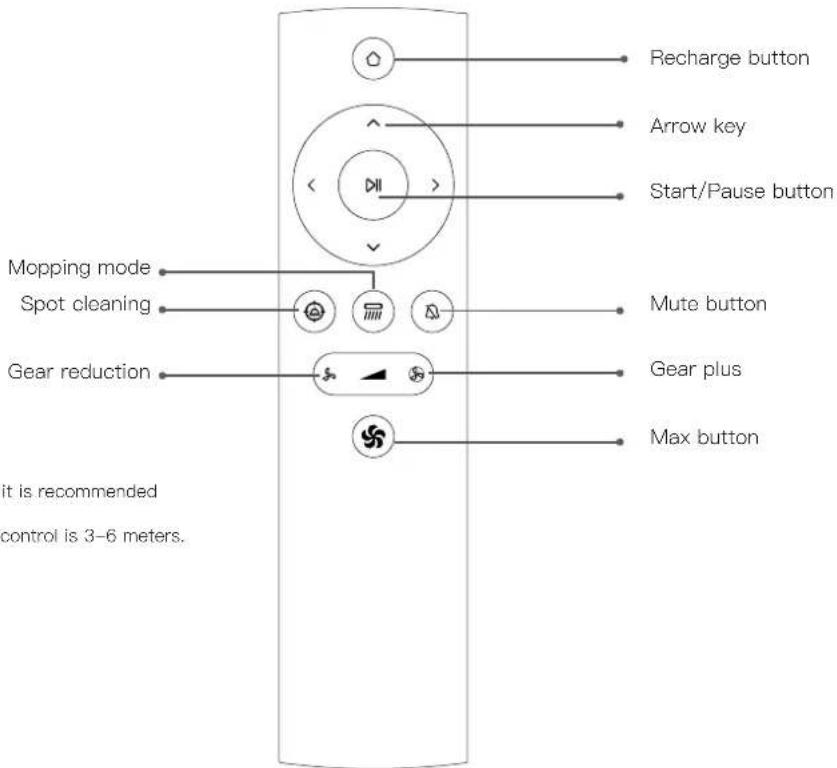
Start/Stop Button
• Extended press to turn on / off
- Short press to start / pause cleaning

Recharge button
- Short press to start/pause recharging
• Solid blue light: Normal working/pause/standby - Blue light flash: Is powering on/configuring network/upgrading firmware
• Yellow light flash: Low battery/recharging - Green light flash: Charging
• Solid green light: Fully charged
• Red light flash quickly: Abnormal/Error
• Light off: Off/sleep
Network Configuration
- While the power is on, press and hold the ⏻ and ⏱ keys simultaneously for 5 seconds
Dust collector pairing mode
- In the power-on state, press and hold the ⏻ button for 5 seconds
Forced shutdown button
- Short press to turn off
Host and sensor
text_image
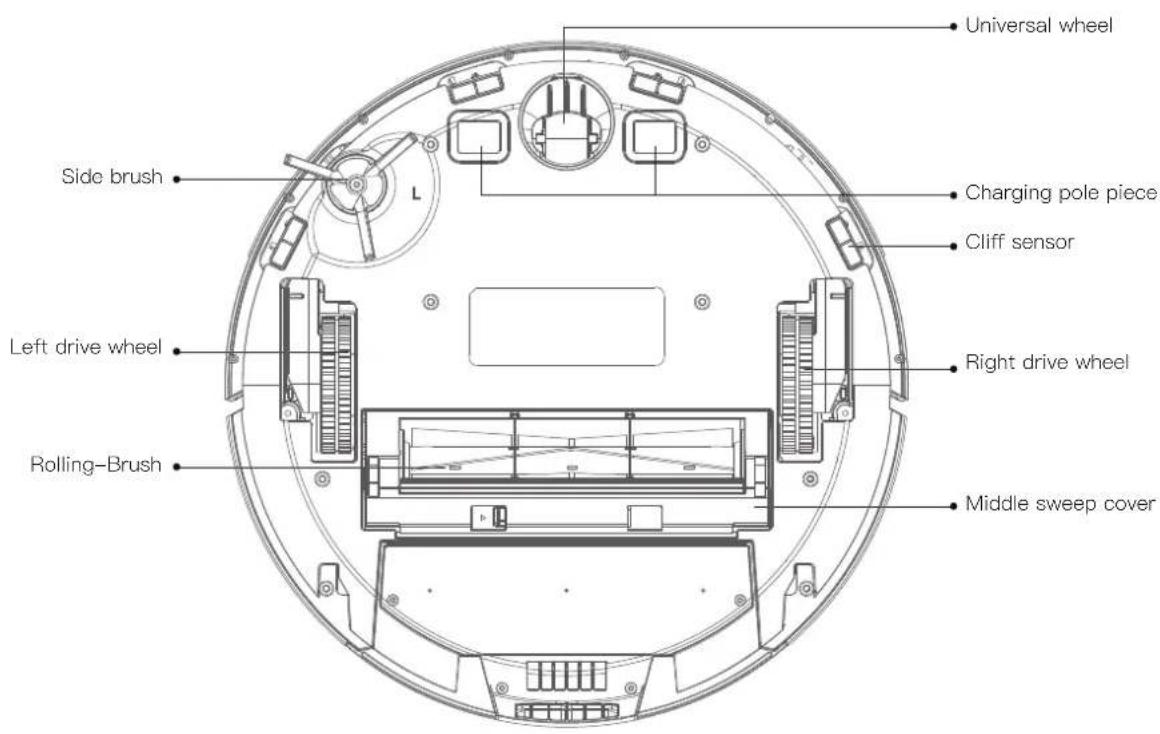
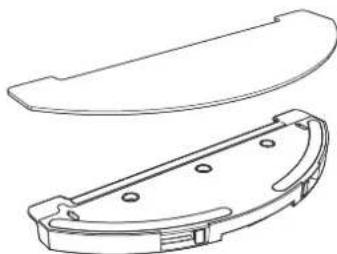
Universal wheel Charging pole piece Cliff sensor Side brush Left drive wheel Right drive wheel Rolling-Brush Middle sweep cover2-in-1 Dust bin & water tank
text_image
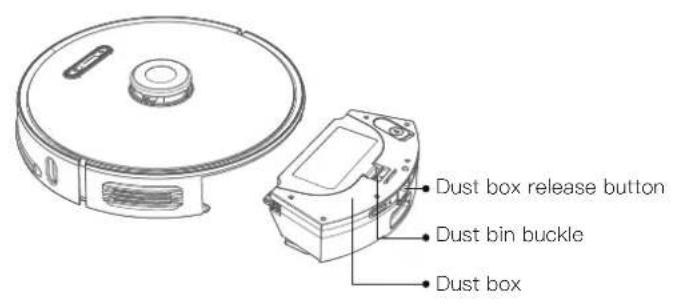
Dust box release button Dust bin buckle Dust box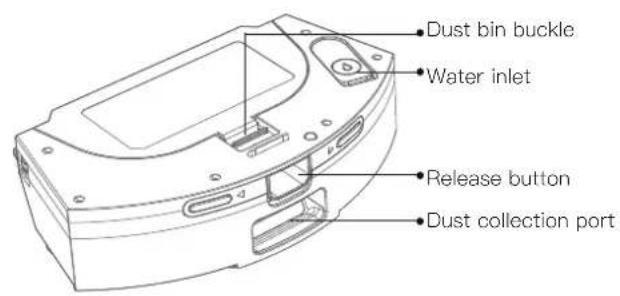
text_image
Dust bin buckle Water inlet Release button Dust collection port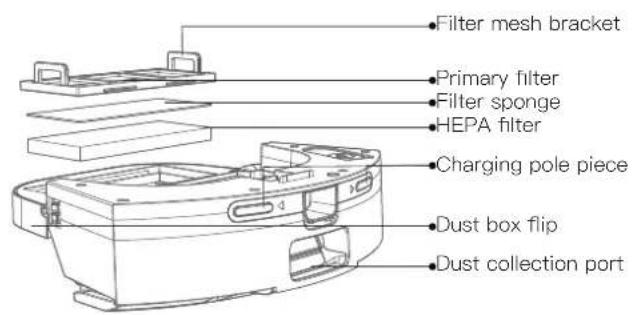
text_image
Filter mesh bracket Primary filter Filter sponge HEPA filter Charging pole piece Dust box flip Dust collection port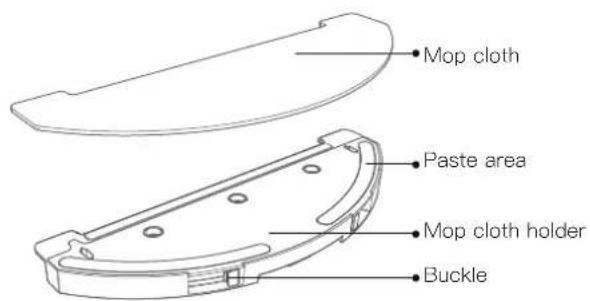
text_image
Mop cloth Paste area Mop cloth holder BuckleDust collector unit
text_image
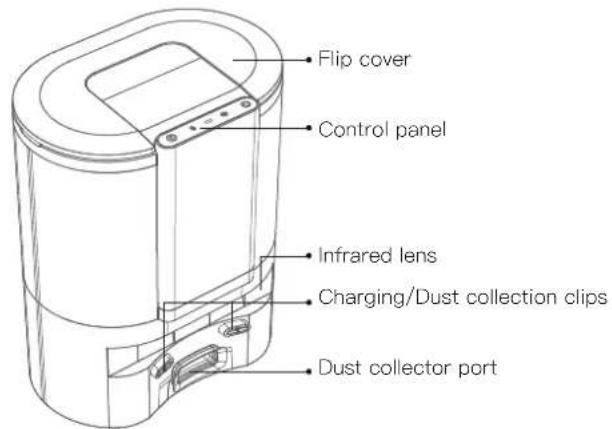
Flip cover Control panel Infrared lens Charging/Dust collection clips Dust collector port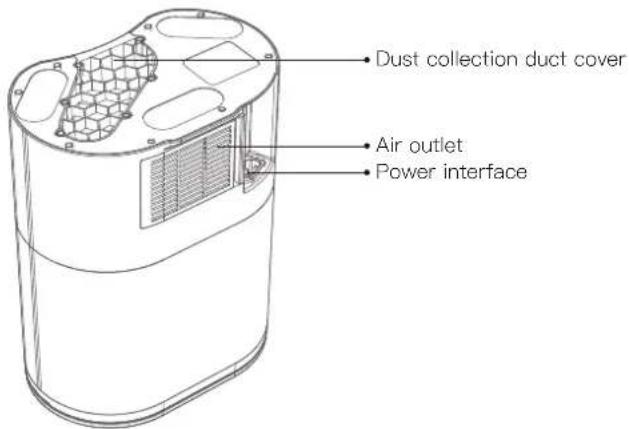
text_image
Dust collection duct cover Air outlet Power interface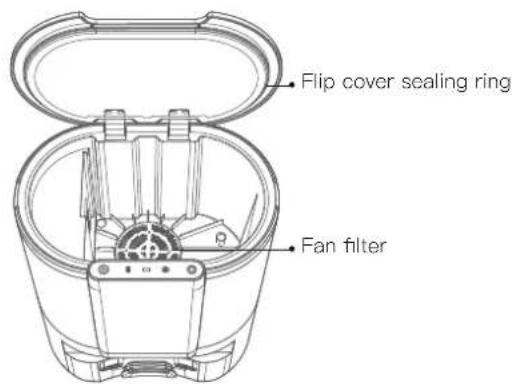
text_image
Flip cover sealing ring Fan filter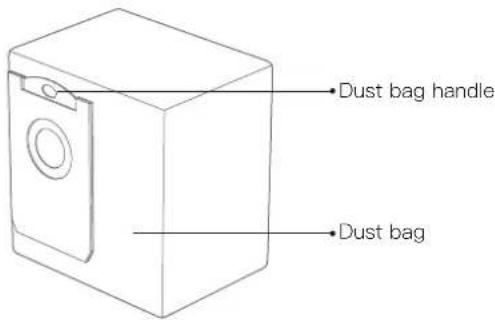
text_image
Dust bag handle Dust bagDust collector unit
text_image
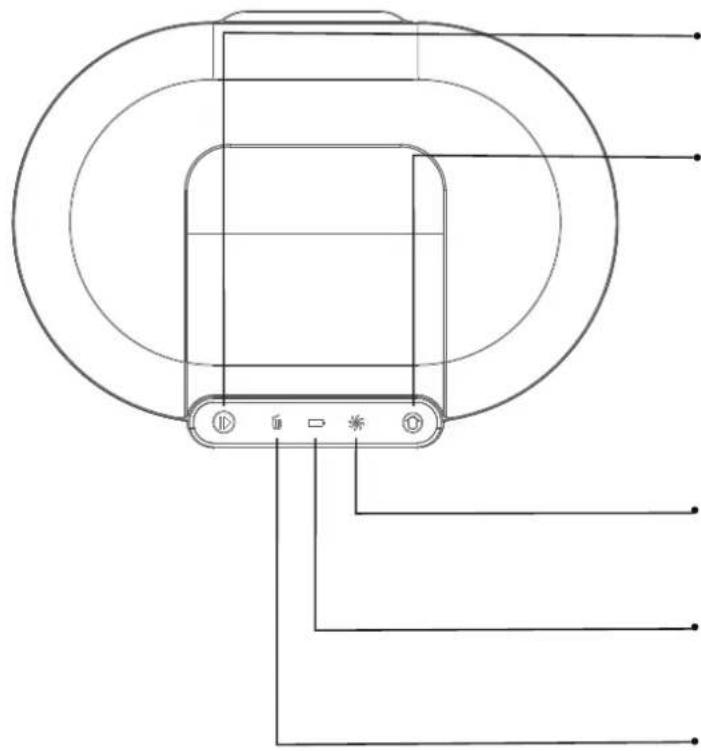
Technical diagram of a device with labeled components and connection linesStart/Stop Button
- Short press: Start auto cleaning / pause cleaning
- Press and hold for 3s: Start spot cleaning
Home button
- Short press: Return to collect dust and charge
- Press and hold for 3 seconds: Return to collect dust and then continue to clean from the place where it left off last time
\* Fan indicator
• Solid green light: Collecting dust
- Red light flashes quickly: Fan overheating / fan error / cover not closed
□ Charging indicator
• Green light breathing flashing: Charging
• Solid green light: Fully charged
Dust bag indicator
- Solid green light: The dust bag is full / the dust duct is blocked
- Red light flashes quickly: The dust bag is not installed / not installed in place
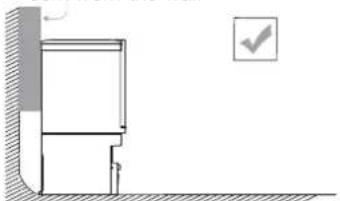
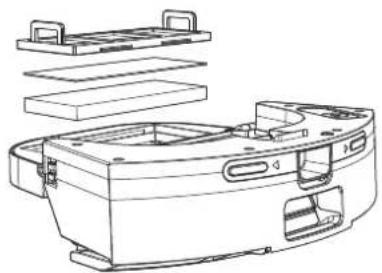
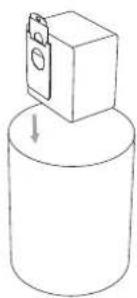
Installation Notes
Install dust collector
- The dust collector should be placed on flat ground more than 6cm away from the wall.
6cm from the wall
natural_image
Simple line drawing of a cabinet or enclosure with a checkmark icon (no text or symbols)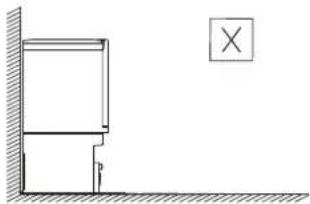
natural_image
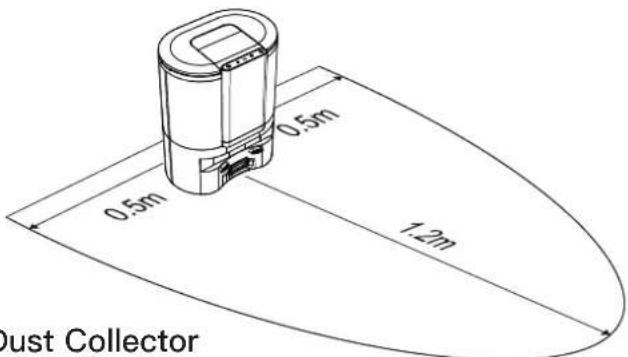
Simple line drawing of a wall corner with a vertical dimension labeled 'p' and a cross symbol in the corner (no text or symbols present)- Ensure there is a space of more than 1.2m at the front, and more than 0.5m on both sides of the dust collector.
text_image
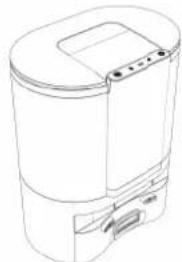
0.5m 0.5m 1.2m Dust CollectorAbout your Dust Collector
The dust collector unit is designed to collect dust and charge the robot cleaner. When the cleaning is completed, the robot vacuum automatically returns to the dust collector, which collects all the dirt and dust and recharges the robot vacuum automatically.
A new bag is required to install in the dust collector once it is filled with dust and dirt.
Instructions for use
Instructions for robot
Power on / off
Press and hold the “ ⏻” button to power on, and the host enters the standby state. After booting, press and hold the “ ⏻” button to shut down.
Note: When the host is charging on the dust collector, it will automatically turn on, and it cannot be turned off during charging.
Start / pause
Under the power on state, short press the " ⏻" button to start the whole house cleaning.
Press any key to pause while cleaning.
Note: It is recommended that the sweeping robot start cleaning from the dust collector;
When the battery is too low, the cleaning will not start.
Please charge and then start cleaning.
When the power is insufficient during the cleaning process, the host will automatically return to the dust collector unit for charging.
After the battery is fully charged, it will automatically return to the interruption to continue cleaning.
Instructions for dust collector
Start/Stop Button
Short press: Start auto cleaning / pause cleaning
Press and hold for 3s: Start spot cleaning
Charging
Automatic recharge: The host will automatically return to the dust collector unit to charge after the cleaning is completed or when the battery is insufficient. Manual charging: Press the "button" button to start recharging; after the host is powered off, you can manually put the host back into the dust collector unit to charge.
Note: Please make sure the charging pole piece is in good contact.
Sleep
If there is no operation for more than 20 minutes, the host will automatically enter into sleep state.
Note: The host will not enter the sleep state when charging;
Automatically shuts down after sleeping to no power.
Home button
Short press: Return to collect dust and charge
Press and hold for 3 seconds: Return to collect dust and then continue to clean
from the place where it left off last time
Pairing of dust collector and robot (Factory paired in default)
- Press and hold the both buttons 📋 and 🔒 on the dust collector for 5 seconds simultaneously: The dust collector goes into pairing mode, the three indicators of the dust collector flash green;
- Press and hold the button ⬆ for 5 seconds on the robot: The robot goes into pairing mode, the indicators of the robot flash green;
- Place the robot at the dust collector to charge, and the voice prompts that the pairing is successful.
Connect to the mobile client
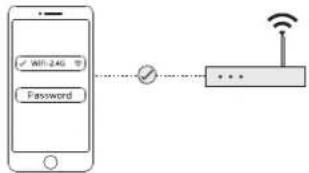
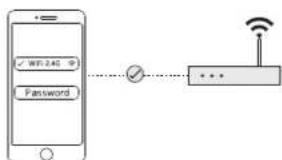
① The phone is connected to WiFi;
flowchart
graph LR
    A["Smartphone"] --> B["Password"]
    B --> C["Switch"]
    C --> D["Router"]
    D --> E["Wireless"]
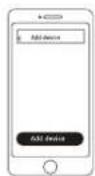
③ Add device on the home page choose sweeping robot"M8 PRO";
⑤ Select the connected WiFi of the phone and enter the WiFi password;
flowchart
graph LR
    A["WiFi 2.4G"] --> B["Password"]
    B --> C["+"]
    C --> D["..."]
    D --> E["Wireless"]
    style A fill:#f9f,stroke:#333
    style E fill:#ccf,stroke:#333
⑦ Return to the APP and wait for the distribution network to complete.
② Scan the QR code below, or search for "ProscenicHome" in the mobile app store to download the app, register and login to the account;

text_image
GET IT ON ► Google play Available on the App Store④ Press and hold the “💡” and “💡” keys for 5 seconds to enter the network configuration;
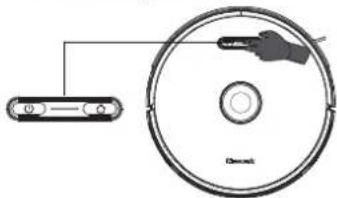
natural_image
Diagram of a CD/DVD disc with an attached cable and connector (no text or symbols)⑥ Go to the mobile phone WLAN list and select and connect the "Proscenic-XXXX" device hotspot;
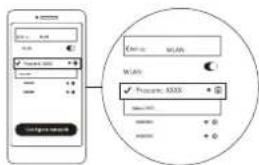
text_image
Screenshot of a mobile app interface with input fields and a circular diagram showing 'Process: XXXX' and 'WAN' options.Remote control
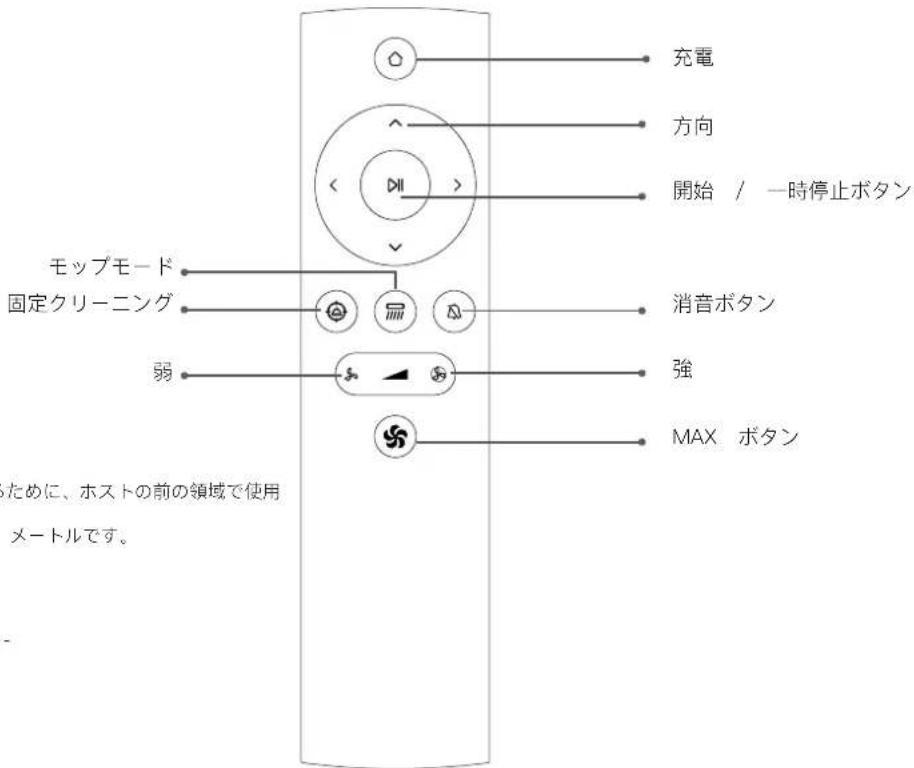
text_image
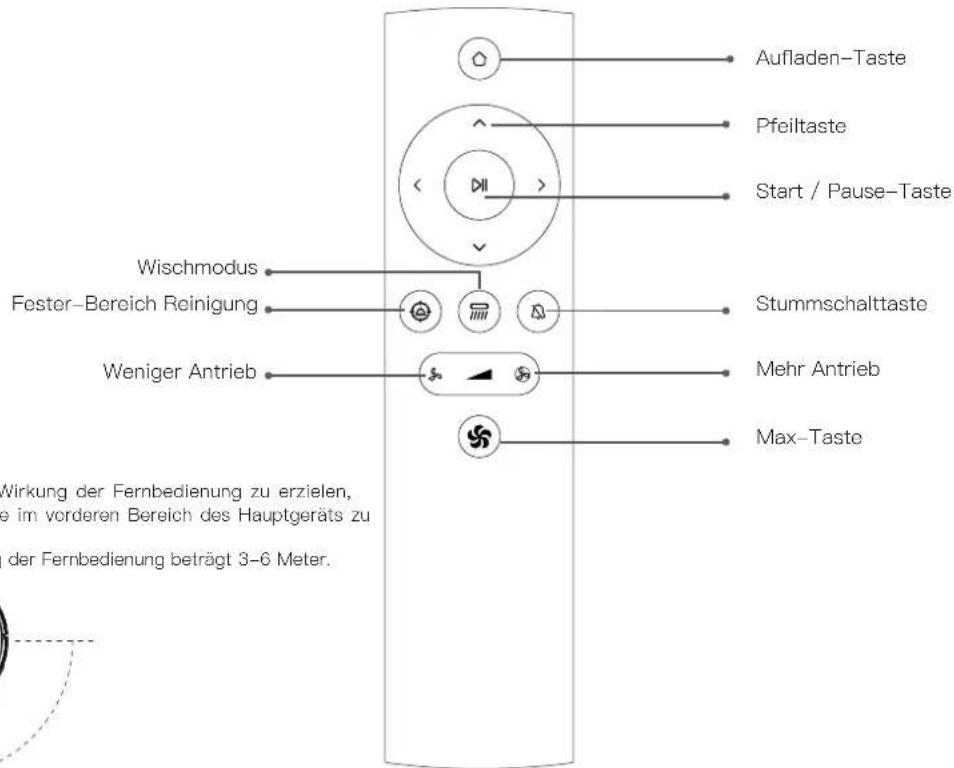
Recharge button Arrow key Start/Pause button Mopping mode Spot cleaning Gear reduction Mute button Gear plus Max button it is recommended control is 3–6 meters.Note:
1. To ensure remote control effectively, it is recommended to use it in the front area of the host;
2. The effective distance of the remote control is 3-6 meters.
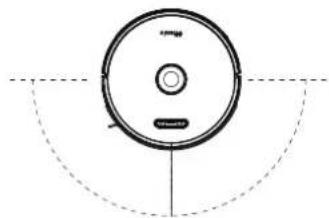
natural_image
Simple line drawing of a circular object with a horizontal bar and dashed arc, no text or symbols present.
Less than or equal to 3–6 meters
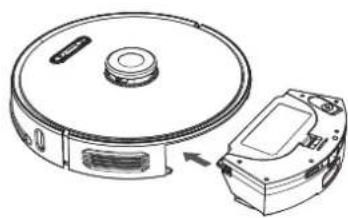
Install 2-in-1 Dust bin & water tank
① Open the rubber cover of the water tank and fill the water tank with water, then fasten the rubber cover;
natural_image
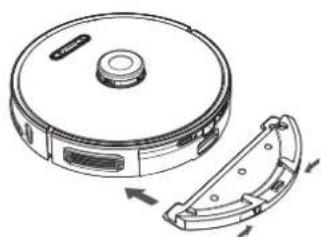
Line drawing of a mechanical device with a handle and mounting bracket (no text or symbols)③ Put the mop cloth into the holder and paste it on the Velcro;
natural_image
Technical line drawing of a mechanical component with a flanged top and a side view showing internal features (no text or symbols)② Install the water tank into the robot according to the direction shown in the figure, and make sure that the buckle is in place;
natural_image
Technical line drawing of a robotic vacuum cleaner with a close-up view of its internal components (no text or symbols)④ Press the buckles on both sides of the mop cloth holder by hand, and push it into the bottom of the robot horizontally in the direction shown.
natural_image
Technical line drawing of a circular vacuum cleaner with attached mechanical component (no text or symbols)* It is not recommended to use a mop cloth for the first cleaning * If you have carpet in your home, please set up a virtual wall on the app
Routine maintenance
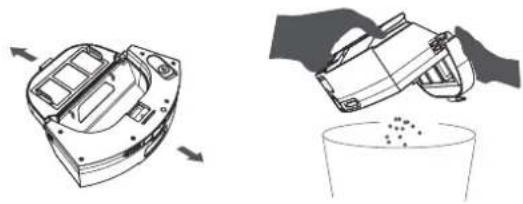
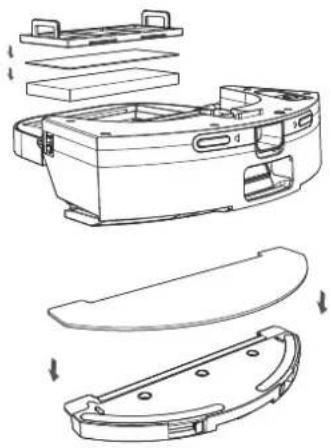
2-in-1 Dust bin & water tank (recommended weekly)
① Press the dust box release button and take out the dust box;
natural_image
Technical line drawing of a circular device with a lid and an attached mechanical component (no text or symbols)③ Take out the primary filter, sponge and HEPA filter, clean the garbage on the surface with a cleaning brush, rinse the filter and dust box with water and then dry;
natural_image
Exploded view diagram of a mechanical device showing internal components and housing (no text or labels)② Open the dust box and dump the garbage in the dust box;
natural_image
Illustration of a robotic device and its hand pouring liquid into a cup (no text or symbols)④ Tear off the mop cloth, rinse with water and dry in the sun;
natural_image
Technical line drawing of a mechanical component with two views (top and side), no text or symbols present.⑤ Pour out the remaining water in the water tank and dry the water tank;
natural_image
Line drawing of a mechanical component with mounting holes and a central housing (no text or symbols)⑥ After the filter, dust box, mop cloth and water tank are all dry, put them back together for next use.
natural_image
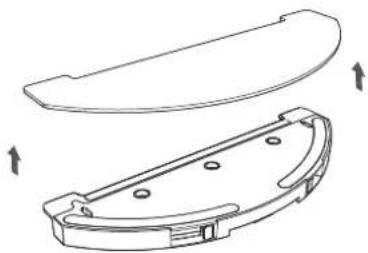
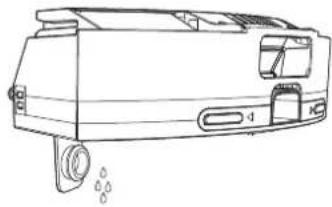
Technical line drawing of a device's internal components, showing exploded and assembled views (no text or symbols)Universal wheel (recommended monthly cleaning)
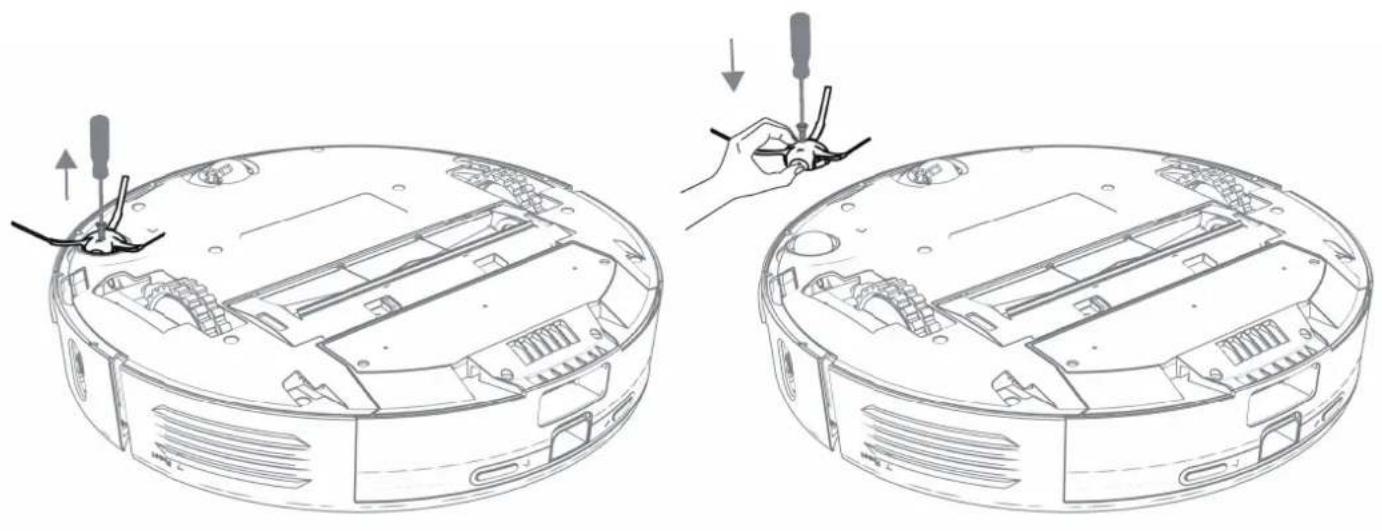
- Flip the main unit and pull out the universal wheel upwards;
- Clean the hair and dust on the wheel, axle and support;
- Reinstall the universal wheel and press it tight.
Note: Wash with water, dry it and put it back.
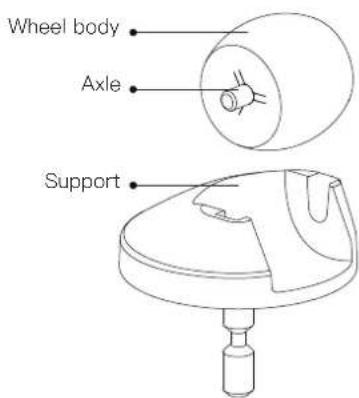
text_image
Wheel body Axle SupportMain brush (recommended weekly cleaning)
① Turn the main unit, press the left and right buckles, and remove the middle sweep cover;
② Remove the roller brush upwards and clean the entangled hair and rubbish with a cleaning brush;
③ Replace the roller brush and insert the three legs of the middle sweep cover into the slot, press down and fix the buckle.
Note: Depending on the application, it is recommended to replace the main brush for 6–12 months to ensure the cleaning effect.
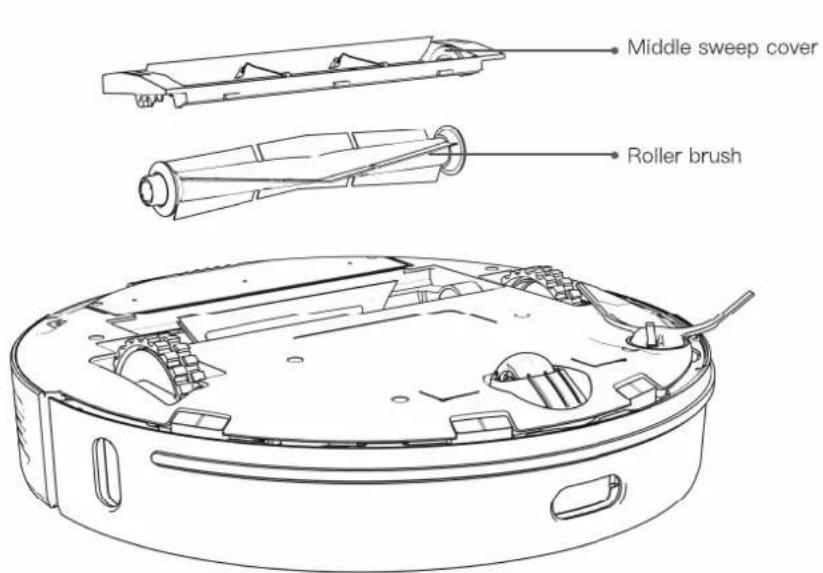
text_image
Middle sweep cover Roller brush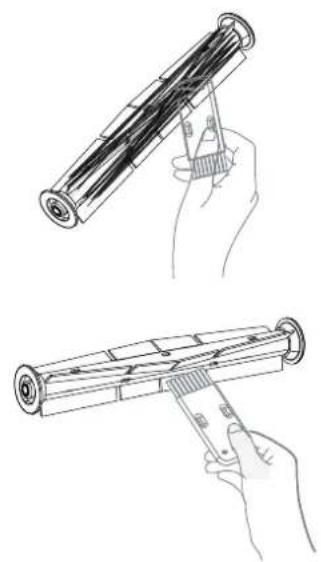
natural_image
Line drawings of two hand-drawn mechanical components, one holding a cylindrical device and the other holding a tool (no text or symbols)Side brush (recommended weekly cleaning)
① Use a screwdriver to unscrew the side brush screws and remove the side brushes;
② After cleaning the wrap hair and rubbish on the side brush, replace the side brush.
Note: Depending on the application, it is recommended to replace the side brush for 3–6 months to ensure the cleaning effect.
natural_image
Technical line drawing showing two views of a circular electronic device with internal components and a hand adjusting the interior (no text or symbols present)Host and sensor (recommended monthly cleaning)
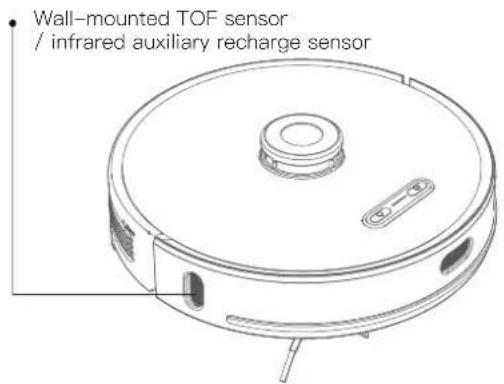
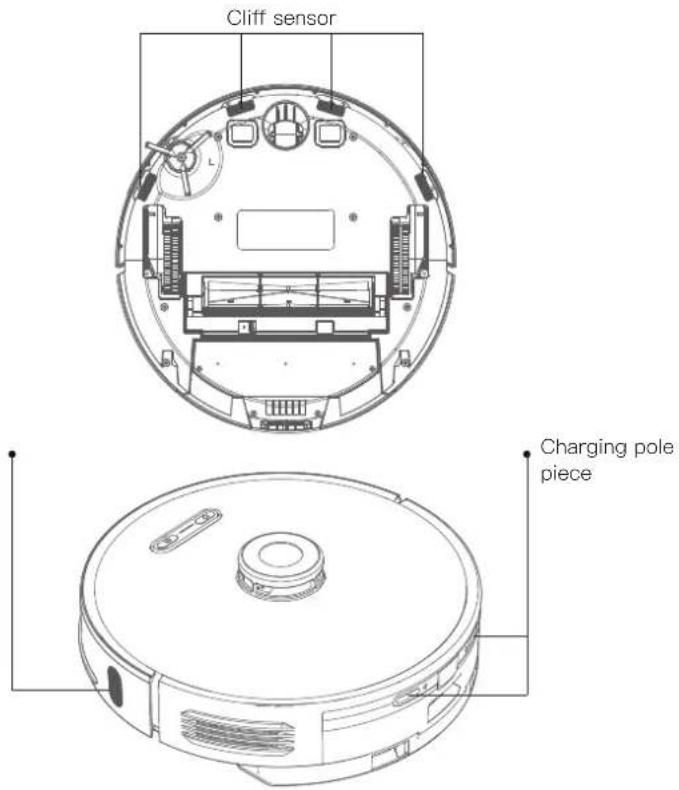
Wipe the sensor on the main unit with a soft, dry cloth, including:
① 4 cliff sensors at the bottom of the main unit
② Wall sensor on the right side of the host
③ Infrared auxiliary recharge sensor
④ Charging pole piece on the back of the robot
text_image
Wall-mounted TOF sensor / infrared auxiliary recharge sensorInfrared auxiliary recharge sensor
text_image
Cliff sensor Charging pole pieceDust bag
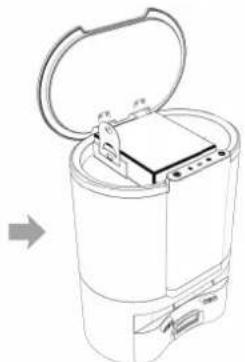
When the dust bag is full, replace it with a new one according to the ☑ Dust bag indicator (solid green light). It is recommended to replace the dust bag every 6–8 weeks.

natural_image
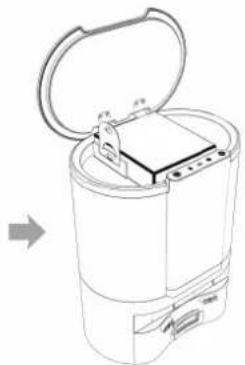
Line drawing of a cylindrical device with an open lid and internal components, no text or symbols present.Open the cover

natural_image
Line drawing of a cylindrical device with an open lid and internal components, showing no text or symbols.Pull up the dust bag through its handle

natural_image
Simple line drawing of a cylindrical object with a small rectangular component above it, no text or symbols present.Throw away the old dust bag


natural_image
Line drawing of a cylindrical device with an open lid and internal components (no text or symbols)Replace with a new dust bag

natural_image
Line drawing of a cylindrical electronic device with lid and base (no text or symbols)Close the flip cover
*Note: The fastener seals the dust and debris in the dust bag.
Cleaning the dust tunnel
①. The indicator light ✦ flashes and the dust bag is not full, unplug the dust collector, turn the dust collector over, use a screwdriver to remove the screws as shown in the figure and open the dust duct cover to clean out the foreign objects.
②. Open the air outlet at the rear of the dust collector, clean the sponge filter, and then put it back in.
*Do not disassemble by force, use a screwdriver to remove the screws. Re-install it as it is after cleaning.
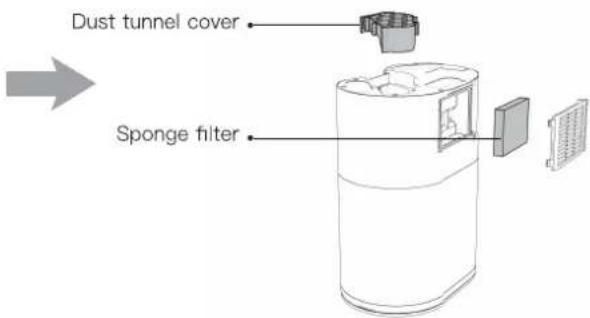
text_image
Dust tunnel cover Sponge filterCleaning the dust collector infrared lens and the charging/dust collector clips
Check the infrared lens and charging / dust collection clips of the dust collection unit for dirt. Wipe them with a clean dry cloth to ensure they are clean and free of dirt. It is recommended to wipe them at least once a month.
Cleaning the fan filter screen bracket
Check whether there is any lint or debris accumulation on the filter screen bracket of the fan. If there is any, please use the cleaning brush for robot or a dry cloth to remove it. It is recommended to clean it at least once a month.

text_image
Infrared lens Charging / dust collection clips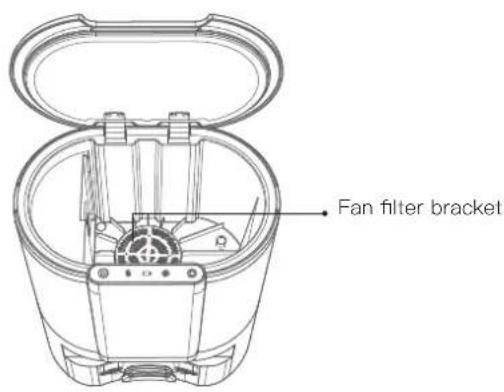
text_image
Fan filter bracketBasic parameters
Robot Dust collector unit
| Name Parameters | |
| Dimensions φ350mmxφ350mmx98mm | |
| Product weight ≈ 3.6kg | |
| Rated voltage 14.4V | == |
| Rated power 50W | |
| Battery capacity 5200mAh | |
| Name Dimension/Rating | |
| Overall Dimensions 282mm | mx361mmx202mm |
| Power Rating 1050W | |
| Input Rating 100-240V ~50/60Hz | |
| Output Rating DC24V 1.2A | == |
FCC Statement
- This device complies with Part 15 of the FCC Rules. Operation is subject to the following two conditions:
(1) This device may not cause harmful interference, and
(2) This device must accept any interference received, including interference that may cause undesired operation.
- Changes or modifications not expressly approved by the party responsible for compliance could void the user's authority to operate the equipment.
NOTE:
This equipment has been tested and found to comply with the limits for a Class B digital device, pursuant to Part 15 of the FCC Rules. These limits are designed to provide reasonable protection against harmful interference in a residential installation.
This equipment generates uses and can radiate radio frequency energy and, if not installed and used in accordance with the instructions, may cause harmful interference to radio communications. However, there is no guarantee that interference will not occur in a particular installation. If this equipment does cause harmful interference to radio or television reception, which can be determined by turning the equipment off and on, the user is encouraged to try to correct the interference by one or more of the following measures:
Reorient or relocate the receiving antenna. Increase the separation between the equipment and receiver.
Connect the equipment into an outlet on a circuit different from that to which the receiver is connected.
Consult the dealer or an experienced radio/TV technician for help.
FCC Radiation Exposure Statement
This equipment complies with FCC radiation exposure limits set forth for an uncontrolled environment.
This equipment should be installed and operated with minimum distance 20cm between the radiator & your body.
Common problem
| Question type Solution | |
| Can not boot | The battery is low, please charge it before using itAmbient temperature is too low (less than 0°C) or too high (higher than 50°C) |
| Unable to start cleaning The battery is low, please charge it before starting it | |
| Unable to recharge | There are too many obstacles near the dust collector. Please put the dust collector in the open areaThe host is too far from the dust collector. Please try to place the main unit near the dust collector |
| Abnormal behavior Reboot after shutdown | |
| There is abnormal noise during cleaning | Roller brush, side brush or left/right wheel may be wrapped with foreign objects, please clean after shutdown |
| Decrease in cleaning ability or dust falling out from machine | The dust box is full, please clean the dust boxHEPA components have been blocked, please clean upThe roller brush is wrapped by foreign matter, please clean the main brush |
| Unable to connect to Wi-Fi | Wi-Fi signal is not good, please make sure the host is in a good Wi-Fi signal coverage area Wi-Fi connection is abnormal, reset Wi-Fi and download the latest app Try to connect again |
| Breakpoint cleaning | Please confirm that the host is not in the do not disturb mode, it will not continue to clean in this modeManually recharging or putting the main unit back into the dust collector will lead the machine not to continue cleaning from last interruption |
| Cannot return to the dust collector after spot cleaning or moving the position | After spot cleaning or long-distance moving position, the host will re-generate the map. If the dust collector is far away, it may not be able to automatically recharge. Please manually put the host back into the dust collector to charge |
| Unable to charge | Make sure there is enough space around the cradle, and there is no dust or obstruction on the surface of the dust collector unit electrode |
| Scheduled cleaning does not work | Please confirm that the device is connected to the network. If the device is not connected to the network, you cannot synchronize the scheduled cleaning task |
| Host is always offline | Please ensure that the equipment distribution network is successful and always within the Wi-Fi coverage |
| Phone cannot pair device | Please make sure that the dust collector and the host are within the Wi-Fi coverage and the signal is good. Follow the instructions to reset the Wi-Fi and then pair it |

Troubleshooting
Robot
| Fault prompt Solution | |
| Abnormal 1. Please confirm that the laser radar is not blocked | Please check or remove foreign objects around the lidar or move the device to a new location to restart |
| Abnormal 2. Please wipe the cliff sensor and move to the new position to start | Wipe the main power cliff sensor and try again (refer to the manual for sensor loca-tion) |
| Abnormal 3. A strong magnetic field is detected, moved to a new location, and then retried | Please move the host to a new location and try again |
| Abnormal 4. Please check the collision sensor and clear the foreign object around it | Try pressing the front bumper and clearing the foreign object, then restart |
| Abnormal 5. The host temperature is abnormal. Please wait for the temperature to return to nor-mal | The host temperature is too high or too low. Please wait until the temperature returns to normal before using |
| Abnormal 6. Charging is abnormal. Please clean the charging contact area | Please check if the original power adapter is used. Please check if the dust collector is in the horizontal position |
Dust collector unit
This product will prompt you the current product status through the indicator light on the top of the body:
| Indicator light Common error Solution | ||
 Flashing red Flashing red | Fan error / overheating / dust collection port is blocked / the cover is not closed properly | 1. Frequent dust collection leads to fan overheating protection or fan malfunction. It is recommended to try to collect dust after 30 minutes;2. Clean up the debris in the dust collection port at the bottom of the robot and in the dust collector;3. Unplug the dust collector, turn the dust collector over, check whether there is any foreign matter in the dust duct cover on the bottom, use a screwdriver to remove the screw and open the dust duct cover to clean the foreign matter. |
| (box3) Flashing red | The dust bag is full / not installed / not installed in place / the dust collector cover is open | 1. Replace with a new dust bag;2. Check whether the dust bag is installed, if not, please install the dust bag.3. Check if the dust bag is installed correctly and in place.4. Make sure that the dust collector cover is completely closed, sealed securely, and the robot has been placed on the dust collector to charge, and try to collect dust once. The method of manually collecting dust is as follows:Short press the on/off button on the robot, after the robot leaving the dust collector, press any button on the robot to pause, and then press and hold f_for 3 seconds, the robot will return to the dust collector to start collecting dust, and the robot will return to charge automatically after the dust collection is completed. |
| (box5) (box6) flash simultaneously | Failed to pair / Haven't paired yet | 1. Press and hold the both buttons Ⓥ and ⚙ simultaneously on the dust collector for 5 seconds: The dust collector goes into pairing mode, the three indicators of the dust collector flash green;2. Press and hold the button ⏻ for 5 seconds on the robot: The robot goes into pairing mode, the indicators of the robot flash green;3. Place the robot at the dust collector to charge, and the voice prompts that the pairing is successful. |
DE
Produktbeschreibung
Saugroboter
natural_image
Line drawing of a simple rectangular device with ventilation slots and a side table (no text or symbols)Start/Stopp-Taste
text_image
Technical diagram of a device with labeled components and connection linesStart-Stopp-Taste
natural_image
Simple line drawing of a cabinet or elevator with a checkmark icon (no text or symbols)
natural_image
Simple line drawing of a wall corner with a vertical dimension labeled 'p' and a cross symbol in the corner (no text or symbols present)natural_image
Diagram of a CD/DVD disc with an attached cable and connector (no text or symbols)text_image
Mobile app interface screenshot showing settings for Wi-Fi and WiFi configuration with input fields and radio buttonsFernbedienung
natural_image
Simple line drawing of a circular object with a horizontal bar and dashed arc, no text or symbols present.natural_image
Line drawing of a mechanical device with no visible text or symbolsnatural_image
Technical line drawing of a mechanical component with a flanged top and curved base (no text or symbols)natural_image
Technical line drawing of a robotic vacuum cleaner with a close-up view of its internal components (no text or symbols)natural_image
Technical line drawing of a robotic vacuum cleaner with attached mechanical component (no text or symbols)natural_image
Technical line drawing of a robotic vacuum cleaner with a close-up view of its internal components (no text or symbols)natural_image
Illustration of a robotic device and a hand pouring liquid into a cup (no text or symbols)natural_image
Technical line drawing of a mechanical housing assembly (no text or symbols)natural_image
Technical line drawing of a mechanical component with two views (top and side), no text or symbols present.natural_image
Line drawing of a mechanical component with mounting holes and a central housing (no text or symbols)natural_image
Exploded view diagram of a mechanical device showing internal components and assembly (no text or labels)natural_image
Technical line drawing showing two views of a circular electronic device with internal components and a hand holding a screwdriver (no text or symbols present)natural_image
Line drawing of a vehicle chassis with ventilation ducts and support structure (no text or symbols)
Bouton Marche/Arrêt
text_image
Technical diagram of a device with labeled components and connection linesnatural_image
Simple line drawing of a cabinet or enclosure with a checkmark icon (no text or symbols)
natural_image
Simple line drawing of a wall corner with a vertical dimension labeled 'p' and a cross symbol in the corner (no text or symbols present)natural_image
Diagram of a circular device with a connector and a labeled component (no text or symbols present)text_image
Mobile app interface screenshot showing settings for user ID, password, and configuration optionsTélécommande
natural_image
Line drawing of a mechanical device with a handle and mounting bracket (no text or symbols)natural_image
Technical line drawing of a mechanical component with a flanged top and a side view showing internal features (no text or symbols)natural_image
Technical line drawing of a robotic vacuum cleaner with a close-up view of its internal components (no text or symbols)natural_image
Technical line drawing of a circular vacuum cleaner with attached mechanical housing (no text or symbols)natural_image
Technical line drawing of a circular device with a lid and an attached rectangular component (no text or symbols)natural_image
Illustration of a robotic device and its hand pouring liquid into a cup (no text or symbols)natural_image
Exploded view diagram of a device housing and casing (no text or labels)natural_image
Technical line drawing of a mechanical component with two views (top and side), no text or symbols present.natural_image
Line drawing of a mechanical device with mounting holes and a handle (no text or symbols)natural_image
Technical line drawing of a device's internal components, showing exploded and assembled views (no text or symbols)natural_image
Technical line drawing showing two views of a circular electronic device with internal components and a hand adjusting the component (no text or symbols present)natural_image
Line drawing of a cylindrical device with an open lid and internal components (no text or symbols)Ouvrir le couvercle
natural_image
Line drawing of a cylindrical device with an open lid and internal components, showing no text or symbols.natural_image
Simple line drawing of a cylindrical object with a rectangular component above it, no text or symbols present.natural_image
Line drawing of a cylindrical device with an open lid and internal components, no text or symbols presentnatural_image
Line drawing of a cylindrical electronic device with lid and ports (no text or symbols)Refermer le couvercle
natural_image
Technical line drawing of a vehicle chassis with vent, door, and support structure (no text or symbols)text_image
Technical diagram of a device with labeled components and connections, including a central display and circular components.Pulsante Accensione/Pausa
natural_image
Simple line drawing of a door with a checkmark icon (no text or symbols)
natural_image
Simple line drawing of a wall corner with a vertical dimension labeled 'p' and a cross symbol in the corner (no text or symbols present)natural_image
Diagram of a CD/DVD disc with attached sensor and control panel (no text or symbols)natural_image
Line drawing of a mechanical device with a handle and mounting bracket (no text or symbols)natural_image
Technical line drawing of a mechanical component with a flanged top and a side view showing internal features (no text or symbols)natural_image
Technical line drawing of a robotic vacuum cleaner with a close-up view of its internal components (no text or symbols)natural_image
Technical line drawing of a robotic vacuum cleaner with attached mechanical component (no text or symbols)natural_image
Technical line drawing of a circular device with a lid and internal components, shown alongside an exploded view of its internal casing (no text or symbols present)natural_image
Illustration of a robotic device and a hand pouring liquid into a cup (no text or symbols)natural_image
Exploded view diagram of a mechanical housing assembly (no text or labels)natural_image
Technical line drawing of a mechanical component with two views (top and side), no text or symbols present.natural_image
Line drawing of a mechanical component with mounting holes and a central housing (no text or symbols)natural_image
Exploded view diagram of a mechanical device showing internal components and assembly (no text or labels)natural_image
Technical line drawing of a circular electronic device with internal components and a hand holding a screwdriver (no text or symbols)natural_image
Line drawing of a cylindrical appliance with an open lid and internal compartments (no text or symbols)natural_image
Line drawing of a cylindrical device with an open lid and internal components, showing no text or symbols.natural_image
Simple line drawing of a cylindrical container with a small rectangular object on top, no text or symbols present.natural_image
Line drawing of a cylindrical device with an open lid and internal components (no text or symbols)natural_image
Line drawing of a cylindrical electronic device with lid and base (no text or symbols)natural_image
Line drawing of a vehicle chassis with ventilation ducts and support structure (no text or symbols)
natural_image
Simple line drawing of a door with a checkmark icon (no text or symbols)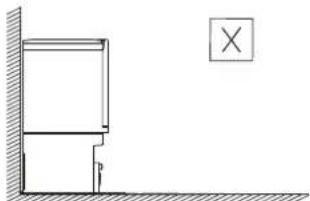
natural_image
Simple line drawing of a wall corner with a vertical structure and a cross symbol (no text or labels)natural_image
Diagram of a circular device with a remote control and a connector, no text or symbols presentnatural_image
Line drawing of a mechanical device with no visible text or symbolsnatural_image
Technical line drawing of a mechanical component with a flanged top and curved base (no text or symbols)natural_image
Technical line drawing of a robotic vacuum cleaner with a close-up view of its internal components (no text or symbols)natural_image
Technical line drawing of a circular vacuum cleaner with attached mechanical component (no text or symbols)natural_image
Technical line drawing of a circular device with a lid and internal components, alongside a separate view of a rectangular device (no text or symbols)natural_image
Illustration of a robotic device and its hand pouring liquid into a cup (no text or symbols)natural_image
Exploded view diagram of a device housing and casing (no text or labels)natural_image
Technical line drawing of a mechanical component with two views (top and side), no text or symbols present.natural_image
Line drawing of a mechanical device with mounting holes and a handle (no text or symbols)natural_image
Technical line drawing of a device's internal components, showing exploded and assembled views (no text or symbols)natural_image
Technical line drawing showing two views of a circular electronic device with internal components and a hand adjusting the interior (no text or symbols present)natural_image
Technical line drawing of a circular robotic vacuum cleaner with mounting holes and a central hub (no text or symbols)natural_image
Line drawing of a cylindrical device with an open lid and internal components (no text or symbols)Abra la cubierta

natural_image
Line drawing of a cylindrical device with an open lid and internal components, no text or symbols presentnatural_image
Simple line drawing of a cylindrical container with a rectangular object on top, no text or symbols present.natural_image
Line drawing of a cylindrical device with an open lid and internal components (no text or symbols)natural_image
Line drawing of a cylindrical electronic device with lid and ports (no text or symbols)Cierre la tapa
natural_image
Technical line drawing of a vehicle chassis with no visible text or symbols開始 / 停止ボタン
natural_image
Simple line drawing of a door with a checkmark icon (no text or symbols)
natural_image
Simple line drawing of a wall corner with a vertical dimension labeled 'p' and a cross symbol in the corner (no text or symbols present)flowchart
graph TD
    A["WiFi 2.6G"] --> B["Connex"]
    B --> C["Wireless Interface"]
text_image
GET IT ON Google play Available on the App Storenatural_image
Diagram of a circular device with a connector and a labeled sensor, connected to a rectangular component (no text or symbols present)text_image
Screenshot of a software interface showing input fields for image resolution and display settings with radio buttons.リモコン
natural_image
Line drawing of a mechanical device with a handle and valve (no text or symbols)natural_image
Technical line drawing of a mechanical component with a flanged top and curved base (no text or symbols)natural_image
Technical line drawing of a robotic vacuum cleaner with a close-up view of its internal components (no text or symbols)natural_image
Technical line drawing of a circular vacuum cleaner with attached mechanical component (no text or symbols)natural_image
Technical line drawing of a circular device with a lid and internal components, alongside a separate view of a rectangular device (no text or symbols)natural_image
Illustration of a robotic device and its hand pouring liquid into a container (no text or symbols)natural_image
Exploded view diagram of a device housing and casing (no text or labels)natural_image
Technical line drawing of a mechanical component with two views (top and side), no text or symbols present.natural_image
Line drawing of a mechanical component with mounting holes and a central housing (no text or symbols)natural_image
Exploded view diagram of a mechanical device showing internal components and assembly (no text or labels)natural_image
Technical line drawing showing two views of a circular electronic device with internal components and a hand holding a screwdriver (no text or symbols present)natural_image
Technical line drawing of a circular robotic vacuum cleaner with mounting holes and a central hub (no text or symbols)赤外線補助充電センサー
natural_image
Line drawing of a cylindrical device with an open lid and internal components (no text or symbols)カバーを開けます
natural_image
Line drawing of a cylindrical device with an open lid and internal components, showing no text or symbols.natural_image
Simple line drawing of a cylindrical container with a small rectangular object on top, no text or symbols present.使用済みのダストバッグを捨ててください

natural_image
Line drawing of a cylindrical device with an open lid and internal components (no text or symbols)新しいダストバッグを取り付け ます

natural_image
Line drawing of a cylindrical electronic device with lid and base (no text or symbols)カバーを完全に閉じます
Proscenic Technology Co., Ltd. (Authorized)
Shenzhen Proscenic Technology Co., Ltd. (Manufacturer)
Address: 10F No. 112, Wende Rd., Zhongli Dist., Taoyuan City 320, Taiwan
Web: www.proscenic.com
PROSCENIC TECHNOLOGY(UK) LTD
Address: 71-75 Shelton Street, Covent Garden, London, WC2H 9JQ
Customer Service
Email: support@proscenic.com Customer service hotline:
| (EU)+00800 456 00 456 | Mon~Fri 8:00-17:00 | Germany |
| (FR)+00800 456 00 456 | Mon~Fri 8:00-17:00 | France |
| (IT) +00800 456 00 456 | Mon~Fri 8:00-17:00 | Italy |
| (ES)+00800 456 00 456 | Mon~Fri 8:00-17:00 | Spain |
| (UK)+00800 456 00 456 | Mon~Fri 8:00-17:00 | the United Kingdom |
| (CN) +86 400-9002-599 | 周一~周五 9:00-17:00 | China |