POWXG30405 - Grass trimmer PowerPlus - Free user manual and instructions
Find the device manual for free POWXG30405 PowerPlus in PDF.

| Product type | Grass trimmer (brushcutter / lawn trimmer) |
| Brand | PowerPlus |
| Model | POWXG30405 |
| Voltage | 230-240 V ~50 Hz |
| Power | 1000 W |
| Motor type | Brushed |
| Shaft length | 600 mm |
| Power cable length | 0.35 m |
| Grass trimmer: cutting width | 380 mm |
| Grass trimmer: wire diameter | 2.0 mm |
| Grass trimmer: wire length | 5 m |
| Grass trimmer: wire feed type | Tap and go |
| Grass trimmer: spool type | Dual thread |
| Brushcutter: cutting width | 230 mm |
| Brushcutter: protection | Metal cover + plastic guard |
| Brushcutter: number of teeth | 4 |
| Sound pressure level (LpA) | 86 dB(A) |
| Sound power level (LwA) | 94 dB(A) |
| Vibration (aw) | 7.7 m/s² |
| Warranty | 36 months |
| Protection class | II (double insulation) |
| Uses | Brushcutting, grass trimming |
| Maintenance | Regular cleaning of vents and cutting head |
| Included spare parts | Metal blade, wire spool, wrenches |
Frequently Asked Questions - POWXG30405 PowerPlus
User questions about POWXG30405 PowerPlus
0 question about this device. Answer the ones you know or ask your own.
Ask a new question about this device
Download the instructions for your Grass trimmer in PDF format for free! Find your manual POWXG30405 - PowerPlus and take your electronic device back in hand. On this page are published all the documents necessary for the use of your device. POWXG30405 by PowerPlus.
USER MANUAL POWXG30405 PowerPlus
natural_image
Yellow power meter with black handle and metal blade, shown against white background (no text or symbols visible)
text_image
iNL NEDERLANDS VERTAALDE VERSIE VAN DE ORIGINELE HANDLEIDING
FR FRANÇAIS TRADUCTION DU MODE D'EMPLOI D'ORIGINE
EN ENGLISH ORIGINAL INSTRUCTION MANUAL
text_image
2 4 a a a a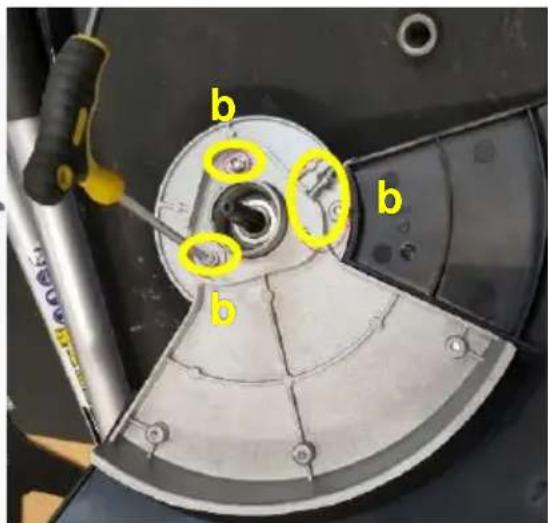
text_image
b b bFIG. C

text_image
a b 1 8FIG. D

text_image
9 a 1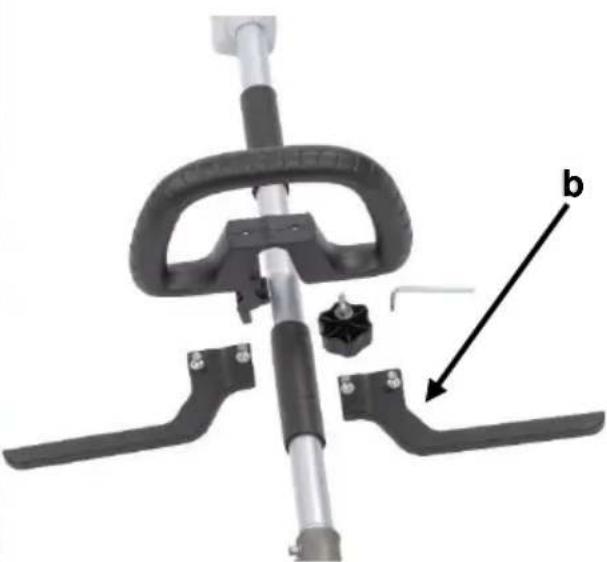
natural_image
Mechanical device with lever and handle components, labeled 'b' (no text or symbols on the device itself)
natural_image
Close-up of a black and white bicycle tire clamp mechanism (no text or symbols visible)FIG. E
POWERPLUS®
HIGH QUALITY TOOLS

text_image
POWERP205 H QUALITY TOOLS POWXG30405 c d 3 b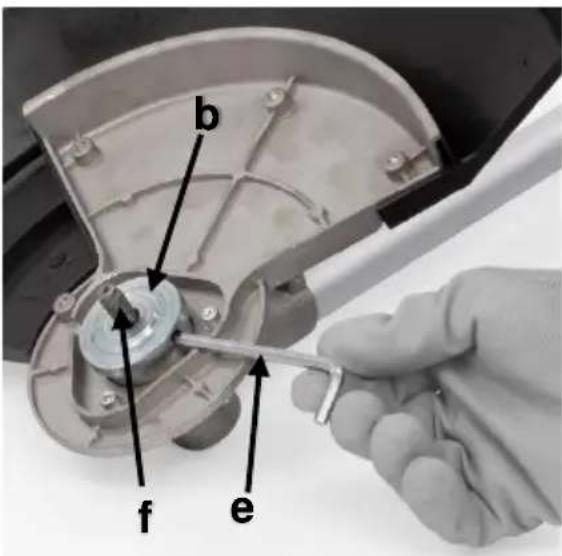
text_image
b f e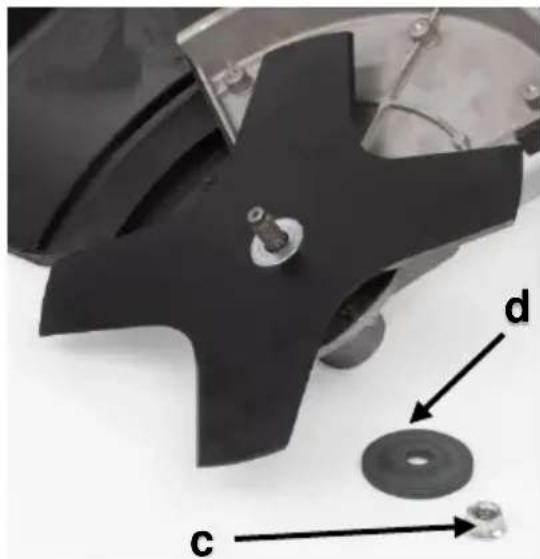
natural_image
Close-up of a mechanical component with labeled parts (c, d) and a central circular feature, no readable text or symbols beyond labels.
natural_image
Close-up of hands using a wrench to adjust a mechanical component (no visible text or symbols)FIG. F
text_image
10 c b a e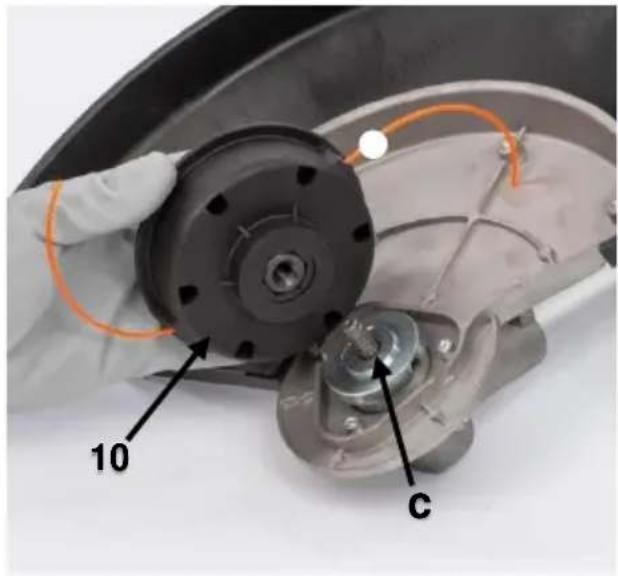
text_image
10 c
natural_image
Close-up of a gloved hand operating a mechanical device with orange arrows indicating rotation (no text or symbols)FIG. G
natural_image
Close-up of a power plant blade with orange arrow indicating rotation (no text or symbols on the blade itself)FIG. G 1

text_image
a bFIG. H
1 BEOOGD GEBRUIK 3
2 BESCHRIJVING (FIG. A) 3
3 INHOUD....3
4 TOELICHTING VAN DE SYMBOLEN 4
5 ALGEMENE VEILIGHEIDSVOORSCHRIFTEN ....4
5.1 Werkplaats....4
5.2 Elektrische veiligheid .... 5
2 BESCHRIJVING (FIG. A)
10 PROBLEEMOPLOSSING
natural_image
Simple hand-drawn sketch of a rounded rectangular shape with no text or symbolsPhilippe Vankerkhove, MSc.EE.
Regelgevings- en compliancemanager
29/11/2022, Lier - Belgium
1 UTILISATION PREVUE 3
2 DESCRIPTION (FIG. A) 3
3 LISTE DES PIÈCES CONTENUES DANS L'EMBALLAGE......3
4 PICTOGRAMMES....4
5 CONSIGNES DE SÉCURITÉ GÉNÉRALES ...... 4
natural_image
Simple hand-drawn sketch of a rounded rectangular shape with a small arrow on the top right (no text or symbols)5.3 Personal safety .... 5
5.4 Power tool use and care....5
5.5 Service....6
6 ADDITIONAL SAFETY RULES FOR GARDEN MULTITOOLS ..... 6
6.1 Brush cutter....6
6.2 Trimmer 6
6.3 Always use common sense....7
7 ASSEMBLY 7
7.1 Shaft assembly (Fig. A & B)....7
7.2 Installing the protection guard (Fig. A & C)....7
7.3 Attaching the carrying belt (Fig. A & D)....8
7.4 Mounting the round handle (Fig. A & E) 8
7.5 Replace the cutter blade and spool (Fig. A, F & G)....8
7.5.1 Removing the cutter blade (Fig. A & F) 8
7.5.2 Mounting the cutter blade (Fig. A & F) 8
7.5.3 Mounting the spool (Fig. A & G) 8
7.5.4 Opening up the trimmer spool 8
8 OPERATION....9
8.1 Starting the machine (Fig. H)....9
8.2 Stopping the machine (Fig. H)....9
8.3 Working using the thread spool....9
8.4 Working with the 4-tooth blade....9
8.5 Trimming procedures 10
8.5.1 Trimming / mowing....10
POWERPLUS® HIGH QUALITY TOOLS
POWXG30405 EN
8.5.2 Closer trimming....10
8.5.3 Fence / foundation trimming....10
8.5.4 Trimming around trees 10
8.5.5 Scalping 10
9 CLEANING AND MAINTENANCE....11
9.1 Cleaning the trimmer and brush cutter attachment....11
10 TROUBLE SHOOTING 11
11 TECHNICAL DATA....12
12 NOISE....12
13 MAINTENANCE INTERVALS....12
13.1 Chain saw....12
14 WARRANTY....13
15 ENVIRONMENT 13
16 DECLARATION OF CONFORMITY 14
BRUSH CUTTER 1000 W POWXG30405
1 INTENDED USE
- This appliance is designed for the following applications:
- Brush cutter (when fitted with metal circular blade): The brush cutter is intended to cut weed and climbing plants. Do not use it for other purposes, never use it for
- cutting wood. Never cut objects with a diameter exceeding 13 mm.
- Grass trimmer (when fitted with nylon line cutting head): The grass trimmer is intended for trimming grass. Do not use it for other purposes.
- Hedge trimmer (when fitted with reciprocating blade): The trimmer is intended to be used for trimming hedges and bushes with diameter not more than 24 mm.
- Chain saw: This appliance is intended for trimming branches in trees.
- Do not use this appliance for other purpose than those described in this manual. Not suitable for professional use.

WARNING! For your own safety, read this manual and the general safety instructions carefully before using the appliance. Your power tool should only be given to other users together with these instructions.
2 DESCRIPTION (FIG. A)
- Drive shaft assembly
- Locking pin
- Brush cutter/grass trimmer attachment
- Drive shaft assembly coupling
- Cutter blade
- Carrying belt
- Protection guard
- Round handle
- Shaft locking knob
- Wire spool
3 PACKAGE CONTENT LIST
- Remove all packaging materials.
- Remove remaining packaging and packing inserts (if included).
- Check that the package contents are complete.
- Check the appliance, the power cord, the power plug and all accessories for transportation damage.
- Keep the packaging materials as far as possible until the end of the warranty period. Then take it to your local waste disposal system.

WARNING: Packaging materials are not toys! Children must not play with plastic bags! There is a danger of suffocation!
■ 1x drive shaft assembly
■ 1x brush cutter/grass trimmer attachment
■ 1x protection guard base cover aluminium
■ 1x protection guard large cover plastic
■ 1x round handle
■ 1x carrying belt
- 1x wire spool
■ 1x cutter blade
■ 1x hex key (in round handle) - 1x spanner
- 1x nut 14 mm
■ 1x black washer
■ 1x receive washer - 1x manual

If any parts are missing or damaged, please contact your dealer.
4 SYMBOLS
- The following symbols are used in this manual and/or on the machine:
 | Denotes risk of personal injury or damage to the tool. |  | Wearing of protective shoes advised. |
 | Read instructions carefully. |  | Wear gloves. |
  | Wear safety glasses and ear protection. |  | Watch out for thrown objects and ricochets. |
 | Never operate the machine in the rain or in damp or wet condition. Moisture is a shock hazard. | 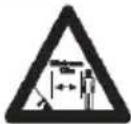 | Keep a minimum distance of 15 m between the machine and third parties during use. |
 | Class II - The machine is double insulated; Earthing wire is therefore not necessary. |  | In accordance with essential requirements of the European directive(s). |
 | Wear a mask in dusty conditions. |  | Electrical products must not be disposed with the domestic waste. |
 | Important information! |  | Kickback safety warning. |
5 GENERAL POWER TOOL SAFETY WARNINGS
- Read all safety warnings and instructions. Failure to heed warnings and follow instructions may result in electric shock, fire and/or serious injury. Keep safety warnings and instructions for future reference. The term "power tool" in the safety warnings refers to your mains-operated (corded) power tool or battery-operated (cordless) power tool.
5.1 Working area
- Keep working area clean and well lit. Untidy and dark areas can lead to accidents.
- Do not operate power tools in potentially explosive surroundings, for example, in the presence of inflammable liquids, gases or dust. Power tools create sparks which may ignite the dust or fumes.
- Keep children and bystanders at a distance when operating a power tool. Distractions can cause you to lose control of it.
5.2 Electrical safety

Always check that the power supply corresponds to the voltage on the rating plate.
- Power tool plugs must match the outlet. Never modify the plug in any way. Do not use adapter plugs with earthed power tools. Unmodified plugs and matching outlets will reduce the risk of a lethal electric shock.
- Avoid body contact with earthed surfaces such as pipes, radiators, kitchen ranges and refrigerators. There is an increased risk of a lethal electric shock if your body is earthed.
- Do not expose power tools to rain or wet conditions. If water gets inside a power tool, it will increase the risk of a lethal electric shock.
- Do not damage the cord. Never use the cord for carrying, pulling or unplugging the power tool. Keep the cord away from heat, oil, sharp edges or moving parts. Damaged or entangled cords increase the risk of a lethal electric shock.
- When operating a power tool outdoors, use an extension cable suitable for outdoor use. Using a cord suitable for outdoor use reduces the risk of a lethal electric shock.
- If operating a power tool in a damp location is unavoidable, use a power supply protected by a residual current device (RCD). Using an RCD reduces the risk of a lethal electric shock.
5.3 Personal safety
- Stay alert, watch what you are doing and use common sense when operating a power tool. Do not use a power tool when you are tired or under the influence of drugs, alcohol or medication. A moment of inattention when operating a power tool may result in serious personal injury.
- Use safety equipment. Always wear eye protection. Using safety equipment such as a dust mask, non-skid safety shoes, a hard hat, or hearing protection whenever it is needed will reduce the risk of personal injury.
- Avoid accidental starts. Ensure the switch is in the off position before inserting the plug. Carrying power tools with your finger on the switch or plugging in power tools when the switch is in the on position makes accidents more likely.
- Remove any adjusting keys or spanners before turning on the power tool. A spanner or key left attached to a rotating part of the power tool may result in personal injury.
- Do not reach out too far. Keep your feet firmly on the ground at all times. This will enable you to retain control over the power tool in unexpected situations.
- Dress properly. Do not wear loose clothing or jewellery. Keep your hair, clothing and gloves away from the power tool. Loose clothes, jewellery or long hair can become entangled in the moving parts.
- If there are devices for connecting dust extraction and collection facilities, please ensure that they are attached and used correctly. Using such devices can reduce dust-related hazards.
5.4 Power tool use and care
- Do not expect the power tool to do more than it can. Use the correct power tool for what you want to do. A power tool will achieve better results and be safer if used in the context for which it was designed.
- Do not use the power tool if the switch cannot turn it on and off. A power tool with a broken switch is dangerous and must be repaired.
- Disconnect the plug from the power source before making adjustments, changing accessories, or storing power tools. Such preventive safety measures reduce the risk of starting the power tool accidentally.
- Store power tools, when not in use, out of the reach of children and do not allow people who are not familiar with the power tool or these instructions to operate it. Power tools are potentially dangerous in the hands of untrained users.
-
Maintenance. Check for misalignment or jammed moving parts, breakages or any other feature that might affect the operation of the power tool. If it is damaged, the power tool must be repaired. Many accidents are caused by using poorly maintained power tools.
-
Keep cutting tools sharp and clean. Properly maintained cutting tools with sharp cutting edges are less likely to jam and are easier to control.
- Use the power tool, accessories and cutting tools, etc., in accordance with these instructions and in the manner intended for the particular type of power tool, taking into account the working conditions and the work which needs to be done. Using a power tool in ways for which it was not intended can lead to potentially hazardous situations.
5.5 Service
- Your power tool should be serviced by a qualified specialist using only standard spare parts. This will ensure that it meets the required safety standards.
6 ADDITIONAL SAFETY RULES FOR GARDEN MULTITOOLS
6.1 Brush cutter
- FOLLOW ALL WARNINGS and instructions regarding operation and blade installation.
- THE BLADE CAN RECOIL VIOLENTLY FROM MATERIAL IT CANNOT CUT – The blade can cause you to lose arms or legs. Keep people and animals 50 feet (15 meters) away in all directions. If the blade contacts foreign objects during operation, turn off the engine and allow the blade to come to a halt. Then check the blade for damage. Always discard the blade if it is warped or cracked.
- INSPECT YOUR BRUSH CUTTER AND ATTACHMENTS BEFORE USE - Never use unless all blade attachment hardware has been properly installed.
■ THE BLADE COASTS AFTER THE THROTTLE IS RELEASED - A coasting blade can injure you or bystanders. Before servicing the blade, always turn off the engine, and be sure the coasting blade has stopped. - DO NOT OPERATE UNIT IN AWKWARD POSITIONS, off balance, with outstretched arms, or with one hand. Always use two hands when operating unit, with thumbs and fingers encircling the handles.
- DO NOT RAISE THE BLADE HEAD above ground level while unit is operating. Injury to operator could result.
- DO NOT USE UNIT FOR ANY PURPOSES OTHER than brush cutting.
- DO NOT OPERATE UNIT FOR PROLONGED PERIODS. Rest periodically.
- DO NOT OPERATE UNIT WHILE UNDER THE INFLUENCE OF ALCOHOL OR DRUGS.
- DO NOT OPERATE UNIT UNLESS DEBRIS SHIELD AND/OR GUARD IS INSTALLED AND IN GOOD CONDITION.
- DO NOT ADD, REMOVE OR ALTER ANY COMPONENTS OF THIS PRODUCT. Doing so could cause personal injury and/or damage the unit, and void the manufacturer's warranty.
- DO NOT operate your unit near or around inflammable liquids or gases whether in or out of doors. An explosion and/or fire may result.
- DO NOT USE ANY OTHER CUTTING ATTACHMENT. Only use our replacement parts and accessories, which are designed specifically to enhance the performance and maximize the safe operation of our products. Failure to do so may cause poor performance and possible injury.
- Use only the blade supplied with this product. Do not use any other cutting attachment. Use of such attachments will void your factory warranty and may result in serious bodily injury.
6.2 Trimmer
- Brush cutters must not be used by children or untrained persons.
- Wear sturdy shoes or boots to protect your feet.
- Wear long trousers to protect your legs.

Only connect the appliance to an electric circuit which is protected by an earth leakage switch (30 mA).
- Check the appliance before use. If it is damaged, it must not be used.
- If the unit is damaged, have the damage repaired by an authorized repair agent.
- Do not use the appliance if the mains cable is damaged or worn.
■ Before use check the extension cord for possible wear and tear. In case of damage, immediately remove the mains cable from the wall socket. Do not touch the cable before the mains cable has been removed from the wall socket. - Do not use the appliance in the presence of children and/or animals.
- Only use the appliance in daylight or with good lighting.
- Never use the appliance without the guard in place.
- Before using the appliance, remove sticks, stones, wire and other obstacles from the surface on which you intend to work.
- Only use the appliance in an upright position, with the cutting line pointing to the ground. Never switch on the appliance in another position.
- Always keep your hands and feet away from the cutting line.
- Avoid touching the cutting line.
■ Make sure that the mains cable does not touch the cutting line.
■ Before putting the appliance down, switch it off and wait for the cutting line to come to a complete standstill. Never attempt to bring the cutting line to a standstill yourself.

Beware. After switching off the appliance it continues to rotate for a short time.
- Only use the type of cutting line recommended by the manufacturer. Never use a metal cutting line or fishing line.
- Remove the plug from the wall socket when you have finished, before servicing, or when the appliance is not being used.
■ After use, always store the appliance safely and out of the reach of children. - Do not cut against hard objects. This could cause injury or damage the trimmer.
- Do not use the trimmer to cut grass which is not in contact with the ground, for example, do not cut grass which is on walls or rocks etc.
6.3 Always use common sense
- It is not possible to cover every conceivable situation you can face. Always exercise care and use your common sense. Avoid all situations which you consider to be beyond your capability. If you still feel uncertain about operating procedures after reading these instructions, you should consult an expert before continuing.
7 ASSEMBLY
7.1 Shaft assembly (Fig. A & B)
■ Loosen the knob (5).
- Slide the front tubular shaft (2) into the tubular shaft of the drive shaft assembly (1).
■ Make sure the locking pin (6) snaps in the hole of the coupling (7).
- Fix the tubular shaft in place with the knob (5).
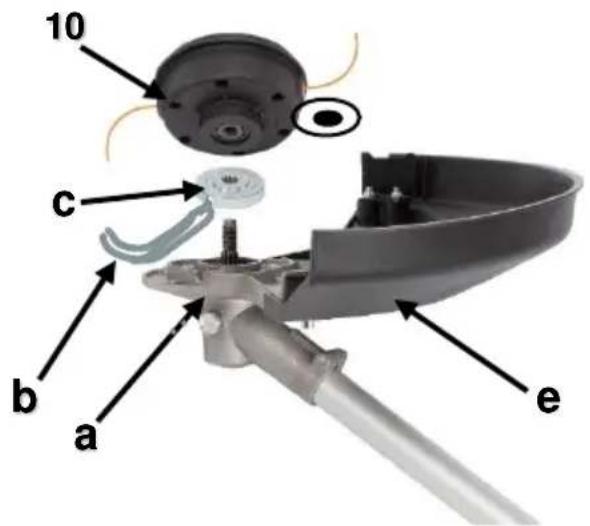
7.2 Installing the protection guard (Fig. A & C)
■ Fit the protection guard (4) to the head of the brush cutter/grass trimmer attachment (2).
- Fasten the protection guard (4) with the 4 hex bolts (a).
- Fit the complete protection guard (4) with 3 hex bolts (b) from the lower side to the brush cutter/grass trimmer attachment (2).
7.3 Attaching the carrying belt (Fig. A & D)
- Put the carrying belt (8) over your shoulder and adjust it for comfortable use.
- Clip the hook (a) on to the eye (b) located in front of the main handle (1).
7.4 Mounting the round handle (Fig. A & E)

The round handle must be mounted with a spacing of at least 25 cm to the device handle! The leg protection must always be mounted on the operator side!
- Place the round handle (9) onto the tubular shaft of the drive shaft assembly (1) in a suitable position with the round handle on top.
- Fasten it to the tubular shaft with the locking knob (a).
- Next fasten the leg support (b) to the round handle using the 2 hex bolts.
- The leg support (b) can be fitted for left or right handed use, on the left for right handed and on the right for left handed use.
7.5 Replace the cutter blade and spool (Fig. A, F & G)

CAUTION: NEVER use the unit if the blade is warped or has teeth that are chipped or missing. Replace a damaged blade immediately.
CAUTION: Always wear heavy-duty work gloves when handling and installing a blade.
7.5.1 Removing the cutter blade (Fig. A & F)
- Turn the tool upside down so that you can replace the cutter blade (3) easily.
- To dismount the cutter blade (3), insert the hex wrench through the hole of the machine body under the cutter blade and into the receive washer (b).
■ Rotate the cutter blade (3) until it is locked with the hex wrench (e). - Loosen the hex nut (c) clockwise (left-hand thread) with the hex socket wrench and remove the nut (c), cup (d), cutter blade (3 ), and hex wrench.
7.5.2 Mounting the cutter blade (Fig. A & F)
- Make sure the receive washer (b) is slotted over the axle nut (f) with the open side facing down.
- Mount the cutter blade (3) onto the shaft so that the guide of the receive washer fits in the mounting hole in the cutter blade (3). Install the upper washer (d), and secure the cutter blade (3) with the hex nut (c) holding the receive washer (b) with the hex wrench (e), rotate the hex nut counter clockwise.
7.5.3 Mounting the spool (Fig. A & G)
■ Remove the cutter blade as described in paragraph 7.5.1 Hold the trimmer head (a), insert the hex (b) wrench through the hole on the receive washer (c).
- Screw the spool (10) anticlockwise onto the shaft and tighten.
- To remove the spool do so in reverse order.
7.5.4 Opening up the trimmer spool
■ remove the spool from the brush cutter (see 7.5.3)
- hold the body off the trimmer spool firmly with one hand
- turn the central knob clockwise until the cartridge is able to come out.
- rewind the cartridge with new trimmer line.
POWXG30405 EN

- put the cartridge back in the spool, place the knob back onto the body and turn it anti-clockwise.
- mount the trimmer spool back on the machine (see 7.5.3)

If the line is too long when you use the equipment for the first time, the surplus end of it will be cut by the blade on the guard hood.
8 OPERATION

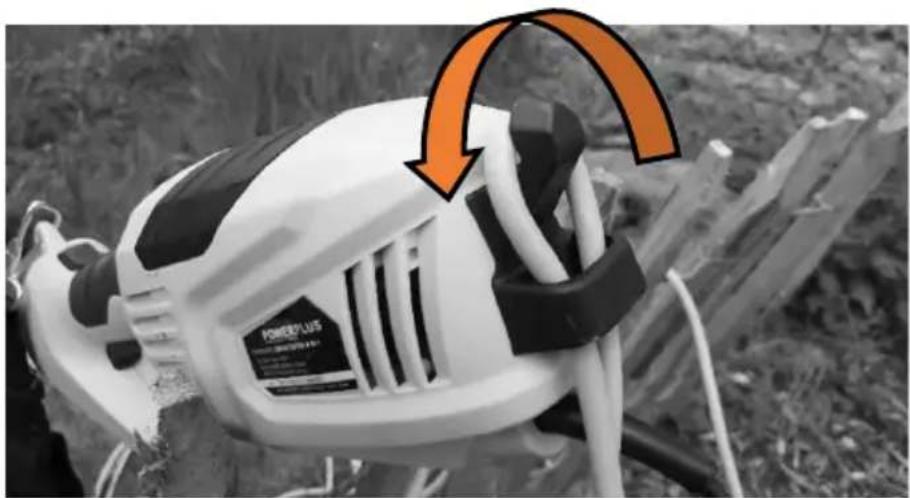
Connect the power plug to the coupling of an appropriate extension cord.
Form a loop, push it through the opening in the rear handle and hook over the cable holder (Fig. G1).
8.1 Starting the machine (Fig. H)
- To start the appliance push the lock off switch (a) forward and then squeeze the trigger switch (b).
8.2 Stopping the machine (Fig. H)
- To switch the appliance off, release the trigger switch.
8.3 Working using the thread spool
- In small grass areas hold the device at an angle of about 30^ and swing the cutting head evenly to the right and left with a semi-circular movement.
- The best results are obtained with a maximum grass length of 15 cm. If the grass is taller, it is recommended to mow several times.
- To cut around trees, fence posts or other obstacles, slowly move the device around the obstacle and cut with the thread ends.
- Avoid any contact with fixed obstacles (rocks, walls, picket fences, etc.). The thread would wear out quickly. Use the edge of the protective cover to keep the device at the correct distance.

Attention! Do not lay the cutting head on the ground during operation!
8.4 Working with the 4-tooth blade

Always wear the harness and suitable protection clothing when working with the device. Wear eye, hearing and head protection. Ensure that the blade is installed correctly. Replace damaged or blunt tool parts. There is a risk of injury.
- Only use the blade to work on open, even areas. Carefully inspect the area to be cut and remove all foreign bodies. Avoid hitting stones, metal or other obstacles. The blade can be damaged and there is a risk of kickback by the machine.
- When working, hold the cutter above the ground and slowly swivel the device back and forth like a scythe in an equal arch.
- Do not hold the cutting head at an angle.
- Do not use the device to cut wild growth or brushwood.
- Regularly check the blades for damage and replace as needed.
8.5 Trimming procedures
- When properly equipped with a debris shield and string head, your unit will trim unsightly weeds and tall grass in those hard-to-reach areas - along fences, walls, foundations and around trees.
- It can also be used for scalping to remove vegetation down to the ground for easier preparation of a garden or to clean out a particular area.

Do not sweep with trimmer. Sweeping refers to tilting head to sweep away debris from walkways, etc. Your trimmer is a powerful tool and small stones or other such debris may be hurled 50 feet (15 metres) or more, causing injury or damage to nearby property such as automobiles, homes and windows.

NOTE: Even if you are careful, trimming around foundations, brick or stone walls, curves, etc., will result in above-normal string wear. To renew the wire, press the lower spool knob against the ground with rotating trimmer.
8.5.1 Trimming / mowing
- Swing trimmer with a sickle-like motion from side to side. Do not tilt the head during the procedure.
- Test area to be trimmed for proper cutting height. Keep head at same level for even depth of cut.
8.5.2 Closer trimming
- Position trimmer straight ahead with a slight tilt so bottom of head is above ground level and string contact occurs at proper cutting point.
- Always cut away from operator. Do not pull trimmer in towards operator.
8.5.3 Fence / foundation trimming
- Approach trimming around chain link fences, picket fences, rock walls and foundations slowly to cut close without whipping string against the barrier.
- If the string comes in contact with rock, brick walls, or foundations, it will break or fray. If string hits fencing, it will snap off.
8.5.4 Trimming around trees
- Trim around tree trunks slowly so string does not contact bark. Walk around the tree trimming from left to right.
■ Approach grass or weeds with the tip of the string and tilt head slightly forward
8.5.5 Scalping

WARNING: Use extreme caution when SCALPING. Keep a distance of 30 meters (100 feet) between operator, other people and animals during these operations.
- Scalping refers to removal of all vegetation down to the ground. To do this, tilt the head to about a 30 degree angle to the right.
- By adjusting the handle you will have better control during this operation.
- Do not attempt this procedure if there is any chance that flying debris could injure the operator, other people, or cause damage to property.
POWXG30405 EN

Avoid kickout, kickout refers to the reaction of a moving blade if it contacts a strong tree, brush or a solid object. The force that results violently pushes the blade away in an arc. Kickout may cause loss of control resulting in injury to the operator or bystanders. Do not use a blade near a chain link fence, metal stakes, landscape borders or building foundations.

Do not cut with dull, cracked or damaged metal blade. Before cutting growth, inspect for obstructions such as boulders, metal stakes or strands of wire from broken fences. If an obstruction can not be removed, mark its location so that you can avoid it with the blade. Rocks and metal will dull or damage a blade. Wire can catch on the blade head and flap around or be thrown into the air.
Do not use a brush cutter for cutting trees.
9 CLEANING AND MAINTENANCE
- Your tool has been designed to operate over a long period of time with a minimum of maintenance. Continuous satisfactory operation depends upon proper tool care and regular cleaning.
- Regularly clean the ventilation slot in your tool using a soft brush or dry cloth.
- Regularly clean the cutting line and spool using a soft brush or dry cloth.
- Regularly use a blunt scraper to remove grass and dirt from the underneath of the guard.
9.1 Cleaning the trimmer and brush cutter attachment
■ Remove stuck cuttings.
- Keep the cutting blade sharp to facilitate your work.
10 TROUBLE SHOOTING
| PROBLEM | POSSIBLE CAUSE | SOLUTION |
| Line will not advance | · Line is welded to itself· Not enough line on the spool· Line has worn too short· Line is tangled on the spool | · Lubricate with a silicone spray· Replace the spool· Remove the spool and feed line out· Remove line from spool and rewind |
| Cutting head is hard to turn | Grass wrapped or built up around head | Clean the effected parts of the machine |
| Grass continually wraps around the shaft and trimmer head assembly | Cutting tall grass at ground level | Cut tall grass from the top down |
| The machine stops and will not start | - The machine is defective- Plug is damaged | - Contact dealer to check damage- Check the plug |
11 TECHNICAL DATA
| Type | POWXG30405 |
| Voltage | 230-240 V ~50 Hz |
| Motor capacity | 1000 W |
| Motor type | Brushed |
| Shaft length | 600 mm |
| Electric plug type | VDE |
| Power cable length | 0.35 m |
| Grass trimmer | |
| Cutting width | 380 mm |
| Wire diameter | 2,0 mm |
| Wire length | 5 m |
| Wire feeding type | Tap & go |
| Spool type | Double threaded |
| Brush cutter | |
| Cutting width | 230 mm |
| Protection | Metal cover + plastic guard |
| Number of teeth | 4 |
12 NOISE
- Noise emission values measured according to relevant standard. (K=3)
| Acoustic pressure level LpA | 86 dB (Å) |
| Acoustic power level LwA | 94 db (A) |

ATTENTION! Wear hearing protection when sound pressure is over 85 dB(A).
aw (Vibration)
7,7 m/s²
K = 1,5 ~m / s^2
13 MAINTENANCE INTERVALS
13.1 Chain saw
- The figures given here are based on normal operating conditions. In the event of more difficult conditions, such as strong dust generation and longer daily operating hours, the given intervals are to be reduced correspondingly.
| Appliance part | Action | Before starting work | After 10 hours of use |
| Complete machine | Check condition, replace damaged parts as needed | X | |
| Accessible screws and nuts | Tighten | X | |
| Cutter head | Check correct installation | X |
14 WARRANTY
- This product is warranted for a 36-month period effective from the date of purchase by the first user.
- This warranty covers all material or production flaws excluding: batteries, chargers, defective parts subject to normal wear & tear such as bearings, brushes, cables, and plugs, or accessories such as drills, drill bits, saw blades, etc.; damage or defects resulting from maltreatment, accidents or alterations; nor the cost of transportation.
- Damage and/or defects resulting from inappropriate use also do not fall under the warranty provisions.
- We also disclaim all liability for any bodily injury resulting from inappropriate use of the tool.
- Repairs may only be carried out by an authorised customer service centre for Powerplus tools.
- You can always obtain more information at the number 00 32 3 292 92 90.
- Any transportation costs shall always be borne by the customer, unless agreed otherwise in writing.
- At the same time, no claim can be made on the warranty if the damage of the device is the result of negligent maintenance or overload.
- Definitely excluded from the warranty is damage resulting from fluid permeation, excessive dust penetration, intentional damage (on purpose or by gross carelessness), inappropriate usage (use for purposes for which the device is not suitable), incompetent usage (e.g. not following the instructions given in the manual), inexpert assembly, lightning strike, erroneous net voltage. This list is not exhaustive.
- Acceptance of claims under warranty can never lead to the prolongation of the warranty period nor commencement of a new warranty period in case of a device replacement.
- Devices or parts which are replaced under the warranty therefore remain the property of Varo NV.
- We reserve the right to reject a claim whenever the purchase cannot be verified or when it is clear that the product has not been properly maintained. (Clean ventilation slots, carbon brushes serviced regularly, etc.).
- Your purchase receipt must be kept as proof of date of purchase.
- Your appliance must be returned undismantled to your dealer in an acceptably clean state, (in its original blow-moulded case if applicable to the unit), accompanied by proof of purchase.
15 ENVIRONMENT
Should your appliance need replacement after extended use, do not throw it away with the household rubbish, but dispose of it in an environmentally safe way. Waste produced by electrical machine items should not be handled like normal household rubbish. Please recycle where recycling facilities exist. Check with your local authority or retailer for recycling advice.
16 DECLARATION OF CONFORMITY


VARO – Vic. Van Rompuy N.V. – Joseph Van Instraat 9 – 2500 Lier – Belgium, solely declares that,
Product: Brush cutter
trade mark: POWERplus
model: POWXG30405
is in conformity with the essential requirements and other relevant provisions of the applicable European Directives / Regulations, based on the application of European harmonized standards. Any unauthorized modification of the apparatus voids this declaration..
European Directives / Regulations (including, if applicable, their amendments up to the date of signature):
2011/65/EU
2006/42/EC
2014/30/EU
2000/14/EC Anhang VI LwA
Measured 94 dB(A) 103 dB(A)
Guaranteed 96 dB(A) 107 dB(A)
Notified Body TuV Sud - DE
European harmonized standards (including, if applicable, their amendments up to the date of signature):
EN60335-1 : 2012
EN50636-2-91:2014
EN55014-1:2017
EN55014-2:2015
EN IEC 61000-3-2 : 2019
EN61000-3-3 : 2013
Keeper of the Technical Documentation: Philippe Vankerkhove, VARO Vic. Van Rompuy N.V.
The undersigned acts on behalf of the company CEO,
Philippe Vankerkhove
Regulatory Affairs – Compliance Manager
29/11/2022, Lier - Belgium
1xSchraubenschlüssel
1x Mutter 14 mm
natural_image
Simple hand-drawn outline of an irregular shape with no text or symbolsPhilippe Vankerkhove, MSc.EE.
29/11/2022, Lier - Belgium
1 USO PREVISTO 3
natural_image
Simple hand-drawn sketch of a rounded rectangular shape with a small arrowhead (no text or symbols)Philippe Vankerkhove, MSc.EE.
29/11/2022, Lier - Belgium
1 USO PREVISTO 3
natural_image
Simple line drawing of a rounded rectangular shape with a small arrow on top (no text or symbols)natural_image
Simple line drawing of a rounded rectangle with a small arrow on top (no text or symbols)Philippe Vankerkhove, MSc.EE.
29/11/2022, Lier - Belgium
1 BRUKSOMRÅDE 3
2 BESKRIVELSE (FIG. A) 3
3 PAKKENS INNHOLD 3
4 SYMBOLER....4
5 GENERELLE SIKKERHETSFORSKRIFTER 4
13 VEDLIKEHOLDSINTERVALLER
13.1 Motorsag
natural_image
Simple hand-drawn sketch of a rounded rectangular shape with a small arrow on top (no text or symbols)Philippe Vankerkhove, MSc.EE.
Regulatoriske saker – Samsvarsleder
29/11/2022, Lier - Belgium
1 TILSIGTET BRUG....3
2 BESKRIVELSE....3
3 MEDF∅LGENDE INDHOLD 3
4 SYMBOLER....4
5 GENERELLE SIKKERHEDSFORSKRIFTER ....4
natural_image
Simple hand-drawn sketch of an irregular shape with a small arrow, no text or symbols presentPhilippe Vankerkhove, MSc.EE.
Regulatory Affairs (afdelingen for juridiske anliggender) - Compliance Manager 29/11/2022, Lier - Belgium
1 ZAMÝŠLENÉ POUŽITÍ ...... 3
2 POPIS (OBRÁZEK A) 3
3 OBSAH BALENÍ....3
4 SYMBOLY 4
5 OBECNÁ BEZPEČNOSTNÍ UPOZORNĚNÍ PRO ELEKTRICKÉ STROJE....4
6 DOPLŇUJÍCÍ BEZPEČNOSTNÍ POKYNY ......6
6.1 Křovinořez....6
6.2 Vyžinač 7
natural_image
Simple hand-drawn sketch of a rounded rectangular shape with a small arrow on top (no text or symbols)Philippe Vankerkhove, MSc.EE.
29/11/2022, Lier - Belgium
1 UTILIZARE PREVĂZUTĂ 3
2 DESCRIERE (FIG. A) 3
3 CONTINUTUL PACHETULUI 3
4 SIMBOLURI....4
5 AVERTISMENTE GENERALE DE SIGURANTĂ PRIVIND APARATELE ELECTRICE ....4
5.1 Zona de lucru 4
natural_image
Simple hand-drawn sketch of a rounded rectangular shape with a small arrow on top (no text or symbols)Philippe Vankerkhove, MSc.EE. Divizia de reglementare – Director de conformitate 29/11/2022, Lier - Belgium
1 ПРЕДНАЗНАЧЕНИЕ НА УПОТРЕБАТА....3
2 ОПИСАНИЕ (ФИГ. А) 3
3 СПИСЪК НА СЪДЪРЖАНИЕТО НА ОПАКОВКАТА.... 3
4 СИМВОЛИ 4
natural_image
Simple hand-drawn sketch of a rounded rectangular shape with no text or symbolsnatural_image
Yellow metal detector with black handle and attached cable, shown against white background (no text or symbols visible)varo
WWW.VARO.COM
DESIGNED AND MARKETED BY VARO
©copyright by varo
VARO - VIC. VAN ROMPUY nv
JOSEPH VAN INSTRAAT 9 - 2500 LIER - BELGIUM