
POWXG1009 - Saw PowerPlus - Free user manual and instructions
Find the device manual for free POWXG1009 PowerPlus in PDF.

| Product type | Electric chainsaw |
| Brand | PowerPlus |
| Model | POWXG1009 |
| Rated power | 2400 W |
| Rated voltage | 230-240 V ~ 50 Hz |
| Guide bar length | 400 mm |
| Oil tank capacity | 0.13 L |
| Chain speed | 13.1 m/s |
| Chain brake | Yes, automatic |
| Chain lubrication | Automatic |
| Tool-free chain adjustment | Yes (SDS) |
| Chain type | Powerplus |
| Guide bar type | Powerplus |
| Motor | Carbon brush |
| Double insulation | Yes, class II |
| Sound pressure level | 93 dB(A) |
| Sound power level | 112 dB(A) |
| Vibration | 7.5 m/s² |
| Recommended extension cord | Cross-section ≥1.5 mm², max length 75 m |
| Warranty | 36 months |
| Intended use | Occasional use: cleaning, pruning, firewood cutting |
Frequently Asked Questions - POWXG1009 PowerPlus
User questions about POWXG1009 PowerPlus
0 question about this device. Answer the ones you know or ask your own.
Ask a new question about this device
Download the instructions for your Saw in PDF format for free! Find your manual POWXG1009 - PowerPlus and take your electronic device back in hand. On this page are published all the documents necessary for the use of your device. POWXG1009 by PowerPlus.
USER MANUAL POWXG1009 PowerPlus
natural_image
Yellow POWERPLUS power chain with black handle and black head, connected to a black electrical outlet (no text or symbols on the device itself)
| NL | NEDERLANDS | VERTAALDE VERSIE VAN DE ORIGINELE HANDLEIDING |
| FR | FRANÇAIS | TRADUCTION DU MODE D'EMPLOI D'ORIGINE |
| EN | ENGLISH | ORIGINAL INSTRUCTION MANUAL |
| DE | DEUTSCH | ÜBERSETZUNG DER ORIGINALBETRIEBSANLEITUNG |
| ES | ESPAÑOL | TRADUCCIÓN DEL MANUAL DE INSTRUCCIONES ORIGINAL |
| IT | ITALIANO | TRADUZIONE DEL MANUALE DI ISTRUZIONI ORIGINALE |
| PT | PORTUGUÊS | TRADUÇÃO DO MANUAL DE INSTRUÇÕES ORIGINAL |
| NO | NORSK | OVERSETTELSE AV ORIGINAL BRUKERVEILEDNING |
| DA | DANSK | OVERSÆTTELSE AF DEN ORIGINALE BRUGSVEJLEDNING |
| CS | ČESKY | PŘEKLAD ORIGINÁLNÍHO NÁVODU K POUŽITÍ |
| RO | ROMÂNĂ | TRADUCEREA MANUALULUI DE INSTRUCTIUNI ORIGINALE |
| BG | БЪЛГАРСКИ | ПРЕВОД НА ОРИГИНАЛНОТО РЬКОВОДСТВО |


FIG. 1

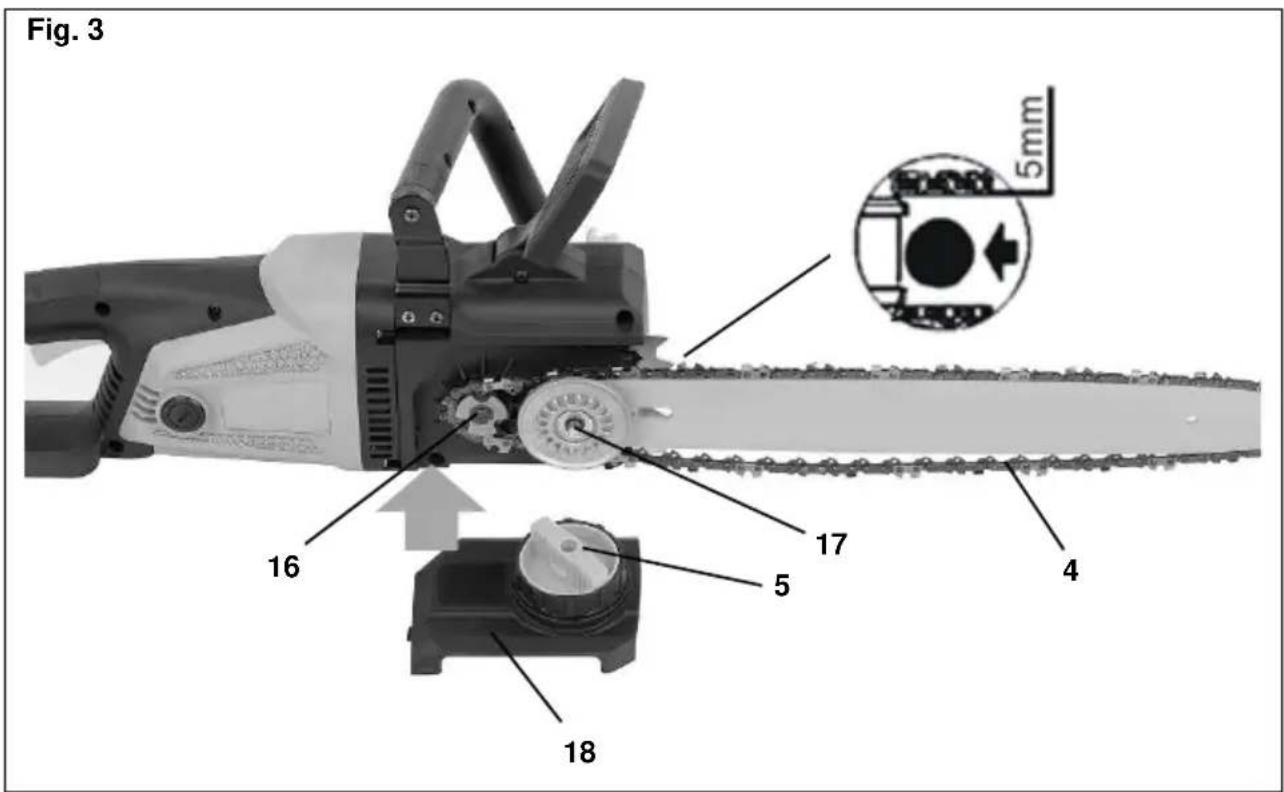
Fig. 4

Fig. 5

Fig. 6
natural_image
Technical line drawing of a mechanical component with no visible text or symbolsFig. 7A

natural_image
Black-and-white photo of a chain saw cutting into a log, with visible wood and power plug (no text or symbols)Fig. 7B

natural_image
Simple metal frame structure with a log on top, no text or symbols visible
natural_image
Illustration of a chainsaw and a circular tool (no text or symbols)Fig. 8
natural_image
Diagram of a chain-linking power tool with a saw and blade, showing no text or symbolsFig. 9

natural_image
Black-and-white photo of a power chain saw with exposed wood and a circular cutout, shown with two arrows indicating direction (no text or symbols on the device itself)Fig. 10

natural_image
Black-and-white illustration of a chainsaw with a wooden log and warning symbol (no text or labels)Fig. 11A
natural_image
Simple diagram showing a tree with curved arrows pointing to it, enclosed in an oval shape (no text or symbols)Fig. 13

2 BESCHRIJVING (FIG. 1)....3
3 INHOUD VAN DE VERPAKKING....3
4 TOELICHTING VAN DE SYMBOLEN 4
5 VEILIGHEIDSINSTRUCTIES....4
2 BESCHRIJVING (FIG. 1)
13 PROBLEEMOPLOSSING
natural_image
Simple hand-drawn sketch of a rounded rectangular shape with a small arrow on top (no text or symbols)Philippe Vankerkhove, MSc. EE Regelgevings- en compliancemanager 05/09/2022, Lier - Belgium
1 UTILISATION PREVUE 3
2 DESCRIPTION (FIG. 1)....3
3 LISTE DES PIECES CONTENUES DANS L'EMBALLAGE......3
4 PICTOGRAMMES 4
5 CONSIGNES DE SÉCURITÉ....4
natural_image
Simple hand-drawn sketch of a rounded rectangular shape with a small protrusion (no text or symbols)Philippe Vankerkhove, MSc. EE
05/09/2022, Lier - Belgium
1 INTENDED USE 3
2 DESCRIPTION (FIG. 1)....3
3 PACKAGE CONTENT LIST....3
4 SYMBOLS 4
5 SAFETY INSTRUCTIONS....4
5.1 Safety instructions and accident prevention ....4
6 KICKBACK....6
7 TRANSPORTING THE CHAINSAW 7
8 BEFORE STARTING UP 7
9 ASSEMBLY 7
9.1 Fitting the guide bar and chain 7
9.2 Tensioning the saw chain....8
9.3 Filling in chain oil (Fig. 4)....8
9.4 Securing the extension lead (Fig. 6)....8
9.5 Chain lubrication....8
9.6 Checking the automatic lubrication....9
9.7 Chain lubricants....9
9.8 Guide bar....9
9.9 Chain wheel....9
9.10 Chain guard....9
9.11 Chain brake....9
9.12 Releasing the chain brake (Fig. 5)....9
9.13 Sharpening the saw chain....9
10 STARTING UP 9
10.1 To switch off.... 10
10.2 Chainsaw protection....10
10.3 Notes on working practice 10
This model is intended for infrequent use by homeowners, cottagers, and campers, and for such general applications as clearing, pruning, cutting firewood, etc. They are not intended for prolonged use. Not suitable for professional use.

WARNING! For your own safety, read this manual and general safety instructions carefully before using the appliance. Your power tool should only be passed on together with these instructions.
2 DESCRIPTION (FIG. 1)
- Rear grip
- Front grip
- Front finger guard / Chain break
- Saw chain
- SDS system
- Guide bar cover
- Guide bar
- Rear finger guard
- Power cable
- Claw stop
- Safety lock-off button
- Cable hook
- ON/OFF switch
- Oil tank cap
- Oil gauge
- Chain wheel
- Guide bolt
- Sprocket cover
3 PACKAGE CONTENT LIST
■ Remove all packaging materials.
- Remove remaining packing and package inserts (if included).
- Check that the package contents are complete.
- Check the appliance, the power cord, the power plug and all accessories for transportation damage.
- Keep the packing materials as long as possible till the end of the warranty period. Dispose it into your local waste disposal system afterwards.

WARNING: Packaging materials are not toys! Children must not play with plastic bags! Danger of suffocation!
1 chainsaw
1 manual
1 chain (Powerplus)
1 bar (Powerplus)
1 bar cover

If any parts are missing or damaged, please contact your dealer.
4 SYMBOLS
In this manual and/or on the machine the following symbols are used:
 | Denotes risk of personal injury or damage to the tool. |  | Wearing of protection against noise advised. |
 | Read manual before use. |  | Wearing of protection goggles advised.Wear a protective helmet. |
 | Never operate the machine in the rain or in damp or wet conditions. Moisture is an electrical shock hazard. |  | Keep bystanders away. |
 | Remove plug from the mains immediately if the cable is damaged or cut. |  | Remove plug from the mains before doing any work on the chainsaw. |
 | Class. II -Double insulated. |  | In accordance with essential applicable safety standards of European directives. |
 | Wear gloves |
5 SAFETY INSTRUCTIONS
The safety instructions must be observed when using the chainsaw. For your own safety and the safety of others, please read this information carefully before using the chainsaw and keep it in a safe place for reference.
Use the chain saw only to saw wood or objects made of wood. Any other types of use are at your own risk and could be dangerous. The manufacturer cannot be held liable for damage caused by improper or incorrect usage.
5.1 Safety instructions and accident prevention
To prevent the incorrect handling of the chainsaw, please read the operating instructions in their entirety before using the chainsaw for the first time. All the information on the handling of the chainsaw is relevant to your personal safety. Ask a professional to show you how to use the chainsaw!
■ Before plugging in, check the plug and cable for damage. If damage is discovered, have it repaired by a specialist immediately.
- Never use a damaged cable, connection or plug or a power cable which does not comply with the requirements. If the cable is damaged or severed, unplug immediately.
- Switch the chainsaw off before releasing the chain brake.
- Always wear goggles and protective gloves when working with the chainsaw.
■ To prevent injury, wear tight-fitting clothes and safety boots.
- To prevent damage to your hearing, wear earmuffs. Helmets with a visor are particularly advantageous.
■ Make sure you have a firm footing when working with the chain saw.
- Keep your place of work tidy.
- To prevent electric shock, avoid contact with earthed parts.
■ Always pull the plug out of the power socket before doing any work on the chainsaw.
- Only plug in when the chainsaw is switched off,
- The chainsaw must be used only by one person at a time. All other persons must stay clear of the chainsaw's area of swing. Children and pets in particular must be kept well away at all times.
- The saw must not be touching anything when it starts up.
- Hold the chainsaw firmly in both hands when working with it.
- The chain saw must not be operated by children and young people. The only exceptions to this prohibition are young persons of 16 years and over who can use the chain saw under supervision as part of their training. Lend the saw only to those persons who are familiar with this type of chainsaw and know how to handle it. Always pass on the operating instructions together with the chainsaw.
■ Make sure the chain saw is stored in a place inaccessible to children.
- The saw may be operated only by persons who are rested and in good health, i.e. in a good physical condition. If you start to tire, have a break in time. The chainsaw should not be used after the consumption of alcohol.
- Never expose the chainsaw to rain or bad weather. Make sure there is enough light at the place of work. Do not use power tools in the vicinity of combustible liquids or gases.
- If the chainsaw is not being used for a while, it must be set aside in such a way that no other person is endangered.
■ Before making a cut, always set the claw stop before you start to saw.
- Remove the chainsaw from the wood only with the saw chain still running. Anyone who saws without a stop can be pulled forwards.
- Never use the chainsaw when standing on a ladder, in a tree or in any other instable places. Do not saw with one hand.
- The power cable must always be behind the saw operator.
- The power cable must always lead away from the rear of the chainsaw.
■ Use only original accessories.
- Chainsaws used outdoors must be connected up to an earth-leakage circuit-breaker.
- Do not overload your power tools. They run best and safest within given range of capacity.
- Always use the correct power tool. Do not use low-powered chainsaws for heavy jobs.
- Use the cable only for its proper purpose. Never carry your electric tool by its cable. Do not use the cable to pull the plug out of the socket. Protect the cable from heat, oil and sharp edges.
■ Extension cables out doors.
■ Use only authorized and accordingly labelled extension cables out of doors.
- Use a strong support when sawing converted timber and thin branches (saw-horse, Fig. 7b). Do not stack the timber and do not have it held by a second person or with your foot.
- Logs must be secured in position.
- On sloping ground, always work facing upwards.
- When cross-cutting always set the claw stop against the timber you want to saw (see Fig. 7b).
- Always set the claw stop before cross-cutting. Only then switch on the chainsaw and start sawing into the wood. Pull the chainsaw upwards at the rear and lead the direction with the front grip. Use the claw stop as a fulcrum. To reposition for further cutting, interrupt the sawing process and exert a slight pressure on the front grip. Pull the saw back a little, position the claw stop further down the cut and pull up the rear grip (see Fig. 7a).
- Pull the saw out of the wood only when the saw chain is running.
- If you carry out several cuts, switch off the chain saw in-between.
- Plunge cuts and horizontal cuts may only be carried out by professionals (high risk of kick-back, see Fig. 8).
- For horizontal cuts, position the smallest possible angle. This requires extreme caution, as the claw stop cannot be applied in this case.
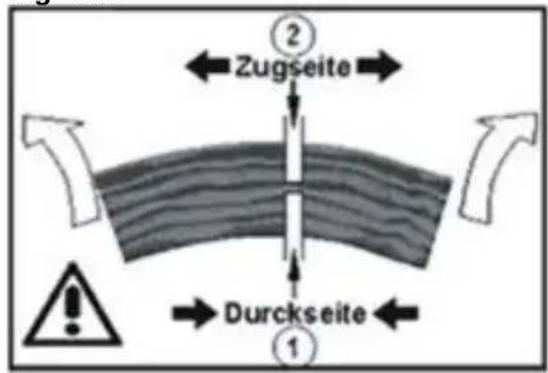
- If the chain gets stuck when sawing with the upper side it may be thrust towards the operator. For this reason you should saw wherever possible with the bottom side, as the chainsaw will then be thrust away from the body towards the wood (see Fig. 9 and 10).
- Pay extra attention when cutting splintered wood. Sawed off pieces of wood may be catapulted in any direction (risk of injury!)
- Do not use the chainsaw to remove nails or similar objects.
- When lopping off branches, the chain saw should be supported wherever possible against the trunk. Do not cut with the tip of the guide bar (risk of kick-back, see Fig. 8).
- Leave branch lopping work should be carried out by trained personnel! Risk of injury!
- Pay special attention to branches under tension. Do not cut through freely suspended branches from underneath.
■ Never stand on the trunk when loping off branches.
- The chainsaw should not be used for forest work, i.e. for felling and lopping off branches in the forest. Because of the cable connection the saw operator does not have the necessary mobility and his safety is not guaranteed!
■ Always stand to the side of the tree being felled.
- When the tree is being felled, watch out for falling branches when stepping back.
- On slopes the saw operator should stand to the upper or left or right side the trunk or lying tree, never to the bottom side.
- Watch out for trunks rolling towards you. Kick-back!
- The power saw is likely to recoil if the tip of the guide bar (especially the top quarter) accidentally touches wood or any other solid objects. In this case the saw will move uncontrolled and will be hurled towards the operator at full power (risk of injury!).
- When working with the chain saw, protective gloves, suitable shoes, leg protectors, eye protectors and ear protectors should be used.
- If the work involves any risk of head injury, a safety helmet must be worn. When cutting down trees and cutting and cutting off branches of felled or fallen trees, in addition a face protector should be worn.
- Always pull the plug from the socket outlet before attempting to check or adjust the chain or to correct some fault and whenever moving one workplace to another.
- Never switch on the chain saw unless you have a firm hold of the tool. a secure footing and are sure that the guide bar and saw chain are not touching anything.
■ Always hold the saw with both hands (right hand on rear handle, left hand on handle (2).
- Never saw above shoulder height, while standing on a ladder or in a tree or in any other insecure position.
- When sawing timber that has split, take particular care that no small pieces of wood are broken off and thrown by the saw chain.
- During breaks, the saw should be laid down in such a way that there is no risk of injury to anyone from the saw chain.
- The chain saw should never be lent to or be allowed to come into the hands of persons who are not familiar with the use of such a tool. The operating Instructions should also go with the saw.
6 KICKBACK
In order to prevent kick-back, please follow these safety instructions:
■ Never start cutting with the tip of the guide bar!
- Never cut with the tip of the guide bar! Be careful, when continuing cuts you are already working on!
■ Always start cuts with the chainsaw already running!
■ Make sure that the saw chain is always properly sharpened.
- Never cut through more than one branch at a time! When lopping off branches, be careful not to touch any other branches.
- When cross-cutting, pay attention to trunks standing very close to each other. If possible use a saw-horse.
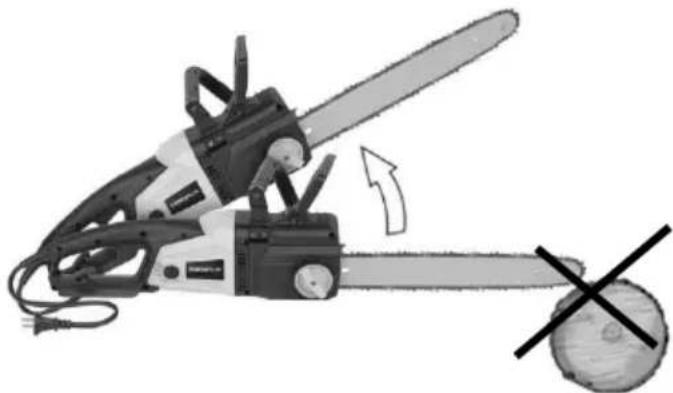
7 TRANSPORTING THE CHAINSAW
Before transporting the chainsaw, always remove the plug from the power socket and slide the chain guard over the rail and chain. If several cuts are to be performed with the chain saw, the saw must be switched off between cuts.
8 BEFORE STARTING UP
- The voltage and current supply must comply with the ratings on the type plate.
- Before commencing work, always check that the chainsaw works properly and is safe to operate.
- Check also that the chain lubrication and the oil gauge are in good working order (see Fig. 4). When the oil lever is approx. 5 ~mm from the bottom mark, you must top up with oil. When the oil level is higher you can work without worry.
- Switch on the chain saw and hold it above the ground. Be careful not allow the chainsaw to touch the ground. For safety reasons it is best to keep a clearance of at least 20 cm. If you now see growing traces of oil, the chain lubrication system is working correctly. If there are no traces of oil at all, try cleaning the oil outlet (Fig. 2, C), the upper chain tensioning borehole and the oil duct, or contact your Customer Service. (Be sure to read the section “Filling in chain oil and chain lubrication” on this point).
- Check the chain tension and retention, if necessary (see the section "Tensioning the saw chain" on this point).
- Make sure the chain brake is working properly (see also the section “Releasing the chain brake”).
9 ASSEMBLY
9.1 Fitting the guide bar and chain

If the chain saw is already connected to the power supply: Pull the plug from the socket outlet. Wear protective gloves whenever doing any work on the saw chain.
Important: The front finger guard (3) must always be in the top (vertical) position (Fig. 5). The guide bar and saw chain are supplied separately. To assemble, first unscrew the lock nut (5) and remove the sprocket cover (18). The guide bolt (17) must be in the centre of the guide. If necessary, adjust the chain tensioning with the chain wheel (16).

To prevent injury on the sharp cutting edges, always wear gloves when assembling, tensioning and checking the chain.
Before assembling the guide bar with the saw chain, check the cutting direction of the teeth! The running direction is marked with an arrow on the sprocket cover (18). To determine the direction of cut, it may be necessary to turn over the saw chain (4). Hold the guide bar (7) vertically with the tip pointing upwards and put on the saw chain (4), beginning at the tip of the bar.
Then assemble the guide bar with the saw chain as follows:
- Place the guide bar with the saw chain on the chain wheel (16) and guide bolt (17).
- Place the saw chain round the chain wheel (16) and make sure it is correctly mounted (see Fig. 2).
- Place the cover (6) on top and tighten gently with the lock nut (5). Now the saw chain has to be correctly tensioned.
9.2 Tensioning the saw chain
Always pull the plug out of the power socket before doing any work on the chainsaw!
Wear safety gloves!
Make sure the saw chain (4) is inside the guide groove of the guide bar (7) (Fig. 2)!
Turn the outer Knob clockwise until the saw chain is correctly tensioned, then rotate the inside knob (5) to block the guide bar in that position.
While the inside knob is being tightened, the guide bar must then be pushed upwards.
Check the chain tension again (see Fig. 3). Do not tension the chain too tightly.
When cold, it should be possible to lift the chain in the middle of the guide bar approx. 5 mm.
Tighten the lock nut (5) securely.
When warm, the saw chain will expand and slacken and there is a danger of it jumping off the rail altogether. Re-tension if necessary.
If the saw chain is re-tensioned when hot, it must be loosened again when the sawing work has been completed. Otherwise, the contraction which takes place as the chain cools would result in excessively high tension.
A new saw chain requires a running-in period of approx. 5 minutes. Chain lubrication is very important at this stage. After running in, check chain tension and re-tension if necessary.
9.3 Filling in chain oil (Fig. 4)
To prevent dirt getting inside the tank, clean the oil tank cap (14) before opening. Check the contents of the oil tank during sawing work by checking the oil gauge (15). Close the oil tank cap tightly and wipe away any spills.
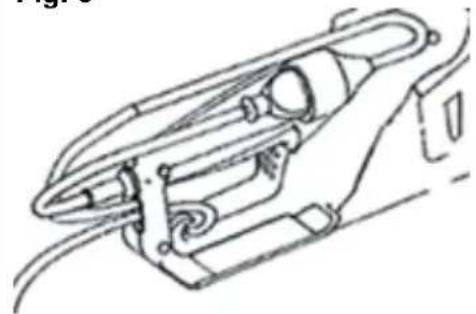
9.4 Securing the extension lead (Fig. 6)
Only use extension leads suitable for outdoor use. The cross section of the cable (max. length of extension cord: 75 m) must be at least 1.5 mm ^2 . Secure the chainsaw flex to the extension lead by inserting the extension lead into the strain relief gap of the housing.
Extension leads longer than 30 m will reduce the performance of the chainsaw.
9.5 Chain lubrication
To prevent excessive wear, the saw chain and guide bar must be evenly lubricated during operation.
Lubrication is automatic. Never work without chain lubrication. If the chain runs dry, the entire cutting apparatus will quickly become severely damaged. It is therefore important to check both chain lubrication and the oil gauge every use (Fig. 4).
Never use the saw when the oil level is below the "Min." mark.
- Min.: When only approx. 5 mm of oil is visible at the lower rim of the oil gauge (15), you must top up with oil.
- Max.: Top up with oil until the window is full.
9.6 Checking the automatic lubrication
Before commencing work, check the automatic chain lubrication and oil gauge. Switch on the chain saw and hold it above the ground. Be careful not to allow the chain saw to touch the ground. For safety reasons it is best to keep a clearance of at least 20 cm. If you now see growing traces of oil, the chain lubrication system is working correctly. If there are no traces of oil at all, try cleaning the oil outlet (Fig 2, C), the upper chain tensioning borehole (E) and the oil duct, or contact your Customer Service.
9.7 Chain lubricants
The service life of saw chains and guide bars depends to a large extent on the quality of the lubricant used. Old oil must not be used! Use only environment-friendly chain lubricant. Store chain lubricant only in containers which comply with the regulations.
9.8 Guide bar
The guide bar (7) is subjected to especially severe wear and tear at the nose and the bottom. To avoid one-sided wear and tear, turn the guide bar over every time when you sharpen the chain.
9.9 Chain wheel
The chain wheel (16) is subjected to especially high wear and tear. If you notice deep wear marks on the teeth, the chain wheel must be replaced. A worn chain wheel curtails the service life of the saw chain. Have the chain wheel replaced by a specialist dealer or your Customer Service.
9.10 Chain guard
The chain guard must be clipped onto the chain and sword as soon as the sawing work has been completed and whenever the chainsaw has to be transported.
9.11 Chain brake
In the event of kick-back, the chain brake (3) will be actuated via the front finger guard. The front finger guard is pushed forwards by the back of the hand and this causes the chain brake to stop the chain saw, or rather the motor, within 0.15 s (Fig. 5, I).
9.12 Releasing the chain brake (Fig. 5)
To be able to use your chain saw again, you must release the saw chain again. First, switch off the chainsaw. Then push the front finger guard (3) back into the vertical position until it locks in place (Fig 5, H). The chain brake is now fully functional again.
9.13 Sharpening the saw chain
You can have your saw chain sharpened fast and correctly by specialist dealers, from whom you can also obtain chain sharpening equipment to enable you to sharpen the chain yourself. Please follow the corresponding operating instructions.
Take care of your tools. Keep your tools sharp and clean to enable you to work well and safely. Follow the maintenance regulations and the instructions for changing tools
10 STARTING UP
Always wear safety goggles, ear muffs, protective gloves and heavy-duty work clothes!
Use the saw only with approved extension cables with the prescribed insulation and connections designed for outdoor use (approved rubber-sheathed cables) which fit the chainsaw plug.
The chain saw is equipped with two safety switches, requiring the use of both hands.
The chainsaw works only when one hand holds the front grip (2) and the other hand actuates the switch on the rear grip (1).
If the chainsaw does not run, the chain brake must be released at the front finger guard (3). Be sure to read the sections "Chain brake" and "Releasing the chain brake" on this point.
After switching on, the chainsaw will run immediately at high speed.
10.1 To switch off
Release either the ON/OFF switch (13) on the rear grip or the other switch (2) on the front grip.
The release of ON/OFF switch results the stop of the chainsaw within 1 sec., and heavy sparkling. This is normal and safe for the proper operation of the chainsaw.
After working with the chainsaw, you should always: Clean the saw chain and guide bar and replace the chain guard.
10.2 Chainsaw protection

Never use the chainsaw in the rain or in damp conditions.
If the extension cable is damaged, pull the plug out of the power socket immediately. Never work with a damaged cable.
- Check the chainsaw for damage. Before using your tool again, check the safety devices or any slightly damaged parts to ensure that they are in good working order.
■ Make sure the moving parts are working correctly.
- All the parts must be correctly assembled and meet all the conditions required to ensure that the chainsaw works correctly.
- Any damaged safety devices and parts must be properly repaired or replaced immediately by a Customer Service workshop, unless there are instructions to the contrary in these operating instructions.
10.3 Notes on working practice
Kick-back (Fig. 8).
You can avoid accidents by not sawing with the tip of the guide bar as this may cause the saw to rear up suddenly.
Always use the complete safety equipment and clothes when working with the saw.
Kick-back is an upward and/or backward movement of the guide bar which can occur if the saw chain at the tip of the guide bar encounters an obstruction.
Make sure your work-piece is firmly secured. Use clamps to stop the work-piece slipping. This also makes it easier to operate the chainsaw with both hands.
Kick-back causes the saw to behave uncontrollably and thus brings with a slack or blunt chain.
A poorly sharpened chain increases the risk of kick-back. Never saw above shoulder height.
To saw up wood, please observe the safety regulations and proceed as follows:
- Make sure the wood to be sawed cannot slip.
– Clamp short pieces of wood in place before sawing - Saw only wood or wooden objects.
- When sawing, make sure that no stones or nails are touched as these could be thrown out and damage the saw chain.
- Avoid bringing the running saw into contact with wire fences or the ground.
- When lopping off branches, support the chainsaw as far as possible and do not saw with the tip of the guide bar.
- Watch out for obstacles such as tree stumps, roots, ditches and hillocks as these could cause you to fall.
Remember!
The chain saw must be running before it comes into contact with the wood.
11.2 To switch on:
Press the safety lock-off (2) and ON/OFF switch on (13).
Place the lowest claw (Fig. 4, J) on the wood. Raise the chain saw by the rear grip (1) and saw into the wood. Move the chain saw back a little and place the claw further down.
Be careful when sawing splintered wood as pieces of wood may be ripped off.
11.3 Wood under tension
Fig. 11a: Top side of under tension
Danger: Tree will rear up!
Fig. 11b: Bottom side of trunk under tension
Danger: Tree will move downwards!
Fig. 11c: Thick trunks and high tension
Danger: Tree will move suddenly and with immense force!
Fig. 11d: Both sides of trunk under tension
Danger: Tree will move sideways.
11.4 Felling trees
To fell trees, observe all the safety regulations and proceed as follows:
Remember!
Danger zone: Falling trees can bring down other trees with them. The danger zone is therefore twice the length of the tree being felled (Fig. 12).
Felling trees is dangerous and requires practice. If you are a beginner or inexperienced, do not try to teach yourself but seek professional training (Fig. 13).
Falling direction:
- First estimate the direction of fall, taking into account the centre of gravity of the crown and the wind direction. The chain saw must be running before it comes into contact with the wood. Switch on the chain saw. Saw an undercut in the tree in the direction of fall and then make a horizontal cut (back cut) on the side opposite to the undercut.
■ Make the undercut: This will give the tree a direction and guidance. - Check the direction of fall: If you have to correct the undercut, always re-cut over the entire width.
- Call now "Timber!"
- Only now make the back cut, which must be higher than the sole of the undercut. Insert wedges in time.
- Leave the bridge in place as it will function as a hinge. If you cut through the bridge, the tree will fall randomly.
- Fell the tree by driving a wedge into the back cut, not by sawing through it.
- When the tree falls, step back and watch the crown.
- Wait for the crown to stop swinging. Do not continue working under branches which have got stuck.
When the chain saw is used to cut trees that exceed its power limits the chain can get stuck. If the chain gets jammed, release it using a wooden wedge.
Do not fell trees:
- If you can no longer distinguish details within the danger zone, e.g. owing to fog, rain, snow drifts or twilight.
If the direction of fall cannot be reliably estimated owing to wind or gusts of wind. Felling work on sloping ground, black ice, frozen or dewy ground is safe only if you can get a firm foothold.
12 CLEANING AND MAINTENANCE
Always pull the plug out of the power socket before doing any work on the chainsaw!
- Keep the cooling vents on the motor housing clean and unobstructed at all times.
- Only the maintenance work described in these operating instructions may be carried out. Any other maintenance work must be carried out by our Customer Service.
- Do not modify the power saw in any way as this could jeopardize its safety.
- Should the chainsaw fail despite our careful manufacturing and inspection procedures have it repaired by an authorized Customer Service work-shop.
13 TROUBLESHOOTING
| FAULT | CAUSE | REMEDY |
| Motor does not run | No electricity | Check socket, cable and plug. |
| Damaged cable: Have repaired by Customer Service. It is prohibited to patch the cable with insulating tape. | ||
| Damaged switches have to be replaced by a Customer Service workshop. | ||
| Chain brake | See section “chain brake” and “Releasing the chain brake” | |
| Running out of carbon brush | Change the carbon brush, ask a Customer Service workshop | |
| Chain does not move | Chain brake | Check the chain brake, release if necessary. |
| Poor cutting performance | Blunt chain | Sharpen the chain |
| Chain tension | Chain wrongly fitted | |
| Check that the chain is fitted correctly | Check the chain tension | |
| Saw works only with difficulty | Chain tension | Check the chain tension |
| Chain jumps off sword | ||
| Chain becomes hot | Chain lubrication | Check oil level |
| Check Chain lubrication |
14 TECHNICAL DATA
| Rated Voltage AC | 230-240 V |
| Rated Frequency | 50 Hz |
| Rated Power | 2400 W |
| Bar Size | 400 mm |
| Cable Length | 0.35 m |
| Oil tank capacity | 0.13 l |
| Chain Speed | 13.1 m/s |
| Auto brake hand guard | Yes |
| Automatic chain oiler | Yes |
| Low kickback | Yes |
| Chain Type | Powerplus |
| Bar Type | Powerplus |
| Quick toolless chain adjustment | Yes |
| Carbon brush motor | yes |
15 NOISE
Noise emission values measured according to relevant standard. (K=3)
| Acoustic pressure level LpA | 93 dB(A) |
| Acoustic power level LwA | 112 dB(A) |
ATTENTION! Wear hearing protection when sound pressure is over 85 dB(A).
aw (Vibration):
7,5 m/s²
K = 1.5 ~m / s^2
16 STORAGE
Keep your chain saw in a safe place. The unused chainsaw should be stored clean, on a flat surface and in a dry place which is inaccessible to children.
17 WARRANTY
- This product is warranted for a 36-month period effective from the date of purchase by the first user.
- This warranty covers all material or production flaws excluding : batteries, chargers, defective parts subject to normal wear & tear such as bearings, brushes, cables, and plugs, or accessories such as drills, drill bits, saw blades, etc. ; damage or defects resulting from maltreatment, accidents or alterations; nor the cost of transportation.
- Damage and/or defects resulting from inappropriate use also do not fall under the warranty provisions.
- We also disclaim all liability for any bodily injury resulting from inappropriate use of the tool.
- Repairs may only be carried out by an authorized customer service centre for Powerplus tools.
- You can always obtain more information at the number 00 32 3 292 92 90.
- Any transportation costs shall always be borne by the customer, unless agreed otherwise in writing.
- At the same time, no claim can be made on the warranty if the damage of the device is the result of negligent maintenance or overload.
- Definitely excluded from the warranty is damage resulting from fluid permeation, excessive dust penetration, intentional damage (on purpose or by gross carelessness), inappropriate usage (use for purposes for which the device is not suitable), incompetent usage (e.g. not following the instructions given in the manual), inexpert assembly, lightning strike, erroneous net voltage. This list is not exhaustive.
- Acceptance of claims under warranty can never lead to the prolongation of the warranty period nor commencement of a new warranty period in case of a device replacement.
- Devices or parts which are replaced under the warranty therefore remain the property of Varo NV.
- We reserve the right to reject a claim whenever the purchase cannot be verified or when it is clear that the product has not been properly maintained. (Clean ventilation slots, carbon brushes serviced regularly, etc.).
- Your purchase receipt must be kept as proof of date of purchase.
- Your appliance must be returned undismantled to your dealer in an acceptably clean state, (in its original blow-moulded case if applicable to the unit), accompanied by proof of purchase.
18 ENVIRONMENT

Should your appliance need replacement after extended use, do not discard it with the household rubbish but dispose of it in an environmentally safe way.
Waste produced by electrical machine items should not be handled like normal household rubbish. Please recycle where recycle facilities exist. Check with your Local Authority or retailer for recycling advice.
19 DECLARATION OF CONFORMITY


VARO – Vic Van Rompuy nv - Joseph Van Instraat 9 - BE2500 Lier - BELGIUM, solely declares that,
Product: Chain saw 2400W
Trade mark: POWERplus
Model: POWXG1009
is in conformity with the essential requirements and other relevant provisions of the applicable European Directives / Regulations, based on the application of European harmonized standards. Any unauthorized modification of the apparatus voids this declaration.
European Directives / Regulations (including, if applicable, their amendments up to the date of signature):
2011/65/EU
2006/42/EC
2014/30/EU
2000/14/EC Annex V LwA
Measured 106dB(A)
Guaranteed 112dB(A)
European harmonized standards (including, if applicable, their amendments up to the date of signature);
EN60745-1 : 2009
EN60745-2-13:2009
EN55014-1:2017
EN55014-2:2015
EN IEC 61000-3-2 : 2019
EN61000-3-3:2013
Keeper of the Technical Documentation: Philippe Vankerkhove, VARO – Vic. Van Rompuy N.V.
The undersigned acts on behalf of the company CEO,

natural_image
Simple hand-drawn sketch of a rounded rectangular shape with no text or symbolsPhilippe Vankerkhove, MSc. EE
Regulatory Affairs – Compliance Manager
05/09/2022, Lier - Belgium
natural_image
Simple hand-drawn sketch of a rounded rectangular shape with no text or symbolsPhilippe Vankerkhove, MSc. EE Zulassungsabteilung – Compliance Manager 05/09/2022, Lier - Belgium
1 USO PREVISTO 3
natural_image
Simple hand-drawn sketch of a rounded rectangular shape with a curved top edge (no text or symbols)Philippe Vankerkhove, MSc. EE
Asuntos reglamentarios - Director de conformidad 05/09/2022, Lier - Belgium
T1 USO PREVISTO 3
2 DESCRIZIONE (FIG. 1)....3
3 DISTINTA DEI COMPONENTI....3
4 SIMBOLI 4
5 NORME DI SICUREZZA 4
natural_image
Simple hand-drawn sketch of a rounded rectangular shape with no text or symbolsPhilippe Vankerkhove, MSc. EE
05/09/2022, Lier - Belgium
natural_image
Simple hand-drawn sketch of a rounded rectangular shape with a curved line on the left (no text or symbols)Philippe Vankerkhove, MSc. EE
05/09/2022, Lier - Belgium
E1 TILTENKT BRUK....3
2 BESKRIVELSE (FIG. 1)....3
3 PAKKENS INNHOLD....3
4 SYMBOLER 4
5 GENERELLE SIKKERHETSADVARSLER....4
natural_image
Simple hand-drawn sketch of a rounded rectangular shape with a curved line and a small mark (no text or symbols)Philippe Vankerkhove, MSc. EE
Regulatoriske saker - Samsvarsleder
05/09/2022, Lier - Belgium
1 TILSIGTET BRUG....3
2 BESKRIVELSE (FIG. 1)....3
3 MEDF∅LGENDE INDHOLD 3
4 SYMBOLER....4
5 SIKKERHEDSFORSKRIFTER....4
natural_image
Simple hand-drawn sketch of a rounded rectangular shape with a curved line on the left (no text or symbols)Philippe Vankerkhove, MSc. EE
Regulatory Affairs (afdelingen for juridiske anliggender) – Compliance Manager 05/09/2022, Lier - Belgium
1 ZAMÝŠLENÉ POUŽITÍ ...... 3
2 POPIS (OBR. 1) ....3
3 SEZNAM OBSAHU BALENÍ......3
4 SYMBOLY 4
5 OBECNÁ BEZPEČNOSTNÍ UPOZORNĚNÍ......4
natural_image
Simple hand-drawn sketch of a rounded rectangular shape with a small circular mark on top (no text or symbols)Philippe Vankerkhove, MSc. EE
05/09/2022, Lier - Belgium
1 ZAMÝŠL'ANÉ POUŽITIE....3
2 POPIS (OBR. 1) ....3
3 OBSAH BALENIA....3
4 SYMBOLY 4
5 BEZPEČNOSTNÉ POKYNY 4
9.2 Napnutie ret'aze pily....8
9.3 Plnenie oleja ret'aze (obr. 4) 8
9.4 Zaistenie predlžovacieho kábla (obr. 6)....8
9.5 Mazanie ret'aze....8
natural_image
Simple hand-drawn sketch of a rounded rectangular shape with a small arrow on top (no text or symbols)Philippe Vankerkhove, MSc. EE
Regulačné záležitosti – Compliance Manager
05/09/2022, Lier - Belgium
1 UTILIZARE PREVĂZUTĂ....3
2 DESCRIERE (FIG. 1) ....3
3 CONTINUTUL PACHETULUI 3
4 SIMBOLURI 4
5 AVERTISMENTE DE SIGURANTĂ 4
natural_image
Simple hand-drawn sketch of a rounded rectangular shape with no text or symbolsPhilippe Vankerkhove, MSc. EE Divizia de reglementare – Director de conformitate 05/09/2022, Lier - Belgium
1 RENDELTETÉSSZERÜ HASZNÁLAT 3
natural_image
Simple hand-drawn sketch of a rounded rectangular shape with no text or symbolsPhilippe Vankerkhove, MSc. EE
05/09/2022, Lier - Belgium
1 ПРЕДНАЗНАЧЕНИЕ НА УПОТРЕБАТА....3
2 ОПИСАНИЕ (ФИГ. 1)....3
3 СПИСЪК НА СЪДЪРЖАНИЕТО НА ОПАКОВКАТА....3
4 СИМВОЛИ 4
natural_image
Simple hand-drawn sketch of a rounded rectangular shape with no text or symbolsKĒDES ZĀGIS 2400 W – 400 MM POWXG1009
1 PAREDZËTAIS LIETOJUMS
13 PROBLÉMU NOVĚRŠANA
natural_image
Simple hand-drawn sketch of an irregular shape with no text or symbolsPhilippe Vankerkhove, MSc. EE
05/09/2022, Lier - Belgium

natural_image
Yellow POWERPLUS chain saw with black handle and yellow blade, no visible text or symbols on the device itselfvaro
WWW.VARO.COM
DESIGNED AND MARKETED BY VARO
©copyright by varo
VARO - VIC. VAN ROMPUY nv
JOSEPH VAN INSTRAAT 9 - 2500 LIER - BELGIUM


- BESCHRIJVING (FIG. 1)
- DESCRIPTION (FIG. 1)
- PACKAGE CONTENT LIST
- SYMBOLS
- SAFETY INSTRUCTIONS
- Safety instructions and accident prevention
- KICKBACK
- TRANSPORTING THE CHAINSAW
- BEFORE STARTING UP
- ASSEMBLY
- Fitting the guide bar and chain
- Tensioning the saw chain
- Always pull the plug out of the power socket before doing any work on the chainsaw!
- Wear safety gloves!
- Filling in chain oil (Fig. 4)
- Securing the extension lead (Fig. 6)
- Chain lubrication
- Checking the automatic lubrication
- Chain lubricants
- Guide bar
- Chain wheel
- Chain guard
- Chain brake
- Releasing the chain brake (Fig. 5)
- Sharpening the saw chain
- STARTING UP
- Always wear safety goggles, ear muffs, protective gloves and heavy-duty work clothes!
- To switch off
- Chainsaw protection
- Notes on working practice
- To switch on:
- Wood under tension
- Felling trees
- Felling trees is dangerous and requires practice. If you are a beginner or inexperienced, do not try to teach yourself but seek professional training (Fig. 13).
- Falling direction:
- CLEANING AND MAINTENANCE
- NOISE
- STORAGE
- WARRANTY
- ENVIRONMENT
- DECLARATION OF CONFORMITY
- KĒDES ZĀGIS 2400 W – 400 MM POWXG1009
- PAREDZËTAIS LIETOJUMS
- PROBLÉMU NOVĚRŠANA
Brand : PowerPlus
Model : POWXG1009
Category : Saw