
CAMCOLI6 - Inspection camera VELLEMAN - Free user manual and instructions
Find the device manual for free CAMCOLI6 VELLEMAN in PDF.
| Product type | WiFi inspection camera |
| Brand | Velleman |
| Model | CAMCOLI6 |
| Camera diameter | 8 mm (± 0.1 mm) |
| Gooseneck length | 80 cm (± 2 cm) |
| Weight | 270 g |
| Power supply | 4 AA batteries (not included) |
| Image sensor | 1/6.5" CMOS |
| Resolution | 640 x 480 pixels |
| Frame rate | 30 fps |
| Viewing angle | 54° |
| Focal distance | 6 cm |
| Minimum bending radius | 45 mm |
| WiFi range | Up to 18 m |
| Protection rating | IP67 (camera + gooseneck) |
| Battery life | Approximately 4 hours |
| Operating temperature | 0 °C to 45 °C |
| Operating humidity | 15-85% RH |
| Main functions | Live viewing, video recording (MOV) and photo (JPG), 4 adjustable white LEDs, 3 interchangeable accessories (hook, mirror, magnetic tip) |
| Compatible app | iSnakescope for iOS (4.1+) and Android (2.3.5+) |
| Care and cleaning | Clean with a soft, lint-free cloth; rinse the gooseneck with clean water after each use |
| Safety | Do not use on people or animals; do not insert the probe into a running machine; avoid excessive bending of the gooseneck (radius < 4.5 cm) |
| Spare parts and repairability | No user-serviceable parts; order spare parts from the dealer; interchangeable accessories included |
| General information | 2-year warranty (conditions in the manual); environmental certification (do not dispose of in household waste) |
Frequently Asked Questions - CAMCOLI6 VELLEMAN
User questions about CAMCOLI6 VELLEMAN
0 question about this device. Answer the ones you know or ask your own.
Ask a new question about this device
Download the instructions for your Inspection camera in PDF format for free! Find your manual CAMCOLI6 - VELLEMAN and take your electronic device back in hand. On this page are published all the documents necessary for the use of your device. CAMCOLI6 by VELLEMAN.
USER MANUAL CAMCOLI6 VELLEMAN
WI-FI INSPECTION CAMERA FOR SMART PHONES AND TABLETS
WIFI-INSPECTIECAMERA VOOR SMARTPHONES EN TABLES
CAMÉRA D'INSPECTION WIFI POUR SMARTPHONES ET TABLETTESS
CÁMARA DE INSPECCION WIFI PARA SMARTPHONE Y TABLET
WIFI INSPEKTIONSKAMERA FÜR SMARTPHONE UND TABLET
CÁMARA WI-FI PARA SMARTPHONES E TABLETS
KAMERA INSPEKCYJNA WIFI DO SMARTFONOW I TABLETÓW
USER MANUAL 3
GEBRUIKERSHANDLEIDING 11
MODE D'EMPLOI 19
MANUAL DEL USUARIO 27
To all residents of the European Union
Important environmental information about this product
This symbol on the device or the package indicates that disposal of the device after its lifecycle could harm the environment. Do not dispose of the unit (or batteries) as unsorted municipal waste; it should be taken to a specialized company for recycling. This device should be returned to your distributor or to a local recycling service. Respect the local environmental rules.
If in doubt, contact your local waste disposal authorities.
Thank you for choosing Velleman! Please read the manual thoroughly before bringing this device into service. If the device was damaged in transit, don't install or use it and contact your dealer.
2. Safety Instructions
| ! | This appliance is not intended for use by persons (including children) with reduced physical, sensory or mental capabilities, or lack of experience and knowledge, unless they have been given supervision or instruction concerning use of the appliance by a person responsible for their safety. Children shall be supervised to ensure that they do not play with the appliance. |
| ! | Do not use in areas where explosive gasses reside. Note that the camera head is made of metal and may cause short-circuits. Never insert the camera in energised/operational machines or equipment. |
| ! | This is not a medical device hence it should never be used on humans or animals. Misuse may lead to severe injuries or even death. |
| ! | There are no user-serviceable parts inside the device. Refer to an authorized dealer for service and/or spare parts. |
3. General Guidelines
Refer to the Velleman® Service and Quality Warranty on the last pages of this manual.
| Keep this device away from dust and extreme temperatures. |
| Protect this device from shocks and abuse. Avoid brute force when operating the device. |
- Familiarise yourself with the functions of the device before actually using it.
Always allow the device to reach room temperature before switching it on. - Do not use the device if condensation forms inside the lens. Let the water evaporate before using again.
The camera and gooseneck are waterproof and can be submerged in pH-neutral liquid (not acid or alkaline). Never submerge the handle as this will cause irreversible damage. Keep the handle away from rain, moisture, splashing and dripping liquids. - Avoid strong mechanical strains or vibrations. The bending radius of the gooseneck must be at least 4.5cm .
- Clean the device after each use.
- Do not use when visible damage to the device is noticed.
- All modifications of the device are forbidden for safety reasons. Damage caused by user modifications to the device is not covered by the warranty.
- Only use the device for its intended purpose. Using the device in an unauthorised way will void the warranty.
- Damage caused by disregard of certain guidelines in this manual is not covered by the warranty and the dealer will not accept responsibility for any ensuing defects or problems.
- Warranty is limited to the device itself; installation and use of the software (apps) is the sole risk of the user.
- Keep this manual for future reference.
4. Features
This Wi-Fi inspection camera works with Android or iOS smart phones or tablets. The free application is available in the Google Play or App store.
- ideal for checking hard-to-reach areas, e.g. behind walls, suspended ceilings, etc.
- 4 built-in white LEDs
adjustable LED intensity
compatible with:
Android:smart phone and tablet (Android OS 2.3.5) (iSnaakescope)
iOS: iPhone, iPod touch, and iPad (iOS 4.1 or later) (iSnakescope)
CAMCOLI6
- video and picture recording
- camera diameter: 8mm
records video and images on the smart phone or tablet - comes with: 3 exchangeable top pieces
magnetic top: to pick up small metal pieces
hook: to retract wires or other small objects
mirror: to look behind corners or in shallow holes.
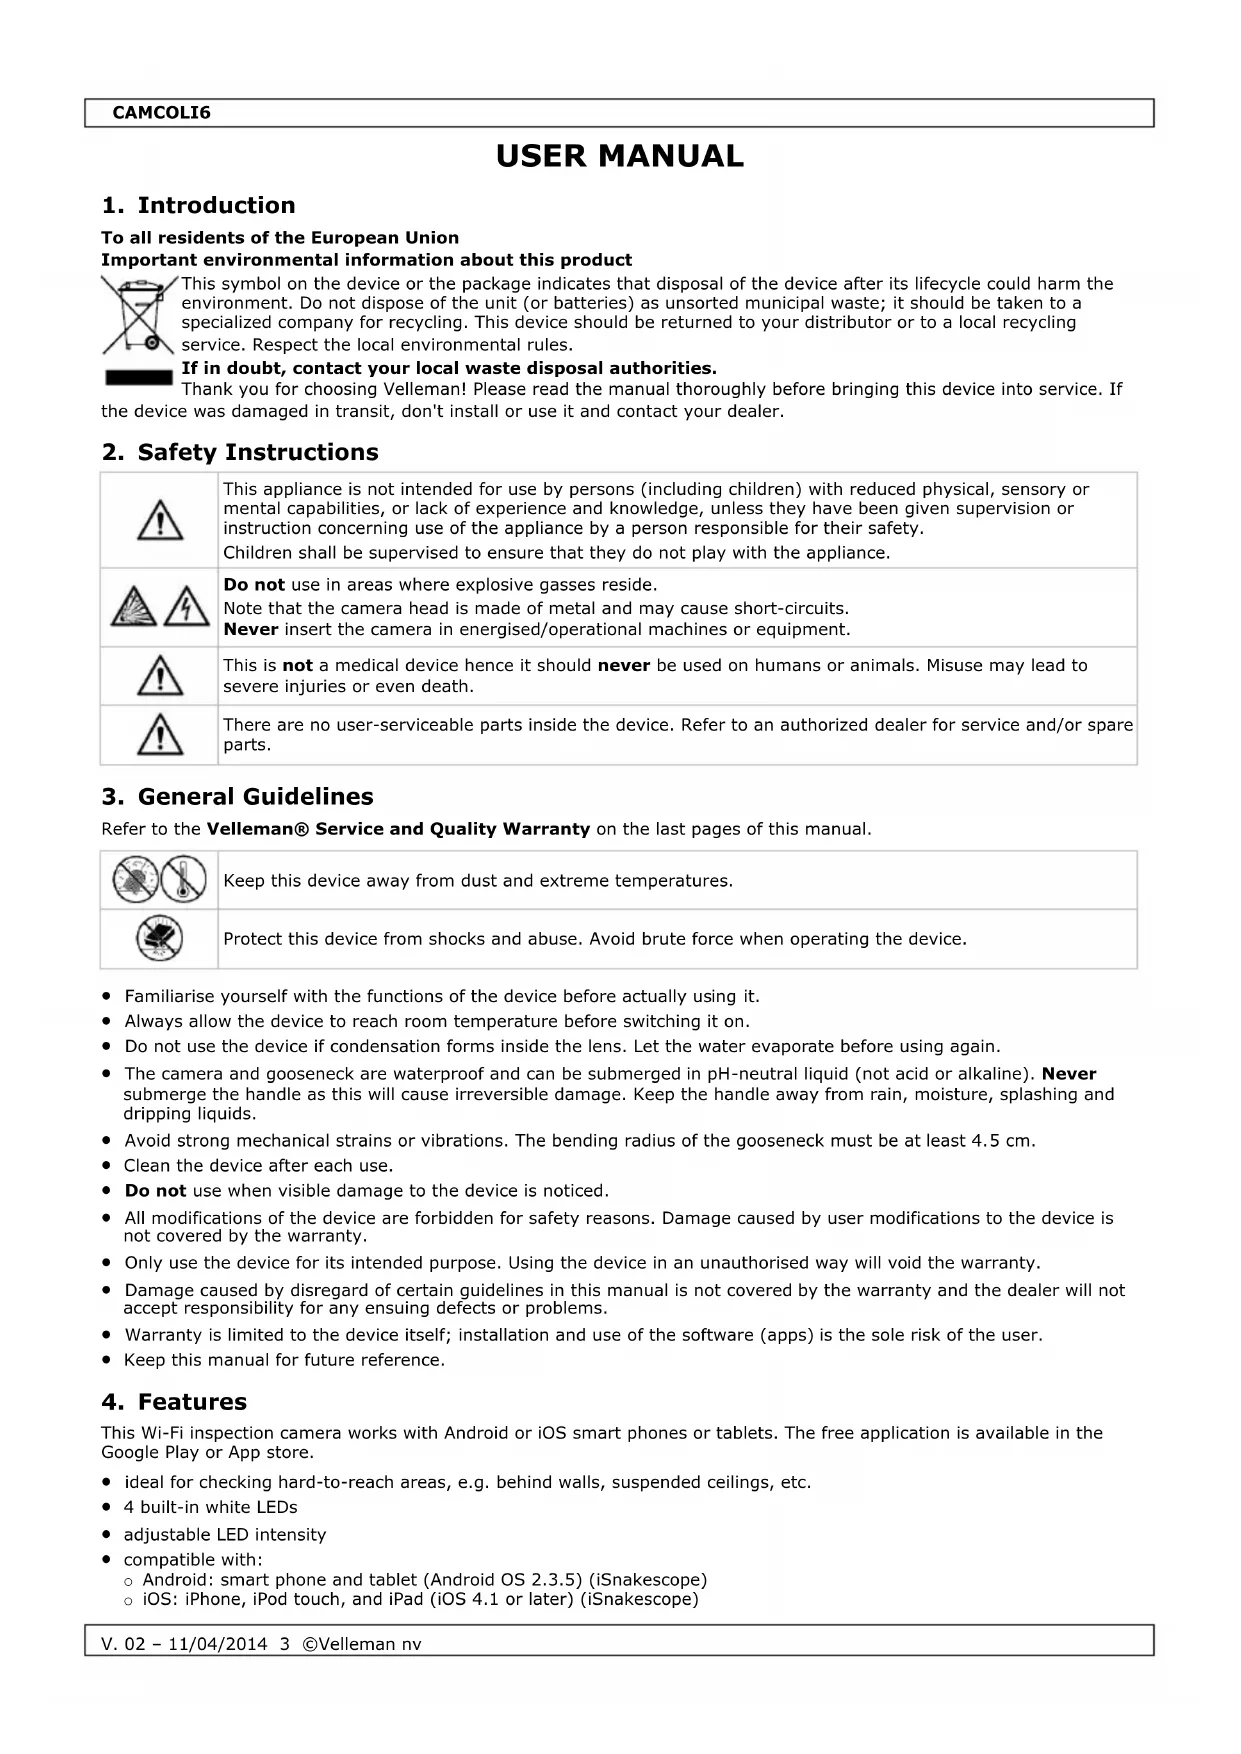
5. Overview
Refer to the illustrations on page 2 of this manual.
| 1 | camera head with LEDs | 6 | reset button |
| 2 | gooseneck (±80 cm) | 7 | battery holder |
| 3 | handle | 8 | battery cover |
| 4 | status LED | 9 | accessory tools: hook, magnet, mirror |
| 5 | thumbwheel: on/off and brightness | 10 | battery replacement |
Status LED
After switching on, the camera goes through a start-up process, among other things to prepare the Wi-Fi hotspot for communication with the mobile device. The LED on the camera indicates the status of the camera. The table below provides an overview:
| LED light | Timing | Status |
| Green, continuous | 0-5 seconds after switching on | Software initializing. |
| Green, flashing 5 times/second | 5-8 seconds after switching on | Software setting. |
| Green, continuous | 8-40 seconds after switching on | Hardware initializing. |
| Green, flashing 1 time/second | After 40 seconds | Software and hardware ready; camera ready to connect to a mobile device. |
| Green, flashing 2 times/second | - | Camera is connected to mobile device. |
| Off (10 seconds), then continuous | - | Resetting. See Troubleshooting for more information. |
| Green and red | - | Low battery. See Installing/Replacing Batteries for more information. |
6. Preparation
Refer to the illustrations on page 2 of this manual.
6.1 Installing/Replacing Batteries

Warning! Do not puncture batteries or throw them in fire as they may explode. Do not attempt to recharge non-rechargeable batteries (alkaline). Dispos of batteries in accordance with local regulations. Keep batteries away from children.
When the status LED [4] lights up green and red, the batteries are empty. Replace the batteries immediately [10].
Proceed as follows:
- Slide the battery cover [8] downwards to open it.
- Remove the battery holder [7] from the handle.
- Insert 4 identical AA batteries into the battery holder. Respect the polarity as indicated inside the holder.
- Slide the battery holder back into the handle and close the cover.
6.2 Attaching Tools
Place the plastic clamp of the tool over the narrow part of the camera head as indicated [9] and close it. Make sure it snaps into place.
- Attach the magnetic top to the camera to pick up small metal pieces from difficult to reach locations.
- Attach the hook to retract wires or other small objects.
- Use the small mirror to look behind corners.
To detach a tool, open the clamp using your fingernail and slide the tool over the camera head. Always store tools in their bag.
6.3 Installing the iSnakescope App
Before you can use the camera, you have to install the iSnakescope app on your mobile device (iOS or Android).
- Make sure that your mobile device is connected to internet and open the App Store (iOS) or Google Play (Android).
- Search for the iSnakescope app and follow the on-screen instructions to install it on your device.
CAMCOLI6
6.4 Connecting to the Camera
The camera generates a Wi-Fi hotspot that allows the image transfer to your mobile device. You have to connect your mobile device to the hotspot to see live camera images, record a video, take a snapshot, and change settings. Playback/deletion of recorded videos is also available when your mobile device is not connected to the hotspot.
Note: while your mobile device is connected to the hotspot, it has no internet connection.
Connecting to an iOS Device
To connect your iOS device to the camera, proceed as follows:
- Switch on the camera: turn the thumbwheel [5] until you hear a click.
The camera goes through a start-up process and creates a Wi-Fi hotspot. This takes about 40 seconds. - Wait until the LED starts flashing slowly (1 time/second = the hotspot is ready).
- On your iOS device, open Settings >Wi-Fi and set Wi-Fi to ON.
- In the list of available networks, select iSnakescope. Note: it may take a minute or longer for the Wi-Fi hotspot to appear in the list. The first time that you try to connect, you have to enter the Wi-Fi password.
- Enter the Wi-Fi password (the default password is 12345678) and tap Join.
- Wait until the connection is established. The green LED on the camera flashes quickly (2 times/second) and a checkmark appears next to the iSnakescope network name.
- Exit Settings.
Connecting to an Android Device
To connect your Android device to the camera, proceed as follows:
1. Switch on the camera: turn the thumbwheel [5] until you hear a click.
The camera goes through a start-up process and creates a Wi-Fi hotspot. This takes about 40 seconds.
2. Wait until the LED starts flashing slowly (1 time/second = the hotspot is ready).
3. On your Android device, open Menu > System Settings and set Wi-Fi to ON.
4. In the list of available networks, select iSnakescope.
Note: it may take a minute or longer for the Wi-Fi hotspot to appear in the list. The first time that you try to connect, you have to enter the Wi-Fi password.
5. Enter the Wi-Fi password (the default password is 12345678) and tap Connect.
6. Wait until the message "Connected" appears on the screen. The green LED on the camera flashes quickly (2 times/second).
7.Exitthemenu.
7. Using the App on an iOS Device
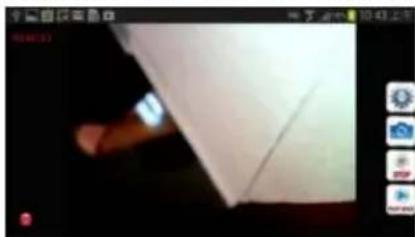
7.1 Live Images, Videos, and Snapshots
Viewing Live Images
To view live images, proceed as follows:
- Make sure that the camera is switched on and your iOS device is connected to the iSnakescope Wi-Fi hotspot.

to open the iSnakescope app.
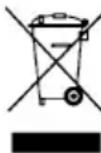
- On your iOS device, tap the iSnakescope icon. The app's splash screen appears:

After a few seconds the live image of the camera and the control buttons appear on the screen:
You are now ready to use the camera.

Never insert the camera in energised/operational machines or equipment.
CAMCOLI6
- Insert the camera head [1] into the space that you want to inspect.
The gooseneck should easily manoeuvre into position. Do not apply force. If necessary, pull back the gooseneck and adjust the bend until the camera head is pointing at the desired location.
Caution: The bending radius of the gooseneck must be at least 4.5cm
For the best images, hold the lens at ± 6 cm from the object to inspect.
- Turn the thumbwheel [5] to adjust the intensity of the LEDs on the camera head.
- To switch off the camera, turn the thumbwheel until you hear a click.
Taking a Snapshot
To take a snapshot of the current image on the screen, tap the snapshot button. The app stores the snapshot in jpg format in the Photos app on your iOS device. In Photos you can delete any unwanted snapshots.
Recording a Video
To record a video, proceed as follows:
- From the live images screen, tap the record button RECD. The app records the live images in mov format.
- To stop recording, tap the stop button
Watching a Recorded Video
To watch a recorded video, proceed as follows:
- From the live images screen, tap the playback button. The list of recorded videos appears:
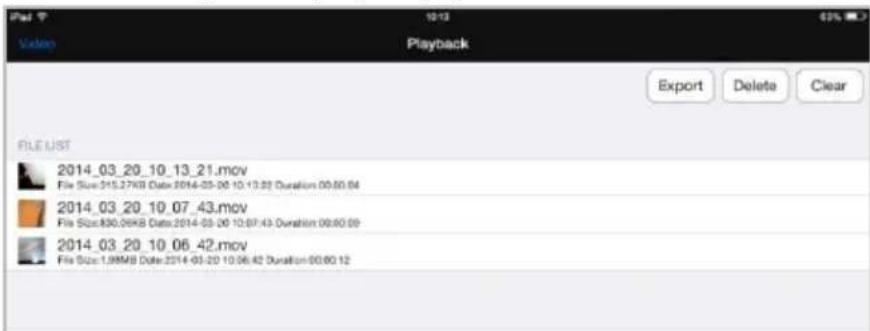
The most recent video is at the top of the list.
-
Tap the video that you want to watch. The video starts to play automatically.
-
Tap the image to display the video control buttons.
Use the pause and play buttons to pause or continue playback. -
Tap Done to return to the list of recorded videos.
Deleting Videos
You can delete videos one by one, or delete all videos at once. Proceed as follows:
- From the live images screen, tap the playback button to open the list of recorded videos.
To delete one video, tap Delete, tap the red minus sign next to the video that you want to delete, and then tap the red Delete button at the right-hand side to confirm.
To delete all videos, tap Clear and tap Yes to confirm.
- To return to the live images screen, tap Video in the left top corner of the screen.
Sharing Snapshots and Videos
To share your snapshots and videos, use the Photos app on your iOS device. The snapshots are immediately available in Photos when you make them; you need to export recorded videos to the Photos app manually.
To export a video to Photos, proceed as follows:
- From the live images screen, tap the playback button to open the list of recorded videos and tap Export.
- Tap the Export button next to the video that you want to export.
- Repeat for each video that you want to export.
- To return to the live images screen, tap Video in the left top corner of the screen.
Your snapshots and videos are now ready for sharing.
Remember that your mobile device is not connected to internet as long as it is connected to the camera Wi-Fi hotspot. If you need an internet connection to share the files (for example, via Skype), then disconnect your iOS device from the iSnakescope hotspot first, and re-establish your normal internet connection.
Note: some mobile phones and PCs may need the VLC video player to play the videos.
CAMCOLI6
7.2 Configuration
Image Resolution
To choose the image resolution, proceed as follows:
- From the live images screen in the app, tap the settings button . The Settings screen appears:
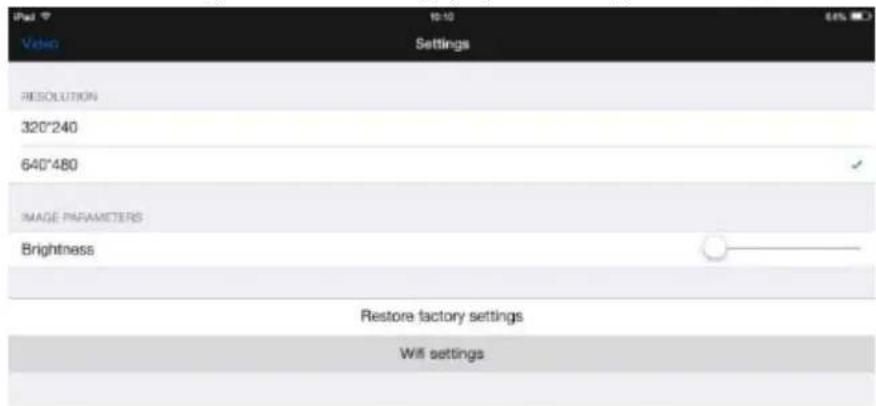
- Under RESOLUTION, select the desired image resolution.
- To return to the live images screen, tap Video in the left top corner of the screen.
Image Brightness
You can adjust the image brightness as follows:
- On the camera: turn the thumbwheel [5] to adjust the brightness of the LEDs in the camera and so provide a brighter or darker image.
Note: using the LEDs at a higher brightness decreases the camera's battery life. - In the iSnakescope app: use the brightness slider in the Settings screen.
To adjust the image brightness in the app, proceed as follows: - From the live images screen, tap the settings button
- Move the Brightness slider to adjust the image brightness.
- To return to the live images screen, tap Video in the left top corner of the screen.
Wi-Fi Settings
You can rename the iSnakescope Wi-Fi hotspot, and you can change the password. Note: the first time you reconnect after changing the name or password, you have to enter the password again.
Proceed as follows:
- From the live images screen, tap the settings button
- Tap Wifi settings. The Wifi Settings screen appears:
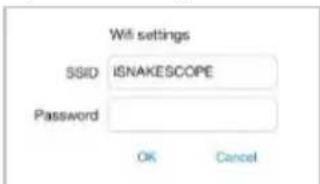
- To change the name of the Wi-Fi hotspot, type the desired name in the SSID box. The name can be any combination of letters and numbers that is at least 8 characters long.
- To change the password, type the desired password in the Password box. The password can be any combination of letters and numbers that is at least 8 characters long.
- Tap OK to confirm the changes.
- To return to the live images screen, tap Video in the left top corner of the screen.
8. Using the App on an Android Device
8.1 Live Images, Videos, and Snapshots
Viewing Live Images
To view live images, proceed as follows:
-
Make sure that the camera is switched on and your Android device is connected to the iSnakescope Wi-Fi hotspot.
-
On your Android device, tap the iSnakescope icon The app's splash screen appears:

to open the iSnakescope app.
CAMCOLI6

After a few seconds the live image of the camera and the control buttons appear on the screen:
You are now ready to use the camera.

Never insert the camera in energised/operational machines or equipment.
- Insert the camera head [1] into the space that you want to inspect.
The gooseneck should easily manoeuvre into position. Do not apply force. If necessary, pull back the gooseneck and adjust the bend until the camera head is pointing at the desired location.
Caution: The bending radius of the gooseneck must be at least 4.5cm
For the best images, hold the lens at ± 6 cm from the object to inspect.
- Turn the thumbwheel [5] to adjust the intensity of the LEDs on the camera head.
- To switch off the camera, turn the thumbwheel until you hear a click.
Taking a Snapshot
To take a snapshot of the current image on the screen, tap the snapshot button . The app stores the snapshot in jpg format in a subfolder named "iSnakescope" in the "SD card" folder on your Android device. Note that snapshots are saved there, even if there is no SD card installed, or if the SD card is full. If the SD card is missing or full, the message "Image Saved in Album!" appears on the screen when you take a snapshot.
Recording a Video
To record a video, proceed as follows:
- From the live images screen, tap the record button. The app records the live images in mov format in a subfolder named "RecordVideo" in the "SD card" folder on your Android device. Note that videos are saved there, even if there is no SD card installed, or if the SD card is full.
- To stop recording, tap the stop button
Watching a Recorded Video
To watch a recorded video, proceed as follows:
- From the live images screen, tap the playback button PLATBND. The list of recorded videos appears:
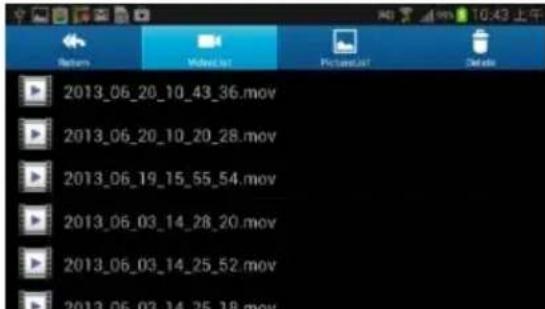
The most recent video is at the top of the list.
- Tap the video that you want to watch. The video starts to play automatically.
- To return to the live images screen, tap Return in the left top corner of the screen.
CAMCOLI6
Deleting Videos and Snapshots
You can delete any unwanted videos or snapshots from the folders where they are stored. Proceed as follows:
- Exit the iSnakescope app.
- Locate your iSnakescope folder.
To delete a video: tap the Delete button in the upper right corner, and then tap the delete icon next to the video that you want to delete.
To delete a snapshot: tap PictureList to display the list of snapshots, then tap the Delete button in the upper right corner, and then tap the delete icon next to the snapshot that you want to delete.
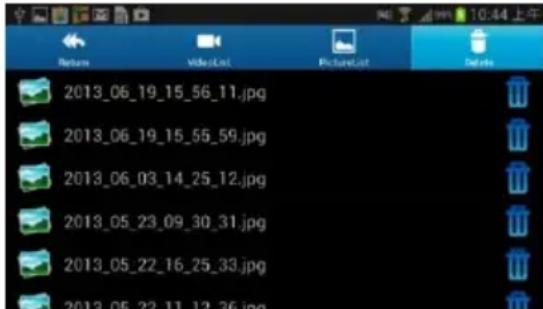
- To return to the live images screen, tap Return in the left top corner of the screen.
8.2 Configuration
Image Resolution
To choose the image resolution, proceed as follows:
- From the live images screen, tap the settings button

The Setting screen appears:
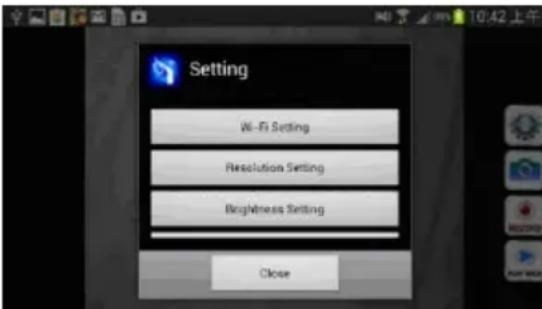
- Tap Resolution Settling and select the desired image resolution.
- To return to the live images screen, tap Close.
Image Brightness
You can adjust the image brightness as follows:
- On the camera: turn the thumbwheel [5] to adjust the brightness of the LEDs in the camera and so provide a brighter or darker image.
Note: using the LEDs at a higher brightness decreases the camera's battery life. - In the iSnakescope app: use the brightness slider in the Setting screen.
To adjust the image brightness in the app, proceed as follows:
- From the live images screen, tap the settings button
- Tap Brightness Settling and move the brightness slider to adjust the image brightness.
- To return to the live images screen, tap Close.
Wi-Fi Settings
You can rename the iSnakescope Wi-Fi hotspot, and you can change the password. Note: the first time you reconnect after changing the name or password, you have to enter the password again.
Proceed as follows:
- From the live images screen, tap the settings button
- Tap Wifi Setting.
- To change the name of the Wi-Fi hotspot, type the desired name in the SSID box. The name can be any combination of letters and numbers that is at least 8 characters long.
- To change the password, type the desired password in the Password box. The password can be any combination of letters and numbers that is at least 8 characters long.
- Tap OK to confirm the changes.
- To return to the live images screen, tap Close.
9. Troubleshooting
Resetting the App
If you experience any problems, you can reset the app. This also resets the Wi-Fi hotspot name (to iSNAKESCOPE) and password (to 12345678). Proceed as follows:

- From the live images screen, tap the settings button
- Tap Restore factory settings and tap Yes to confirm. The app resets image resolution, brightness, and the hotspot name and password.
- To return to the live images screen, tap Video in the left top corner of the screen (iOS) or tap Close (Android).
Resetting the Camera
If you experience any problems, and resetting the app does not help, you can also reset the camera. Proceed as follows:
- Take a thin pin to push the reset button [6] during ± 5 seconds. The green status LED goes out. During reset, the status LED stays out for 10 seconds, then lights up again.
- Wait until the green LED starts flashing again.
- If necessary, reconnect the camera to the app.
10. Cleaning and Maintenance
- Wipe the device with a lint-free, soft anti-static cloth. Do not use abrasive solutions or solvents.
- Clean the gooseneck and camera with clean water after each use and let it dry before storing it.
11. Technical Specifications
| pick-up element | 1/6.5" CMOS | |
| number of pixels | 640 (H) x 480 (V) | |
| frame rate | 30 fps | |
| viewing angle | 54° | |
| focus | 6 cm | |
| minimum bending radius | 45 mm | |
| Wi-Fi range | maximum 18 m | |
| white balance | automatic | |
| IP rating | IP67 (camera + flexible tube) | |
| power supply | battery | 4 x AA battery (order code HR6C/27) (not incl.) |
| battery lifetime | ± 4 h | |
| dimensions | camera | Ø 8 (± 0.1) x 55 mm |
| flexible tube | 80 cm (± 2 cm) | |
| operating temperature | 0-45 °C | |
| operating humidity | 15-85 % RH | |
| weight | 270 g | |
Use this device with original accessories only. Velleman nv cannot be held responsible in the event of damage or injury resulting from (incorrect) use of this device.
For more info concerning this product and the latest version of this manual, please visit our website www.velleman.eu.
The information in this manual is subject to change without prior notice.
All registered trademarks and trade names are properties of their respective owners and are used only for the clarification of the compatibility of our products with the products of the different manufacturers.
iPad, iPod touch, iPhone, are trademarks of Apple Inc., registered in the U.S. and other countries. IOS is a trademark or registered trademark of Cisco in the U.S. and other countries and is used under license. Android is a trademark of Google Inc. Skype is a trademark of Skype and Velleman is not affiliated, sponsored, authorised or otherwise associated by/with the Skype group of companies.
© COPYRIGHT NOTICE
The copyright to this manual is owned by Velleman nv. All worldwide rights reserved. No part of this manual may be copied, reproduced, translated or reduced to any electronic medium or otherwise without the prior written consent of the copyright holder.
GEBRUIKERSHANDLEIDING
1. Inleiding
6.1 Colocar/substituir as pilhas

Velleman® Service and Quality Warranty
Since its foundation in 1972, Velleman® acquired extensive experience in the electronics world and currently distributes its products in over 85 countries.
All our products fulfil strict quality requirements and legal stipulations in the EU. In order to ensure the quality, our products regularly go through an extra quality check, both by an internal quality department and by specialized external organisations. If, all precautionary measures notwithstanding, problems should occur, please make appeal to our warranty (see guarantee conditions).
General Warranty Conditions Concerning Consumer Products (for EU):
-
All consumer products are subject to a 24-month warranty on production flaws and defective material as from the original date of purchase.
-
Velleman® can decide to replace an article with an equivalent article, or to refund the retail value totally or partially when the complaint is valid and a free repair or replacement of the article is impossible, or if the expenses are out of proportion.
You will be delivered a replacing article or a refund at the value of 100% of the purchase price in case of a flaw occurred in the first year after the date of purchase and delivery, or a replacing article at 50% of the purchase price or a refund at the value of 50% of the retail value in case of a flaw occurred in the second year after the date of purchase and delivery.
- Not covered by warranty:
- all direct or indirect damage caused after delivery to the article (e.g. by oxidation, shocks, falls, dust, dirt, humidity...), and by the article, as well as its contents (e.g. data loss), compensation for loss of profits;
- consumable goods, parts or accessories that are subject to an aging process during normal use, such as batteries (rechargeable, non-rechargeable, built-in or replaceable), lamps, rubber parts, drive belts... (unlimited list);
- flaws resulting from fire, water damage, lightning, accident, natural disaster, etc....;
- flaws caused deliberately, negligently or resulting from improper handling, negligent maintenance, abusive use or use contrary to the manufacturer's instructions:
- damage caused by a commercial, professional or collective use of the article (the warranty validity will be reduced to six (6) months when the article is used professionally);
- damage resulting from an inappropriate packing and shipping of the article;
- all damage caused by modification, repair or alteration performed by a third party without written permission by Velleman®.
- Articles to be repaired must be delivered to your Velleman® dealer, solidly packed (preferably in the original packaging), and be completed with the original receipt of purchase and a clear flaw description.
- Hint: In order to save on cost and time, please reread the manual and check if the flaw is caused by obvious causes prior to presenting the article for repair. Note that returning a non-defective article can also involve handling costs.
- Repairs occurring after warranty expiration are subject to shipping costs.
- The above conditions are without prejudice to all commercial warranties.
The above enumeration is subject to modification according to the article (see article's manual).
NL
- To all residents of the European Union
- Important environmental information about this product
- If in doubt, contact your local waste disposal authorities.
- Safety Instructions
- General Guidelines
- Features
- CAMCOLI6
- Overview
- Status LED
- Preparation
- Installing/Replacing Batteries
- Attaching Tools
- Installing the iSnakescope App
- Connecting to the Camera
- Connecting to an iOS Device
- Connecting to an Android Device
- Using the App on an iOS Device
- Live Images, Videos, and Snapshots
- Viewing Live Images
- Taking a Snapshot
- Recording a Video
- Watching a Recorded Video
- Deleting Videos
- Sharing Snapshots and Videos
- Configuration
- Image Resolution
- Image Brightness
- Wi-Fi Settings
- Using the App on an Android Device
- Live Images, Videos, and Snapshots
- Deleting Videos and Snapshots
- Configuration
- Troubleshooting
- Resetting the App
- Resetting the Camera
- Cleaning and Maintenance
- Technical Specifications
- © COPYRIGHT NOTICE
- GEBRUIKERSHANDLEIDING
- Inleiding
- Colocar/substituir as pilhas
- Velleman® Service and Quality Warranty
- General Warranty Conditions Concerning Consumer Products (for EU):
- - Not covered by warranty:
- NL
Brand : VELLEMAN
Model : CAMCOLI6
Category : Inspection camera