
ET 6 Pro - Exercise bike Christopeit - Free user manual and instructions
Find the device manual for free ET 6 Pro Christopeit in PDF.

| Product type | Ergonometric exercise bike, class H/A |
| Brand | Christopeit |
| Model | ET 6 Pro |
| Dimensions (L x W x H) | 96 x 52 x 140 cm |
| Product weight | 40 kg |
| Maximum user weight | 150 kg |
| Power supply | 220-240 V / 50-60 Hz / 60 W |
| Braking system | Induction brake with 32 resistance levels |
| Flywheel weight | Approx. 12 kg |
| Training programs | Manual, 12 preset programs, watt program (10-300 W), user program, 3 heart rate programs (55%, 75%, 90% max HR), body fat program |
| Display | Time, speed, distance, calories, pulse, watts, level, ODO |
| Pulse measurement | Hand grip sensors + receiver for chest strap (5.0-5.5 kHz) |
| Connectivity | Bluetooth for Kinomap (iOS/Android), USB port for charging |
| Adjustments | Seat adjustable horizontally and vertically (quick release), handlebar tiltable, adjustable levelling feet |
| Additional functions | Fitness test (rating F1-F6), smartphone/tablet holder, transport wheels |
| Maintenance | Clean with a damp cloth; check screws every 50 h; lubricate bearings every 100 h |
| Safety | Emergency stop via button; do not use unattended; follow instructions in the manual |
| Standards | EN ISO 20957-1:2013 and EN ISO 20957-5:2016 (class H/A) |
| Package contents | Assembly instructions, tool kit, power cord |
Frequently Asked Questions - ET 6 Pro Christopeit
User questions about ET 6 Pro Christopeit
0 question about this device. Answer the ones you know or ask your own.
Ask a new question about this device
Download the instructions for your Exercise bike in PDF format for free! Find your manual ET 6 Pro - Christopeit and take your electronic device back in hand. On this page are published all the documents necessary for the use of your device. ET 6 Pro by Christopeit.
USER MANUAL ET 6 Pro Christopeit
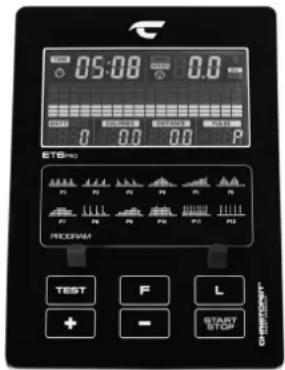
WATT; USER; H.R.C; FAT
KM Total (ODO)
- Summary of Parts Page 3 - 4
- Important Recommendations and Safety Information Page 15
- Parts List-List of spare parts-tec. Data Page 16 - 18
- Assembly Instructions With Exploded Diagrams Page 19 - 21 Mount, use and dismount
- Watt table Page 21
- Computer instructions-trouble shooting Page 22 - 24
Cleaning, Check and Storage
- Training Instructions-Warm-up Page 25
Dear customer,
We congratulate you on your purchase of this home training sports unit and hope that we will have a great deal of pleasure with it. Please take heed of the enclosed notes and instructions and follow them closely concerning assembly and use.
Please do not hesitate to contact us at any time if you should have any questions.
Important Recommendations and Safety Instructions
Our products are all TUV-GS tested and therefore represent the highest current safety standards. However, this fact does not make it unnecessary to observe the following principles strictly.
- Assembly the machine exactly as described in the installation instructions and use only the enclosed, specific parts of the machine. Before assembling, verify the completeness of the delivery against the delivery notice and the completeness of the carton against the assembly steps in the installation and operating instructions.
- Before the first use and at regular intervals (approximately every 50 Operating hours) check the tightness of all screws, nuts and other connections and the access shafts and joints with some lubricant so that the safe operating condition of the equipment is ensured. In particular, the adjustment of saddle and handlebar need smooth function and good condition.
- Set up the machine in a dry, level place and protect it from moisture and water. Uneven parts of the floor must be compensated by suitable measures and by the provided adjustable parts of the machine if such are installed. Ensure that no contact occurs with moisture or water.
- Place a suitable base (e.g. rubber mat, wooden board etc.) beneath the machine if the area of the machine must be specially protected against indentations, dirt etc.
- Before beginning training, remove all objects within a radius of 2 metres from the machine.
- Do not use aggressive cleaning agents to clean the machine and employ only the supplied tools or suitable tools of your own to assemble the machine and for any necessary repairs. Remove drops of sweat from the machine immediately after finishing training.
- WARNING! Your health can be impaired by incorrect or excessive training. Consult a doctor before beginning a planned training programme. He can define the maximum exertion (pulse, Watts, duration of training etc.) to which you may expose yourself and can give you precise information on the correct posture during training, the targets of your training and your diet. Never train after eating large meals.
- Only train on the machine when it is in correct working order. Use original spare parts only for any necessary repairs. WARNING: Replace the worm parts immediately and keep this equipment out of use until repaired.
- When setting the adjustable parts, observe the correct position and the marked, maximum setting positions and ensure that the newly adjusted position is correctly secured.
- Unless otherwise described in the instructions, the machine must only be used for training by one person at a time. The exercise time should not overtake 90 min./daily.
- Wear training clothes and shoes which are suitable for fitness training with the machine. Your clothes must be such that they cannot catch during training due to their shape (e.g. length). Your training shoes should be
appropriate for the trainer, must support your feet firmly and must have non-slip soles.
- WARNING! If you notice a feeling of dizziness, sickness, chest pain or other abnormal symptoms, stop training and consult a doctor.
- Never forget that sports machines are not toys. They must therefore only be used according to their purpose and by suitably informed and instructed persons.
- People such as children, invalids and handicapped persons should only use the machine in the presence of another person who can give aid and advice. Take suitable measures to ensure that children never use the machine without supervision.
-
Ensure that the person conducting training and other people never move or hold any parts of their body into the vicinity of moving parts.
-
At the end of its life span this product is not allowed to dispose over the normal household waste, but it must be given to an assembly point for the recycling of electric and electronic components. You may find the symbol on the product, on the instructions or on the packing.
The materials are reusable in accordance with their marking. With the re-use, the material utilization or the protection of our environment. Please ask the local administration for the responsible disposal place. - To protect the environment, do not dispose of the packaging materials, used batteries or parts of the machine as household waste. Put these in the appropriate collection bins or bring them to a suitable collection point.
- For speed dependent operation mode, the braking resistance level can be adjustable manually and the variations of power will depend on the pedaling speed. For speed independent operation mode, the user can set the wanted power consumption level in Watt, constant power level will be kept by various braking resistance levels, that will be determined automatically by system. That is independent on the pedaling speed.
- The unit has a resistance device with 32 levels. This makes it possible to increase or reduce the braking resistance and thus the amount of effort required in the training. Pressing the button with n^+u reduces the braking resistance and thus the amount of effort required in the training. Pressing the button n^+u increases the braking resistance and thus the amount of effort required in the training.
- This machine has been tested and certified in compliance with wind EN ISO 20957-1:2013 and EN ISO 20957-5:2016, H / A^ . The maximum permissible load (=body weight) is specified as 150kg . The classification of HA means this exercise bike is designed foe home use only and with good accuracy class, the variations of power consuming are within ± 5W up to 50W and ± 10% over 50W . This item's computer corresponds to the basic demands of the EMV Directive of 2014/30/EU.
- The assembly and operating instructions is part of the product. If selling or passing to another person the documentation must be provided with the product.
Parts list - List of spare parts ET6 Order No. 2003
Technical data: Issue: 15.03.2020
Ergometer with high accuracy of class H/A
Electric induction braking
32 stepped resistance control
Approx. 12 kg flywheel mass
12 stored training programs
3 heart rate programs
1 individual programs
1 manual program
1 speed independent program (10-300 Watt, resistance adjustable in 5 Watt steps)
1 body fat program
- Hand pulse measurement and receiver for chest belt
- Horizontally and vertically adjustable comfort saddle
- Saddle and handlebar inclination adjustable
Floor level compensation
Transport rollers
- Back Light LCD Display shows simultaneously: Time, Speed, Distance,
approx. calorie consumption, RPM, Watt, pulse frequency and ODO
- Inputs of limits: Time, Distance, approx. Calories, Pulse frequency and Watt
Announcement of limits
Fitness-Test (Recovery Function)
- Integrated holder for smartphones and tablets
- USB port for charging during exercising
- Bluetooth-Connection for KINOMAP (APP for iOS and Android)
- Electrical data: 220-240V/50-60Hz~/60Watt
- Load max. 150 kg (Body weight)
Items weight: 40kg
Space requirement approx.: L 96 x W 52 x H 140 cm
Please contact us if any components are defective or missing, or if you need any spare parts or replacements in future:
This product is created only for private Home sports activity and not allowed to us in a commercial or professional area. Home Sport use class H/A
05101520253035405060708090100mm
| Illustration No. | Designation Dimension | mm | Quantity Attached to Stück | ET-Number | |
| 1 Main frame | 1 | 33-2003-01-SW | |||
| 2 Front bottom tube | 1 | 1 | 33-2003-02-SW | ||
| 3 Rear bottom tube | 1 | 1 | 33-2003-03-SW | ||
| 4 Handlebar post | 1 | 1 | 33-2003-04-SW | ||
| 5 Handlebar | 1 | 4 | 33-2003-05-SW | ||
| 6 Saddle Post | 1 | 1+38 | 33-2003-06-SW | ||
| 7 Saddle bracket | 1 | 38 | 36-9814-12-BT | ||
| 7a Saddle | 1 | 38 | 36-9107-06-BT | ||
| 8 Computer | 1 | 4 | 36-2003-03-BT | ||
| 9L | Pedal left | 9/16"L | 1 | 10R | 36-9109-84-BT |
| 9R | Pedal right | 9/16"R | 1 | 10L | 36-9109-85-BT |
| 10L | Crank left | 9/16"L | 1 | 64 | 33-9109-82-SW |
| 10R | Crank right | 9/16"R | 1 | 64 | 33-9109-83-SW |
| 11L | Front end cap left | 1 | 2 | 36-9108-54-BT | |
| 11R | Front end cap right | 1 | 2 | 36-9108-55-BT | |
| 12 | End cap with height adjustment | 2 | 3 | 36-9108-56-BT | |
| 13 | Carriage bolt | M10x57 | 2 | 1+2 | 39-10026 |
| 14 | Washer | 10//20 | 3 | 13 | 39-10206-CR |
| 15 | Spring washer | for M10 | 2 | 13 | 39-9995-CR |
| 16 | Cap nut | M10 | 2 | 13 | 39-10021 |
| 17 | Bolt | M8x16 | 10 | 1,3+4 | 39-9888-CR |
| 18 | Spring washer | for M8 | 10 | 17 | 39-9864-VC |
| 19 | Washer | 8//16 | 13 | 7,17+25 | 39-10018-CR |
| 20 | Adjustable foot | 2 | 3 | 36-9805-24-BT | |
| 21 | Controller cable | 1 | 22+71 | 36-2003-05-BT | |
| 22 | Connection cable | 1 | 8+21 | 36-2003-06-BT | |
| 23 a | Computer cover a | 1 | 4+23b | 36-9108-57-BT | |
| 23 b | Computer cover b | 1 | 4+23a | 36-9108-58-BT | |
| 24 | Screw | M5x12 | 2 | 23 | 39-9988 |
| 25 | L-shaped knob | 1 | 4+5 | 36-9107-29-BT | |
| 26 | Screw | 4.2x18 | 13 | 10,23,71+77 | 36-9111-38-BT |
| Illustration No. | Designation Dimension | mm | Quantity Attached to Stück | ET-Number |
| 27 Screw 4 & 8 39-9903-SW | ||||
| 28 Pulse cable | 1 5+30 36-9107-07-BT | |||
| 29 a Handlebar | grip 2 5 36-9109-59-BT | |||
| 29 b Handlebar | grip 2 5 36-9805-15-BT | |||
| 30 Pulse unit 2 | 5+28 36-9107-08-BT | |||
| 31 Round plug | 2 5 36-9211-21-BT | |||
| 32 Quick release 1 1+6 36-9211-18-BT | ||||
| 33 Saddle bushing 1 1 36-9109-60-BT | ||||
| 34 Saddle support wrapping | 1 6 36-9805-11-BT | |||
| 35 Knob | 1 36 | 36-9211-19-BT | ||
| 36 Fixed bracket | 1 38 | 33-9211-08-SI | ||
| 37 Square plug | 2 38 | 36-9211-23-BT | ||
| 38 Saddle slide | 1 6+7 33-9211-07-SI | |||
| 39 Round plug | 36-9109-61-BT | |||
| 40 Power cord | 36-9836113-BT | |||
| 41 Curved washer | 8//19 | 2 17 | 39-9966-CR | |
| 42 Spring | 1 4 36-9109-62-BT | |||
| 43 Plug | 1 45 | 36-2003-07-BT | ||
| 44 Axle nut | M10x1.25 | 2 64 | 39-9820-SI | |
| 45 Turn plate | 2 10 | 36-2003-04-BT | ||
| 46L | Chain cover left | 1 | 1+46R | 36-2003-01-BT |
| 46R | Chain cover right | 1 | 1+46L | 36-2003-02-BT |
| 47 Screw 14 | 10+45 36-9836-22-BT | |||
| 48 C-clip | C17 | 2 64 | 39-9805-32-BT | |
| 49 Bearing | 6203Z 4 1+52 36-9805-31-BT | |||
| 50 Square plug | 1 1 36-9109-64-BT | |||
| 51 Spring | 1 52 | 36-9109-65-BT | ||
| 52 Idle wheel bracket | 1 56 | 33-9109-18-SI | ||
| 53 Sensor | 1 1+71 36-9109-69-BT | |||
| 54 Bolt | 8 56 | 39-9911 | ||
| 55 Washer | 6//16 | 8 54 | 39-10013-VC | |
| 56 EMS Flywheel | 1 1 33-9109-19-SI | |||
| 57 Nylon bushing | 1 52 | 36-9109-67-BT | ||
| 58 Nylon washer | 1 52 | 36-9814-20-BT | ||
| 59 Rubber ring | 1 1 36-9109-68-BT | |||
| 60 Rubber ring | 1 1 36-9109-69-BT | |||
| 61 Screw | M6x15 | 4 63+64 | 39-10120-SW | |
| 62 | Spring washer | for M6 | 12 | 54+61 |
| 63 Belt wheel | 1 64 | 36-9109-70-BT | ||
| 64 Axle | 1 63 | 33-9109-20-SI | ||
| 65 Nylon nut | M6 4 4 39-9861-VZ | |||
| 66 Power supply holder | 1 46 | 36-2003-08-BT | ||
| 67 Nylon nut | M8 1 56 | 39-9918-CR | ||
| 68 Belt | 1 56+63 | 36-9109-72-BT | ||
| 69 Screw | 4.2x25 | 6 46 | 39-9909-SW | |
| 70 Wave washer | 1 64 | 36-9918-22-BT | ||
| 71 Controller board | 1 77 | 36-2003-09-BT | ||
| 72 EMS connector wire | 1 56+71 | 36-9109-74-BT | ||
| 73 Magnet | 1 63 | 36-1122-23-BT | ||
| 74 Small round cover | 2 45 | 36-2003-10-BT | ||
| 75 Power outlet | 1 66 | 36-2003-11-BT | ||
| 76 Switch | 1 66 | 36-2003-12-BT | ||
| 77 Fixed frame | 1 1 33-2003-07-SW | |||
| 78 Screw | 4x15 | 2 75 | 39-10188 | |
| 79 Power wire | 1 75+76 | 36-2003-13-BT | ||
| Illustration No. | Designation Dimension | mm | Quantity Attached | to Stück | ET-Number |
| 80 AC wire blue 1 71+76 36-2003-14-BT | |||||
| 81 AC wire brown 1 71+76 36-2003-15-BT | |||||
| 82 Ground wire 1 1+71 36-2003-16-BT | |||||
| 83 Cable protector 1 3 36-9828-13-BT | |||||
| 84 Tool Set 1 36-9109-75-BT | |||||
| 85 Assembly and exercise instruction 1 36-2003-17-BT |
Assembly Instructions
Before beginning assembly, be sure to observe our recommendations and safety instruction. Remove all the part of your cycle from the carton and place them on the floor carefully. Some parts are pre-assembled. Assembly time: 30 - 40 min.
Step 1:
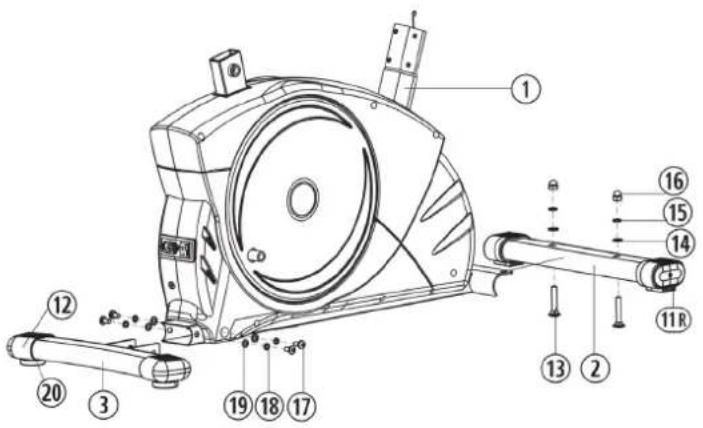
Attach the front and rear stabilizer (2+3) at mainframe (1).
- Attach the rear stabilizer (3) assembled with 2 rear caps (12) and adjustable feet (20) to main frame (1), using 2 Allen head bolts (17), 2 washers (19) and 2 spring washers (18). You can use adjustable feet (20) to level the bike at uneven floor.
- Please dismount the plastic protection from front side of main frame and use the screw materiel for assembly the front foot. Attach the front stabilizer (2) assembled with 2 front caps with transportation roller (11) to main frame (1), using 2 carriages bolts (13), 2 washers (14), 2 spring washers (15) and two cap nuts (16).
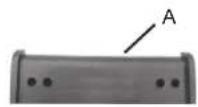
Part "A" serves as a transport safety device and it is no need after build up.
Step 2:
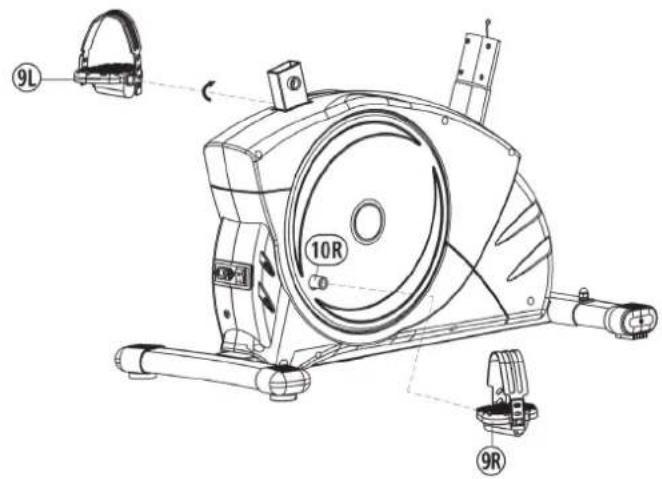
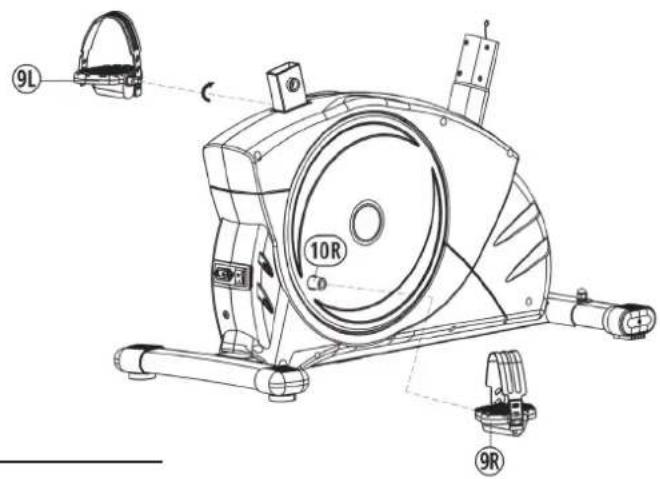
Attach the pedals (9R + 9L) at pedal crank (10).
- Attach the pedal straps to the appropriate pedals (9R+9L). NOTE: The end with many adjustable holes must be set outw
- The pedals (9R + 9L) are marked with R^ \& ,L^ NOTE: Right and Left is specified as viewed seated on the machine during training.
Connect each pedal (9R+9L) to the matching pedal crank (10R+10L)
(NOTE: The right pedal "R" should be threaded on clockwise. The left pedal "L" should be threaded on counter-clockwise.)
Step 3:
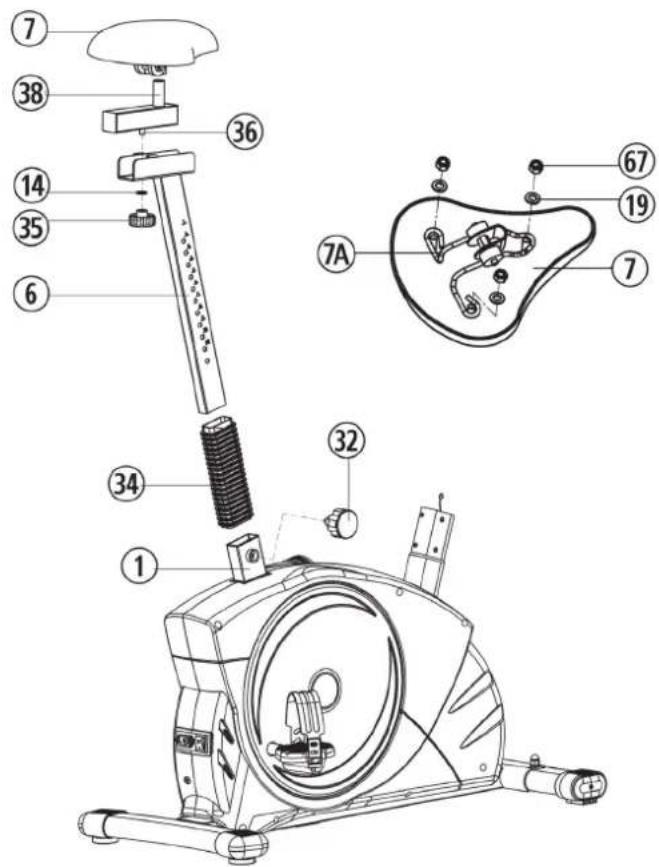
Attach the seat (7) and seat post (6).
- Slide the plastic collar (34) to cover the seat post (6). Insert the seat post (6) to seat post mounting tube of mainframe (1) and secure in position with the seat post quick release (32).
- Place the saddle (7) with the seat surface downwards. Place the saddle bracket (7a) on the upwards pointing bottom of the saddle (7). The threaded pieces on the bottom of the saddle must project through the corresponding holes in the saddle bracket (7a). Place washers (19) on the threaded pieces, screw on nuts (67) and tighten firmly.
- Put the clamp of seat (7) to the seat slide (38) and tighten the seat firmly into your desired position.
- After place the seat slide (38) with seat (7) onto the seat post (6) fix it with washer (14) star grip nut (35), you can move the seat slide to adjust your desired position.
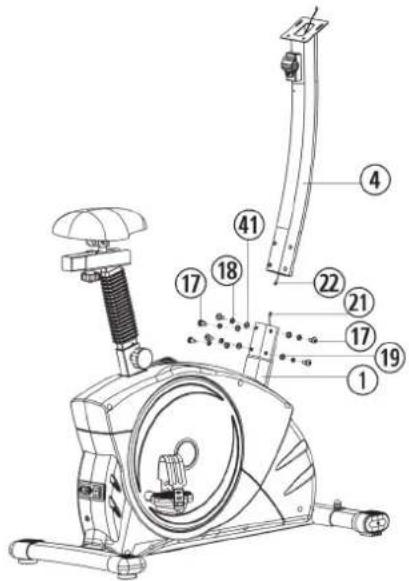
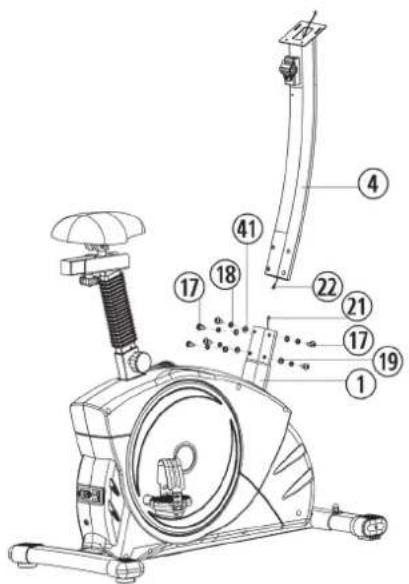
Step 4: Attach the handlebar post (4) at mainframe (1).
- Remove the pre-assembled 6 Allen head bolt (17), 4 washers (19), 2 washers (41) and 6 spring washers (18) from main frame (1).
- Attach the front post (4) to the front post mounting tube of main frame (1) and connect the plug of control cable (21) to the socket of the connection cable (22).
- Insert the front post (4) to mainframe (1) and secure, using 6 Allen head bolts (17), 6 spring washers (18), 2 washers (41) and 4 washers (19).
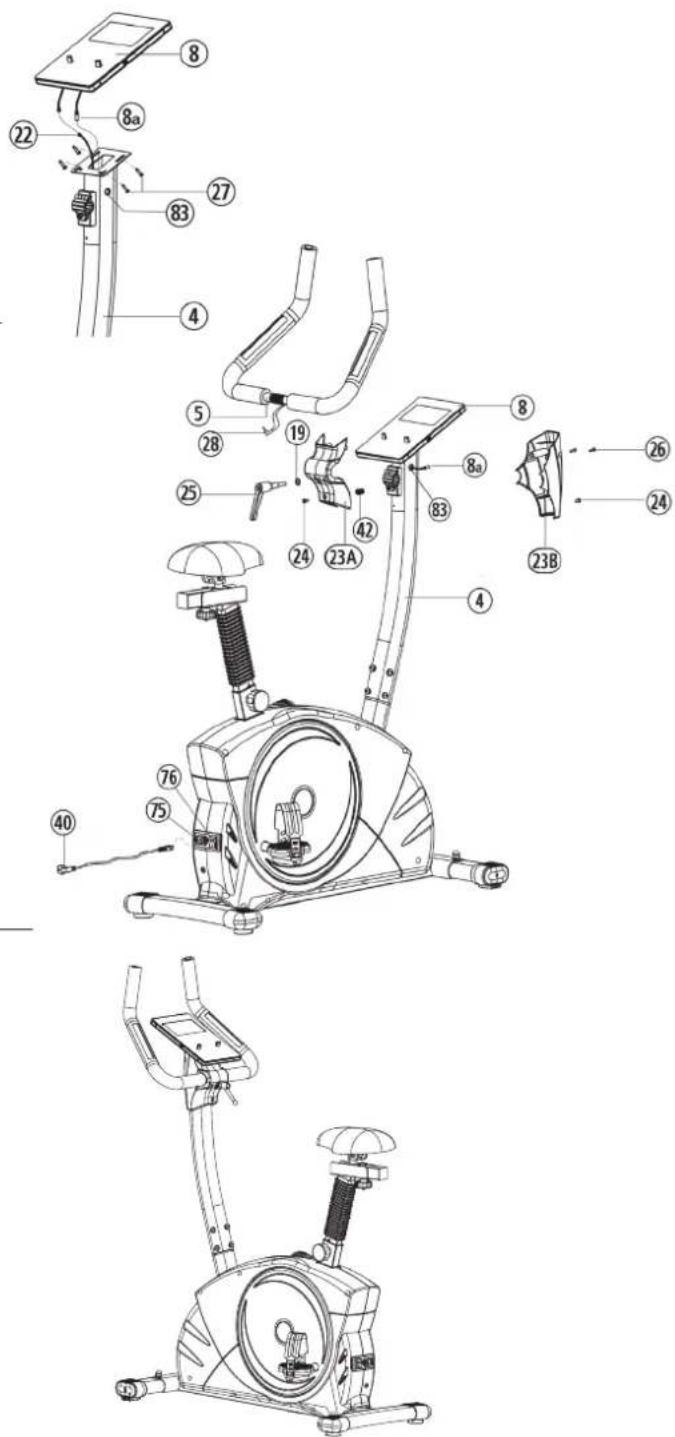
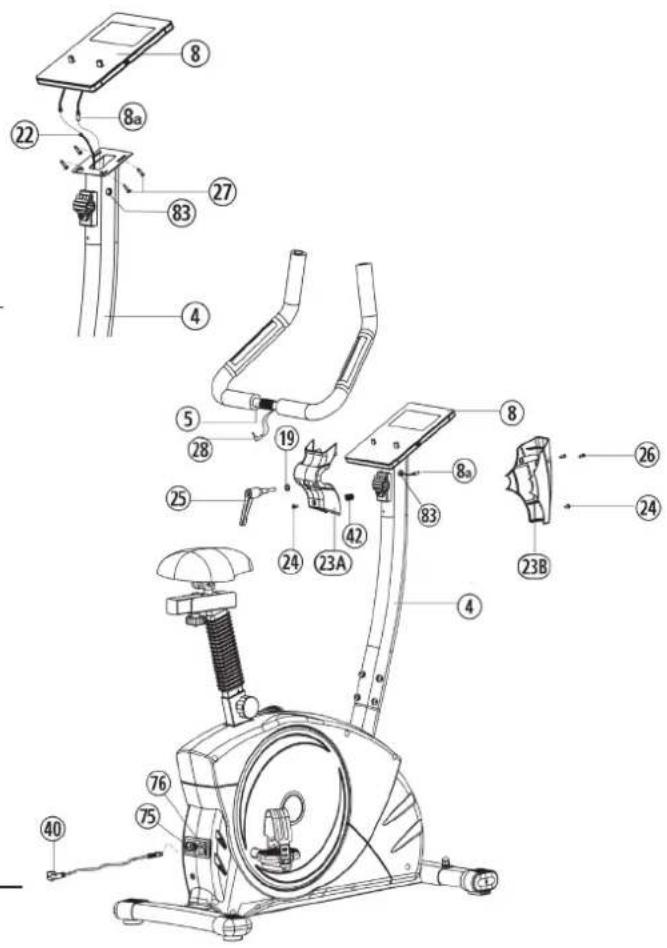
Step 5: Attach the computer (8) at handlebar post (4).
- Remove the screws (27) to fix the computer from backside of computer (8). Put in the plug of connection cable (22) into the socket from computers (8) backside.
- Remove the cable protector (83) from the support tube (4). Guide the pulse cable (8a) from the computer (8) through the side opening on the support tube (4) and reinsert the cable protector (83).
- Attach the computer (8) on top of handlebar post (4) with and tighten with screws (27). (Attention: Ensure that the cable loom are not crunched or pinched during installation.
Step 6: Attach the handlebar (5).
- Remove the screws (26) from the handlebar cover (23A + 23B) . Attach the handlebar (5) to the welded clamp of front post (4) and secure with clamp first. Then put on the decoration cover (23a) and a washer and the handlebar grip screw (25) to tighten the handlebar (5) firmly. Fix the decoration cap (23a) with screw (24).
- Insert the plug of hand pulse wire (28) to the jack(8a). Attach the handlebar cover (23b) with screws (24 + 26) .
- Plug the mains cable (40) into the mains connection socket (75) and into a properly connected socket (230V 50Hz) . Then switch on the main switch (76).
Step 7: Checks
- Check the correct installation and function of all screwed and plug connections. Installation is thereby complete.
- When everything is in order, familiarize yourself with the machine at a low resistance Setting and make your individual adjustments.
Note: Please keep the tool set and the instructions in a safe place as these may be required for repairs or spare parts orders becoming necessary later.
Transportation of Equipment:
There are two rollers equipped on the front foot. For moving, you can lift up the rear foot and drive it to where you would like to locate or store it.
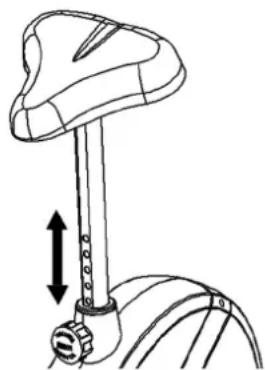
Adjustment - Seat Position
For an effective workout, the seat must be adjusted properly. While your are pedaling, your Knees should be slightly bent when the pedals are in the farthest position. In order to adjust the seat, unscrew the knob few turns and draw it out slightly. Adjust the seat to the right height, then release the knob and tighten it all the way.
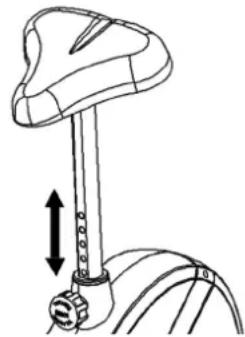
Important:
Make sure to put the knob back into place in the seat post and tighten it completely. Never exceed the maximum height of the seat. Always get off the bicycle before making any adjustment.
Mount, Use & Dismount
Mount:
a. After the seat is adjusted to properly position, insert your foot into retaining strap of pedal step on the pedal and hold the handlebar tightly.
b. Try to put whole body weight on your foot and simultaneously cross over the trainer and land your another foot on the other side.
c. Now you are in the position to start your training.
Use:
a. Keep you hands on the handlebar, and both feet are insert into retaining straps of both pedal properly.
b. Pedal your exercise bike by your both feet alternately.
c. Then you can increase the pedaling speed gradually and adjust braking resistance levels to increase the exercise intention.
Dismount:
a. Slow down the pedaling speed until it comes to rest.
b. Keep the left hand grabbing the left handlebar tightly, put your feet cross over the equipment and land on the floor, then land the other one.
This training equipment is a stationary exercise machine used to simulate without causing excessive pressure to the joints, hence decreasing the risk of impact injuries.
Exercise bike offer a non-impact cardiovascular workout that can vary from light to high intensity based on the resistance preference set by the user.
It will strengthen your muscles of legs and increase cardio capacity and maintain fitness of your body also.
RPM and Power Level Stufe 1 - Level 32 for ET 6 PRO Art.-No. 2003.
| Level↓/ RPM→ | 20 30 40 | 50 60 70 80 | 90 100 110 120 | |||||||
| 1 | 8 14 19 | 26 32 39 45 | 50 59 64 69 | |||||||
| 2 | 10 17 24 | 32 40 49 57 | 64 74 81 88 | |||||||
| 3 | 12 20 30 | 38 48 59 69 | 77 89 98 107 | |||||||
| 4 | 14 24 35 | 45 56 69 80 | 90 104 115 126 | |||||||
| 5 | 16 28 40 | 51 64 79 91 | 104 119 132 | 145 | ||||||
| 6 | 18 31 45 | 57 72 89 108 | 118 134 149 | 164 | ||||||
| 7 | 20 34 50 | 63 80 98 115 | 131 148 166 | 183 | ||||||
| 8 | 21 37 55 | 69 88 107 126 | 16 144 163 182 | 201 | ||||||
| 9 | 23 40 59 | 76 96 117 137 | 17 158 178 198 | 218 | ||||||
| 10 | 25 43 68 | 83 104 126 | 18 171 193 214 | 236 | ||||||
| 11 | 27 46 68 | 90 112 136 | 160 184 208 | 231 254 | ||||||
| 12 | 29 49 73 | 97 120 146 | 71 198 223 | 248 273 | ||||||
| 13 | 30 52 78 | 103 128 156 | 182 211 238 | 265 292 | ||||||
| 14 | 31 55 82 | 109 136 166 | 193 224 252 | 282 311 | ||||||
| 15 | 33 58 86 | 115 144 176 | 204 237 266 | 297 328 | ||||||
| 16 | 35 61 90 | 121 152 185 | 215 250 281 | 313 346 | ||||||
| 17 | 37 64 95 | 128 160 194 | 226 263 296 | 328 363 | ||||||
| 18 | 38 68 100 | 134 168 204 | 238 276 310 | 344 381 | ||||||
| 19 | 40 71 104 | 140 176 213 | 250 289 324 | 360 398 | ||||||
| 20 | 42 74 108 | 146 184 222 | 262 302 338 | 376 416 | ||||||
| 21 | 43 77 113 | 152 192 232 | 274 315 358 | 392 434 | ||||||
| 22 | 45 80 117 | 17 159 200 241 | 285 328 368 | 408 452 | ||||||
| 23 | 47 83 122 | 180 208 250 | 297 341 382 | 424 470 | ||||||
| 24 | 48 86 126 | 171 216 260 | 309 354 396 | 440 488 | ||||||
| 25 | 49 89 131 | 177 224 270 | 320 367 410 | 456 506 | ||||||
| 26 | 51 92 136 | 183 232 279 | 331 380 425 | 473 524 | ||||||
| 27 | 53 95 141 | 180 240 288 | 342 393 440 | 489 543 | ||||||
| 28 | 54 98 145 | 195 248 297 | 353 406 455 | 506 562 | ||||||
| 29 | 55 101 | 201 256 307 | 365 420 471 | 523 581 | ||||||
| 30 | 56 104 | 204 264 317 | 433 433 486 | 540 600 | ||||||
| 31 | 57 107 | 212 272 327 | 446 501 557 | 619 | ||||||
| 32 | 59 110 | 220 280 337 | 459 516 | 674 638 |
Remarks:
- The power consumptions (Watt) are calibrated by measuring the driving speed (min-1) of axle and the braking torque (Nm).
- Your equipment was calibrated to fulfill the requirements of its accuracy classification before shipment. If you have doubts about the accuracy, please contact with your local retailer or send it to accredited test laboratory to ensure or calibrate it.
Computer instruction for ET 6 Pro
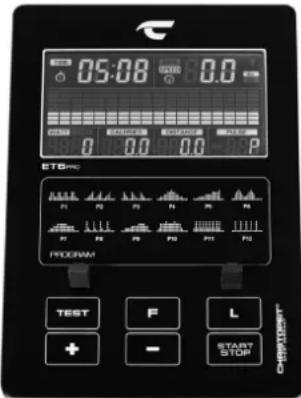
DISPLAY:
RPM:0~15~999
(Alternates with SPEED every 6 seconds.)
SPEED:0.0~99.9 km/h
(Alternates with RPM every 6 seconds.)
TIME:00:00\~99:59.
DISTANCE:0.00~99.99 km
CALORIES:0~999kcal
WATT:0\~999
(Alternates with LEVEL every 6 seconds.)
PULSE: P~40~240, max value is available.
(Heart symbol flashes on/off if pulse data transmit.)
LEVEL:1~32 level
(Alternates with WATT every 6 seconds.)
PROGRAM:MANUAL;PROGRAM(P1\~P12)
WATT; USER; H.R.C.; FAT
KM Total (ODO):
The distance in km of all training units is displayed. It is not possible to specify. The ODO display can be reset to zero at any time. To do this, press the ++key and the --key at once for 2 seconds.
KEY FUNCTIONS
- START/STOP key: Starts or stops/interrupts program
- F -key: Function select and confirmation key.
-
- key: Increases value or select option.
-
- key: Decreases value or select option.
(Only flashing values are adjustable.)
- L -key: Press to return to select program. Reset the computer by 3 sek. press.
- TEST key: Fitness test by measuring your recovery rate. (F1-6)
OPERATION
Use
1) Connect the power cord with the ET 6 PRO and one correctly connected socket and turn on the main switch. The display in the computer lights up accompanied by a signal tone and briefly shows internal data for speed programming, bluetooth interface and ODO. Then MANUAL appears in the display and you are in the manual program.
2) Use the +/- keys to select a program category: MANUAL, PROGRAM, WATT, USER, H.R.C., FAT and confirm by pressing the F -key. The default values such as time, distance, calories and pulse in the selected program can be called up with the F -key and changed by using the +/- keys.
3) When the program and the default values are set, press the START/ STOP-key to start training.
4) Pressing the START/STOP -key again ends or interrupts the program. All values reached up to that point are save until the device switched off and you can continue training based on these values or you can set all functions to zero using the "L" key.
5) The computer switches off automatically approx. 4 minutes after the end of the training. We recommend to turn off the main switch after each training.
1. MANUAL: manually program:
When selecting the program, select the MANUAL category using the +/- keys and confirm with the F -key. Call up the setting options LEVEL / TIME / DISTANCE / CALORIES / PULSE by pressing the F -key and setting the values using the +/- keys. Use the START/STOP button to start the manual program and adjust the resistance during training using the +/- keys.
2.PROGRAM:exercise programs:
When selecting the program, select the PROGRAM category using the +/- keys and confirm with the F -key. Then call up one of the 12 different training programs using the +/- keys and confirm with the F -key. Call up the default options LEVEL / TIME / DISTANCE / CALORIES / PULSE by pressing the F -key and setting the values using the +/- keys. Use the START/STOP -keys to start the selected program.
3. WATT: independent watt program:
When selecting the program, select the WATT category using the + / - keys and confirm with the F -key. Calling up the default options WATT / TIME / DISTANCE / CALORIES / PULSE by pressing the F -key and setting the values using the + / - keys. The default setting for the WATT value is 100, the value can be changed from 10 to 300 watts in 5 watt steps. The WATT value is set with the + / - keys. The entered WATT value remains independent of the pedal speed constant through automatic adjustment of resistance. Use the START/STOP -key to start the watt program.
4. USER: individual programs:
When selecting the program, select the USER category using the +/- keys and confirm with the F -key. Create your own program profile. With this program you can determine the resistance of each section (18 bars) by yourself. Set the desired resistance for the first bar using the +/- keys and confirm the entry using the F -key. Proceed in the same way for all 18 bars. Then press the L key to set TIME / DISTANCE / CALORIES / PULSE. You can use the +/- keys to change the value and confirm with the F key. Start the program by pressing the START / STOP button. The set program profile is saved automatically and can be overwritten if necessary. Once you have set the USER program, you only need to open it and you can set the TIME / DISTANCE / CALORIES / PULSE directly by pressing the L key.
5. H.R.C.: pulse programs:
When selecting the program, select the H.R.C. category using the +/- keys and confirm with the F -key. Call up the preset options GENDER / AGE / PULSE PROGRAM / TIME / DISTANCE / CALORIES by pressing the F key and setting the values using the +/- keys. The pulse programs 55% 75% and 90% are based on the age input and use this to calculate the upper pulse limit 55% 75% or 90% of the maximum heart rate value. With the pulse program you can set the upper pulse limit yourself. The PULSE display flashes as soon as the upper pulse limit is reached during training.
55% -- DIET PROGRAM
75% -- HEALTH PROGRAM
90% -- SPORTS PROGRAM
TARGET HEARTRATE
TEST (RECOVERY):
When you have finished your workout, press Test-key. For RECOVERY to function correctly, it needs your Heart Rate input. TIME will count down from 1 minute and then your fitness level from F1 to F6 will be displayed. (See table under Fitness Test Program)
NOTE: During RECOVERY, no other displays will operate.
| Condition Score | Heart Rate | |
| Excellent F1 Über 50 | ||
| Good F2 40 ~ 49 | ||
| Average F3 30 – 39 | ||
| Fair F4 20 ~ 29 | ||
| Poor F5 10 – 19 | ||
| Very Poor F6 Unter 10 | ||
6.FAT: body fat program
Here you can analyse a BMI and get an individual training proposal. Use the F key to select the personal values: gender = male / female, age = 10-99 years, height = 120-200cm, weight = 20-150kg and enter your data by using the +/- buttons. Then grab the hand pulse sensors to measure your body fat. After approx. 10 seconds the result is displayed: BMI value and the resulting body fat type (1-4). A training program is suggested after the BMI and body fat type are displayed twice. To start the training program, press the Start / Stop button.
ATTENTION: If the computer displays an error message „Err1“, there is a signal interference with the pulsesensor. In this case, run the body fat program again and grab the pulse sensors again so that the pulse sensors are covered with your hand as much as possible.
BODY MASS INDEX - Table
| Bodyfat-Type → Gender ↓ | Underweight No | rimal- weight | Slightly Overweight | Overweight |
| Type 1 Type 2 Type 3 Type 4 | ||||
| man < 10% 10% | 19,9% 20%~24,9% ≥ 25% | |||
| woman | < 20% 20%~29,9% 30%~34,9% ≥ 35% | |||
PULSE RATE
1. Hand pulse measurement:
On the left and right handlebar grip part two metal contact plates are insert as pulse sensors. Please take care that both hands at the same time in normal force on the sensors. During the heartbeat measurement a heart symbol flashes next to the pulse display. (The hand pulse measurement serves only for orientation, as it is caused by movement, friction, sweat etc. it can come to deviations from the actual pulse. A few people may cause malfunctions of hand pulse measurement. Should you have trouble with the hand pulse measurement, we recommend the use of a cardio chest belt.)
"WARNING" Heart rate monitor systems may be inaccurate. Excessive exercising can lead to serious damage or maybe to death. If dizziness or weakness is felt, stop exercising immediately.
2. Cardio - Pulse Measurement:
On the market, cardio pulse measurements are available, which consist of a transmitter chest belt and a watch receiver or only chest belt. The computer of your Ergometer has build in receiver (without sender) and with using a suitable chest belt for cardio pulse measurement the computer can show the pulse data. This works with all un-coded chest belts with transmission frequency is between 5.0 - 5.5 kHz. The range of the transmitters depends on the model approx... 1m.
ATTENTION: If both pulse measuring methods are used simultaneously, Hand pulse measurement takes precedence.

Kinomap INDOOR TRAININGS APP
The product can be used with the Kinomap app. This enables entertaining and interactive training with Android or iOS devices and saving training data.
Sport, coaching, gaming and eSport are the keywords of the Kinomap app. This contains many kilometers of real film material to exercise inside as if you were outside; Tracking routes and analysis of your performance; Coaching content; Multiplayer mode; new posts daily; Official indoor races and more ... The APP thus contains approx. 100,000 videos recorded by athletes and 200,000km of accumulated tracks for cycling, running or rowing for currently approx. 270,000 members from all over the world.
Download the app and connect
Scan the adjacent QR code with your smartphone / tablet or use the search function at the Playstore (Android) or APP Store (IOS) to download the Kinomap APP. Register and follow the instructions in the APP.
Activate Bluetooth on the smartphone or tablet and select the device manager via the menu in the APP and then select the „Exercise bike" category. Then select your type designation via the manufacturer logo „Christopeit Sport" in order to connect the sports equipment. Depending on the sports equipment, different functions are recorded by the APP via Bluetooth or data is exchanged.
Attention: The Kinomap APP offers a free trial version for 14 days. After that, fees will apply which are listed on the Kinomap homepage. Further information can be found at: https://www.kinomap.com/en/

Kinomap
IOS ANDAndroid APP
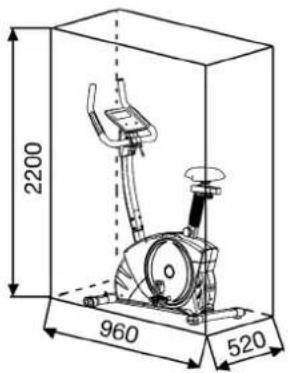
Training area in mm (for home trainer and user)
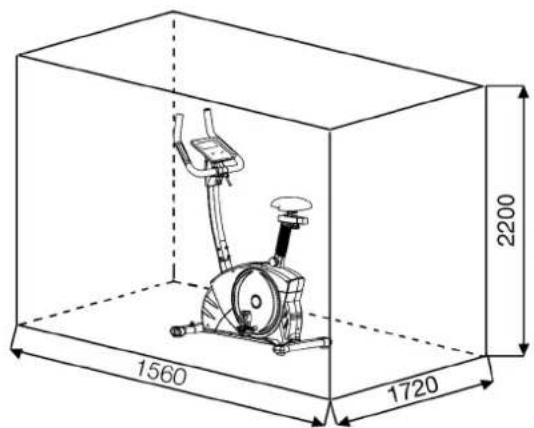
Free area in mm (Training area and security area (rotating 60cm))
Cleaning, Checks and Storage of the Ergometer bike:
1. Cleaning
Use only a less wet cloth for cleaning. Caution: Never use benzene, thinner or other aggressive cleaning agents for surface cleaning as this damage caused.
The device is only for private home use and for use suitable indoors. Keep the unit clean and moisture from the device.
2. Storage
Plug out the power supply unit while intending the unit for more than 4 weeks not to use. Push the saddle slide toward the handlebar and the seat support tube as deeply as possible into the frame. Choose a dry storage in-house and put some spray oil to the pedal bearings left and right, to the thread of the handlebar bolt, and on the thread of the quick release for saddle support.
Cover the bike to protect it from being discolor by any sunlight and dirty through dust.
3. Checks
We recommend every 50 hours to review the screw connections for tightness, which were prepared in the assembly. Every 100 operating hours, you should put some spray oil at the pedal bearings left and right, to the thread of the handlebar bolt and to the thread of quick release for saddle support.
Troubleshooting
If you cannot solve the problem with the following information, please contact the authorized service center.
| Problem Possible | Cause Solution | |
| Computer has no value at Dis-play if you press any key. | No power cord is well plugged or wall power is without power. | Check that the power cord is properly plugged in, possibly with another electric device check if the wall power is fine. |
| Computer is not counting data and do not switch on after start cycling. | Sensor impulse missing base on not well plugged connection | Check the plug connections at computer and inside of handle-bar support. |
| Computer is not counting data and do not switch on after start cycling. | Sensor impulse missing base on not correct position of sensor. | Take off the cover and check the distance between magnet and Sensor. The magnet at turning belt wheel should have only less than < 5mm distance against the sensor position. |
| No pulse value Pulse cable is not plugged in. | Check the separately pulse cable is well connected with computer. | |
| No pulse value Pulse sensors not well connected | Screw out the screw for pulse measurement and check if plugs are well connected and no damage at pulse cable. |
Training instructions
You must consider the following factors in determining the amount of training effort required in order to attain tangible physical and health benefits:
1. Intensity:
The level of physical exertion in training must exceed the level of normal exertion without reaching the point of breathlessness and / or exhaustion.
A suitable guideline for effective training can be taken from the pulse rate. During training this should rise to the region of between 70% to 85% of the maximum pulse rate (see the table and formular for determination and calculation of this).
During the first weeks, the pulse rate should remain at the lower end of this region, at around 70% of the maximum pulse rate. In the course of the following weeks and months, the pulse rate should be slowly raised to the upper limit of 85% of the maximum pulse rate. The better the physical condition of the person doing the exercise, the more the level of training should be increased to remain in the region of between 70% to 85% of the maximum pulse rate. This should be done by lengthening the time for the training and / or increasing the level of difficulty.
If the pulse rate is not shown on the computer display or if for safety reasons you wish to check your pulse rate, which could have been displayed wrongly due to error in use, etc., you can do the following:
a. Pulse rate measurement in the conventional way (feeling the pulse at the wrist, for example, and counting the number of beats in one minute).
b. Pulse rate measurement with a suitable specialised device (available from dealers specialising in health-related equipment).
2. Frequency
Most experts recommend a combination of health-conscious nutrition, which must be determined on the basis of your training goal, and physical training three times a week. A normal adult must train twice a week to maintain his current level of condition. At least three training sessions a week are required to improve one's condition and reduce one's weight. Of course the ideal frequency of training is five sessions a week.
3. Planning the training
Each training session should consist of three phases: the warm-up phase, the training phase, and the cool-down phase. The body temperature and oxygen intake should be raised slowly in the warm-up phase. This can be done with gymnastic exercises lasting five to ten minutes.
Then the actual training (training phase) should begin. The training exertion should be relatively low for the first few minutes and then raised over a period of 15 to 30 minutes such that the pulse rate reaches the region of between 70% to 85% of the maximum pulse rate.
In order to support the circulation after the training phase and to prevent aching or strained muscles later, it is necessary to follow the training phase with a cool-down phase. This should be consist of stretching exercises and / or light gymnastic exercises for a period of five to ten minutes.
You find further information on the subject warm-up exercises, stretch exercises or general gymnastics exercises in our download area under www.christopeit-sport.com
4. Motivation
The key to a successful program is regular training. You should set a fixed time and place for each day of training and prepare yourself mentally for the training. Only train when you are in the mood for it and always have your goal in view. With continuous training you will be able to see how you are progressing day by day and are approaching your personal training goal bit by bit.
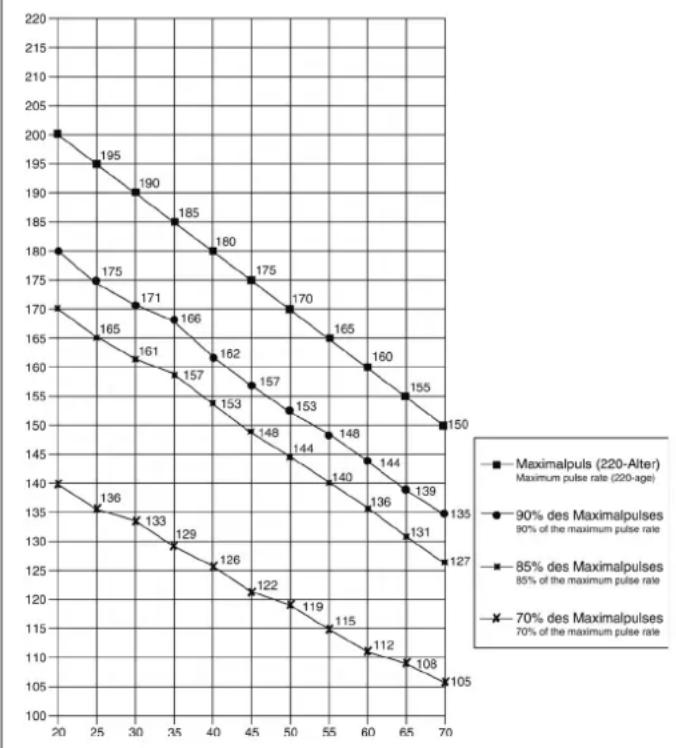
Calculation formula: Maximum pulse rate = 220· age (220 minus your age)
90% of the maximum pulse rate = (220 - age) x 0.9
85% of the maximum pulse rate = (220 - age) x 0.85
70% of the maximum pulse rate = (220 - age) x 0.7
Warm up exercises (Warm Up)
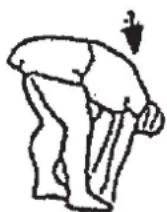
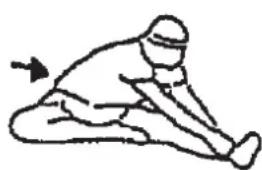
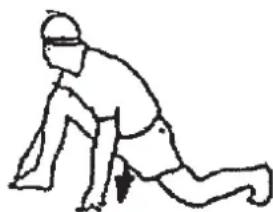
Start your warm up by walking on the spot for at least 3 minutes and then perform the following gymnastic exercises to the body for the training phase to prepare accordingly. The exercises do not overdo it and only as far run until a slight drag felt. This position will hold a while.

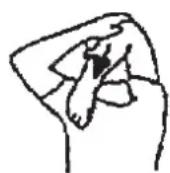
Reach with your left hand behind your head to the right shoulder and pull with the right hand slightly to the left elbow. After 20sec. switch arm.
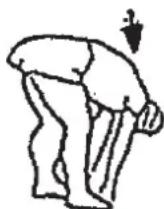
Bend forward as far forward as possible and let your legs almost stretched. Show it with your fingers in the direction of toe. 2 x 20sec.
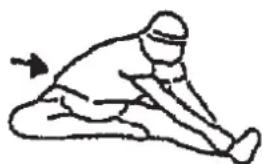
Sit down with one leg stretched out on the floor and bend forward and try to reach the foot with your hands. 2 x 20sec.
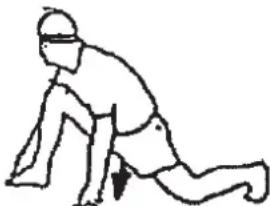
Kneel in a wide lunge forward and support yourself with your hands on the floor. Press the pelvis down. Change after 20 sec leg.

Sommaire
Chere cliente, cher client,
1. MANUAL: programme manuel
3. WATT: programme watt independant
3. Planning van de training
Warming-up oefingen (Warm Up)
War 2: MoHTax neJaJe (9R+9L).
1.YcTaHOBtEΦKCHpyIOUneJeHTbI neJaEn Ha COOTBeTCTByIOUne ne-dann (9R+9L).
(BHIMAHHe: KoHeU c DbIPKAMn dIa HAcTpoKn Ha 60JIbUyIO BENuHy DOJIKeH yKa3bIBaTb HApKy.
2.YctahOBHTepea(9R+9L)HaueKKnpBouwna(10R+10L)PeanmEOTMapkpOBky“R”nI npabOuN L"JnJeBOn.
(BHIMAHHe:JIeBaI npBaBcTOpHa NpOpa3yMeBaIOCT npn HaxoK DeHN BceIe B MOMENT TpeHnpOBKn. PpBaBneJaIb (9R)doJNka BpaaTaBcNo YacOBn CTpeKe, a JBeBa neJaIb (9L) npOTNB YacOBn CTpeKN.
Uar 3: MoHTax onOpHoi Tpy6bI ceNa (6), ceNa n oBunBkn (7).
- BCTABbTe onOpHyTo Tpy6y CeIa (6) NoCne TORO KAK Ha Hee HAdenn MaHKeTy (34)B COOTBeTCTByIOUeEe KpENIIeHHe HA OCHOBHO pAmE (1) 3aФHKcNpyIte ee B JxEJaEMOM NOnOxKEnHn PnI NMOUIN 6bICTPOeI- CTByIOUe 3ATBOPa (32). (5bICTPOeIeCTByIOUeN 3ATBOP (32) DONJKeH- 6bITb HEmHO OcA6NeH ToJIbKO NocpeDCTBOM He6OJIbUO NOBOPaUN BaHNA, 3aTEM OH BbITrNBAeTCdIg OCBO6OKeJHn PHKCaUN BBICoTb, I bICota CeIaN MoKeT 6bITb NepeCTabNeHa. Nocne XeJaEMOn Ha- cTPOkN 6bICTPOeIeCT-BYIOUIN 3aTBP (32) ChOba 3aKpenNTb NocpeI- CTBOM 3aKpyuINBaHNA).
- Bnoknte cedno (7) cnHbem BN3. PnactHy kpenneHne CnHnna (7a) ceIa HANOxNte Ha IekaiyO CBepxy 3aHIO HO CTOPHY CeIa. DeTaNc pe3b6oHa 6paTHOH CTOpHO CEIIaONKbI BbIXoNTb Pe3 COOTBeCTByIOUne OTBepCTNBA KpenneHne CnHnna (7a).HaJeTB NOKkAHLHe WAIb61 (19) Hape3b6Oblbe 3neMeHTbl, HApkyTNTb raIKN (67) n Kpenko 3aTAYb.
- Hadehhe ceIIO (7) Ha nonayHOK ceIa (38) n 3akpyTne eroc Je- IaembIM HAKLOHOH HA KpennHe He ceIa.
4.YctahOBtBeBaIeceNo(38)BKeJaemoeNIOJKeHneNOropnOHTaIIIN3aFHKcpyTeeroNocpeCTBOMPpKNaOuHOnWai6bI(14)IN BInDe3Be3DOUKNBbIPOHeHOraIKN(35)

Uar 4: MoHTax onOpHoI Tpy6bI pyra (4) Ha ochOBHOI pame (1).
- YdannTe 60ntbI (17), noKnaHbIe Wai6bl (19+41) n npyXHHbIe KOnb-za (18) c KpennEnHa onOpHoi Tpy6bl pyn Ha oChOBHO pame (1).
2.ПОДБЕДNTE ONOPHYTO Tpy6у pyI4(K COOTBETCTBHyOeMy Kpenne HnHO Ha OCHOBHoi paMe (1)И CoeINHITe cepBOBbIraTeIb (21) C coeINHITeIbHbIM Ka6eIeM DIBrAteIa (22). - Bctabte onopny ty6y pyra (4) B cooTBeTCTByuOooe KpenneHHe ochOBHO pame (1) TaK, YTO6bI Ka6eB He 3aUeMnAocn 3aФNKcnpyTe ee npn nmoOn 60ntob (17), noKnadhbx uai6 (19+41) npykHHbIX koneu (18).
MOnTax N KOMNbOTepa (8).
- YdaHnTe 6oTbI (27) HA KOMNbIOTepa. CoeHNHTe CoeHNHTeJIbHbI Ka6eIb (22) DaTHNcA C COOTBETCTBYOUM HHe3DM HA KOMNbHOtepe (8).
- Chmnte 3aunty ka6e (83) n3 onopno Tpy6b (4). Ppoedehte Ka-6eNb DaTnka npIbca (8a) ot KOMNIOTepa (8) uepe3 60KOBoe OTBepCTne Ha onopno Tpy6e (4) n BCTabBe 3auNTy ka6e (83).
- PnKpyTHe KOMbIOTep (8) K DePkaTeIIO KOMbIOTepa Ha onOpHOn Tpy6e (4) npn NMOU BnHTOB (27) n36erar 3aueMneHna Ka6eIa.
MOnTaX 3akpenTe pyJ (5).
- CHHMMTe BnHTb (26) c 06wnBkny pyra (23A + 23B). NOpBeHnTe pynb (5) K OTKpbTomy KpeIeHmIO pyra Ha onopHO Tpybe (4) n 3akpoIte ero HAD pyneM (5). HadeHbTe nepeHmN 3aunTHbIK KOxyx pyra (23a) Ha KpeIeHnry pyra, n 3akpeHnTe pynb (5) npn NOMO-UN BnHTa (25) NaNDKlaadHbIe 7aib6bI (19) nocne yero 3akpeHnTe 06wnBky (23a) npn NOMOuIN BnHTa (24).
- CoeHnTe KaebIb DaTnka Nylba (28) C 6yKcoi (8a) KOTopyo Bbl npOeJIu YpeC OTBepCTne B ONOPHO Tpy6 (4). PpIKpyTnTe 3aHnN KOxyx pyra (23b) npn NOMOUI BNHTOB (24+26) K ONOPHO Tpy6 (4).
- BCTaBtBe CeTeBoi Ka6eIb (40) B po3eTKy CeTeBOrno noKIOUOHeHn (75) nB npAunlboHO noKIOUOHeHHyIO po3eTKy (230 B~50 T). 3aTeM BKNIOuHTe rnaHBn BBkIOUOATEJIb (76)
7: KoHTponb
- PpOBepbTe BCE coeINHeHn 6oJTOB u CoeINHeHn Ha npaBnIbHOctb nx C6OpKn yHKUHOHPOBaHn. C6OpKa Ha 3OM 3aBepueHa.
- Ecnn BCE B nopAKe, To onpOByTe cHapJr, ycTaHOBb ero Ha cambln nKnn nOKa3aTeNb cOnpoTnBHeHn, n onpOByTe TpeHaxep.
IpmeaHne: XpaHnTe 6epeXHO nHcTpymEnr H pyKOBOCTBO, TAK KAc OHn Ioo3Hee MoryT noHaDoBtbcra np MeJkOM peMOHTe nn 3aKa3e 3anachbix Yactei.

Ponb3OBAHne TpeHaXepom
Ha nepeHne HoxKHe haoJATcB Db TpaHCnOpTnpOBOHybIX pONika. IJIra toro, YTO6bI nepeDBNHYb TpeHaxep Ha dpyroe MeCTO INN NOMeCTNb HA MecTo XpAHEHn, BO3bMNTcB 3a pyJB N HAKnHOte TpeHaxep Ha nepeHNO HOxKBy TAK, YTO6bI TpeHaxep MOXHO bNIO NERKO nepeDHNyB C NOMOuBHO TpaHCnOpTnpOBOHybIX pONIKOB HA HyKHOe MECTO.
PerynpobKa BbICOTb ceHa:
Длп риннгу do6HOrO noLoXeHnHa ceIne Bo BpeMa TpeHnpOBKn, Heo6xOAnMo yctaHOBt npabInbHyIOBbICOTy ceIa. IpaBnIbHbIM noLoXeHnEMceIa CHTaeTcnoLoXeHnE, KOrdaKoJIeHN B HIXHem noLoXeHnNe daIIHaxOaTcB HEmHOrO cOrHToM noLoXeHnIN He MOrTy 6bITb DO KOHua BblpAmHebl.ДлЯ yCTaHOBnEHnIpaBnIbHOROnoLoXeHnCEIa Ocna6bTe OndOHpyKoIB6bICTpoJeNCTByOuIm 3aTbOp IN BbITraHnTErp6OK,dpYro pyKoI nepeTaBBte ceINo BJKeNaemaO noLoXeHnE.OTnyCTnTE rp6OK, qTO6bl OH 3ana n KpeNko 3akpyTnte erO.
BaxkHo:
YdoCTOBepbTecb TOM, YTO 6bICTpOeJeCTByoUa3aTBOp 3aФNKcPObaH n KpeNko 3akpyeh. He BbytackBaIte onOpHyTo ty6y ceJa do KOHa u He MeHnTe N03uM CEJa BO BPem TpeHnpOBKn.
Cauntbca n cnyskaTbca c TpeHaekepa:
Cauntbcn Ha TpeHaxke:
Iocne yctahOBHeHn npabNbHOB BbICoTb CeJa BO3bMNTecb 3a pyNb. UcTaHOBtE 6bnXaMyIO neaB HNXHIO IO 03NIO N BDeHbTe CTyHIO BΦHKcnpUOoi pEmeWOK Tak, QTObI OHa HaxOAnacB HaDEKHom NOLOKeHHn Ha neaII. PepeKnHbTe DpyrIIO Hory Ha npOTINBOJNOJHXHy TOPOHy n C4bTe Ha ceIo. PnI ATOM KpENKO DEPKNTECB DByMa pyKaMn 3a pyNb. Iocne 3TORo BdEhBte DpyrIIO CTynHIO BΦHKcnpUOoi pEmeWOK neaII.
Ponb3ObaHne:
DepKntecb DByMa pykAm 3a pynb Hc BCTabaIte C cedna BO Bpem TpeHnpBKn. Cneinte 3a Tem, YTObI CTynHn Ha neanax BCE Bpem TpeHnpBKn 6blnn 3aФNKCINPOBaHbI peMeKamn.
CnyckaTbcn C tpehXepa:
PpeKpaTnTe TpeHnpOBky, KpeNko Depkacb 3a pyNb. Chmnte Chaana Ondy CTynHIO CneJaIIN NOCTaBbTe ee HaJeXHOM NIOXKeHN HA NOI IN COJNTe C cedna. Chmnte NOTOM DpyTuO CTynHIO C neJaIIN NOCTaBbTe ee Ha NoI IN COJNTe M TpeHaXkepa.
3TOT Tpehaxep - HenoDbnKbI DOMaHm TpeHaXep, IMNTpyUoHm e3dy Ha BENOcInePe. N3-3a TpeHnpBKn npn IIO60 nOrope, 6e3 BHeuHnx BO3dEChTBn, a TaKKe 6e3 DaBHeHH npn e3De B rpynne yMeHbWaeTcB BeporTHocTb NaDeHHN n NepeyTomJeHHN.
I3-3a BO3MOXHOCTN 3MeHeHn COIpOTNBHeHn, e3Ja Ha BEnOCnnepepeOCTABnET BO3MOXHOCTb TpeHPOBKn cepDeuHO-CocyDnCTOn CICTeMbI 6e3 uepe3mepHO HApRjEHN. Pn nTOM BO3MOxHa 6oJee nn MeHee INTHCINBnA TpeHPOBKa. Pn 3TOM TpeHpyIOCTc HxKHe NKeUHOCTN, YkPepnJIeTc CepeHuO-cocYdntar CnCTema N CnOCo6CTByeTcN noIDepXkaHne XopoWe cnOpTINBHO φOpMbI.
Hcno 06opOToB m MoUHocTb OT ypOBHr 1 do ypOBHr 32 dIe ET 6 PRO apt. 2003 r.
| Level↓/ RPM→ | 203040 | 50607080901 | 00110120 | |||||||
| 1 | 8 14 19 | 26 32 39 45 | 50 59 64 69 | |||||||
| 2 | 10 17 26 | 32 40 49 57 | 64 74 81 88 | |||||||
| 3 | 12 20 30 | 38 48 59 69 | 77 89 98 107 | |||||||
| 4 | 14 24 36 | 45 56 69 80 | 90 104 115 126 | |||||||
| 5 | 16 28 40 | 51 64 79 91 | 104 119 132 | 45 | ||||||
| 6 | 18 31 45 | 57 72 89 10 | 8 118 134 149 | 164 | ||||||
| 7 | 20 34 50 | 63 80 98 11 | 5 131 148 166 | 183 | ||||||
| 8 | 21 37 56 | 69 88 107 1 | 26 144 163 18 | 2 201 | ||||||
| 9 | 23 40 59 | 76 96 117 1 | 8 158 178 19 | 8 218 | ||||||
| 10 | 25 43 68 | 83 104 126 | 148 171 193 2 | 14 236 | ||||||
| 11 | 27 46 68 | 90 112 136 | 160 184 208 2 | 31 254 | ||||||
| 12 | 29 49 78 | 97 120 146 | 171 198 223 2 | 48 273 | ||||||
| 13 | 30 52 78 | 103 128 156 | 182 211 238 | 265 292 | ||||||
| 14 | 31 55 82 | 109 136 166 | 193 224 252 | 282 311 | ||||||
| 15 | 33 58 86 | 115 144 176 | 204 237 266 | 297 328 | ||||||
| 16 | 35 61 90 | 121 152 185 | 215 250 281 | 313 346 | ||||||
| 17 | 37 64 95 | 128 160 194 | 226 263 296 | 328 363 | ||||||
| 18 | 38 68 100 | 134 168 20 | 4 238 276 310 | 344 381 | ||||||
| 19 | 40 71 104 | 140 176 21 | 3 250 289 32 | 360 398 | ||||||
| 20 | 42 74 108 | 146 184 22 | 2 262 302 33 | 376 416 | ||||||
| 21 | 43 77 113 | 152 192 23 | 2 274 315 35 | 392 434 | ||||||
| 22 | 45 80 117 | 159 200 24 | 1 285 328 36 | 408 452 | ||||||
| 23 | 47 83 122 | 165 208 25 | 0 297 341 38 | 424 470 | ||||||
| 24 | 48 86 126 | 171 216 26 | 0 309 354 39 | 440 488 | ||||||
| 25 | 49 89 131 | 177 224 27 | 0 320 367 41 | 456 506 | ||||||
| 26 | 51 92 136 | 183 232 27 | 9 331 380 42 | 473 524 | ||||||
| 27 | 53 95 141 | 189 240 28 | 8 342 393 44 | 489 543 | ||||||
| 28 | 54 98 145 | 195 248 29 | 7 353 406 45 | 506 562 | ||||||
| 29 | 55 101 | 201 256 3 | 07 365 420 4 | 51 523 581 | ||||||
| 30 | 56 104 | 207 264 3 | 17 377 433 4 | 540 600 | ||||||
| 31 | 57 107 | 213 272 3 | 27 389 446 5 | 51 557 619 | ||||||
| 32 | 59 110 | 220 280 3 | 37 401 459 5 | 574 638 |
3aMeaHnR:
- Noka3aTeB MbouHocn B BaTbX paCHTbIbaeTcN 3 Noka3aTeNe Yncna
60pOToB neAaBHO OCN B MHyTu (UPM) n TOpMO3HO rOMeHTa (Nm). - TpeHaepe 6bl bBbepe H a3BaOe npEe oTrpy3KoN n 3TNIM
yDobNetbopRtpe6oBaHn KnaCCnDfNkauqnn "C BblCOKOnTOHOCbIO
HNkauqnn". Ecln Bbl NOBepraTe cOmHeHNO Noka3aTeN TpeHaepe,
6paTInTeCb K npOdaBu y Dn KOHTpON/HAcTpoN TpeHaepe.
KommbioTepeT6Pro
Ducnnn3:
06opotOB mHyTy (o6/MnH): 0~15~999
55% -- INPOPTAMMA INETA
75%--ПОТРAMMA 3ДОPOВБE
90% -- IPOIPTAMMA CIOPT
♥ -LIENEBARHACTOTAIIbCA
FITNESSTEST/ФУHKLИBAOCCTAHOBJIENIpyJBCA:
Iocne TpeHnPOBKn Haxmnte Ha KnaBnWy TEST / TECT. Depxnte pykn nIoTHo HA ceHCopax N3MepnTeNa NybCa noka nokaataeZeIT/BPEMR OTCuHTbBaet MNHyTu No y6bBaOoue. Iocne 3TOro BbICBeuHBAeTcA CTeneHb BOCCTaHOBHeHnNpybca F1 do F6.
Yka3aHHe:BoBpempaCetaTOI0NOKaTeTnOCTaNbHbIE NOKa3aTeHn He DeiCTByIO.(Cm.Ta6nUyBnporpammeΦHTHEc-TEcTnpoBaHn)
MaKc. yactota nylbca = 220 - Bo3pact
(220-BaWBo3pact)
90% OT MaKc. YAcToTbI NyIbCa = (220 - Bo3pact) x 0.9
85% OT MaKc. YacToTbI pyJbCa = (220 - Bo3pact) x 0.85
70% OT MaKc. yactotbI nylbca = (220 - Bo3pact) x 0.7
YnpaXHeHn dna pa3MHKn nepeed TpeHnpOBKo
HaHnTe pa3MHky C xOdbbHa MeCTe B TeHeHne 3 MInHyT. Iocne 3TOrB bINONHte CneDyUoHne ynpaxKHeHn, KOtOpBie NOMORY Bam ONImaJIbHO NOIroTOBnTBcK TpeHnPOBKe. Bo BpemBaBIOHHeHn yPaxKHeHn Bbl He DoJnxHbI NCbITbIBaTb60nl. BbINOHNrTe yPaxKHeHne Do NOBHeHn TReHyUeTo 4yBCTBa B MbIuE.
BctaHbTe poBHO n 3aBeDInTe Ondy pyKy 3a rOnOBy. BTopyo pyKy noLoXknte cbExy,Bo3bMnTecb 3a loKOTb N NotAHnTe DO ouyuence npactxKeHHa TpuiencA. OctaHbTeCb B 3tOM NoIooXeHHn Ha 20 cekHyd, NOBTopiTe dpyroyn pyko.
HaKIOHnTEcb BnepeI He Cm6BaHor NNONbTaIeTcB DOCTaTb NaIbCaMn pyk Do nona. BInonHnTe ynpaxKeHHe 2 p3a no 20 CEkyHd.
CádbTe Ha non N BbITAHITE ONDHY. HAKNOHITcB Bneped n nonp6yIte doCTaTB CTynHIO. BbINOJIHTe YnpaXHeHne 2 pa3a no 20 cekyHd.
B NOJOKeHNI WnPOKORo BbIIaJa OOBpNTecb pyKaAMn B NOI NOTAHInTe MblUcbl Hor. Ype3 20 cekyHn NOMEHnTE HORY.
Pocne pa3MNKnIOTpCnTe HOrAMN IpykAmN, YTO6bI paccla6ntbMbIuBc. He npekpaauTe TpeHnpOBky BHe3aHNo. Chaana yMeHBunTe TEMTpeHnpOBKn, YTO6bI nybc onyctncrdo o6bUHoro noka3aTeJra (Cool down). Mbl peKOMeHNdyem B KOHcE TpeHnpOBKn CHOBA BInONHtB KOMJIeKC ynpaxHeHn dna pa3MNKN.
© by Top-Sports Gilles GmbH
D-42551 Velbert (Germany)
Service:
Tel.: +49 (0)2051/6067-0
