CA703W - Dehumidifier Clean Air Optima - Free user manual and instructions
Find the device manual for free CA703W Clean Air Optima in PDF.
User questions about CA703W Clean Air Optima
0 question about this device. Answer the ones you know or ask your own.
Ask a new question about this device
Download the instructions for your Dehumidifier in PDF format for free! Find your manual CA703W - Clean Air Optima and take your electronic device back in hand. On this page are published all the documents necessary for the use of your device. CA703W by Clean Air Optima.
USER MANUAL CA703W Clean Air Optima
Clean Air Optima Dehumidifier CA-703B/ CA-703W
(EN) User manual
natural_image
Two white and black electronic appliances with digital display screens, no visible text or symbols on the devices themselves.Read these instructions carefully before you start using the Dehumidifier and keep the manual for future reference.
Clean Air Optima®
CA-703B/ CA-703W / Main unit

text_image
Diagram of a multi-section industrial machine with numbered components, likely illustrating a manufacturing or processing process.
text_image
2.00 8.0 7. 8.English
Thank you for purchasing the Clean Air Optima Dehumidifier CA-703B/ CA-703W.
We wish you many years of healthy indoor air with this efficient and effective product.
Ensure that all safety precautions are followed when using this electrical appliance for the proper operation of the device. These instructions describe the safety precautions to be observed during operation. They are meant to prevent injuries and to avoid damaging the device.
Description of the appliance
The appliance consists of the following main components:
- Handle
- Air inlet
- Air outlet
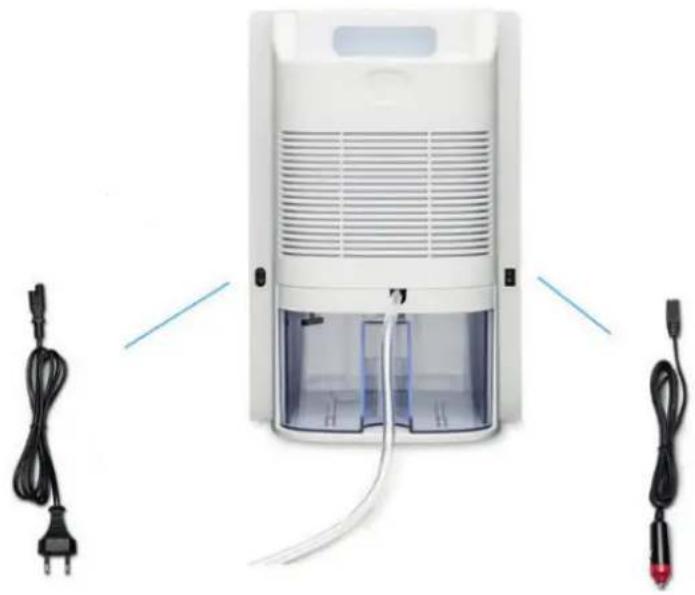
- Power interface
- Continuous drainage (water drain, hose connection). Drain hose 1,5 meter included
- Water tank
- Control panel
- Air outlet
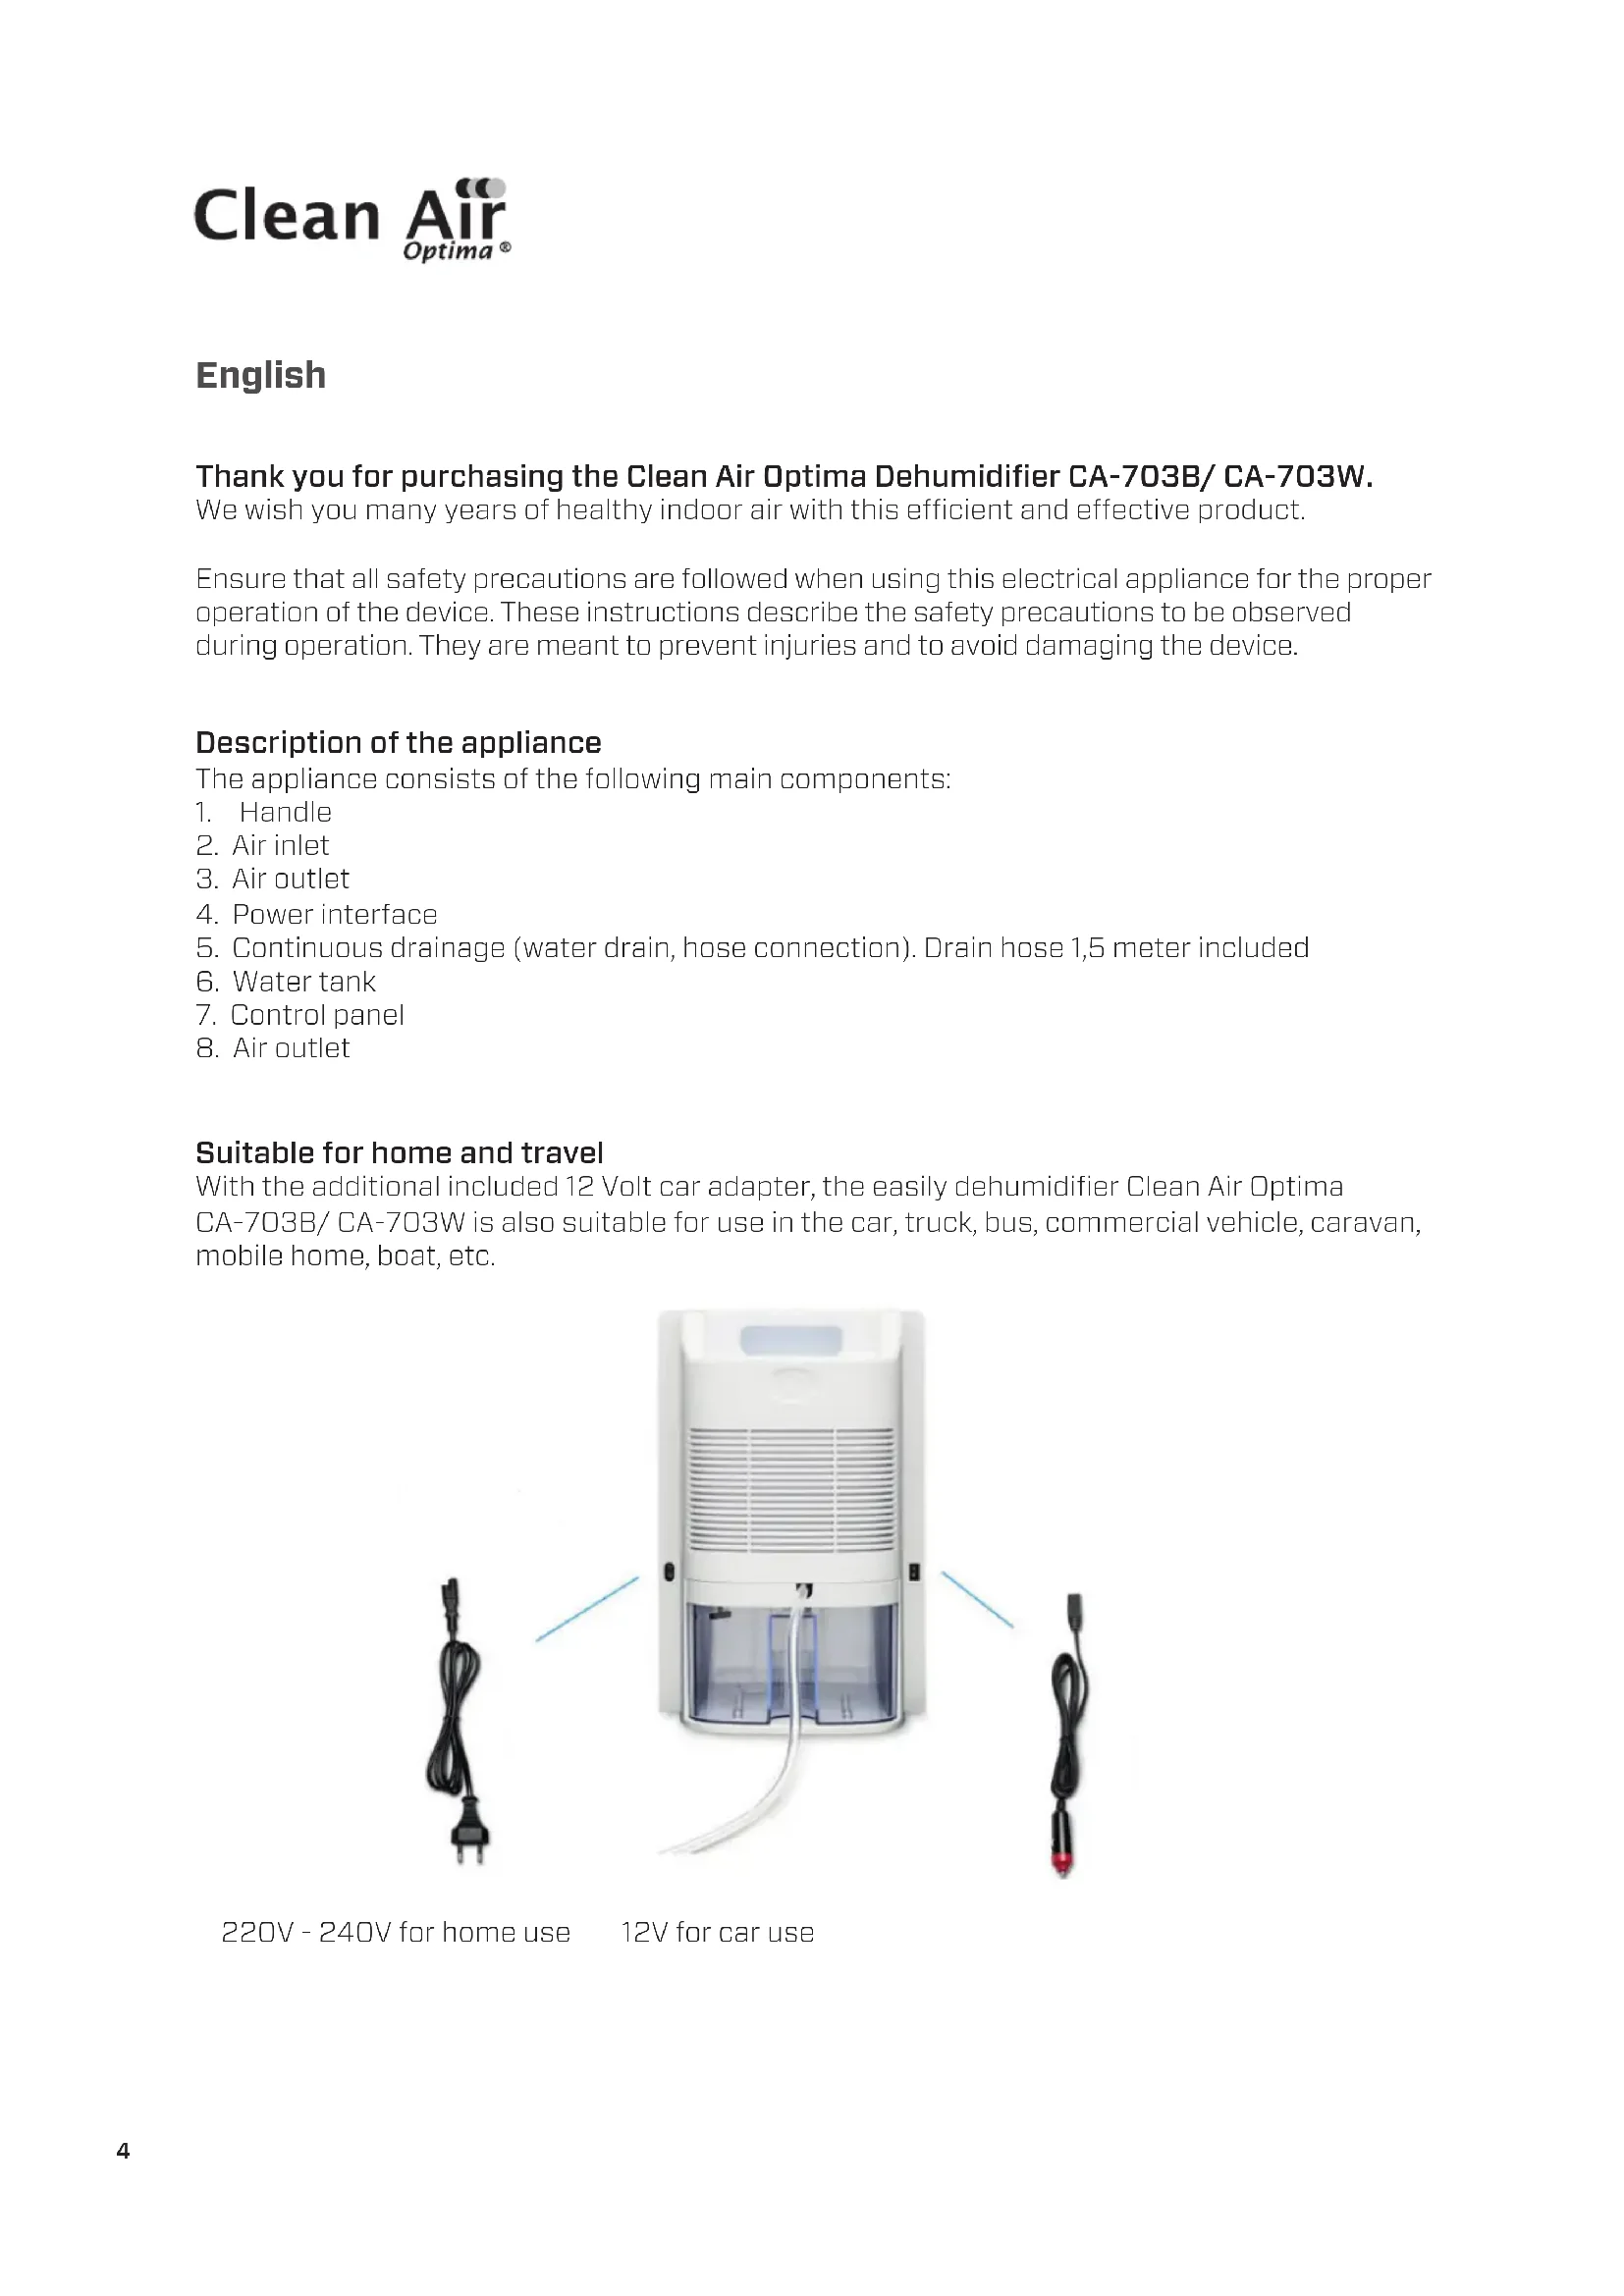
Suitable for home and travel
With the additional included 12 Volt car adapter, the easily dehumidifier Clean Air Optima CA-703B/CA-703W is also suitable for use in the car, truck, bus, commercial vehicle, caravan, mobile home, boat, etc.
natural_image
White portable air purifier with open lid and side cables, shown alongside two black cable connectors (no text or symbols visible)220V - 240V for home use 12V for car use
Safety warnings
This device may only be used in accordance with this safety instructions. Take the following steps to minimize the risk of personal injury caused by for example electric shocks or fire.
- Only for indoor use. Do not use or store outdoors.
- This device can be used by children aged from 8 years and above and persons with reduced physical, sensory or mental capabilities or lack of experience and knowledge if they have been given supervision or instruction concerning use of the device in a safe way and understand the hazards involved. Children shall not play with the device. Cleaning and user maintenance shall not be made by children without supervision.
- Use proper voltage: AC 220V - 240V, 50/60Hz.
- Do not use the device when there is visible damage on the electrical cord or on the device itself. Do not repair the device yourself in case of damage. Never pull the device by its cord. If the power cord is damaged, then it must be replaced by an authorized service person to prevent electric shock or fire.
- Repairs may only performed by authorized service personal. Do not try to repair the device yourself to prevent electric shock or fire.
- Always switch off the device before disconnecting the plug.
- Always remove the plug from the cord when the device is not being used.
- Pull the plug when you do not use the device or when you clean internal or external parts of it.
- For safety use put the device in a steady, horizontal position. Do not move while using.
- Do not use the device in rooms where inflammable liquids, gases are stored or close to heat sources or heat-generating devices.
- Never insert any other object into the body to avoid breakdown.
- Never cover the air inlet and air outlet grid.
- Never dissemble or replace the device's inner parts.
- Use and store the device not under 5°C or above 50°C.
- Do not tip the unit to any side when the water tank is full.
- Do not put heavy objects on the unit.
- Please avoid places with direct sunlight. There is a risk that the device discolors.
- Never immerse the unit in water or other liquids.
- Empty the water tank regularly. In extreme conditions the water tank may be full after a few hours operation.
- Use, maintain and clean the device as described in this manual.
How to use

Power
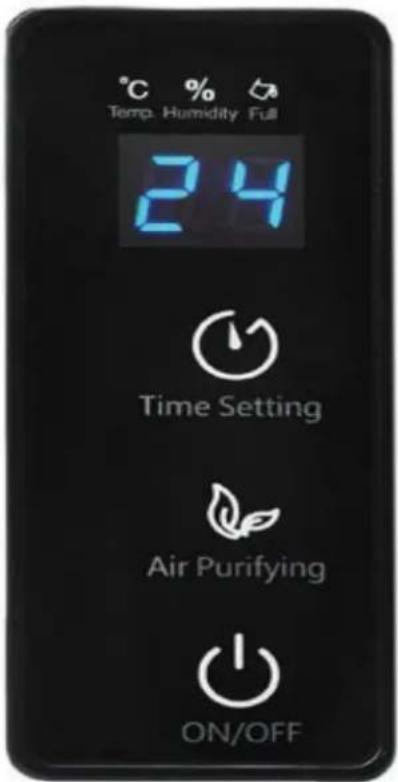
Press the "POWER" button, the button lights lue, the device starts to dehumidify.
Press the "POWER" button again, the device turns off. All indicator lights go out. The fan will stop 10 seconds later. The UV light will always be on when you activate the power button.
The evaporator in the dehumidifier may defrost automatically if it is operated with a room temperature less than 18 °C.
- During the defrosting operation, the dehumidification function and air purification function may intermit.
- Don't turn of the power or pull out the power plug of the device during the defrosting operation.

Purify Indicator Light
en the device is working, the air purify action (lonizer) starts to work when push this button. The indicator light will t up.

Timer
ss the "TIMER" button to set 0-24 hours ing. Press the button one time, the timer increase with one hour.
When the device is operating, the timer that is set indicates when the device switches off.

Temperature Light
light shows the indoor temperature. This light shows the temperature both in the device is in operation and in standby mode.

Dehumidify Indicator Light
light shows the indoor humidity. This light vs the humidity level both when the device operation and in standby mode.

Water Tank Full Indicator Light
When water tank is full, the device will automatically stop. This light turns on and s up red.
Drain the water tank, and return the water tank to the body of the device, the water tank full indicator light will turn off. The device will work automatically again.
text_image
Temp. Humidity Full 24 Time Setting Air Purifying ON/OFFWater Drainage
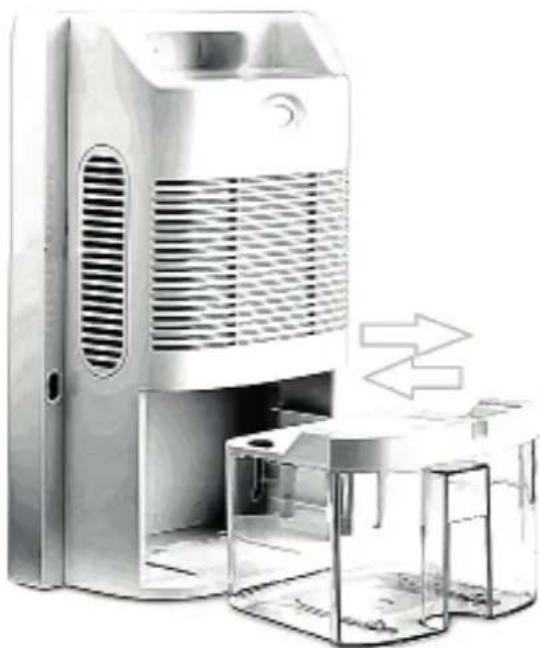
Water tank:
The Water tank full indicator light will lights up red when the water tank is full, a warning will be given.
Take out the water tank(FIG 1), then empty the water inside. Then put the water tank back into the dehumidifier correctly.
natural_image
Exterior view of a modern office building (no signage)
natural_image
Simple line drawing of a container with liquid drops falling (no text or symbols)(Fig 1)
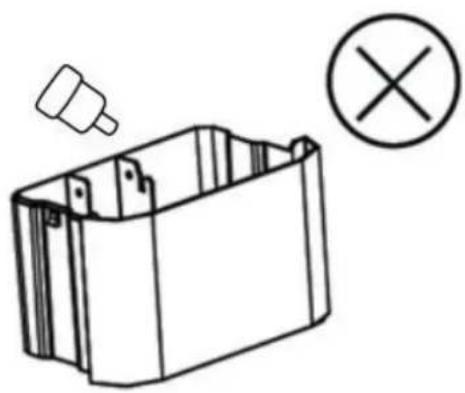
Please do not move the float out of the water tank, or the sensor will not detect the water tank whether it is full or not (FIG 2).
natural_image
Simple line drawing of a battery pack with a plastic bottle and a cross symbol (no text or labels)(Fig 2)
Clean Air Optima®
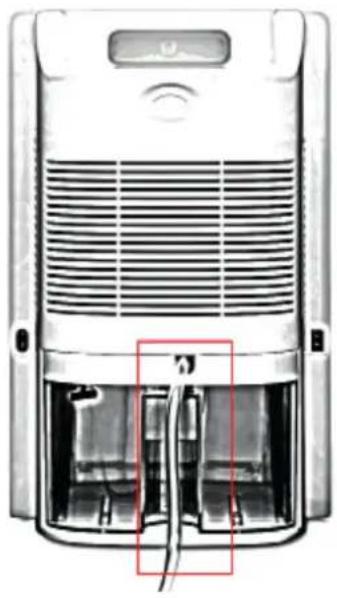
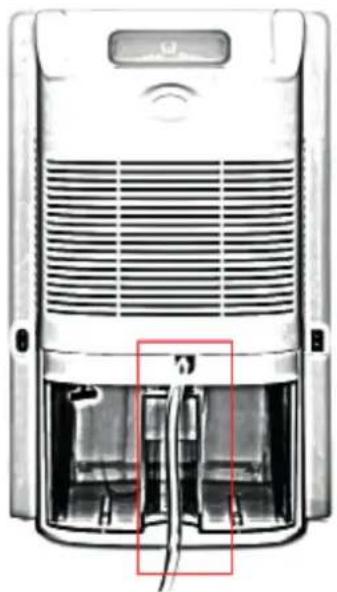
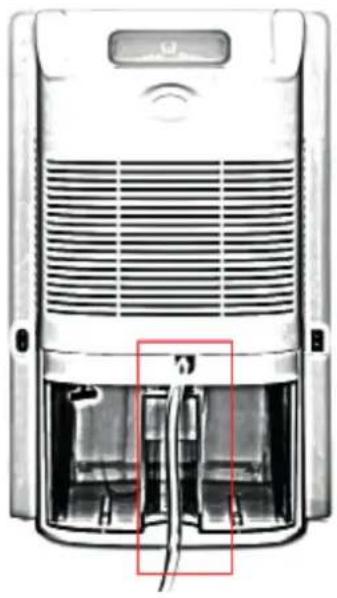
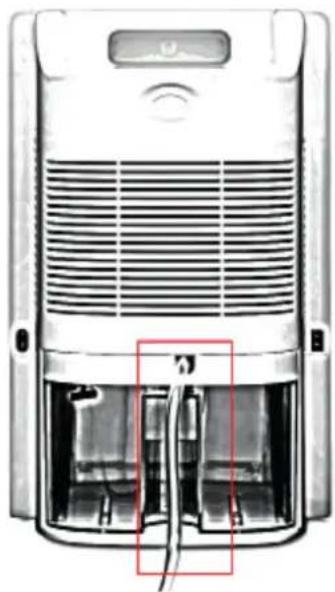
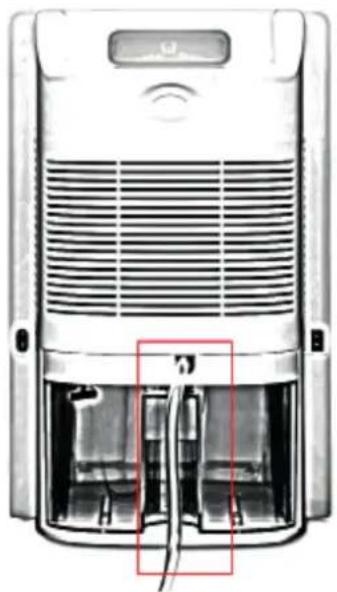
Continuous Drainage

natural_image
Interior view of a modern electric air purifier with ventilation grilles and exposed wiring (no text or symbols visible)Connect the hose to the drainage hole.
Installation
When the device is working, make sure that the left distance is 20 cm away from walls and furniture, see picture below.

text_image
20cmMaintenance
NOTE: TURN OFF THE DEVICE AND UNPLUG IT BEFORE ANY MAINTENANCE OR REPAIR TO AVOID ELECTRIC SHOCKS.
Cleaning
Before cleaning the device, unplug the power cord.
Clean the housing with a soft moisture cloth. Do not use chemical solvent (such as benzene, alcohol, gasoline). The surface may be damaged or even the whole case may be deformed.
Do not sprinkle water on the device.
The permanent photocatalytic filter is located on either side of the device.
The photocatalytic filter should be cleaned by gentle brushing once a week
Dehumidifier storage
If the dehumidifier will not be used for an extended period of time:
- Drain the water tank completely and make sure that there is no more water stocked inside.
2 Unplug the device and fold up the power supply cord.
- Store the dehumidifier in a cool, dry location, away from direct sunlight, extreme temperature and excessive dust.
Troubleshooting
The following is a troubling shooting guide to help you solve any issues that you may have using the Clean Air Optima Dehumidifier CA-703B/ CA-703W.
| Problem Possible Cause Solution | ||
| Device does not switch onInefficiency dehumidification | The power cord does not connect correctlyThe water tank is full or water tank is not in the correct positionThe environment temperature is below 5°C or above 50°CThe air inlet and outlet have a blockage | Connect the power plug and power socket correctlyDrain the water tank and replace the water tank to the correct positionThe device can not work in such temperatureClean the blockage from the air inlet and outlet |
| Noise The device is installed askew Make sure the machine | is installed uprightly | |
WARNING!
If the above recommended solutions do not work, please contact Clean Air Optima technical support at the telephone number for your region. Do not attempt to disassemble, reassemble, or repair the device as this may void the warranty.
Specifications
Model CA-703B/ CA-703W
For rooms up to 10m² / 25m³ / 112ft²
Rated voltage 220V - 240V, 50/60Hz
Rated power 65W
Fan capacity 80 m³/h
Capacity 700ml/Day (30°C RH 80%)
Water tank 2L
Sound level <38 dB(A)
Equipped with Ionizer and UV-Lamp
Dimensions 240 x 140 x 360mm
Weight 2.16kg
Colour White or black
Complies with
EU regulations CE / WEEE / RoHS
Ask your retailer or your municipality for updated information regarding the disposal of the packaging and of the device.
natural_image
Symbol of a trash bin crossed with two crossed lines, no text or labels presentClean Air Optima®
Service
Warranty Certificate for the Clean Air Optima Dehumidifier CA-703B/CA-703W.
Date of purchase: ....
Customers name: ....
Address:
Telephone: ....
Email:
Seller's name: ....
Address:
- Please fill in completely this Warranty Certificate. Send it with the invoice and the unit, postage pre-paid and using the original packing box, to your distributor. Make sure to include the appropriate return postage for the package.
- Please enclose a short description of the damage, fault or malfunction, and the circumstances under which these problems arose.
The Clean Air Optima Dehumidifier CA-703B/ CA-703W is subjected to strict testing procedures before leaving the factory. If within two years from the date of purchase the product does not perform according to the specifications, because of factory defects, the purchaser is entitled to free repairs or replacement of parts upon presentation of this warranty (provided that the malfunction or damage to the device and/or parts occurred under normal operating conditions). What is covered: All parts defective in material and workmanship. For how long: two years from purchase date. What we will do: Repair or replace any defective parts.
Other Conditions
The provisions of this warranty are in lieu of any other written warranty whether express or implied, written or oral, including any warranty of merchantability or fitness for a particular purpose. The manufacturer's maximum liability shall not exceed the actual purchase price paid by you for the product. In no event shall the manufacturer be liable for special, incidental, consequential, or indirect damages. This warranty does not cover a defect that has resulted from improper or unreasonable use or maintenance, faulty assembly, accident, natural catastrophes, improper packing, or unauthorized tampering, alteration, or modification as determined solely by us. This warranty is void if the label bearing the serial number has been removed or defaced.
Thank you for reading!

Share your feedback about the Clean Air Optima Dehumidifier CA-703B/ CA-703W on: www.cleanairoptima.com

For frequently asked questions about the CA-703B/CA-703W go to: www.cleanairoptima.com and search for the CA-703B/CA-703W.

Download PDF instruction manual on: www.cleanairoptima.com/info/manuals

Watch all Clean Air Optima Product animation video's on: www.youtube.com
Clean Air Optima International B.V. | David Ricardostraat 9-7 / 9-9 | 7559 SH Hengelo (ov) The Netherlands | Phone: +31 (0) 74 - 2670145
Clean Air Optima Germany GmbH | Enschedestraße 14 | 48529 Nordhorn | Germany Phone: +49 (0) 5921 879-121
E-mail: info@cleanairoptima.com
Internet: www.cleanairoptima.com
Clean Air Optima®
CA-703B/ CA-703W/ Hauptgerät

text_image
Diagram of a multi-section industrial machine with numbered components, likely illustrating a manufacturing or processing process.
text_image
2.00 8.0 7. 8.Deutsch
natural_image
White portable air purifier with open lid and side cables, shown alongside two black cable connectors (no text or symbols visible)natural_image
Exterior view of a modern office building (no signage)
natural_image
Simple line drawing of a container with liquid drops falling (no text or symbols)(Abb. 1)
natural_image
Simple line drawing of a battery pack with a plastic bottle and a cross symbol (no text or labels)(Abb. 2)
Clean Air Optima®
natural_image
Interior view of a modern electric air purifier with ventilation grilles and exposed wiring (no text or symbols visible)text_image
Diagram of a multi-section industrial machine with numbered components for identification
text_image
2.00 8.0 7. 8.Nederlands
natural_image
Exterior view of a white portable air purifier with attached cables and power cord connectors (no text or symbols visible)natural_image
Exterior view of a modern office building (no signage)
natural_image
Simple line drawing of a container with liquid drops falling (no text or symbols)(Afb. 1)
natural_image
Simple line drawing of a battery pack with a plastic bottle and a cross symbol (no text or labels)(Afb. 2)
Clean Air Optima®
Doorlopende afvoer
natural_image
Interior view of a white electric heater with visible ventilation grilles and internal components (no text or symbols)natural_image
Symbol of a trash bin with crossed lines indicating no waste or restriction, accompanied by a solid black rectangle below (no text or labels)Service
text_image
Diagram of a multi-section industrial machine with numbered components for identification
text_image
2.00 8.0 7. 8.Français
natural_image
Exterior view of a white portable air purifier with attached cables and two separate cable connectors (no text or symbols visible)text_image
Temp. Humidity Full 24 Time Setting Air Purifying ON/OFF
Minuterie
natural_image
Exterior view of a modern electric air purifier with cooling unit and side panel (no text or symbols visible)
natural_image
Simple line drawing of a container with liquid drops falling (no text or symbols)(Fig 1)
natural_image
Simple line drawing of a battery pack with a plastic bottle and a cross symbol (no text or labels)(Fig 2)
Clean Air Optima®
Vidange en continu

natural_image
Interior view of a modern electric air purifier with ventilation grilles and exposed circuit breakers (no text or symbols visible)natural_image
Symbol of a trash bin with crossed lines indicating no waste or discharge, and a solid black rectangle below (no text or labels)Service après-vente
text_image
Diagram of a multi-section industrial machine with numbered components for identification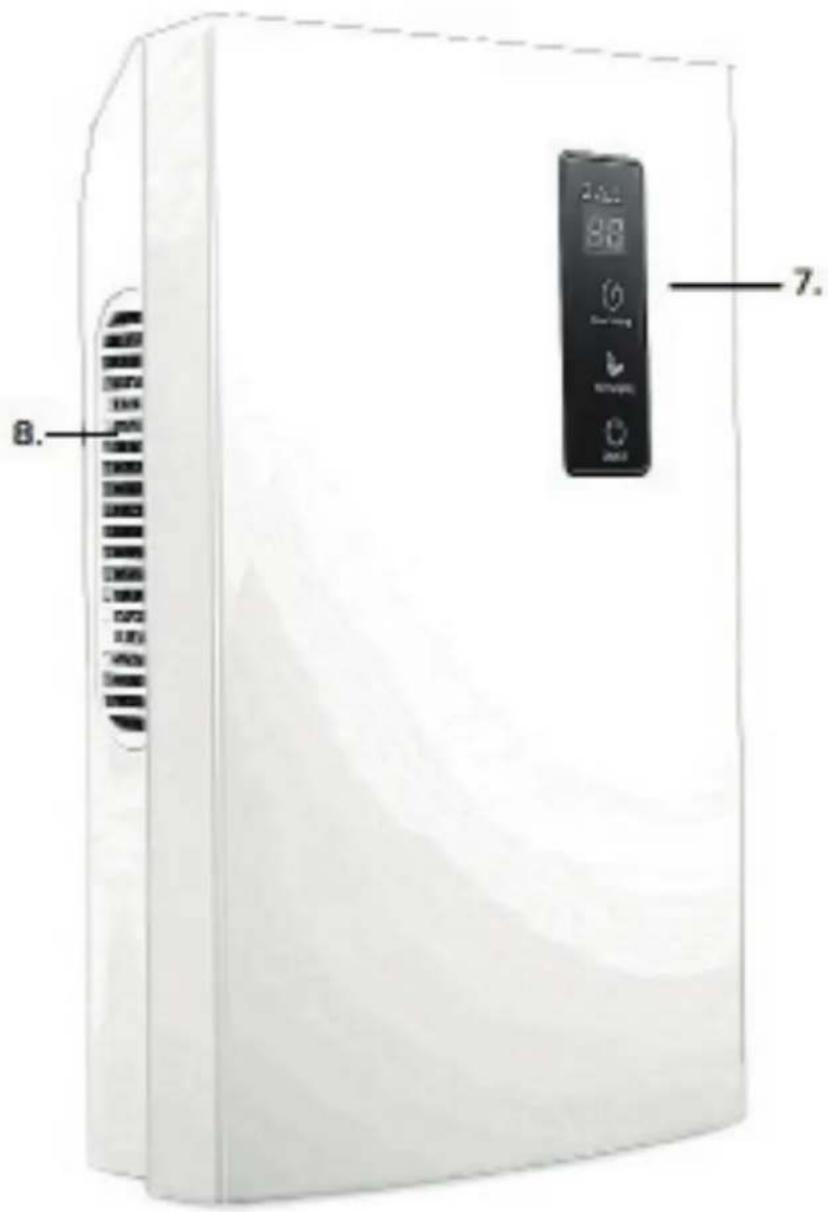
text_image
2.00 8.0 7. 8.Español
Le agradecemos la compra del humidificador Clean Air Optima CA-703B/ CA-703W.
natural_image
White portable air purifier with blue vent, connected to two black cables (no text or symbols visible)natural_image
Exterior view of a modern office building (no signage)
natural_image
Simple line drawing of a container with liquid drops falling (no text or symbols)(Fig 1)
natural_image
Simple line drawing of a battery pack with a plastic bottle and a cross symbol (no text or labels)(Fig 2)
Clean Air Optima®
Vaciado continuo

natural_image
Interior view of a modern electric air purifier with ventilation grilles and exposed wiring (no text or symbols visible)natural_image
Symbol of a trash bin crossed with a diagonal line, no text or numbers presentClean Air Optima®
Servicio
text_image
Diagram of a multi-section industrial machine with numbered components for identification
text_image
2.00 8.0 7. 8.Italiani
natural_image
Exterior view of a white portable air purifier with attached cables and two terminal connectors (no text or symbols visible)natural_image
Exterior view of a modern air purifier with ventilation grilles and a side table (no text or symbols visible)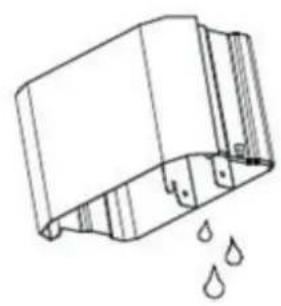
natural_image
Simple line drawing of a container with liquid drops falling (no text or symbols)(Fig. 1)
natural_image
Simple line drawing of a container with a plastic clip and a cross symbol (no text or labels)(Fig. 2)
Clean Air Optima®
Scarico continuo
natural_image
Interior view of a modern electric air purifier with ventilation grilles and exposed wiring (no text or symbols visible)natural_image
Symbol of a trash bin with crossed lines indicating no waste, and a solid black rectangle below (no text or labels)Assistenza
text_image
Diagram of a multi-section industrial machine with numbered components for identification
text_image
2.4V 8V 7. 8.Polski
natural_image
Exterior view of a white portable air purifier with attached cables and two separate cable connectors (no text or symbols visible)text_image
Temp. Humidity Full 24 Time Setting Air Purifying ON/OFF
Kontrolka temperatury
natural_image
Exterior view of a modern office building (no signage)
natural_image
Simple line drawing of a container with liquid drops falling (no text or symbols)(Rys. 1)
natural_image
Simple line drawing of a battery pack with a plastic bottle and a cross symbol (no text or labels)(Rys. 2)
Clean Air Optima®
natural_image
Interior view of a modern electric air purifier with ventilation grilles and exposed wiring (no text or symbols visible)natural_image
Symbol of a trash bin with crossed lines indicating no waste, and a solid black rectangle below (no text or labels)Obstuga serwisowa
text_image
Diagram of a multi-section industrial machine with numbered components for identification
text_image
2.4V 8V 7. 8.Čeština
natural_image
Exterior view of a white portable air purifier with attached cables and two terminal connectors (no text or symbols visible)text_image
Temp. Humidity Full 24 Time Setting Air Purifying ON/OFF
Kontrolka teploty
natural_image
Exterior view of a modern office building (no signage)
natural_image
Simple line drawing of a container with liquid drops falling (no text or symbols)(Obr. 1)
natural_image
Simple line drawing of a battery pack with a plastic bottle and a cross symbol (no text or labels)(Obr. 2)
Clean Air Optima®
natural_image
Interior view of a portable air purifier with ventilation grilles and control panel (no text or symbols visible)natural_image
Symbol of a trash bin crossed with no text or numbers, representing waste sorting or disposal (no text present)Clean Air Optima®
Servis
Záruční list pro odvlhčovač Clean Air Optima Dehumidifier CA-703B/ CA-703W.
text_image
Diagram of a multi-section industrial machine with numbered components for identification
text_image
2.4V 8V 7. 8.Română
natural_image
White portable air purifier with attached circuit board and two separate cables (no text or symbols visible)text_image
Temp. Humidity Full 24 Time Setting Air Purifying ON/OFFGolirea de apă
Rezervorul de apă:
natural_image
Exterior view of a modern office building (no signage)
natural_image
Simple line drawing of a container with liquid drops falling (no text or symbols)(Fig 1)
natural_image
Simple line drawing of a battery pack with a plastic bottle and a cross symbol (no text or labels)(Fig 2)
Clean Air Optima®
Golire continuă
natural_image
Top-down view of a white electric heater with ventilation grilles and internal wiring (no text or symbols visible)natural_image
Symbol of a trash bin with crossed lines indicating no waste or restriction, accompanied by a solid black rectangle below (no text or labels)Service
Certificat de garantie pentru Dezumidificatorul Clean Air Optima CA-703B/ CA-703W.
text_image
Diagram of a multi-section industrial machine with numbered components for identification
text_image
2.4V 8V 7. 8.Lietuvių kalba.
natural_image
Exterior view of a white portable air purifier with attached cables and two black/red connectors (no text or symbols visible)text_image
Temp. Humidity Full 24 Time Setting Air Purifying ON/OFF
natural_image
Exterior view of a modern electric air purifier with cooling unit and side panel (no text or symbols visible)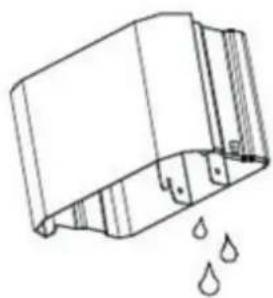
natural_image
Simple line drawing of a container with liquid drops falling (no text or symbols)(1 pav.)
natural_image
Simple line drawing of a battery pack with a plastic bottle and a cross symbol (no text or labels)(2 pav.)
Clean Air Optima®
Nuolatinis vandens nuleidimas

natural_image
Interior view of a modern electric air purifier with ventilation grilles and exposed wiring (no text or symbols visible)text_image
Diagram of a multi-section industrial machine with numbered components, likely illustrating a manufacturing or processing process.
text_image
2.4V 8V 7. 8.Eesti keel
Täname teid öhukuivati Clean Air Optima Dehumidifier CA-703B/ CA-703W ostmise eest.
natural_image
White portable air purifier with blue vent, connected to two black and red cables (no text or symbols visible)natural_image
Exterior view of a modern office building (no signage)
natural_image
Simple line drawing of a container with liquid drops falling (no text or symbols)(Joon. 1)
natural_image
Simple line drawing of a battery pack with a plastic bottle and a cross symbol (no text or labels)(Joon. 2)
Clean Air Optima®
Pidev väljalase

natural_image
Interior view of a modern electric air purifier with ventilation grilles and exposed wiring (no text or symbols visible)natural_image
Symbol of a trash bin with crossed lines indicating no waste, and a solid black rectangle below (no text or labels)Remont
Garantiitõend õhukuivatile Clean Air Optima Dehumidifier CA-703B/ CA-703W.
text_image
Diagram of a multi-section industrial machine with numbered components for identification
text_image
2.4V 8V 7. 8.Latviski
natural_image
White portable air purifier with attached circuit board and two black and red cables shown on the side (no text or symbols visible)text_image
Temp. Humidity Full 24 Time Setting Air Purifying ON/OFF
natural_image
Exterior view of a modern office building (no signage)
natural_image
Simple line drawing of a container with liquid drops falling (no text or symbols)(1. att.)
natural_image
Simple line drawing of a battery pack with a plastic bottle and a cross symbol (no text or labels)(2. att.)
Clean Air Optima®
natural_image
Interior view of a portable air purifier with ventilation grilles and internal components (no text or symbols visible)Pievienojiet noteces atverei šlūteni.
Uzstādīšana
natural_image
Symbol of a trash bin crossed with no visible text or labelsClean Air Optima®
Serviss
E-pasts: info@cleanairoptima.com
Timekla vietne: www.cleanairoptima.com
Clean Air Optima®
text_image
Diagram of a device with numbered parts, likely illustrating a mechanical or electronic assembly.
text_image
2.4V 8V 7. 8.Русский
natural_image
White portable air purifier with attached circuit board and two separate cables (no text or symbols visible)text_image
Temp. Humidity Full 24 Time Setting Air Purifying ON/OFFСлив воды
Резервуар для воды:
natural_image
Exterior view of a modern office building (no signage)
natural_image
Simple line drawing of a container with liquid drops falling (no text or symbols)(Рисунок 1)
natural_image
Simple line drawing of a battery pack with a plastic bottle and a cross symbol (no text or labels)(Рисунок 2)
Clean Air Optima®
Непрерывный слив
natural_image
Interior view of a modern electric heater with visible cooling fins and ventilation slots (no text or symbols)text_image
Diagram of a multi-section industrial machine with numbered components for identification
text_image
2.00 8.00 7. 8.Македонски
natural_image
White portable air purifier with open lid and side cables, shown alongside two black and red connectors (no text or symbols visible)natural_image
Exterior view of a modern stainless steel air purifier with ventilation grilles and a small glass base (no text or symbols visible)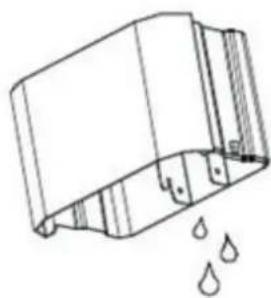
natural_image
Simple line drawing of a container with liquid drops falling (no text or symbols)(Слика 1)
natural_image
Simple line drawing of a plastic container with a droplet and a cross symbol (no text or labels)(Слика 2)
Clean Air Optima®
Постојано празнење