
CS200 - Detector VELLEMAN - Free user manual and instructions
Find the device manual for free CS200 VELLEMAN in PDF.
| Product Type | Metal Detector |
| Brand | Velleman |
| Model | CS200 |
| Power Supply | 2 x 9V alkaline batteries (not included) |
| Operating Frequency | 6,6 kHz |
| Detection Head Diameter | 20 cm |
| Sensitivity Adjustment Range | 15 cm (maximum estimated detection depth for a coin) |
| Operating Temperature | 0 °C to 40 °C |
| Storage Temperature | -20 °C to 60 °C |
| Maximum Humidity | 90 % |
| Approximate Weight | 1,2 kg (with batteries) |
| Rod Length | Adjustable (approximately 80 to 120 cm) |
| Display | LCD with metal type, depth, sensitivity, and battery status indicator |
| Detection Modes | All Metal, Discrimination (DISC), Notch |
| Audio Discrimination | 3 different tones depending on metal |
| Headphone Output | 3,5 mm jack (headphones not included) |
| Detection Head | Waterproof (can be used underwater) |
| Warranty | 24 months (conditions in manual) |
| Cleaning and Maintenance | Damp cloth, no harsh solvents |
| Recommended Accessories | 9V alkaline batteries, headphones |
Frequently Asked Questions - CS200 VELLEMAN
User questions about CS200 VELLEMAN
0 question about this device. Answer the ones you know or ask your own.
Ask a new question about this device
Download the instructions for your Detector in PDF format for free! Find your manual CS200 - VELLEMAN and take your electronic device back in hand. On this page are published all the documents necessary for the use of your device. CS200 by VELLEMAN.
USER MANUAL CS200 VELLEMAN
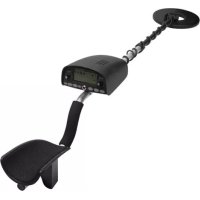
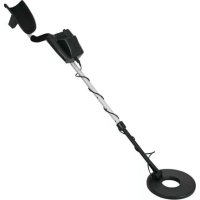
natural_image
Black metal detector device with attached circular dial and digital display (no visible text or symbols)USER MANUAL 3
GEBRUIKERSHANDLEIDING 8
MODE D'EMPLOI 14
MANUAL DEL USUARIO 20
To all residents of the European Union
Important environmental information about this product
This symbol on the device or the package indicates that disposal of the device after its lifecycle could harm the environment. Do not dispose of the unit (or batteries) as unsorted municipal waste; it should be taken to a specialized company for recycling. This device should be returned to your distributor or to a local recycling service. Respect the local environmental rules.
If in doubt, contact your local waste disposal authorities.
Thank you for choosing Velleman! Please read the manual thoroughly before bringing this device into service. If the device was damaged in transit, do not install or use it and contact your dealer. With your CS200 metal detector, you can search for coins, relics, jewellery, gold, and silver just about everywhere.
The detector is easy to use. Its features include:
LCD Display: indicates the probable type of metal with an arrow, the depth of the target, DISC/NOTCH range, the level of sensitivity, the operating mode, and low battery indication.
Three Tone Audio Discrimination: sounds distinctive tones for different types of metals.
Notch: ignores junk metal and finds valuable items by setting the disc and notch range.
Headphone Jack: lets you connect headphones (not supplied) and operate without trouble
Waterproof Search Coil: use the detector even if you must put it under water.
Note:
Your metal detector requires two 9-volt alkaline batteries (not supplied).
2. General Guidelines
Refer to the Velleman® Service and Quality Warranty on the last pages of this manual.
3. Preparation
3.1 Assembling the detector
Refer to the illustrations on page 2 of this manual.
| 1 | search coil |
| 2 | search coil fixation system |
| 3 | stem |
| 4 | lock nut |
| 5 | cable |
| 6 | control housing |
| 7 | arm support |
Assembling your detector is easy and requires no special tools. Just follow these steps:
- Remove the fixation system of the search coil (nut and bolt system). Insert the stem and align the holes on the search coil bracket and the stem. Push the bolt through the holes and tighten with the nut knob.
CAUTION: Do not tighten the search coil fixation too hard. Do not use tools such as pliers to tighten it.
-
Insert the arm support into the end of the stem and tighten the lock screw at the back of the control housing.
-
Turn the stem's lock nut clockwise until it loosens.
-
Adjust the stem length to have the search coil level with and about 12 to 2 inches above the ground when you stand upright with the detector in your hand, your arm relaxed at your side.
-
Turn the stem's lock nut counter-clockwise to lock it in place.
-
Wind the search coil cable around the stem. Leave enough slack in the cable. Insert the search coil's plug into the search coil jack on the detector's control housing.
CAUTION: The search coil's plug fits into the jack only one way. Do not force the plug or you could damage it.
- Loosen the search coil fixation knob, adjust the search coil to the desired angle and tighten the nut knob.
CS200
3.2 Installing the batteries
- Make sure the POWER switch is turned off.
- At the back of the control housing, slide the battery covers off away from the middle.
- Place a 9V battery in each battery compartment matching the polarity symbols (+ and -) marked inside.
- Slide the battery covers back on.
About batteries
• Use only fresh alkaline batteries of required size & voltage
- Do not mix old and new batteries or different types of batteries
- If you do not plan to use the device for a week or longer, remove the batteries. Batteries can leak chemicals that can destroy electronic parts.
• To extend battery life, switch the left and right battery after 3-4 hours of operation.
- Dispose of old batteries promptly and properly. Never bury or burn them.
4. Functions and Indications
4.1 Display
Refer to the illustrations on page 2 of this manual.
| 1 | metal icons |
| 2 | sensitivity level |
| 3 | low-battery indicator |
| 4 | operation mode indicators |
| 5 | target indicators |
| 6 | disc/notch range |
| 7 | depth indicator |
| 8 | sensitivity or disc/notch control indication |
The target indicator consists of an LCD display and target icons. When the detector locates an object, an arrow appears below the target icon of the type of material that is probably being detected. The depth of the target is also displayed.
- If the detector receives a strong signal, the arrow appears steadily. If the signal is weak, the arrow blinks or does not appear.
• If detecting ceases for about 5 seconds, the arrow will disappear. - The target icons are only visual references to help you decide whether or not an item is worth investigating.
GOLD RANGE:
- Iron/foil (screw icon): indicates that the target is probably iron or foil. Some oxidized iron might actually register somewhere within the SILVER range.
- Nickel (5¢ icon): indicated that the target is probably a nickel coin.
- Pull-tab (pull-tab icon): indicated that the target is probably a pull-tab from an aluminium can. Some rough gold items might register within the pull-tab category.
- S-CAPS: indicates that the target is probably a type of metal like a bottle cap with whorl. Some small gold items might register within this category.
- Zinc/copper (1¢ icon): indicated that the target might be a zinc or copper coin. Some larger gold items might register within the 1¢ category.
SILVER RANGE (1¢/25¢ icon):
Indicates that the object is probably a silver coin. Some large aluminium objects might register within the 25¢/1¢ category.
4.2 Tones
If the detector is set to the ALL METAL mode, it sounds a single tone when it detects any type of metal. If you set the detector to the DISC or NOTCH modes, the built-in audio identification system sounds a unique audio tone for each of the three categories of metal. This makes it easier to identify the metal being detected.
• The detector sounds a low tone when it detects small gold objects, a nail, a bottle cap or nickel.
- The medium tone is for aluminium pull-tabs, zinc or copper items. Depending on the alloys used to make them, about 15 percent of gold rings cause the detector to sound a medium tone.
• A high tone is for brass or silver items. Highly oxidized iron may generate a medium or high tone.
CS200
5. Operation
Refer to the illustrations on page 2 of this manual.
| 1 | volume knob |
| 2 | function panel |
| 3 | operation mode buttons |
| 4 | regulation mode buttons |
| 5 | regulation buttons: 'Up' and 'Dn'(down) |
| 6 | power switch |
| 7 | headphones jack |
5.1 Turning on the detector
First turn the volume knob (1) to 12 o'clock (halfway between min and max).
Slide the power switch (6) to ON. All symbols are displayed on the LCD screen. The detector sounds a high, medium and low tone respectively.
After about 2 seconds, the detector automatically goes ALL METAL mode, with the regulation buttons (5) available for the sensitivity (SENS) adjustment. The standard value of SENS is 5.
5.2 Setting the operating mode
The detector has three operating modes: ALL METAL, DISC and NOTCH. You can select the desired mode by pressing the corresponding key (3) at the left of the function panel. Whatever the mode, upon detecting something, the detector will always sound a tone and indicate the probable type of metal by means of an arrow underneath the icons, and also indicate the depth of the object.
- ALL METAL: used for detecting any type of metal. In this mode, only the SENS value can be adjusted.
- DISC: used for target discrimination. You can set the target range by pressing the DISC/NOTCH regulation mode button (4) and then the UP or DOWN button (5). The detector can detect the metal type indicated on the display. All other metal types are rejected. For example, if you set the DISC level 4 segments from MAX to MIN, the detector can detect S-CAPS, 1¢ or 25¢ whilst other types of metal are rejected. The detection range can only be extended from silver towards gold.
- NOTCH: used to detect purer types of silver or gold. When you press the NOTCH operation mode button (3), the detector will only detect purer silver and gold objects, discarding most alloys. Pressing the DISC/NOTCH button and then the Up button will result in less pure objects being detected. This mode works from the 'pure' metals on both sides towards the middle.
5.3 Testing and using the detector
To learn how the detector reacts to different metals, you should test it before you use it the first time. You can test the detector indoors and outdoors.
INDOOR testing and use
NOTE: Never test the detector on a floor inside a building. Most buildings have metal of some kind in the floor, which might interfere with the objects you are testing, or mask the signal completely.
- Slide the POWER switch to ON.
- Select the operating mode.
- Place the detector on a wooden or plastic table, and remove any watches, rings or metal jewellery you are wearing.
-
Adjust the search coil so the flat part points towards the ceiling.
-
Slowly sweep a sample of the material you want the detector to find (such as a gold ring or a coin) 2-3 inches above the face of the search coil. When the detector detects any metal within the selected range, it sounds a tone and an arrow appears below the target icon. The LCD displays the depth of the target.
NOTE: if you are using a coin, the detector will detect it more easily if you hold it so that a flat side is parallel with the flat side of the search coil. A sweep with the side of the coin over the search coil might cause false indication and unstable display of the arrow.
OUTDOOR testing and use
- Slide the POWER switch to ON.
- Select the operating mode.
- Find an area on the ground outside where there is no metal.
- Place the material you want the detector to find (such as a gold ring or a coin) on the ground. NOTE: If you are using a valuable metal sample such as gold to test the detector, mark the area where you placed the item, to help you retrieve it later. Do not place it in tall grass or weeds.
CS200
- Hold the search coil level to the ground about 1-2 inches above the surface, slowly move the search coil over the area where you placed the sample, sweeping the search coil in a side-to-side motion.
- If the detector detects the item, it sounds a tone, and an arrow and the depth appear on the display below the target icon.
- If the detector does not detect the item, make sure that the target mode is set correctly for the type of metal you are searching for. Also make sure that you're moving the search coil correctly.
5.4 Search coil sweeping hints
- Never sweep the search coil as if it were a pendulum. Raising the search coil while sweeping or at the end of a sweep will cause false readings.
- Sweep slowly. Hurrying will cause you to miss targets.
- It is better you sweep the search coil from side to side in a straight line and keep the search coil parallel with the ground.
- The detector responds with a signal when it detects most valuable metal objects. If a signal does not repeat after you have swept the search coil over the target a few times, the target is probably junk metal.
- False signals can be caused by trashy ground, electrical interference, or large irregular pieces of junk metal.
- False signals are usually broken or non-repeatable.
5.5 Adjusting sensitivity
After you have become familiar with how your detector works, it is important to fine tune the sensitivity to get a good result. Press the touch button SENS on the panel. Then press Up or Dn to increase or decrease the sensitivity. The level on the segment will be displayed form high to low position.
NOTE: in order to detect a target deeply buried, you can adjust the SENS to a high position. But don't set the SENS lever to MAX, because the detector will receive interference and false signal from broadcast antennae and other electronic lines. The detector will have unstable arrow and irregular tone indications.
5.6 Pinpointing a target
Accurately pinpointing a target makes digging it up easier, but it takes practice. We suggest you practise finding sample on your own property before you start searching other locations.
Follow these steps to pinpoint a target:
- When the detector detects a buried target, continue sweeping the search coil over the target in a narrowing side-to-side motion.
- Make a visual note of the exact spot on the ground where the detector beeps.
- Stop the search coil directly over this point on the ground. Then move the search coil straight forward away from you and straight back towards you a couple of times and make another visual note.
- Repeat steps 1-3 at a right angle to the previous search line. Make an "X" mark on the ground. The target will be directly below the "X" at the point of the beep response.
5.7 Factors that affect the detecting
It is difficult to have an accurate detecting result. Sometimes the detecting may be restricted by some factors:
• the angle of the object buried in the soil
• the depth of the target
• the level of oxidization of the target
• the size of the target
• electro-magnetic and electrical interference surrounding the object.
If you detect patiently and correctly and practise several times, you will get satisfactory results.
5.8 Using headphones
- Make sure your headphones have a 3.5mm plug.
- Set the VOLUME knob to zero.
- Insert the headphones' plug into the PHONE jack. The internal speaker will automatically disconnect.
- Set the VOLUME knob to the desired setting. Do not listen at extremely high volume levels, as it may lead to partial or permanent hearing loss.
6. Cleaning and Maintenance
Your CS200 metal detector is an example of superior design and craftsmanship. The following suggestions will help you take care of your metal detector so you can enjoy it for years.
 | Handle the detector gently and carefully. Dropping it can damage circuit boards and cases and can cause the detector to work improperly. |
 | Use the detector only in normal temperature environments. Temperature extremes can shorten the life of electronic devices, or damage the detector's exterior. |
 | Keep the detector away from dust and dirt, which can cause premature wear of parts. |
 | Wipe the detector with a damp cloth occasionally to keep it looking new. Do not use harsh chemicals, cleaning solvents or strong detergents to clean the detector. |
7. Technical Specifications
power supply 2 x 9 V battery (not incl.)
frequency 6.6 kHz
sensitivity 15 cm
sear coil dimensions....Ø 20 cm
operating temperature range 0 °C to 40 °C
storage temperature range -20°C to 60 °C
humidity....90%
Use this device with original accessories only. Velleman Group nv cannot be held responsible in the event of damage or injury resulting from (incorrect) use of this device. For more info concerning this product and the latest version of this manual, please visit our website www.velleman.eu. The information in this manual is subject to change without prior notice.
RED Declaration of Conformity
Hereby, Velleman Group nv declares that the radio equipment type [CS200] is in compliance with Directive 2014/53/EU.
The full text of the EU declaration of conformity is available at the following internet address: www.velleman.eu.
© COPYRIGHT NOTICE
The copyright to this manual is owned by Velleman Group nv. All worldwide rights reserved.
No part of this manual may be copied, reproduced, translated or reduced to any electronic medium or otherwise without the prior written consent of the copyright holder.
GEBRUIKERSHANDLEIDING
1. Inleiding
© INFORMACJA O PRAWACH WŁASNOŚCI
3.2 Colocar as pilhas
Velleman® Service and Quality Warranty
Since its foundation in 1972, Velleman® acquired extensive experience in the electronics world and currently distributes its products in over 85 countries.
All our products fulfil strict quality requirements and legal stipulations in the EU. In order to ensure the quality, our products regularly go through an extra quality check, both by an internal quality department and by specialized external organisations. If, all precautionary measures notwithstanding, problems should occur, please make appeal to our warranty (see guarantee conditions).
General Warranty Conditions Concerning Consumer Products (for EU):
- All consumer products are subject to a 24-month warranty on production flaws and defective material as from the original date of purchase.
- Velleman® can decide to replace an article with an equivalent article, or to refund the retail value totally or partially when the complaint is valid and a free repair or replacement of the article is impossible, or if the expenses are out of proportion.
You will be delivered a replacing article or a refund at the value of 100% of the purchase price in case of a flaw occurred in the first year after the date of purchase and delivery, or a replacing article at 50% of the purchase price or a refund at the value of 50% of the retail value in case of a flaw occurred in the second year after the date of purchase and delivery.
• Not covered by warranty:
- all direct or indirect damage caused after delivery to the article (e.g. by oxidation, shocks, falls, dust, dirt, humidity...), and by the article, as well as its contents (e.g. data loss), compensation for loss of profits;
- consumable goods, parts or accessories that are subject to an aging process during normal use, such as batteries (rechargeable, non-rechargeable, built-in or replaceable), lamps, rubber parts, drive belts... (unlimited list);
- flaws resulting from fire, water damage, lightning, accident, natural disaster, etc....;
- flaws caused deliberately, negligently or resulting from improper handling, negligent maintenance, abusive use or use contrary to the manufacturer's instructions;
- damage caused by a commercial, professional or collective use of the article (the warranty validity will be reduced to six (6) months when the article is used professionally);
- damage resulting from an inappropriate packing and shipping of the article;
- all damage caused by modification, repair or alteration performed by a third party without written permission by Velleman®.
- Articles to be repaired must be delivered to your Velleman® dealer, solidly packed (preferably in the original packaging), and be completed with the original receipt of purchase and a clear flaw description.
- Hint: In order to save on cost and time, please reread the manual and check if the flaw is caused by obvious causes prior to presenting the article for repair. Note that returning a non-defective article can also involve handling costs.
• Repairs occurring after warranty expiration are subject to shipping costs.
- The above conditions are without prejudice to all commercial warranties.
The above enumeration is subject to modification according to the article (see article's manual).
NL


- To all residents of the European Union
- Important environmental information about this product
- If in doubt, contact your local waste disposal authorities.
- Note:
- General Guidelines
- Preparation
- Assembling the detector
- CS200
- Installing the batteries
- About batteries
- Functions and Indications
- Display
- GOLD RANGE:
- SILVER RANGE (1¢/25¢ icon):
- Tones
- Operation
- Turning on the detector
- Setting the operating mode
- Testing and using the detector
- INDOOR testing and use
- OUTDOOR testing and use
- Search coil sweeping hints
- Adjusting sensitivity
- Pinpointing a target
- Factors that affect the detecting
- Using headphones
- Cleaning and Maintenance
- Technical Specifications
- © COPYRIGHT NOTICE
- GEBRUIKERSHANDLEIDING
- Inleiding
- © INFORMACJA O PRAWACH WŁASNOŚCI
- Colocar as pilhas
- Velleman® Service and Quality Warranty
- General Warranty Conditions Concerning Consumer Products (for EU):
- • Not covered by warranty:
- NL
Brand : VELLEMAN
Model : CS200
Category : Detector