
CS130 - Detector VELLEMAN - Free user manual and instructions
Find the device manual for free CS130 VELLEMAN in PDF.
| Product type | Metal detector |
| Brand | Velleman |
| Model | CS130 |
| Dimensions (length) | 78 to 106 cm (adjustable) |
| Detection head diameter | 18 cm |
| Weight | 1,260 g |
| Power supply | 1 9V battery (6LR61C, not included) |
| Low battery indication | Red LED if voltage < 8.8 V |
| Headphone output | 3.5 mm jack |
| Adjustments | Sensitivity, discrimination (DISC), volume, ground balance (TUNE) |
| Discrimination function | Metal filtering by phase shift |
| Analog meter | Indicates metal type (ferrous on left, non-ferrous on right) |
| Detection head | Waterproof (fresh and salt water) |
| Shaft | Adjustable with locking nut |
| Armrest | Comfortable, adjustable |
| Intended use | Detection of coins, jewelry, gold, silver, metal objects |
| Maintenance | Wipe with a damp cloth, dry; do not use solvents; rinse the head with fresh water after use in salt water |
| Storage | Dry and warm place, remove batteries when not in use |
| Safety | Do not touch dangerous objects; do not use with headphones in traffic; keep out of reach of children |
| Warranty | 24 months for consumer products (conditions in manual) |
| Recommended accessories | Headphones (not included), alkaline batteries |
| Environmental information | Do not dispose of with household waste; recycle at a waste disposal facility |
Frequently Asked Questions - CS130 VELLEMAN
User questions about CS130 VELLEMAN
0 question about this device. Answer the ones you know or ask your own.
Ask a new question about this device
Download the instructions for your Detector in PDF format for free! Find your manual CS130 - VELLEMAN and take your electronic device back in hand. On this page are published all the documents necessary for the use of your device. CS130 by VELLEMAN.
USER MANUAL CS130 VELLEMAN
CS130

User manual
1. Introduction
To all residents of the European Union
Important environmental information about this product


This symbol on the device or the package indicates that disposal of the device after its lifecycle could harm the environment. Do not dispose of the unit (or batteries) as unsorted municipal waste; it should be taken to a specialized company for recycling. This device should be returned to your distributor or to a local recycling service. Respect the local environmental rules.
If in doubt, contact your local waste disposal authorities.
Thank you for choosing Velleman! Please read the manual thoroughly before bringing this device into service. If the device was damaged in transit, do not install or use it and contact your dealer. Damage caused by disregard of certain guidelines in this manual is not covered by the warranty and the dealer will not accept responsibility for any ensuing defects or problems.
2. Safety Instructions


Keep the device away from children and unauthorised users.
Caution: wearing headphones in public places may lead to hazardous situations as traffic noise or audible warning signals are subdued.

NEVER TOUCH AMUNITION OR OTHER POTENTIALLY LETHAL OBJECTS. Clearly mark the finding location – have somebody guard the site when possible - and contact the local authorities at once.
3. General Guidelines
Refer to the Velleman® Service and Quality Warranty on the last pages of this manual.
- Protect this device from shocks and abuse. Avoid brute force when operating the device.
- Protect the device against extreme heat, dust and moisture.
- Familiarise yourself with the functions of the device before actually using it.
- All modifications of the device are forbidden for safety reasons.
- Only use the device for its intended purpose. Using the device in an unauthorised way will void the warranty.
- Damage caused by disregard of certain guidelines in this manual is not covered by the warranty and the dealer will not accept responsibility for any ensuing defects or problems.
- The warranty does not cover damage caused by salty environments.
• Always make sure to comply with local rules and regulations. - If the device is not used for a long time, remove the batteries. Leaking batteries can cause serious damage.
4. Features
- hunt for coins, jewellery, gold and silver
• comfortable arm support
• headphones output: 3.5mm jack
• VU meter for metal indication
• waterproof search coil (∅ 180mm) - adjustable tune
- adjustable stem
• adjustable sensitivity (>12cm for 0.5€ coin)
• volume control - low-battery indicator
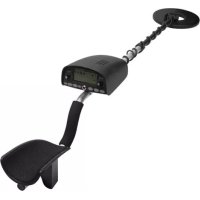
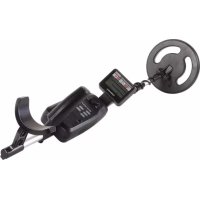
5. Overview
Refer to the illustrations on page 2 of this manual.
| metal detector | E | upper shaft | |
| A | arm rest | F | locking nut |
| B | handle with trace button | G | lower shaft |
| C | control box | H | coil knob |
| D | battery compartment | I | search coil |
control box + indicator
| 1 | LOW BAT | low battery indication: lights up when voltage drops below 8.8V |
| 2 | VOLUME | volume button: set speaker or headphone volume to normal or low |
| 3 | TUNE | “ground balance control”: to eliminate background signals caused by mineralized soils |
| 4 | [x3CG] | headphone jack: to connect an external headphone (not incl.) |
| 5 | DISC | discrimination control: to eliminate (notch) undesired metalsNote: this setting influences the sensitivity |
| 6 | analogue meter | needle indicates metal type |
6. How it works
- A (low frequency) metal detector basically consists of a transmitter, a receiver and a microprocessor (control box) which handles the signals.
Transmitter
- The transmitter is a coil of wire located inside the search coil. By sending an alternating current through this coil a magnetic field is generated, having a polarity pointing either into or out of the ground. This magnetic field will induce a flow of current inside nearby metallic objects. These objects in turn will create a magnetic field with a polarity which is usually opposite to that of the magnetic field of the transmitter.
Receiver
- The receiver is another coil of wire that is located inside the search coil and which is constructed in such a way that the magnetic field of the transmitting coil does not induce current in it. Magnetic fields from nearby metallic objects however will produce an electric current in the receiver coil.
Phase shift
- The signal received from the receiving coil will usually be delayed versus the transmitted signal due to the tendency of conductors to impede changes in the flow of current, the so called inductance. The delay is referred to as phase shift. Metal objects that are primarily inductive e.g. large thick objects made of good conductors (gold, silver, copper...) will result in large phase shifts, whereas metal objects that are primarily resistive e.g. smaller thin objects made of less conductive materials will result only in minor phase shifts. Refer to the table below for a short overview of the electrical conductivity of some materials.
| Material | Electrical conductivity (S/ m) | Material | Electrical conductivity (S/ m) |
| silver | 63.01 × 10^6 | nickel | 14.3 × 10^6 |
| copper | 59.6 × 10^6 | iron | 9.93 × 10^6 |
| gold | 45.2 × 10^6 | platinum | 9.66 × 10^6 |
| aluminium | 37.8 × 10^6 | tin | 9.17 × 10^6 |
| calcium | 29.8 × 10^6 | sea water | 4.788 |
| zinc | 16.6 × 10^6 | drinking water | 0.0005 ~ 0.05 |
• Note that detection also depends on the size, shape, depth... of the metal.
Ferromagnetic
- Substances that usually conduct very poorly or not at all can become magnetized when inside a magnetic field, resulting in a strong signal picked up by the receiver. However, this signal shows little or no phase shift. Soils containing small grains of iron-bearing minerals will show ferromagnetic characteristics.
Discrimination
- Since any given metal will respond with its own characteristic phase shift, it will be possible to distinct between them. The process of distinguishing between different metals is called discrimination.
Ground balance
- As mentioned earlier, soils that contain iron will produce a response signal which can be a lot stronger than the signal produced by a metallic object concealed in it. This is also the case for places where ground water contains a lot of dissolved salt.
- However, the phase shift caused by the ground, the ground effect, remains fairly constant over a limited area when the search head is kept at a steady height.
- Accurate ground balance makes it possible to precisely pin-point the location and depth of an object.
7. Preparation
• The CS130 comes fully mounted. Carefully unpack it.
- Loosen the locking nut [F] and slide the lower shaft [G] out of the upper shaft [E] until the desired length is reached.

natural_image
Diagram of a mechanical component with a rotating shaft and threaded end (no text or symbols)UNLOCK

natural_image
Technical line drawing of a mechanical component with a rotating arrow indicating rotation (no text or symbols)LOCK
Note: the coils' wiring runs inside the stem. Do not force to avoid damage.
- To determine the ideal shaft length, stand upright holding the metal detector by the handle [B] and your arm on the arm rest [A]. When holding your arm relaxed next to your body, the search coil [I] should be about 12 " to 2" (max.) (1.5\~5cm) above the ground.
- Turn the locking nut [F] counter clockwise (top view) to secure the lower shaft.
- Loosen the search coil knob [H], adjust the search coil [I] so it is parallel to the ground and tighten the nut knob.
- Insert the battery (see §14).
8. Operation
- It is strongly advised to test the detector at home before going into the field. Perform tests with different metals e.g. coins, golden ring, silver spoon...
○ Perform indoor tests by placing the detector on a wooden or plastic table, search coil [1] facing the ceiling and slowly moving a metal object over the coil. Be sure not to wear jewellery as these will influence the reading. Hold the metal object under different angles while moving across the coil and notice the difference in detection. Note that the volume will increase quickly as the metal object passes directly in front of the search head, with the loudest signal occurring when the search head is centred immediately over the metal object. As the object passes beyond the search head the signal will quickly fade.
Note: Never test the detector on a floor inside a building. Most buildings have metal of some kind in the floor, which might interfere with the objects you're testing or mask the signal completely. The search coil will not detect without motion. You must move the object since you are not sweeping with the detector at this time. If the detector does not detect the material, check the battery power and verify that the search coil is properly connected.
Also perform outdoor tests to learn the influence of the soil type on the detector and to practise ground balancing. Place a metal object on the ground and slowly sweep the search coil [1] over it. Be careful when using valuable metals for outdoor testing – make sure you can always retrieve them.
- Switch on the detector by turning the VOLUME button [2] clockwise. To switch it off, turn the button counter clockwise until it clicks.
- When desired, plug a headphone (not included) with a 3.5mm plug into the headphone jack [4].
- Set the speaker (or headphone) sound level using the volume button [2].
- When the low battery indication [1] lights up, replace the batteries to ensure detecting accuracy.
- Set the DISC button [5] about halfway.
CS130
- Hold the search coil [I] about 1 foot (30cm) from the ground and press and hold the trace button on the handle [B]. Turn the TUNE button [3] until the analogue meter [6] points to 0 (zero). Release the trace button.
Note: Press the trace button whenever the detector is drifting away from the sensitivity setting, e.g. when moving from dry ground to wet ground. This returns the meter to zero.
- Slowly sweep the search coil over the desired area. Refer to §10.
- Slowly turn the discrimination control [5] clockwise. The further the button is turned, the more metals will be rejected. Refer to §6 how it works – phase shift for more information.
Note: press the trace button after each adjustment.
8.1 Interpreting signals
• The detector produces a signal as soon as it is switched on.
• The signal varies according to the detected object.
- For ferrous metals, the tone will be low and the meter moves to the left.
• Non-ferrous metals will produce a higher tone and the meter moves to the right.
Oscillating Signal
- An oscillating signal is caused most often by outside sources such as fluorescent lights, radios, power lines and the proximity of other metal detectors. There's not much you can do about it.
Intermittent Signal from Speaker
An intermittent signal can have several origins:
- This could be due to poor battery connections. Make sure the batteries are securely clipped in place.
• A radio transmission from a passing taxi or another vehicle using radio transmitter equipment.
• The speaker may have come loose. Have your dealer fix the speaker back into place.
False signals
- The detector responds with a signal when it detects most valuable metal objects. If a signal does not repeat after you've swept the search coil over the target a few times, the target is probably junk metal.
- False signals can be caused by trashy ground, electrical interference, or large irregular pieces of junk metal.
- False signals are usually broken or non-repeatable.
9. Recommendations for use
- Treasure hunting can be a profitable and a rewarding hobby, if approached in a patient and diligent manner. Time spent researching to locate a worthwhile search site can be time wasted if your search is hasty and erratic. To achieve maximum results, it is important to decide on your approach to each particular site, before the actual search.
- Tactics will be decided by the type of site – it is more profitable to scan a small area thoroughly than to conduct a haphazard search of the total site. However, when the site is too far away for you to make several return visits, a plan should be adopted which gives maximum site coverage, but at the same time allows some detailed search.
- It quite often happens that where one find is made, other finds will be made in the immediate vicinity. Accordingly, places having the highest density of markers represent the most likely spots for further finds.
- The detailed search is made by marking out strips of a width determined by the sweep of the detector, and moving forwards the approximate diameter of the search head after each sweep until the 'strip' has been completely covered. The adjacent strips are covered in similar manner, until the complete area has been thoroughly searched.
- Wooden pegs and string are ideal for marking out areas, but very often natural landmarks such as trees, rocks and plants can with practice, prove just as effective.
10. Useful tips
- No detector is 100 percent accurate. Various conditions influence metal detection. The detector's reaction depends on a number of things:
• the angle at which the object rests in the ground.
• the depth of the object.
• the amount of iron in the object.
- the size of the object
Search coil sweeping hints
- Never sweep the search coil as if it were a pendulum. Raising the search coil while sweeping or at the end of a sweep will cause false readings.
- Sweep slowly. Hurrying will cause you to miss targets.
- It is better to sweep the search coil from side to side in a straight line and keep the search coil parallel with the ground.
Pinpointing a target
- Accurately pinpointing a target makes digging it up easier. Accurate pinpointing takes practice, and we suggest you practice finding and digging up small metal objects on your own property before you search other locations.
- Sometimes, targets are difficult to accurately locate due to the sweep direction. Try changing your sweep direction to pinpoint a target.
-
Follow these steps to pinpoint a target.
-
When the detector detects a buried target, continue sweeping the search coil over the target in a narrowing side-to-side motion.
- Make a visual note of the exact spot on the ground where the detector beeps.
- Stop the search coil directly over this spot on the ground. Then move the search coil straight forward away from you and straight back toward you a couple of times.
- Make a visual note of the exact spot on the ground where the detector beeps.
- Repeat Steps 1-3 at a right-angle to the original search line, making an "X" pattern. The target will be directly below the "X" at the point of the loudest response.

Notes:
- If trash in an area is so heavy that you get false signals, slow your sweep and use shorter sweeps.
- Recently buried coins might not respond the same as coins buried for a long period of time because of oxidation.
- Some nails, nuts, bolts, and other iron objects (such as old bottle caps) oxidise and create a "halo" effect. A halo effect is caused by a mixture of natural elements in the ground and the oxidation created by different metals. Because of the metal mixtures, target signals might not be in a "fixed" position. This effect makes these objects very hard to detect accurately.
Detection range
- The detection range will vary depending on the size of the object, the length of time an object has been buried and the type of ground the object is buried in. The best soil is compact soil, where you can locate coins at great depth, especially if they have interacted with the salts in the ground, which makes them appear larger to the detector. The worst conditions for detecting are in loose soil or freshly dug ground or when the object has only recently been buried. Ninety percent of all objects are found within 6" of the surface. Adverse soil conditions can reduce the detection range by as much as 50%.
Determining the target size and depth
- An operator who is familiar with his instrument will be able to do an excellent job of determining object size, shape and depth before he digs. He does this through careful analysis of the audio signals coming from the detector. You should always listen for the specific characteristics of a signal. Determine over how large an area the contact generates a signal to try and "outline" the object before you dig. Listen for the sharpness or dullness of the signal and determine the strength of the signal. A coin generates a sharp signal, while the signal for a nail is vague.
Batteries
• Always carry a spare set of batteries when going out on a fieldtrip.
• Using headphones will increase batteries life-time.
11. Cleaning and storage
- The life of your detector is shortened by neglect or careless use. Wipe the housing with a damp cloth and then wipe it dry carefully if you have used the detector in a hostile environment (salty water, sand, etc.).
- Do not clean the detector with solvents or detergents.
- The search coil is waterproof and can be submerged in either fresh or salt water. However, do not let water enter the control box. Rinse the search coil with fresh water after using in salt water.
Salt damage
- Salty air can penetrate the control box in case of frequent use in a salty environment. Parts of the electronic circuitry may corrode. You can protect your metal detector by covering the control box with polythene. The warranty does not cover damage caused by salty environments.
Storage
- Store the detector in a dry and warm environment under normal humidity conditions.
- Remove the batteries to prevent them from leaking if the metal detector is to be stored for long periods.
12. Troubleshooting
- Before turning the device in for repair, read this section as it might contain the solution for your problem.
- When problems occur, first check the batteries. Replace the batteries when necessary and ensure the connections are correct and secure.
The detector drifts out of tune
- The metal detector can be affected by changing temperatures e.g. when the device is taken out of storage and out into the field. Wait a while until the temperature of your CS130 has stabilised. The device may need as much as half an hour to acclimatise if the change in temperature is extreme.
• Sometimes batteries will cause the signal to drift. Replace them if this is the case.
13. Code of Conduct
- Do not interfere with archaeological sites or ancient monuments. Join your local archaeological society if you are interested in ancient history.
- Do not leave a mess. Use a sharpened trowel or knife to cut a neat circle or triangle, extract the object and carefully replace the soil and the grass.
- Help keep your country tidy. Bottle tops, silver paper and tin cans belong in a waste bin. Rusty iron and other scrap should be collected and taken to a specialized company for further handling.
- Do not trespass: ask permission before venturing onto private property.
- Report all historical finds to the local museum or government and get expert help if you accidentally discover a site of archaeological interest.
- Be very careful if you discover any live ammunition or any lethal object such as an unexploded mine. Do not touch the object! Mark the site carefully and report the find at once to the local police.
- Do not leave gates open when crossing fields and do not damage crops or frighten animals.
- Try to get along with any other detector you may meet. There is much to be learnt from experienced users.
• Always obey local laws and regulations. Contact your local government for more information.
Notice: It is illegal for anyone to use a metal detector on a scheduled ancient monument unless permission has been obtained from the Historic Buildings and Ancient Monument Commission for England or the Secretary of State for the Environment in Scotland and Wales.
14. Batteries
- When battery-voltage is low (<8.8V), the low battery indicator [1] lights up and batteries must be replaced to ensure correct functioning of the detector.
- Switch off the detector by turning the VOLUME button [2] counter clockwise until a click is heard.
- Open the compartments [D] and insert a new 9V AA battery (6LR61C, not included).
- Close the battery compartment. The detector is now ready for use.

WARNING:
Do not puncture or throw batteries in fire as they might explode.
Do not attempt to recharge non-rechargeable batteries.
Dispose of batteries in accordance with local regulations.
Keep batteries away from children.
15. Technical specifications
| low battery indication | red LED when <8.8V |
| signal output | speaker and 3.5mm headphone jack |
CS130
| power supply | 1 x 9V battery (6LR61C, not incl.) | |
| dimensions | ||
| length | 78~106cm | |
| coil | 18cm | |
| weight | ±650g | |
Use this device with original accessories only. Velleman nv cannot be held responsible in the event of damage or injury resulted from (incorrect) use of this device.
For more info concerning this product and the latest version of this user manual, please visit our website www.velleman.eu.
The information in this manual is subject to change without prior notice.
© COPYRIGHT NOTICE
The copyright to this manual is owned by Velleman nv. All worldwide rights reserved. No part of this manual or may be copied, reproduced, translated or reduced to any electronic medium or otherwise without the prior written consent of the copyright holder.
GEBRUI KERSHANDLEI DING
1. Inleiding
natural_image
Diagram of a mechanical component with a rotating arm and shaft (no text or symbols)ONTGRENDELEN

natural_image
Diagram of a mechanical component with a rotating arrow indicating rotation (no text or symbols)VERGRENDELEN
natural_image
Diagram of a cable or wire being twisted with a circular motion arrow (no text or symbols)DÉVERROUILLAGE

natural_image
Diagram of a cable or wire component with a rotating arrow indicating rotation (no text or symbols)VERROUILLAGE
CS130
- Technical specifications
natural_image
Diagram of a cable or wire component with a rotating arm and curved internal structure (no text or symbols)DESBLOQUEAR

natural_image
Diagram of a mechanical component with a rotating arrow indicating rotation (no text or symbols)BLOQUEAR
Observaciones:
natural_image
Diagram of a mechanical component with a rotating arm and threaded shaft (no text or symbols)ENTRIEGELN

natural_image
Technical line drawing of a mechanical component with a rotating arrow indicating rotation (no text or symbols)VERRIEGELN
natural_image
Diagram of a mechanical component with a rotating arm and shaft (no text or symbols)DESBLOQUEAR

natural_image
Technical line drawing of a mechanical component with a curved arrow indicating rotation (no text or symbols)BLOQUEAR
Notas:
natural_image
Diagram of a mechanical component with a rotating arm and threaded shaft (no text or symbols)ODBLOKOWANIE

natural_image
Diagram of a mechanical component with a rotating arrow indicating rotation (no text or symbols)BLOKOWANIE
Declare on our own responsibility that the finished product(s).
Constituting the subject of this declaration, conforms with the essential requirements and other relevant stipulations of the R&TTE Directive (1999/5/EC).
The product is in conformity with the following standards:
Technical data are available and can be obtained from :
Vince Van Balberghe - Quality Manager:

natural_image
Abstract line drawing with overlapping curved shapes (no text or symbols)EN
Velleman® Service and Quality Warranty
Since its foundation in 1972, Velleman® acquired extensive experience in the electronics world and currently distributes its products in over 85 countries. All our products fulfil strict quality requirements and legal stipulations in the EU. In order to ensure the quality, our products regularly go through an extra quality check, both by an internal quality department and by specialized external organisations. If, all precautionary measures notwithstanding, problems should occur, please make appeal to our warranty (see guarantee conditions).
General Warranty Conditions Concerning Consumer Products (for EU):
- All consumer products are subject to a 24-month warranty on production flaws and defective material as from the original date of purchase.
- Velleman® can decide to replace an article with an equivalent article, or to refund the retail value totally or partially when the complaint is valid and a free repair or replacement of the article is impossible, or if the expenses are out of proportion.
You will be delivered a replacing article or a refund at the value of 100% of the purchase price in case of a flaw occurred in the first year after the date of purchase and delivery, or a replacing article at 50% of the purchase price or a refund at the value of 50% of the retail value in case of a flaw occurred in the second year after the date of purchase and delivery.
• Not covered by warranty:
- all direct or indirect damage caused after delivery to the article (e.g. by oxidation, shocks, falls, dust, dirt, humidity...), and by the article, as well as its contents (e.g. data loss), compensation for loss of profits;
- consumable goods, parts or accessories that are subject to an aging process during normal use, such as batteries (rechargeable, non-rechargeable, built-in or replaceable), lamps, rubber parts, drive belts... (unlimited list);
- flaws resulting from fire, water damage, lightning, accident, natural disaster, etc....;
- flaws caused deliberately, negligently or resulting from improper handling, negligent maintenance, abusive use or use contrary to the manufacturer's instructions;
- damage caused by a commercial, professional or collective use of the article (the warranty validity will be reduced to six (6) months when the article is used professionally);
- damage resulting from an inappropriate packing and shipping of the article; - all damage caused by modification, repair or alteration performed by a third party without written permission by Velleman®.
- Articles to be repaired must be delivered to your Velleman® dealer, solidly packed (preferably in the original packaging), and be completed with the original receipt of purchase and a clear flaw description.
- Hint: In order to save on cost and time, please reread the manual and check if the flaw is caused by obvious causes prior to presenting the article for repair. Note that returning a non-defective article can also involve handling costs.
• Repairs occurring after warranty expiration are subject to shipping costs.
- The above conditions are without prejudice to all commercial warranties. The above enumeration is subject to modification according to the article (see article's manual).
NL


- User manual
- Introduction
- To all residents of the European Union
- Important environmental information about this product
- If in doubt, contact your local waste disposal authorities.
- Safety Instructions
- General Guidelines
- Features
- Overview
- How it works
- Transmitter
- Receiver
- Phase shift
- Ferromagnetic
- Discrimination
- Ground balance
- Preparation
- Operation
- CS130
- Interpreting signals
- Oscillating Signal
- Intermittent Signal from Speaker
- False signals
- Recommendations for use
- Useful tips
- Search coil sweeping hints
- Pinpointing a target
- Notes:
- Detection range
- Determining the target size and depth
- Batteries
- Cleaning and storage
- Salt damage
- Storage
- Troubleshooting
- The detector drifts out of tune
- Code of Conduct
- Batteries
- WARNING:
- Technical specifications
- © COPYRIGHT NOTICE
- GEBRUI KERSHANDLEI DING
- Inleiding
- Observaciones:
- Notas:
- EN
- Velleman® Service and Quality Warranty
- General Warranty Conditions Concerning Consumer Products (for EU):
- • Not covered by warranty:
- NL
Brand : VELLEMAN
Model : CS130
Category : Detector